


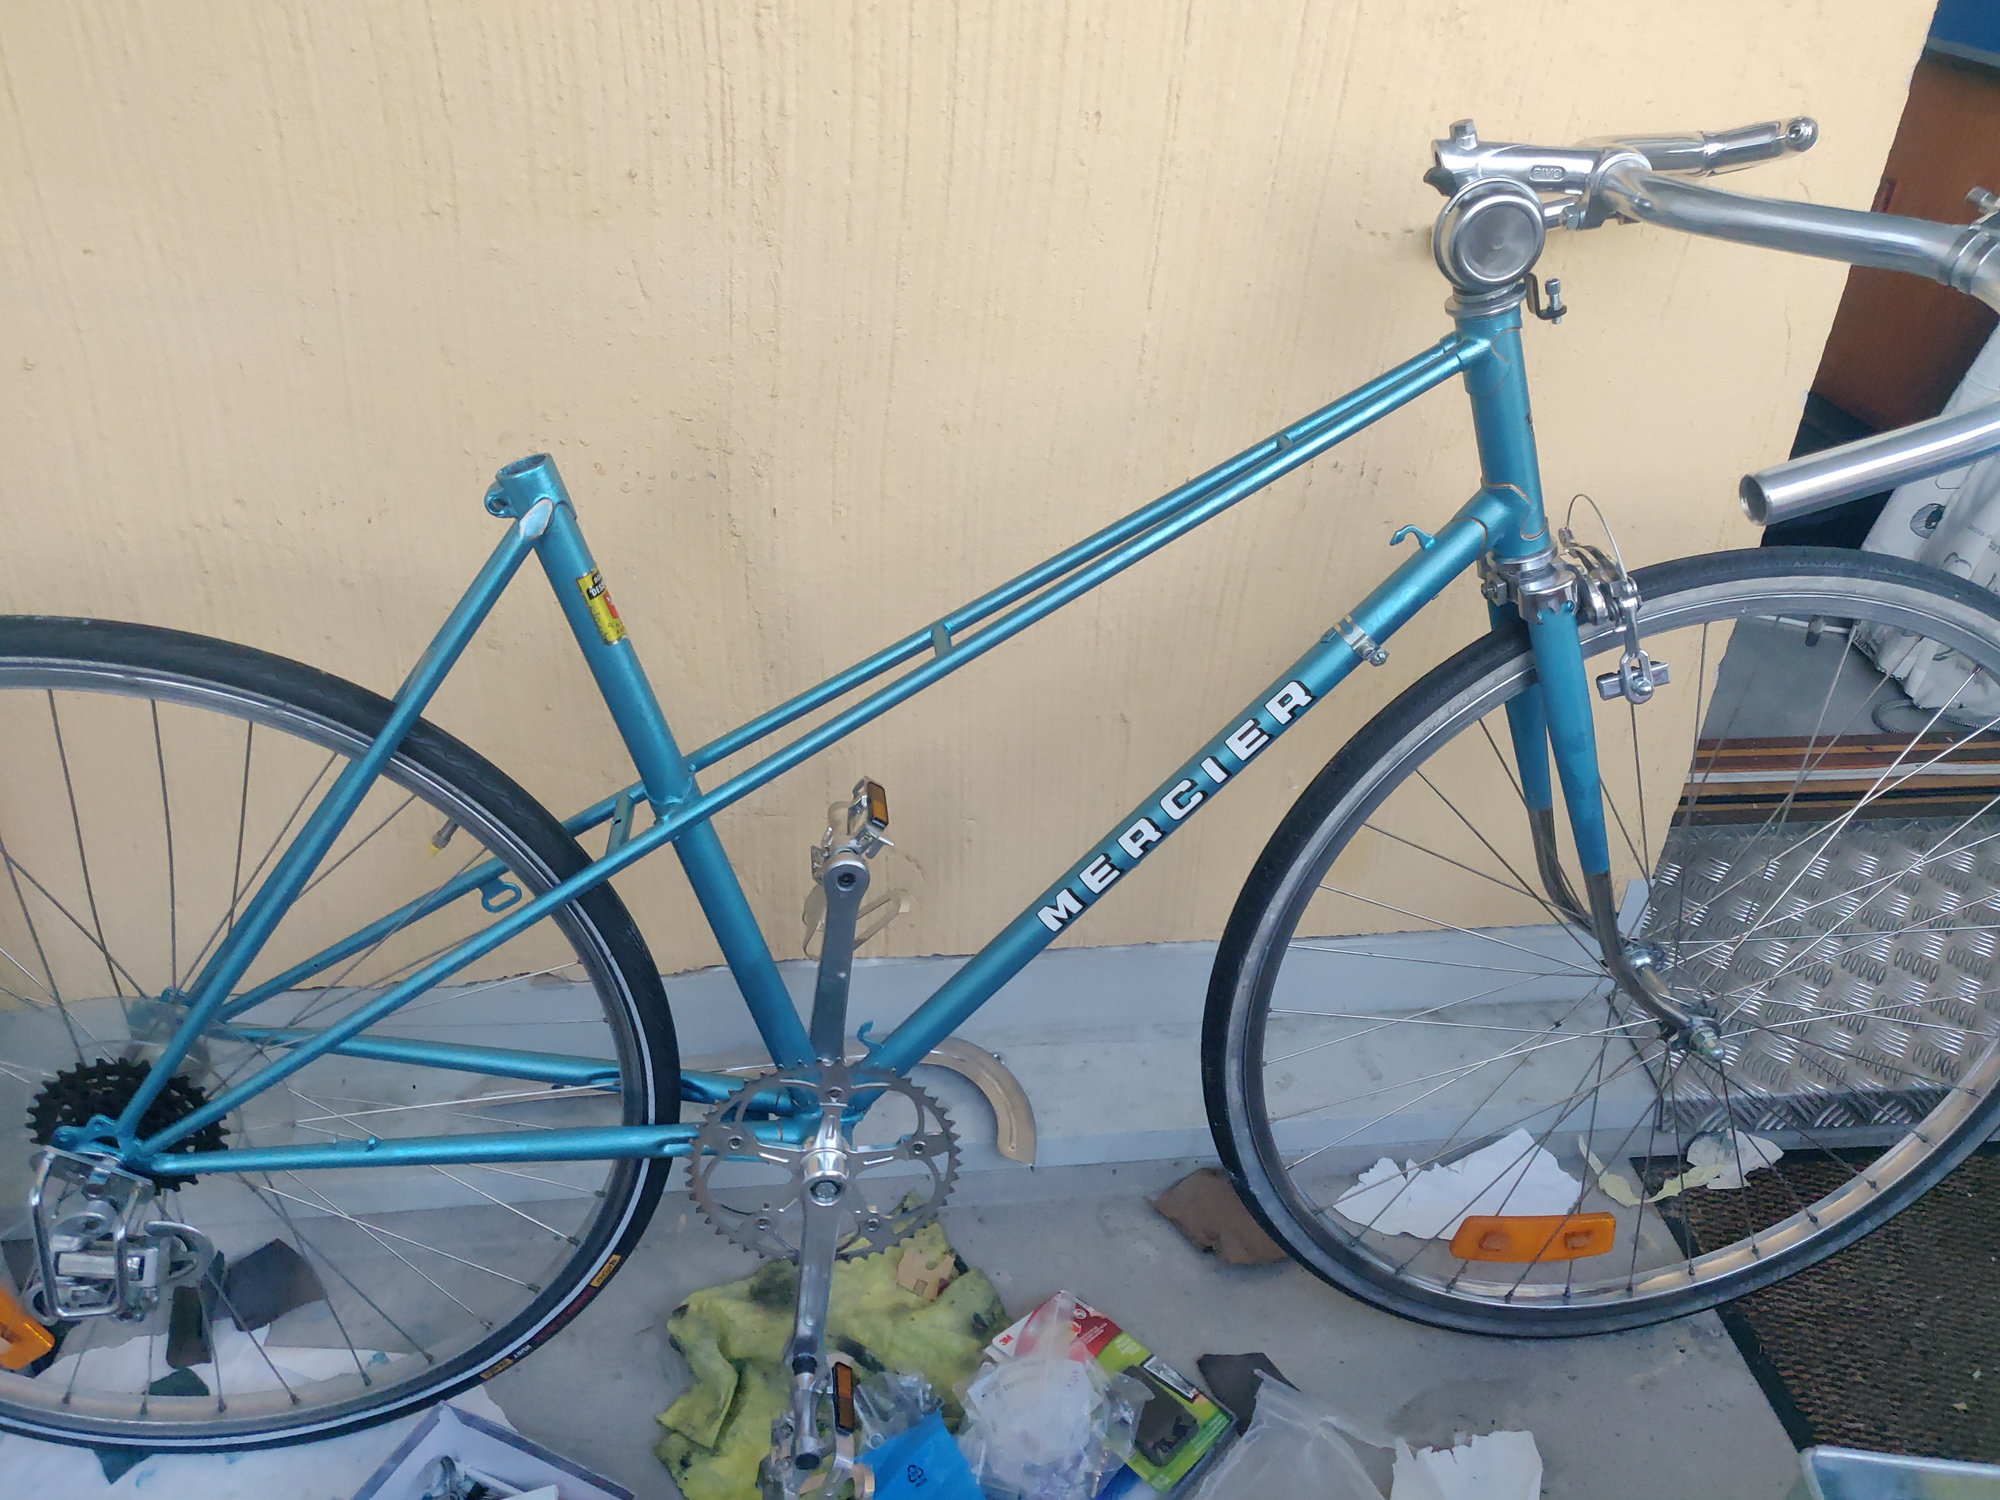
80's Mercier Mixte city/commuter build
 04-04-21, 12:56 PM
#26
Junior Member
Thread Starter
What a great project. What ever you do finally it is going to be fantastic. I am working on a vintage Gitane Mixte at the moment and am making some of the same decisions. If it were me I would go with the Mafac brakes. They are very French and are one of the best brakes out there. They can fit either 27" or 700c wheels and with Kool Stop pads can stop the bike just fine. Also, unlike dual pivots, they don't require you to drill out the back side of the fork. They are easy to polish if you are in to that and not really hard to set up . 700 c aluminum rims are the way to go. Vintage Araya rims are fine , Super Champions and Mavics are great as well. If you have the money new wheels will not need cleaning or truing. Equally important are the hubs. Newer sealed bearing hubs like the Shimano Ultegra ones on my current build spin forever. So do Campi hubs. When you disassemble them you can see the difference. I have a set of Kenda 700 x 32cream colored tires on my build and they are classy. I love Suntour derailleurs and the GT won't let you down but the thing weighs a ton. If you can find them the cyclone is one of the best derailleurs ever made according to Saint Sheldon. For shifters my vote is for thumbies. Suntour made a beutiful all metal thumb shifter back in the day that would be perfect for friction shifting. I generally use friction because it is foolproof and with a friction thumbie it is very easy to get precise shifts without taking your hands off the bars or your eyes off the traffic. Also you can use spiral wound cable covers for everything.
I hadn't thought about having to drill the fork, thanks for pointing that out. I'll most likely be using hubs that are newer than the frame, so I think I'll get some new rims as well. Period-correct wheels would be nice for sure, but then I couldn't have a hub dynamo for starters and since this isn't a totally accurate restoration, I think using new-ish parts makes more sense. Still missing the rear hub though, I only seem to come accross IGH and SS hubs in the 120mm spacing.
As pointed, the bottom bracket is likely to be too low for a 650B conversion, but the 650B evangelists have made me a convert
 yesterday I found an odd-sized rusted out wheel from my parents' attic and thought, why not go the middle way, that is 590?
  It would give me 6 mm more circumference than 650b (and even fewer tyre options)
  Actually, I just came across a pair of old Nisi Toro Stretto rims of cheep euro ten speed fame costing a total of 16 � ...
 04-05-21, 02:35 AM
#27
Newbie

Ended up making my own...
Chainguard thickness will allow polishing and it will polish very nicely.
I might have few 120mm hubs with 5spd cassette around somewhere, can check later today. If you have dremel or similar multitool, shaping/cutting the end of rear mudguard to fit inside chainstays is perfectly valid thing to do, oems did that, too.
Last edited by gesta; 04-05-21 at 02:40 AM.
04-05-21, 04:00 AM
#28
Junior Member
Thread Starter
I tried exact same setup for 70�s Peugeot mixte and clearances were too tight between chainring, crankarm and chainguard even after flattening that bead from the chainguard. Then again, I�m running 130mm hub with 8spd cassette which brings rear end of chainguard more outboard than your intended setup.
Ended up making my own...
Chainguard thickness will allow polishing and it will polish very nicely.
I might have few 120mm hubs with 5spd cassette around somewhere, can check later today. If you have dremel or similar multitool, shaping/cutting the end of rear mudguard to fit inside chainstays is perfectly valid thing to do, oems did that, too.
This would be my second option, that would look maybe even cooler

I'm interested in 5 speed 120mm hubs, even though I just ordered an used Campa Nuovo Tipo for cheap yesterday
Just ordered a SunRace 14-28 freewheel tooI found two Weinmann Vainqueur 750 front center pull brakes in decent shape, I think I'll mod the other to be the rear brake. Cost nothing, so I'll try them with some new Kool Stop pads before getting any other brakes.
Since my NOS stainless fenders were too wide, I'm considering a pair of silver Bluemels I saw on sale...
For tires, I'm kinda fond of the brown thread / cream wall color scheme one can find in old Peugeot catalogues, for example. Not that many budget-friendly options available, at least in <40 mm width. Does anybody have experience with the Session tires from Fyxation? I'm concerned stuff like this tends to be all for the looks
04-05-21, 08:27 AM
#29
Junior Member
Thread Starter
Like I said here, the forkblade decals (French map outline on top of tricolor ribbon) are partially damaged, but I haven't found a replacement yet.

The other side was worse
The other side was worse

The fork blade stickers on my bike were so damaged I ended up removing them. Considering a replacement, maybe something like the ones above would do, too. The border where the painted area ends and the chromed area starts is not all that straight or clean
04-07-21, 01:51 AM
#30
Junior Member
Thread Starter
Luckily the chrome on my fork is in much better condition than on the 300 above
I'm waiting some parts to arrive by mail, including the bb cartridge, stem, hubs and RD. Since there's not much I could work on at the moment, I'm thinking about how I'm going to color-coordinate saddle, tires and bartape.
Option 1: Black, black, black


Red Cycling Products Pro RaceTape in black suede-effect

Panaracer Pasela in black
I'm starting to gravitate towards the opinion that black would look better with a "cool" color such as the blue in this frame...

https://www.bikeforums.net/classic-v...cier-bike.html

I'm waiting some parts to arrive by mail, including the bb cartridge, stem, hubs and RD. Since there's not much I could work on at the moment, I'm thinking about how I'm going to color-coordinate saddle, tires and bartape.
Option 1: Black, black, black
Red Cycling Products Pro RaceTape in black suede-effect
Panaracer Pasela in black
I'm starting to gravitate towards the opinion that black would look better with a "cool" color such as the blue in this frame...
https://www.bikeforums.net/classic-v...cier-bike.html
04-07-21, 01:52 AM
#31
Junior Member
Thread Starter
Option 2: Brown
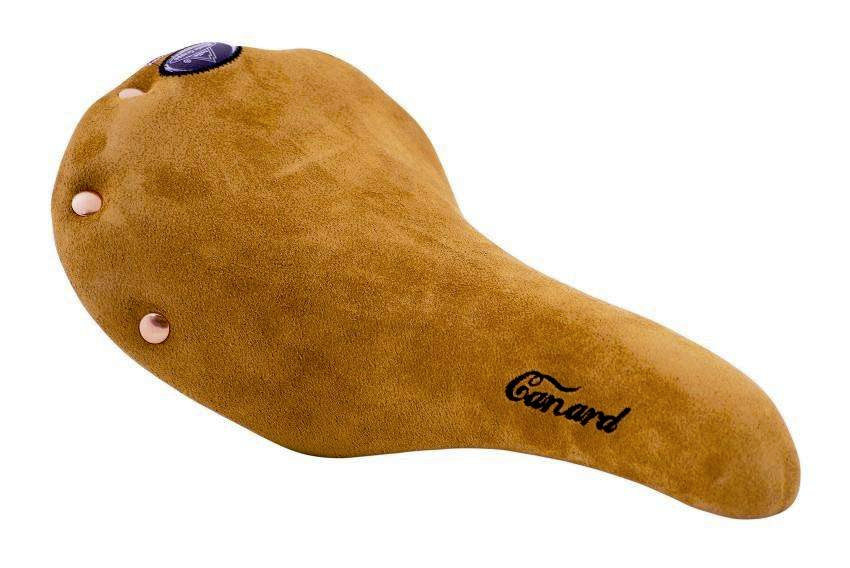
Selle Monte Grappa Canard

Red Cycling Products Pro RaceTape in brown suede-effect
Panaracer Pasela skinwall
I found great deals for the brown saddle and tape.
Blue and brown is a popular combo for sure, and I also see the appeal of tires like these
 Or maybe mix'n'match both or get bartape in some contrasting color like blue or red like shown here https://www.bikeforums.net/classic-v...ggestions.html
Selle Monte Grappa Canard
Red Cycling Products Pro RaceTape in brown suede-effect
Panaracer Pasela skinwall
I found great deals for the brown saddle and tape.
Blue and brown is a popular combo for sure, and I also see the appeal of tires like these
Or maybe mix'n'match both or get bartape in some contrasting color like blue or red like shown here https://www.bikeforums.net/classic-v...ggestions.html
Last edited by Krov9; 04-07-21 at 01:54 AM. Reason: Adding link to thread
04-08-21, 09:13 AM
#32
Junior Member
Thread Starter
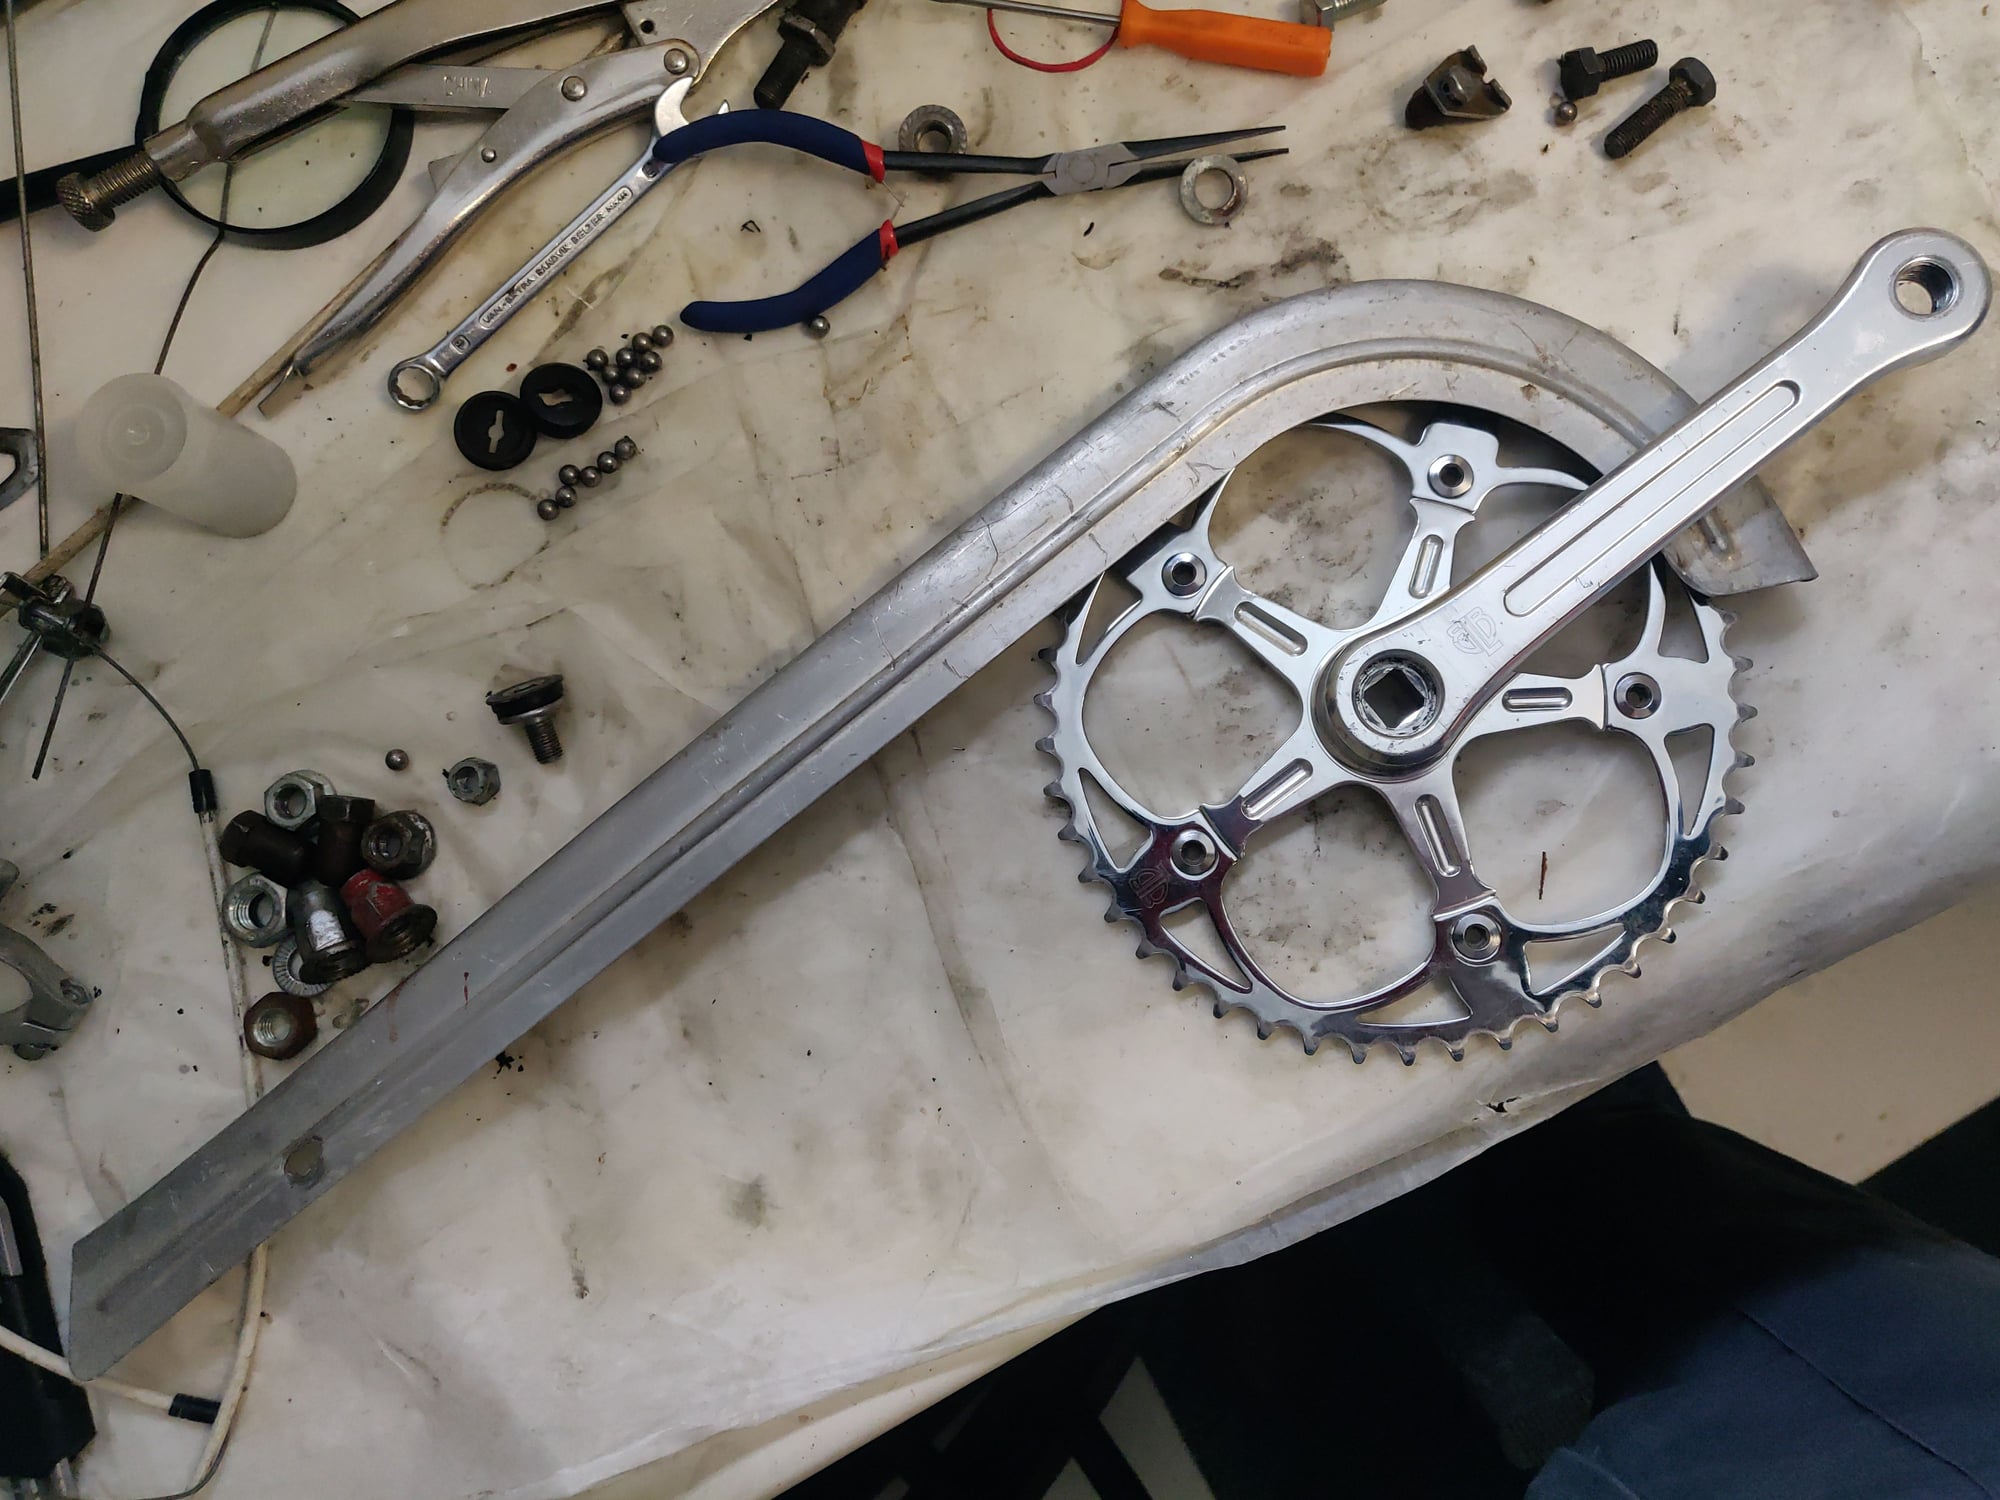
I talked about 1x5 earlier on, but I just bought a whole Suntour Vx derailleur setup so I'm considering a 2x5 option too. I happen to have this somewhat obscure Thun (Alfred Thun GmbH) Aero Coronado double crankset from an old Nopsa La Migliore that I might use. It's just that I don't have a clue about the spindle length here, should have measured the one it was attached to. I already ordered a 113.5 mm Neco cartridge, we'll see how that'll fit once it arrives.
Disassebled for cleaning & polishing - see that blue paint splatter? I think I may have managed to lose two of the tiny washers that wereunder the bashguard bolts between the chainrings (?)
This is a 80's item and aesthetically looks kinda MTB to me, so I'm not sure if it's any closer match to the rest of the bike than the BLB Pista Vera seen above. Anyway, it has an unique look and should look pretty nice when polished I'm going to lose what's left of the decals when cleaning, though.
so I'm considering a 2x5 option too. I happen to have this somewhat obscure Thun (Alfred Thun GmbH) Aero Coronado double crankset from an old Nopsa La Migliore that I might use. It's just that I don't have a clue about the spindle length here, should have measured the one it was attached to. I already ordered a 113.5 mm Neco cartridge, we'll see how that'll fit once it arrives.Disassebled for cleaning & polishing - see that blue paint splatter? I think I may have managed to lose two of the tiny washers that were
This is a 80's item and aesthetically looks kinda MTB to me, so I'm not sure if it's any closer match to the rest of the bike than the BLB Pista Vera seen above. Anyway, it has an unique look and should look pretty nice when polished
I'm going to lose what's left of the decals when cleaning, though.
Last edited by Krov9; 04-08-21 at 09:15 AM. Reason: Corrected a mistake
04-09-21, 02:15 PM
#33

Shifting is fun!

Join Date: Aug 2009
Location: South Holland, NL
Posts: 10,997
Bikes: Yes, please.
Mentioned: 279 Post(s)
Tagged: 0 Thread(s)
Quoted: 2192 Post(s)
Liked 4,580 Times
in
1,762 Posts
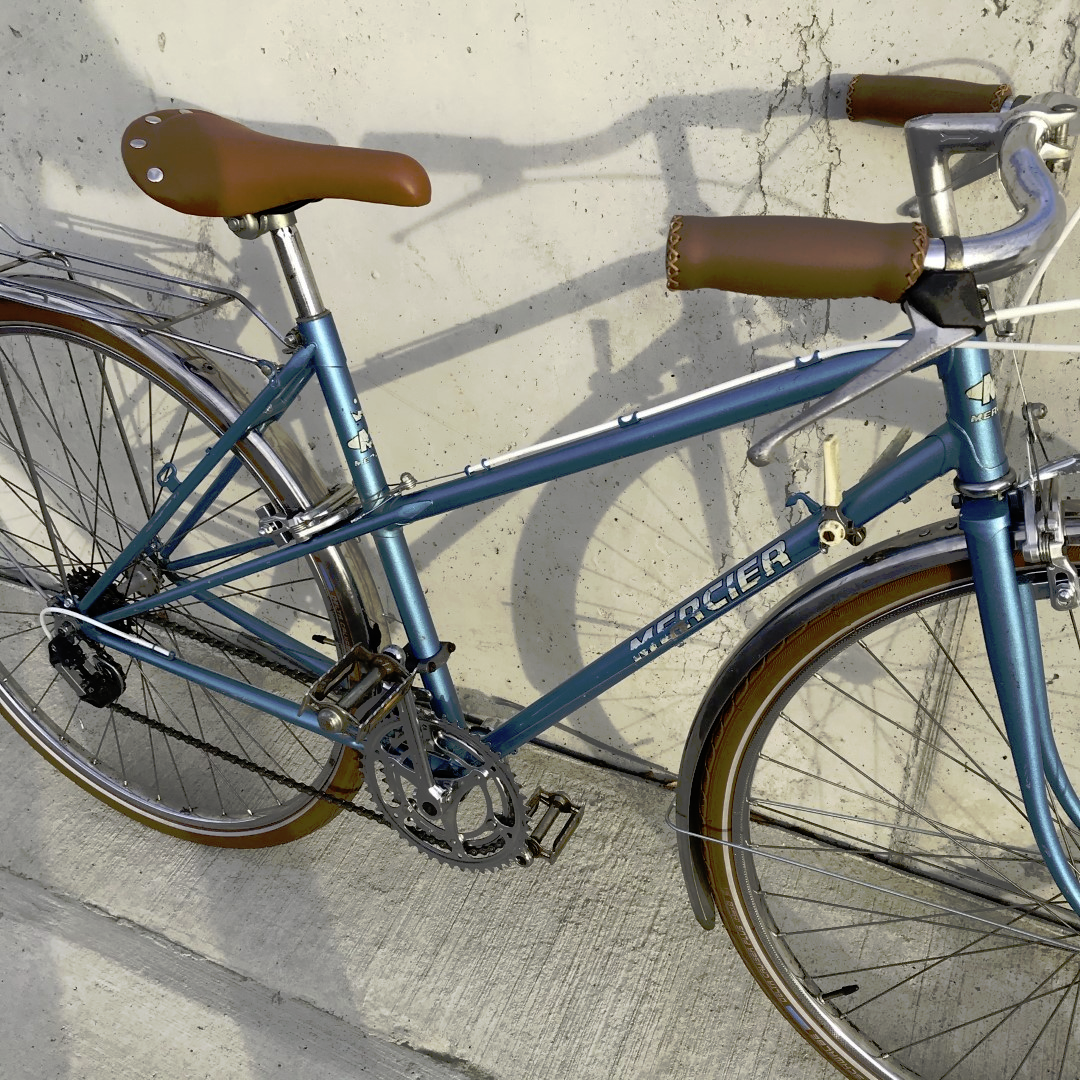
I've tried both brown and black, and I like the black a whole lot better. But I do not like black tires on a bike like this.
Brown:

Black:

Brown:
Black:
04-10-21, 06:17 AM
#34
Junior Member
Thread Starter
I dig the guidonnet levers in the brown configuration pic. You're running Panaracer Paselas, am I right? I'm not too fond of tanwall tyres myself, because I'm used to seeing them on neglected bikes that have stood outside with the same tires on since the 80's.
Might consider some brown- or "gumwall" types instead
I'm undecided whether I'll go with 35C or 38C, but even with fenders, there should be ample clearance for both.
Last edited by Krov9; 04-10-21 at 06:18 AM. Reason: Shortened quote
04-10-21, 02:17 PM
#35
Shifting is fun!
Join Date: Aug 2009
Location: South Holland, NL
Posts: 10,997
Bikes: Yes, please.
Mentioned: 279 Post(s)
Tagged: 0 Thread(s)
Quoted: 2192 Post(s)
Liked 4,580 Times
in
1,762 Posts
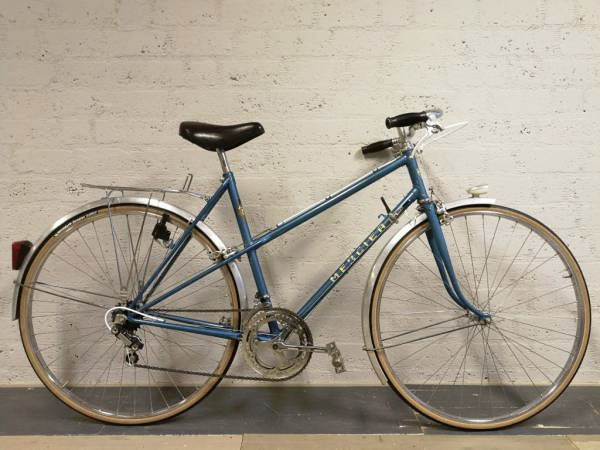
Cool bike! Seems to be the same color as mine but a somewhat earlier model, judging by the lugwork and decals. Are those Huret derailleurs? How does the FD handle such a large difference between the two chainwheels?
I dig the guidonnet levers in the brown configuration pic. You're running Panaracer Paselas, am I right? I'm not too fond of tanwall tyres myself, because I'm used to seeing them on neglected bikes that have stood outside with the same tires on since the 80's.
Might consider some brown- or "gumwall" types instead I'm undecided whether I'll go with 35C or 38C, but even with fenders, there should be ample clearance for both.
I dig the guidonnet levers in the brown configuration pic. You're running Panaracer Paselas, am I right? I'm not too fond of tanwall tyres myself, because I'm used to seeing them on neglected bikes that have stood outside with the same tires on since the 80's.
Might consider some brown- or "gumwall" types instead
I'm undecided whether I'll go with 35C or 38C, but even with fenders, there should be ample clearance for both.The guidonnet levers look interesting, but don't work very well on these bars, as in this combination they require a rather uncomfortable wrist angle.
And yes, they are folding Paselas, my go-to tire for the kind of varied road surfaces you get in our local events like L'Eroica and the Retroronde. They are light and supple and look more or less period correct, while being able to take a lot of abuse.
Last edited by non-fixie; 04-12-21 at 12:39 PM. Reason: typo
04-12-21, 10:56 AM
#36
Senior Member
Join Date: Dec 2016
Location: Long Island, NY
Posts: 2,107
Bikes: Trek 800 x 2, Schwinn Heavy Duti, Schwinn Traveler, Schwinn Le Tour Luxe, Schwinn Continental, Cannondale M400 and Lambert, Schwinn Super Sport
Mentioned: 14 Post(s)
Tagged: 0 Thread(s)
Quoted: 809 Post(s)
Liked 1,018 Times
in
664 Posts
Thanks for the support, nice to hear you are working on a similar project! I'd like to see your progress too.
I hadn't thought about having to drill the fork, thanks for pointing that out. I'll most likely be using hubs that are newer than the frame, so I think I'll get some new rims as well. Period-correct wheels would be nice for sure, but then I couldn't have a hub dynamo for starters and since this isn't a totally accurate restoration, I think using new-ish parts makes more sense. Still missing the rear hub though, I only seem to come accross IGH and SS hubs in the 120mm spacing.
As pointed, the bottom bracket is likely to be too low for a 650B conversion, but the 650B evangelists have made me a convert yesterday I found an odd-sized rusted out wheel from my parents' attic and thought, why not go the middle way, that is 590? It would give me 6 mm more circumference than 650b (and even fewer tyre options) Actually, I just came across a pair of old Nisi Toro Stretto rims of cheep euro ten speed fame costing a total of 16 � ...
I hadn't thought about having to drill the fork, thanks for pointing that out. I'll most likely be using hubs that are newer than the frame, so I think I'll get some new rims as well. Period-correct wheels would be nice for sure, but then I couldn't have a hub dynamo for starters and since this isn't a totally accurate restoration, I think using new-ish parts makes more sense. Still missing the rear hub though, I only seem to come accross IGH and SS hubs in the 120mm spacing.
As pointed, the bottom bracket is likely to be too low for a 650B conversion, but the 650B evangelists have made me a convert
yesterday I found an odd-sized rusted out wheel from my parents' attic and thought, why not go the middle way, that is 590? It would give me 6 mm more circumference than 650b (and even fewer tyre options) Actually, I just came across a pair of old Nisi Toro Stretto rims of cheep euro ten speed fame costing a total of 16 � ... 
I've got to get a better picture...
04-15-21, 03:59 AM
#37
Junior Member
Thread Starter
Lately I've been waiting for more parts to arrive by mail as well as cleaning and polishing the ones I already have.

The bash ring seems to be made of some cheap alloy and plated with this rough silver coating. I haven't figured any way to make it look nicer besides painting or getting rid of it entirely

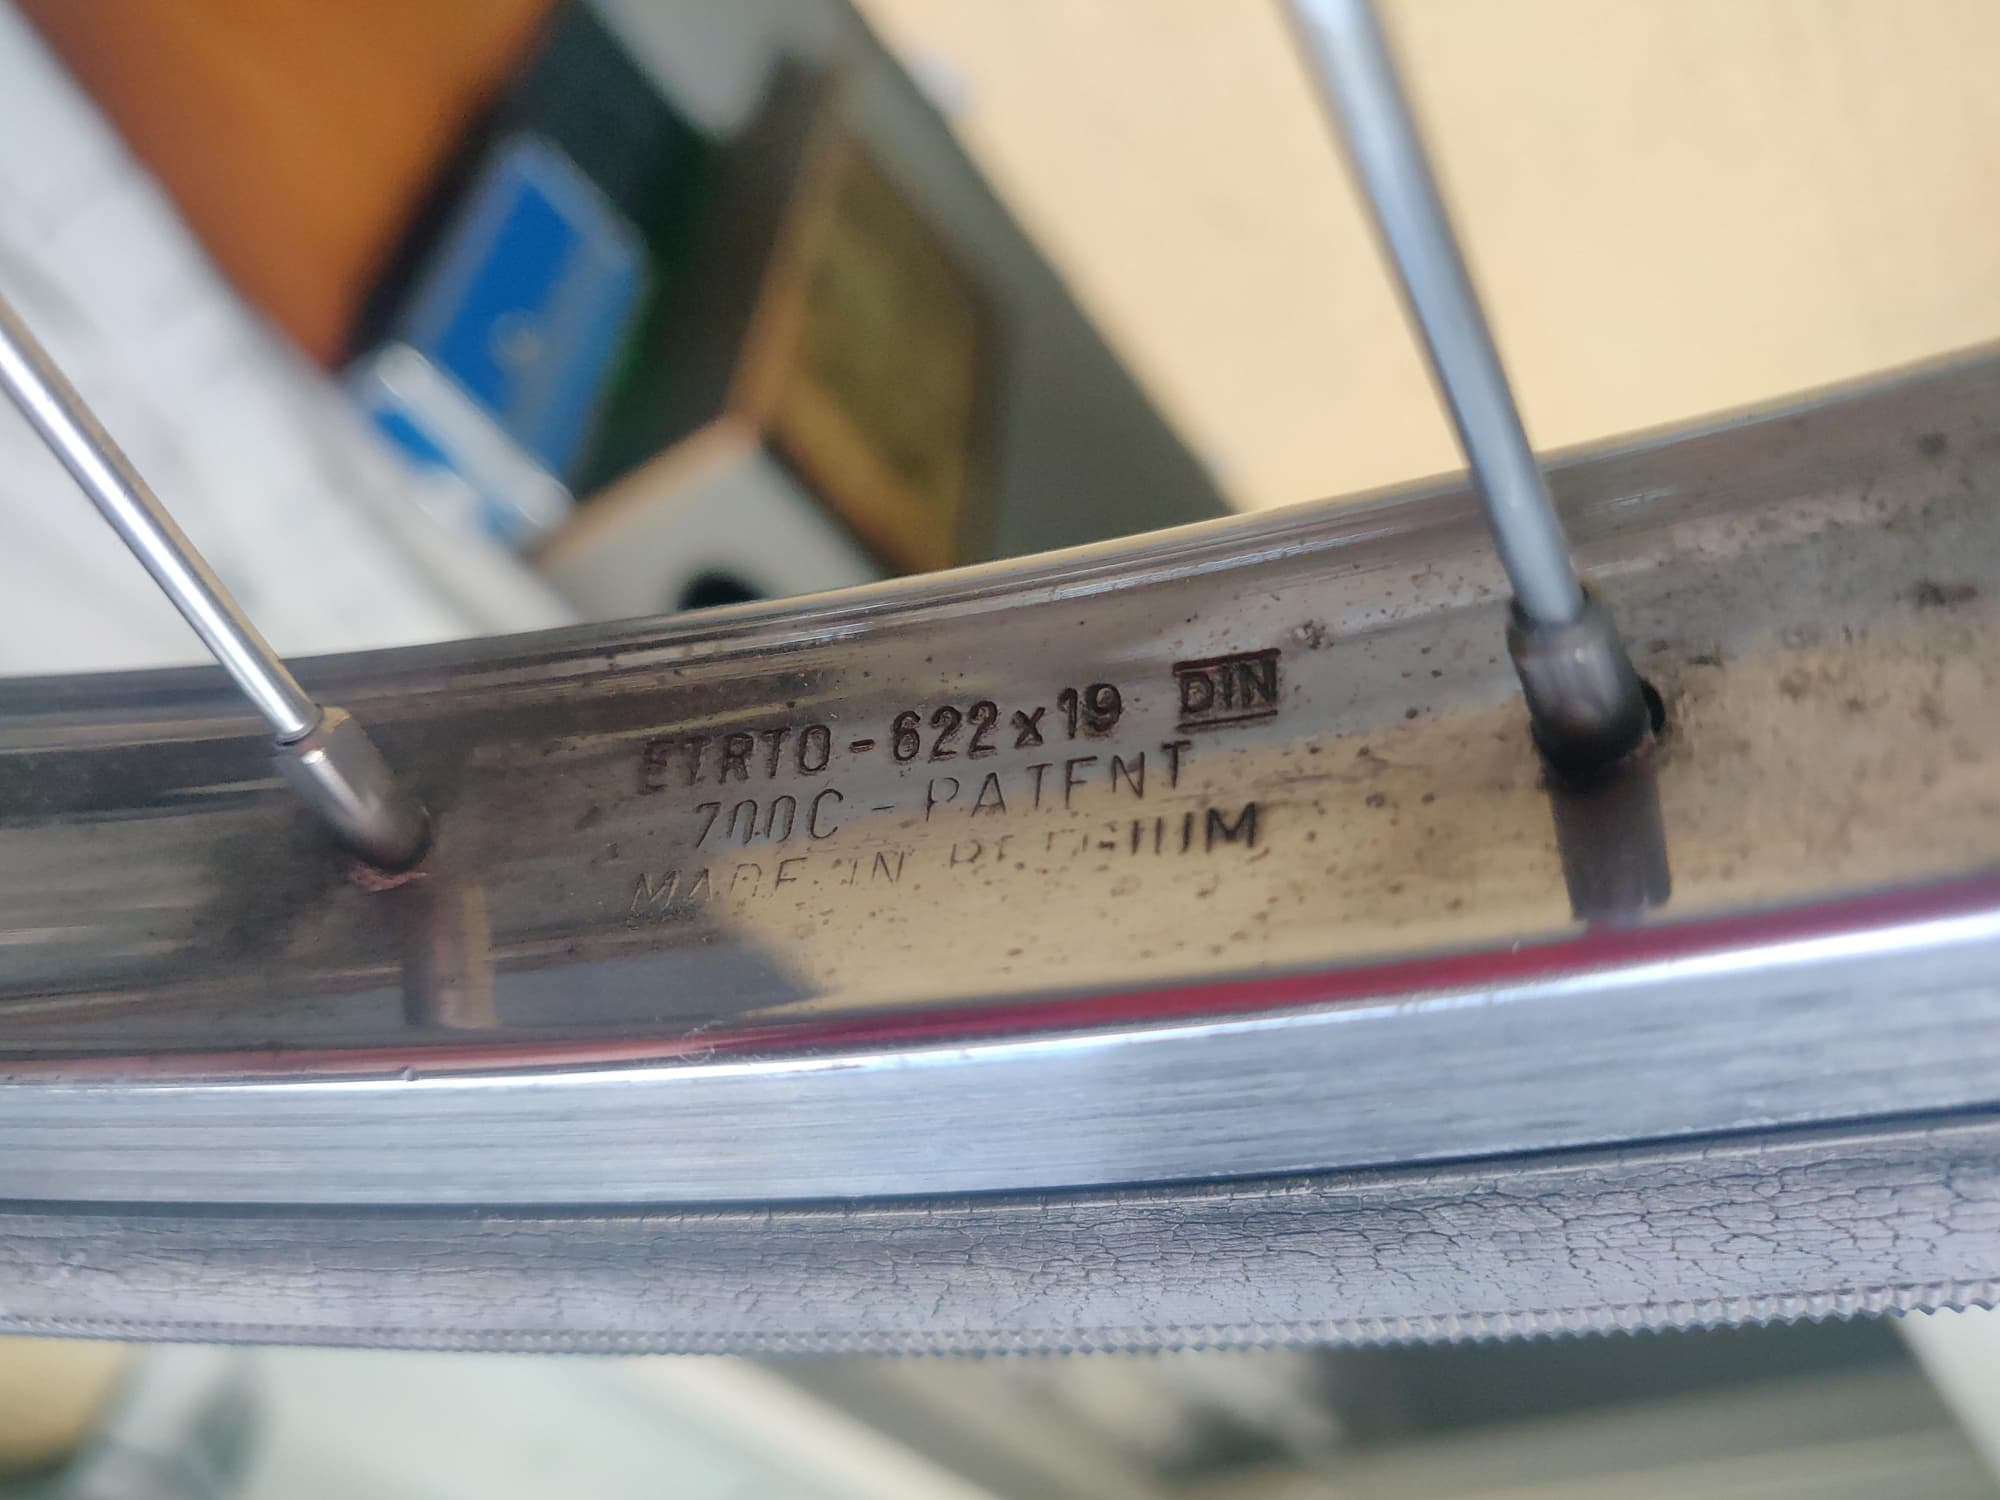
These will most likely be the rims for the first pair of wheels I'll be building myself. They don't match, as those with a keen eye might notice: one is 20 mm while the other is 22 mm wide (inside wall to wall) but the profile is roughly the same. Only the narrower one has decals, which I'm afraid can't be removed without damaging the anodising. I got these new, never laced rims for 10 € including a third, single wall DT Swiss rim A nice deal I'd say! I think the narrower one will go in the front wheel, not that it would make that much difference. I'll likely go with plain straight gauge Sapim Leader spokes for reasons of budget... in terms of costs, this project is already spiraling out of hand 

Measuring ERD

I've been wanting to put some brown (not tan) wall tires on this bike, and I think these Vredestein Classic Tours look pretty nice, BUT this color is in short supply almost everywhere I looked AND they weight over 800 gram a piece, which is basically the same as a pair of Paselas in roughly the same size. Other options would be Michelin Ride Tour and Schwalbe City Line, both of which are everything but performance-oriented: cheap, heavy and come with a knobby tread, as "city" oriented tires tend to. If you know nicely rolling brown sidewall 700c tires with semi-slick tread in 35 - 40c diameter, suggestions are welcome. I'm hoping to spend no more than 60 € on the pair.
What should be obvious so far and might not appeal to many C&V enthusiasts is that this is a low to mid tier bike to begin with and will be fitted with a mishmash of components from different makes, countries and eras. This is because I have a limited budget, limited access to period French components, and generally just don't know better, so bear with me and feel free to direct me to better directions if you feel so inclined
I'm hoping that for June I'll have a fun, good looking and practical bike to ride around.
Lots of work to do still - next will be ordering the spokes, patching up chipped paint from a couple of spots and polishing the bike with car wax. I've been trying to polish the fork blades by first removing oxidation with white vinegar and aluminum foil. The difference between the area that was under the sticker and the area that has been exposed to elements is still apparent, I'm not sure if I'll be able to fix that entirely. It would sure be nice to be able to buy some new tricolor foil tape in the right width Unfortunately I haven't been able to source that yet.
The bash ring seems to be made of some cheap alloy and plated with this rough silver coating. I haven't figured any way to make it look nicer besides painting or getting rid of it entirely
These will most likely be the rims for the first pair of wheels I'll be building myself. They don't match, as those with a keen eye might notice: one is 20 mm while the other is 22 mm wide (inside wall to wall) but the profile is roughly the same. Only the narrower one has decals, which I'm afraid can't be removed without damaging the anodising. I got these new, never laced rims for 10 € including a third, single wall DT Swiss rim
A nice deal I'd say! I think the narrower one will go in the front wheel, not that it would make that much difference. I'll likely go with plain straight gauge Sapim Leader spokes for reasons of budget... in terms of costs, this project is already spiraling out of hand Measuring ERD
I've been wanting to put some brown (not tan) wall tires on this bike, and I think these Vredestein Classic Tours look pretty nice, BUT this color is in short supply almost everywhere I looked AND they weight over 800 gram a piece, which is basically the same as a pair of Paselas in roughly the same size. Other options would be Michelin Ride Tour and Schwalbe City Line, both of which are everything but performance-oriented: cheap, heavy and come with a knobby tread, as "city" oriented tires tend to. If you know nicely rolling brown sidewall 700c tires with semi-slick tread in 35 - 40c diameter, suggestions are welcome. I'm hoping to spend no more than 60 € on the pair.
What should be obvious so far and might not appeal to many C&V enthusiasts is that this is a low to mid tier bike to begin with and will be fitted with a mishmash of components from different makes, countries and eras. This is because I have a limited budget, limited access to period French components, and generally just don't know better, so bear with me and feel free to direct me to better directions if you feel so inclined
I'm hoping that for June I'll have a fun, good looking and practical bike to ride around.
Lots of work to do still - next will be ordering the spokes, patching up chipped paint from a couple of spots and polishing the bike with car wax. I've been trying to polish the fork blades by first removing oxidation with white vinegar and aluminum foil. The difference between the area that was under the sticker and the area that has been exposed to elements is still apparent, I'm not sure if I'll be able to fix that entirely. It would sure be nice to be able to buy some new tricolor foil tape in the right width
Unfortunately I haven't been able to source that yet.
04-16-21, 06:10 AM
#38
Junior Member
Thread Starter
 maybe with some grease and spreading the clamp a bit... It just seems hard to imagine a 1" thick post would fit in there
Yesterday I made a couple of mishaps trying to polish the brakes and cranks. I tried brass wire brush Dremel attachment on one of the Weinmann brake arms and ended up pitting it quite a bit

I also tried to get a few scratches out of the left BLB Pista Vera crankarm by wet sanding with 1000 paper, which ended up partially removing the shiny silver anodising/clear coat on it
 now it looks pretty horrible. I'm not sure how to fix it, will I have to remove the rest of the anodising from.both crank arms and painstakingly polish them?
 Polishing seems quite difficult all in all. It's hard to hold a tiny piece of thin, wet, wrinkly sandpaper with rubber gloves and get it to reach anywhere on a part with lots of recessions etc
 and I don't even have a work table
04-19-21, 02:40 AM
#39
Junior Member
Thread Starter
Fear and loathing in the balcony... I mean bike workshop
Removing the fixed cup of the bottom bracked seems like a daunting task. From what I've heard, these tend to be in pretty damn tight, often requiring, among other things, long penetrant soaks, a sturdy bench vice, a blowtorch and lots
of manpower to remove. I'm considering taking it to a bike shop (30 - 40 € list price for the operation), but I've heard that sometimes even they can't remove these. So maybe I'll just re-pack the old style bottom bracket assembly with some loose ball bearing.
As mentioned earlier, I found a replacement for the original pitted Stronglight spindle from the parts bin, but it's sized for a triple, so it might be too long for a double especially with a 120 mm rear hub! Someone is also selling an used French thread Shimano cup and cone bottom bracket assembly locally for 20 € which seems pretty steep, and it has a 112 mm spindle that is possibly too short
I've been trying to polish some of the unfinished aluminum parts by wet sanding with 600, 800 and 1000 grit sandpapers, followed by using Autosol metal polish with a felt disk on my cheapo dremel copy. Too bad I've lost the protective cover for the chuck, and don't have any kind of bench vice available at the moment, so I'm forced to work with the part in one hand and the dremel in the other. This has lead to some slipping, resulting with the spinning, bored metal chuck hitting the part which means new deep scratches that would require lots of rough sanding to remove.
Well, the cast wasn't that clean to begin with, so I don't think I'll have the nerve to restart the whole process because of this. Gotta find that lost protective chuck cover though


Today I'm planning to take the fork to a paint shop so that they can mix some patch-up paint to match. After that I'm taking it to a bike shop to be cold set to 100 mm, as I currently lack the equipment and know-how to perform that myself.
I'm also planning to pick up an used set of wheels, most likely to serve as a temporary substitute, before I get the set with the dynamo hub laced. Here in the North we're approaching the season when you never need lights on your bike anyway.
Anxious to get this thing rollin'!
Removing the fixed cup of the bottom bracked seems like a daunting task. From what I've heard, these tend to be in pretty damn tight, often requiring, among other things, long penetrant soaks, a sturdy bench vice, a blowtorch and lots
of manpower to remove. I'm considering taking it to a bike shop (30 - 40 € list price for the operation), but I've heard that sometimes even they can't remove these. So maybe I'll just re-pack the old style bottom bracket assembly with some loose ball bearing.
As mentioned earlier, I found a replacement for the original pitted Stronglight spindle from the parts bin, but it's sized for a triple, so it might be too long for a double
especially with a 120 mm rear hub! Someone is also selling an used French thread Shimano cup and cone bottom bracket assembly locally for 20 € which seems pretty steep, and it has a 112 mm spindle that is possibly too short I've been trying to polish some of the unfinished aluminum parts by wet sanding with 600, 800 and 1000 grit sandpapers, followed by using Autosol metal polish with a felt disk on my cheapo dremel copy. Too bad I've lost the protective cover for the chuck, and don't have any kind of bench vice available at the moment, so I'm forced to work with the part in one hand and the dremel in the other. This has lead to some slipping, resulting with the spinning, bored metal chuck hitting the part
which means new deep scratches that would require lots of rough sanding to remove.Well, the cast wasn't that clean to begin with, so I don't think I'll have the nerve to restart the whole process because of this. Gotta find that lost protective chuck cover though
Today I'm planning to take the fork to a paint shop so that they can mix some patch-up paint to match. After that I'm taking it to a bike shop to be cold set to 100 mm, as I currently lack the equipment and know-how to perform that myself.
I'm also planning to pick up an used set of wheels, most likely to serve as a temporary substitute, before I get the set with the dynamo hub laced. Here in the North we're approaching the season when you never need lights on your bike anyway.
Anxious to get this thing rollin'!
04-20-21, 12:50 PM
#40
Junior Member
04-20-21, 03:24 PM
#41
Junior Member
Thread Starter

Today I tried Sheldon's method for removing the stubborn fixed cup. Turned out I didn't have a spanner big enough for the task!

I'm a bit pessimistic whether this will work...
Someone said these are supposed to take a 1" seatpost, but I only got a 25.0 mm post to insert that far, and see those scratches?

Pivo stem with mismatched bolt and cone, that came from a 22.2 mm stem, so the cone is a big wide. I don't expect it to be a problem when tightening as long as it stays in the groove.

Maybe the bottom bracket would have sat too low if I had fitted this frame with 650B wheels: this is the bottom bracket height with 23c tyres on 700c wheels.
They say a picture is worth a thousand words, right? I'm off to bed, and I'd be really happy to read some insightful new replies in the morning
04-20-21, 05:42 PM
#42
Senior Member

Join Date: Feb 2013
Location: Alta California
Posts: 14,242
Mentioned: 415 Post(s)
Tagged: 1 Thread(s)
Quoted: 3802 Post(s)
Liked 3,324 Times
in
2,170 Posts
From here and other sources, I've figured the seatpost should be 1" = 25.4 mm. Based on my own measurements, I had ordered a 25,0 mm seatpost, but I couldn't even cram that in maybe with some grease and spreading the clamp a bit... It just seems hard to imagine a 1" thick post would fit in there
Yesterday I made a couple of mishaps trying to polish the brakes and cranks. I tried brass wire brush Dremel attachment on one of the Weinmann brake arms and ended up pitting it quite a bit
I also tried to get a few scratches out of the left BLB Pista Vera crankarm by wet sanding with 1000 paper, which ended up partially removing the shiny silver anodising/clear coat on it now it looks pretty horrible. I'm not sure how to fix it, will I have to remove the rest of the anodising from.both crank arms and painstakingly polish them?
maybe with some grease and spreading the clamp a bit... It just seems hard to imagine a 1" thick post would fit in there Yesterday I made a couple of mishaps trying to polish the brakes and cranks. I tried brass wire brush Dremel attachment on one of the Weinmann brake arms and ended up pitting it quite a bit
I also tried to get a few scratches out of the left BLB Pista Vera crankarm by wet sanding with 1000 paper, which ended up partially removing the shiny silver anodising/clear coat on it
now it looks pretty horrible. I'm not sure how to fix it, will I have to remove the rest of the anodising from.both crank arms and painstakingly polish them?
saddle pillar size -
there is a loooong list of things which can make the opening de facto smaller than nominal -
binder ears pinched down from someone putting in a pillar which is too small
binder ears pinched down from someone overtightening, even if pillar size was correct
opening made out of round by the heat needed to braze the seat lug
foreign matter inside the top of the tube such as paint, corrosion, dried grease, etc.
i keep an expandable blade reamer in my workshop for making sure that seat tube openings are round and clear of foreign matter
it is too hard work to do by hand to use the reamer for enlargements, use it only to get opening round & clear
---
anodised parts -
there are two choices -
a) live with the scratches
b) remove the anodising prior to attempting to polish out the scratches
otherwise you willl make things worse looking than they were before you began
most folks find that oven cleaner works pretty well for removing anodising
remember that it emits toxic fumes so it is best to use outdoors
-----
04-21-21, 12:31 AM
#43
Junior Member
Thread Starter
-----
saddle pillar size -
there is a loooong list of things which can make the opening de facto smaller than nominal -
binder ears pinched down from someone putting in a pillar which is too small
binder ears pinched down from someone overtightening, even if pillar size was correct
opening made out of round by the heat needed to braze the seat lug
foreign matter inside the top of the tube such as paint, corrosion, dried grease, etc.
i keep an expandable blade reamer in my workshop for making sure that seat tube openings are round and clear of foreign matter
-----
Maybe I would need to do some reaming, perhaps a drill with a steel wire brush would do?
Yep I learned the hard way you can't polish anodising
04-26-21, 07:52 AM
#44
Junior Member
Thread Starter
Reconsidering 650B once again
I did some math for once seems that converting from 23x622 to 38x584 (ISO/ERTRO for 650B) would in fact lower the bottom bracket by a whopping 4 mm or so (622 / 2 + 23 = 334; 584 / 2 + 38 = 330) so I'm keeping that option open, even now that I have a set of 700c wheels for this bike. I already have a pair of hubs and a source of cheap double walled 650B rims. Of course, brake reach is another matter that has to be considered. In this situation, the conversion would need brakes with 80+ mm reach.
Bottom bracket drama
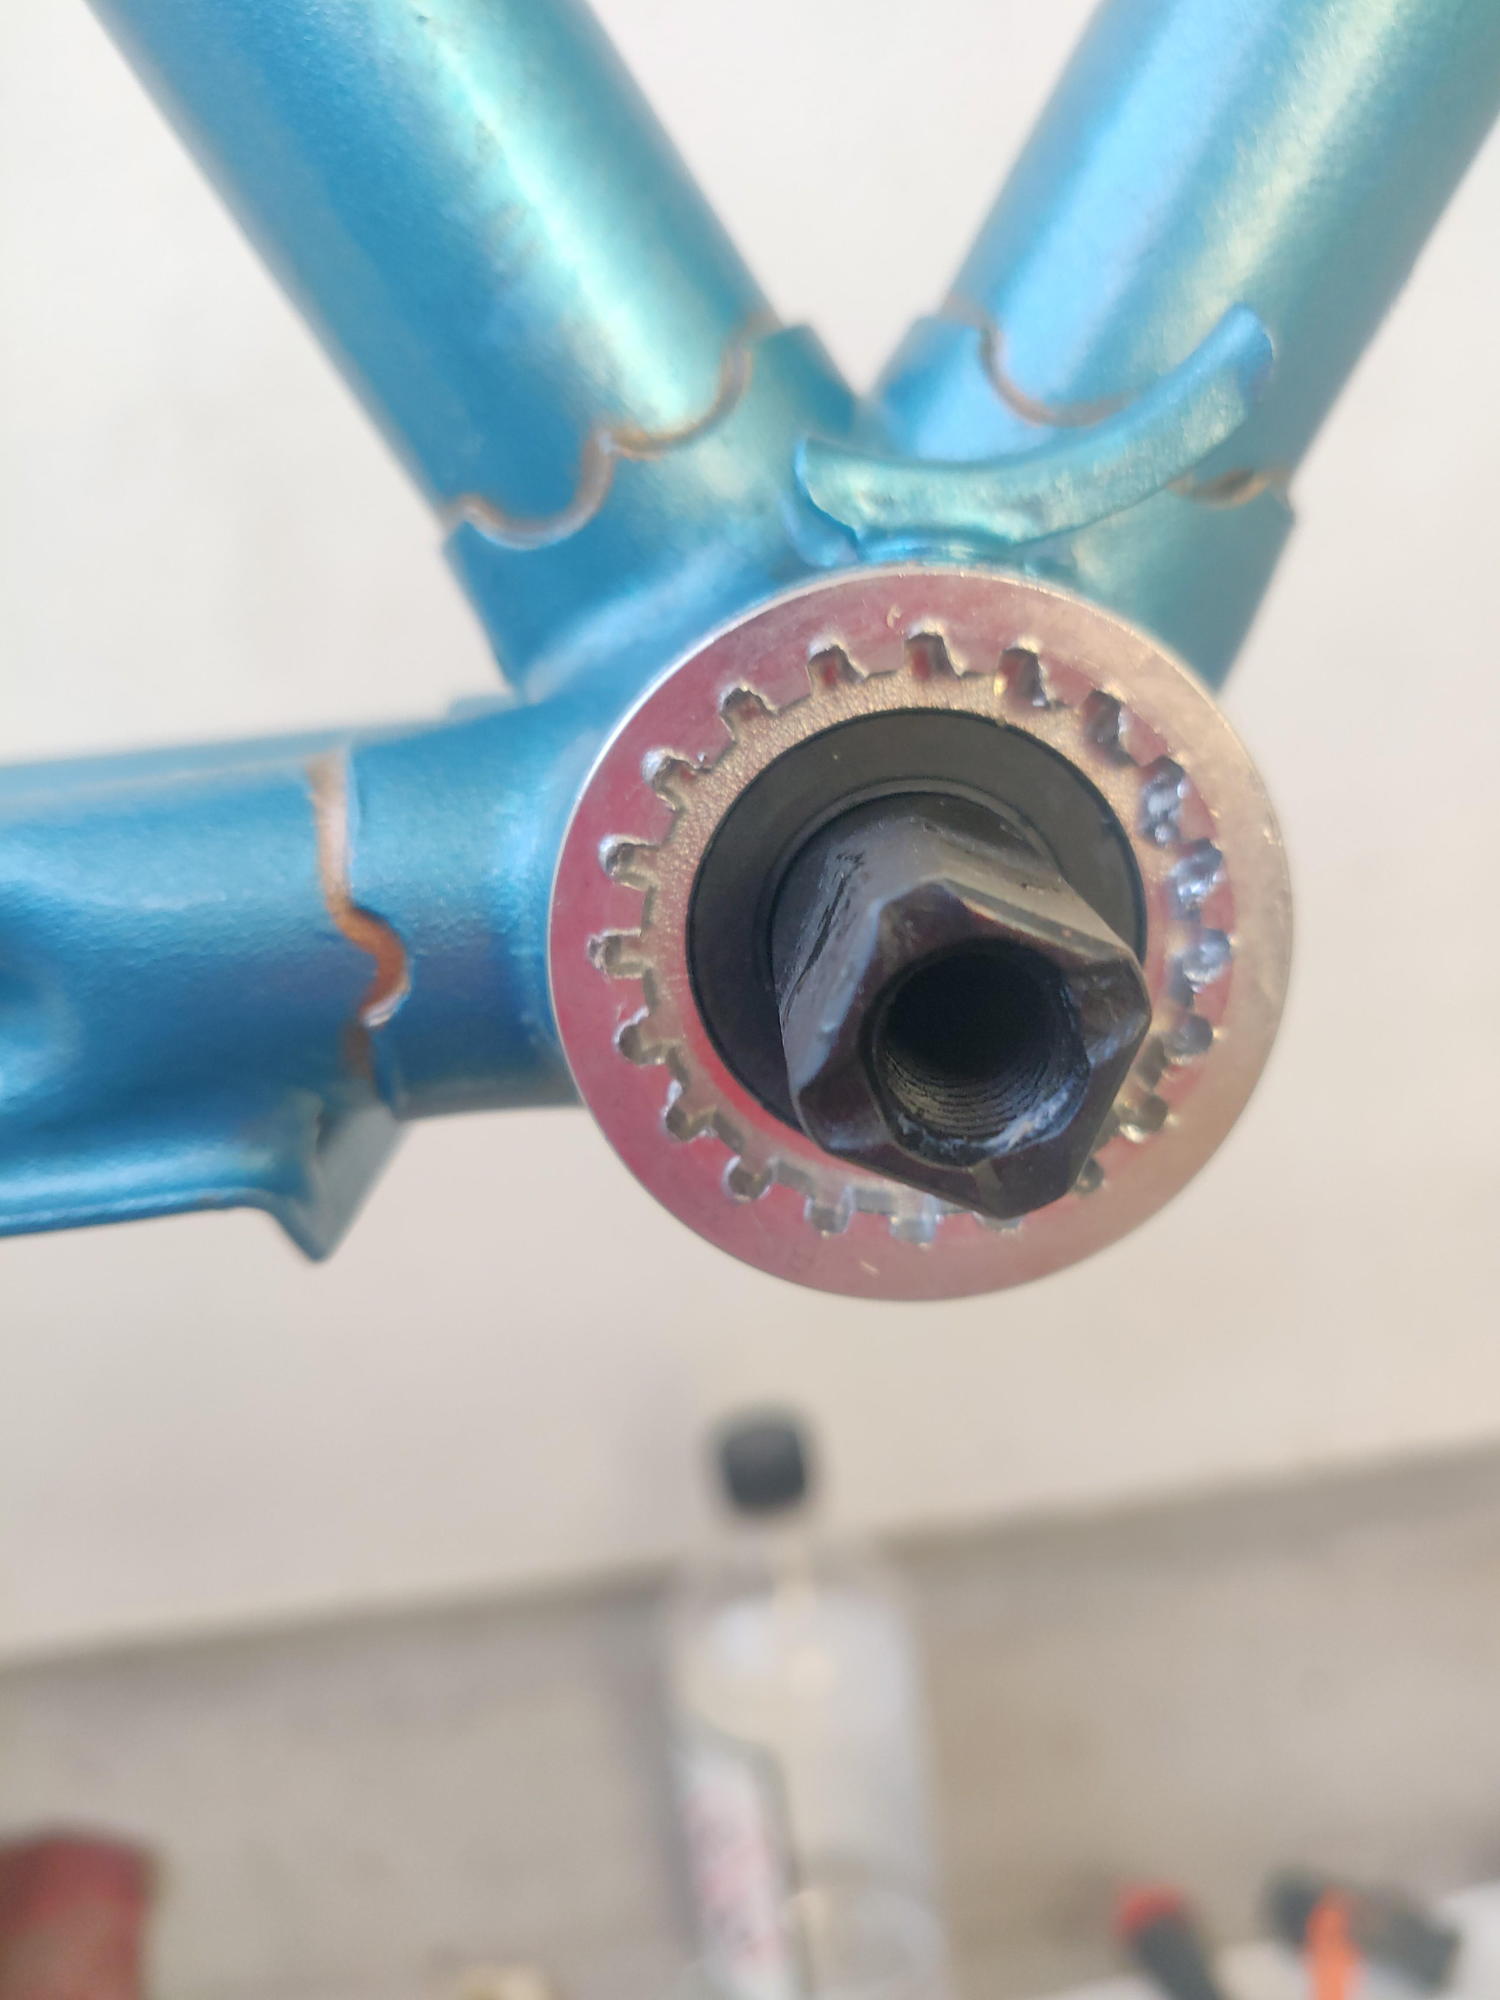
As mentioned earlier, I tried Sheldon's "nuts and bolts" method for removing the drive-side "fixed cup".
When I had already given up on the effort, as it showed no signs of turning, and removed my "tool", I was met with this sight:

Turns out the washer, or the nut that was large enough to let the un-threaded part of the bolt turn freely inside it that I used as a washer was too large and had stuck against the edge of the bb cup. As I tightened the bolt, I actually wasn't tightening it from both sides of the "flange" of the axle hole. What I had done instead, was compressing the cups so much it fractured.
Removing the oversized nut and using Sheldon's method as it is meant to took the ill-fated cup out easily.
Luckily it seems that the thread on the BB shell survived quite intact - I used the unbroken left side cup for gently "tracing" the thread - you can do this with French BB's because both sides come with a right-hand thread.

I'm going to install a Neco cassette BB after I'm done patching up some chipped paint.
What has happened to the seat tube?
In my last post, I wondered why I couldn't fit an 0.4mm undersized seat post into the tube for more than 23mm of its length.
First of all, the clamp has obviously gone through a lot - hopefully not enough to compromise the structural integrity of the frame. Seems that It has either been tightened around a far too narrow post or clamped in a bench vice at some point, leaving the opening oval in shape and the clamp "jaws" asymmetric


I resorted to using quite a lot of force to get it open: I happened to have a carpenter's hammer with a 1" head, that I shoved into the opening using a pair of heavy pliers as a "second hammer" drive it in. Well, that seems to have done the trick forcing it back in shape
There also seems to be some kind of protrusion down the length of the tube making it impossible to insert a post any further - it's located at the braze-on for the twin lateral stays. I'm guessing it might be some excess brazing that somehow got in there?

Figuring out the cockpit - of course I forgot to mask the "elbows" of the thicker part of the bar where the stem clamps, so they got scratched a bit. I think I'm going to wrap bartape all the way to the stem

I did some math for once
seems that converting from 23x622 to 38x584 (ISO/ERTRO for 650B) would in fact lower the bottom bracket by a whopping 4 mm or so (622 / 2 + 23 = 334; 584 / 2 + 38 = 330) so I'm keeping that option open, even now that I have a set of 700c wheels for this bike. I already have a pair of hubs and a source of cheap double walled 650B rims. Of course, brake reach is another matter that has to be considered. In this situation, the conversion would need brakes with 80+ mm reach.Bottom bracket drama
As mentioned earlier, I tried Sheldon's "nuts and bolts" method for removing the drive-side "fixed cup".
When I had already given up on the effort, as it showed no signs of turning, and removed my "tool", I was met with this sight:
Turns out the washer, or the nut that was large enough to let the un-threaded part of the bolt turn freely inside it that I used as a washer was too large and had stuck against the edge of the bb cup. As I tightened the bolt, I actually wasn't tightening it from both sides of the "flange" of the axle hole. What I had done instead, was compressing the cups so much it fractured.
Removing the oversized nut and using Sheldon's method as it is meant to took the ill-fated cup out easily.
Luckily it seems that the thread on the BB shell survived quite intact - I used the unbroken left side cup for gently "tracing" the thread - you can do this with French BB's because both sides come with a right-hand thread.
I'm going to install a Neco cassette BB after I'm done patching up some chipped paint.
What has happened to the seat tube?
In my last post, I wondered why I couldn't fit an 0.4mm undersized seat post into the tube for more than 23mm of its length.
First of all, the clamp has obviously gone through a lot - hopefully not enough to compromise the structural integrity of the frame. Seems that It has either been tightened around a far too narrow post or clamped in a bench vice at some point, leaving the opening oval in shape and the clamp "jaws" asymmetric
I resorted to using quite a lot of force to get it open: I happened to have a carpenter's hammer with a 1" head, that I shoved into the opening using a pair of heavy pliers as a "second hammer" drive it in. Well, that seems to have done the trick forcing it back in shape
There also seems to be some kind of protrusion down the length of the tube making it impossible to insert a post any further - it's located at the braze-on for the twin lateral stays. I'm guessing it might be some excess brazing that somehow got in there?
Figuring out the cockpit - of course I forgot to mask the "elbows" of the thicker part of the bar where the stem clamps, so they got scratched a bit. I think I'm going to wrap bartape all the way to the stem
Likes For Krov9:
05-02-21, 08:02 AM
#45
Junior Member
Thread Starter
On Friday, I applied the first coat of paint on the stops where the old paint had chipped or scratched. They definitely got the color right at the paint shop, but the clear coat on the old paint has yellowed on some spots more than others, which at some places makes the new paint kind of stand out. Tomorrow I'll go and buy some more sandpaper and give it a fine grit wet sanding before adding up a second coat, to make the surface more even, followed by a clear coat.
Turns out this front rack I had planned to use is too large, and would require a taller stem in order to be able to clamp around it.

I found a couple of nice, afforable ones from MV-TEK and BRN Bernardi, but haven't yet located a stockist that would deliver either of them to Finland, besides Ridewill.it that is crazy expensive - would you go about paying 6.10 € for the product and from 46,90 to 140,90 € for shipping??

(sorry for the crappy quality - Bike Forums wouldn't let me post the pic from Ridewill.it)

Turns out this front rack I had planned to use is too large, and would require a taller stem in order to be able to clamp around it.
I found a couple of nice, afforable ones from MV-TEK and BRN Bernardi, but haven't yet located a stockist that would deliver either of them to Finland, besides Ridewill.it that is crazy expensive - would you go about paying 6.10 € for the product and from 46,90 to 140,90 € for shipping??
(sorry for the crappy quality - Bike Forums wouldn't let me post the pic from Ridewill.it)
05-06-21, 02:40 AM
#46
Junior Member
Thread Starter
I kinda botched the paintjob by sanding it too much on a too large area Ended up sanding through the original paint on several spots despite only using 1000 grit paper - seems that the old paint is not very thick or smooth. I'll try to fix what I can with the last of the patch up paint I have once it will be again warm enough to paint on the balcony. I think > +15 degrees celsius for several hours combined with direct sunlight should be sufficient.
PS: I just got the rest of the parts by mail, including a nice set of aluminum fenders, cables and housing. Also, the closest thing to a co-op we have here is open again, so I was able to buy a downtube cable stop and some other little parts for cheap.
Ended up sanding through the original paint on several spots despite only using 1000 grit paper - seems that the old paint is not very thick or smooth. I'll try to fix what I can with the last of the patch up paint I have once it will be again warm enough to paint on the balcony. I think > +15 degrees celsius for several hours combined with direct sunlight should be sufficient.PS: I just got the rest of the parts by mail, including a nice set of aluminum fenders, cables and housing. Also, the closest thing to a co-op we have here is open again, so I was able to buy a downtube cable stop and some other little parts for cheap.
Last edited by Krov9; 05-06-21 at 02:42 AM. Reason: Forgot to include
05-10-21, 08:27 AM
#47
Junior Member
Thread Starter
I was going to use a set of cheap pitlock skewers, but I'm not sure if they are too long to tighten properly over a 120 mm O.L.D frame. A couple of washers outside the dropouts wouldn't hurt, would it?
The Mavic QR skewer above is not original to the wheelset I got, but should be of the right length.


Did some more painting, but trying to sand the surface to a similar texture as the original quite crappy paintjob is really hard, so it will most likely ending up looking a bit patchy anyway.
Edit:
Still trying to figure out what to do with the seatpost. Maybe I should get it reamed with the proper tools? As mentioned, it should take 25.4 mm (1") but even 25.0 mm is tight past the clamp. However, I'm under the impression that it would still be unwise to use a smaller post than intended?
The Mavic QR skewer above is not original to the wheelset I got, but should be of the right length.
Did some more painting, but trying to sand the surface to a similar texture as the original quite crappy paintjob is really hard, so it will most likely ending up looking a bit patchy anyway.
Edit:
Still trying to figure out what to do with the seatpost. Maybe I should get it reamed with the proper tools? As mentioned, it should take 25.4 mm (1") but even 25.0 mm is tight past the clamp. However, I'm under the impression that it would still be unwise to use a smaller post than intended?
Last edited by Krov9; 05-10-21 at 08:30 AM.
05-12-21, 12:25 PM
#48
Junior Member
Thread Starter
Is there a word for trying to fix a tiny annoyance and ending up causing a much larger problem in the process?
That's what's going on with my painting. The original paint was in a pretty good condition, save for a few dings and rust spots, but I ended up doing a number of mistakes (and counting...) which are inevitable leading to the end result looking much worse than what I started with
I will try to document my mistakes here, so that others might learn from them.
1. Not masking properly areas that don't need fixing
2. Not stirring paint enough - lead to visible silver and blue streaks instead of a homogenous metallic blue
3. Sanding with too rough paper ...
4. For too long...
5. on a too large area thinking that my ugly streaky paintjob would somehow turn even and "blend in"
Now, instead of a few spots and dings, I have approx. 70% of the original painted surface covered with ugly streaky uneven patchup paint applied thickly with a tiny paintbrush, with primer showing through oversanded spots here and there.
Only way to fix this would be getting a professional paintjob and would need to get the decals replaced too - would cost around 200 € which is tooooo much. I've already spent over 300 € in this project, twice what it would be worth complete, and it's not even finished yet.
I'll provide you pics at some point, but right now I'm just too disappointed to do that.
With a little self reflection, I notice I have a habit of being over enthusiastic and screwing stuff up because of that
05-17-21, 02:39 AM
#49
Junior Member
Thread Starter
Some shots of the damage I inflicted on the finish of my dear bike with my half-assed painting attempt

05-24-21, 02:36 AM
#50
Junior Member
Thread Starter
Finally got over the hassle with painting. It's not perfect but as long as it rides and doesn't start rusting instantly, that's fine I guess.

There was some significant rust here that had crept under the paint

Starting to come together bit by bit. I have a feeling the grips will be too far from the saddle for comfort with this setup. Maybe I'll switch out the handlebar as soon as I get a pair of brake levers that can mount to a straight section of bar. I have a porteur style bar (Pelago Parisienne) waiting for this, that I bought to have a second option. (I'll get rid of that ugly RD cage, don't worry!)

I'll switch the cable hanger to a silver one as soon as I get a hold of one.
I had the tool slip a bit while trying to tighten the aluminum drive side cup

Bought a set of cool silver anodised Alesa concave profile wheels

I find these are suspiciously similar to some Weinmanns I see online, and both came out of Belgium. Makes one think
There are still some open questions:
I might end up swapping the V-Gt Luxe for a Vx I have because I won't need that capasity here with the largest cog being only 28t. We'll see how that goes. I already have another project in mind, where I think I'll couple the V-Gt with a 52-42 crankset, 14-32 freewheel, Vx FD and just generally other left over parts from this build. Only riding will tell how I'll like this setup and if something asks to be changed.
Those silver anodised Alesas would look sweet after being polished and having surface oxidation removed, but that seems damn hard to do.
There was some significant rust here that had crept under the paint
Starting to come together bit by bit. I have a feeling the grips will be too far from the saddle for comfort with this setup. Maybe I'll switch out the handlebar as soon as I get a pair of brake levers that can mount to a straight section of bar. I have a porteur style bar (Pelago Parisienne) waiting for this, that I bought to have a second option. (I'll get rid of that ugly RD cage, don't worry!)
I'll switch the cable hanger to a silver one as soon as I get a hold of one.
I had the tool slip a bit while trying to tighten the aluminum drive side cup
Bought a set of cool silver anodised Alesa concave profile wheels
I find these are suspiciously similar to some Weinmanns I see online, and both came out of Belgium. Makes one think
There are still some open questions:
I might end up swapping the V-Gt Luxe for a Vx I have because I won't need that capasity here with the largest cog being only 28t. We'll see how that goes. I already have another project in mind, where I think I'll couple the V-Gt with a 52-42 crankset, 14-32 freewheel, Vx FD and just generally other left over parts from this build. Only riding will tell how I'll like this setup and if something asks to be changed.
Those silver anodised Alesas would look sweet after being polished and having surface oxidation removed, but that seems damn hard to do.

