


Bottom HT lug
 05-20-15, 04:27 AM
#1
Junior Member
Thread Starter
Join Date: May 2015
Posts: 11
Mentioned: 0 Post(s)
Tagged: 0 Thread(s)
Quoted: 0 Post(s)
Likes: 0
Liked 0 Times
in
0 Posts
Bottom HT lug
Hello, my name is Steve and I am new to this forum. I am starting to build my first road bike and I have a question. My HT is 36mm and DT is 35mm. The lug I have is stamped 61 degrees. My drawing requires a 59 degree HT-ST lug. Should I braze this lug and try to cold set it to 59? Is this possible? It just seems like a lot to move. Could the lug be altered before brazing or should I just look for a lug that is already 59 degrees?
 05-20-15, 08:01 AM
#2
Newbie
First I would check to see what the true angle of the lug is, often what is posted is not 100% accurate. It is quite doable to alter the dimension of a lug 1* or so, but I would not braze it first and cold set that angle. You can grind a little bit out of the inside of the lug and use a couple of boom tubes to slowly bend the lug to your desired angle using hose clamps to keep the lug edges in contact with the tube. If you lug happens to be a stamped lug, then you will have no issues bending it into position, a cast lug will make you do a little work. Hope that is helpful.
05-20-15, 09:07 AM
#3

Senior Member
Join Date: Feb 2012
Location: Rochester, NY
Posts: 18,073
Bikes: Stewart S&S coupled sport tourer, Stewart Sunday light, Stewart Commuting, Stewart Touring, Co Motion Tandem, Stewart 3-Spd, Stewart Track, Fuji Finest, Mongoose Tomac ATB, GT Bravado ATB, JCP Folder, Stewart 650B ATB
Mentioned: 0 Post(s)
Tagged: 0 Thread(s)
Quoted: 4201 Post(s)
Liked 3,856 Times
in
2,305 Posts
+1. It is very common to have to do some "blacksmithy" to lugs and other sockets when building. A change degree or two is usually not too big a deal. Placing thick walled tubes into the lug and bending is the typical first effort to shift the angle. Some localized bending of the lug's edges/points is a second step. I try these before I grind the insides. I usually try to bend the angle a bit further then needed and draw the angle back with the edge/point bending. I use a 4 or 6 inch adjustable wrench for this localized bending. Andy.
05-20-15, 11:57 AM
#4


Randomhead
Join Date: Aug 2008
Location: Happy Valley, Pennsylvania
Posts: 24,395
Mentioned: 0 Post(s)
Tagged: 0 Thread(s)
Quoted: 4 Post(s)
Liked 3,696 Times
in
2,517 Posts
2 degrees is often in the range of the slop. If not, you can probably remove a little material and get it to sit flat
05-20-15, 02:26 PM
#5
Junior Member
Thread Starter
Join Date: May 2015
Posts: 11
Mentioned: 0 Post(s)
Tagged: 0 Thread(s)
Quoted: 0 Post(s)
Likes: 0
Liked 0 Times
in
0 Posts
Thanks for all the replies. I will try the methods suggested within the next couple of days. I'll let you know how I make out.
05-22-15, 07:23 AM
#6
Junior Member
Thread Starter
Join Date: May 2015
Posts: 11
Mentioned: 0 Post(s)
Tagged: 0 Thread(s)
Quoted: 0 Post(s)
Likes: 0
Liked 0 Times
in
0 Posts
I tried the hose clamp idea. I put the lower HT lug in the head tube and hose clamped the top of the lug to the HT tube. I then inserted the down tube and every time I pulled down the clamp would slide off. The top of the lower HT lug doesn't have much metal to clamp to. I guess my next step is to grind the lug and remove some material in certain spots to get my 59 degrees. I'm afraid this may weaken the lug, but I don't know what else to do. Why do you guys say not to cold set it? Is 2 degrees too much to move while cold setting?
05-22-15, 09:26 AM
#7
Randomhead
Join Date: Aug 2008
Location: Happy Valley, Pennsylvania
Posts: 24,395
Mentioned: 0 Post(s)
Tagged: 0 Thread(s)
Quoted: 4 Post(s)
Liked 3,696 Times
in
2,517 Posts
no, you should cold set it if you can't get it to conform without
05-22-15, 10:42 AM
#8
Senior Member
Yes it's hard to clamp the top of the lug. Sometimes holding it in a vise works a bit better. I would have no worries about opening up the lug a little. How tight is the fit? And how do you check the angle of the lug-tube joint?
05-22-15, 11:09 AM
#9
Junior Member
Thread Starter
Join Date: May 2015
Posts: 11
Mentioned: 0 Post(s)
Tagged: 0 Thread(s)
Quoted: 0 Post(s)
Likes: 0
Liked 0 Times
in
0 Posts
The fit is tight with the DT, not with the HT. I check the angle by putting the DT and HT in the lug and laying it on my drawing, marking where the centers are. It comes out as 61 degrees, which is what is stamped on the lug.
05-22-15, 11:20 AM
#10

Decrepit Member

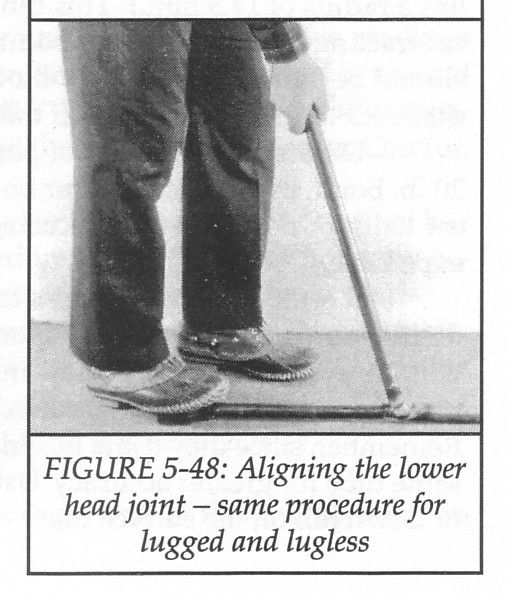
Paterek shows this illustration of the HT-DT lug angle being cold set using boom tubes. I've never had to resort to doing this, but it makes sense for adjusting the angle up to a couple of degrees.
 05-22-15, 12:42 PM
#11
Senior Member
I would open the fit, focusing on the top of the socket near the HT and try to bend the bottom spoon of the lug. The lug should slide with little force anyway and not be too tight. Bending after brazing is a last resort type of thing and not without risks.
05-22-15, 09:19 PM
#12
Junior Member
Thread Starter
Join Date: May 2015
Posts: 11
Mentioned: 0 Post(s)
Tagged: 0 Thread(s)
Quoted: 0 Post(s)
Likes: 0
Liked 0 Times
in
0 Posts
I brazed the bottom HT - DT joint after modifying the lug. I then cold set the joint and I went to far. I bent it back to where it had to be (59 degrees). I noticed a very slight buckle in the down tube, near the lug. It's very small and I could fix it cosmetically, but is it weaker? Should I scrap this joint and start over or is it ok?
05-25-15, 01:11 PM
#13
Senior Member
It's really up to you.
Did you set the lug at the right angle, but it moved during brazing?
Did you set the lug at the right angle, but it moved during brazing?
05-25-15, 02:19 PM
#14
Framebuilder
Join Date: Dec 2007
Posts: 570
Mentioned: 0 Post(s)
Tagged: 0 Thread(s)
Quoted: 8 Post(s)
Likes: 0
Liked 0 Times
in
0 Posts
I brazed the bottom HT - DT joint after modifying the lug. I then cold set the joint and I went to far. I bent it back to where it had to be (59 degrees). I noticed a very slight buckle in the down tube, near the lug. It's very small and I could fix it cosmetically, but is it weaker? Should I scrap this joint and start over or is it ok?
Seriously though, now you know why setting a joint like that is a bad idea. Now you have a compromised tube in one of the worst possible places. Chalk it up to experience and move on.
06-01-15, 06:17 PM
#15
Junior Member
Thread Starter
Join Date: May 2015
Posts: 11
Mentioned: 0 Post(s)
Tagged: 0 Thread(s)
Quoted: 0 Post(s)
Likes: 0
Liked 0 Times
in
0 Posts
06-01-15, 06:47 PM
#16
Senior Member
Join Date: Feb 2012
Location: Rochester, NY
Posts: 18,073
Bikes: Stewart S&S coupled sport tourer, Stewart Sunday light, Stewart Commuting, Stewart Touring, Co Motion Tandem, Stewart 3-Spd, Stewart Track, Fuji Finest, Mongoose Tomac ATB, GT Bravado ATB, JCP Folder, Stewart 650B ATB
Mentioned: 0 Post(s)
Tagged: 0 Thread(s)
Quoted: 4201 Post(s)
Liked 3,856 Times
in
2,305 Posts
06-02-15, 09:15 AM
#17
Senior Member
Join Date: Aug 2012
Location: Seattle
Posts: 507
Mentioned: 0 Post(s)
Tagged: 0 Thread(s)
Quoted: 103 Post(s)
Liked 144 Times
in
88 Posts
Those gussets aren't as simple as you may think. You've essentially created a can opener on the DT - possibly past where the butting ends; on the thin part of the tube - which could cause cracks.
Bontrager and Sadoff (and others) used gussets but spent a lot of time perfecting them. They welded along the side edges, leaving the trailing edge open and theirs are concaved trailing edge, not convex. Others i'm sure know more about this than I do.
The fun part is we'll see what happens!
Congrats, looking good! And you are right, this is definitely not the cheap or fast way to get a nice custom frame!
06-02-15, 03:27 PM
#18
Randomhead
Join Date: Aug 2008
Location: Happy Valley, Pennsylvania
Posts: 24,395
Mentioned: 0 Post(s)
Tagged: 0 Thread(s)
Quoted: 4 Post(s)
Liked 3,696 Times
in
2,517 Posts
keep an eye on that, I'm pretty sure it's gonna break. I can't really tell, but it looks like it's already broken
My philosophy on replacing parts is that it's good for the soul. I used to think I would salvage a project somehow after I made a mistake, but what I found is that I wouldn't finish it. So now it's just replace and don't worry about the old parts
My philosophy on replacing parts is that it's good for the soul. I used to think I would salvage a project somehow after I made a mistake, but what I found is that I wouldn't finish it. So now it's just replace and don't worry about the old parts
06-03-15, 08:12 AM
#19
Senior Member
I'd say that as long as the patch is within a few cm of the butt transition it should be fine. This looks like a road bike; MTBs with long suspension forks will see much higher stresses, hence the issue with gussets.
06-04-15, 06:39 PM
#20
Junior Member
Thread Starter
Join Date: May 2015
Posts: 11
Mentioned: 0 Post(s)
Tagged: 0 Thread(s)
Quoted: 0 Post(s)
Likes: 0
Liked 0 Times
in
0 Posts
I think it will be fine. It's a 35mm DT that is .8mm at the end. I'm using double over size tubing. I brought the front triangle to a well respected local mechanic who used to work for a well respected frame builder and he said I won't have any problems with it.
It will be some time before I get to start on the rear triangle because I haven't got around to ordering the drop outs. Thanks for all the input so far. When I do finish the rear triangle, I will post some pics. Steve
It will be some time before I get to start on the rear triangle because I haven't got around to ordering the drop outs. Thanks for all the input so far. When I do finish the rear triangle, I will post some pics. Steve
06-06-15, 12:10 PM
#22
framebuilder
Steve, you have done the right thing by asking experiences builders their opinion. When I looked at an enlarged view of your photo of the patch, it is possible to see a crack that extends beyond your added gusset. This crack filled with silver when you did the repair. A crack left like that means you have not met the minimum standard of acceptable framebuilding tolerances. It clearly has the potential to break and therefore is a liability to whoever may ride it in the future. Unless you replace the tube or cut the frame up, it is always possible that someone will get hurt riding it. We have a moral/ethical responsibility as framebuilders to make sure we always meet the minimum standard � which is that to the best of our knowledge we have made a frame good enough that won�t break under normal circumstances. Yours does not pass that minimal test.
Of course before you either replace the tube or cut up the frame (I can�t think of a 3[SUP]rd[/SUP] option) you (and only you) can ride it around the block a few times to see if the fit is right and the geometry is what you want. But to leave it as is means it is always possible for the frame to be ridden sometime by someone else when it breaks.
Learning to build frames is expensive. Either you pay a good instructor to teach you the right way or you make a bunch of mistakes trying to figure it out on your own. The disadvantage of doing it yourself is that poorly built frames in the beginning can hang around hurting your reputation long after you have gotten better.
06-08-15, 04:09 AM
#23
Junior Member
Thread Starter
Join Date: May 2015
Posts: 11
Mentioned: 0 Post(s)
Tagged: 0 Thread(s)
Quoted: 0 Post(s)
Likes: 0
Liked 0 Times
in
0 Posts
Doug, I believe what you are seeing as a crack is actually me slipping with my dremmel tool. I was trying different attachments to clean up the lugs before I file them. That scratch was caused by an engraving attachment. It has since been removed with an Emory cloth. That is if we are talking about the same scratch. The one I am referring to is a little more than half way down the gusset, on the DT, to the left of the gusset. Please let me know if you are seeing something else, because if I do have a crack, I will trash the frame.
06-08-15, 06:15 AM
#24
Randomhead
Join Date: Aug 2008
Location: Happy Valley, Pennsylvania
Posts: 24,395
Mentioned: 0 Post(s)
Tagged: 0 Thread(s)
Quoted: 4 Post(s)
Liked 3,696 Times
in
2,517 Posts
I think that Doug is talking about the thing that sticks out of the triangular part of the gusset. What were you dremeling? By far the best tool for moving filler around is a torch, and files are next. Sandpaper last
06-08-15, 07:12 AM
#25
Junior Member
Thread Starter
Join Date: May 2015
Posts: 11
Mentioned: 0 Post(s)
Tagged: 0 Thread(s)
Quoted: 0 Post(s)
Likes: 0
Liked 0 Times
in
0 Posts
Where ever I have a lot of silver built up I use the dremel first, followed by a file, and lastly sand cloth or scotch brite. When I get home I'll have to look at the gusset closer. There is a local frame builder (Harry Havnoonian), that I can ask and get his opinion.