


Smaller Gauge Wire for SON Dynamo?
 03-23-23, 12:36 PM
#1
Newbie
Thread Starter
Join Date: Dec 2021
Posts: 21
Mentioned: 0 Post(s)
Tagged: 0 Thread(s)
Quoted: 5 Post(s)
Likes: 0
Liked 4 Times
in
4 Posts
Smaller Gauge Wire for SON Dynamo?
Hi everyone,
Most bikes I see with a SON dynamo have the wires wound around the right fork blade. I want to run the wire(s) inside the fork, through the small hole near the dropout. I’ve already fished a thin wire as a leader through the fork, so I can attach the leader to the dynamo wire and pull it through the fork. However, the hole is too small for the existing dynamo wires and I do not want to enlarge the hole.
Here's my question: Can I use a smaller-gauge wire to connect the dynamo to the headlight?
Will a smaller-gauge wire be unable to carry the voltage/amperage from the dynamo?
Will a smaller-gauge wire reduce the brightness of the headlight and taillight?
Will I still be able to incorporate a USB charging setup at a future point in time?
Or, will the difference between the existing/stock wire and a smaller gauge be imperceptible/nonexistent?
Here are the specs:
Dynamo: SON 36
Headlight: Edelux II
Taillight: Busch + Muller � Micro
Below are photos of the leader wire threaded through the fork.
Your wisdom, advice, experience, and opinions are appreciated. Thanks!
Last edited by emdub; 03-23-23 at 12:40 PM.
 03-23-23, 01:24 PM
#2
Senior Member

Join Date: Sep 2017
Location: Upstate SC
Posts: 1,694
Mentioned: 3 Post(s)
Tagged: 0 Thread(s)
Quoted: 815 Post(s)
Liked 1,647 Times
in
776 Posts
As you have probably figured out by now, you aren't allowed to post pictures with your first post.
Now, not knowing the specs on the output of the dynamo, or the stock wire gauge or what you intend to use, I can only answer in generalizations (sorry.)
Here's my question: Can I use a smaller-gauge wire to connect the dynamo to the headlight? Yes, but.....
Will a smaller-gauge wire be unable to carry the voltage/amperage from the dynamo? Smaller gauge wires cannot carry the amperage of a larger gauge, and therefore create increased voltage drop in the circuit.
Will a smaller-gauge wire reduce the brightness of the headlight and taillight? Possibly (see above)
Will I still be able to incorporate a USB charging setup at a future point in time? Possibly
Or, will the difference between the existing/stock wire and a smaller gauge be imperceptible/nonexistent? Imperceptible? Maybe, if your smaller wires are still capable of handling the current, and you only add 0.1v drop, I doubt your eyes will be able to notice. Nonexistent? No.
03-23-23, 03:28 PM
#3
Senior Member
Join Date: Aug 2010
Location: Madison, WI
Posts: 11,182
Bikes: 1961 Ideor, 1966 Perfekt 3 Speed AB Hub, 1994 Bridgestone MB-6, 2006 Airnimal Joey, 2009 Thorn Sherpa, 2013 Thorn Nomad MkII, 2015 VO Pass Hunter, 2017 Lynskey Backroad, 2017 Raleigh Gran Prix, 1980s Bianchi Mixte on a trainer. Others are now gone.
Mentioned: 47 Post(s)
Tagged: 0 Thread(s)
Quoted: 3454 Post(s)
Liked 1,454 Times
in
1,133 Posts
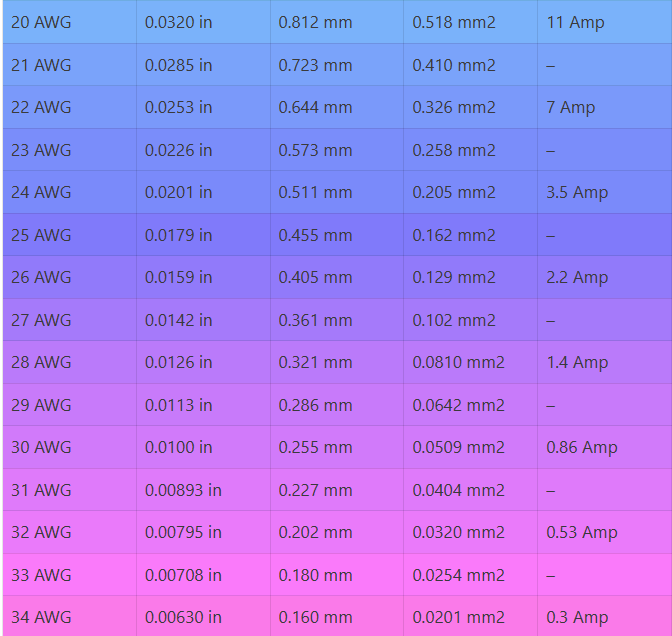
I think you want wire that can take at least one amp of current. Looking at the table that Bald Paul posted, you probably could get pretty small. But keep in mind that a really thin wire can break pretty easily, say for example if you forgot to unplug the hub when removing the wheel (I speak from experience), but there is a reason I used thicker wire. Years ago when wired bike computers were common, I had too many wired computers become dysfunctional when I snagged the wire on something and broke it. I did not want a repeat on my dyno systems so I used thicker wire than the wire that was provided by B&M.
If you are curious I documented my wiring setup on one of my bikes at this link:
https://www.bikeforums.net/electroni...b-charger.html
If you are curious I documented my wiring setup on one of my bikes at this link:
https://www.bikeforums.net/electroni...b-charger.html
03-23-23, 03:37 PM
#4
Senior Member
Join Date: Aug 2010
Location: Madison, WI
Posts: 11,182
Bikes: 1961 Ideor, 1966 Perfekt 3 Speed AB Hub, 1994 Bridgestone MB-6, 2006 Airnimal Joey, 2009 Thorn Sherpa, 2013 Thorn Nomad MkII, 2015 VO Pass Hunter, 2017 Lynskey Backroad, 2017 Raleigh Gran Prix, 1980s Bianchi Mixte on a trainer. Others are now gone.
Mentioned: 47 Post(s)
Tagged: 0 Thread(s)
Quoted: 3454 Post(s)
Liked 1,454 Times
in
1,133 Posts
One more thing. With the lights and USB charger not in use, the voltage can climb quite high. I had over 30 volts on my multimeter when going down a hill with my hub not connected to any devices. So, the wire insulation should be good enough to handle higher voltage.
03-26-23, 04:37 PM
#5


Randomhead
Join Date: Aug 2008
Location: Happy Valley, Pennsylvania
Posts: 24,386
Mentioned: 0 Post(s)
Tagged: 0 Thread(s)
Quoted: 4 Post(s)
Liked 3,687 Times
in
2,510 Posts
Some people only use one wire to the headlight and use the frame for the return current. That's the way it was done until the advent of the hub dyno, and many hub dynos are set up to take return current through the frame. It seems like hub dynos made by SP don't natively have this capability, but Shimano an SoN hubs can do this. It can cause reliability issues, but mostly works okay.
03-27-23, 04:02 PM
#6
Senior Member

Join Date: Feb 2008
Location: Peoria, IL
Posts: 4,469
Mentioned: 86 Post(s)
Tagged: 0 Thread(s)
Quoted: 1827 Post(s)
Liked 3,367 Times
in
1,573 Posts
As a general exercise, let's look at an extremely small wire... 30 gauge.
If you look at a wire gauge table, you'll see that it has a resistance of 0.338 ohms per meter.
A worst-case estimate of the amount of wire between the dynamo and headlight might be 2 meters, with a total resistance of 0.66 ohms.
The nominal dynamo current is 0.5A, so that means that the voltage drop across the wires is 0.338 volts.
The headlight needs only 6v or so.
The dynamo's internal resistance is on the order of 2 ohms. At typical speeds, the dynamo output is around 20v with no load (I've measured 23vac at 16mph from my Schmidt).
The dynamo has no problem with an extra 0.338v drop across the wiring.
The bigger issue is just the durability of the wiring and its insulation.
How small of a wire do you need?
Steve in Peoria
03-28-23, 10:58 AM
#7
Randomhead
Join Date: Aug 2008
Location: Happy Valley, Pennsylvania
Posts: 24,386
Mentioned: 0 Post(s)
Tagged: 0 Thread(s)
Quoted: 4 Post(s)
Liked 3,687 Times
in
2,510 Posts
I don't think I would go with smaller gauge wire, that's why I suggested going with one wire instead. Anton of Velo Lumino rewires all his dyno systems for one wire, I think. I bought a taillight from him and it was set up like that. The next size up is the coax wire that Peter White sells. It's pretty small. I have some, I should use it.
I'm just a simple man, so on most of my bikes I'm perfectly happy with the dual conductor B&M wire.
I'm just a simple man, so on most of my bikes I'm perfectly happy with the dual conductor B&M wire.
03-28-23, 11:34 AM
#8
Full Member
How long is the stock wire?
You can reduce some of that resistance in the smaller wire by reducing length to regain back some (or all) of the losses you incurred by going from the stock wire.
A pretty safe bet would be to reduce wire size by the amount that maintains the wire resistance equal to the stock wire in its full intact length.
For example, if the smaller wire has 20% more resistance per foot you would likely be safe if the new wire was no more than 80% the length of the stock wire.
This would allow at least comparable performance to the stock wire if that full length had been used.
Last edited by Wiggle; 03-28-23 at 11:42 AM.
03-28-23, 08:39 PM
#9

Senior Member

Join Date: Apr 2005
Location: Ann Arbor, MI
Posts: 16,869
Bikes: 1980 Masi, 1984 Mondonico, 1984 Trek 610, 1980 Woodrup Giro, 2005 Mondonico Futura Leggera ELOS, 1967 PX10E, 1971 Peugeot UO-8
Mentioned: 49 Post(s)
Tagged: 0 Thread(s)
Quoted: 1854 Post(s)
Liked 661 Times
in
504 Posts
As a general exercise, let's look at an extremely small wire... 30 gauge.
If you look at a wire gauge table, you'll see that it has a resistance of 0.338 ohms per meter.
A worst-case estimate of the amount of wire between the dynamo and headlight might be 2 meters, with a total resistance of 0.66 ohms.
The nominal dynamo current is 0.5A, so that means that the voltage drop across the wires is 0.338 volts.
The headlight needs only 6v or so.
The dynamo's internal resistance is on the order of 2 ohms. At typical speeds, the dynamo output is around 20v with no load (I've measured 23vac at 16mph from my Schmidt).
The dynamo has no problem with an extra 0.338v drop across the wiring.
The bigger issue is just the durability of the wiring and its insulation.
How small of a wire do you need?
Steve in Peoria
If you look at a wire gauge table, you'll see that it has a resistance of 0.338 ohms per meter.
A worst-case estimate of the amount of wire between the dynamo and headlight might be 2 meters, with a total resistance of 0.66 ohms.
The nominal dynamo current is 0.5A, so that means that the voltage drop across the wires is 0.338 volts.
The headlight needs only 6v or so.
The dynamo's internal resistance is on the order of 2 ohms. At typical speeds, the dynamo output is around 20v with no load (I've measured 23vac at 16mph from my Schmidt).
The dynamo has no problem with an extra 0.338v drop across the wiring.
The bigger issue is just the durability of the wiring and its insulation.
How small of a wire do you need?
Steve in Peoria
All wires create some heat when carrying current. The wire temperature tends to increase because of this self-heating, and the wire is cooled by head conduction, radiation of heat from warmer places to cooler places, and airflow. For every wire in every setting there is an amount of current which will melt it or otherwise destroy it. THAT is the limit of what a wire can take, but it is nearly impossible to predict. Tables of wire usage (sometimes the wire gauge tables that Steve mentions) could list a limit called "ampacity," which (I haven't read this for quite a while) means an amount of current which may cause a practical safe upper limit of current carried by a wire of the specified gauge in a standardied cooling environment. It's really hard to relate this to a real world circuit in a house or on a bicycle. For a wire in teh middle of a large wiring harness, carrying high power and surrounded by nearly no moving air, the ampacity could directly come into play. Such cases might be found in modern cars, airplanes, buildings, or ships, but not likely on a bicycle.
So it's not easy to answer the Thread Starter's questions. If he as a voltmeter and can use it, if the voltage drop of the whole wire loop is less than 1% of the supply voltage that is probably ok to use and ot to worry about it.
If the generator wire or wires are too thick to be pulled through the little holes in the frame, I would make bigger holes. I would not make the generator supply wires smaller than what SON provided.
03-28-23, 09:02 PM
#10
Senior Member
Join Date: Feb 2008
Location: Peoria, IL
Posts: 4,469
Mentioned: 86 Post(s)
Tagged: 0 Thread(s)
Quoted: 1827 Post(s)
Liked 3,367 Times
in
1,573 Posts
edit: forgot to mention that the teflon insulation is really tough! It's very resistant to abrasion. It's also slippery and tolerant of high heat, but these two attributes are a low priority on bikes. [/edit]
Teflon wire tends to be pricey, although I imagine that you can buy modest lengths on ebay and other sources.
Steve in Peoria
(there are alternatives to teflon, which I've investigated and purchased. However, I had to buy a 50 foot roll, which I suspect isn't what the OP wants to buy)
Last edited by steelbikeguy; 03-28-23 at 09:11 PM.
03-28-23, 09:36 PM
#11
Senior Member
Join Date: Apr 2005
Location: Ann Arbor, MI
Posts: 16,869
Bikes: 1980 Masi, 1984 Mondonico, 1984 Trek 610, 1980 Woodrup Giro, 2005 Mondonico Futura Leggera ELOS, 1967 PX10E, 1971 Peugeot UO-8
Mentioned: 49 Post(s)
Tagged: 0 Thread(s)
Quoted: 1854 Post(s)
Liked 661 Times
in
504 Posts
That is all true! I worked with Teflon insulation quite a bit when I was in the aerospace industry and it was rather easy to get, and the durability of the wire will be the major factor, ultimately. It also contains compounds of fluorine, so it is burns it can be harmful. It is the thinnest of anything other than magnet wire, but magnet wire is hard to work with. Since moving to automotive nearly 30 years ago, nearly any talk of Teflon has started pejorative speeches about $500 hammers and $10k toilets that us aerospace guys want to to use. I also found them to be difficult to source. But the silver plated stuff is easy to work with if you have th correct wire stripper and crimping tools. I haven't done much wiring or cable-making since leaving the aero world. I would try it if I wanted to push a ffew wires through a small hole. Most days I would rather do other things like prepare bikes for riding.
What were some of the other possibilities? At Ford they had some higher-temperature polyester wire which seemed pretty nice and had been proven robust, for road vehicle use, in the engine bay. Almost as severe as aircraft applications.
Road Fan
What were some of the other possibilities? At Ford they had some higher-temperature polyester wire which seemed pretty nice and had been proven robust, for road vehicle use, in the engine bay. Almost as severe as aircraft applications.
Road Fan
03-28-23, 09:44 PM
#12
Senior Member
Join Date: Apr 2005
Location: Ann Arbor, MI
Posts: 16,869
Bikes: 1980 Masi, 1984 Mondonico, 1984 Trek 610, 1980 Woodrup Giro, 2005 Mondonico Futura Leggera ELOS, 1967 PX10E, 1971 Peugeot UO-8
Mentioned: 49 Post(s)
Tagged: 0 Thread(s)
Quoted: 1854 Post(s)
Liked 661 Times
in
504 Posts
But without changing the insulator I would probably stick with what SON has already worked out. If we go to a different protection system all bets are off and let teh innovations begin.
03-29-23, 03:03 AM
#13
Senior Member
Join Date: Aug 2010
Location: Madison, WI
Posts: 11,182
Bikes: 1961 Ideor, 1966 Perfekt 3 Speed AB Hub, 1994 Bridgestone MB-6, 2006 Airnimal Joey, 2009 Thorn Sherpa, 2013 Thorn Nomad MkII, 2015 VO Pass Hunter, 2017 Lynskey Backroad, 2017 Raleigh Gran Prix, 1980s Bianchi Mixte on a trainer. Others are now gone.
Mentioned: 47 Post(s)
Tagged: 0 Thread(s)
Quoted: 3454 Post(s)
Liked 1,454 Times
in
1,133 Posts
I suspect the OP is not coming back.
03-29-23, 08:40 AM
#14
Full Member
All wires create some heat when carrying current. The wire temperature tends to increase because of this self-heating, and the wire is cooled by head conduction, radiation of heat from warmer places to cooler places, and airflow. For every wire in every setting there is an amount of current which will melt it or otherwise destroy it. THAT is the limit of what a wire can take, but it is nearly impossible to predict. Tables of wire usage (sometimes the wire gauge tables that Steve mentions) could list a limit called "ampacity," which (I haven't read this for quite a while) means an amount of current which may cause a practical safe upper limit of current carried by a wire of the specified gauge in a standardied cooling environment. It's really hard to relate this to a real world circuit in a house or on a bicycle. For a wire in teh middle of a large wiring harness, carrying high power and surrounded by nearly no moving air, the ampacity could directly come into play. Such cases might be found in modern cars, airplanes, buildings, or ships, but not likely on a bicycle.
03-29-23, 09:03 AM
#15
Senior Member
Join Date: Apr 2005
Location: Ann Arbor, MI
Posts: 16,869
Bikes: 1980 Masi, 1984 Mondonico, 1984 Trek 610, 1980 Woodrup Giro, 2005 Mondonico Futura Leggera ELOS, 1967 PX10E, 1971 Peugeot UO-8
Mentioned: 49 Post(s)
Tagged: 0 Thread(s)
Quoted: 1854 Post(s)
Liked 661 Times
in
504 Posts
How long is the stock wire?
You can reduce some of that resistance in the smaller wire by reducing length to regain back some (or all) of the losses you incurred by going from the stock wire.
A pretty safe bet would be to reduce wire size by the amount that maintains the wire resistance equal to the stock wire in its full intact length.
For example, if the smaller wire has 20% more resistance per foot you would likely be safe if the new wire was no more than 80% the length of the stock wire.
This would allow at least comparable performance to the stock wire if that full length had been used.
You can reduce some of that resistance in the smaller wire by reducing length to regain back some (or all) of the losses you incurred by going from the stock wire.
A pretty safe bet would be to reduce wire size by the amount that maintains the wire resistance equal to the stock wire in its full intact length.
For example, if the smaller wire has 20% more resistance per foot you would likely be safe if the new wire was no more than 80% the length of the stock wire.
This would allow at least comparable performance to the stock wire if that full length had been used.
03-29-23, 09:29 AM
#16
Full Member
Agree, and the bike owner can always tune the length of the "send and return" leads to achieve a neat and tidy installation, improve servicability, or whatever other useful purpose. Eliminating the return lead and sending the return current through the frame, if metal, can be very tidy, and the resistance of the frame could be lower than that of a discrete return wire.
03-31-23, 06:50 PM
#17
Senior Member
Join Date: Apr 2005
Location: Ann Arbor, MI
Posts: 16,869
Bikes: 1980 Masi, 1984 Mondonico, 1984 Trek 610, 1980 Woodrup Giro, 2005 Mondonico Futura Leggera ELOS, 1967 PX10E, 1971 Peugeot UO-8
Mentioned: 49 Post(s)
Tagged: 0 Thread(s)
Quoted: 1854 Post(s)
Liked 661 Times
in
504 Posts
Soldering should be done right.
04-01-23, 02:39 AM
#19
Senior Member
Join Date: Aug 2010
Location: Madison, WI
Posts: 11,182
Bikes: 1961 Ideor, 1966 Perfekt 3 Speed AB Hub, 1994 Bridgestone MB-6, 2006 Airnimal Joey, 2009 Thorn Sherpa, 2013 Thorn Nomad MkII, 2015 VO Pass Hunter, 2017 Lynskey Backroad, 2017 Raleigh Gran Prix, 1980s Bianchi Mixte on a trainer. Others are now gone.
Mentioned: 47 Post(s)
Tagged: 0 Thread(s)
Quoted: 3454 Post(s)
Liked 1,454 Times
in
1,133 Posts
If your plan is to add a USB charger later, you should factor that into your decision when you wire up the headlamp, as to how you would add the USB charger to the circuit later. I connect my USB charger between the fork crown and headlamp. I have quick connect fittings there (in a previous post I had a link to more detail on this) so that I can remove the USB charger and then plug my lights back into the circuit when I remove the USB charger.
A second common option that I suspect won't work for you is to run a second set of wires to the hub, so the USB charger wires and lighting wires both go to the hub. Some have put both sets of wires into a single Shimano (or SP) connector.
A third but less convenient way that I had not thought of until last week was to add a second wire connector to the hub. I loaned a USB charger to a friend for his bike tour, he installed it this way last week, he has a Shimano hub so he has to unplug the connector to the hub and plug in the other connector each time he switches from lights to USB or back to lights. But you won't want extra wires. He did it this way so that when his trip is over and he no longer has a USB charger on his bike, is original lighting wire remains uncut from the hub to the headlamp.
I have been using a Sinewave Revolution USB charger for touring for seven years, but I bought a Cycle2Charge USB charger this past August. I am leaving shortly for a short bike trip, I will find out on that trip how the Cycle2Charge works for bike touring, but so far I am quite pleased with the Cycle2Charge.
I will not be responding to questions for a few weeks while on that bike tour.
04-03-23, 09:24 AM
#20
Full Member
I have been using a Sinewave Revolution USB charger for touring for seven years, but I bought a Cycle2Charge USB charger this past August. I am leaving shortly for a short bike trip, I will find out on that trip how the Cycle2Charge works for bike touring, but so far I am quite pleased with the Cycle2Charge.
I will not be responding to questions for a few weeks while on that bike tour.
I will not be responding to questions for a few weeks while on that bike tour.
04-18-23, 12:38 PM
#21
Senior Member
Join Date: Aug 2010
Location: Madison, WI
Posts: 11,182
Bikes: 1961 Ideor, 1966 Perfekt 3 Speed AB Hub, 1994 Bridgestone MB-6, 2006 Airnimal Joey, 2009 Thorn Sherpa, 2013 Thorn Nomad MkII, 2015 VO Pass Hunter, 2017 Lynskey Backroad, 2017 Raleigh Gran Prix, 1980s Bianchi Mixte on a trainer. Others are now gone.
Mentioned: 47 Post(s)
Tagged: 0 Thread(s)
Quoted: 3454 Post(s)
Liked 1,454 Times
in
1,133 Posts
Sorry for being off topic (topic is wire thickness), I am answering a question.
Cycle2Charge.
Trip was 13 days (11 days actual travel, took two days off) and 381 miles. (My GPS sometimes reads a bit high, this might be an overstatement.) Natchez Trace is closer to 444 miles, but we did not start in Natchez. Our plans were to rent a vehicle from Enterprise in Nashville, drive to Natchez with our bikes and gear. But after we priced and planned the trip, Enterprise stopped renting vehicles to go to Natchez, or anywhere else from Nashville for that month. We rented from someone else and that was to drop off the vehicle in Jackson. I did use my phone on the days we did not travel, but did not use the GPS those days.
EDIT: Looking at this days later, I realize I screwed up, trip was 11 days of travel, two zero distance days, total of 13 days. I corrected the error in the above paragraph that previously said "Trip was 11 days (9 days actual travel, took two days off)"
This was a very relaxed trip, my touring partner is still recovering from a bad crash that involved surgeries. Only two days were longer than 40 miles. I mention that because my last tour before covid, a quarter of my days were over 60 miles and half were over 40 miles. Thus this trip has a lot less rotation of the dynohub than most tours, thus not much dyno energy produced.
I had my GPS on when rolling, a Garmin 64 that runs on AA batteries. I use and recharge NiMH batteries in it. I had a headlamp for my head in the campsite, that uses one AA rechargeable. And used AAA in my taillights, also rechargeable. I did recharge some of the AAA batteries but not all during the trip. And I did charge up my headlamp AA during the trip. But finished the trip with the headlamp and taillights with a partial charge. I did not bother to charge my camera batteries on the trip, I did not take enough photos to need to do so. I had two spares, was on my last spare battery at the end of trip.
On day one, I did not charge any batteries since they were all full. That was the only day I used my dyno powered lights, otherwise those lights were off.
I use a Voltaic powerbank that has a capacity of 44 watt hours. It started out the trip full, finished the trip with three of four charge indicators lit, thus more than half full but those charge indicators do not really mean much.
Thus, I ended the trip with less of a charge in the powerbank and with other batteries not full, but overall it was not too far behind from being fully self sustainable on power for the trip of a week and a half. I think if I only turned on my phone to check forecasts once a day and turned if off, that I probably would have been self sustainable for electric power and could have finished the trip with all batteries fuller. I never plugged into an outlet on the trip.
The Cycle2Charge does not start charging batteries until you are up to about 7 mph. And when slowing down, it quits at about 6 or 6.5 mph. The northern part of Natchez Trace is quite hilly and some days I spent a lot of time pedaling up hills at a slow enough speed that I got no charge out of it. That said, at that slow speed, no other charger would produce much, so I do not see that as a downside. But it does mean that a lot of hours on a bike trip, you are pedaling but not making much if any power. There was one day that was on a detour almost the entire day, I probably had less than one hour of speed over 7 mph that day since so much of the time was on the uphill side of the steep hills.
Am I happy I bought the Cycle2Charge? Yes. I will use it on future tours.
I loaned my Sinewave Revolution to my touring partner to use on his bike, and he never used it, he left his phones off most days and did not use a GPS. When he had an opportunity to charge up his powerbank from an outlet, he did so. But I wanted to see how close I was to self sustainable I was, so I intentionally never plugged in. I am not really sure how water proof the Cycle2Charge is, so on future tours I might bring the Sinewave along as a spare.
I previously wrote up my thoughts on the Cycle2Charge when I first bought it, posted those thoughts on a different forum. On that forum, I am Mickeg. I do not think a non-member can see the graphics, so I included one graphic below, this compares Sinewave Revolution to the Cycle2Charge, and a few others.
Cycle2Charge charging unit
On that forum I also wrote up a thread on my power usage on my 2019 five week long tour with the Sinewave. That is on a S&S coupled bike, thus I have to disassemble the bike before and after a trip for shipping, thus skipped using any dyno powered lights on that bike. Link is:
Electrics that I use for bike touring - what works for me.

It is a bit hard to find the Cycle2Charge in the photo because I am not using it as a stem cap, it is below the handlebar. But if you follow the coiled cord downwards, you will see where the USB end is plugged into it. It is mounted on my handlebar bag bracket that is on a second lower stem. This is not my S&S coupled bike, I have dyno powered lights on it.

Trip was 13 days (11 days actual travel, took two days off) and 381 miles. (My GPS sometimes reads a bit high, this might be an overstatement.) Natchez Trace is closer to 444 miles, but we did not start in Natchez. Our plans were to rent a vehicle from Enterprise in Nashville, drive to Natchez with our bikes and gear. But after we priced and planned the trip, Enterprise stopped renting vehicles to go to Natchez, or anywhere else from Nashville for that month. We rented from someone else and that was to drop off the vehicle in Jackson. I did use my phone on the days we did not travel, but did not use the GPS those days.
EDIT: Looking at this days later, I realize I screwed up, trip was 11 days of travel, two zero distance days, total of 13 days. I corrected the error in the above paragraph that previously said "Trip was 11 days (9 days actual travel, took two days off)"
This was a very relaxed trip, my touring partner is still recovering from a bad crash that involved surgeries. Only two days were longer than 40 miles. I mention that because my last tour before covid, a quarter of my days were over 60 miles and half were over 40 miles. Thus this trip has a lot less rotation of the dynohub than most tours, thus not much dyno energy produced.
I had my GPS on when rolling, a Garmin 64 that runs on AA batteries. I use and recharge NiMH batteries in it. I had a headlamp for my head in the campsite, that uses one AA rechargeable. And used AAA in my taillights, also rechargeable. I did recharge some of the AAA batteries but not all during the trip. And I did charge up my headlamp AA during the trip. But finished the trip with the headlamp and taillights with a partial charge. I did not bother to charge my camera batteries on the trip, I did not take enough photos to need to do so. I had two spares, was on my last spare battery at the end of trip.
On day one, I did not charge any batteries since they were all full. That was the only day I used my dyno powered lights, otherwise those lights were off.
I use a Voltaic powerbank that has a capacity of 44 watt hours. It started out the trip full, finished the trip with three of four charge indicators lit, thus more than half full but those charge indicators do not really mean much.
Thus, I ended the trip with less of a charge in the powerbank and with other batteries not full, but overall it was not too far behind from being fully self sustainable on power for the trip of a week and a half. I think if I only turned on my phone to check forecasts once a day and turned if off, that I probably would have been self sustainable for electric power and could have finished the trip with all batteries fuller. I never plugged into an outlet on the trip.
The Cycle2Charge does not start charging batteries until you are up to about 7 mph. And when slowing down, it quits at about 6 or 6.5 mph. The northern part of Natchez Trace is quite hilly and some days I spent a lot of time pedaling up hills at a slow enough speed that I got no charge out of it. That said, at that slow speed, no other charger would produce much, so I do not see that as a downside. But it does mean that a lot of hours on a bike trip, you are pedaling but not making much if any power. There was one day that was on a detour almost the entire day, I probably had less than one hour of speed over 7 mph that day since so much of the time was on the uphill side of the steep hills.
Am I happy I bought the Cycle2Charge? Yes. I will use it on future tours.
I loaned my Sinewave Revolution to my touring partner to use on his bike, and he never used it, he left his phones off most days and did not use a GPS. When he had an opportunity to charge up his powerbank from an outlet, he did so. But I wanted to see how close I was to self sustainable I was, so I intentionally never plugged in. I am not really sure how water proof the Cycle2Charge is, so on future tours I might bring the Sinewave along as a spare.
I previously wrote up my thoughts on the Cycle2Charge when I first bought it, posted those thoughts on a different forum. On that forum, I am Mickeg. I do not think a non-member can see the graphics, so I included one graphic below, this compares Sinewave Revolution to the Cycle2Charge, and a few others.
Cycle2Charge charging unit
On that forum I also wrote up a thread on my power usage on my 2019 five week long tour with the Sinewave. That is on a S&S coupled bike, thus I have to disassemble the bike before and after a trip for shipping, thus skipped using any dyno powered lights on that bike. Link is:
Electrics that I use for bike touring - what works for me.
It is a bit hard to find the Cycle2Charge in the photo because I am not using it as a stem cap, it is below the handlebar. But if you follow the coiled cord downwards, you will see where the USB end is plugged into it. It is mounted on my handlebar bag bracket that is on a second lower stem. This is not my S&S coupled bike, I have dyno powered lights on it.
Last edited by Tourist in MSN; 04-25-23 at 04:36 PM.
04-19-23, 05:23 PM
#22
Full Member
Sorry for being off topic (topic is wire thickness), I am answering a question.
Cycle2Charge.
Trip was 11 days (9 days actual travel, took two days off) and 381 miles. (My GPS sometimes reads a bit high, this might be an overstatement.) Natchez Trace is closer to 444 miles, but we did not start in Natchez. Our plans were to rent a vehicle from Enterprise in Nashville, drive to Natchez with our bikes and gear. But after we priced and planned the trip, Enterprise stopped renting vehicles to go to Natchez, or anywhere else from Nashville for that month. We rented from someone else and that was to drop off the vehicle in Jackson. I did use my phone on the days we did not travel, but did not use the GPS those days.
This was a very relaxed trip, my touring partner is still recovering from a bad crash that involved surgeries. Only two days were longer than 40 miles. I mention that because my last tour before covid, a quarter of my days were over 60 miles and half were over 40 miles. Thus this trip has a lot less rotation of the dynohub than most tours, thus not much dyno energy produced.
I had my GPS on when rolling, a Garmin 64 that runs on AA batteries. I use and recharge NiMH batteries in it. I had a headlamp for my head in the campsite, that uses one AA rechargeable. And used AAA in my taillights, also rechargeable. I did recharge some of the AAA batteries but not all during the trip. And I did charge up my headlamp AA during the trip. But finished the trip with the headlamp and taillights with a partial charge. I did not bother to charge my camera batteries on the trip, I did not take enough photos to need to do so. I had two spares, was on my last spare battery at the end of trip.
On day one, I did not charge any batteries since they were all full. That was the only day I used my dyno powered lights, otherwise those lights were off.
I use a Voltaic powerbank that has a capacity of 44 watt hours. It started out the trip full, finished the trip with three of four charge indicators lit, thus more than half full but those charge indicators do not really mean much.
Thus, I ended the trip with less of a charge in the powerbank and with other batteries not full, but overall it was not too far behind from being fully self sustainable on power for the trip of a week and a half. I think if I only turned on my phone to check forecasts once a day and turned if off, that I probably would have been self sustainable for electric power and could have finished the trip with all batteries fuller. I never plugged into an outlet on the trip.
The Cycle2Charge does not start charging batteries until you are up to about 7 mph. And when slowing down, it quits at about 6 or 6.5 mph. The northern part of Natchez Trace is quite hilly and some days I spent a lot of time pedaling up hills at a slow enough speed that I got no charge out of it. That said, at that slow speed, no other charger would produce much, so I do not see that as a downside. But it does mean that a lot of hours on a bike trip, you are pedaling but not making much if any power. There was one day that was on a detour almost the entire day, I probably had less than one hour of speed over 7 mph that day since so much of the time was on the uphill side of the steep hills.
Am I happy I bought the Cycle2Charge? Yes. I will use it on future tours.
I loaned my Sinewave Revolution to my touring partner to use on his bike, and he never used it, he left his phones off most days and did not use a GPS. When he had an opportunity to charge up his powerbank from an outlet, he did so. But I wanted to see how close I was to self sustainable I was, so I intentionally never plugged in. I am not really sure how water proof the Cycle2Charge is, so on future tours I might bring the Sinewave along as a spare.
I previously wrote up my thoughts on the Cycle2Charge when I first bought it, posted those thoughts on a different forum. On that forum, I am Mickeg. I do not think a non-member can see the graphics, so I included one graphic below, this compares Sinewave Revolution to the Cycle2Charge, and a few others.
Cycle2Charge charging unit
On that forum I also wrote up a thread on my power usage on my 2019 five week long tour with the Sinewave. That is on a S&S coupled bike, thus I have to disassemble the bike before and after a trip for shipping, thus skipped using any dyno powered lights on that bike. Link is:
Electrics that I use for bike touring - what works for me.
It is a bit hard to find the Cycle2Charge in the photo because I am not using it as a stem cap, it is below the handlebar. But if you follow the coiled cord downwards, you will see where the USB end is plugged into it. It is mounted on my handlebar bag bracket that is on a second lower stem. This is not my S&S coupled bike, I have dyno powered lights on it.
It really seems like the best deal in a high performing USB dynamo charger for a reasonable price. It seems to be the top performer at medium-high speeds and still one of the better choices at low-speed. The igaro would be my other choice but it's a quite a bit costlier. The new S model by igaro is quite cool. Looks like a bar extension and has integrated capacitors to keep power during intermittent stop.
I'm curious too about the weather resistance of the C2C, hoping for the best but we will see. Is there a reason you didn't mount the cap on the stem? Just preference l?
04-19-23, 06:21 PM
#23
Senior Member
Join Date: Aug 2010
Location: Madison, WI
Posts: 11,182
Bikes: 1961 Ideor, 1966 Perfekt 3 Speed AB Hub, 1994 Bridgestone MB-6, 2006 Airnimal Joey, 2009 Thorn Sherpa, 2013 Thorn Nomad MkII, 2015 VO Pass Hunter, 2017 Lynskey Backroad, 2017 Raleigh Gran Prix, 1980s Bianchi Mixte on a trainer. Others are now gone.
Mentioned: 47 Post(s)
Tagged: 0 Thread(s)
Quoted: 3454 Post(s)
Liked 1,454 Times
in
1,133 Posts
The bike that I used on my last tour, the cockpit below:

The lighting in the above photo is very poor, but you can see a small square LCD to the left of the stem cap.
My heavy touring bike in photo below. The stem cap is underneath the bike computer.

The cockpits are a bit busy, and something like a USB port does not have to be there so I put it elsewhere.
04-22-23, 07:16 AM
#24
Full Member
I have three touring bikes, on one of them I mount the computer above the stem cap. On several I use a DIY bracket to mount my heart rate monitor to the left of the stem cap, that is held on with the stem cap bolt.
The bike that I used on my last tour, the cockpit below:
The lighting in the above photo is very poor, but you can see a small square LCD to the left of the stem cap.
My heavy touring bike in photo below. The stem cap is underneath the bike computer.
The cockpits are a bit busy, and something like a USB port does not have to be there so I put it elsewhere.
I've had some rides now this season and quite pleased with the C2C from what I'm seeing. Its able to keep my EE2 powered indefinitely and collect extra power in my Soshine E2S battery bank.
04-25-23, 02:31 PM
#25

aka Tom Reingold

Join Date: Jan 2009
Location: New York, NY, and High Falls, NY, USA
Posts: 40,498
Bikes: 1962 Rudge Sports, 1971 Raleigh Super Course, 1971 Raleigh Pro Track, 1974 Raleigh International, 1975 Viscount Fixie, 1982 McLean, 1996 Lemond (Ti), 2002 Burley Zydeco tandem
Mentioned: 511 Post(s)
Tagged: 0 Thread(s)
Quoted: 7346 Post(s)
Liked 2,452 Times
in
1,430 Posts
@Tourist in MSN, I always enjoy reading your posts and seeing your pictures.
__________________
Tom Reingold, tom@noglider.com
New York City and High Falls, NY
Blogs: The Experienced Cyclist; noglider's ride blog
�When man invented the bicycle he reached the peak of his attainments.� � Elizabeth West, US author
Please email me rather than PM'ing me. Thanks.
Tom Reingold, tom@noglider.com
New York City and High Falls, NY
Blogs: The Experienced Cyclist; noglider's ride blog
�When man invented the bicycle he reached the peak of his attainments.� � Elizabeth West, US author
Please email me rather than PM'ing me. Thanks.