


Hole Repair Problem..?
 04-09-22, 02:39 PM
#1

Senior Member
Thread Starter

Join Date: Apr 2007
Location: Thunder Bay, Ontario, Canada - burrrrr!
Posts: 11,674
Bikes: 1958 Rabeneick 120D, 1968 Legnano Gran Premio, 196? Torpado Professional, 2000 Marinoni Piuma
Mentioned: 210 Post(s)
Tagged: 0 Thread(s)
Quoted: 1372 Post(s)
Likes: 0
Liked 1,749 Times
in
937 Posts
Hole Repair Problem..?
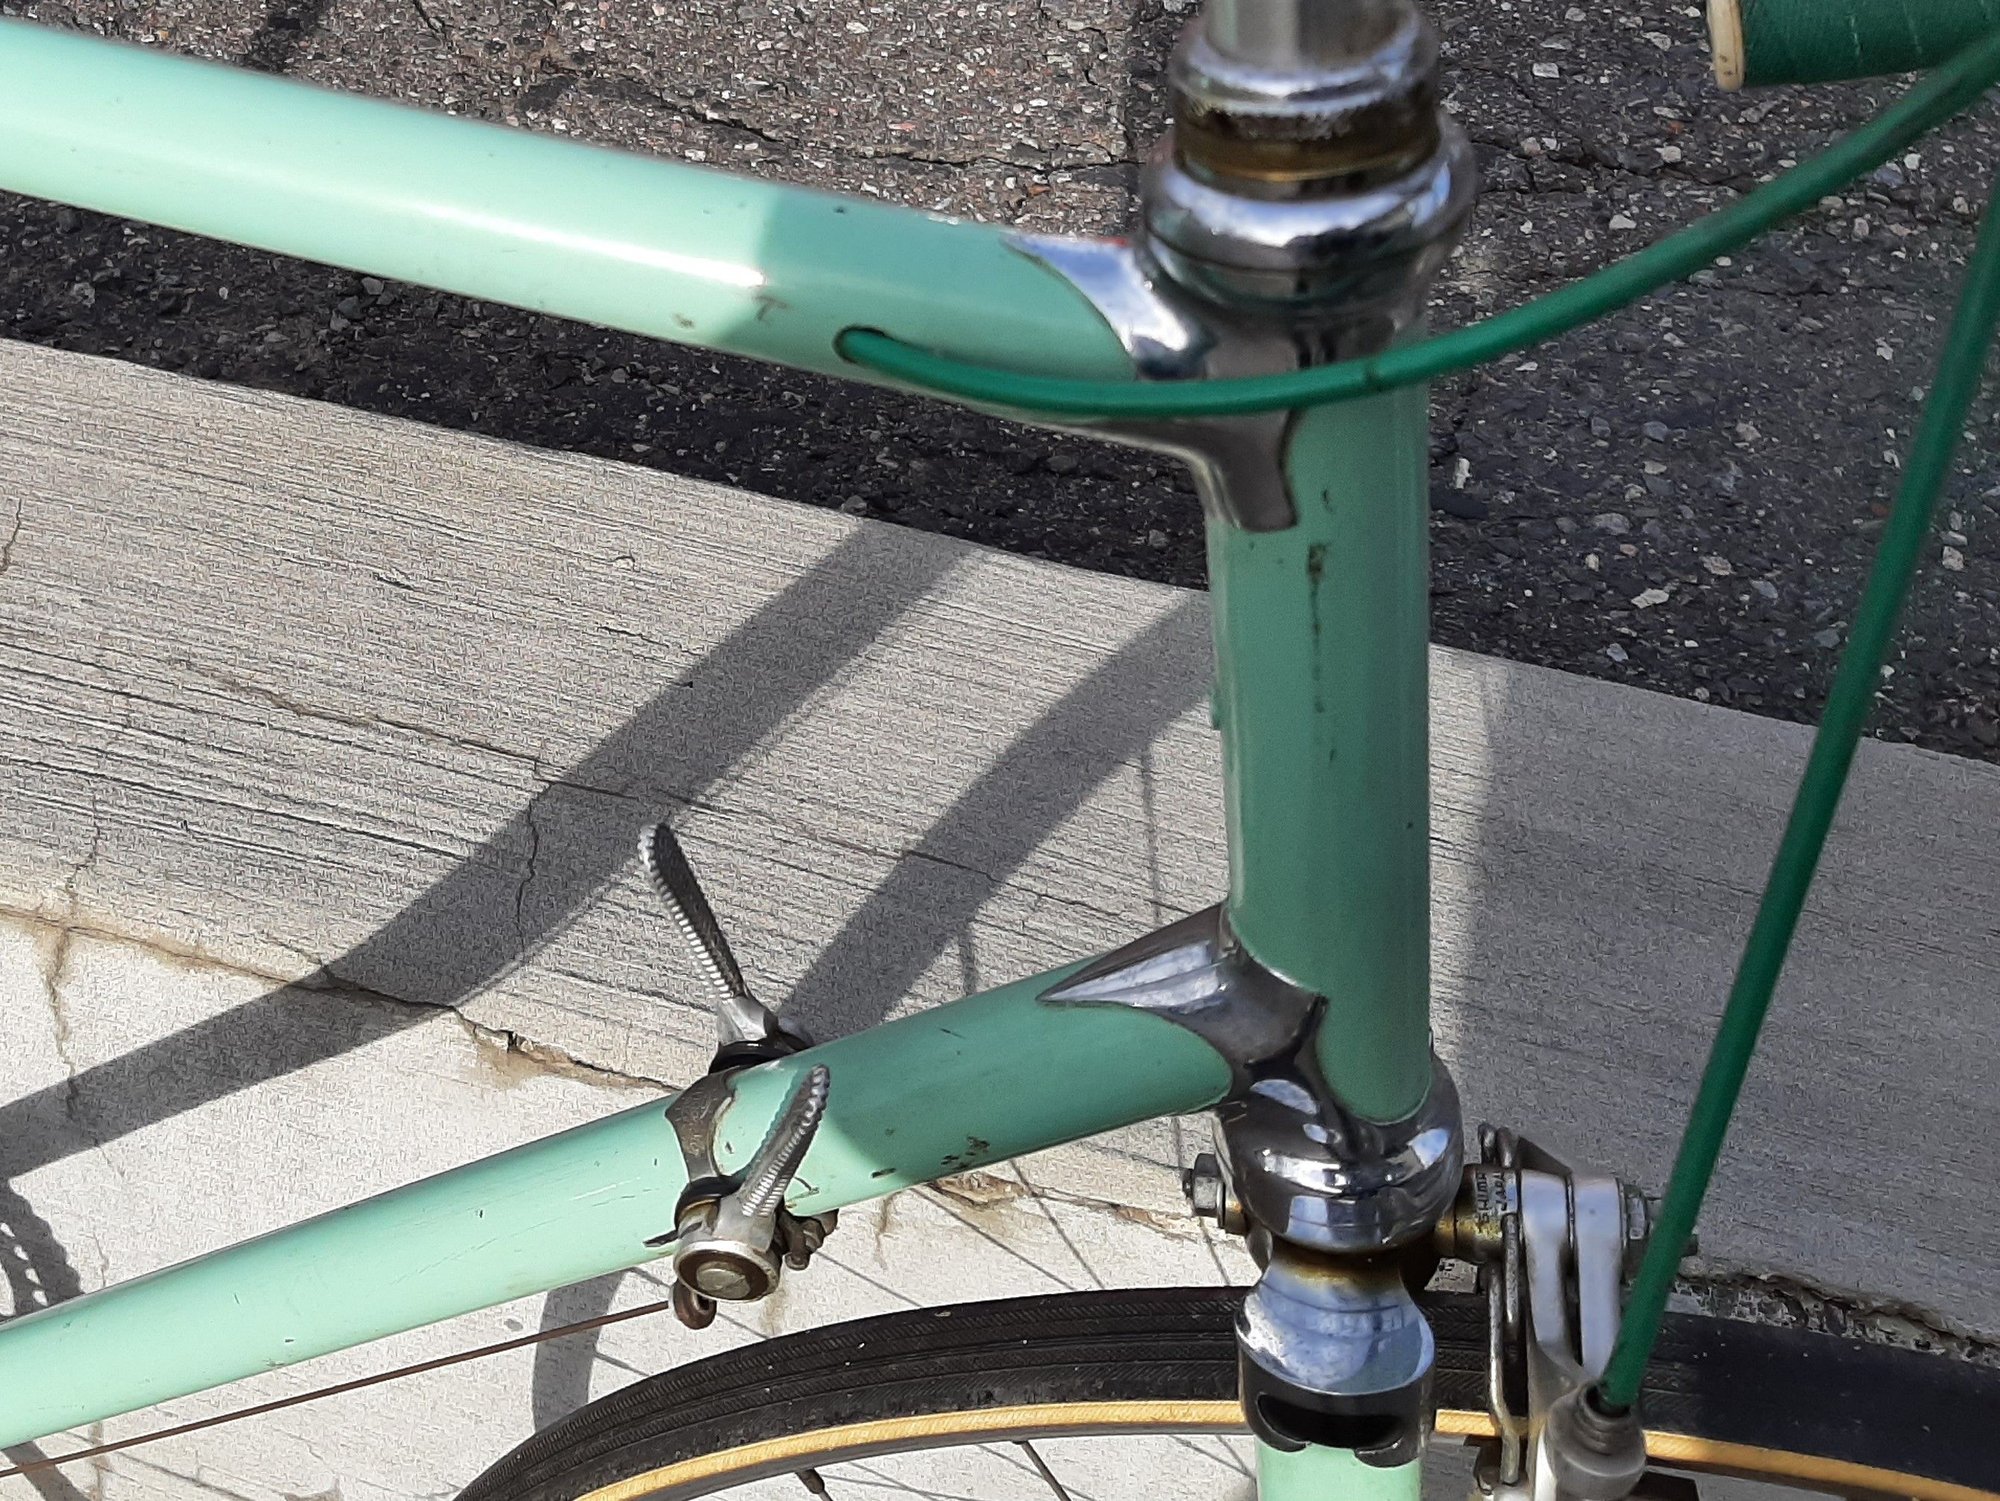
My next project, and I am really looking forward to it, presents a problem. The bike, a 1971 Bianchi high end machine, sports two holes in the top tube that the original owner drilled to allow for an internal brake cable routing. Needless to say, I want to repair the holes, as in plug them up and do so without damaging the lovely chrome plated integral Bianchi head set shell. I am seeking suggestions as to how to do this. The two most likely options are JB Weld (not what I really want to do) or silver solder an alloy plug into place using a small soldering iron and taking great care to NOT damage the chrome. Any suggestions would be appreciated. Thanks...

__________________
"98% of the bikes I buy are projects".
"98% of the bikes I buy are projects".
 04-09-22, 02:47 PM
#2
Happy With My Bikes

Join Date: Sep 2020
Location: Oklahoma
Posts: 2,183
Bikes: Hi-Ten bike boomers, a Trek Domane and some projects
Mentioned: 2 Post(s)
Tagged: 0 Thread(s)
Quoted: 882 Post(s)
Liked 2,304 Times
in
1,114 Posts
Just spitballing... Could you perhaps epoxy the alloy plug instead of soldering it?
I was going to suggest titanium putty as we use it at work for things but after checking the price it would likely be too expensive for this use.
I was going to suggest titanium putty as we use it at work for things but after checking the price it would likely be too expensive for this use.
__________________
"It is the unknown around the corner that turns my wheels." -- Heinz St�cke
"It is the unknown around the corner that turns my wheels." -- Heinz St�cke
 04-09-22, 04:23 PM
#4
Full Member
Join Date: Aug 2017
Location: San Mateo, CA
Posts: 252
Bikes: Bike Friday PRP, Bike Friday NWT, Bromton M6R, 1991 Miyata 914, 1991 Miyata 1000, 1986 Raleigh Portage, many more frames
Mentioned: 11 Post(s)
Tagged: 0 Thread(s)
Quoted: 215 Post(s)
Liked 346 Times
in
181 Posts
That's funny, SwimmerMike had this exact same issue with one of his Bianchis. He took it to a local framebuilder who filled it in with brass, if I'm remembering corectly. Maybe SwimmerMike can chip in on how he got it fixed.
04-09-22, 04:38 PM
#5
Phyllo-buster

Join Date: Jan 2010
Location: Nova Scotia
Posts: 8,844
Bikes: roadsters, club bikes, fixed and classic
Mentioned: 133 Post(s)
Tagged: 0 Thread(s)
Quoted: 2297 Post(s)
Liked 2,048 Times
in
1,253 Posts
Mike Barry used to fill dents with brass. I can't speak to holes but his work was excellent on two of my bikes.
04-09-22, 10:05 PM
#6
Junior Member
An entirely non-heat method, often used as a cheaper repair ( compared to welding ) on car sheet metal body work is to use a high quality body filler. You would want some sort of backing in the hole first to support it. Maybe a carefully placed piece of fibreglass cloth secured inside the hole, around the inner edges, with epoxy. Body filler is easy to sand to match the contours of the top tube.
Last edited by redshift1; 04-09-22 at 10:06 PM. Reason: Grammar
04-09-22, 10:17 PM
#7

Stop reading my posts!

Join Date: Sep 2004
Posts: 12,574
Mentioned: 89 Post(s)
Tagged: 0 Thread(s)
Quoted: 1440 Post(s)
Liked 1,058 Times
in
783 Posts
we call that "Bondo" (a brandname) and yeah it has some fans but...if this was my frame and I wanted a "no-heat" method I would use epoxy putty. There are many colors (if you go to wood/furniture repair sources) but the typical one sold in hardware shops is gray.
I think it's a stronger "patch" than Bondo.
But Do The Prep (roughen surfaces and clean with denatured alcohol) to optimize bonding.
If you shop around (and if it matters) you can find epoxy putty in white, I know Mohawk and maybe Behlens sells a tube in that color.
I think it's a stronger "patch" than Bondo.
But Do The Prep (roughen surfaces and clean with denatured alcohol) to optimize bonding.
If you shop around (and if it matters) you can find epoxy putty in white, I know Mohawk and maybe Behlens sells a tube in that color.
Last edited by unworthy1; 04-09-22 at 10:20 PM.
04-09-22, 10:24 PM
#8
Senior Member

Join Date: May 2010
Location: Bastrop Texas
Posts: 4,467
Bikes: Univega, Peu P6, Peu PR-10, Ted Williams, Peu UO-8, Peu UO-18 Mixte, Peu Dolomites
Mentioned: 13 Post(s)
Tagged: 0 Thread(s)
Quoted: 957 Post(s)
Liked 1,619 Times
in
1,039 Posts
Bondo Time!!! Ha
__________________
 No matter where you're at... There you are... Δf:=f(1/2)-f(-1/2)
No matter where you're at... There you are... Δf:=f(1/2)-f(-1/2)
04-09-22, 11:22 PM
#9
se�or miembro

Join Date: Dec 2018
Location: Pac NW
Posts: 6,602
Bikes: '70s - '80s Campagnolo
Mentioned: 92 Post(s)
Tagged: 0 Thread(s)
Quoted: 3870 Post(s)
Liked 6,461 Times
in
3,194 Posts
04-10-22, 03:54 AM
#10
Senior Member

Join Date: Jun 2006
Location: NW Burbs, Chicago
Posts: 12,048
Mentioned: 201 Post(s)
Tagged: 0 Thread(s)
Quoted: 3011 Post(s)
Liked 3,788 Times
in
1,405 Posts
What's the problem with the holes? But if you insist, anything beyond bondo is overkill.
Likes For iab:
04-10-22, 04:32 AM
#11
Senior Member
Join Date: Feb 2020
Posts: 2,813
Mentioned: 49 Post(s)
Tagged: 0 Thread(s)
Quoted: 1105 Post(s)
Likes: 0
Liked 1,326 Times
in
782 Posts
And if by alloy you mean aluminium it'll need an inert gas for sure and probably special fluxes/prep...
04-10-22, 05:48 AM
#12
Senior Member
Join Date: Jan 2016
Posts: 3,442
Mentioned: 33 Post(s)
Tagged: 0 Thread(s)
Quoted: 872 Post(s)
Liked 2,272 Times
in
1,274 Posts
If the prep work is done correctly, JB weld is great stuff . I have used it for water jacket repairs on outboard motors and it worked amazingly well. I was shocked and after many hours of use , it was still holding strong. I don’t think a torch is necessary . That paint still looks pretty good for its age and a less invasive approach would be better .
Likes For Kabuki12:
04-10-22, 07:28 AM
#13
Bike Butcher of Portland

Join Date: Jul 2014
Location: Portland, OR
Posts: 11,630
Bikes: It's complicated.
Mentioned: 1299 Post(s)
Tagged: 0 Thread(s)
Quoted: 4677 Post(s)
Liked 5,790 Times
in
2,279 Posts
I did a similar job for @Drillium Dude awhile back on his Casati. For small holes I used silver to fill, larger ones brass. Bigger yet I used a bit of brass stock and silvered it in. Of course these were all filed and sanded flush with the rest of the tubing. The elephant int he room is the cost of repainting.
Those holes are far enough away from the chrome, no worries about heat affecting that.
__________________
If someone tells you that you have enough bicycles and you don't need any more, stop talking to them. You don't need that kind of negativity in your life.
If someone tells you that you have enough bicycles and you don't need any more, stop talking to them. You don't need that kind of negativity in your life.
04-10-22, 08:38 AM
#14
Senior Member

Join Date: Mar 2014
Location: City of Angels
Posts: 4,870
Bikes: A few too many
Mentioned: 42 Post(s)
Tagged: 1 Thread(s)
Quoted: 1364 Post(s)
Liked 2,178 Times
in
1,182 Posts
IMO,
I would not use brazing (heat) for a repair such as this. ..you may find that drilling the holes left a burr or high point around the hole, filing it or dimpling it will provide some "extra" hold for the filler. If you do not do this there is no way the Bondo will a stay in place when sanding the filler down. etc.
Find a small peening hammer or pick/scribe and just barley dimple the hole to allow for a thin layer of filler to adhere to the frame.
If this seems too drastic a solution (SMALL dimple), then I would find a suitable sticker or reflective tape and move on, watch for stress fracture (not likely) and it they occur us the more aggressive solution.
Best, Ben
__________________
"EVERY PERSON IS GUILTY OF ALL THE GOOD THEY DID NOT DO"
Voltaire
Voice recognition may sometimes create odd spelling and grammatical errors
"EVERY PERSON IS GUILTY OF ALL THE GOOD THEY DID NOT DO"
Voltaire
Voice recognition may sometimes create odd spelling and grammatical errors
04-10-22, 08:45 AM
#15
Senior Member
If the prep work is done correctly, JB weld is great stuff . I have used it for water jacket repairs on outboard motors and it worked amazingly well. I was shocked and after many hours of use , it was still holding strong. I don’t think a torch is necessary . That paint still looks pretty good for its age and a less invasive approach would be better .
BTW, I patched the fuel tank on my lawn mower with JB weld about 3 years ago. It's still fine.
And, yes, I do have a replacement oil pan for the car and fuel tank for the lawn mower. I just don't want to get into any more projects, unless absolutely necessary.
Last edited by gearbasher; 04-10-22 at 08:49 AM.
04-10-22, 08:58 AM
#16
don't try this at home.

Join Date: Jan 2006
Location: N. KY
Posts: 5,933
Mentioned: 10 Post(s)
Tagged: 0 Thread(s)
Quoted: 972 Post(s)
Liked 509 Times
in
349 Posts
Epoxy putty sounds good. But it needs a backer support. A couple of ideas. Tape over the surrounding paint to keep drips from sticking.
1. can you reach the holes from the seatpost and the headset tube? On the inside of the tube, epoxy in a piece of fiberglass screening or similar. A couple of layers of screening. Apply the putty after this is cured.
2. a thin rod, with a very fine wire or doubled up thread wrapped around the middle. Use a nail with the head cut off? Liquid epoxy on the rod, slide it in the hole endwise, pull it tight against the inside of the tube and secure the wire around a stick until cured.. Oh, and put a couple more drops of epoxy into the hole with the rod in place to wick out along the rod.
It's the same idea as a drywall anchor:
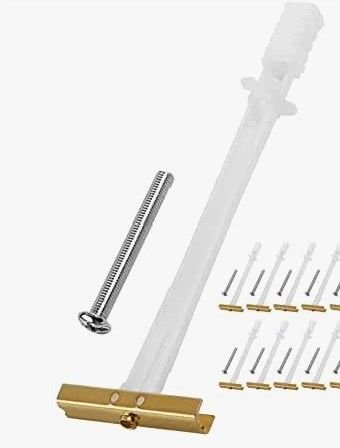
or using a glued in backer for drywall holes:

1. can you reach the holes from the seatpost and the headset tube? On the inside of the tube, epoxy in a piece of fiberglass screening or similar. A couple of layers of screening. Apply the putty after this is cured.
2. a thin rod, with a very fine wire or doubled up thread wrapped around the middle. Use a nail with the head cut off? Liquid epoxy on the rod, slide it in the hole endwise, pull it tight against the inside of the tube and secure the wire around a stick until cured.. Oh, and put a couple more drops of epoxy into the hole with the rod in place to wick out along the rod.
It's the same idea as a drywall anchor:
or using a glued in backer for drywall holes:
Last edited by rm -rf; 04-10-22 at 09:04 AM.
04-10-22, 09:19 AM
#17
Senior Member
Join Date: Mar 2021
Location: Beaverton, OR
Posts: 1,432
Bikes: You had me at rusty and Italian!!
Mentioned: 31 Post(s)
Tagged: 0 Thread(s)
Quoted: 566 Post(s)
Liked 1,045 Times
in
541 Posts
Tap the the hole(s), contoured rubber washer or a dab of silicone and insert appropriate sized button head screw that will insert a few mm into the tube. Not pretty but structurally sound.
04-10-22, 09:41 AM
#18
Senior Member
Join Date: Jun 2006
Location: NW Burbs, Chicago
Posts: 12,048
Mentioned: 201 Post(s)
Tagged: 0 Thread(s)
Quoted: 3011 Post(s)
Liked 3,788 Times
in
1,405 Posts
Stress fracture at that point might be a problem. Sweat and water intrusion is another. Filling it with epoxy won't solve the prior, but will help the latter. I'm not quite sure it's a problem, but I'm definitely not sure it isn't. Could be a case of FUD, but perhaps not. I wouldn't recommend just drilling a hole through the frame to pass cable housing through. What could possibly go wrong?
I did a similar job for @Drillium Dude awhile back on his Casati. For small holes I used silver to fill, larger ones brass. Bigger yet I used a bit of brass stock and silvered it in. Of course these were all filed and sanded flush with the rest of the tubing. The elephant int he room is the cost of repainting.
Those holes are far enough away from the chrome, no worries about heat affecting that.
So again, done with bondo, it is a $10 fix. Dude to brass fill and paint, $1000 fix. Or do nothing. Or follow SurerRosa's lead. Nothing wrong with a sticker. All will yield the same result with different refinement.
04-10-22, 09:53 AM
#19
Senior Member
Join Date: Aug 2013
Posts: 2,321
Mentioned: 35 Post(s)
Tagged: 0 Thread(s)
Quoted: 767 Post(s)
Liked 1,898 Times
in
889 Posts
Depends on how good you are with paint matching, touch-ups, etc., and how much you want to spend.
Trying to tap that thin-walled tubing for a screw is not advisable.
Trying to tap that thin-walled tubing for a screw is not advisable.
Likes For oneclick:
04-10-22, 10:16 AM
#22
Passista
Join Date: Jul 2005
Posts: 7,596
Bikes: 1998 Pinarello Asolo, 1992 KHS Monta�a pro, 1980 Raleigh DL-1, IGH Hybrid, IGH Utility
Mentioned: 5 Post(s)
Tagged: 0 Thread(s)
Quoted: 866 Post(s)
Liked 720 Times
in
395 Posts
I had good results tin soldering cable guides with a 200W iron. But that was on a bare frame.
Likes For Reynolds:
04-10-22, 11:03 AM
#23
Senior Member

Join Date: Jun 2010
Location: Medford MA
Posts: 2,089
Bikes: Ron Cooper touring, 1959 Jack Taylor 650b ladyback touring tandem, Vitus 979, Joe Bell painted Claud Butler Dalesman, Colin Laing curved tube tandem, heavily-Dilberted 1982 Trek 6xx, Ren� Herse tandem
Mentioned: 80 Post(s)
Tagged: 0 Thread(s)
Quoted: 964 Post(s)
Liked 1,451 Times
in
723 Posts
Adding to the dogpile here, my suggestion is to do the internal cable guide up proper-like, brazing in a stainless tube like Joe Bell does.
Doesn't exactly help the OP's predicament however. If I were Randy, I'd make a tight-fitting plug out of something plasticky and JB-Weld it in place. Then touch-up paint/blending/whatever.
Doesn't exactly help the OP's predicament however. If I were Randy, I'd make a tight-fitting plug out of something plasticky and JB-Weld it in place. Then touch-up paint/blending/whatever.
__________________
Owner & co-founder, Cycles Ren� Hubris. Unfortunately attaching questionable braze-ons to perfectly good frames since about 2015. With style.
Owner & co-founder, Cycles Ren� Hubris. Unfortunately attaching questionable braze-ons to perfectly good frames since about 2015. With style.
Likes For scarlson:


 04-10-22, 01:10 PM
#25
Bike Butcher of Portland
Join Date: Jul 2014
Location: Portland, OR
Posts: 11,630
Bikes: It's complicated.
Mentioned: 1299 Post(s)
Tagged: 0 Thread(s)
Quoted: 4677 Post(s)
Liked 5,790 Times
in
2,279 Posts
I have seen dozens of Italian bikes with that exact drilling. I have owned at least 2. I never have seen a problem with it.
So again, done with bondo, it is a $10 fix. Dude to brass fill and paint, $1000 fix. Or do nothing. Or follow SurerRosa's lead. Nothing wrong with a sticker. All will yield the same result with different refinement.
So again, done with bondo, it is a $10 fix. Dude to brass fill and paint, $1000 fix. Or do nothing. Or follow SurerRosa's lead. Nothing wrong with a sticker. All will yield the same result with different refinement.
Perhaps the fact that people with problem frames tend to seek me out biases my perception of the magnitude of the problem. Anecdotal evidence is always hard to account for. We don't have any real statistical evidence.
Bondo won't stop a crack from propagating, but it will stop water and sweat intrusion. That's an area that gets a heavy dose of dripping sweat, so cleaning and filling or covering it makes sense to me as a minimum.
If someone gave me that frame, it was my size, and I wanted to ride it, I'd fill it in the method I posted, but my labor's free to me. I filled several cable guide holes in @Drillium Dude's Casati for aesthetic reasons, and it was nowhere near $1000. Most of my repair jobs get either paint patched (glossy black works out pretty well, for example) or powder coated (~$150 at my local place).
Maybe the best compromise is to fill it with JB weld, carefully sand it down trying to avoid damaging the surrounding paint, then patch, check the area often for signs of cracking, and ride it. Steel should give plenty of warning before failure.
__________________
If someone tells you that you have enough bicycles and you don't need any more, stop talking to them. You don't need that kind of negativity in your life.
If someone tells you that you have enough bicycles and you don't need any more, stop talking to them. You don't need that kind of negativity in your life.