


How to install press-fit dust seals in hub
 12-23-22, 09:32 PM
#1

Newbie
Thread Starter
How to install press-fit dust seals in hub
One of the bonded metal / rubber dust covers on my no-name front hub was somewhat dinged up and not flush when I started repacking the bearings. When it wouldn't seat flush by finger pressure, I finished wrecking it by trying to seat it by gently tapping it with a small hammer and piece of wood. They are too delicate for this. Luckily, I found replacements in the used parts room at LBS. Here's how I persuaded the replacement seal into place without wrecking it.
1 - May be unnecessary, but I put the seal in the freezer to make it as small as possible.
2 - Set the wheel on the bottom of a milk crate so the axle pokes through and the hub is supported
3 - Set the seal on the hub and just barely start it into the seat
4 - Lay a cone wrench flat on top of the seal and press gently to distribute your pressure evenly over most of the circumference. Rotate the wrench and work the seal into place until it is flush.
Last edited by bluemule; 12-24-22 at 09:41 PM.
 12-23-22, 09:36 PM
#2
Really Old Senior Member

How about using a deep socket and lightly tapping "object" into place?
12-24-22, 03:01 PM
#3
Senior Member
Join Date: Feb 2012
Location: Rochester, NY
Posts: 18,071
Bikes: Stewart S&S coupled sport tourer, Stewart Sunday light, Stewart Commuting, Stewart Touring, Co Motion Tandem, Stewart 3-Spd, Stewart Track, Fuji Finest, Mongoose Tomac ATB, GT Bravado ATB, JCP Folder, Stewart 650B ATB
Mentioned: 0 Post(s)
Tagged: 0 Thread(s)
Quoted: 4200 Post(s)
Liked 3,853 Times
in
2,303 Posts
The side of one's cone wrench, which is already on the workbench just to one's side. For the dust caps that have their "inside the cross-sectional shape" face outwards (like Shimano Freehub bodies do) a socket that fits in the "U" of the dust cap works well. But they are one duct cap that I try to not remove. Andy
__________________
AndrewRStewart
AndrewRStewart
Likes For Andrew R Stewart:
12-24-22, 09:50 PM
#4
Newbie
Thread Starter
It's a good idea about the socket, although given my initial experience trying to "tap" the seal in place, I'm leery of using impact versus pressure with tactile feedback.
I hesitated taking the seals out in the first place, but the bearings were very tight and gritty, with one seal was already half out and a bit bent. Now the hub is clean with well seated covers, and I'll be paying attention to adjustment and condition. So when it needs repacked next time, I'll try leaving the seals in place.
I hesitated taking the seals out in the first place, but the bearings were very tight and gritty, with one seal was already half out and a bit bent. Now the hub is clean with well seated covers, and I'll be paying attention to adjustment and condition. So when it needs repacked next time, I'll try leaving the seals in place.
12-24-22, 11:18 PM
#5
Really Old Senior Member
Tapping has worked for me for the last 50+ years in a plethora of mechanical applications. although I'm sure your experience far exceeds mine.
12-24-22, 11:23 PM
#6
SE Wis
Join Date: Apr 2005
Location: Milwaukee, WI
Posts: 10,509
Bikes: '68 Raleigh Sprite, '02 Raleigh C500, '84 Raleigh Gran Prix, '91 Trek 400, 2013 Novara Randonee, 1990 Trek 970
Mentioned: 40 Post(s)
Tagged: 0 Thread(s)
Quoted: 2745 Post(s)
Liked 3,390 Times
in
2,053 Posts
Flat washer and tighten the axle nut
12-25-22, 08:05 AM
#7
Newbie
Thread Starter
12-25-22, 08:24 AM
#8
Newbie
Thread Starter
Nice approach. Gradual, controlled and relentless pressure. Fingers on the washer can give tactile feedback and keep it level to the hub. You can peer at the work from the side to make sure you're seating and not squashing the seal if it gets caught on the edge.
12-25-22, 04:22 PM
#9
WGB
Join Date: Jul 2017
Location: Niagara Region
Posts: 2,917
Bikes: Panasonic PT-4500
Mentioned: 46 Post(s)
Tagged: 0 Thread(s)
Quoted: 1799 Post(s)
Liked 2,334 Times
in
1,378 Posts
Honest questions.
A) was there ever a specific tool to remove the seals?
Asking because I hate trying to clean out long dead dried grease yet if I remove the seals I dent them (meaning ruin them)
B) was there ever a specific tool to re-install the seals? As this thread shows I am not the only one who has this issue. Surely there was a tool bitd.
12-26-22, 04:19 PM
#10
Senior Member

Join Date: Jul 2015
Location: NW Oregon
Posts: 2,975
Bikes: !982 Trek 930R Custom, Diamondback ascent with SERIOUS updates, Fuji Team Pro CF and a '09 Comencal Meta 5.5
Mentioned: 15 Post(s)
Tagged: 1 Thread(s)
Quoted: 1299 Post(s)
Liked 739 Times
in
534 Posts
Honest questions.
A) was there ever a specific tool to remove the seals?
Asking because I hate trying to clean out long dead dried grease yet if I remove the seals I dent them (meaning ruin them)
B) was there ever a specific tool to re-install the seals? As this thread shows I am not the only one who has this issue. Surely there was a tool bitd.
A) was there ever a specific tool to remove the seals?
Asking because I hate trying to clean out long dead dried grease yet if I remove the seals I dent them (meaning ruin them)
B) was there ever a specific tool to re-install the seals? As this thread shows I am not the only one who has this issue. Surely there was a tool bitd.
B) Yes.. a SEAL INSTALLER ... they come in a kit... they are expensive and not used much unless you do that sort of thing for a living... If you have a socket large enough to span the bore of the hub, use the BACKSIDE of the socket against the seal and insert a Drive Extension as a handle, from the Hex side of the socket... use a light hammer and tap multiple times. the outside of the Hub will act as a stop, setting the installed depth of the seal... Inthe case of theCassette type rear hub, the Cassette side seal is inset to a specific depth... a Socket of correct Outer diameter will work fine.. install that seal AFTER you set the bearing balls in place but before installing the Axle with Cne and Jam Nut previously positioned and jammed in place snugly.... some trial/error may be required... they like to walk sideways sometimes... a quick tug with a hooked pick can set them straight.. hopefully!
Seals that press fit to the Axle Cone require a Socket of the correct diameter to span the seal but not contact the Cone during install... if that type of seal gets pushed too far down, the seal will rub the bearing balls and the results will not be good. Once again, a bit of trial and error is called for.
If a seal still gets bent during removal, the Correct 12 point Socket is used to tap out the dent on a smooth metal surface... this can also flare out the seal lips... be careful when choosing the socket.... a 17mm or 19mm 3/8 drive socket usually fits.
If you have a metal lathe, make a seal installer... or don't waste the time and just use the sockets you already have. ;-)
Surprisingly, the backward Socket and extension look very similar to the SEAL INSTALLERS... and seal removers were most likely invented by the seal makers.
Last edited by maddog34; 12-26-22 at 04:45 PM.
12-27-22, 09:13 AM
#11
Newbie
Thread Starter

Removal tool
A fulcrum leg added o the hooked screwdriver might help. Fancier version could have a pivot and clamp to change the angle of the fulcrum leg to adjust for different size hubs.
12-27-22, 09:33 AM
#12
SE Wis
Join Date: Apr 2005
Location: Milwaukee, WI
Posts: 10,509
Bikes: '68 Raleigh Sprite, '02 Raleigh C500, '84 Raleigh Gran Prix, '91 Trek 400, 2013 Novara Randonee, 1990 Trek 970
Mentioned: 40 Post(s)
Tagged: 0 Thread(s)
Quoted: 2745 Post(s)
Liked 3,390 Times
in
2,053 Posts
Pretty much every stamped metal, press fit oil seal, whether automotive, bicycle, or any other application, is damaged during removal. It's the nature of the product and why they sell replacements. Consider them consumables like brake pads or cables.
On a bicycle hub it's not a high stress bearing application and isn't used to keep lube in, so reuse of a slightly damaged one isn't the end of the world.
On a bicycle hub it's not a high stress bearing application and isn't used to keep lube in, so reuse of a slightly damaged one isn't the end of the world.
12-28-22, 12:16 AM
#13
Newbie
Thread Starter
I thought that would be the case, but when I went looking for replacements at online bike supplies and at LBS, I expected to be able to get a half dozen for some reasonable small hardware price. But nobody was selling them online or even at my LBS. Ebay offers a few of them as exotic things of incalculable value. I found KOK International, a manufacturer in Taiwan, should I wanted a container full of 'em. I eventually found what I needed by rummaging LBS used parts. Hence this thread. So far, no one's been able to say, "Oh, yeah, [[i]online bike vendor A, B, C, etc.]'s got em for a buck or two, bags of 10 for shops."
12-28-22, 05:19 AM
#14
SE Wis
Join Date: Apr 2005
Location: Milwaukee, WI
Posts: 10,509
Bikes: '68 Raleigh Sprite, '02 Raleigh C500, '84 Raleigh Gran Prix, '91 Trek 400, 2013 Novara Randonee, 1990 Trek 970
Mentioned: 40 Post(s)
Tagged: 0 Thread(s)
Quoted: 2745 Post(s)
Liked 3,390 Times
in
2,053 Posts
https://www.motion.com/
https://www.mcmaster.com/
https://www.grainger.com/
01-01-23, 10:19 PM
#15
WGB
Join Date: Jul 2017
Location: Niagara Region
Posts: 2,917
Bikes: Panasonic PT-4500
Mentioned: 46 Post(s)
Tagged: 0 Thread(s)
Quoted: 1799 Post(s)
Liked 2,334 Times
in
1,378 Posts
Thank you. I have destroyed a few of these. I only remove when dealing with rims which have sat long enough to have the grease turn to sludge. I have used the methods described but with poor results. I will watch for a (cheap) seal remover.
Ps. Is this the tool you speak of? Shown on left in photo with two new seals.
I have one (somewhere) ....

Ps. Is this the tool you speak of? Shown on left in photo with two new seals.
I have one (somewhere) ....
01-02-23, 10:44 AM
#16
Newbie
Thread Starter
That's just a drawing I made for my post, not an actual tool. It wouldn't be difficult to make one with a screwdriver, hammer, anvil, welder and files. If you work on many different types of bikes, maybe a make set with different fulcrum angle or span to fit different size hubs.
But why reinvent fire? Automotive seal / bearing pullers and installation kit. Just fabricate them at a scale appropriate to bicycle hubs. The disks for the installation tool could be formed with a lip to support the sides of the seal at the start of installation, then changed to a flat face for setting it flush. You wouldn't necessarily have to use impact - hand pressure may suffice.
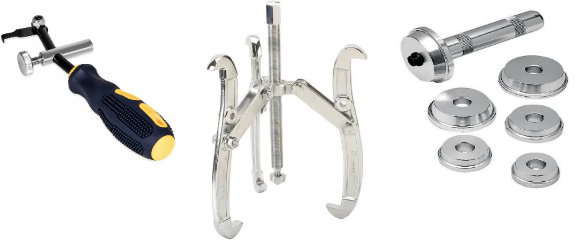
But why reinvent fire? Automotive seal / bearing pullers and installation kit. Just fabricate them at a scale appropriate to bicycle hubs. The disks for the installation tool could be formed with a lip to support the sides of the seal at the start of installation, then changed to a flat face for setting it flush. You wouldn't necessarily have to use impact - hand pressure may suffice.
01-02-23, 11:08 AM
#17
SE Wis
Join Date: Apr 2005
Location: Milwaukee, WI
Posts: 10,509
Bikes: '68 Raleigh Sprite, '02 Raleigh C500, '84 Raleigh Gran Prix, '91 Trek 400, 2013 Novara Randonee, 1990 Trek 970
Mentioned: 40 Post(s)
Tagged: 0 Thread(s)
Quoted: 2745 Post(s)
Liked 3,390 Times
in
2,053 Posts
But why reinvent fire? Automotive seal / bearing pullers and installation kit. Just fabricate them at a scale appropriate to bicycle hubs. The disks for the installation tool could be formed with a lip to support the sides of the seal at the start of installation, then changed to a flat face for setting it flush. You wouldn't necessarily have to use impact - hand pressure may suffice.
https://www.northerntool.com/shop/to...B&gclsrc=aw.ds
01-02-23, 11:24 PM
#18
Newbie
Thread Starter
WGB That bag of seals and nifty puller is exactly the sort of supply I expected would be easy to find at the online bicycle shops and ebay and amazon. But I could find nothing of the sort. Hence my other thread Sourcing bonded dust covers / grease seals. Is that a SUNTOUR logo? Looks vintage…
