


Direct-mount vs traditional derailleur hanger
 08-11-22, 08:20 AM
#1
ignominious poltroon
Thread Starter

Join Date: Jan 2022
Posts: 4,034
Mentioned: 3 Post(s)
Tagged: 0 Thread(s)
Quoted: 2238 Post(s)
Liked 3,429 Times
in
1,793 Posts
Direct-mount vs traditional derailleur hanger
Briefly: I have a new thru-axle frame (Sage Barlow) and need to figure out whether this is traditional or direct-mount. [I mounted a GRX derailleur before I became aware of this, and something is quite wrong, so I suspect it is this (in which case I guess I remove the green linkage).] This is new to me.
 08-11-22, 08:32 AM
#2

Senior Member
Join Date: Feb 2012
Location: Rochester, NY
Posts: 18,071
Bikes: Stewart S&S coupled sport tourer, Stewart Sunday light, Stewart Commuting, Stewart Touring, Co Motion Tandem, Stewart 3-Spd, Stewart Track, Fuji Finest, Mongoose Tomac ATB, GT Bravado ATB, JCP Folder, Stewart 650B ATB
Mentioned: 0 Post(s)
Tagged: 0 Thread(s)
Quoted: 4200 Post(s)
Liked 3,853 Times
in
2,303 Posts
Help us help you with either links to the bike's website or an actual photo of your bike. Andy
__________________
AndrewRStewart
AndrewRStewart
Likes For Andrew R Stewart:
08-11-22, 08:36 AM
#3
ignominious poltroon
Thread Starter
Join Date: Jan 2022
Posts: 4,034
Mentioned: 3 Post(s)
Tagged: 0 Thread(s)
Quoted: 2238 Post(s)
Liked 3,429 Times
in
1,793 Posts
Sorry, I just awoke (west coast) and this was keeping me up all night. The website is here, but mine is a slightly older (deeply discounted) frame. I will get a photo as soon as I can...


Last edited by Polaris OBark; 08-11-22 at 08:49 AM.
08-11-22, 08:51 AM
#4
ignominious poltroon
Thread Starter
Join Date: Jan 2022
Posts: 4,034
Mentioned: 3 Post(s)
Tagged: 0 Thread(s)
Quoted: 2238 Post(s)
Liked 3,429 Times
in
1,793 Posts

This figure is like a cruel joke. Presumably the yellow bit is diagnostic, but I don't know how to interpret it.
08-11-22, 08:59 AM
#5
ignominious poltroon
Thread Starter
Join Date: Jan 2022
Posts: 4,034
Mentioned: 3 Post(s)
Tagged: 0 Thread(s)
Quoted: 2238 Post(s)
Liked 3,429 Times
in
1,793 Posts
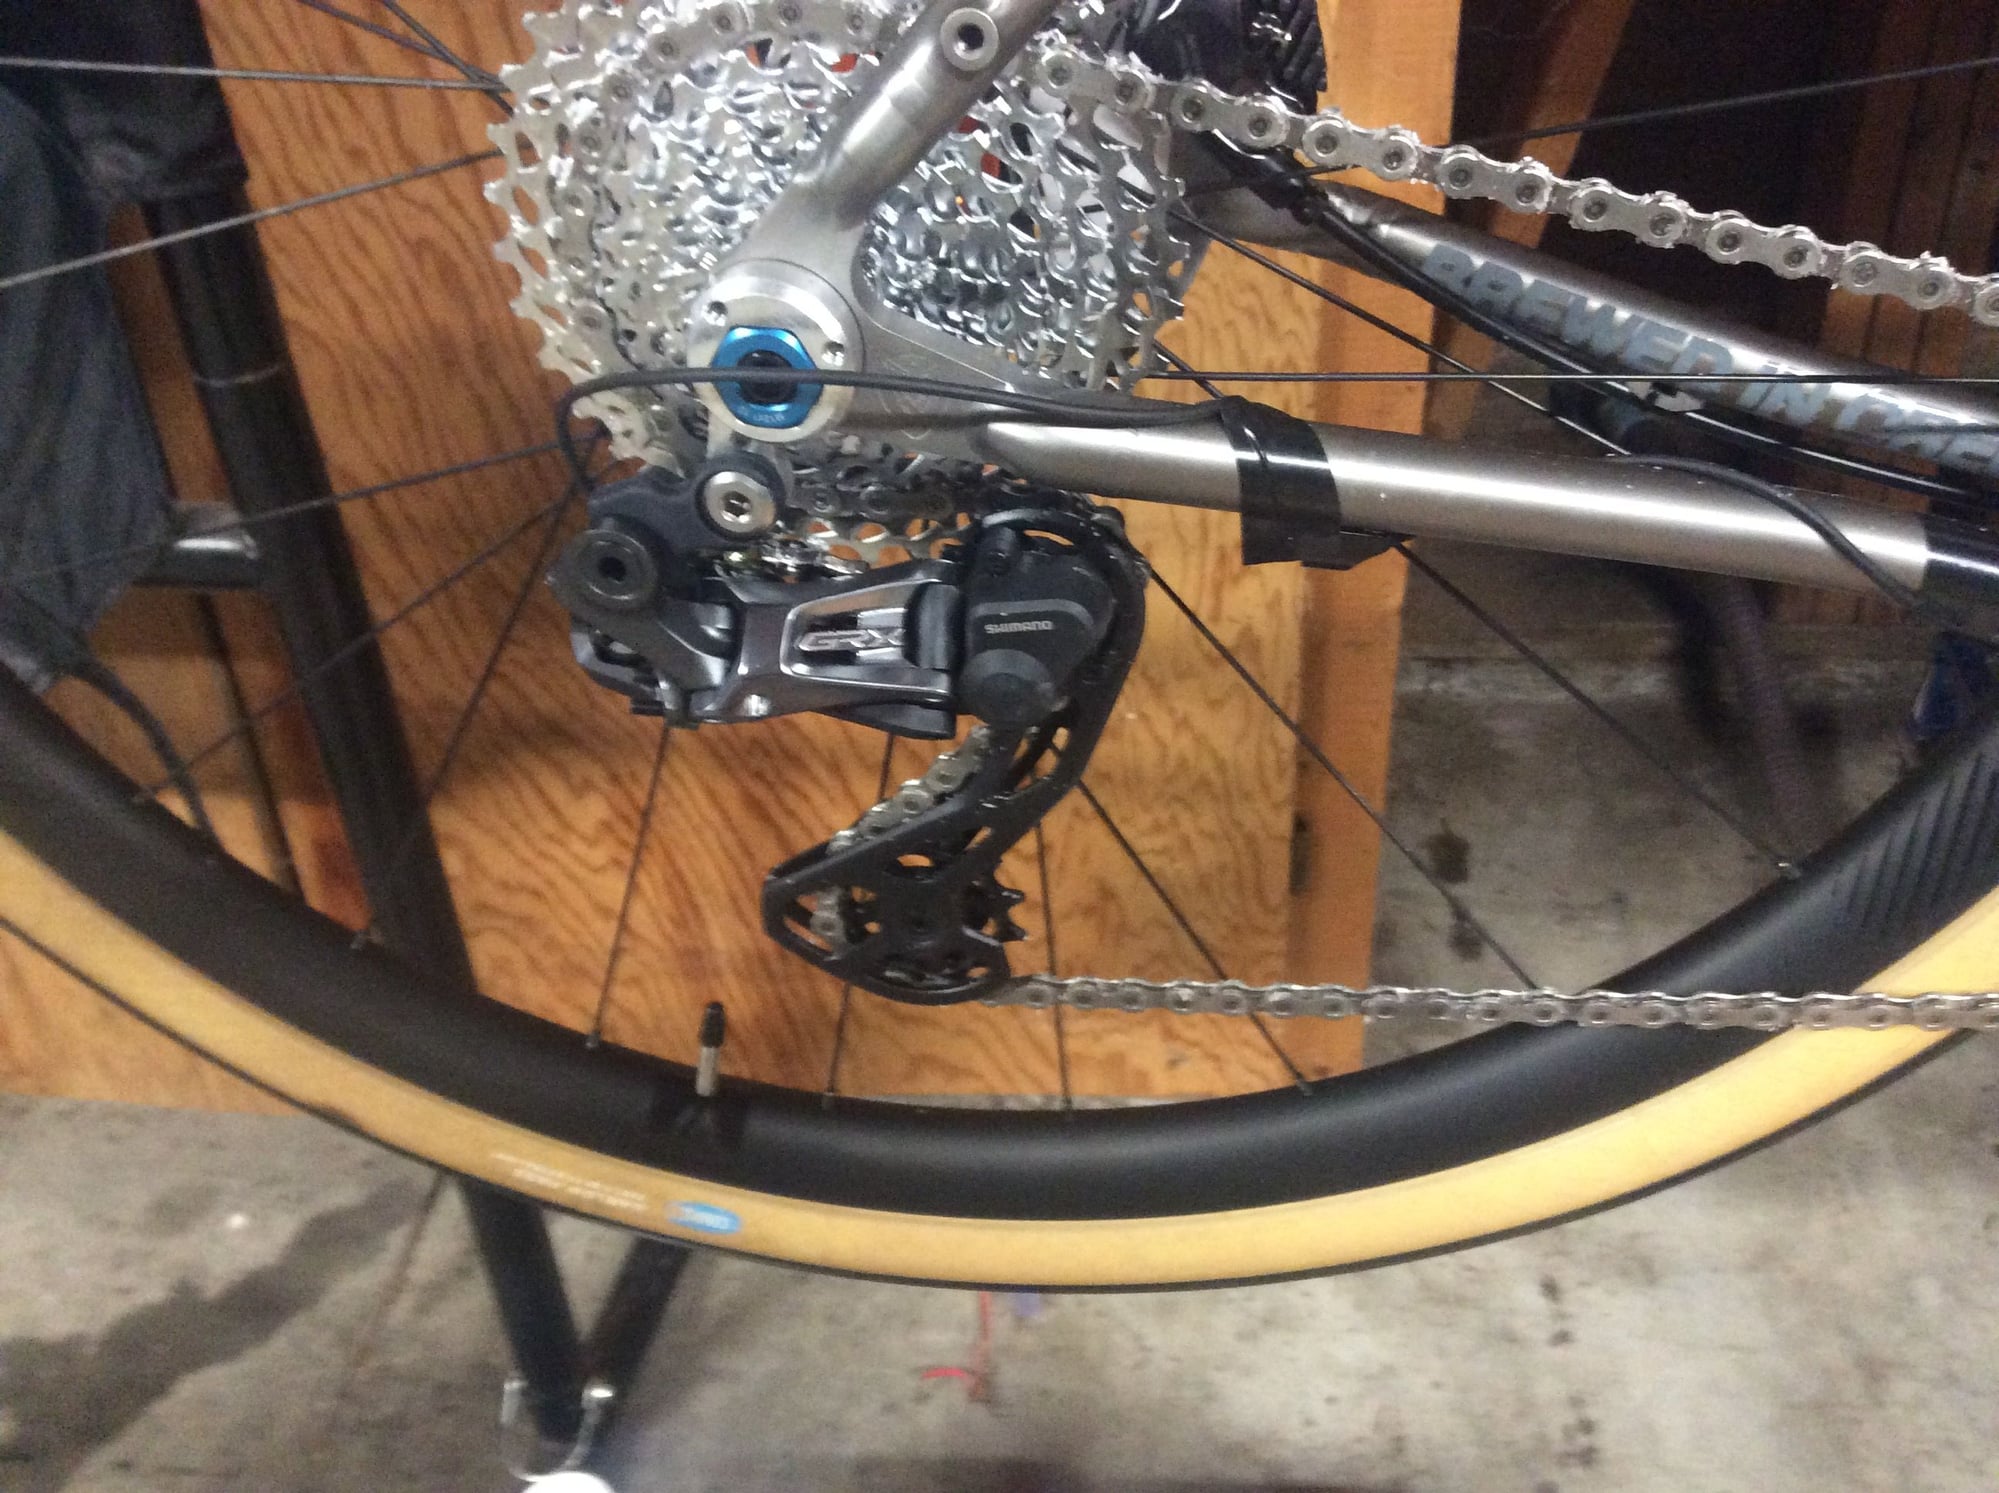
Anyway, I am coming to the conclusion that mine indeed is a standard mount, given the angle of the hanger relative to the seat stay. Is that correct (pictures now posted above).
They appear to use the same hanger on all of their bikes.
Last edited by Polaris OBark; 08-11-22 at 09:27 AM.
08-11-22, 11:27 AM
#6
LR�P=HR
Join Date: Sep 2019
Location: SF Bay Area
Posts: 2,174
Bikes: 1981 Holdsworth Special, 1993 C-dale MT3000 & 1996 F700CAD3, 2018 Cervelo R3 & 2022 R5, JustGo Runt, Ridley Oval, Kickr Bike 8-)
Mentioned: 1 Post(s)
Tagged: 0 Thread(s)
Quoted: 865 Post(s)
Liked 1,203 Times
in
692 Posts
The hanger in the pictures does appear to be a regular old style type.
It's possible to install the RD with the RD stop on the incorrect side of the hanger stop. (for want of a better term)
Barry
OK decided to go take a peek at mine for you.
Your pivot point (RED ARROW) appears to be too low. Supporting my earlier guess you have the stop points incorrect.
Note how my Red/Yellow bolts are almost level with the ground.
Loosen the YELLOW Arrow and move the RD stop point upwards above that of the hangers stop point.
FYI for Direct Mount, You remove the red bolt and toss the part indicated by the Green arrow.
The Red bolt is then used to connect with the Direct Mount type Hanger.
All the best
Barry
Last edited by Barry2; 08-11-22 at 12:04 PM.
Likes For Barry2:
08-11-22, 11:43 AM
#7
Senior Member
If you haven't already seen it, this article from Wheels Manufacturing might help clarify the difference. But I'm afraid it likely doesn't address your specific problem.
https://wheelsmfg.com/blog/standard-...r-hangers.html
One of my bikes has a Shimano RD-R7000 mounted (w/b-Link) to a frame with a standard hanger. I'll take a look at it and see if I see any gross visual differences between your photo above and my setup.
https://wheelsmfg.com/blog/standard-...r-hangers.html
One of my bikes has a Shimano RD-R7000 mounted (w/b-Link) to a frame with a standard hanger. I'll take a look at it and see if I see any gross visual differences between your photo above and my setup.
Likes For Hondo6:
08-11-22, 11:51 AM
#8
ignominious poltroon
Thread Starter
Join Date: Jan 2022
Posts: 4,034
Mentioned: 3 Post(s)
Tagged: 0 Thread(s)
Quoted: 2238 Post(s)
Liked 3,429 Times
in
1,793 Posts
I think it was the B-adjustment bolt (screw) or possibly I didn't hang it with respect to that little tab correctly the first time. Anyway, now it all works.
On to the next bit of drama: My 2mm hex won't come out of the front derailleur limit bolt.
On to the next bit of drama: My 2mm hex won't come out of the front derailleur limit bolt.
08-11-22, 11:56 AM
#9
Senior Member
The chain on yours appears to be loose in the photo. How does it look when chain is installed on the front crank?
Please disregard - I see you found the derailleur mounting problem.
For the stuck hex, I'd suggest wiggling the hex key's long end gently side-to-side gently while pulling on it fairly gently. A drop or two of chain lube applied to the stuck end might help.
Last edited by Hondo6; 08-11-22 at 12:01 PM.
08-11-22, 12:09 PM
#10
LR�P=HR
Join Date: Sep 2019
Location: SF Bay Area
Posts: 2,174
Bikes: 1981 Holdsworth Special, 1993 C-dale MT3000 & 1996 F700CAD3, 2018 Cervelo R3 & 2022 R5, JustGo Runt, Ridley Oval, Kickr Bike 8-)
Mentioned: 1 Post(s)
Tagged: 0 Thread(s)
Quoted: 865 Post(s)
Liked 1,203 Times
in
692 Posts
So did my picture fix it?
Inquiring minds........................
Barry
Inquiring minds........................
Barry
08-11-22, 12:18 PM
#11
ignominious poltroon
Thread Starter
Join Date: Jan 2022
Posts: 4,034
Mentioned: 3 Post(s)
Tagged: 0 Thread(s)
Quoted: 2238 Post(s)
Liked 3,429 Times
in
1,793 Posts
08-11-22, 12:21 PM
#12
ignominious poltroon
Thread Starter
Join Date: Jan 2022
Posts: 4,034
Mentioned: 3 Post(s)
Tagged: 0 Thread(s)
Quoted: 2238 Post(s)
Liked 3,429 Times
in
1,793 Posts
Everything is done now, apart from the handlebar tape, replacing the adjustable stem with a (TBD) fixed stem, and making a new attempt to thread the Di2 rear derailleur wire through the chainstay (having wasted hours on this previously).
08-11-22, 12:23 PM
#13
ignominious poltroon
Thread Starter
Join Date: Jan 2022
Posts: 4,034
Mentioned: 3 Post(s)
Tagged: 0 Thread(s)
Quoted: 2238 Post(s)
Liked 3,429 Times
in
1,793 Posts

Likes For Polaris OBark:
08-11-22, 12:38 PM
#14
Senior Member
I'd guess it should work for Di2 wires, too.
One of the commenters to the video suggested using dental floss vice tape. Probably a good idea - especially if you use the flat (ribbon) type. It has more surface area, and is much stronger than most thread.
Plus, it also makes the cable or wire smell "minty fresh".
08-11-22, 01:09 PM
#15
ignominious poltroon
Thread Starter
Join Date: Jan 2022
Posts: 4,034
Mentioned: 3 Post(s)
Tagged: 0 Thread(s)
Quoted: 2238 Post(s)
Liked 3,429 Times
in
1,793 Posts
Have you seen this?
I'd guess it should work for Di2 wires, too.
One of the commenters to the video suggested using dental floss vice tape. Probably a good idea - especially if you use the flat (ribbon) type. It has more surface area, and is much stronger than most thread.
Plus, it also makes the cable or wire smell "minty fresh".
Likes For Polaris OBark:
08-11-22, 01:46 PM
#16
Senior Member
Yeah, I got it threaded with (mint ribbon) dental floss/shop vac, and also using a steel shifter cable and strong magnet. That, unfortunately, was the easy part. Getting the Di2 wire in is difficult, but getting it out the other hole is what is confounding me. A very helpful person here who sent me some wires also included a couple of cable end-caps. At first this had me puzzled, but then I finally figured out that what you do is thread the brake cable through the end cap and the open end then fits very snuggly on the Di2 wire end. It works perfectly, and is clearly the best option UNLESS your hole is so small you can't get it out again. I was able to get it in by making sure the whole Di2 wire end and cap assembly was perpendicular to the chain stay tube. At any angle less than 90� it won't work, due to the size of the hole. Although I could get it in, getting it out the other end was hopeless. I tried for hours to align the assembly with the hole (perpendicular), but failed. I'm about to get one of those lizard skins chain stay protectors and hide my failure, but I will probably have one more try, because I hate being defeated.
08-11-22, 01:57 PM
#17
ignominious poltroon
Thread Starter
Join Date: Jan 2022
Posts: 4,034
Mentioned: 3 Post(s)
Tagged: 0 Thread(s)
Quoted: 2238 Post(s)
Liked 3,429 Times
in
1,793 Posts
Nah. Di2 really is great. It is a design flaw in the frame. (The newer version of the frame has better wire ports.) There is a boss for a mechanical shifting wire to run outside/under the chain stay. This internal stretch (about 4 or 5 inches) is purely for cosmetic purposes.
