


jig-stand - for a jig that is made out of 80/20 extrusion
 07-08-22, 03:03 PM
#1
Newbie
Thread Starter
jig-stand - for a jig that is made out of 80/20 extrusion
hello dear friends, 
i am musing about the jig-stand - for a jig that is made out of 80/20 extrusion. pithybikes created a rotating jig - that works great with 80/20
TIG Weld Rotating Head On Stand For Bicycle Frame Jig :: or what about the bicycle-framebuilding-the-jig/
pithy:
cf: https://www.pithybikes.com/

image-credits: see the video-clip mentioned above

image-credits: see the video-clip mentioned above
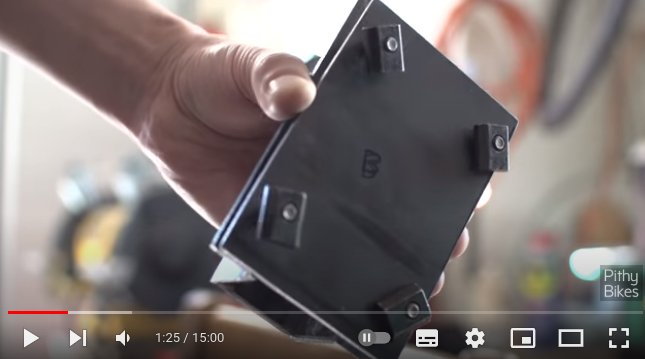
image-credits: see the video-clip mentioned above
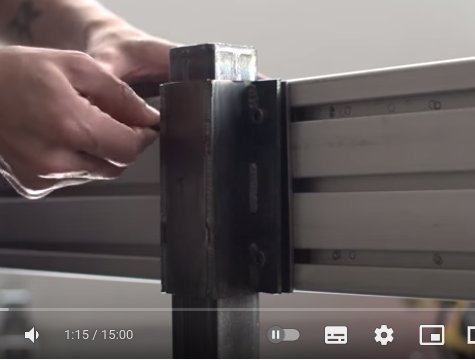
image-credits: see the video-clip mentioned above
TIG Weld Rotating Head On Stand For Bicycle Frame Jig :: or what about the bicycle-framebuilding-the-jig/
background: well i have been looking for some jigs that fits to (for) a jig that is made out of 80/20 extrusion.
the pros: well: this fits very well - and since pithybikes uses 80/20 extrusion - this fits very well
btw: eg like Tanner W makes use of the 80/20 as well - this would fit for all that use tanner W - jigs
btw: See Tanner W - also made out of 80/20 https://www.instructables.com/Bicycl...-Building-Jig/
well I'm a bit concerned on the wear and tear of the tube thats being gripped by his clamp though.
btw: see more options - here we can se other jig-stands: Kirstofer Henry
https://www.flickr.com/photos/blackc...io/6284108707/
see the amhoov-jig-stand: for the arctos stand: https://amhoov.org/2019/08/06/bicycl...lding-the-jig/
what are your ideas - what do you use!?
look forward to hear from you
greetings
apollo
i am musing about the jig-stand - for a jig that is made out of 80/20 extrusion. pithybikes created a rotating jig - that works great with 80/20
TIG Weld Rotating Head On Stand For Bicycle Frame Jig :: or what about the bicycle-framebuilding-the-jig/
pithy:
I get around to TIG welding a rotating head on the stand that holds the bicycle frame jig. Before I had to completely remove the jig from the stand, flip it upside down, and then re-attach it. Now I don't need to do that anymore!
image-credits: see the video-clip mentioned above
image-credits: see the video-clip mentioned above
image-credits: see the video-clip mentioned above
image-credits: see the video-clip mentioned above
TIG Weld Rotating Head On Stand For Bicycle Frame Jig :: or what about the bicycle-framebuilding-the-jig/
background: well i have been looking for some jigs that fits to (for) a jig that is made out of 80/20 extrusion.
the pros: well: this fits very well - and since pithybikes uses 80/20 extrusion - this fits very well
btw: eg like Tanner W makes use of the 80/20 as well - this would fit for all that use tanner W - jigs
btw: See Tanner W - also made out of 80/20 https://www.instructables.com/Bicycl...-Building-Jig/
well I'm a bit concerned on the wear and tear of the tube thats being gripped by his clamp though.
btw: see more options - here we can se other jig-stands: Kirstofer Henry
https://www.flickr.com/photos/blackc...io/6284108707/
see the amhoov-jig-stand: for the arctos stand: https://amhoov.org/2019/08/06/bicycl...lding-the-jig/
what are your ideas - what do you use!?
look forward to hear from you
greetings
apollo
 07-08-22, 07:53 PM
#2

Senior Member
Join Date: Feb 2012
Location: Rochester, NY
Posts: 18,073
Bikes: Stewart S&S coupled sport tourer, Stewart Sunday light, Stewart Commuting, Stewart Touring, Co Motion Tandem, Stewart 3-Spd, Stewart Track, Fuji Finest, Mongoose Tomac ATB, GT Bravado ATB, JCP Folder, Stewart 650B ATB
Mentioned: 0 Post(s)
Tagged: 0 Thread(s)
Quoted: 4201 Post(s)
Liked 3,857 Times
in
2,305 Posts
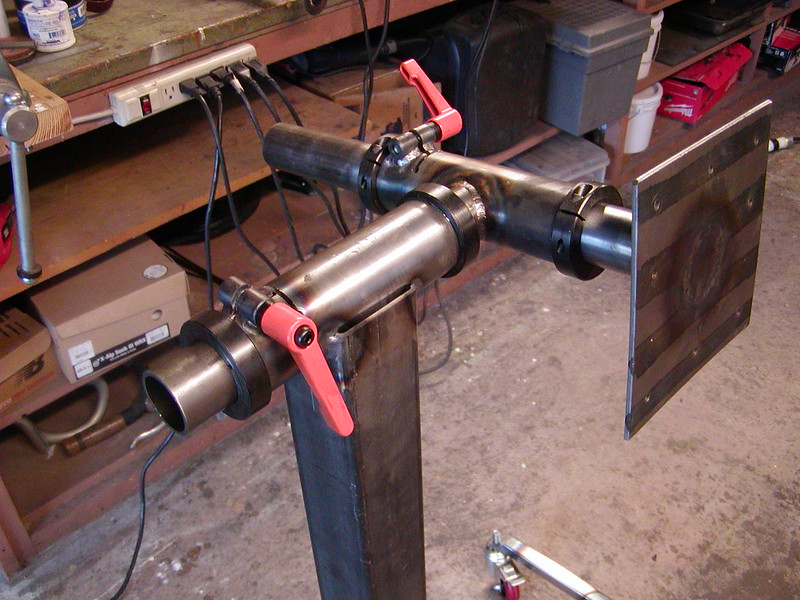
I have a jig mounting device I don't need. It came with my Anvil and is for a bench top. I use a Park stand and made mount for the jig to fit that. Here's an image.

This mount is very solid and the rotation is smooth and tightens up well. I would be using it if it wasn't a bench mount. Let me know if you're interested. Andy
This mount is very solid and the rotation is smooth and tightens up well. I would be using it if it wasn't a bench mount. Let me know if you're interested. Andy
__________________
AndrewRStewart
AndrewRStewart
07-08-22, 09:04 PM
#3
blahblahblah chrome moly

Join Date: Apr 2009
Location: Seattle
Posts: 1,987
Mentioned: 92 Post(s)
Tagged: 0 Thread(s)
Quoted: 1173 Post(s)
Liked 2,569 Times
in
1,073 Posts
EDIT: I didn't see Andrew's reply until after I sent mine. I didn't mean to say my way would be easier than Andrew's, I meant easier than making the Pithy style. If you have the Park stand already.
Original post:
My way might be easier if (1) you have a lathe and (2) you have a spare Park bike repair stand, the professional kind.
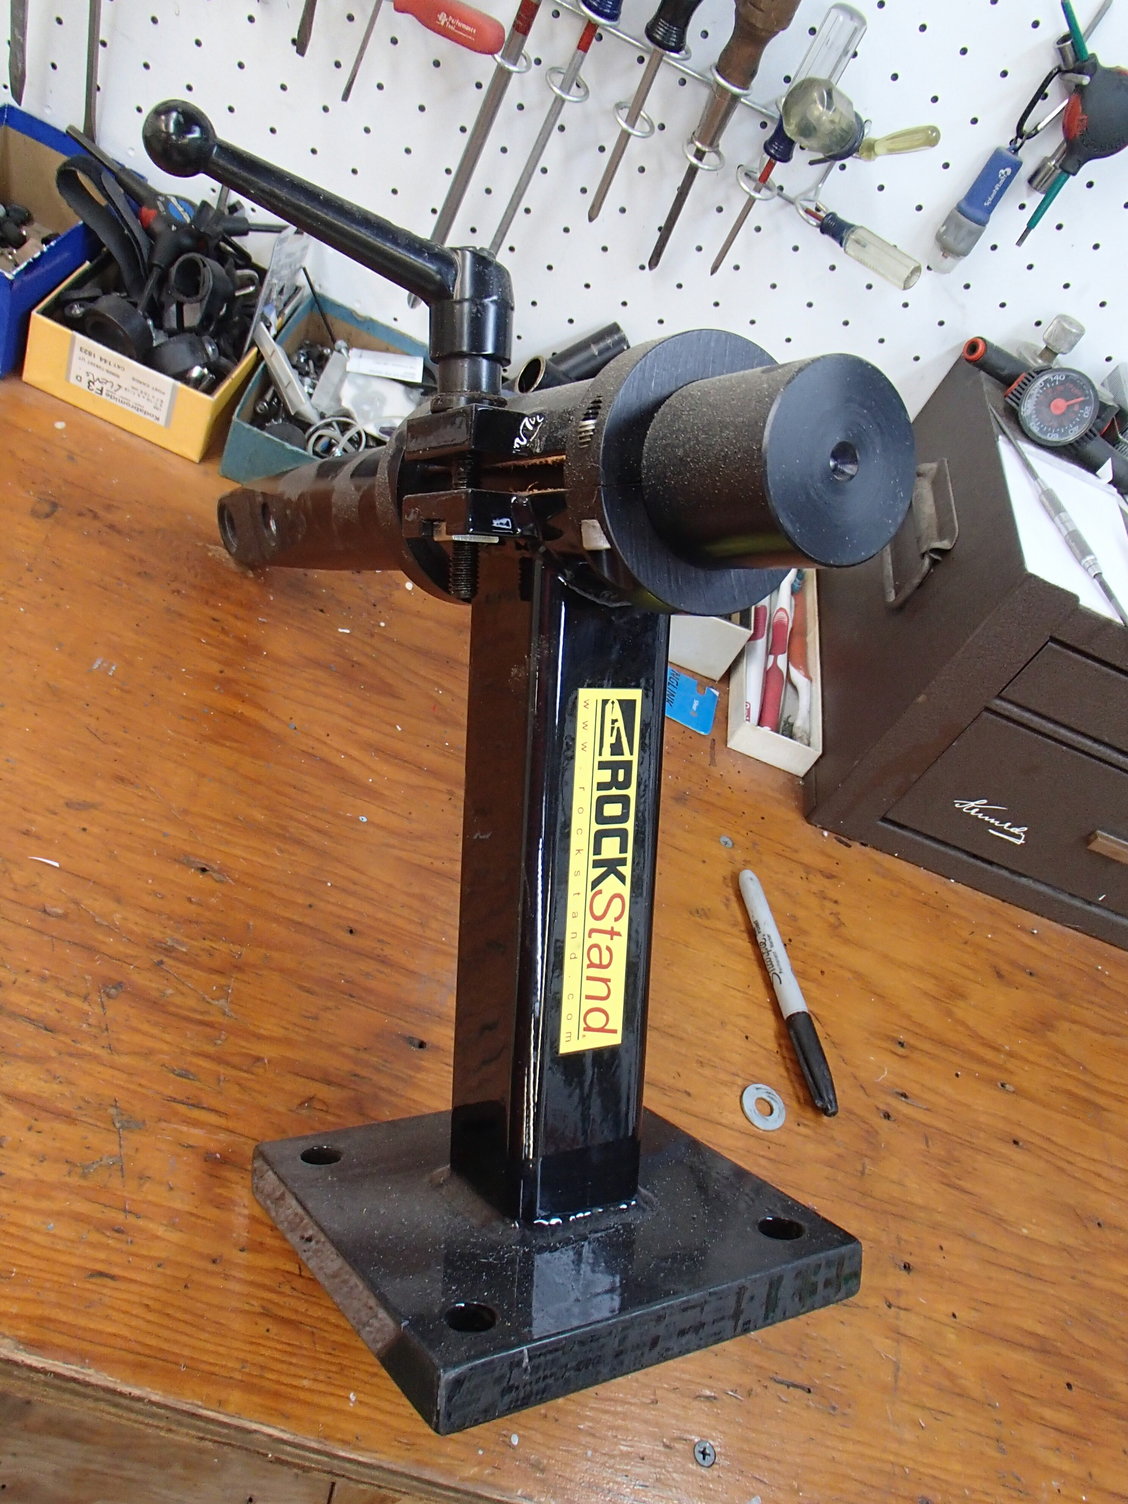
I made an adapter that plugs into the Park stand "receiver" and bolts to the back of the jig.
My jig is solid 1-1/4" thick aluminum, much heavier than any 80/20 style jig I'll bet, about 150lb. (I wouldn't have chosen to make it so heavy but I got it that way for cheap.) Even with all that weight, the Park doodad holds it securely. My Park receiver (this kind) is actually bolted to the wall of my shed, so it's not on a bike stand per se, but I think it would also work fine on a regular Park stand, you know the kind with the heavy steel base at the floor, and an upright pipe that holds the receiver at whatever height you choose.
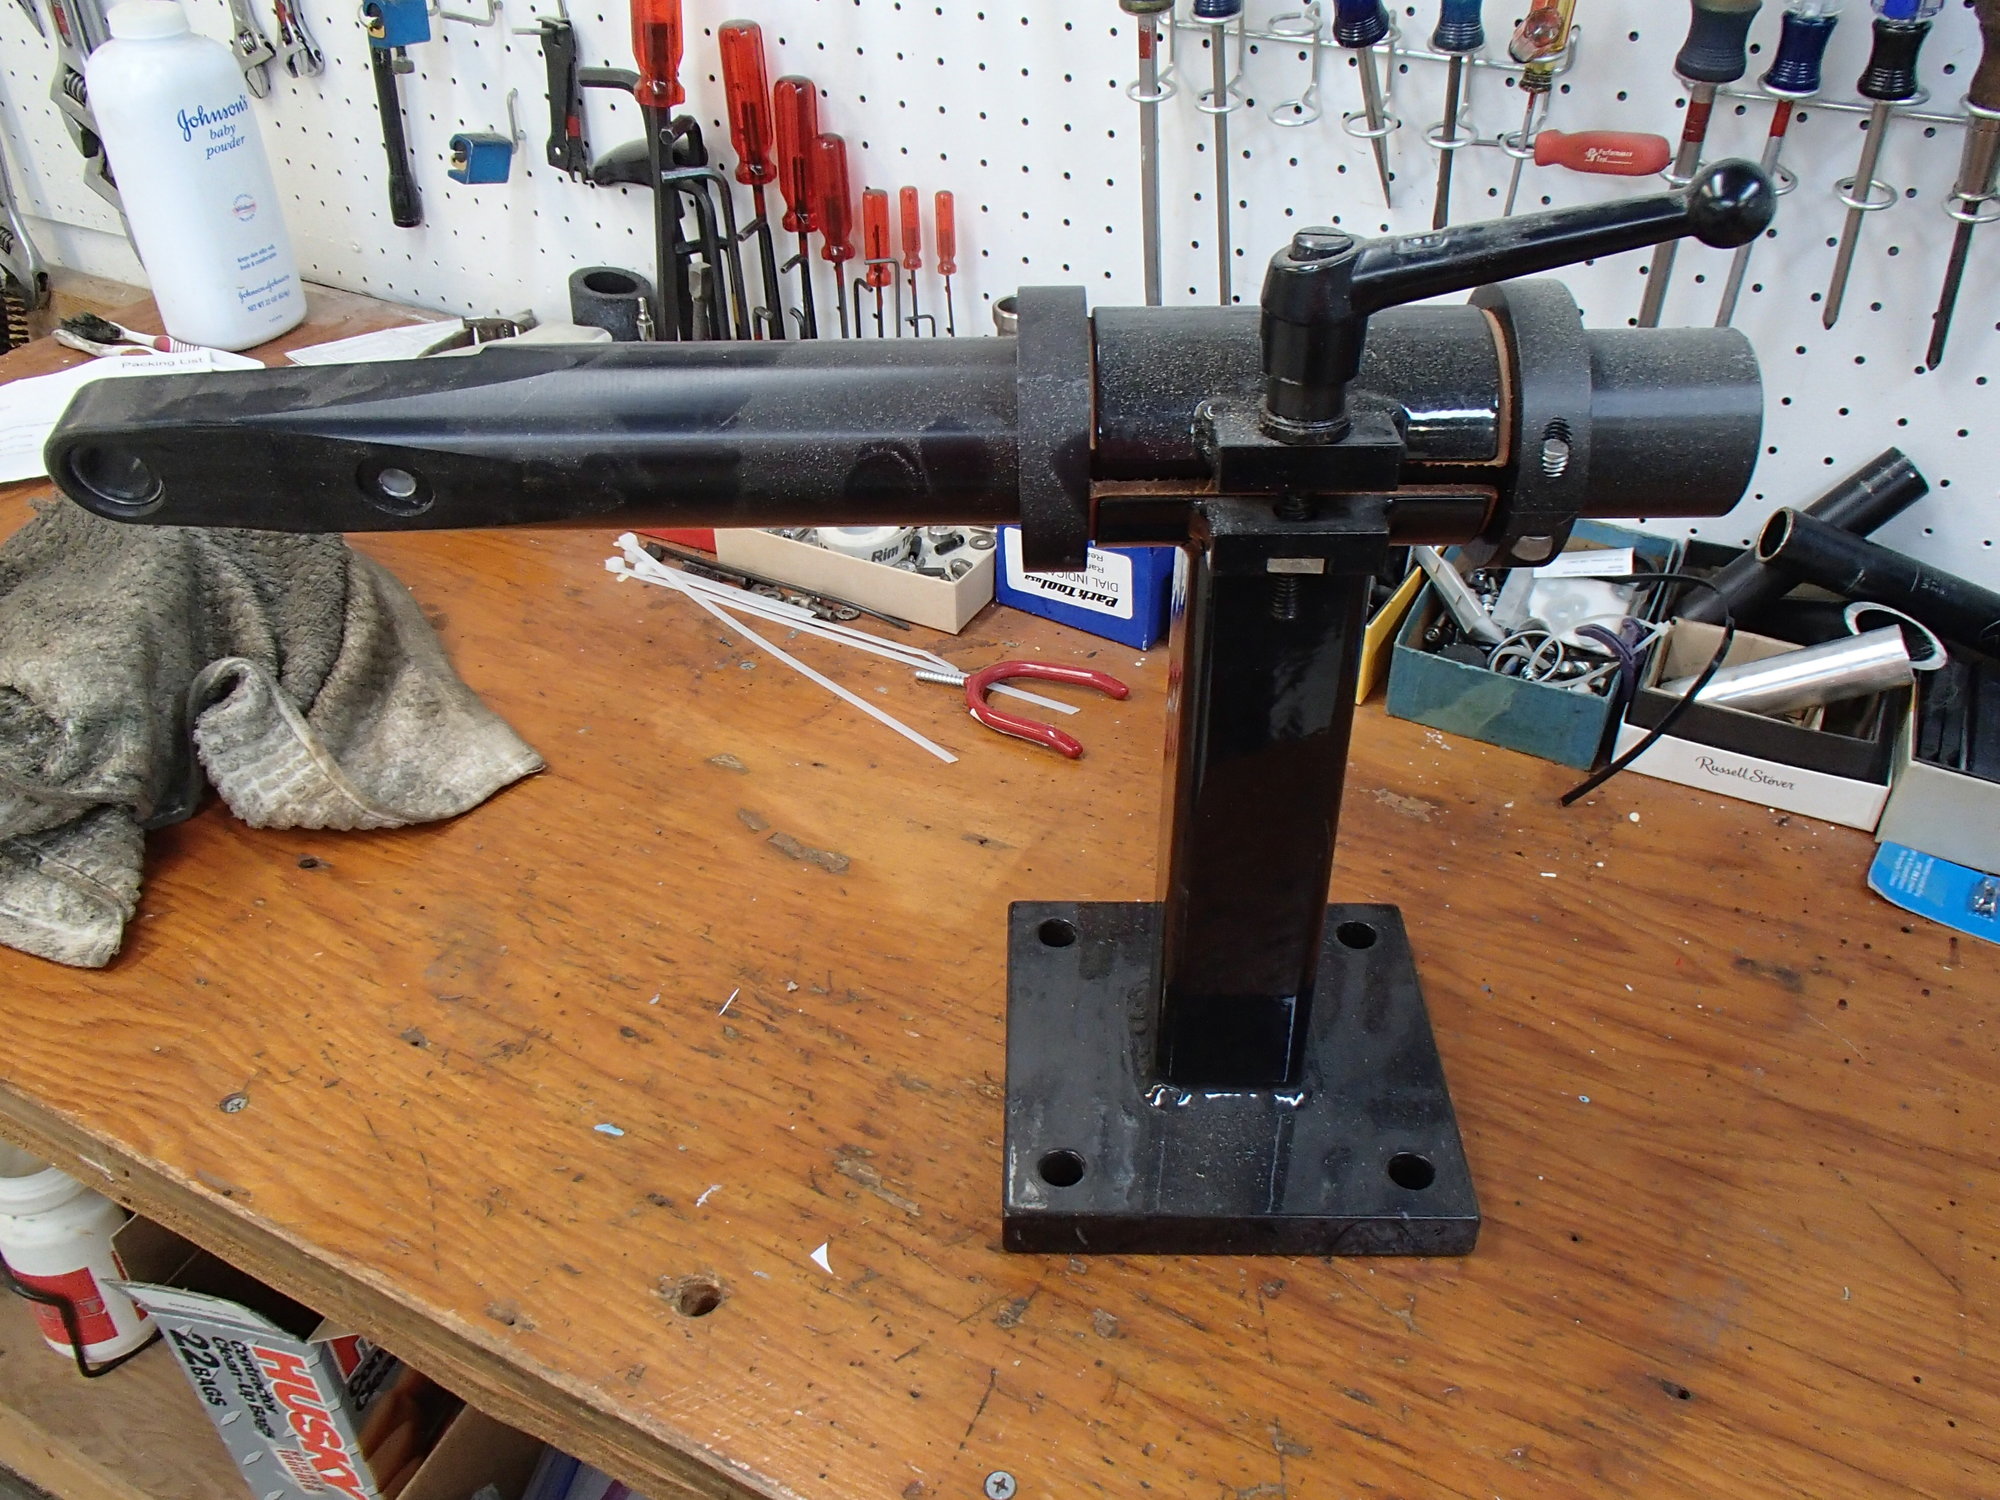
Mine rotates when I want it to, and locks down solid when I don't want it moving.
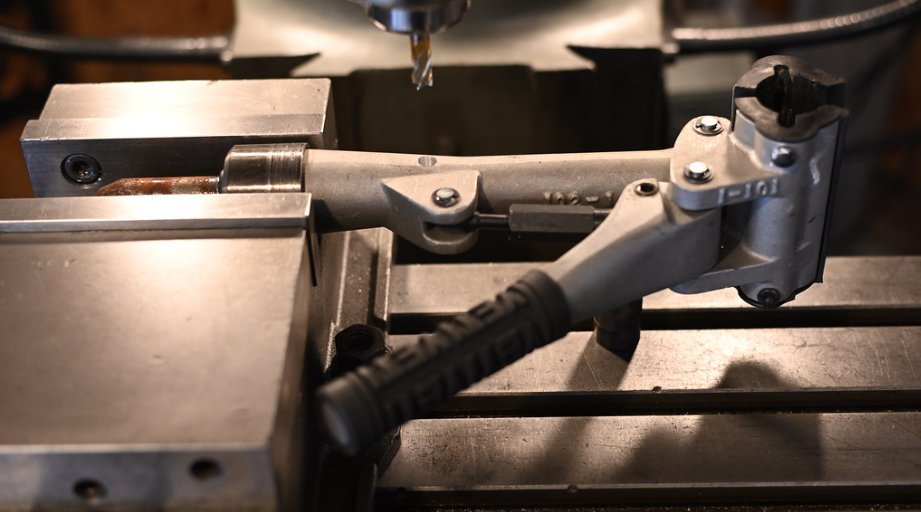
The adapter I made on the lathe, that goes in the Park receiver:
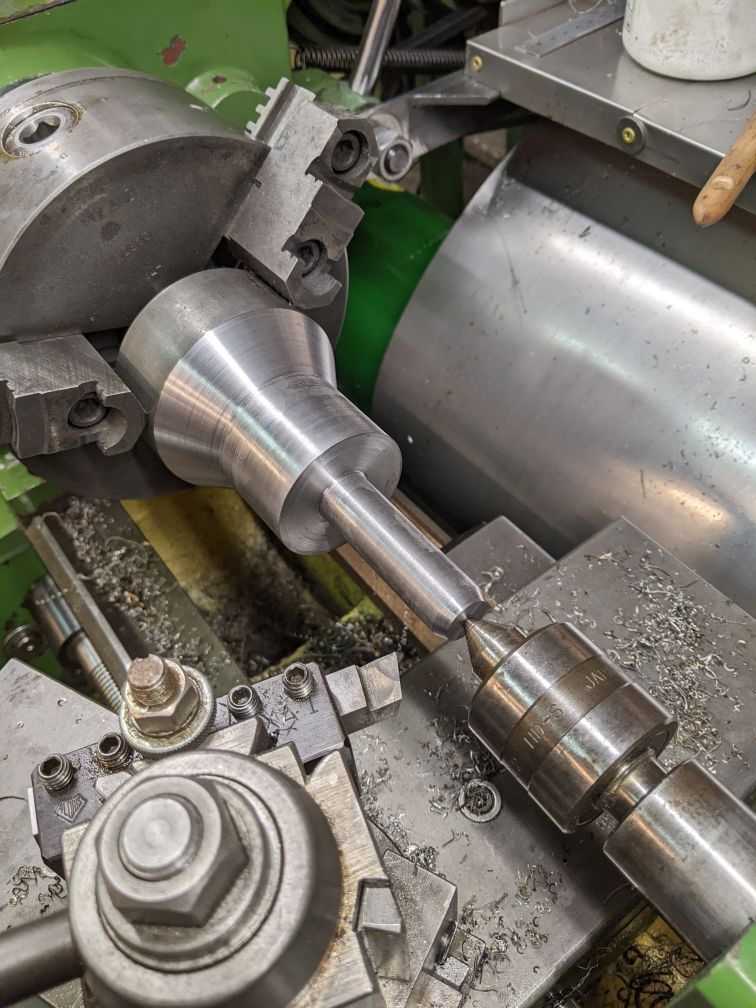
This could also be made by welding pipe to a plate, rather than starting with such a big steel round bar. Not such a mountain of chips in the chip tray that way. But to a man with a new lathe, everything looks like a lathe project.
The park receiver is bolted inside the shed, with a hole thru the shed wall for hanging the jig on the outside wall:

Wacky, I know, but it's the only place I have room for it.
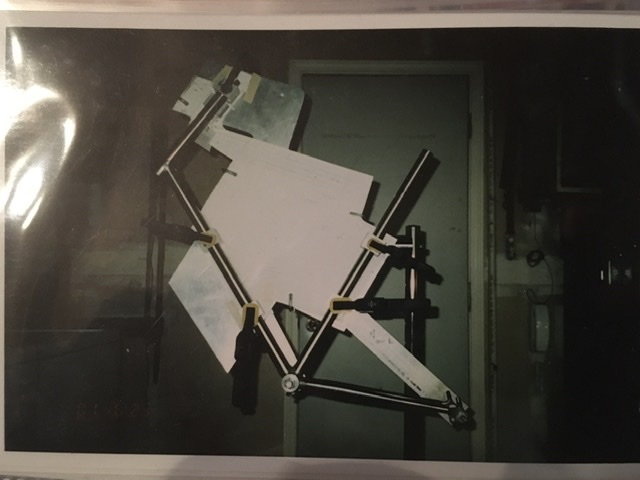
The jig so far, work-in-progress (almost ready to make frames):
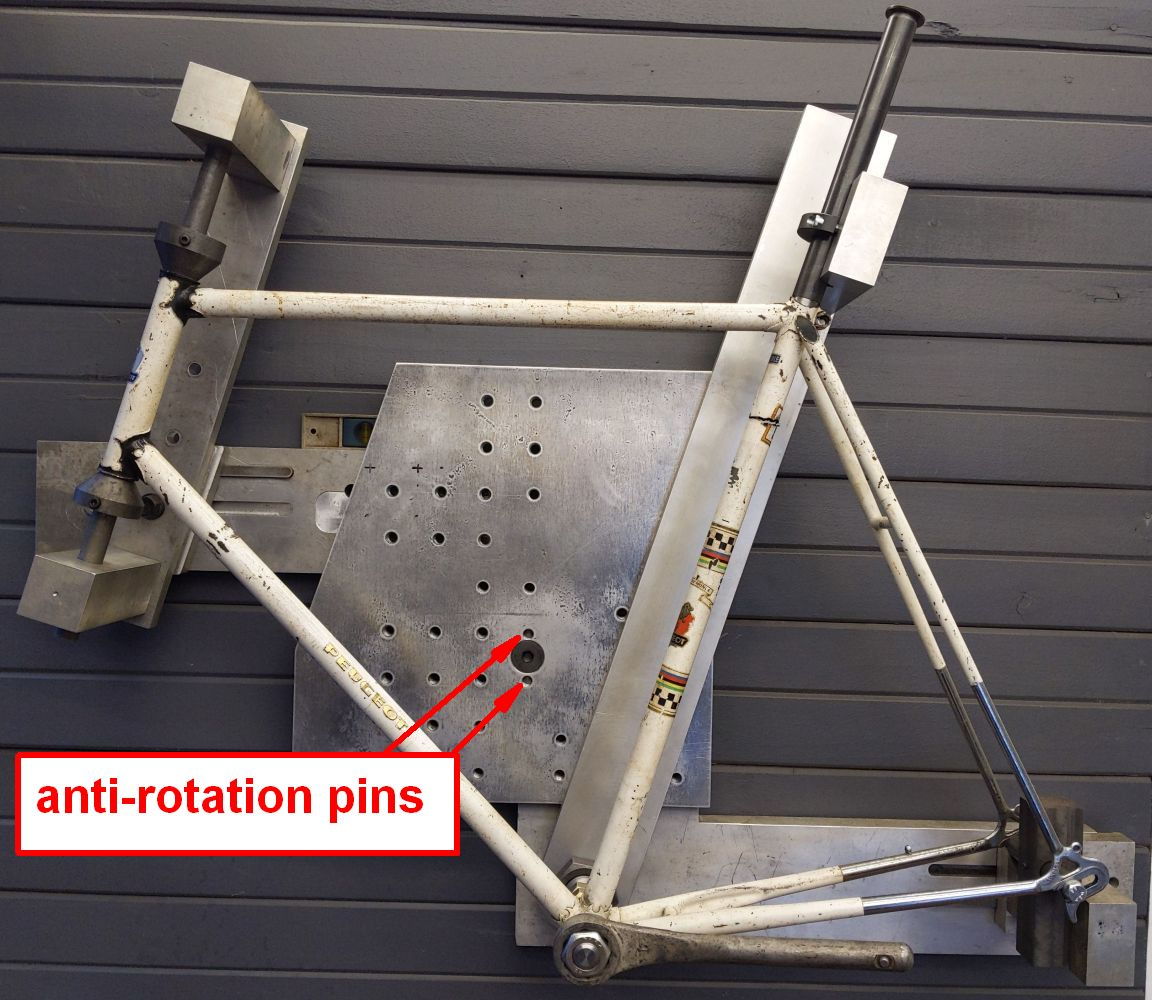
The jig bolts to the lathe-turned adaper with one 3/4" grade-8 bolt, and there are two dowel pins that keep the jig from rotating on the adapter. That way the only place it can rotate is the adapter in the Park receiver, so you can control it and lock it down. If you do it as pipe welded to a plate, you could use, say, 4 smaller bolts, and no dowel pins needed.
The whole jig story (way too many pictures) is in a Flickr album here, for those with too much time on their hands.
Mark B
Original post:
My way might be easier if (1) you have a lathe and (2) you have a spare Park bike repair stand, the professional kind.
I made an adapter that plugs into the Park stand "receiver" and bolts to the back of the jig.
My jig is solid 1-1/4" thick aluminum, much heavier than any 80/20 style jig I'll bet, about 150lb. (I wouldn't have chosen to make it so heavy but I got it that way for cheap.) Even with all that weight, the Park doodad holds it securely. My Park receiver (this kind) is actually bolted to the wall of my shed, so it's not on a bike stand per se, but I think it would also work fine on a regular Park stand, you know the kind with the heavy steel base at the floor, and an upright pipe that holds the receiver at whatever height you choose.
Mine rotates when I want it to, and locks down solid when I don't want it moving.
The adapter I made on the lathe, that goes in the Park receiver:
This could also be made by welding pipe to a plate, rather than starting with such a big steel round bar. Not such a mountain of chips in the chip tray that way. But to a man with a new lathe, everything looks like a lathe project.
The park receiver is bolted inside the shed, with a hole thru the shed wall for hanging the jig on the outside wall:
Wacky, I know, but it's the only place I have room for it.
The jig so far, work-in-progress (almost ready to make frames):
The jig bolts to the lathe-turned adaper with one 3/4" grade-8 bolt, and there are two dowel pins that keep the jig from rotating on the adapter. That way the only place it can rotate is the adapter in the Park receiver, so you can control it and lock it down. If you do it as pipe welded to a plate, you could use, say, 4 smaller bolts, and no dowel pins needed.
The whole jig story (way too many pictures) is in a Flickr album here, for those with too much time on their hands.
Mark B
Last edited by bulgie; 07-08-22 at 09:35 PM.
07-08-22, 09:55 PM
#4
Senior Member
Join Date: Feb 2012
Location: Rochester, NY
Posts: 18,073
Bikes: Stewart S&S coupled sport tourer, Stewart Sunday light, Stewart Commuting, Stewart Touring, Co Motion Tandem, Stewart 3-Spd, Stewart Track, Fuji Finest, Mongoose Tomac ATB, GT Bravado ATB, JCP Folder, Stewart 650B ATB
Mentioned: 0 Post(s)
Tagged: 0 Thread(s)
Quoted: 4201 Post(s)
Liked 3,857 Times
in
2,305 Posts
The Anvil jig I use has a Park stand mount I "borrowed" from one of the Cyclery North jigs i have mentioned before. A local welder did the joining of that stand mount (adapter as Mark says) to a self machined hinge half (that mimics the above imaged stand I don't need). This detail I feel is a good one to try to achieve with a jig stand if possible. Two different axis that it will tilt on. I find myself having to spin and tilt the jig to get at the right spot with the best ease when tacking/brazing. Andy
__________________
AndrewRStewart
AndrewRStewart
07-09-22, 05:45 AM
#5
Senior Member
Join Date: Jan 2013
Location: South Jersey
Posts: 2,266
Mentioned: 18 Post(s)
Tagged: 0 Thread(s)
Quoted: 714 Post(s)
Liked 800 Times
in
475 Posts
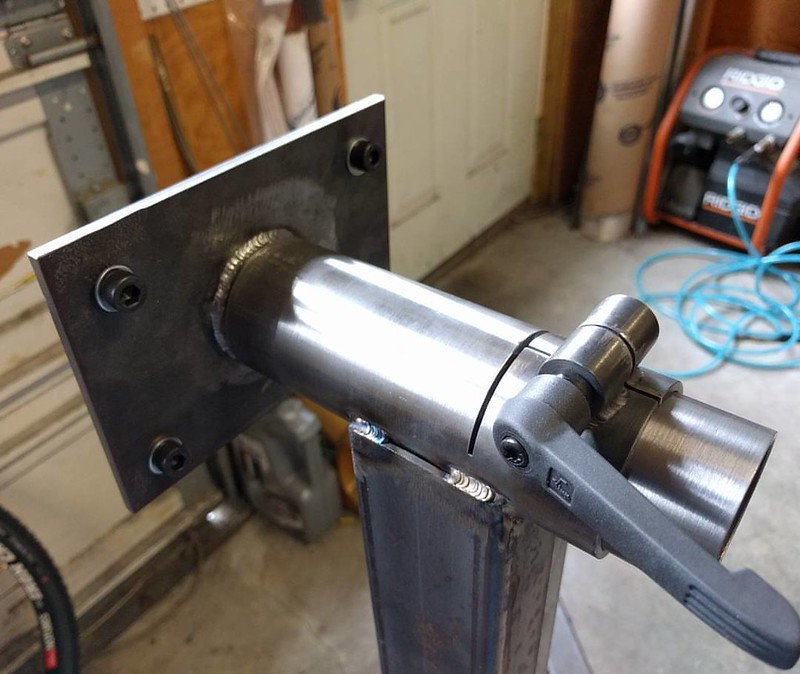
This is how I made the rotating mount for my frame jig. Two pieces of tube and the smaller tube fits inside the larger one. The larger tube is slotted and a seat clamp style collar is welded on to be able to tighten the clamp and lock the position. My only advice would be to bolt the plate down to your welding table to minimize warping from welding the tube onto it. Mine warped enough that it deflected a section of 40x120 extrusion when the bolts were tightened. I had to chuck it in the lathe and turn the plate as flat as possible and then bend the corners back down with a sledge hammer.
Likes For dsaul:
07-09-22, 10:40 AM
#6
Newbie
Thread Starter
hello dear Andrew Steward, Bulgie and DSaul
note, at the moment i do not have not too much time -. since i have to leave the house.
but i am deep impressed by your replys - the options and all the ideas you share. # food for thougts - and for
all the plans here
awesome ideas - great work - i will reply more later
have a great day
untill later
yours
apollo
07-09-22, 06:21 PM
#7
blahblahblah chrome moly
Join Date: Apr 2009
Location: Seattle
Posts: 1,987
Mentioned: 92 Post(s)
Tagged: 0 Thread(s)
Quoted: 1173 Post(s)
Liked 2,569 Times
in
1,073 Posts
Corrie Martin, who made my jig, also made a real solid 3-legged stand with wheels for it, and his stand does have the extra tilt feature. I made sure not to ruin that feature when I modified the jig to go on the wall, so some future user of this jig could put it back on Corrie's stand with the tilt. Or that could be me, if I ever got a bigger shop (not likely!)
I've used jigs that were stuck in the vertical orientation (like mine), whether rotating or not, and jigs that were stuck in the horizontal like a table, and one that was permanently at some angle in between vertical and horizontal. I can say I mostly prefer the vertical, if only because flux doesn't drip onto the jig very much! You TIG guys don't care about that of course! The horizontal table type jig always had big mounds of flux, like the guano around a booby's nest. Made it hard to use a height gauge, but otherwise it wasn't that big a problem.
07-09-22, 06:46 PM
#8
blahblahblah chrome moly
Join Date: Apr 2009
Location: Seattle
Posts: 1,987
Mentioned: 92 Post(s)
Tagged: 0 Thread(s)
Quoted: 1173 Post(s)
Liked 2,569 Times
in
1,073 Posts
Even clamping it to a flat welding table will not eliminate the weld distortion though. I have seen a couple ways to minimize that type of warping: start with a thicker plate, just stronger in that direction, and fabricate a framework in back that only needs to be lightly welded to the plate, like this:
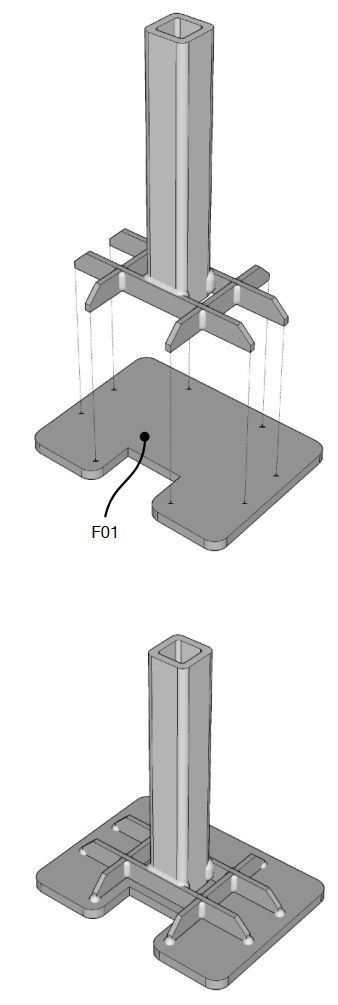
Note the 8 small welds around the periphery of the flat plate, no welds near the center. The framework is thoroughly welded to the main tube.
That's from Jeremy Schmidt's belt-grinder design. His instructions for making one are so superb you might want to buy the plans even if you're not sure if you want to build one, the plans are that good. I bought them, partly to support Jer, who seems like a cool dude and who put so much work into these plans and videos. (Haven't built the BG yet.)
See him building the belt-grinder here on YT. Link to buy the plans is in the comments below the vid:
I know a bunch of guys who have made the BG � our local Metal Heads group went in on a group purchase of steel, laser-cut to all the shapes needed, saving huge amounts of time over cutting the shapes the way Jer does in the video. Everyone who built one loves it. I'm still working on getting my MIG welder working, which has been back-burnered for a while. Oops I'm getting way off topic, I'll shut up now!
07-09-22, 07:18 PM
#9
Senior Member
Join Date: Jan 2013
Location: South Jersey
Posts: 2,266
Mentioned: 18 Post(s)
Tagged: 0 Thread(s)
Quoted: 714 Post(s)
Liked 800 Times
in
475 Posts
I'd love to build a belt grinder some day. I have a CNC plasma table to cut out the parts.
07-10-22, 03:37 AM
#10
Newbie
Thread Starter
DSaul your clamp looks pretty smart. i like it.
Alistair Spence did something similar: he integrated the tilt with the second clamp. cf. https://tinyurl.com/26ytetuz
By the way - can we add the flick image here - i do not know?!
Mitch Pryor cit:
well thats interesting:
Alistair Spence
Alistair Spence .
well i think that the jig sould fit the 80/20 Extrusion design... since i have a jig with the 80/20
background: well i have been looking for some jigs that fits to (for) a jig that is made out of 80/20 extrusion.
the pros: well: this fits very well - and since pithybikes uses 80/20 extrusion - this fits very well
btw: eg like Tanner W makes use of the 80/20 as well - this would fit for all that use tanner W - jigs
btw: See Tanner W - also made out of 80/20 https://www.instructables.com/Bicycl...-Building-Jig/
see a tiny gallery of jig-stands - with your (DSaul) jig-stand included https://tinyurl.com/8stx55ec
love the discussion - love to hear from you
greetings
cf. https://tinyurl.com/26ytetuz
By the way - can we add the flick image here - i do not know?!
Alistair Spence did something similar: he integrated the tilt with the second clamp. cf. https://tinyurl.com/26ytetuz
By the way - can we add the flick image here - i do not know?!
Mitch Pryor cit:
Based on using the same feature on the Anvil, I think you will appreciate being able to set a clamping pressure to be able to tilt and hold without needing to reach for the lever each time like you do on the Anvil. I find I rarely use the feature since I have to stop brazing momentarily to make an adjustment, always at the worst times. Nice work.
Alistair Spence
Truth is, I wasn't sure if the second axis of rotation was completely necessary but it's one of those things that I figured I would incorporate while I was making the thing. It seems like it could be handy at times. In my fairly limited experience it seems like it's usually less work to add a feature during the first go through of fabricating a design. As opposed to going back and modifying it after it's finished, so I figured why not? Since I haven't finished the jig yet I had to make some educated guesses on some of the dimensions of the stand. I hope I haven't overlooked anything too obvious... Guess I'll find out soon enough, when I finish machining the jig and plug it into the stand.
The jig will get finished, even with my super slow machining skills. Once I get my own mill I'll get more practice in and become a more efficient machinist, in time. As it is, I'm glad to have the use of your shop and advice. I do enjoy the process..
background: well i have been looking for some jigs that fits to (for) a jig that is made out of 80/20 extrusion.
the pros: well: this fits very well - and since pithybikes uses 80/20 extrusion - this fits very well
btw: eg like Tanner W makes use of the 80/20 as well - this would fit for all that use tanner W - jigs
btw: See Tanner W - also made out of 80/20 https://www.instructables.com/Bicycl...-Building-Jig/
see a tiny gallery of jig-stands - with your (DSaul) jig-stand included https://tinyurl.com/8stx55ec
love the discussion - love to hear from you
greetings
cf. https://tinyurl.com/26ytetuz
By the way - can we add the flick image here - i do not know?!
Last edited by apollodriver; 07-10-22 at 04:08 AM.
07-10-22, 09:13 PM
#11


Randomhead
Join Date: Aug 2008
Location: Happy Valley, Pennsylvania
Posts: 24,396
Mentioned: 0 Post(s)
Tagged: 0 Thread(s)
Quoted: 4 Post(s)
Liked 3,696 Times
in
2,517 Posts
If you want to add a flickr picture here, just hit share on flickr (the swoopy arrow) and grab a link. I usually grab the link to bb code, which is what this forum uses
 Jig stand. by Alistair Spence, on Flickr
Jig stand. by Alistair Spence, on Flickr
07-15-22, 05:02 PM
#12
Newbie
Thread Starter
hello dear Unterhausen, hello dear all,
many many thanks for the help and for the Tpp.
Awesome - i am glad to be part of such a great community.
have a great day
i want to do something similar .... Thats for sure.
update: the best thing would be a two folded top-center: with two options
a. on the one handside - the bridge to 80&20 extrusion
b. on the other side: the classical VAR-Clamp
this would be great
see what is meant ..... by
a. the bridge to the 80/20 extrusion

this bridge to 80/20 extrusion

ready to be mounted to the 80/20 extruson design
i want to have the option to add a plate that is taking up the 80/20 extrusion.
and besides this
b . and on the other side - the option to mount a classical VAR - Clamp
see a classical VAR Clamp
image taken by kristofer Henry
https://www.flickr.com/photos/44bike...7635587810192/
Machining a .375" blind hole on the right hand side of this Park clamp to accept a .375" stainless rod for brazing applications.
to sume up - what do you think about the two foldet bike stand!?
this would be awesome
look forward to hear from you
many many thanks for the help and for the Tpp.
Awesome - i am glad to be part of such a great community.
have a great day
i want to do something similar .... Thats for sure.
update: the best thing would be a two folded top-center: with two options
a. on the one handside - the bridge to 80&20 extrusion
b. on the other side: the classical VAR-Clamp
this would be great
see what is meant ..... by
a. the bridge to the 80/20 extrusion
this bridge to 80/20 extrusion
ready to be mounted to the 80/20 extruson design
i want to have the option to add a plate that is taking up the 80/20 extrusion.
and besides this
b . and on the other side - the option to mount a classical VAR - Clamp
see a classical VAR Clamp
image taken by kristofer Henry
https://www.flickr.com/photos/44bike...7635587810192/
Machining a .375" blind hole on the right hand side of this Park clamp to accept a .375" stainless rod for brazing applications.
to sume up - what do you think about the two foldet bike stand!?
this would be awesome
look forward to hear from you
Last edited by apollodriver; 07-18-22 at 05:36 AM.
07-22-22, 10:47 PM
#13
Senior Member
Join Date: May 2022
Location: USA - Southwest PA
Posts: 3,076
Bikes: Cannondale - Gary Fisher - Giant - Litespeed - Schwinn Paramount - Schwinn (lugged steel) - Trek OCLV
Mentioned: 6 Post(s)
Tagged: 0 Thread(s)
Quoted: 1397 Post(s)
Liked 1,876 Times
in
1,079 Posts
 07-23-22, 05:53 AM
#14
Newbie
Thread Starter
hi there - good day dear t2p
many thanks for sharing your ideas - thanks for the pictures. This look pretty impressive -
Awesome job.
many thanks for sharing your ideas - thanks for the pictures. This look pretty impressive -
Awesome job.
07-23-22, 09:06 AM
#15
Senior Member
Join Date: May 2022
Location: USA - Southwest PA
Posts: 3,076
Bikes: Cannondale - Gary Fisher - Giant - Litespeed - Schwinn Paramount - Schwinn (lugged steel) - Trek OCLV
Mentioned: 6 Post(s)
Tagged: 0 Thread(s)
Quoted: 1397 Post(s)
Liked 1,876 Times
in
1,079 Posts
