


calling Carlton experts
 12-24-20, 06:35 PM
#26

www.theheadbadge.com

Join Date: Sep 2005
Location: Southern Florida
Posts: 28,513
Bikes: https://www.theheadbadge.com
Mentioned: 124 Post(s)
Tagged: 0 Thread(s)
Quoted: 2421 Post(s)
Liked 4,388 Times
in
2,092 Posts
I'll bet it's less likely to break than a forged drop in the same predicament.
-Kurt
__________________


 12-24-20, 07:31 PM
#27

feros ferio
Thread Starter

Join Date: Jul 2000
Location: www.ci.encinitas.ca.us
Posts: 21,796
Bikes: 1959 Capo Modell Campagnolo; 1960 Capo Sieger (2); 1962 Carlton Franco Suisse; 1970 Peugeot UO-8; 1982 Bianchi Campione d'Italia; 1988 Schwinn Project KOM-10;
Mentioned: 44 Post(s)
Tagged: 0 Thread(s)
Quoted: 1392 Post(s)
Liked 1,324 Times
in
836 Posts
Yes, I know a forged DO would likely crack.
__________________
"Far and away the best prize that life offers is the chance to work hard at work worth doing." --Theodore Roosevelt
Capo: 1959 Modell Campagnolo, S/N 40324; 1960 Sieger (2), S/N 42624, 42597
Carlton: 1962 Franco Suisse, S/N K7911
Peugeot: 1970 UO-8, S/N 0010468
Bianchi: 1982 Campione d'Italia, S/N 1.M9914
Schwinn: 1988 Project KOM-10, S/N F804069
12-24-20, 07:32 PM
#28
www.theheadbadge.com
Join Date: Sep 2005
Location: Southern Florida
Posts: 28,513
Bikes: https://www.theheadbadge.com
Mentioned: 124 Post(s)
Tagged: 0 Thread(s)
Quoted: 2421 Post(s)
Liked 4,388 Times
in
2,092 Posts
12-25-20, 08:22 AM
#29
feros ferio
Thread Starter
Join Date: Jul 2000
Location: www.ci.encinitas.ca.us
Posts: 21,796
Bikes: 1959 Capo Modell Campagnolo; 1960 Capo Sieger (2); 1962 Carlton Franco Suisse; 1970 Peugeot UO-8; 1982 Bianchi Campione d'Italia; 1988 Schwinn Project KOM-10;
Mentioned: 44 Post(s)
Tagged: 0 Thread(s)
Quoted: 1392 Post(s)
Liked 1,324 Times
in
836 Posts
Next fun poser for all of you Carlton experts, to help a novice here:
I am in need of a head badge. I have ordered a decal from the UK as an inexpensive backup plan B, but a metal plaque would be cool. Now the interesting part -- the two rivet holes on my head tube are in a long vertical orientation, rather than side-by-side, as we see in most other marques and many other Carltons I have seen, as well. I did see a Carlton-built Huffy with rivet hole spacing and orientation about like mine ... . So ... any ideas on obtaining a genuine or reproduction head badge? I'll get the exact rivet spacing later today, after we have our family Zoomfest to watch the grandsons open their presents. (I already got mine, of course. )
)
I am in need of a head badge. I have ordered a decal from the UK as an inexpensive backup plan B, but a metal plaque would be cool. Now the interesting part -- the two rivet holes on my head tube are in a long vertical orientation, rather than side-by-side, as we see in most other marques and many other Carltons I have seen, as well. I did see a Carlton-built Huffy with rivet hole spacing and orientation about like mine ... . So ... any ideas on obtaining a genuine or reproduction head badge? I'll get the exact rivet spacing later today, after we have our family Zoomfest to watch the grandsons open their presents. (I already got mine, of course.
)
__________________
"Far and away the best prize that life offers is the chance to work hard at work worth doing." --Theodore Roosevelt
Capo: 1959 Modell Campagnolo, S/N 40324; 1960 Sieger (2), S/N 42624, 42597
Carlton: 1962 Franco Suisse, S/N K7911
Peugeot: 1970 UO-8, S/N 0010468
Bianchi: 1982 Campione d'Italia, S/N 1.M9914
Schwinn: 1988 Project KOM-10, S/N F804069
"Far and away the best prize that life offers is the chance to work hard at work worth doing." --Theodore Roosevelt
Capo: 1959 Modell Campagnolo, S/N 40324; 1960 Sieger (2), S/N 42624, 42597
Carlton: 1962 Franco Suisse, S/N K7911
Peugeot: 1970 UO-8, S/N 0010468
Bianchi: 1982 Campione d'Italia, S/N 1.M9914
Schwinn: 1988 Project KOM-10, S/N F804069
12-25-20, 10:08 AM
#30
Disraeli Gears

Regarding the bent dropout -- you may be able to (judiciously) use a torch to help with the bending back. The turnaround and the lower leg don't really enter into the structural loading of the dropout in use, at least not very much. So any loss of temper wouldn't matter too much. If it bothers you, then you might get it back to shape, then reheat and quench. All that being said, I'm no metallurgist -- might be good to talk to a knowledgeable frame-maker with old-school cred (i.e. pre-forged dropouts) about it.
By the way, I haven't seen many, if any, of those Cyclo dropouts with a stamped profile. Maybe I don't get out enough. The ones I'm most familiar with (also by Cyclo) are totally flat, in the "Stallard pattern." (as in Percy). I have 3 frames with those:

Happy Holidays C&V!
By the way, I haven't seen many, if any, of those Cyclo dropouts with a stamped profile. Maybe I don't get out enough. The ones I'm most familiar with (also by Cyclo) are totally flat, in the "Stallard pattern." (as in Percy). I have 3 frames with those:
Happy Holidays C&V!
Last edited by Charles Wahl; 12-25-20 at 10:17 AM.
12-25-20, 10:44 AM
#31
Senior Member
Re: the bent dropout, I knew I had seen some photos of dropout repair using the handle of a crescent wrench as leverage - turns out they were in @gugie 's "Atelier" album on Flickr.
https://www.flickr.com/photos/gugie/...7654202199211/
I've never done it and am not suggesting you do this or don't do this, but if I was looking for advice I could trust on straightening a dropout I don't think one could do better than @gugie. If you contact him, you might get some wisdom on technique.
12-25-20, 11:17 AM
#32
Bike Butcher of Portland

Join Date: Jul 2014
Location: Portland, OR
Posts: 11,633
Bikes: It's complicated.
Mentioned: 1299 Post(s)
Tagged: 0 Thread(s)
Quoted: 4678 Post(s)
Liked 5,793 Times
in
2,280 Posts
Comments on this thread:
1. Bike never had a derailleur hanger. There are lots of vintage English frames made of full 531 DB tubing set without them. Carlton was no exception, the numerous Raleigh Gran(d) Sport(s) out there sometimes had them (Zeus), mostly didn't.
2. Do not use heat to bend it back. You're more likely to do damage than to help. @daka found my method using the "wrong end" of most any 8" adjustable wrench ("Crescent" brand or copy). 6" won't work, 10-12 won't either. The round hole cast in the end is the perfect size to do this - if you have a derailleur hanger, which this bike doesn't. You slip it over the derailleur stop to get leverage - if it uses the standard Campy 7 o'clock stop. Never tried it on a Huret (4 o'clock stop). If you carefully clamped the end of the dropout to a vice frame upside down, rest of frame supported on a workbench you could use a mallet to carefully bend it back. The key is to keep the faces planar. You can get creative in you rmethod
Bottom line, just bend it back, keep the faces planar, be gentle, you'll be fine. The mild steel that these dropouts were stamped from isn't high strength, but pretty tough.
__________________
If someone tells you that you have enough bicycles and you don't need any more, stop talking to them. You don't need that kind of negativity in your life.
If someone tells you that you have enough bicycles and you don't need any more, stop talking to them. You don't need that kind of negativity in your life.
12-25-20, 04:47 PM
#33
Bike Butcher of Portland
Join Date: Jul 2014
Location: Portland, OR
Posts: 11,633
Bikes: It's complicated.
Mentioned: 1299 Post(s)
Tagged: 0 Thread(s)
Quoted: 4678 Post(s)
Liked 5,793 Times
in
2,280 Posts
I've successfully bent bent back many a forged dropout using the method previously detailed, above.
Steel is pretty tough stuff. Dropouts are typically made of steel that's of lower strength (takes more force to permanently bend it), but higher toughness (you can bend it back and forth a lot before it breaks).
Steel is pretty tough stuff. Dropouts are typically made of steel that's of lower strength (takes more force to permanently bend it), but higher toughness (you can bend it back and forth a lot before it breaks).
__________________
If someone tells you that you have enough bicycles and you don't need any more, stop talking to them. You don't need that kind of negativity in your life.
If someone tells you that you have enough bicycles and you don't need any more, stop talking to them. You don't need that kind of negativity in your life.
12-25-20, 05:04 PM
#34
feros ferio
Thread Starter
Join Date: Jul 2000
Location: www.ci.encinitas.ca.us
Posts: 21,796
Bikes: 1959 Capo Modell Campagnolo; 1960 Capo Sieger (2); 1962 Carlton Franco Suisse; 1970 Peugeot UO-8; 1982 Bianchi Campione d'Italia; 1988 Schwinn Project KOM-10;
Mentioned: 44 Post(s)
Tagged: 0 Thread(s)
Quoted: 1392 Post(s)
Liked 1,324 Times
in
836 Posts
Happy ending -- I put in my bench vise, perpendicular to the jaws, and slowly and gently closed on it until the end of the gap matched the 3/8" on the other side. It seems to be very mild steel.
A second problem became apparent -- not only was the opening spread, but the entire dropout was rotated clockwise, and the right side seat stay was slightly, but visibly, bent near the dropout. I clamped the dropout firmly in my bench vise, this time parallel to the jaws, and steadily applied downward force on the head tube to bring it into alignment with the other side. Every frame has a history, and I wonder if this one had some sort of somewhat violent chain-in-the-spokes event. The derailleur claw's mounting bolt would have acted as a pivot, and the axle would have been pulled downward as the start of a clockwise arc. The dropout slot would have been forced open, and the same direction of force would have rotated it forward.
Anyway, this was the first real bullet I have had to dodge on this 58-year-old frame, so I am not going to look a gift horse in the mouth (or any other part of its anatomy).
Again, thank you everyone who has contributed to this thread -- the exchange has been most helpful and fruitful.
__________________
"Far and away the best prize that life offers is the chance to work hard at work worth doing." --Theodore Roosevelt
Capo: 1959 Modell Campagnolo, S/N 40324; 1960 Sieger (2), S/N 42624, 42597
Carlton: 1962 Franco Suisse, S/N K7911
Peugeot: 1970 UO-8, S/N 0010468
Bianchi: 1982 Campione d'Italia, S/N 1.M9914
Schwinn: 1988 Project KOM-10, S/N F804069
12-26-20, 01:55 PM
#35
feros ferio
Thread Starter
Join Date: Jul 2000
Location: www.ci.encinitas.ca.us
Posts: 21,796
Bikes: 1959 Capo Modell Campagnolo; 1960 Capo Sieger (2); 1962 Carlton Franco Suisse; 1970 Peugeot UO-8; 1982 Bianchi Campione d'Italia; 1988 Schwinn Project KOM-10;
Mentioned: 44 Post(s)
Tagged: 0 Thread(s)
Quoted: 1392 Post(s)
Liked 1,324 Times
in
836 Posts
More good news today: I disassembled the axle assemblies and found that the cones and hub races are in superb condition. I may even re-use the ball bearings themselves, given how little wear is evident on the cones and races. The rear axle is indeed 126mm OLD, another big plus, since I wanted to go 2x6 or 2x7, anyway. Next up, polish the chrome on the frame, cut the rusty spokes, and buy new spokes and 700C aluminum rims.
__________________
"Far and away the best prize that life offers is the chance to work hard at work worth doing." --Theodore Roosevelt
Capo: 1959 Modell Campagnolo, S/N 40324; 1960 Sieger (2), S/N 42624, 42597
Carlton: 1962 Franco Suisse, S/N K7911
Peugeot: 1970 UO-8, S/N 0010468
Bianchi: 1982 Campione d'Italia, S/N 1.M9914
Schwinn: 1988 Project KOM-10, S/N F804069
"Far and away the best prize that life offers is the chance to work hard at work worth doing." --Theodore Roosevelt
Capo: 1959 Modell Campagnolo, S/N 40324; 1960 Sieger (2), S/N 42624, 42597
Carlton: 1962 Franco Suisse, S/N K7911
Peugeot: 1970 UO-8, S/N 0010468
Bianchi: 1982 Campione d'Italia, S/N 1.M9914
Schwinn: 1988 Project KOM-10, S/N F804069
12-26-20, 02:47 PM
#36
Senior Member
Join Date: Aug 2017
Location: Minneapolis
Posts: 936
Bikes: 1968 Raleigh Super Course, 1972 Raleigh Professional, 1975 Raleigh International, 1978 Raleigh Professional, 1985 Raleigh Prestige, 1972 Schwinn Paramount, 1980 Schwinn Voyageur 11.8, 1960 Carlton Franco Suisse Peugeot PX10, 1972 Motobecane Le Champ
Mentioned: 9 Post(s)
Tagged: 0 Thread(s)
Quoted: 322 Post(s)
Liked 690 Times
in
351 Posts
Well that is good news! I�m looking forward to seeing those hubs laced to some fresh rims.
11-10-21, 07:45 PM
#37
Junior Member
I am probably the only guy ever to restore one of these bikes. The red one has a Gnnnn serial number indicating a 1972 frame. That's very interesting because I thought these models were gone by the 1970's. The blue one has the "Franco Suisse" belt-buckle (blue & red) decal, indicating the first half of the 1960's (1960-1965). The frameset is super light - on part with the highest end racing bikes available at the time, 2nd from the top-of-the-line in its day. If you would post your serial number, we could tell you the year. That bike is a KEEPER.
Below is my restoration. I used a 1974 Raleigh International frameset (a newer instance of the same model from Worksop, England), also second from the top of the line, 1970-1976. Every single decal on my bike, I drew myself in Adobe Illustrator. I sent the artwork to Colorado to have a decal printer print them for me. Paint by Brian Baylis. Chrome (lug polishing) by Brian Baylis. Total weight is 22 lbs with titanium bottom bracket, saddle, and superleggera Campagnolo seatpost.

Below is my restoration. I used a 1974 Raleigh International frameset (a newer instance of the same model from Worksop, England), also second from the top of the line, 1970-1976. Every single decal on my bike, I drew myself in Adobe Illustrator. I sent the artwork to Colorado to have a decal printer print them for me. Paint by Brian Baylis. Chrome (lug polishing) by Brian Baylis. Total weight is 22 lbs with titanium bottom bracket, saddle, and superleggera Campagnolo seatpost.
Last edited by systemBuilder; 11-10-21 at 07:57 PM.
11-10-21, 08:33 PM
#38
Senior Member

Join Date: Feb 2008
Location: Peoria, IL
Posts: 4,474
Mentioned: 86 Post(s)
Tagged: 0 Thread(s)
Quoted: 1829 Post(s)
Liked 3,373 Times
in
1,579 Posts
man, that's gorgeous!
It doesn't hurt that it was painted by Brian Baylis! I remember him mostly for some of his intriguing color combinations and incredible details, but he was great with more conventional schemes like this too. I hope you will post some detailed shots!
The green reminds me a lot of the emerald green used on the Raleigh Super Course. Was that the goal, or was it just a pleasant coincidence? Raleigh certainly seemed to have developed some wonderful colors and paint schemes in the 70's.
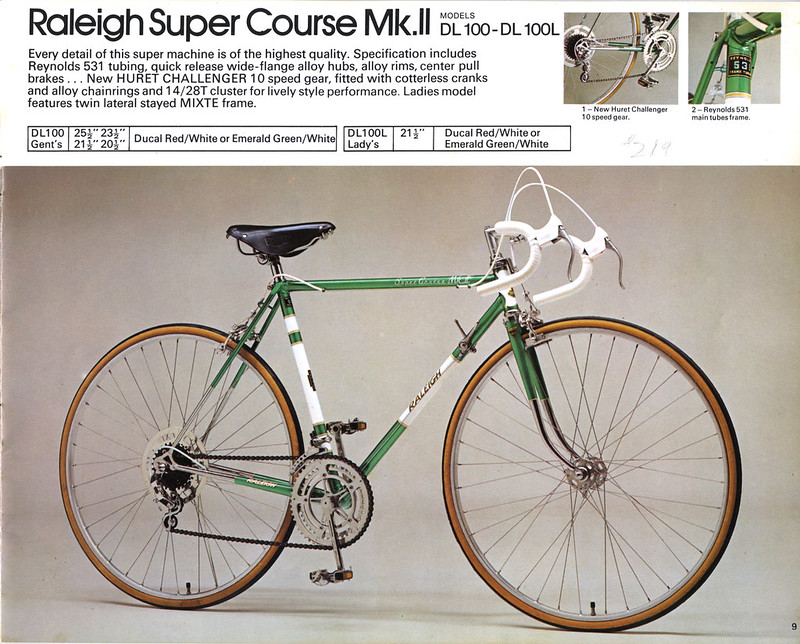
Here's the Super Course in the 1974 catalog...
Steve in Peoria, and a big fan of the Raleigh Carlton models of the 70's.
It doesn't hurt that it was painted by Brian Baylis! I remember him mostly for some of his intriguing color combinations and incredible details, but he was great with more conventional schemes like this too. I hope you will post some detailed shots!
The green reminds me a lot of the emerald green used on the Raleigh Super Course. Was that the goal, or was it just a pleasant coincidence? Raleigh certainly seemed to have developed some wonderful colors and paint schemes in the 70's.
Here's the Super Course in the 1974 catalog...
Steve in Peoria, and a big fan of the Raleigh Carlton models of the 70's.
Likes For steelbikeguy:
11-10-21, 09:58 PM
#39
Senior Member
Join Date: Aug 2017
Location: Minneapolis
Posts: 936
Bikes: 1968 Raleigh Super Course, 1972 Raleigh Professional, 1975 Raleigh International, 1978 Raleigh Professional, 1985 Raleigh Prestige, 1972 Schwinn Paramount, 1980 Schwinn Voyageur 11.8, 1960 Carlton Franco Suisse Peugeot PX10, 1972 Motobecane Le Champ
Mentioned: 9 Post(s)
Tagged: 0 Thread(s)
Quoted: 322 Post(s)
Liked 690 Times
in
351 Posts
Quote: �The red one has a Gnnnn serial number indicating a 1972 frame. That's very interesting because I thought these models were gone by the 1970's.�
Curiously, Carlton used the same or a very similar format a couple of times. If you look at the earlier Carlton serial numbering system you can see that G is likely from 1959, it�s known however, that the info depicted here is not perfect but my example should be late 59 or early 60. You are correct, production of the Franco Suisse was finished long before the dawn of the seventies. The serial numbering system your referring to began anew around 1966/67. I�ve got a Raleigh Super Course with a B serial number from late 1967 and a Raleigh Professional with a G serial number and it�s from 1972.
 What you did with that international looks stunning!
I love the paint work and decals. Coincidentally, I�ve got a 75 international and I knew it and my Franco would be similar but you�ve made yours a near dead ringer. Looks great!!
Curiously, Carlton used the same or a very similar format a couple of times. If you look at the earlier Carlton serial numbering system you can see that G is likely from 1959, it�s known however, that the info depicted here is not perfect but my example should be late 59 or early 60. You are correct, production of the Franco Suisse was finished long before the dawn of the seventies. The serial numbering system your referring to began anew around 1966/67. I�ve got a Raleigh Super Course with a B serial number from late 1967 and a Raleigh Professional with a G serial number and it�s from 1972.
What you did with that international looks stunning!I love the paint work and decals. Coincidentally, I�ve got a 75 international and I knew it and my Franco would be similar but you�ve made yours a near dead ringer. Looks great!!
Last edited by Pcampeau; 11-10-21 at 10:17 PM.
11-25-22, 03:56 PM
#40
Steel,Friction,Freewheels
Join Date: Oct 2004
Location: Tampa, Florida, USA
Posts: 61
Bikes: '69 Carlton Team Pro, '72 Carlton Giro d'Italia, '78 Motobecane C4C "sur mesure", '64 Royal Enfield Revelation, '73 Peugeot PX10, '77 Mercier Lugano, 2003 Moser M81
Mentioned: 0 Post(s)
Tagged: 0 Thread(s)
Quoted: 4 Post(s)
Liked 28 Times
in
9 Posts
'71-'72 Carlton Giro d'Italia
Showing a recent restoration of Pete Chisman's last team issue Carlton. Chrome and paint renewed by Waterford.


Likes For Guy Retreau:
Likes For BFisher:
12-31-23, 05:20 PM
#42
Junior Member
man, that's gorgeous!
It doesn't hurt that it was painted by Brian Baylis! I remember him mostly for some of his intriguing color combinations and incredible details, but he was great with more conventional schemes like this too. I hope you will post some detailed shots!
The green reminds me a lot of the emerald green used on the Raleigh Super Course. Was that the goal, or was it just a pleasant coincidence? Raleigh certainly seemed to have developed some wonderful colors and paint schemes in the 70's.
-
Last edited by systemBuilder; 12-31-23 at 05:24 PM.
Likes For systemBuilder:
