


Need repair advice - Raleigh cottered crank "clunk"
 04-11-10, 09:19 PM
#1
Senior Member
Thread Starter

Join Date: Apr 2009
Location: Detroit
Posts: 10,303
Mentioned: 6 Post(s)
Tagged: 0 Thread(s)
Quoted: 17 Post(s)
Likes: 0
Liked 42 Times
in
33 Posts
Need repair advice - Raleigh cottered crank "clunk"
I took a hammer, grinder, and vice grips to my old Raleigh Record today - and that STILL didn’t fix it!

The problem started with a mysterious “clunk” that developed whenever the chain was under load. Since everything else is new, the old cottered crank was my prime suspect so I rebuilt it today, and seated the cotter with my hammer before securing the nut .
During the test ride, the noise was attenuated, but still present, so I retorqued the nut on the cotter – and I stripped it ! – Darn.
Then on my way back home, the seat post dropped down a few inches into the seat tube. - Darn!
At home I resolved to address both issues: The stripped cotter yielded only to my grinder, but as I tightened the seat post binder – it only became looser. This was because the rear brake hanger sandwiched beneath it had failed. - Darn !

I had to resort to vice grips back off the binder bolt: I found a suitable replacement bolt in my parts bin, and a cable hanger on eBay.
The remaining problem then, is the installation of a new cotter pin. I noticed that on the crank side, both the original pin (right, below) and the replacement (left below) had a small “steps”, swedged into the angled face\by the bottom bracket. . .
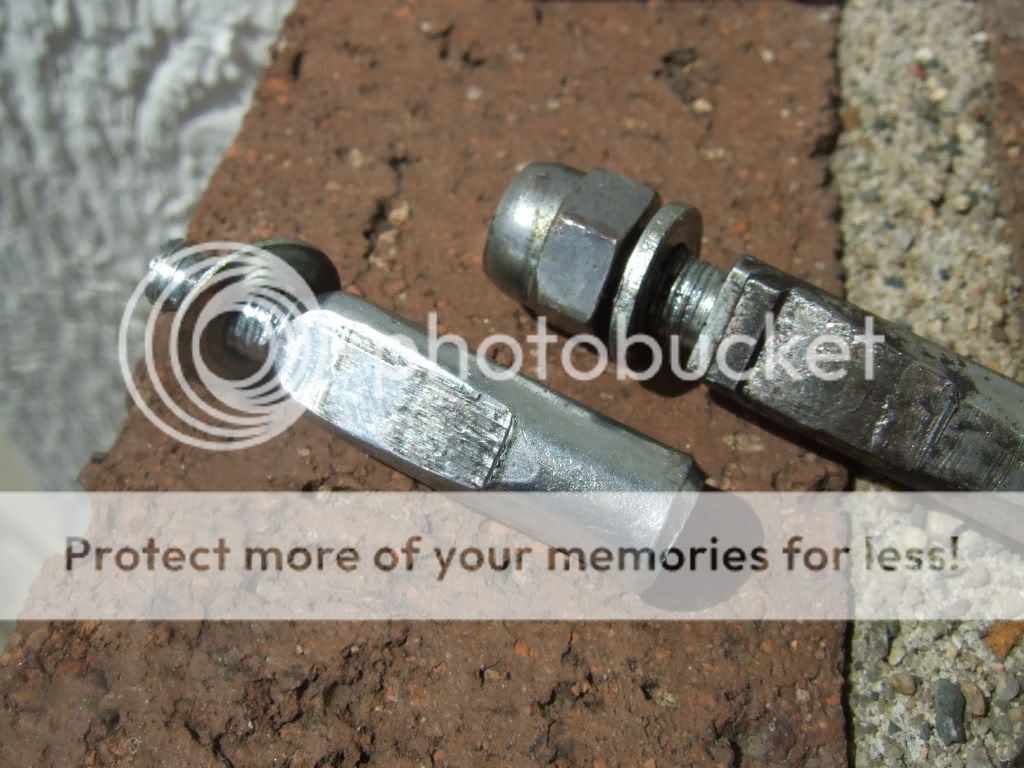
Could this "step" be inhibiting the pin from seating as far as it need to? - causing the mysterious clunking? - I read that some guys file the cotter pins prior to installation but I did not know why:
- Could it be that the pin’s angled face on the crank side is too obtuse?
- Should I try to file it down flatter for my next attempt?
Affirmations? Suggestions?
The problem started with a mysterious “clunk” that developed whenever the chain was under load. Since everything else is new, the old cottered crank was my prime suspect so I rebuilt it today, and seated the cotter with my hammer before securing the nut .
During the test ride, the noise was attenuated, but still present, so I retorqued the nut on the cotter – and I stripped it ! – Darn.
Then on my way back home, the seat post dropped down a few inches into the seat tube. - Darn!
At home I resolved to address both issues: The stripped cotter yielded only to my grinder, but as I tightened the seat post binder – it only became looser. This was because the rear brake hanger sandwiched beneath it had failed. - Darn !
I had to resort to vice grips back off the binder bolt: I found a suitable replacement bolt in my parts bin, and a cable hanger on eBay.
The remaining problem then, is the installation of a new cotter pin. I noticed that on the crank side, both the original pin (right, below) and the replacement (left below) had a small “steps”, swedged into the angled face\by the bottom bracket. . .
Could this "step" be inhibiting the pin from seating as far as it need to? - causing the mysterious clunking? - I read that some guys file the cotter pins prior to installation but I did not know why:
- Could it be that the pin’s angled face on the crank side is too obtuse?
- Should I try to file it down flatter for my next attempt?
Affirmations? Suggestions?
__________________
- Auchen
- Auchen
 04-11-10, 09:32 PM
#2
Senior Member
Join Date: Mar 2010
Posts: 65
Mentioned: 0 Post(s)
Tagged: 0 Thread(s)
Quoted: 0 Post(s)
Likes: 0
Liked 0 Times
in
0 Posts
First of all, go easy with the tools. I don't know what you are doing wrong with the seat post. Maybe the seat post is too narrow.
If you hammer your cotter pins, make sure that you are supporting the crank arm on a brick or piece of wood. If you don't do this, you will surely damage the bottom bracket. This also makes it easier to tighten the pin.
To stay tight, the cotter pin has to have the right shape, which you can obtain by filing it down to look like the original one.
Ideally, you should use a cotter press to tighten the pin, but you can use a heavy duty C clamp instead. This is what I do.
Don't even think about trying to tighten the pin with the nut. It'll strip right away.
Read Sheldon's page on cottered cranks.
04-11-10, 10:02 PM
#3
Senior Member
Thread Starter
Join Date: Apr 2009
Location: Detroit
Posts: 10,303
Mentioned: 6 Post(s)
Tagged: 0 Thread(s)
Quoted: 17 Post(s)
Likes: 0
Liked 42 Times
in
33 Posts
Thanks Giffin - ( The seat post is the right one for this bike. The problem was that the seat binder bolt was effectively x-threaded, and basically turned the retaining tang on the blind side right THRU the brake hanger - that's why it tore when I tried to tighten it. - Getting it off was a task, because the back end of the original binder was ROUND -( No hex with which to keep it from rotating.) Anyway, the new seat binder bolt (pictured) is a much better configuration.
I would not try to tighten a cotter pin with the nut - but usually after riding a few miles with a new installation, the nuts loosen up - one mild retorque and it's good to go.
^ I was relying on the cotter to assume the required "shape" (they are so soft and malleable) - but apparently that is only good enough sometimes. I think I am going to take a little off the next one - ( and take your advice on the C-clamp because backing it up with a pipe is awfully unstable).
The thing is, what shape ought it to be? The original cotter was noisier even than the one I replaced it with.
I would not try to tighten a cotter pin with the nut - but usually after riding a few miles with a new installation, the nuts loosen up - one mild retorque and it's good to go.
The thing is, what shape ought it to be? The original cotter was noisier even than the one I replaced it with.
__________________
- Auchen
- Auchen
04-11-10, 10:20 PM
#4

Senior Member

Join Date: Mar 2005
Location: Pinole, CA, USA
Posts: 17,392
Mentioned: 24 Post(s)
Tagged: 0 Thread(s)
Quoted: 443 Post(s)
Likes: 0
Liked 27 Times
in
25 Posts
Is the new cotter the same size as the old one? It looks smaller in diameter in the picture.
This is why my cotter press is well worth the $55 to me.
This is why my cotter press is well worth the $55 to me.
04-11-10, 10:44 PM
#5
Senior Member
Join Date: Mar 2010
Posts: 65
Mentioned: 0 Post(s)
Tagged: 0 Thread(s)
Quoted: 0 Post(s)
Likes: 0
Liked 0 Times
in
0 Posts
"The thing is, what shape ought it to be?"
Same exact shape as the original. Without the cuts/steps, of course.
The nut won't loosen up much if the cotter pin is set in correctly.
If you go the C-clamp route, you need a very heavy duty C-clap and optimally one with a fine thread. You will also need some sort of thick metal spacer/cylinder.
Again, read Sheldon's page.
https://www.sheldonbrown.com/cotters.html
https://oldbikeblog.blogspot.com/2008...otters_17.html
04-11-10, 11:16 PM
#6
I'm shovel-ready!

Join Date: Jan 2010
Location: Seattle, WA
Posts: 136
Bikes: Raleigh Sports All-Gold
Mentioned: 0 Post(s)
Tagged: 0 Thread(s)
Quoted: 1 Post(s)
Likes: 0
Liked 6 Times
in
5 Posts
You know, I replaced my cotters recently and managed to strip the threads on the news ones almost immediately, applying almost no torque. A friend of mine had picked them up for me at a shop owned by a friend of hers - she didn't even ask me to pay her back for them - so I certainly didn't want to complain about the quality of them. The fact remains, however, that they were able to withstand very, very little torque.
So I looked around before replacing them, and in particular I looked here. It turns out that the cotters I wrecked looked like what is sold here as "Grade D" - and it looks to me like yours are, too. I ordered a pair of the "Grade B," the highest grade in stock at the moment, and the difference was night and day.
So I looked around before replacing them, and in particular I looked here. It turns out that the cotters I wrecked looked like what is sold here as "Grade D" - and it looks to me like yours are, too. I ordered a pair of the "Grade B," the highest grade in stock at the moment, and the difference was night and day.
04-12-10, 04:04 AM
#7
Senior Member
Thread Starter
Join Date: Apr 2009
Location: Detroit
Posts: 10,303
Mentioned: 6 Post(s)
Tagged: 0 Thread(s)
Quoted: 17 Post(s)
Likes: 0
Liked 42 Times
in
33 Posts
I know having the right tool helps, but I'm cheap and was able to get away without such a problem in the past. (Still, I'll likely modify a heavy c-clamp before spending that much money!).
__________________
- Auchen
- Auchen
04-12-10, 04:25 AM
#8

Senior Member
Join Date: Apr 2007
Location: Thunder Bay, Ontario, Canada - burrrrr!
Posts: 11,674
Bikes: 1958 Rabeneick 120D, 1968 Legnano Gran Premio, 196? Torpado Professional, 2000 Marinoni Piuma
Mentioned: 210 Post(s)
Tagged: 0 Thread(s)
Quoted: 1372 Post(s)
Likes: 0
Liked 1,751 Times
in
938 Posts
Press and snug - don't bang and tighten
The nuts on your cotter pins is NOT there to tighten up the cotters. The nut is just to keep everything in place, once the cotters are pressed very tightly into their fit. I use a small home made press to achieve good cotter pin seating. And you MUST get the cotter pin as tight into the fit as you can get it, without trying to torque the fastening nut.
Using a hammer to install a cotter pin will work, but even supported underneath, you are still taking a chance of impacting ball bearings and their races. This is not good and just might result in rapid bearing failure.
You will need to start with new cotter pins. Yours are pooched. And, chances are, you will have to file the FLATS of each pin so that the pin properly engages the fit into the crank arm/spindle combination. But there is a trick that you must pay attention to... The cotter pin flats must be filed identically. The angles must be the same on each or your crank arms will not line up at 180 degrees apart.
It is difficult to tell someone how to do this. I intend to write an article on how to remove and install cotter pins. Just too busy these days.
CotterPin_Press_4_Comment_1..jpg
04-12-10, 04:49 AM
#9
Senior Member
Thread Starter
Join Date: Apr 2009
Location: Detroit
Posts: 10,303
Mentioned: 6 Post(s)
Tagged: 0 Thread(s)
Quoted: 17 Post(s)
Likes: 0
Liked 42 Times
in
33 Posts
"The thing is, what shape ought it to be?"
Same exact shape as the original. Without the cuts/steps, of course.
The nut won't loosen up much if the cotter pin is set in correctly.
If you go the C-clamp route, you need a very heavy duty C-clap and optimally one with a fine thread. You will also need some sort of thick metal spacer/cylinder.
Again, read Sheldon's page.
https://www.sheldonbrown.com/cotters.html
https://oldbikeblog.blogspot.com/2008...otters_17.html
Same exact shape as the original. Without the cuts/steps, of course.
The nut won't loosen up much if the cotter pin is set in correctly.
If you go the C-clamp route, you need a very heavy duty C-clap and optimally one with a fine thread. You will also need some sort of thick metal spacer/cylinder.
Again, read Sheldon's page.
https://www.sheldonbrown.com/cotters.html
https://oldbikeblog.blogspot.com/2008...otters_17.html
I used Sheldons' methods successfully before (even on the left side of this bike) and that's why I did not expect to have a problem.
However - I am sure you have identified my problem correctly: i.e., The 9.5 English sized cotter on the right side does not fit, and requires "shaping" somehow.
Sheldon's treatise on fling cotters is less than exhaustive though. Of one thing I am certain though: The step was the result of trying to seat the cotter in too small a hole on the right side - and not from riding with a loose cotter.
( Sometimes it's hard to distinguish cause from effect with these things. )
__________________
- Auchen
- Auchen
04-12-10, 04:53 AM
#10
Senior Member
Thread Starter
Join Date: Apr 2009
Location: Detroit
Posts: 10,303
Mentioned: 6 Post(s)
Tagged: 0 Thread(s)
Quoted: 17 Post(s)
Likes: 0
Liked 42 Times
in
33 Posts
You know, I replaced my cotters recently and managed to strip the threads on the news ones almost immediately, applying almost no torque. A friend of mine had picked them up for me at a shop owned by a friend of hers - she didn't even ask me to pay her back for them - so I certainly didn't want to complain about the quality of them. The fact remains, however, that they were able to withstand very, very little torque.
So I looked around before replacing them, and in particular I looked here. It turns out that the cotters I wrecked looked like what is sold here as "Grade D" - and it looks to me like yours are, too. I ordered a pair of the "Grade B," the highest grade in stock at the moment, and the difference was night and day.
So I looked around before replacing them, and in particular I looked here. It turns out that the cotters I wrecked looked like what is sold here as "Grade D" - and it looks to me like yours are, too. I ordered a pair of the "Grade B," the highest grade in stock at the moment, and the difference was night and day.
__________________
- Auchen
- Auchen
04-12-10, 05:30 AM
#11
Phyllo-buster

Join Date: Jan 2010
Location: Nova Scotia
Posts: 8,847
Bikes: roadsters, club bikes, fixed and classic
Mentioned: 133 Post(s)
Tagged: 0 Thread(s)
Quoted: 2298 Post(s)
Liked 2,054 Times
in
1,254 Posts
So I looked around before replacing them, and in particular I looked here. It turns out that the cotters I wrecked looked like what is sold here as "Grade D" - and it looks to me like yours are, too. I ordered a pair of the "Grade B," the highest grade in stock at the moment, and the difference was night and day.
I'm sure a I can find a dozen different angles and lengths of English cotters in my bin. I save the old skool hard ones for my better bikes.
04-12-10, 05:59 AM
#12
Senior Member
Thread Starter
Join Date: Apr 2009
Location: Detroit
Posts: 10,303
Mentioned: 6 Post(s)
Tagged: 0 Thread(s)
Quoted: 17 Post(s)
Likes: 0
Liked 42 Times
in
33 Posts
The nuts on your cotter pins is NOT there to tighten up the cotters. The nut is just to keep everything in place, once the cotters are pressed very tightly into their fit. I use a small home made press to achieve good cotter pin seating. And you MUST get the cotter pin as tight into the fit as you can get it, without trying to torque the fastening nut.
Using a hammer to install a cotter pin will work, but even supported underneath, you are still taking a chance of impacting ball bearings and their races. This is not good and just might result in rapid bearing failure.
You will need to start with new cotter pins. Yours are pooched. And, chances are, you will have to file the FLATS of each pin so that the pin properly engages the fit into the crank arm/spindle combination. But there is a trick that you must pay attention to... The cotter pin flats must be filed identically. The angles must be the same on each or your crank arms will not line up at 180 degrees apart.
It is difficult to tell someone how to do this. I intend to write an article on how to remove and install cotter pins. Just too busy these days.
Attachment 145827
PS- When you write your webpage on cotter installation, you might want to explore the differences between Grade D and B cotters -(at least as it may have been a contributing factor in this case.)
__________________
- Auchen
- Auchen
04-12-10, 06:06 AM
#13
Grillparzer
Join Date: Aug 2009
Location: Silver Spring, MD
Posts: 643
Bikes: Surly Cross Check
Mentioned: 0 Post(s)
Tagged: 0 Thread(s)
Quoted: 4 Post(s)
Likes: 0
Liked 2 Times
in
1 Post
Something I cam across several years ago that might be useful, a cotter pin press.
https://bikesmithdesign.com/CotterPress/
https://bikesmithdesign.com/CotterPress/
04-12-10, 06:08 AM
#14
Senior Member
Thread Starter
Join Date: Apr 2009
Location: Detroit
Posts: 10,303
Mentioned: 6 Post(s)
Tagged: 0 Thread(s)
Quoted: 17 Post(s)
Likes: 0
Liked 42 Times
in
33 Posts
It's excellent to know someone's making better quality cotters out there. The issue you may run into is that the harder the cotter steel the less tolerance there is in fitting a crankarm. As Randy says,these may require "dressing" with a file to maximized the contact between the mating surfaces and increase the strength. The soft lower grades are more malleable and will more easily deform to fit the cavity, if you use a proper press, not a hammer.
I'm sure a I can find a dozen different angles and lengths of English cotters in my bin. I save the old skool hard ones for my better bikes.
I'm sure a I can find a dozen different angles and lengths of English cotters in my bin. I save the old skool hard ones for my better bikes.
- But I think the maleability of the new cotters is not helping matters - I suspect that once it "bites" you have induced a step, and there is no way to seat as fully. I won't know for sure until I try it . (It will be a little while before I have the Grade B's in hand.)
__________________
- Auchen
- Auchen
04-12-10, 06:44 AM
#15
Phyllo-buster
Join Date: Jan 2010
Location: Nova Scotia
Posts: 8,847
Bikes: roadsters, club bikes, fixed and classic
Mentioned: 133 Post(s)
Tagged: 0 Thread(s)
Quoted: 2298 Post(s)
Liked 2,054 Times
in
1,254 Posts
Here's a quick sample of 8 different pins from a jar...overall length, metallurgy, length of bevel. angle of bevel, width of bevel are varied. There was a multitude of combinations of cranksets and axles being matched up so some pins work better with some combos than others...duh,
I find the cotter pin angles are usually too steep and this causes them to notch too quickly. If you flatten the bevel a little, more steel will engage the flat of the axle. It only takes a little contact to make a strong union.
Attachment 145829Attachment 145830
I find the cotter pin angles are usually too steep and this causes them to notch too quickly. If you flatten the bevel a little, more steel will engage the flat of the axle. It only takes a little contact to make a strong union.
Attachment 145829Attachment 145830
04-12-10, 06:59 AM
#16
Senior Member
Thread Starter
Join Date: Apr 2009
Location: Detroit
Posts: 10,303
Mentioned: 6 Post(s)
Tagged: 0 Thread(s)
Quoted: 17 Post(s)
Likes: 0
Liked 42 Times
in
33 Posts
Hi Clubman !
That is quite a collection! I just ordered 4 of the Grade B variety from Mark at Bikesmith - Even though they will be harder than the terrible Grade D items from the Orient, I think I will flatten the bevel just a bit more to be conservative.
Mark also suggested greasing the cotter before installation. I always grease the spindle lightly (to avoid corrosion) but greasing the cotter is something I did not do. Maybe it will help in seating it further.
__________________
- Auchen
- Auchen
04-12-10, 07:12 AM
#17
Senior Member
Thread Starter
Join Date: Apr 2009
Location: Detroit
Posts: 10,303
Mentioned: 6 Post(s)
Tagged: 0 Thread(s)
Quoted: 17 Post(s)
Likes: 0
Liked 42 Times
in
33 Posts
Something I cam across several years ago that might be useful, a cotter pin press.
https://bikesmithdesign.com/CotterPress/
https://bikesmithdesign.com/CotterPress/
I should buy one, but until now, I've gotten away without one and I just dropped a lot of $ on parts and supplies. - So for now I'll just try out a C-clamp version. My hammer and stand pipe is not the best tool - (though in this case, I am inclined to think that the primary culprit was more likely the shape and malleability of the cotter itself.)
__________________
- Auchen
- Auchen
04-12-10, 09:16 PM
#18
Extraordinary Magnitude

Join Date: Aug 2009
Location: Waukesha WI
Posts: 13,646
Bikes: 1978 Trek TX700; 1978/79 Trek 736; 1984 Specialized Stumpjumper Sport; 1984 Schwinn Voyageur SP; 1985 Trek 620; 1985 Trek 720; 1986 Trek 400 Elance; 1987 Schwinn High Sierra; 1990 Miyata 1000LT
Mentioned: 84 Post(s)
Tagged: 0 Thread(s)
Quoted: 2608 Post(s)
Liked 1,699 Times
in
935 Posts
I used a C clamp and a 16mm socket.
Put the fixed end of the C clamp on the pin and the ball pivot footy thing on the socket- it'll balance much nicer.
Put the fixed end of the C clamp on the pin and the ball pivot footy thing on the socket- it'll balance much nicer.
__________________
*Recipient of the 2006 Time Magazine "Person Of The Year" Award*
Commence to jigglin’ huh?!?!
"But hey, always love to hear from opinionated amateurs." -says some guy to Mr. Marshall.
Commence to jigglin’ huh?!?!
"But hey, always love to hear from opinionated amateurs." -says some guy to Mr. Marshall.
04-12-10, 09:24 PM
#19
I'm shovel-ready!
Join Date: Jan 2010
Location: Seattle, WA
Posts: 136
Bikes: Raleigh Sports All-Gold
Mentioned: 0 Post(s)
Tagged: 0 Thread(s)
Quoted: 1 Post(s)
Likes: 0
Liked 6 Times
in
5 Posts
Then there's this guy, who makes cotters himself and sells them on Ebay (not cheap, either): https://cgi.ebay.com/Tapered-Cotter-P...item2559f2ee93
 04-12-10, 09:44 PM
#21
Senior Member
Thread Starter
Join Date: Apr 2009
Location: Detroit
Posts: 10,303
Mentioned: 6 Post(s)
Tagged: 0 Thread(s)
Quoted: 17 Post(s)
Likes: 0
Liked 42 Times
in
33 Posts
Then there's this guy, who makes cotters himself and sells them on Ebay (not cheap, either): https://cgi.ebay.com/Tapered-Cotter-P...item2559f2ee93
(I had actually looked at the those on eBay earlier... Can't justify the added cost just to re-use my R nuts though.)
__________________
- Auchen
- Auchen
04-15-10, 07:47 PM
#22
Senior Member
Thread Starter
Join Date: Apr 2009
Location: Detroit
Posts: 10,303
Mentioned: 6 Post(s)
Tagged: 0 Thread(s)
Quoted: 17 Post(s)
Likes: 0
Liked 42 Times
in
33 Posts
UPDATE:
Well Bikesmith shipped the new cotters in record time, and from appearances, they are far superior to the crummy grade "D" cotters.
- They also don't automatically strip when you secure the nut ( a big +)
I installed them but unfortunately, it did not cure the "clunk". . .
To make a long story short - the culprit turned out to be the Freewheel.
- I had not suspected it because it was a new freewheel and a new chain, and the chain line was excellent.
- It was however one of those new fangled 6 speed types, with the teeth angled strategically to help maintain lateral positioning of the chain on the cogs, but unfortunately the chain had a tendency to "hang and pop" on select teeth, and the sound emanated up the seat tube.
It was quite annoying.
I installed a new 5-speed (old style flat-toothed) freewheel, and the noise went away.
Go figure.
__________________
- Auchen
- Auchen
 04-15-10, 08:02 PM
#24
www.theheadbadge.com

Join Date: Sep 2005
Location: Southern Florida
Posts: 28,513
Bikes: https://www.theheadbadge.com
Mentioned: 124 Post(s)
Tagged: 0 Thread(s)
Quoted: 2422 Post(s)
Liked 4,393 Times
in
2,092 Posts
Glad to hear you solved the problem. Out of curiosity though, how do the cranks sit now? Nice and tight?
-Kurt
-Kurt
__________________


04-15-10, 08:24 PM
#25
Senior Member
Thread Starter
Join Date: Apr 2009
Location: Detroit
Posts: 10,303
Mentioned: 6 Post(s)
Tagged: 0 Thread(s)
Quoted: 17 Post(s)
Likes: 0
Liked 42 Times
in
33 Posts
Actually, Kurt, I think they were tight to begin with - but for sure they are good and tight now. - Though I still did not spring for a cotter tool - I did however, dispense with the pipe I was using: and instead found another, somewhat more reliable solution.
__________________
- Auchen
- Auchen