


Crack in the head tube! Trek 600
 11-17-21, 10:53 PM
#51

Senior Member

Join Date: Nov 2015
Posts: 4,473
Mentioned: 102 Post(s)
Tagged: 0 Thread(s)
Quoted: 1635 Post(s)
Likes: 0
Liked 823 Times
in
532 Posts
Wow! Didn't even know that some Treks had these one piece headstocks.
Might the step on the faux lug around the head tube section created a stress riser?
Might the step on the faux lug around the head tube section created a stress riser?
__________________
72 Line Seeker
83 Davidson Signature
84 Peugeot PSV
84 Peugeot PY10FC
84 Gitane Tour de France.
85 Vitus Plus Carbone 7
86 ALAN Record Carbonio
86 Medici Aerodynamic (Project)
88 Pinarello Montello
89 Bottecchia Professional Chorus SL
95 Trek 5500 OCLV (Project)
72 Line Seeker
83 Davidson Signature
84 Peugeot PSV
84 Peugeot PY10FC
84 Gitane Tour de France.
85 Vitus Plus Carbone 7
86 ALAN Record Carbonio
86 Medici Aerodynamic (Project)
88 Pinarello Montello
89 Bottecchia Professional Chorus SL
95 Trek 5500 OCLV (Project)
 11-18-21, 06:58 AM
#52
Senior Member

Join Date: May 2008
Location: Fredericksburg, Va
Posts: 9,579
Bikes: '65 Frejus TDF, '73 Bottecchia Giro d'Italia, '83 Colnago Superissimo, '84 Trek 610, '84 Trek 760, '88 Pinarello Veneto, '88 De Rosa Pro, '89 Pinarello Montello, '94 Burley Duet, 97 Specialized RockHopper, 2010 Langster, Tern Link D8
Mentioned: 73 Post(s)
Tagged: 0 Thread(s)
Quoted: 1607 Post(s)
Liked 2,213 Times
in
1,103 Posts
Since it is old enough, hasn't happened yet and isn't catastrophic, I am going to move forwards with my plan for this frame. What plan? There were several! One just got eliminated, gravel.
__________________
Bikes don't stand alone. They are two tired.
Bikes don't stand alone. They are two tired.
11-18-21, 08:12 AM
#53
Old fart

Join Date: Nov 2004
Location: Appleton WI
Posts: 24,777
Bikes: Several, mostly not name brands.
Mentioned: 153 Post(s)
Tagged: 0 Thread(s)
Quoted: 3582 Post(s)
Liked 3,395 Times
in
1,929 Posts
N.B. I know some weight weenies who used one-piece head tubes in frames because they were lighter than three-piece head tube/head lugs.
11-18-21, 10:06 AM
#54
Senior Member
Join Date: Nov 2015
Posts: 4,473
Mentioned: 102 Post(s)
Tagged: 0 Thread(s)
Quoted: 1635 Post(s)
Likes: 0
Liked 823 Times
in
532 Posts
I dunno,.....
I'd feel kinda weird if I was a frame builder at Trek and had to see the use of these one piece, faux lugged headstocks. It would feel just wrong.
They must have been thinking, nothing could really go wrong with them, being all one piece.......
Sure, other manufacturers used one piece headstocks like Vitus, but they did not go to the extent of faking lugs on them.
Unfortunately, I suspect this just mostly beancounter engineering at fault.
......
Last edited by Chombi1; 11-18-21 at 09:34 PM.
11-18-21, 11:39 AM
#55
Senior Member
Join Date: May 2008
Location: Fredericksburg, Va
Posts: 9,579
Bikes: '65 Frejus TDF, '73 Bottecchia Giro d'Italia, '83 Colnago Superissimo, '84 Trek 610, '84 Trek 760, '88 Pinarello Veneto, '88 De Rosa Pro, '89 Pinarello Montello, '94 Burley Duet, 97 Specialized RockHopper, 2010 Langster, Tern Link D8
Mentioned: 73 Post(s)
Tagged: 0 Thread(s)
Quoted: 1607 Post(s)
Liked 2,213 Times
in
1,103 Posts
The challenge is always ROI and impact to margins for the business.
f you can reduce assembly cost, this represents, along with the seat cluster with socketed seat stays, you can also increase production with assembly time reduction.
It is a risk decision associated with being innovative in manufacturing/assembly. I really can't fault them. I don't know, maybe JDT knows, if TREK did any FEM of the head tube portion of the frame. I suspect not with an assumption of an engineering safety factor built in .
Quality of the piece delivered is up to the supplier, adding to the risk of some having voids or inclusions that might contribute to the stress riser triggering a failure.
__________________
Bikes don't stand alone. They are two tired.
Bikes don't stand alone. They are two tired.
11-18-21, 05:40 PM
#56
Senior Member

Join Date: Jun 2010
Location: Medford MA
Posts: 2,089
Bikes: Ron Cooper touring, 1959 Jack Taylor 650b ladyback touring tandem, Vitus 979, Joe Bell painted Claud Butler Dalesman, Colin Laing curved tube tandem, heavily-Dilberted 1982 Trek 6xx, René Herse tandem
Mentioned: 80 Post(s)
Tagged: 0 Thread(s)
Quoted: 964 Post(s)
Liked 1,451 Times
in
723 Posts
Thanks for all the responses about this! I've definitely learned something about Trek history, reading these posts.
These 600 series bikes look to have had the rear (seatstays, chainstays) and the front (headtube, fork) done by outside contractors in Japan. That started in '82, the year of my bike. I had been under the impression that the whole thing was made in Japan, but looking at the Vintage-Trek website set me straight.
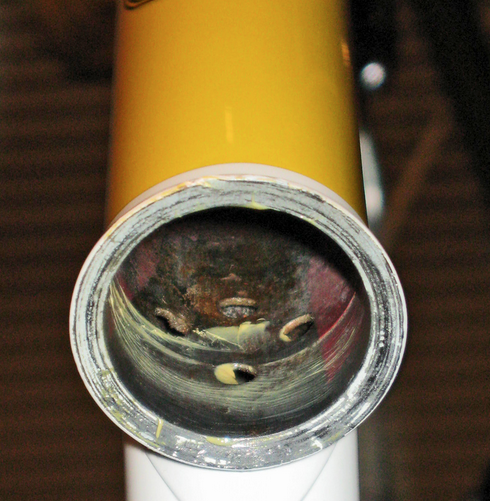
Maybe mine is brazed with silver, and I've misjudged the metals. I am looking deep into the headtube using a flashlight, and all the filler's corroded in there, making it difficult. The Trek brochures from '82 are pretty vague, they just say "low temperature" which is not very specific but could mean silver (or could mean they are very careful with bronze!!). I know the fork and rear triangle were done with bronze. In either case, gently heating and peeling the faux lugs will be the way I disassemble.
I've ordered a headtube and some lugs from Framebuilder Supply. I'm also grateful for the discussion about how big the vent holes should be, in the headtube where the lugs/tubes are brazed in. I will be making them small, probably a just one little hole to make snaking dynamo wire through the downtube easier.
These 600 series bikes look to have had the rear (seatstays, chainstays) and the front (headtube, fork) done by outside contractors in Japan. That started in '82, the year of my bike. I had been under the impression that the whole thing was made in Japan, but looking at the Vintage-Trek website set me straight.
Maybe mine is brazed with silver, and I've misjudged the metals. I am looking deep into the headtube using a flashlight, and all the filler's corroded in there, making it difficult. The Trek brochures from '82 are pretty vague, they just say "low temperature" which is not very specific but could mean silver (or could mean they are very careful with bronze!!). I know the fork and rear triangle were done with bronze. In either case, gently heating and peeling the faux lugs will be the way I disassemble.
I've ordered a headtube and some lugs from Framebuilder Supply. I'm also grateful for the discussion about how big the vent holes should be, in the headtube where the lugs/tubes are brazed in. I will be making them small, probably a just one little hole to make snaking dynamo wire through the downtube easier.
__________________
Owner & co-founder, Cycles René Hubris. Unfortunately attaching questionable braze-ons to perfectly good frames since about 2015. With style.
Owner & co-founder, Cycles René Hubris. Unfortunately attaching questionable braze-ons to perfectly good frames since about 2015. With style.
11-18-21, 06:04 PM
#57

Senior Member
Join Date: Jun 2006
Posts: 20,305
Mentioned: 130 Post(s)
Tagged: 0 Thread(s)
Quoted: 3464 Post(s)
Liked 2,827 Times
in
1,995 Posts
Here is a guide:
As done by Mr. Confente
As done by Mr. Confente
01-06-22, 03:18 PM
#58
Senior Member
Join Date: Jun 2010
Location: Medford MA
Posts: 2,089
Bikes: Ron Cooper touring, 1959 Jack Taylor 650b ladyback touring tandem, Vitus 979, Joe Bell painted Claud Butler Dalesman, Colin Laing curved tube tandem, heavily-Dilberted 1982 Trek 6xx, René Herse tandem
Mentioned: 80 Post(s)
Tagged: 0 Thread(s)
Quoted: 964 Post(s)
Liked 1,451 Times
in
723 Posts
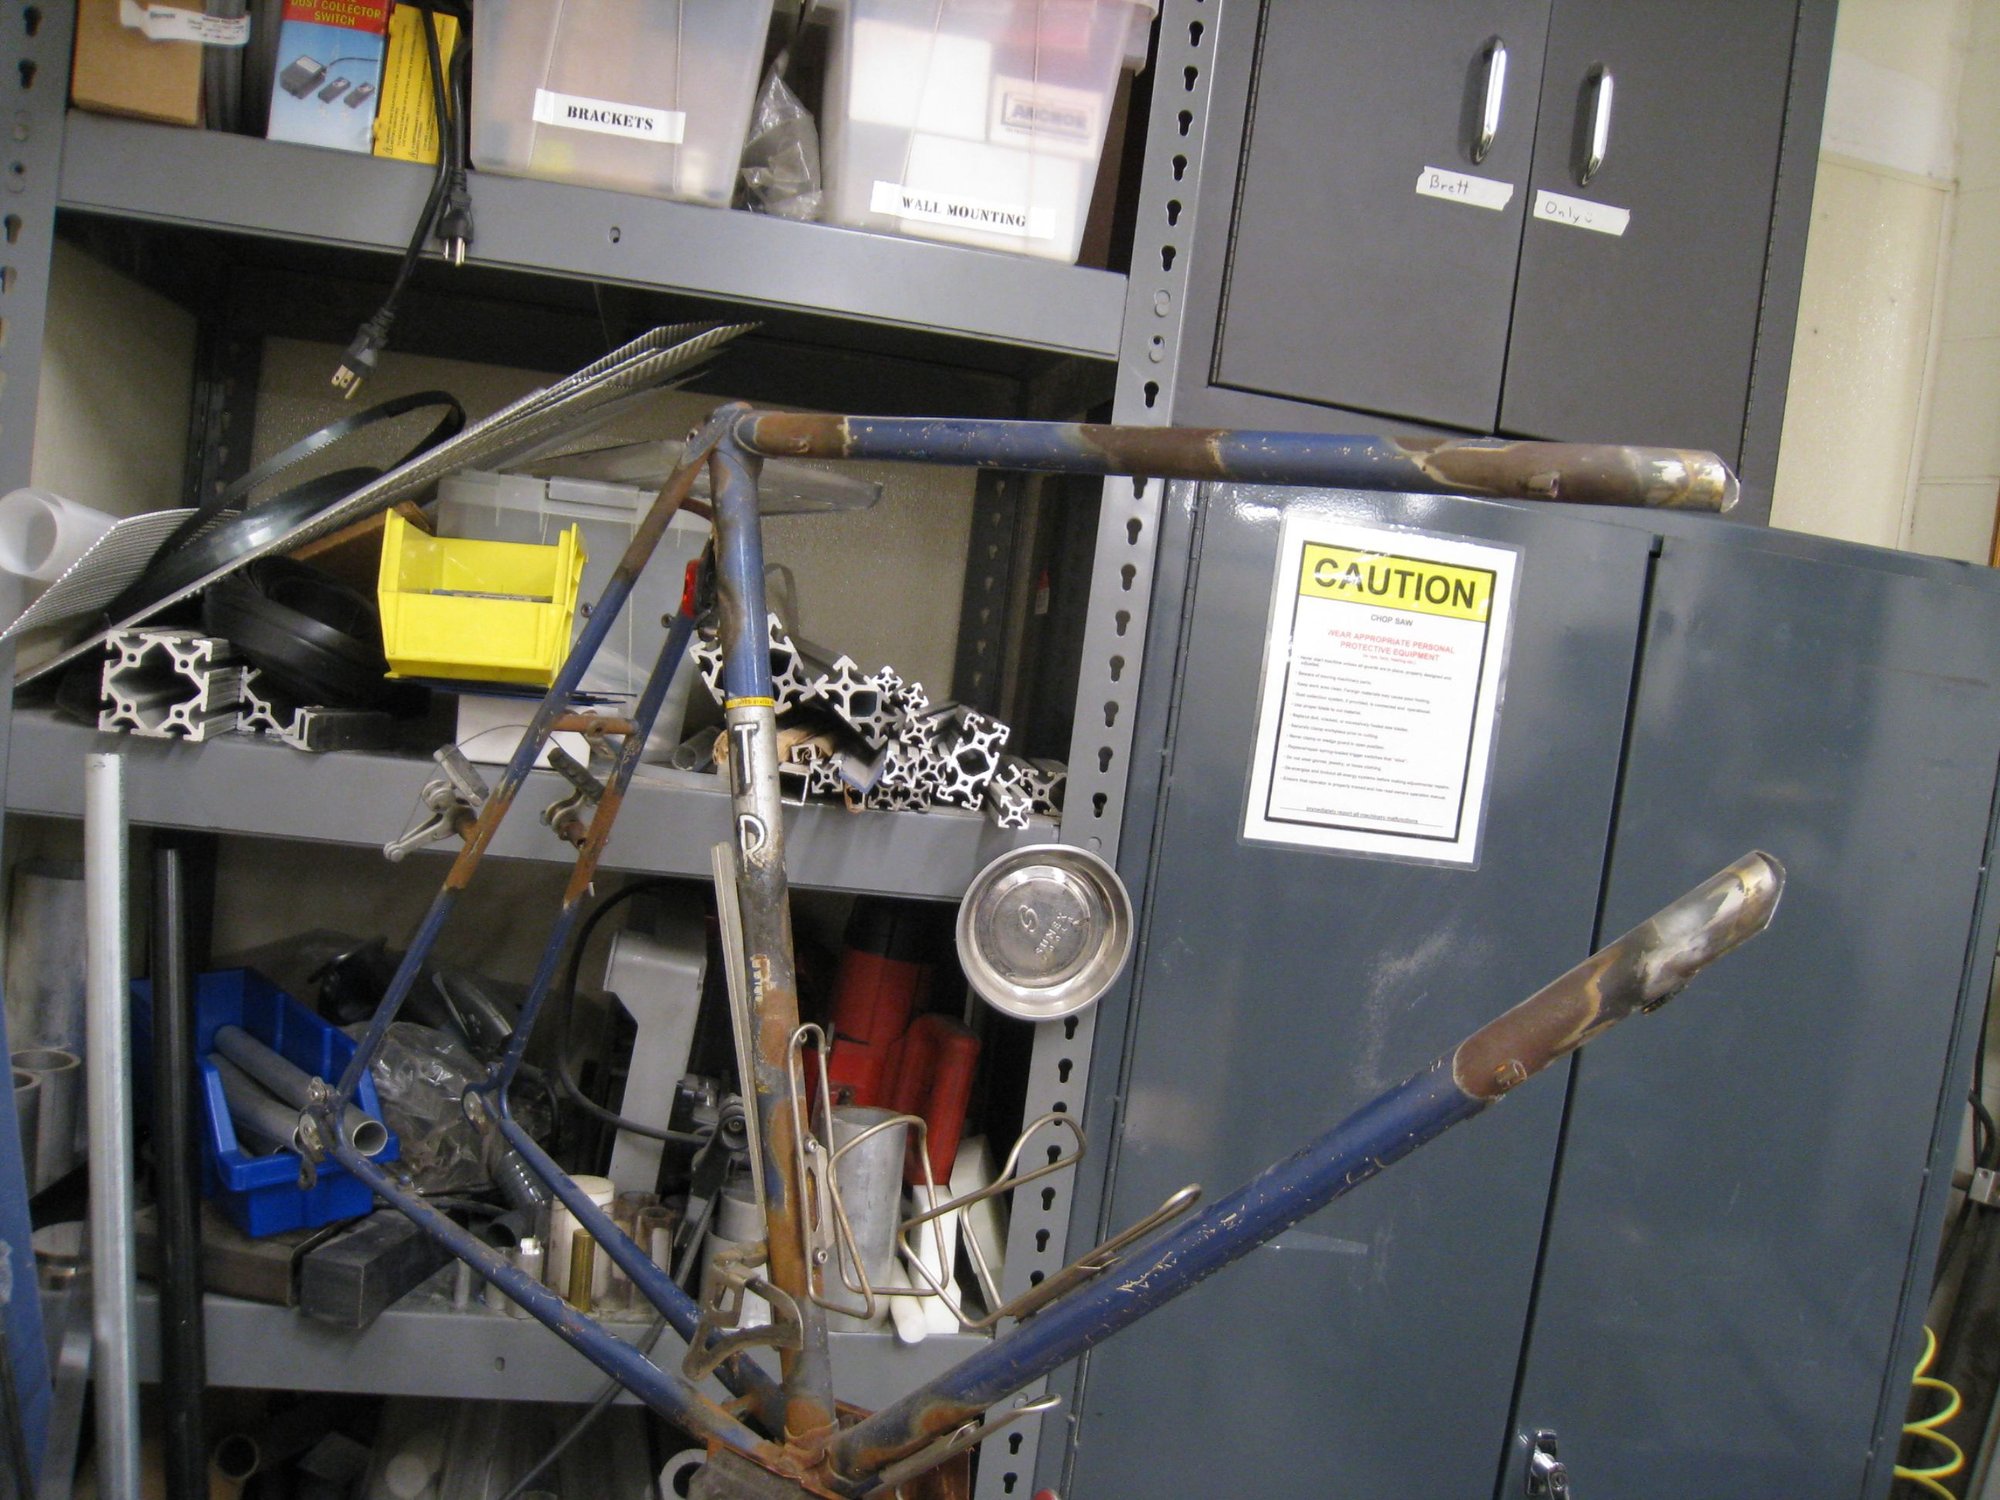
Here I go! I will replace this headtube.
Before I started disassembly work, I decided to take measurements of the frame. The top tube is bent a little (likely because of a dent in the middle), so the angles are hard to get. But basically, even though this frame was marketed as a 73/73 seat/head tube, it is not. If you put the top tube level, the seat tube is 73.5 and the head tube is 74.5. Wild! That might explain the ultra twitchy handling. With my raked-out fork, I had under 30mm of trail! That's French Tandem territory. I do have to say, it was quite easy on the arms for a tired rider, however. I may slacken the head angle by half a degree when I put the new head tube on, to make things a tiny bit less extreme.
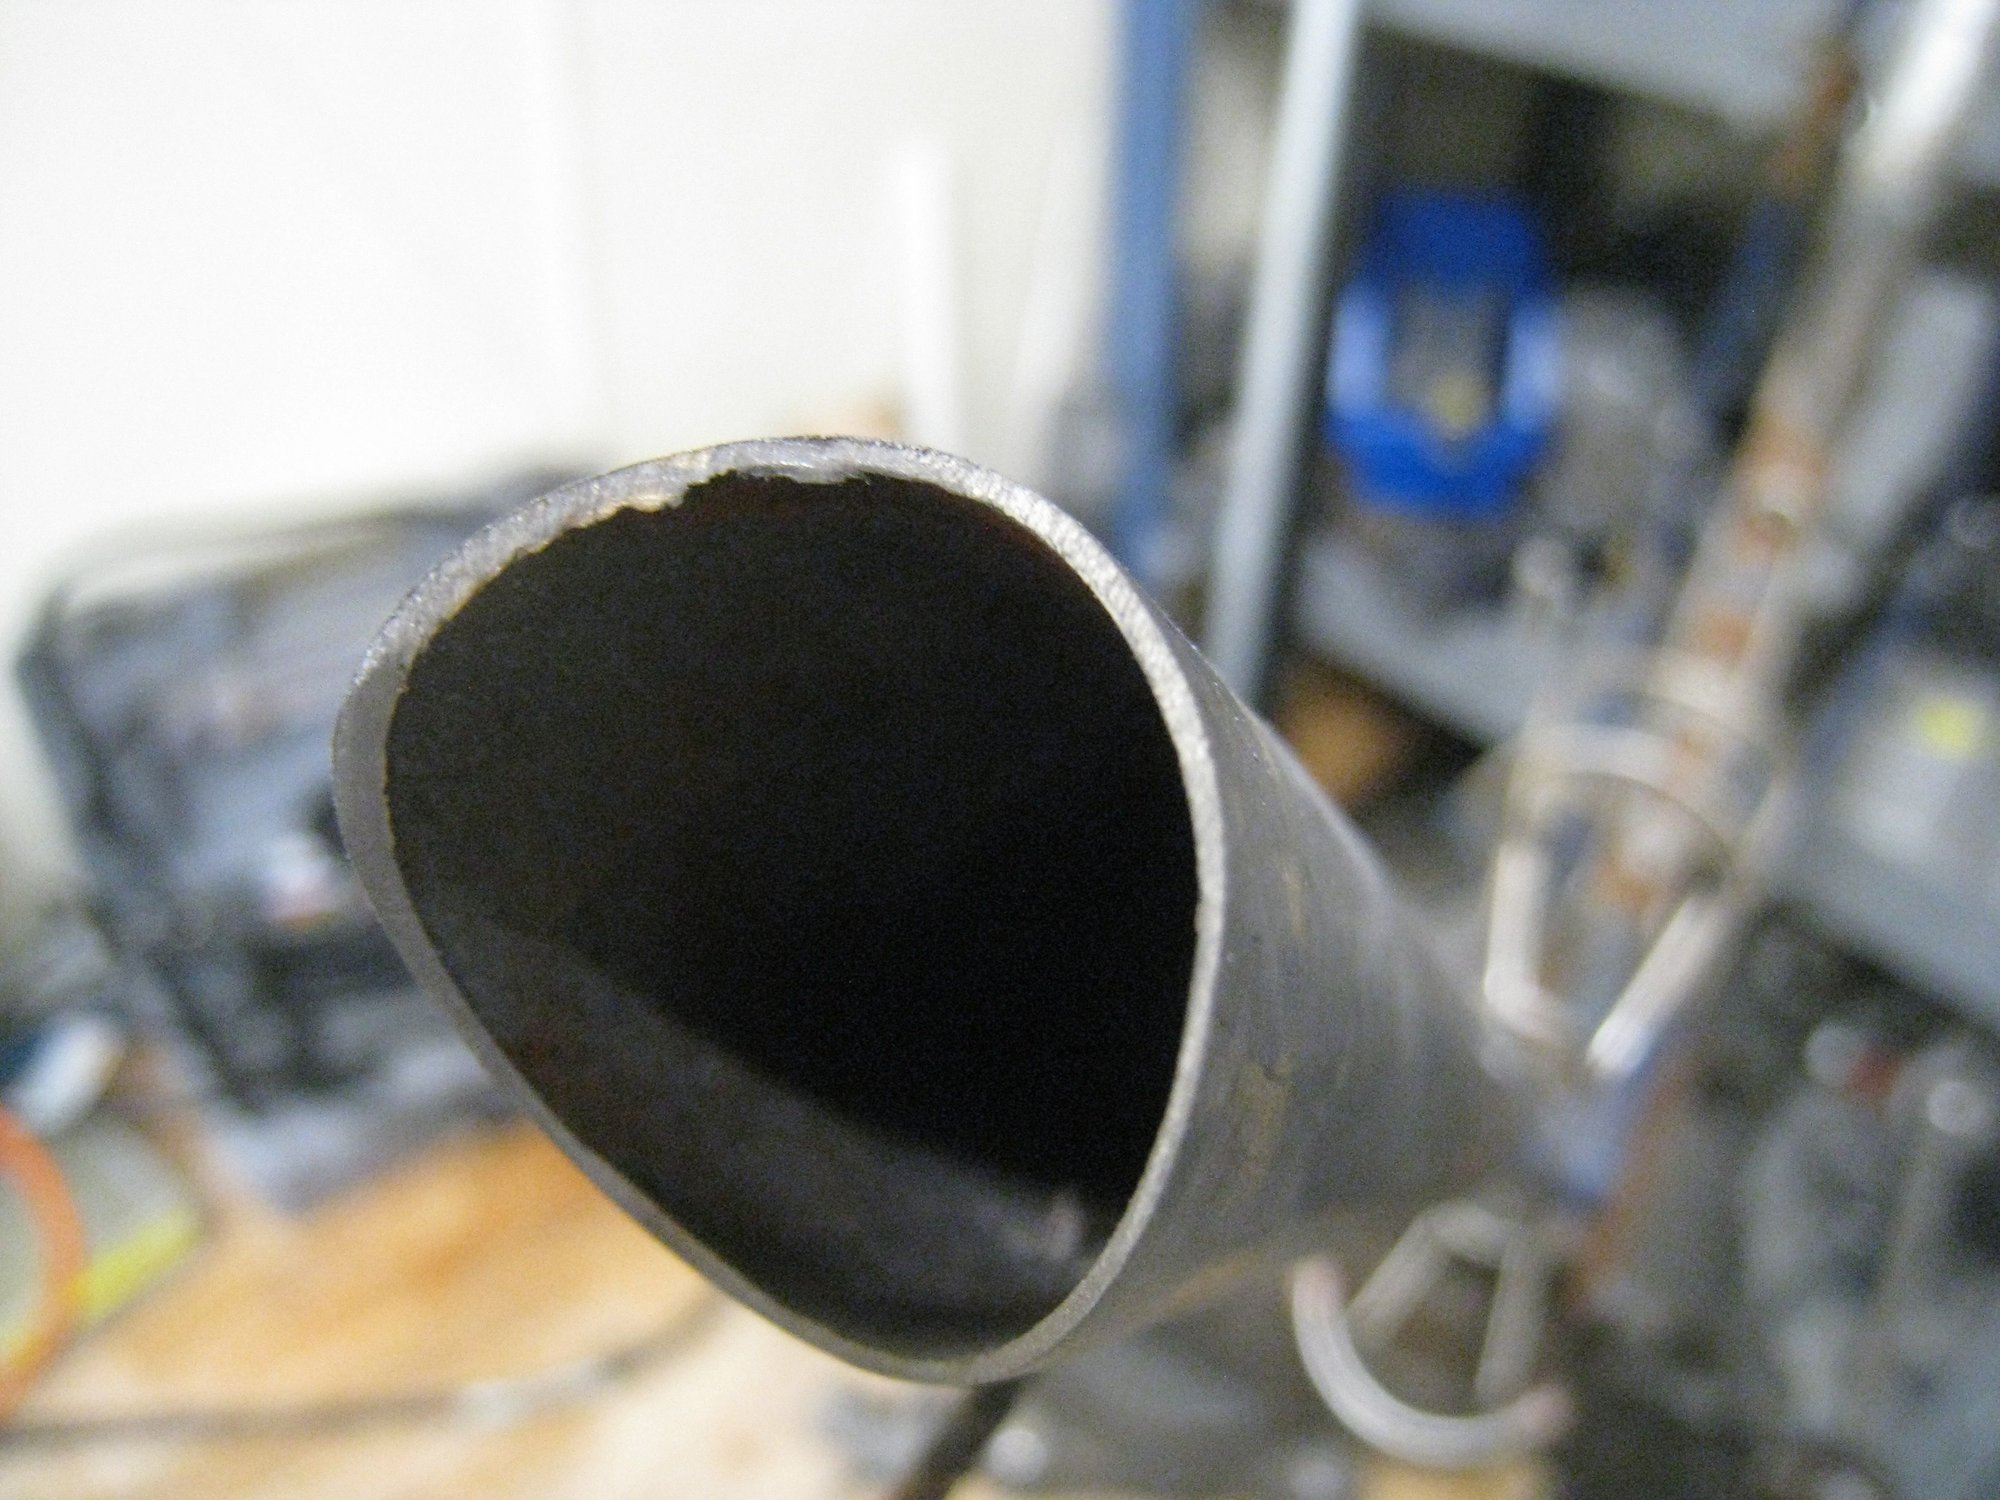
First, for prep, I filleted (flayed??) the head tube, with an angle grinder and hacksaw.
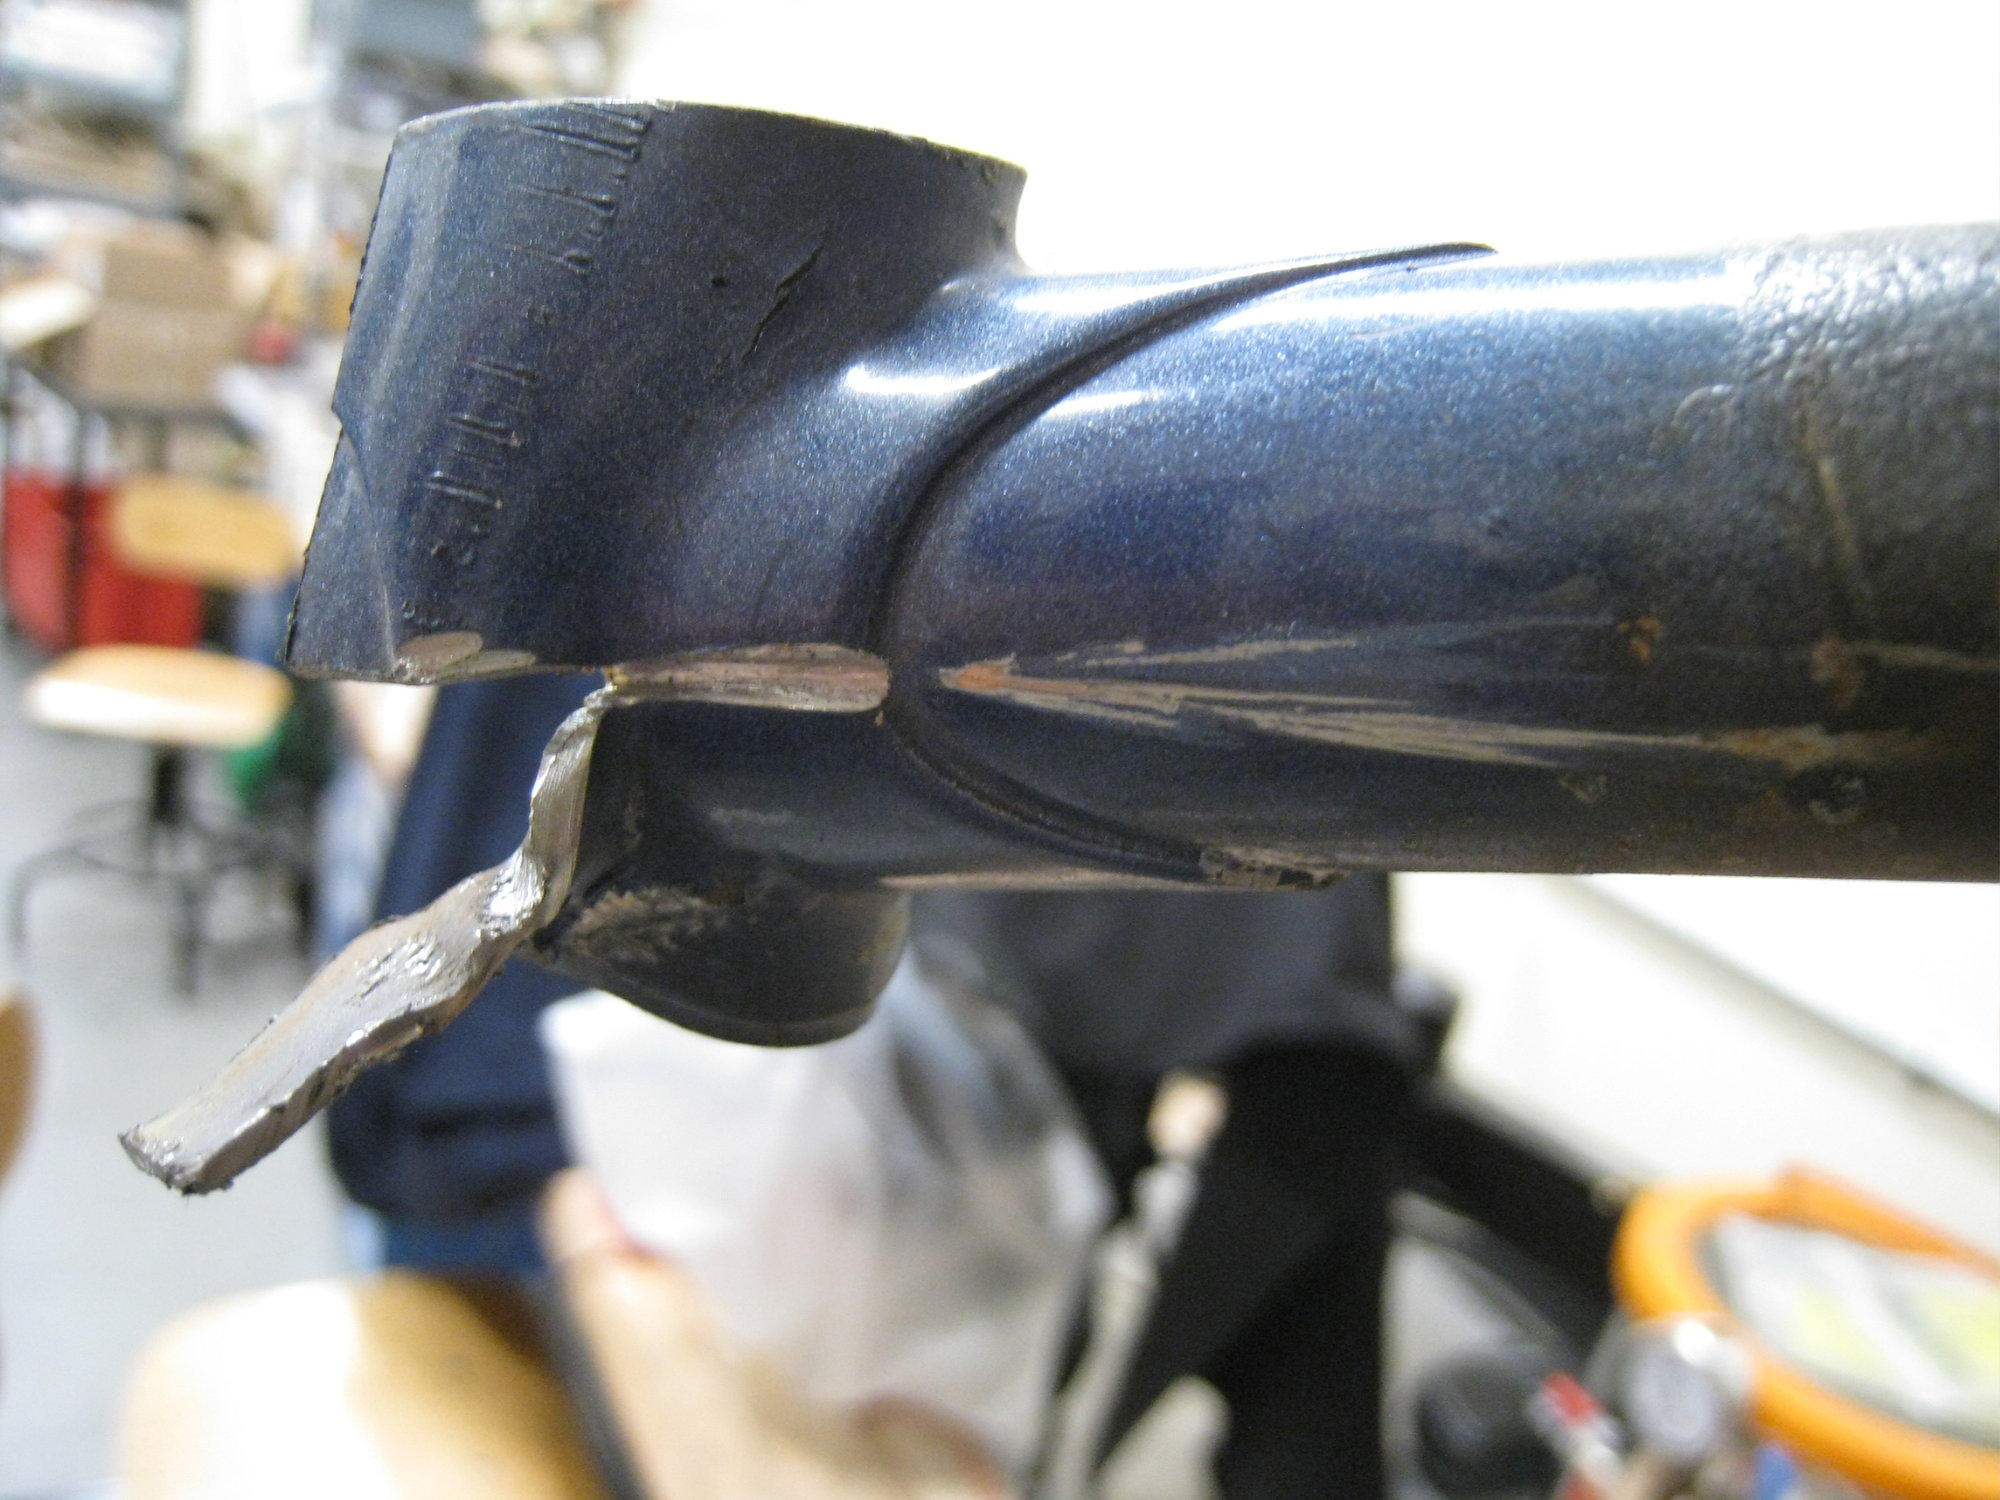
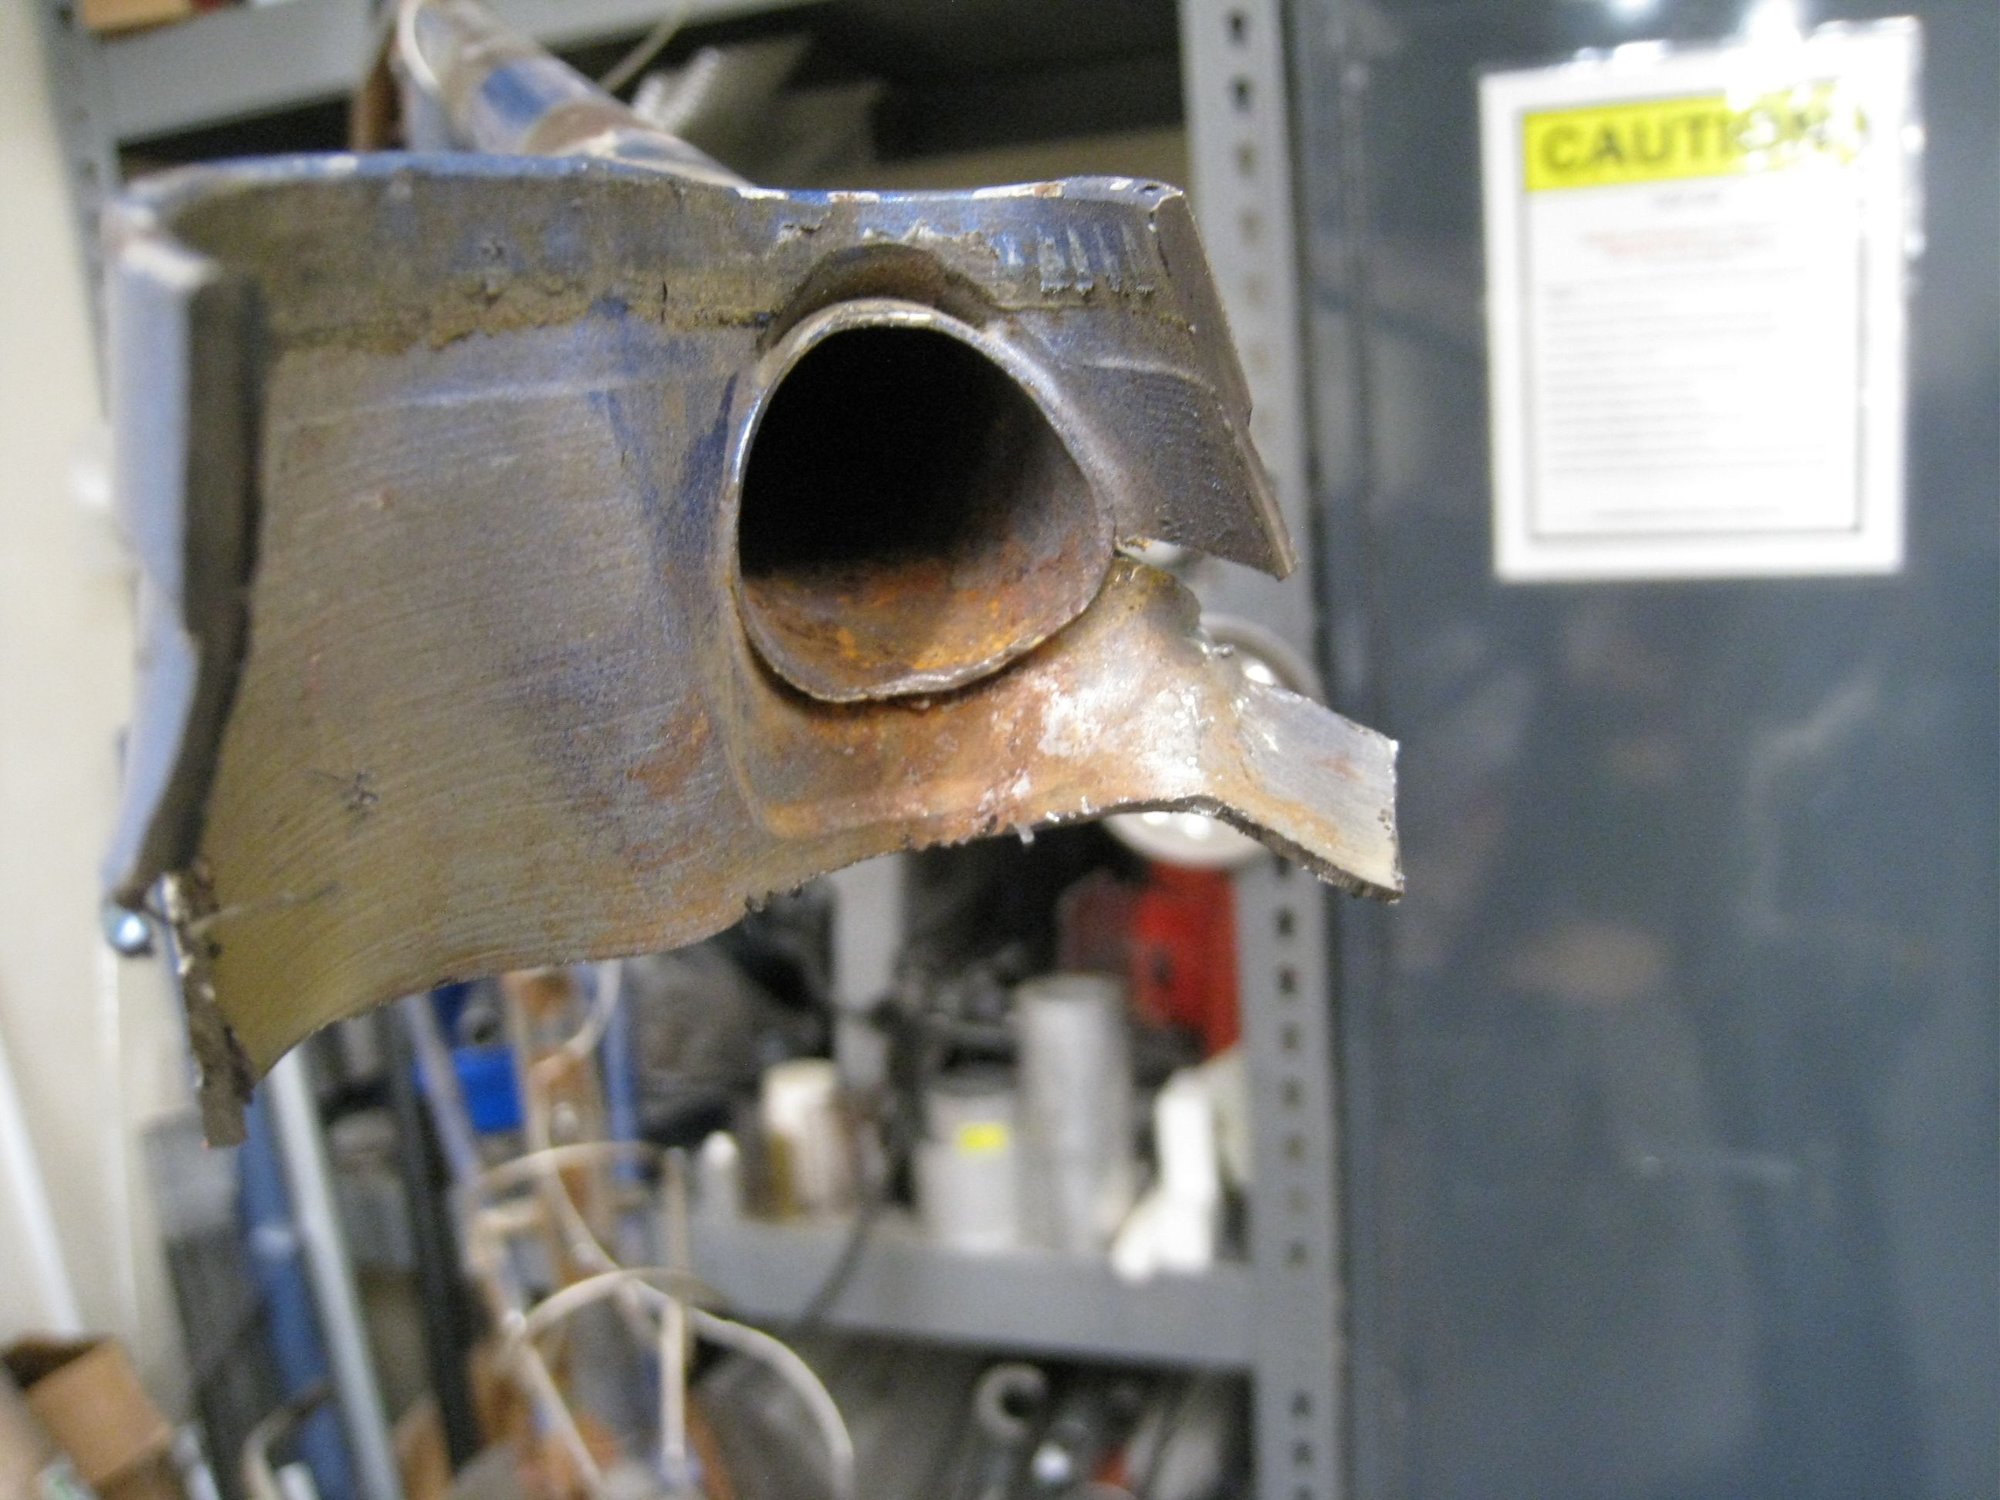
Then, I torched it up and peeled the lugs off. The red you see is not me overheating the steel. It's dust on the steel glowing, not the steel itself. A lot of dust was created when I cut everything apart. You can tell in person, but not so much in pictures. In any case, I did not cook a tube. I only did it with propane, and it was enough.

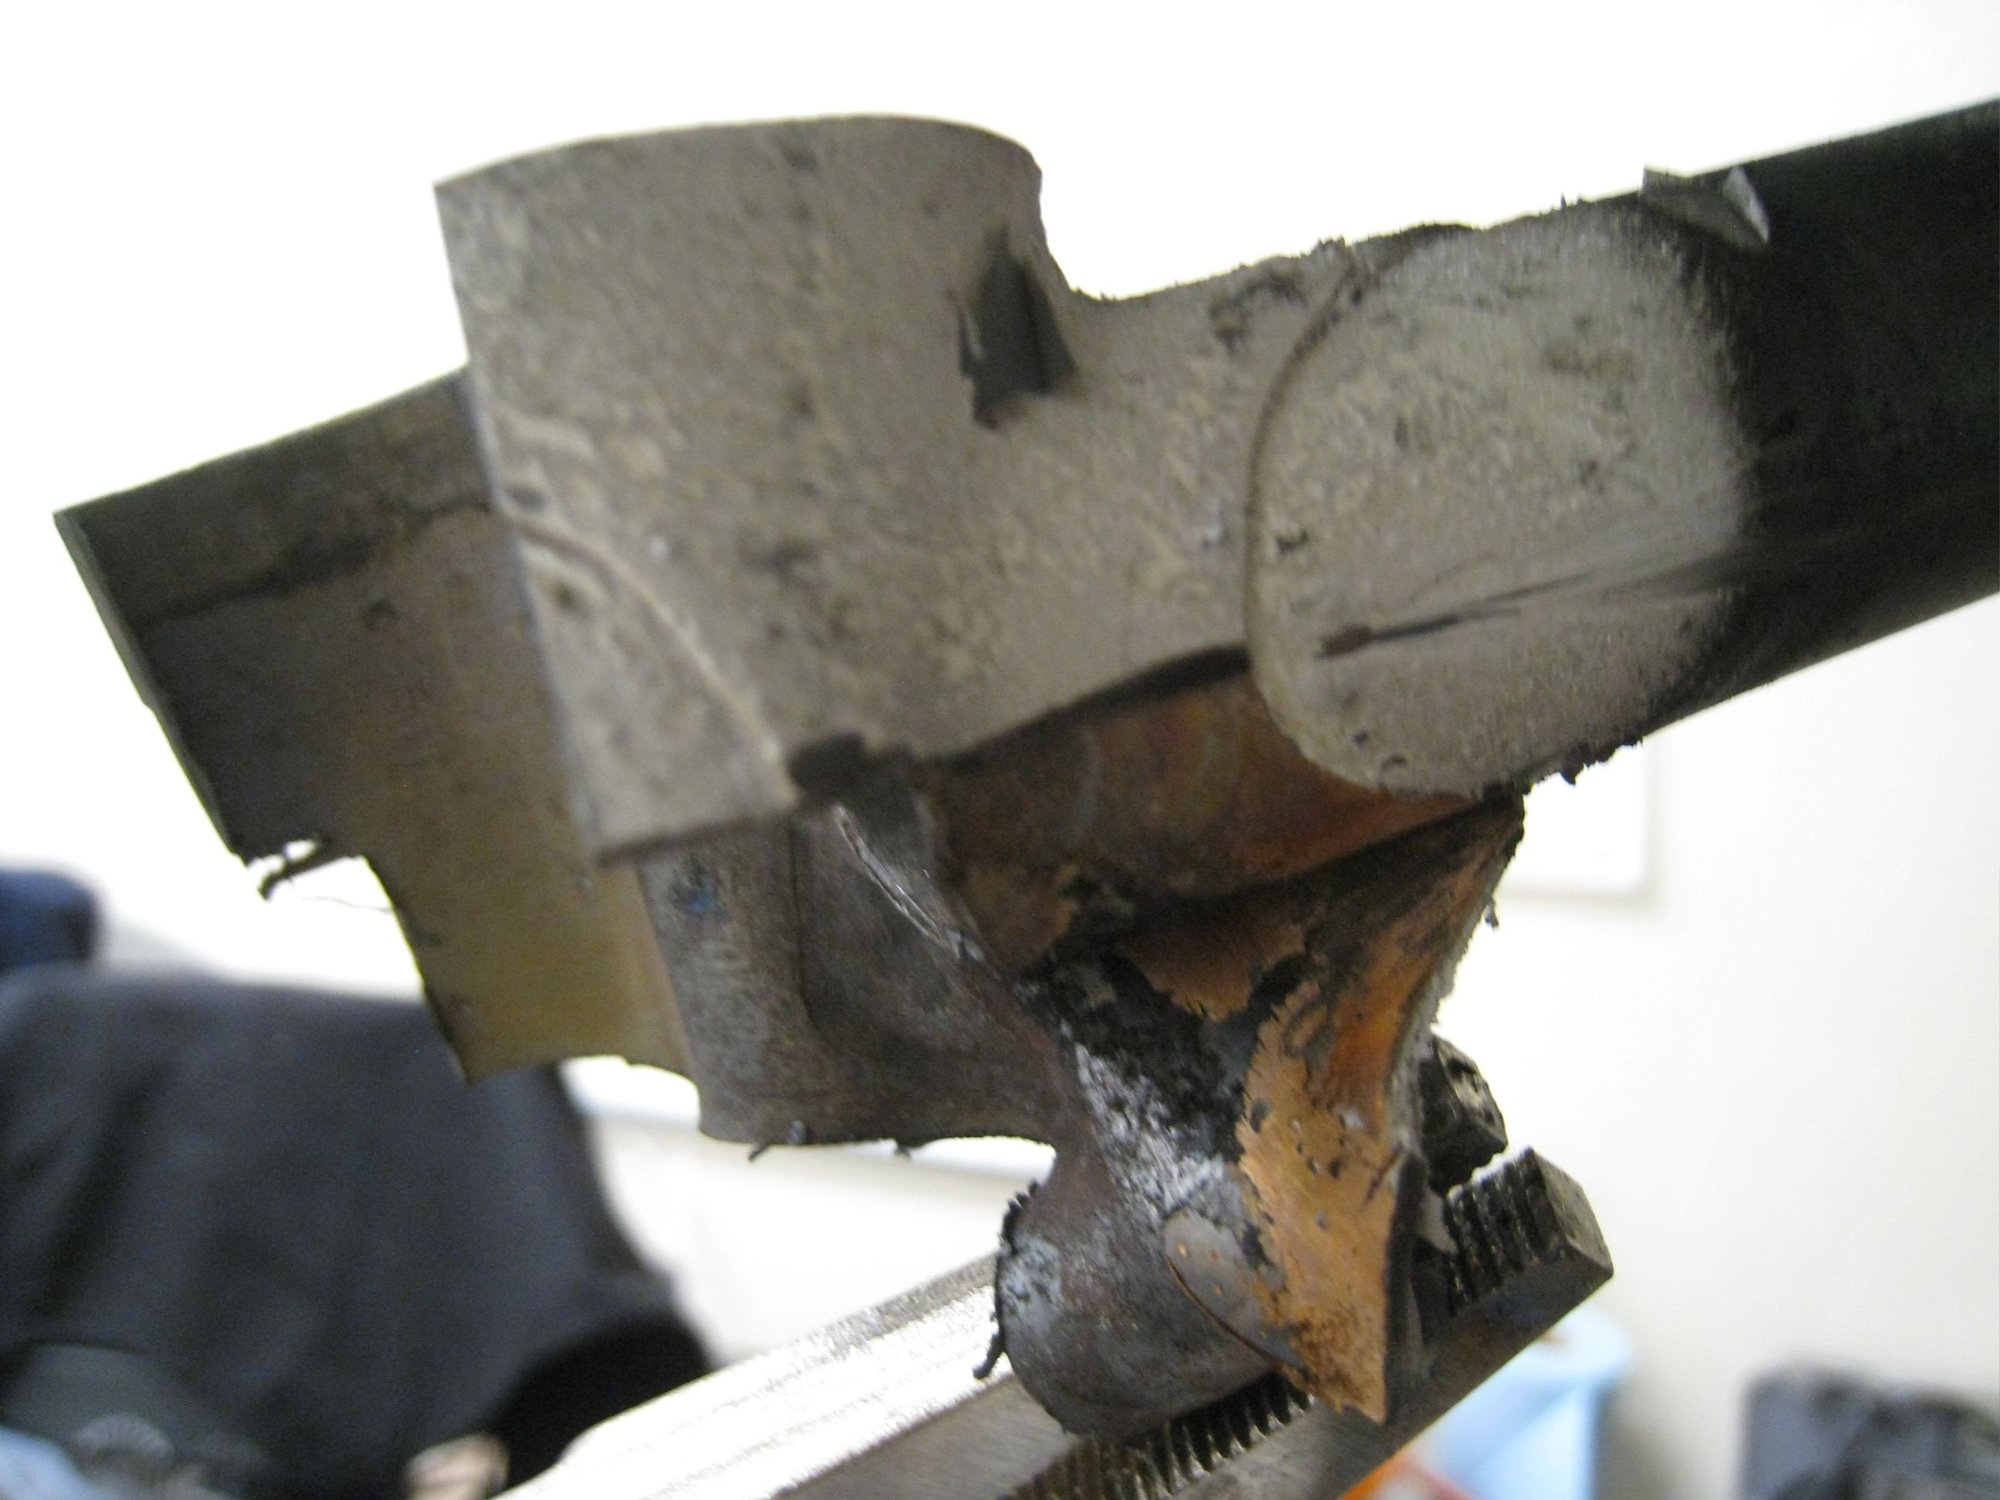
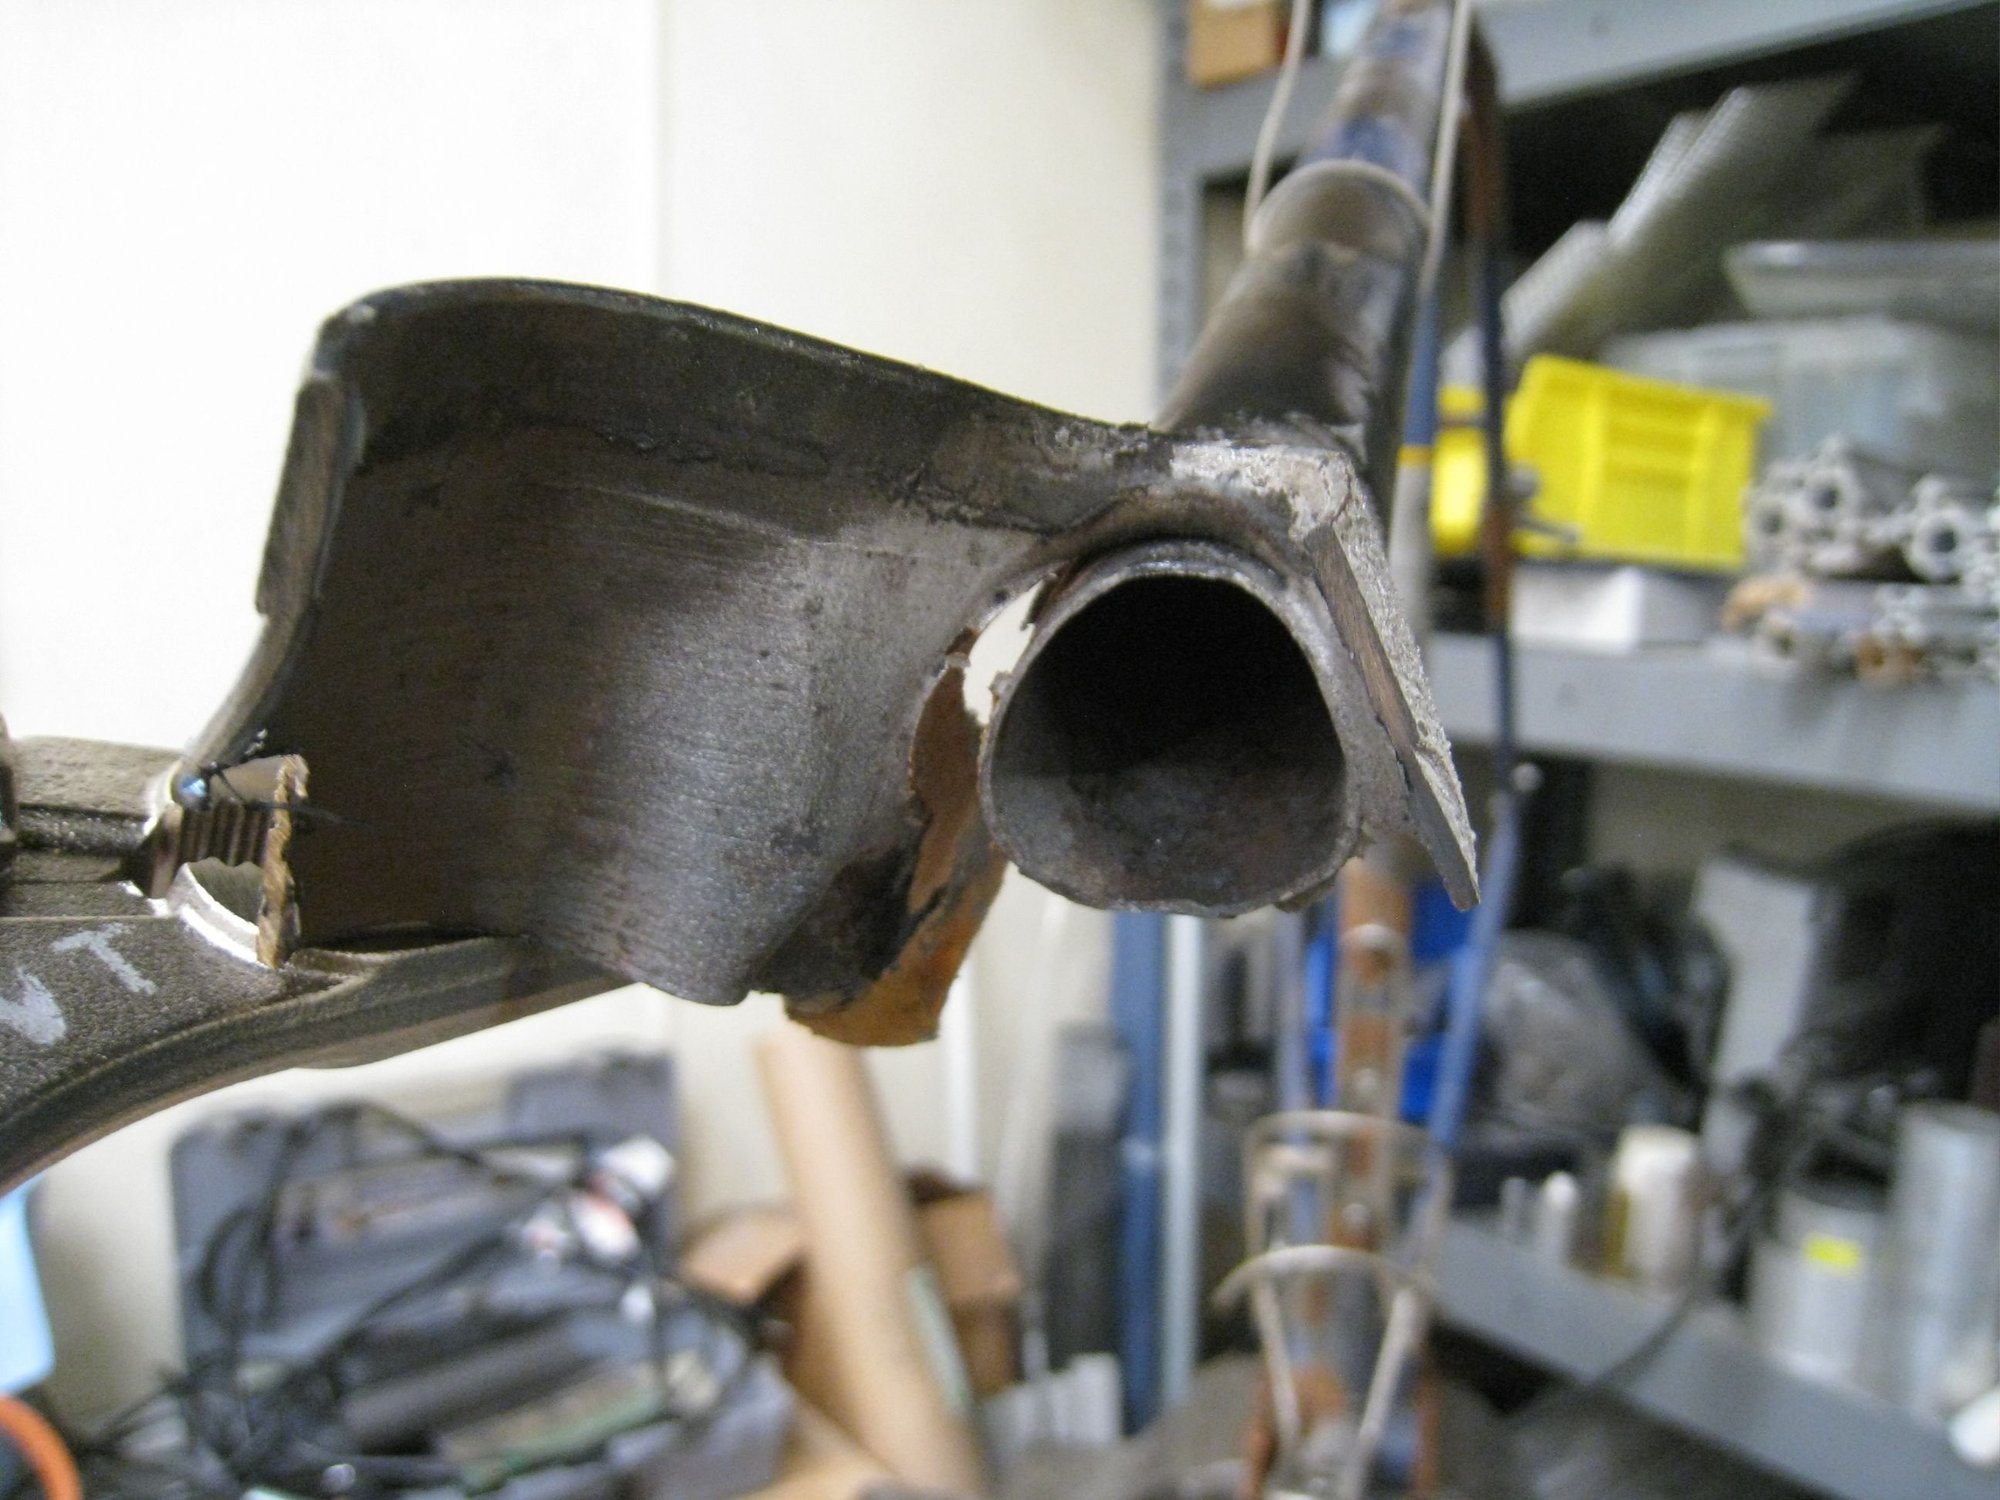
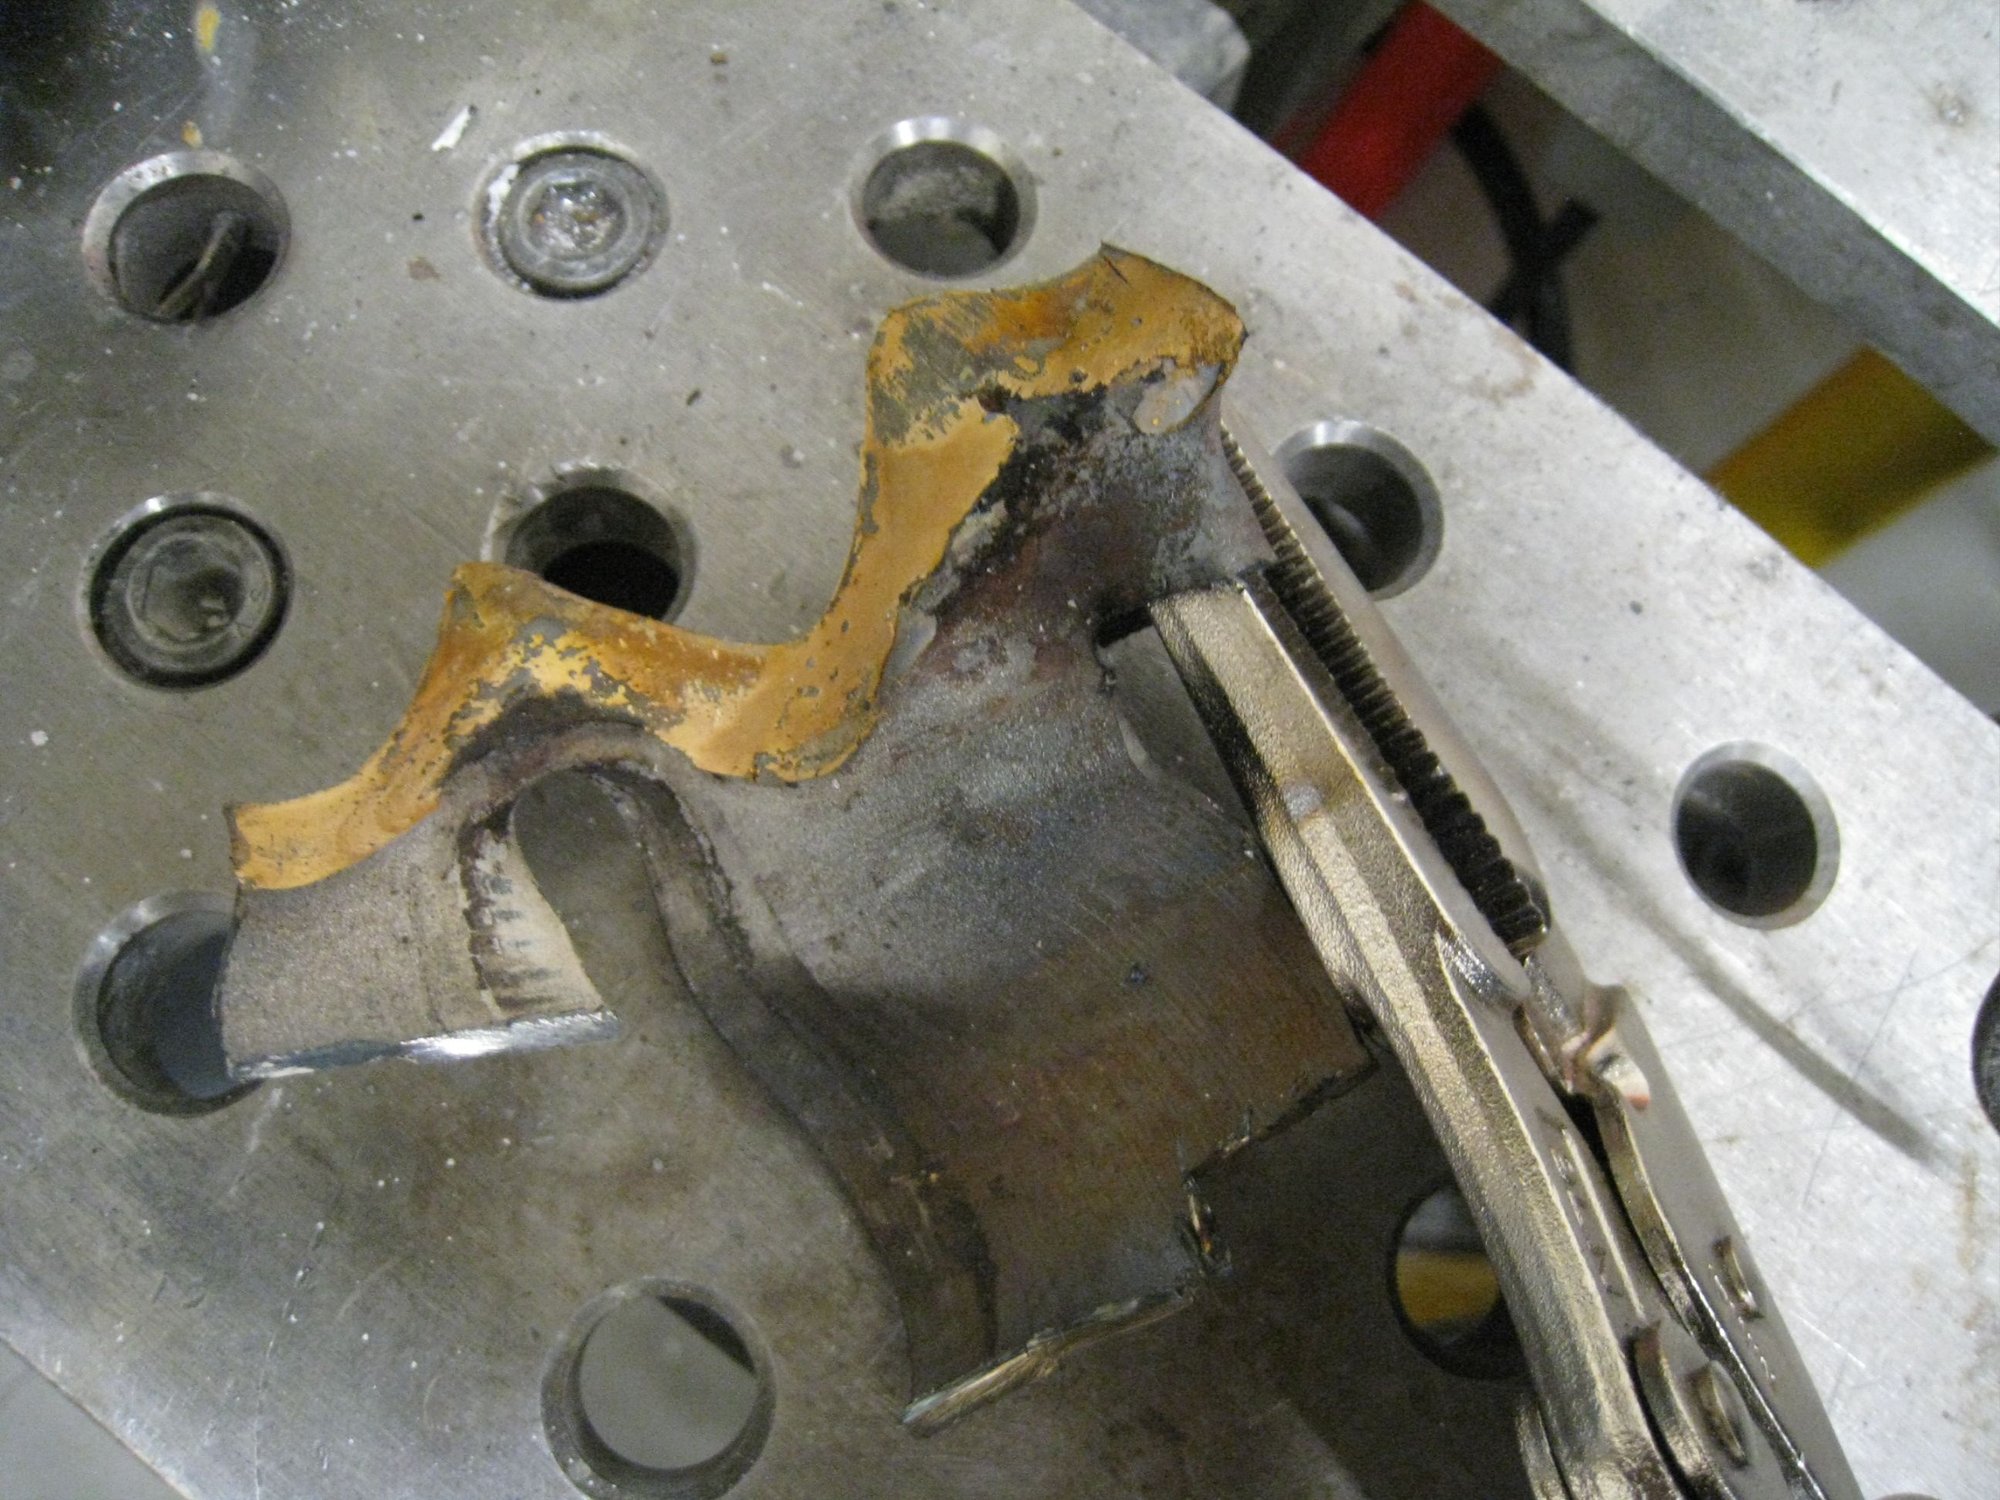
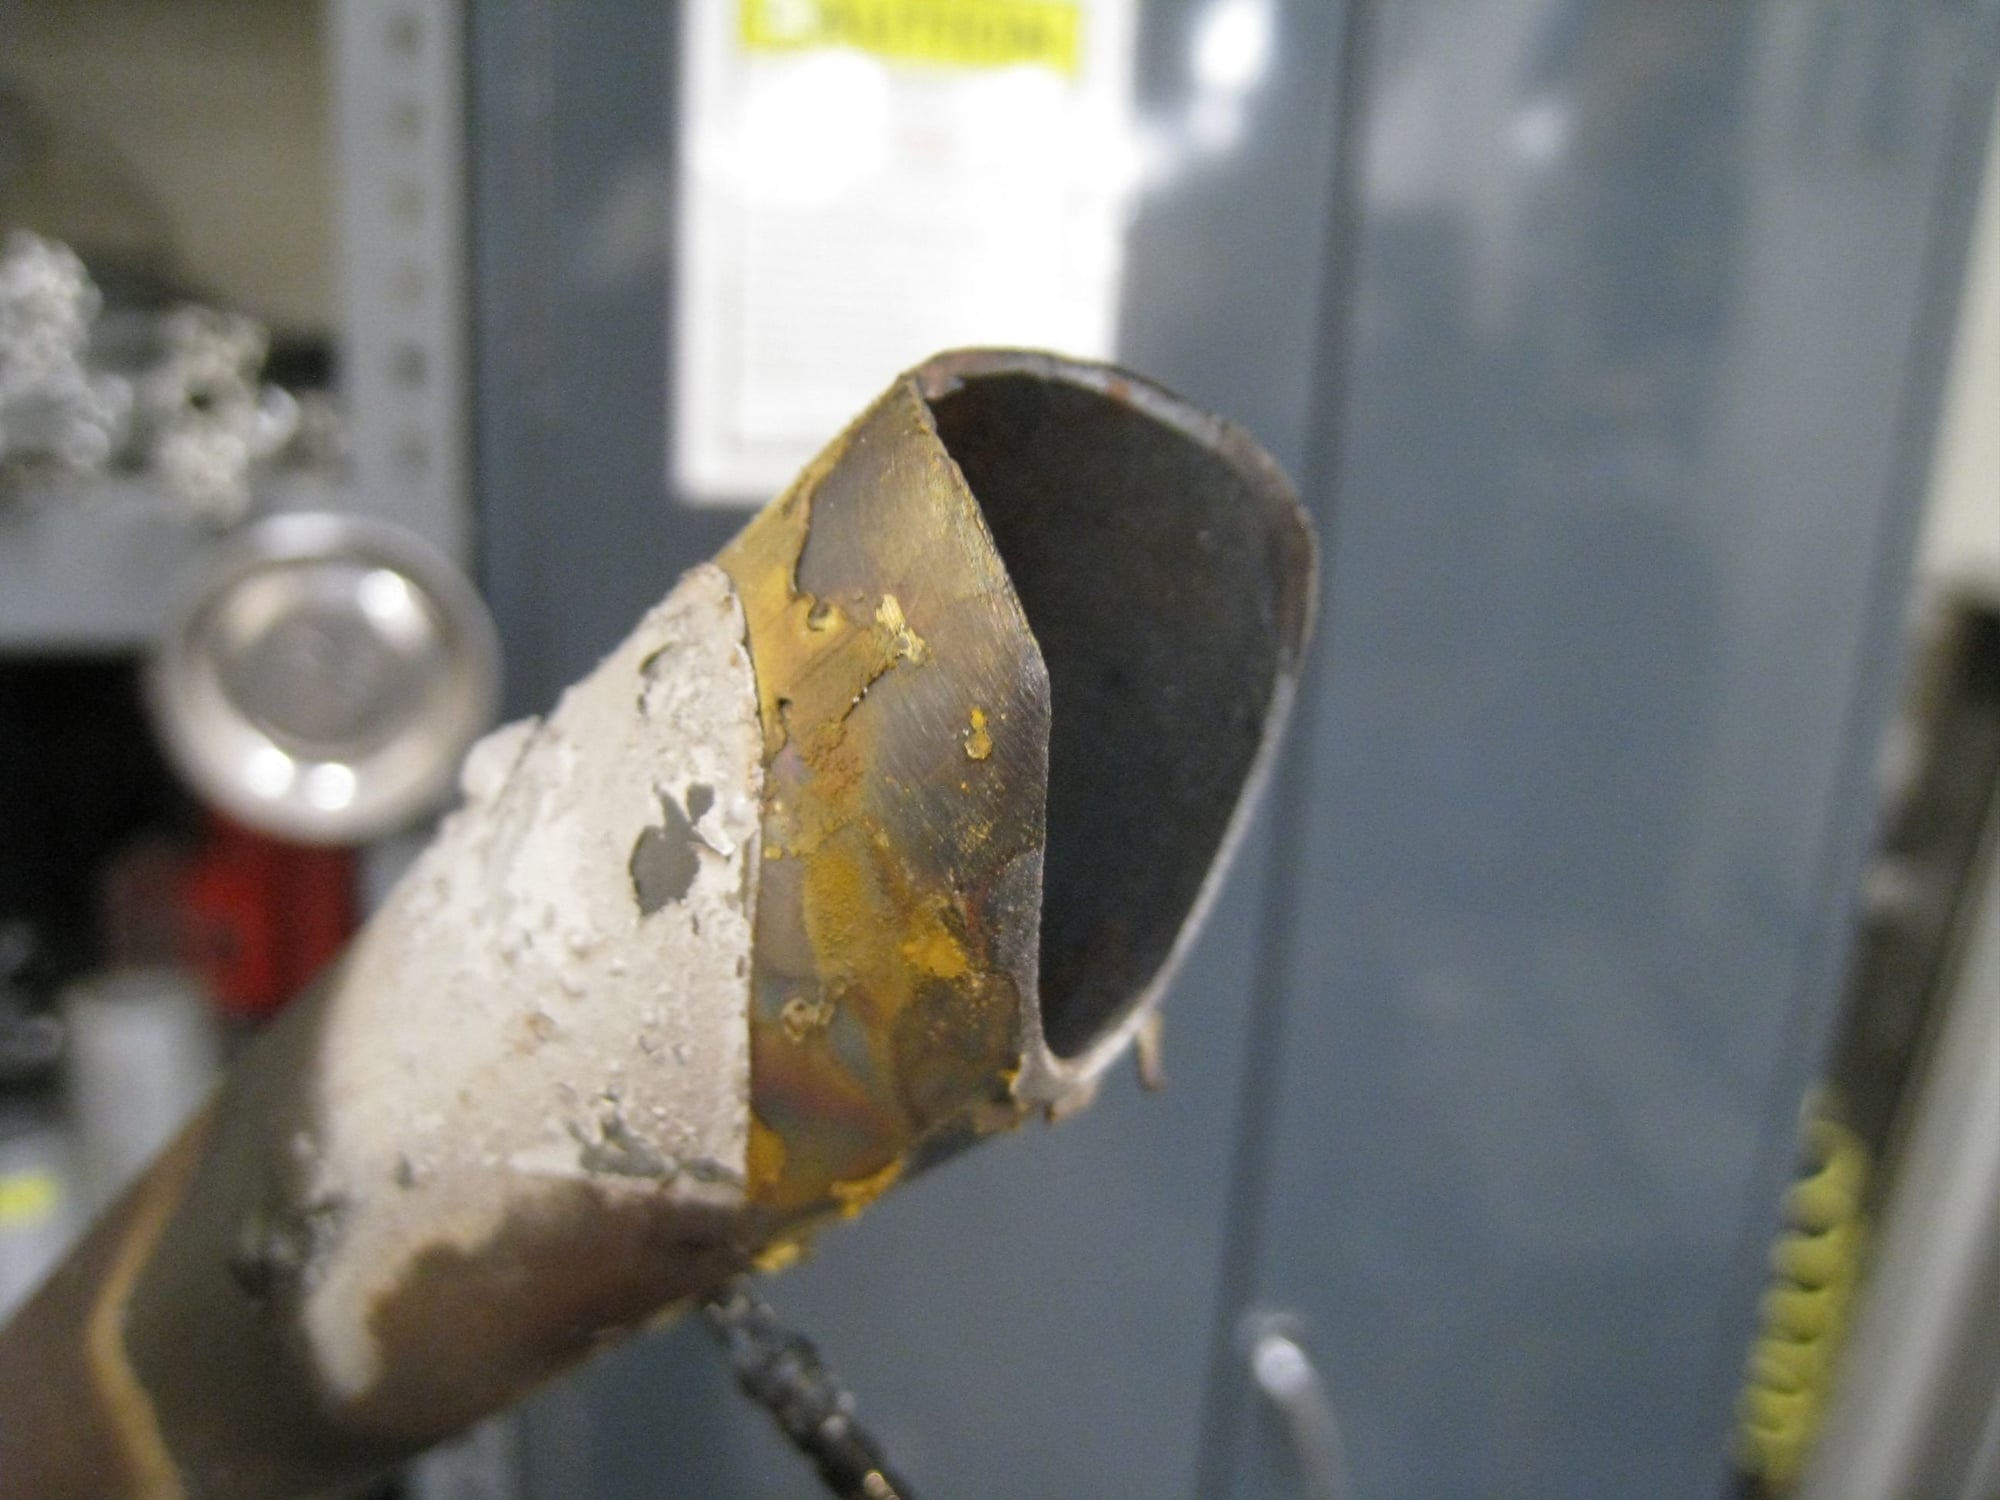
After a chat with Jack at Franklin Frame, who is doing some chroming for my René Herse project, I got the same advice as elsewhere: peel the lugs off with low-moderate heat. So that's what I did. I only used propane for this - it worked fine - so it must be the bike was brazed with a high-silver of some sort.
Jack told me to expect the original miters to be wrong. Boy, was he right! I will have to redo both, to a significant degree!
So, next: the hard part, sanding and re-mitering!
Before I started disassembly work, I decided to take measurements of the frame. The top tube is bent a little (likely because of a dent in the middle), so the angles are hard to get. But basically, even though this frame was marketed as a 73/73 seat/head tube, it is not. If you put the top tube level, the seat tube is 73.5 and the head tube is 74.5. Wild! That might explain the ultra twitchy handling. With my raked-out fork, I had under 30mm of trail! That's French Tandem territory. I do have to say, it was quite easy on the arms for a tired rider, however. I may slacken the head angle by half a degree when I put the new head tube on, to make things a tiny bit less extreme.
First, for prep, I filleted (flayed??) the head tube, with an angle grinder and hacksaw.
Then, I torched it up and peeled the lugs off. The red you see is not me overheating the steel. It's dust on the steel glowing, not the steel itself. A lot of dust was created when I cut everything apart. You can tell in person, but not so much in pictures. In any case, I did not cook a tube. I only did it with propane, and it was enough.
After a chat with Jack at Franklin Frame, who is doing some chroming for my René Herse project, I got the same advice as elsewhere: peel the lugs off with low-moderate heat. So that's what I did. I only used propane for this - it worked fine - so it must be the bike was brazed with a high-silver of some sort.
Jack told me to expect the original miters to be wrong. Boy, was he right! I will have to redo both, to a significant degree!
So, next: the hard part, sanding and re-mitering!
__________________
Owner & co-founder, Cycles René Hubris. Unfortunately attaching questionable braze-ons to perfectly good frames since about 2015. With style.
Owner & co-founder, Cycles René Hubris. Unfortunately attaching questionable braze-ons to perfectly good frames since about 2015. With style.
Last edited by scarlson; 01-08-22 at 02:43 PM.
Likes For scarlson:
01-06-22, 04:22 PM
#59
Senior Member
Join Date: Oct 2005
Location: Upper Left, USA
Posts: 1,915
Mentioned: 50 Post(s)
Tagged: 0 Thread(s)
Quoted: 634 Post(s)
Liked 444 Times
in
298 Posts
Here I go! I will replace this headtube.
Before I started disassembly work, I decided to take measurements of the frame. The top tube is bent a little (likely because of a dent in the middle), so the angles are hard to get. But basically, even though this frame was marketed as a 73/73 seat/head tube, it is not. If you put the top tube level, the seat tube is 73.5 and the head tube is 74.5. Wild! That might explain the ultra twitchy handling. With my raked-out fork, I had under 30mm of trail! That's French Tandem territory. I do have to say, it was quite easy on the arms for a tired rider, however. I may slacken the head angle by half a degree when I put the new head tube on, to make things a tiny bit less extreme.
First, for prep, I filleted (flayed??) the head tube, with an angle grinder and hacksaw.
Then, I torched it up and peeled the lugs off. The red you see is not me overheating the steel. It's dust on the steel glowing, not the steel itself. A lot of dust was created when I cut everything apart. You can tell in person, but not so much in pictures. In any case, I did not cook a tube. I only did it with propane, and it was enough.
After a chat with Franklin Frame, who is doing some chroming for my René Herse project, I got the same advice as elsewhere: peel the lugs off with low-moderate heat. So that's what I did. I only used propane for this - it worked fine - so it must be the bike was brazed with a high-silver of some sort.
Franklin told me to expect the original miters to be wrong. Boy, was he right! I will have to redo both, to a significant degree!
So, next: the hard part, sanding and re-mitering!
01-06-22, 05:53 PM
#60
Senior Member
Join Date: Jun 2010
Location: Medford MA
Posts: 2,089
Bikes: Ron Cooper touring, 1959 Jack Taylor 650b ladyback touring tandem, Vitus 979, Joe Bell painted Claud Butler Dalesman, Colin Laing curved tube tandem, heavily-Dilberted 1982 Trek 6xx, René Herse tandem
Mentioned: 80 Post(s)
Tagged: 0 Thread(s)
Quoted: 964 Post(s)
Liked 1,451 Times
in
723 Posts
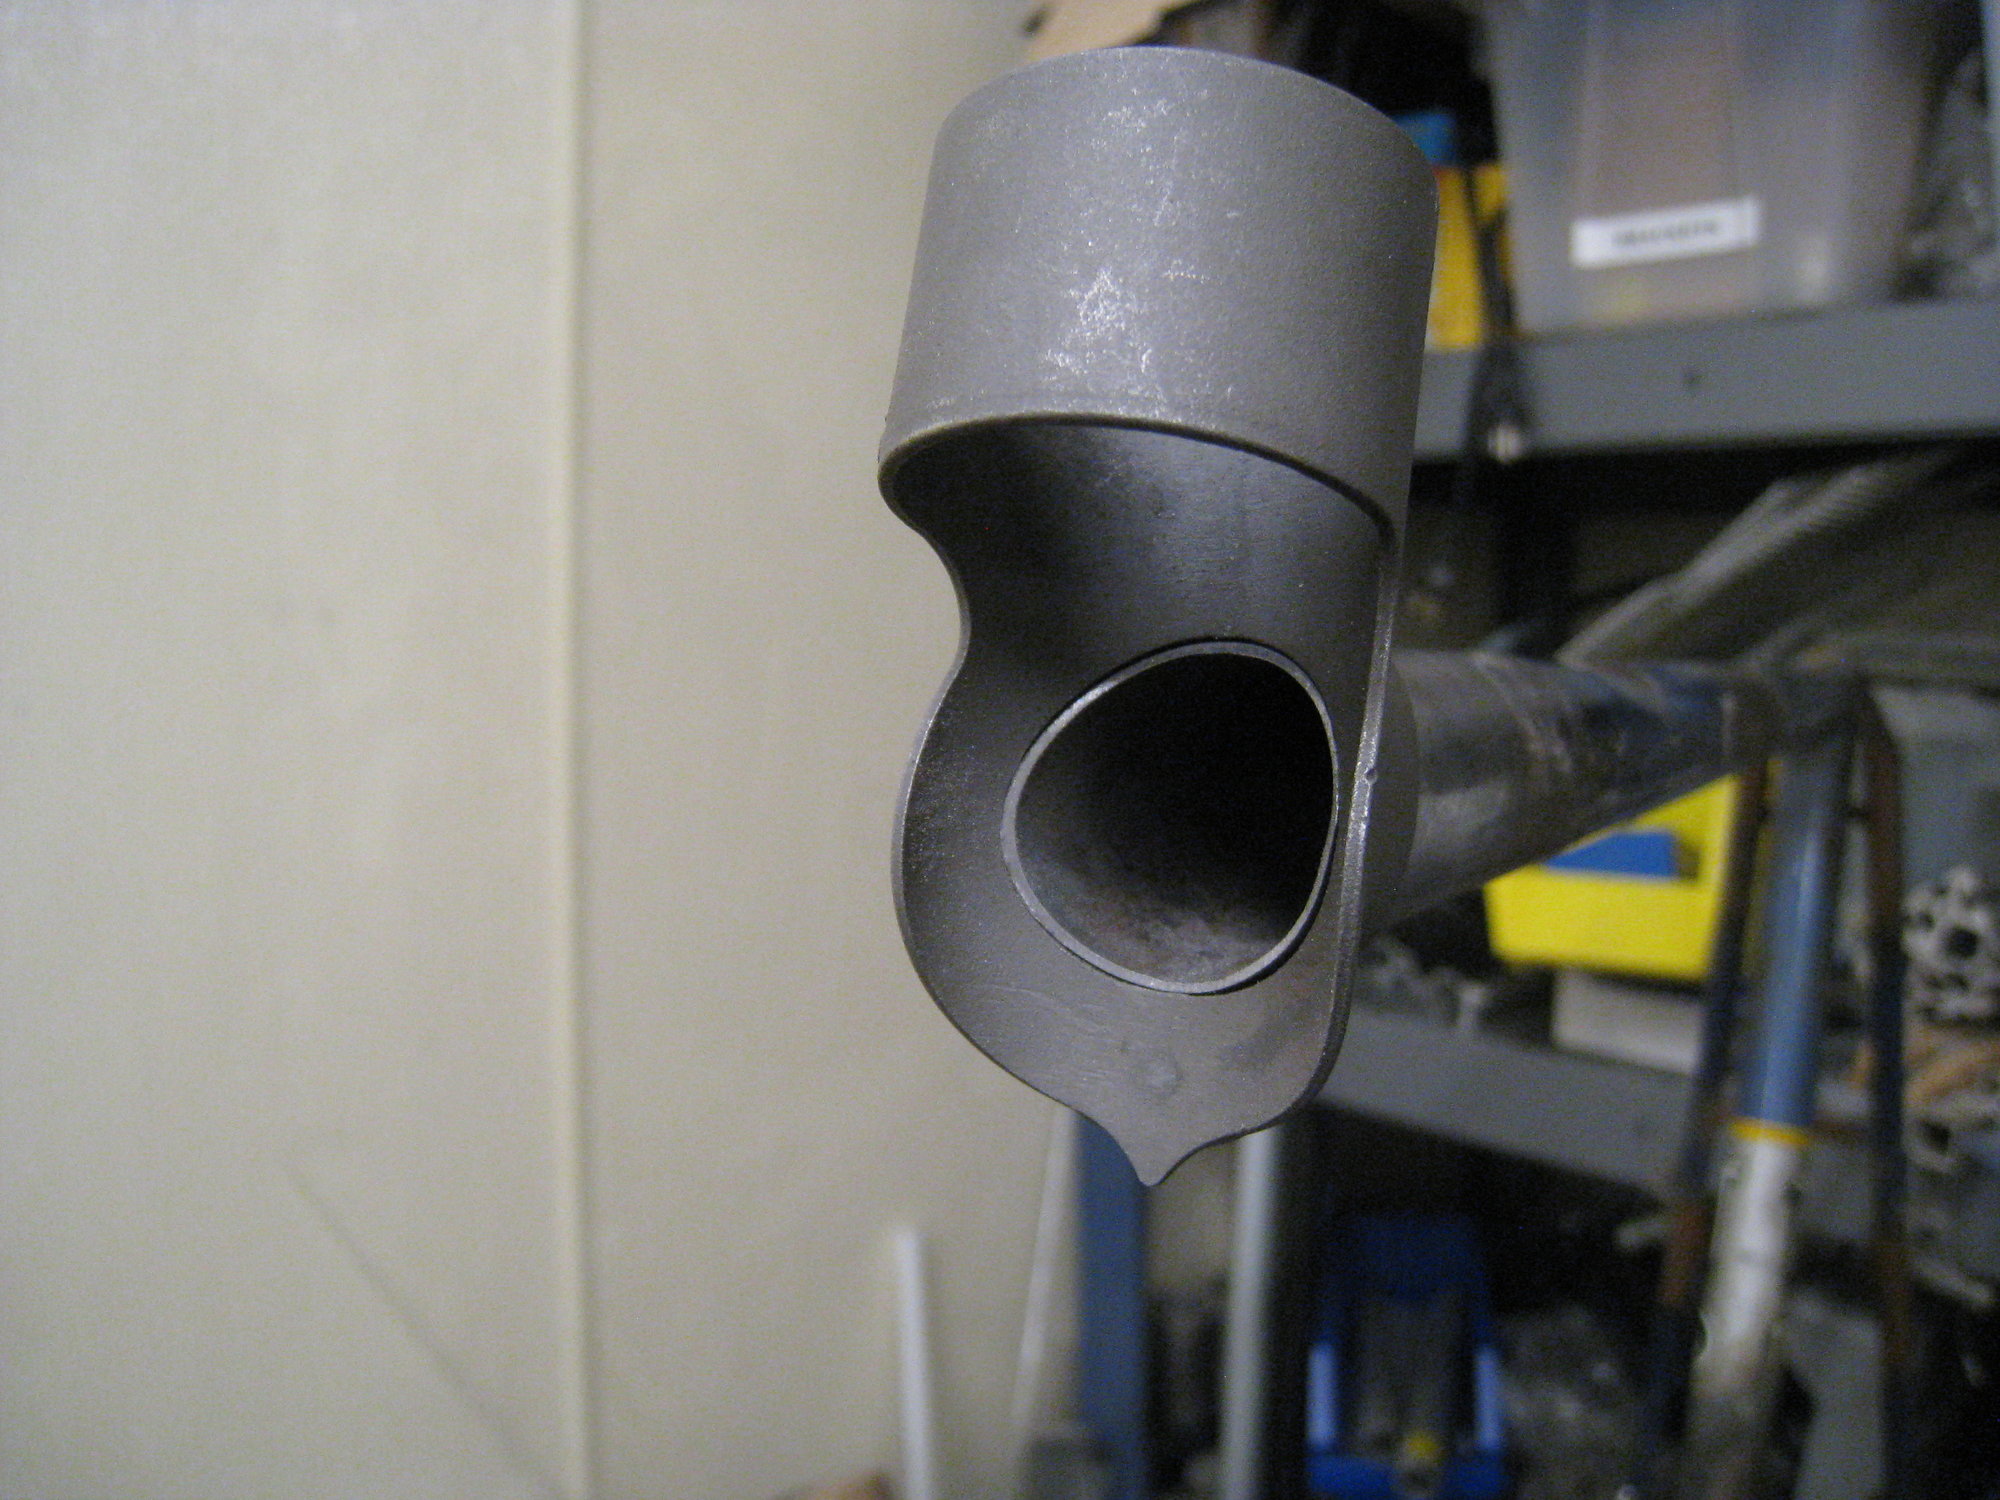
Firstly, the tubes are mitered before being brazed in, so they were rotated a little relative to vertical. When I held the new head tube up to the frame, this was clear, because of some (1-1.5mm) gaps. Also, the down tube was a little short, so the head angle wanted to be closer to 75.5 degrees!
I corrected by filing the top tube a mm or two shorter and then wrapping sandpaper around the headtube and using that to sand the miters until they were en forme. Pics to come. I'm going to braze tonight.
__________________
Owner & co-founder, Cycles René Hubris. Unfortunately attaching questionable braze-ons to perfectly good frames since about 2015. With style.
Owner & co-founder, Cycles René Hubris. Unfortunately attaching questionable braze-ons to perfectly good frames since about 2015. With style.
Likes For scarlson:
01-06-22, 06:15 PM
#61
Banned.

Join Date: Jul 2009
Location: PAZ
Posts: 12,294
Mentioned: 255 Post(s)
Tagged: 0 Thread(s)
Quoted: 2588 Post(s)
Liked 4,823 Times
in
1,709 Posts
@scarlson
Timely post! I went down the rabbit hole late last night reading the Joe Starck interview in RR #12 (after seeing a reference in a recent BF thread) and he talked about a Trek frame he and another builder did some "destructive testing" on. Apparently it was a frame Starck had built some years before which had been damaged, and he was interested to see what kind of brazing material penetration his joints actually had. The description he gave pretty much matches what you've done here. Weird how you then updated this thread showing a similar process, complete with photos, the very next day!
DD

Likes For Drillium Dude:
01-06-22, 09:07 PM
#62
Cyclist
Really interesting post, love the pictures of the HT replacement process.
What I find interesting is that this is at least the third time we've seen documented issues with "handmade era" Trek frames, including the Ishiwata fork crown failures and numerous examples of poor brazing at the rear brake bridge. Hardly a pattern that should make Trek riders nervous, especially given the low numbers, but still, funny that things keep popping up.
What I find interesting is that this is at least the third time we've seen documented issues with "handmade era" Trek frames, including the Ishiwata fork crown failures and numerous examples of poor brazing at the rear brake bridge. Hardly a pattern that should make Trek riders nervous, especially given the low numbers, but still, funny that things keep popping up.
01-06-22, 09:27 PM
#63
Senior Member
Join Date: Jun 2010
Location: Medford MA
Posts: 2,089
Bikes: Ron Cooper touring, 1959 Jack Taylor 650b ladyback touring tandem, Vitus 979, Joe Bell painted Claud Butler Dalesman, Colin Laing curved tube tandem, heavily-Dilberted 1982 Trek 6xx, René Herse tandem
Mentioned: 80 Post(s)
Tagged: 0 Thread(s)
Quoted: 964 Post(s)
Liked 1,451 Times
in
723 Posts
@Drillium Dude , I love those old RRs! Read damn near every one of them back in the day when they came out.
So, here's the brazing! First, it's a 73ST / 74HT, if the expensive digital protractor is to be believed.
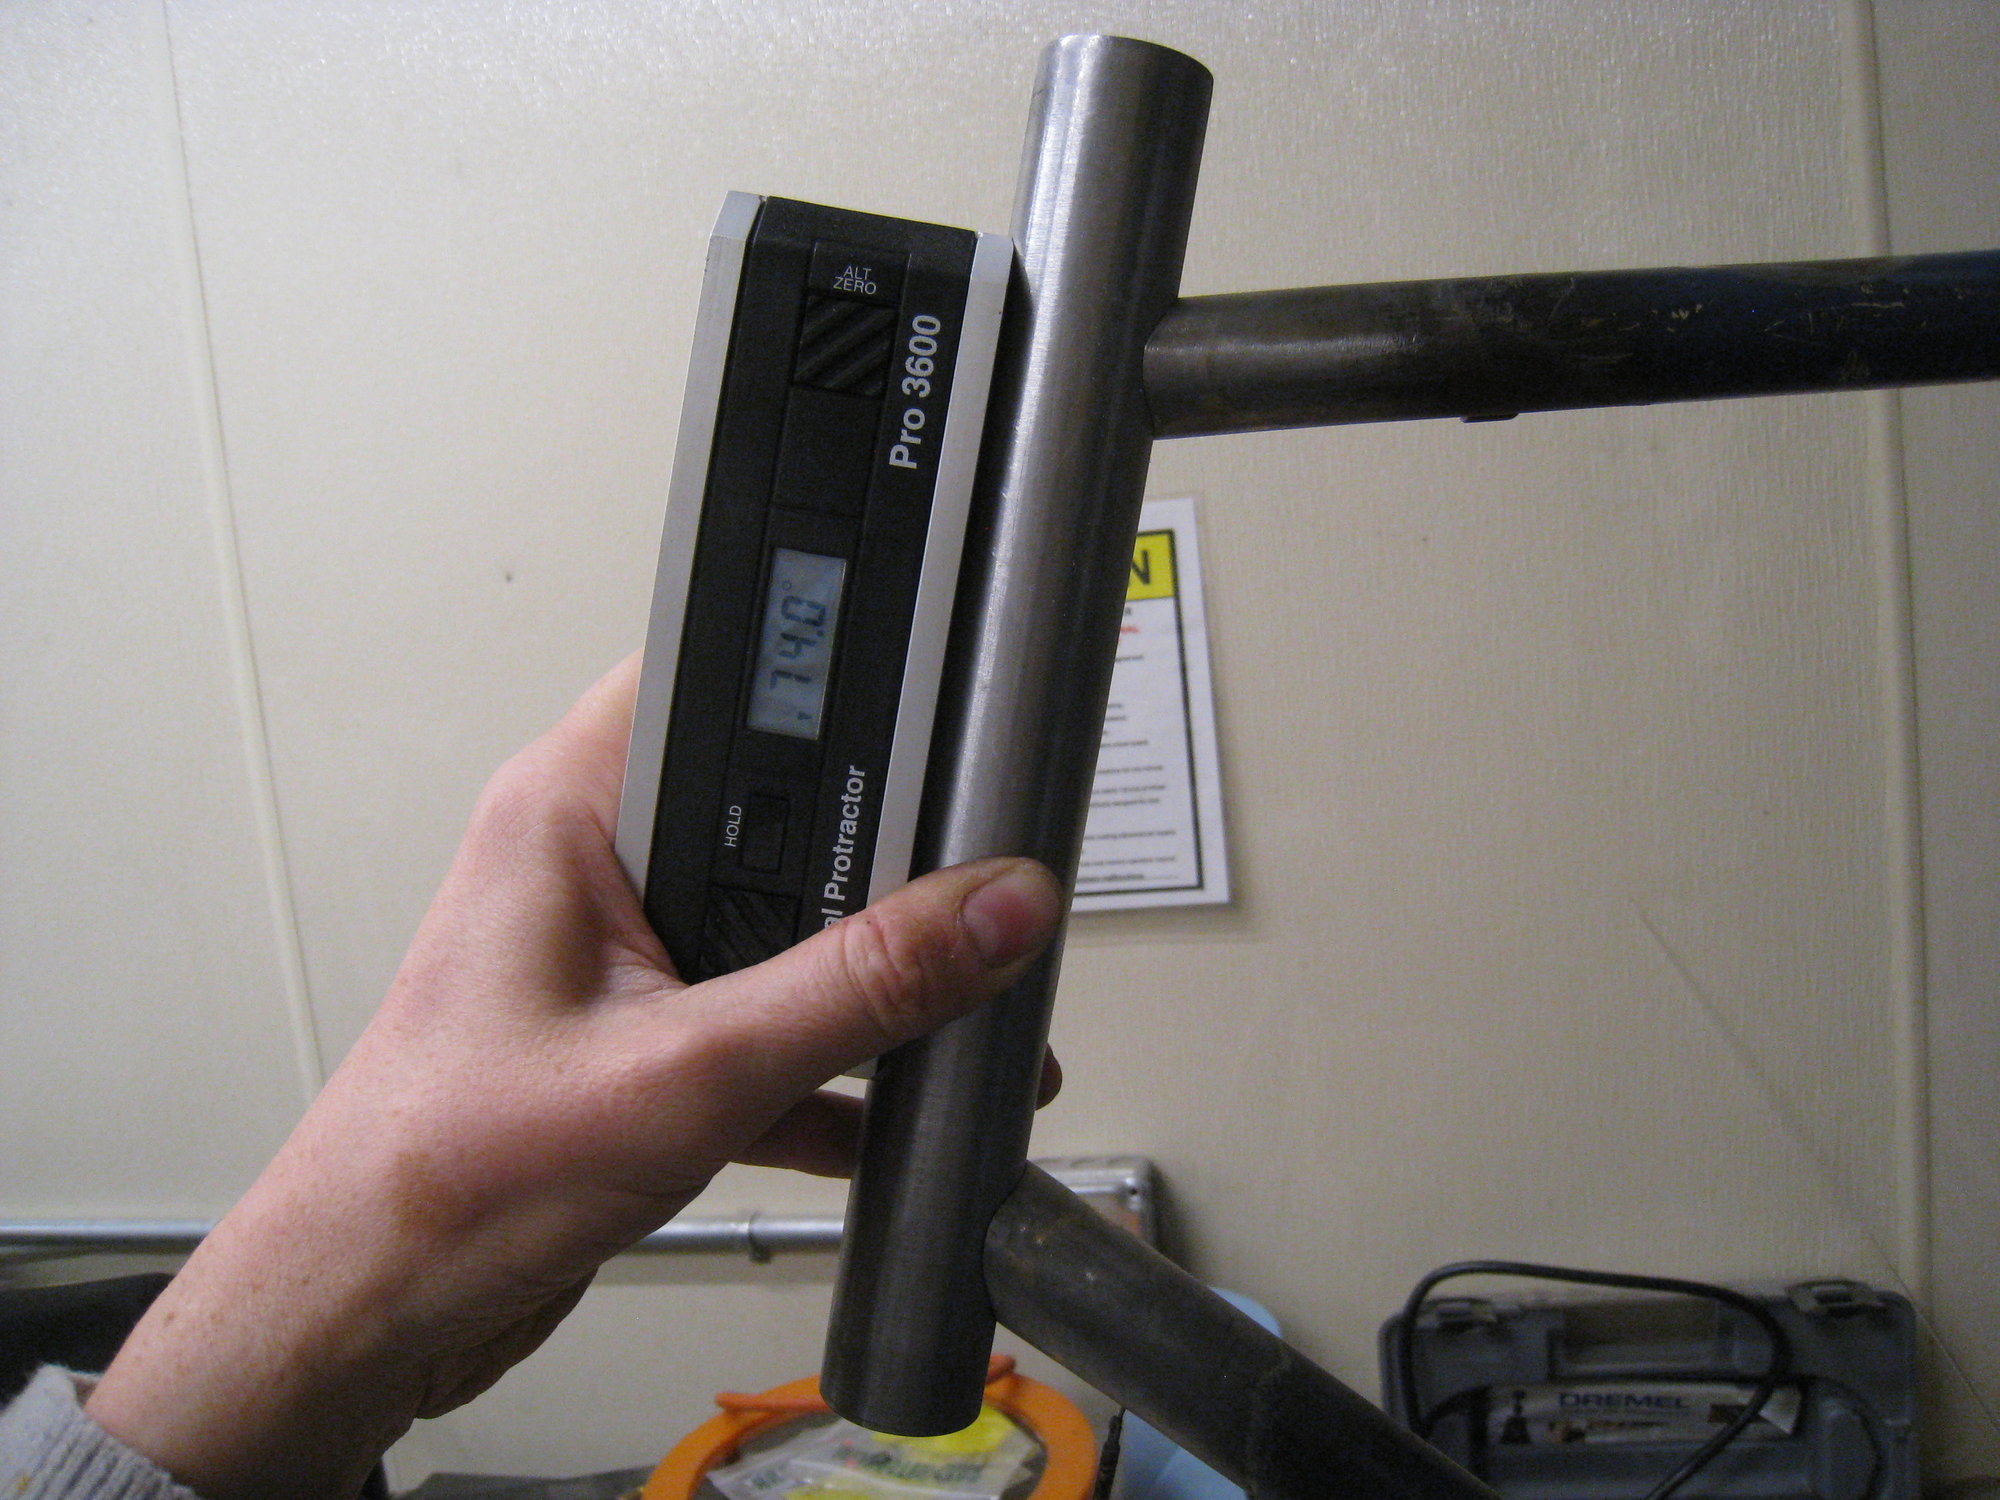
Here's a closeup of my beautiful mitering job.
Tube in lug.
Top lug brazed.

Both lugs brazed!!
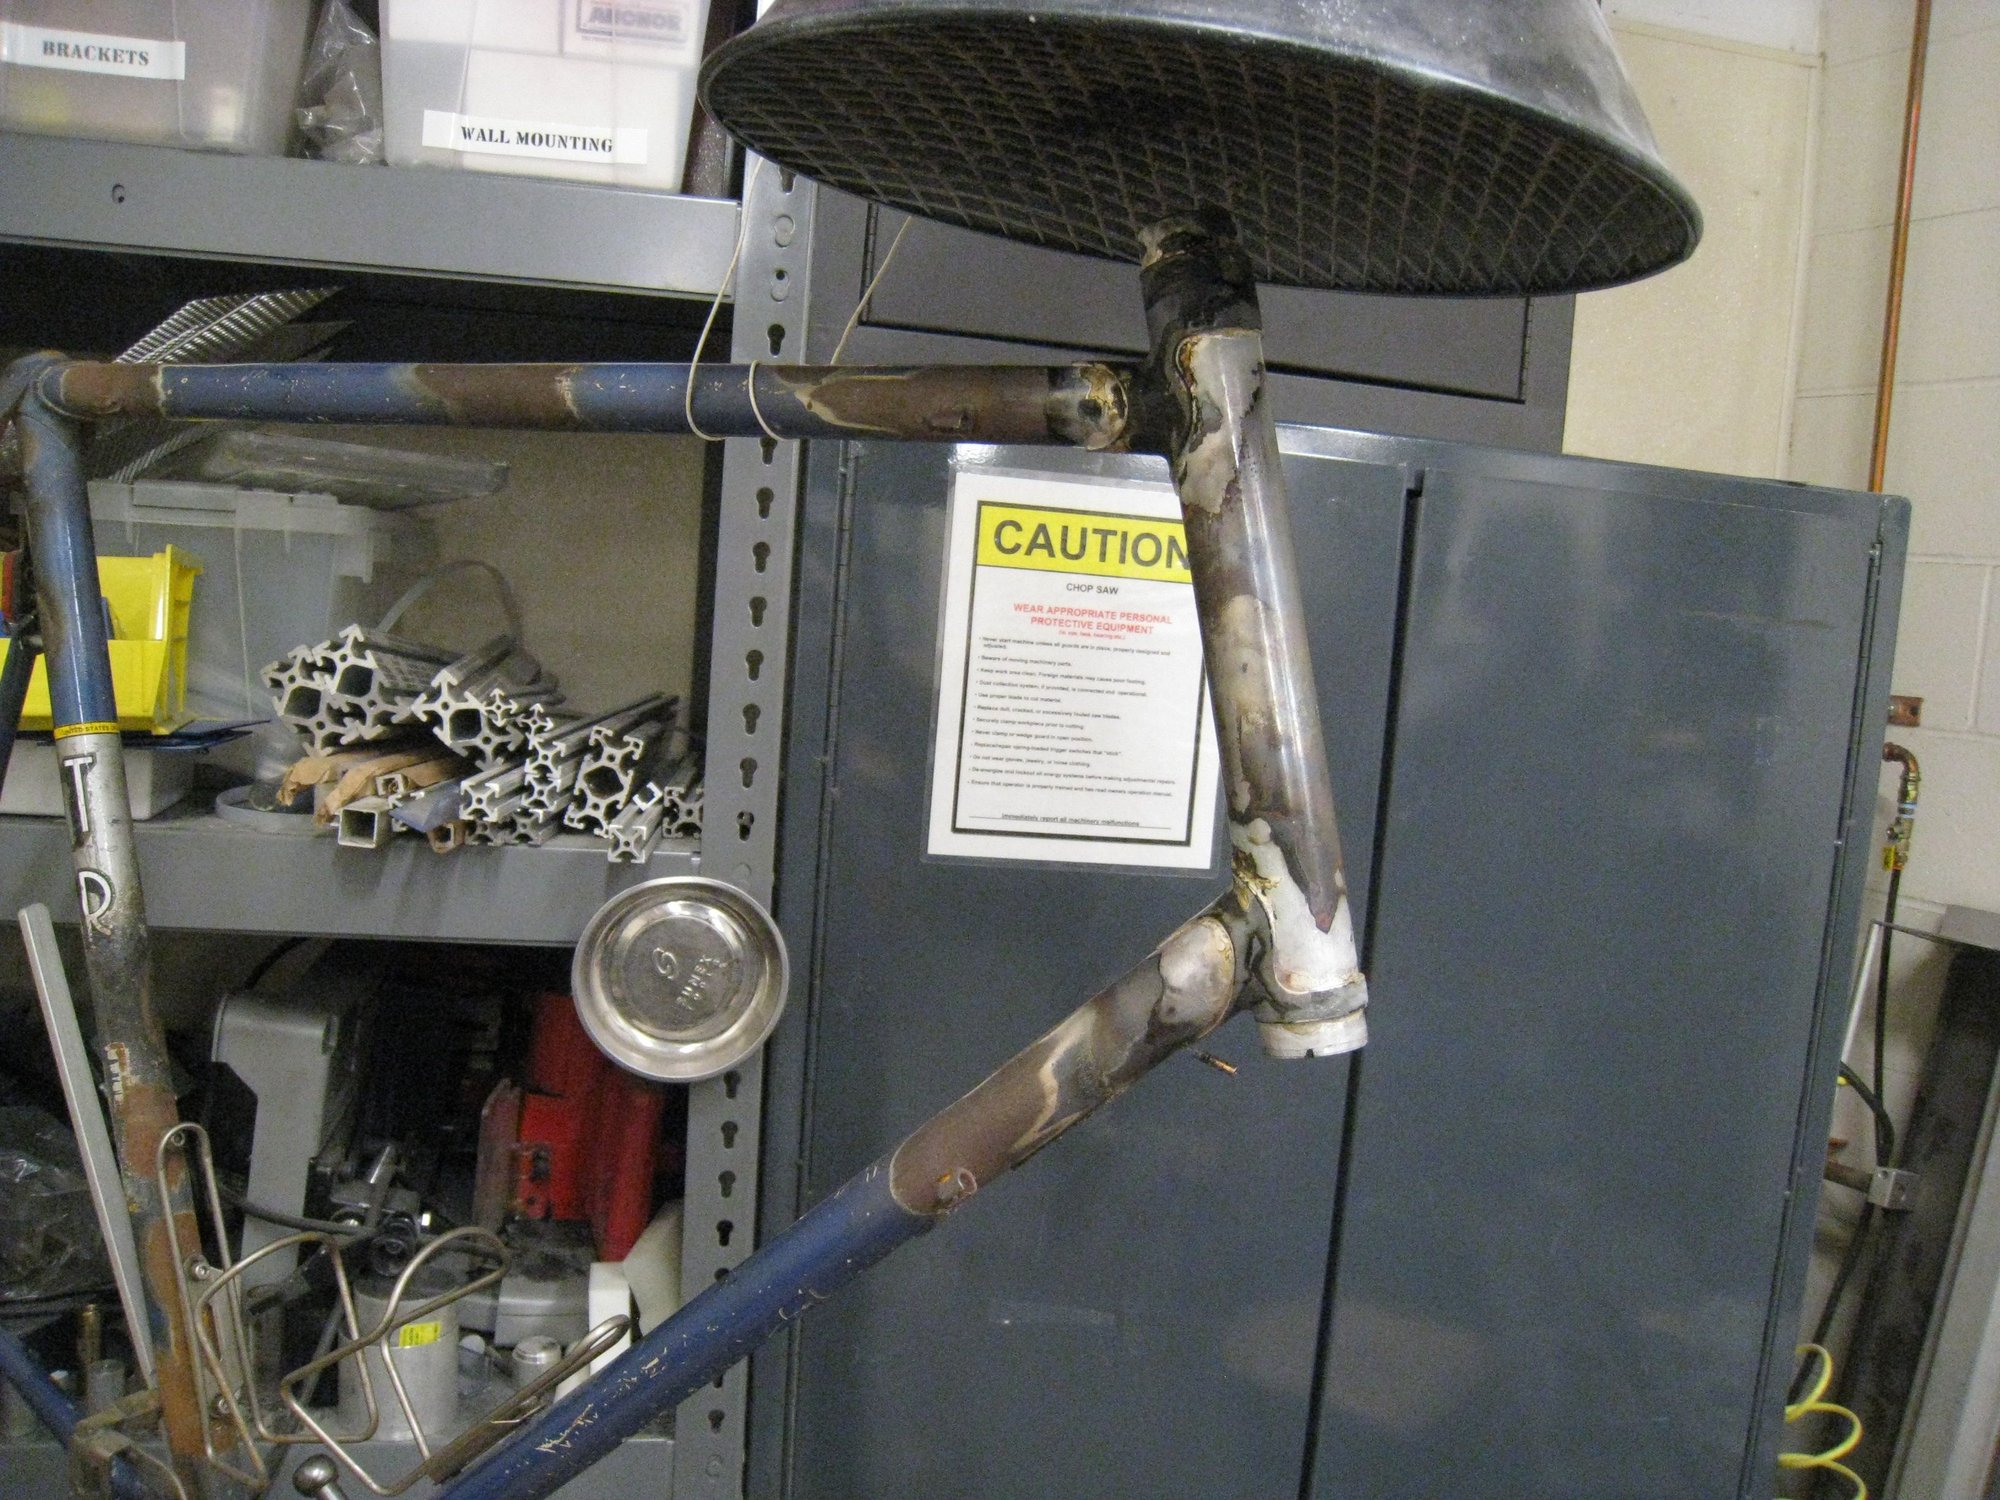
Cutting off the extra tube. I filed it square and checked it at multiple angles using a machinist's square, because I don't have a facing tool.

After this, I did a bunch of lug thinning and checked everywhere to see if there was any sign of voids. I think I got all the way through. I would start at the top and draw the filler through with the heat. Eventually it'd get to the bottom or come out someplace else, and that's how I'd know I'd done it. Used maybe 3/4 of a troy ounce on this. Based on what I've read, that seems typical.
Now, reaming it the next/final step. There is a 1-3/16" reamer at work, which comes out to 30.2, which should be correct according to Sheldon. The frame can be mounted in the lathe, using a centering cone on the tailstock. Often a Jacobs chuck has a tapered nose that can be used as well, but a centering cone is nicer. Everything's great, right?
Well, not exactly. The trouble is, I did a little test on a scrap piece of headtube and a 1-3/16" reamer, it turns out, is too big for a good interference fit with headset cups. The Park Tool spec page explains: 30.2 is the size of the headset cups. 30-30.1mm is the ID of the frame, for a proper interference fit. So, I bought a 30mm shell reamer, used, from evilbay. It was $15. I cannot afford the damn Park Tool, of course. I will probably do this frame in the lathe, but I'll build a guide, pilot, and holder from threaded rod and a cone I turn on the lathe in the meantime, so that I have a long-term solution when I no longer have access to a lathe. I won't sweat the facing. I figure if I can't find any defect using a machinist's square, it's faced well enough for me. I could get out a dial indicator and mount the frame in the mill if I really wanted to be serious, or buy a side facing cutter (another $15) but I don't think even the Park tool facer/reamer is that good.
So, waiting on reamer. I also have to braze back in the water bottle boss on the bottom of the downtube (the bottom lug point was partially covering this hole) and re-run the internal wire I burned up. Then toss some linseed oil in the frame and we'll be good to go!
So, here's the brazing! First, it's a 73ST / 74HT, if the expensive digital protractor is to be believed.
Here's a closeup of my beautiful mitering job.
Tube in lug.
Top lug brazed.
Both lugs brazed!!
Cutting off the extra tube. I filed it square and checked it at multiple angles using a machinist's square, because I don't have a facing tool.
After this, I did a bunch of lug thinning and checked everywhere to see if there was any sign of voids. I think I got all the way through. I would start at the top and draw the filler through with the heat. Eventually it'd get to the bottom or come out someplace else, and that's how I'd know I'd done it. Used maybe 3/4 of a troy ounce on this. Based on what I've read, that seems typical.
Now, reaming it the next/final step. There is a 1-3/16" reamer at work, which comes out to 30.2, which should be correct according to Sheldon. The frame can be mounted in the lathe, using a centering cone on the tailstock. Often a Jacobs chuck has a tapered nose that can be used as well, but a centering cone is nicer. Everything's great, right?
Well, not exactly. The trouble is, I did a little test on a scrap piece of headtube and a 1-3/16" reamer, it turns out, is too big for a good interference fit with headset cups. The Park Tool spec page explains: 30.2 is the size of the headset cups. 30-30.1mm is the ID of the frame, for a proper interference fit. So, I bought a 30mm shell reamer, used, from evilbay. It was $15. I cannot afford the damn Park Tool, of course. I will probably do this frame in the lathe, but I'll build a guide, pilot, and holder from threaded rod and a cone I turn on the lathe in the meantime, so that I have a long-term solution when I no longer have access to a lathe. I won't sweat the facing. I figure if I can't find any defect using a machinist's square, it's faced well enough for me. I could get out a dial indicator and mount the frame in the mill if I really wanted to be serious, or buy a side facing cutter (another $15) but I don't think even the Park tool facer/reamer is that good.
So, waiting on reamer. I also have to braze back in the water bottle boss on the bottom of the downtube (the bottom lug point was partially covering this hole) and re-run the internal wire I burned up. Then toss some linseed oil in the frame and we'll be good to go!
__________________
Owner & co-founder, Cycles René Hubris. Unfortunately attaching questionable braze-ons to perfectly good frames since about 2015. With style.
Owner & co-founder, Cycles René Hubris. Unfortunately attaching questionable braze-ons to perfectly good frames since about 2015. With style.
Last edited by scarlson; 01-06-22 at 10:17 PM.
Likes For scarlson:
01-07-22, 12:35 PM
#64
Senior Member
Join Date: May 2008
Location: Fredericksburg, Va
Posts: 9,579
Bikes: '65 Frejus TDF, '73 Bottecchia Giro d'Italia, '83 Colnago Superissimo, '84 Trek 610, '84 Trek 760, '88 Pinarello Veneto, '88 De Rosa Pro, '89 Pinarello Montello, '94 Burley Duet, 97 Specialized RockHopper, 2010 Langster, Tern Link D8
Mentioned: 73 Post(s)
Tagged: 0 Thread(s)
Quoted: 1607 Post(s)
Liked 2,213 Times
in
1,103 Posts
Speaking of thinks being off, It took awhile before I noticed this CS bridge. It is off as the photo almost suggests. 1984 610 same as #49 above.
 P1000864 on Flickr
P1000864 on Flickr
__________________
Bikes don't stand alone. They are two tired.
Bikes don't stand alone. They are two tired.
Likes For SJX426:
01-07-22, 02:30 PM
#65
Banned.
Join Date: Jul 2009
Location: PAZ
Posts: 12,294
Mentioned: 255 Post(s)
Tagged: 0 Thread(s)
Quoted: 2588 Post(s)
Liked 4,823 Times
in
1,709 Posts
Speaking of thinks being off, It took awhile before I noticed this CS bridge. It is off as the photo almost suggests. 1984 610 same as #49 above.
P1000864 on Flickr
P1000864 on Flickr
This kinda thing would've bothered me bitd had I paid full price. Since I got the bike for a song, not so much today

DD
01-07-22, 05:59 PM
#66
Senior Member
Join Date: Oct 2005
Location: Upper Left, USA
Posts: 1,915
Mentioned: 50 Post(s)
Tagged: 0 Thread(s)
Quoted: 634 Post(s)
Liked 444 Times
in
298 Posts
@Drillium Dude , I love those old RRs! Read damn near every one of them back in the day when they came out.
So, here's the brazing! First, it's a 73ST / 74HT, if the expensive digital protractor is to be believed.
Here's a closeup of my beautiful mitering job.
Tube in lug.
Top lug brazed.
Both lugs brazed!!
Cutting off the extra tube. I filed it square and checked it at multiple angles using a machinist's square, because I don't have a facing tool.
After this, I did a bunch of lug thinning and checked everywhere to see if there was any sign of voids. I think I got all the way through. I would start at the top and draw the filler through with the heat. Eventually it'd get to the bottom or come out someplace else, and that's how I'd know I'd done it. Used maybe 3/4 of a troy ounce on this. Based on what I've read, that seems typical.
Now, reaming it the next/final step. There is a 1-3/16" reamer at work, which comes out to 30.2, which should be correct according to Sheldon. The frame can be mounted in the lathe, using a centering cone on the tailstock. Often a Jacobs chuck has a tapered nose that can be used as well, but a centering cone is nicer. Everything's great, right?
Well, not exactly. The trouble is, I did a little test on a scrap piece of headtube and a 1-3/16" reamer, it turns out, is too big for a good interference fit with headset cups. The Park Tool spec page explains: 30.2 is the size of the headset cups. 30-30.1mm is the ID of the frame, for a proper interference fit. So, I bought a 30mm shell reamer, used, from evilbay. It was $15. I cannot afford the damn Park Tool, of course. I will probably do this frame in the lathe, but I'll build a guide, pilot, and holder from threaded rod and a cone I turn on the lathe in the meantime, so that I have a long-term solution when I no longer have access to a lathe. I won't sweat the facing. I figure if I can't find any defect using a machinist's square, it's faced well enough for me. I could get out a dial indicator and mount the frame in the mill if I really wanted to be serious, or buy a side facing cutter (another $15) but I don't think even the Park tool facer/reamer is that good.
So, waiting on reamer. I also have to braze back in the water bottle boss on the bottom of the downtube (the bottom lug point was partially covering this hole) and re-run the internal wire I burned up. Then toss some linseed oil in the frame and we'll be good to go!
Likes For tricky:
01-08-22, 02:02 PM
#67
Bike Butcher of Portland

Join Date: Jul 2014
Location: Portland, OR
Posts: 11,630
Bikes: It's complicated.
Mentioned: 1299 Post(s)
Tagged: 0 Thread(s)
Quoted: 4677 Post(s)
Liked 5,790 Times
in
2,279 Posts
__________________
If someone tells you that you have enough bicycles and you don't need any more, stop talking to them. You don't need that kind of negativity in your life.
If someone tells you that you have enough bicycles and you don't need any more, stop talking to them. You don't need that kind of negativity in your life.
01-09-22, 02:11 PM
#68
Senior Member
Join Date: Jun 2010
Location: Medford MA
Posts: 2,089
Bikes: Ron Cooper touring, 1959 Jack Taylor 650b ladyback touring tandem, Vitus 979, Joe Bell painted Claud Butler Dalesman, Colin Laing curved tube tandem, heavily-Dilberted 1982 Trek 6xx, René Herse tandem
Mentioned: 80 Post(s)
Tagged: 0 Thread(s)
Quoted: 964 Post(s)
Liked 1,451 Times
in
723 Posts
Really interesting post, love the pictures of the HT replacement process.
What I find interesting is that this is at least the third time we've seen documented issues with "handmade era" Trek frames, including the Ishiwata fork crown failures and numerous examples of poor brazing at the rear brake bridge. Hardly a pattern that should make Trek riders nervous, especially given the low numbers, but still, funny that things keep popping up.
What I find interesting is that this is at least the third time we've seen documented issues with "handmade era" Trek frames, including the Ishiwata fork crown failures and numerous examples of poor brazing at the rear brake bridge. Hardly a pattern that should make Trek riders nervous, especially given the low numbers, but still, funny that things keep popping up.
Interestingly, I weighed the headtube scraps I cut and peeled off, and weighed the new tube (Columbus SL) and the lugs, and the new stuff was only 10g lighter!! That's without facing and reaming, but also sans 3/4 Troy of filler, and granted I'd lost some metal to sawing but the old headtube still had the headbage, so probably close to the final equation.
__________________
Owner & co-founder, Cycles René Hubris. Unfortunately attaching questionable braze-ons to perfectly good frames since about 2015. With style.
Owner & co-founder, Cycles René Hubris. Unfortunately attaching questionable braze-ons to perfectly good frames since about 2015. With style.
Last edited by scarlson; 01-09-22 at 02:20 PM.
01-12-22, 09:58 PM
#69
Senior Member
Join Date: Jun 2010
Location: Medford MA
Posts: 2,089
Bikes: Ron Cooper touring, 1959 Jack Taylor 650b ladyback touring tandem, Vitus 979, Joe Bell painted Claud Butler Dalesman, Colin Laing curved tube tandem, heavily-Dilberted 1982 Trek 6xx, René Herse tandem
Mentioned: 80 Post(s)
Tagged: 0 Thread(s)
Quoted: 964 Post(s)
Liked 1,451 Times
in
723 Posts
Here's the final step: reaming!
I bought a shell reamer off ebay for $15. It was advertised as 5 thou undersize 1-3/16". It turned out not to be undersized at all! So, I carefully hand-stoned it down to approximately 30.1mm, or just 3 thou under size. Fun times! Basically rotated the reamer against an oil stone until I got it. Then sharpened the cutting edges. In the process, I discovered why it had been so cheap: it was cracked. But no matter, this is light duty. It made it through with no trouble! And I learned something! You can see my lathe setup in the photos below. Again, not a lot of material taken off, so we don't need to be crazy careful about our setup. It just needs to be true and on-center, so I'm actually using the improper chuck jaws which don't grip the reamer that securely. It's OK. I took it easy and nothing slipped. You can see the result at the bottom.


Not bad, eh? Headset cups are a nice tight press fit.
I will make a handle to hold this shell reamer from a 2' piece of 5/8" threaded rod. I'll turn it to diameter and put a roll pin through it to keep the reamer from spinning. A little bit of machining will get me a decent piloting cone. An old BMW valve spring will provide the feed-pressure on the cone. That's the park tool, in essence. What sells for $500, I can make myself for $35. Sure sure, it's not quite "shop quality". But it's good enough for a homegamer like me!
Now I assemble the bike and get back on the road! Phew, I cannot wait.
I bought a shell reamer off ebay for $15. It was advertised as 5 thou undersize 1-3/16". It turned out not to be undersized at all! So, I carefully hand-stoned it down to approximately 30.1mm, or just 3 thou under size. Fun times! Basically rotated the reamer against an oil stone until I got it. Then sharpened the cutting edges. In the process, I discovered why it had been so cheap: it was cracked. But no matter, this is light duty. It made it through with no trouble! And I learned something! You can see my lathe setup in the photos below. Again, not a lot of material taken off, so we don't need to be crazy careful about our setup. It just needs to be true and on-center, so I'm actually using the improper chuck jaws which don't grip the reamer that securely. It's OK. I took it easy and nothing slipped. You can see the result at the bottom.
Not bad, eh? Headset cups are a nice tight press fit.
I will make a handle to hold this shell reamer from a 2' piece of 5/8" threaded rod. I'll turn it to diameter and put a roll pin through it to keep the reamer from spinning. A little bit of machining will get me a decent piloting cone. An old BMW valve spring will provide the feed-pressure on the cone. That's the park tool, in essence. What sells for $500, I can make myself for $35.
Sure sure, it's not quite "shop quality". But it's good enough for a homegamer like me!Now I assemble the bike and get back on the road! Phew, I cannot wait.
__________________
Owner & co-founder, Cycles René Hubris. Unfortunately attaching questionable braze-ons to perfectly good frames since about 2015. With style.
Owner & co-founder, Cycles René Hubris. Unfortunately attaching questionable braze-ons to perfectly good frames since about 2015. With style.
Likes For scarlson:
12-20-22, 11:18 AM
#70
The Huffmeister

Join Date: Jul 2008
Location: The Le Grande HQ
Posts: 2,715
Bikes: '79 Trek 938, '86 Jim Merz Allez SE, '90 Miyata 1000, '68 PX-10, '80 PXN-10, '73 Super Course, '87 Guerciotti, '83 Trek 600, '80 Huffy Le Grande
Mentioned: 45 Post(s)
Tagged: 0 Thread(s)
Quoted: 1214 Post(s)
Liked 3,509 Times
in
1,397 Posts
I'm surprised there were no more replies to this thread! As I just picked up one of these (an '83 Trek 600), I have a vested interest in the integrity of the construction of these bikes. Its also good to know that the ride of this bicycle is so favored that such lengths would be attempted to keep it underneath a rider.
Any updates on this? New paint? Leaving raw and dirty? Curious minds want to know!
Any updates on this? New paint? Leaving raw and dirty? Curious minds want to know!
12-20-22, 03:26 PM
#71
Senior Member
Join Date: Jun 2010
Location: Medford MA
Posts: 2,089
Bikes: Ron Cooper touring, 1959 Jack Taylor 650b ladyback touring tandem, Vitus 979, Joe Bell painted Claud Butler Dalesman, Colin Laing curved tube tandem, heavily-Dilberted 1982 Trek 6xx, René Herse tandem
Mentioned: 80 Post(s)
Tagged: 0 Thread(s)
Quoted: 964 Post(s)
Liked 1,451 Times
in
723 Posts
I'm surprised there were no more replies to this thread! As I just picked up one of these (an '83 Trek 600), I have a vested interest in the integrity of the construction of these bikes. Its also good to know that the ride of this bicycle is so favored that such lengths would be attempted to keep it underneath a rider.
Any updates on this? New paint? Leaving raw and dirty? Curious minds want to know!
Any updates on this? New paint? Leaving raw and dirty? Curious minds want to know!
I will say, it is a fine frame. I don't think it's super duper desirable, being only the three main tubes are 531 and it's not very thin walled either (.8/.5/.8 for the top tube I think), and the rest of the tubes (head, fork, stays) are hi-tensile. It appears that it works well for me in particular, and that is why I like it.
The angles are a lot steeper than published (I think I might have alluded to that in a prior post) so it's got like a 74.5 or 75 degree head tube, and about 1 or 2 degrees of up-slope on the top tube. The steep head angle coupled with a fork that has a lot of rake means I can get down to ~30mm of trail. This makes the bike twitchy at low speeds, but a dream at high speeds with a handlebar bag. Super easy on the arms and shoulders, which means I can use narrow bars, get more aero, and be all French style randonneury. It's allowed me to do 100+ mile days in relative comfort. But what works for me, might not work for someone else. I just really like this bike. My friend and co-conspirator, Kevin, prefers a smaller frame, lower bars which flare inward (weird right), and less flex in the frame. I'm working on rehabbing an OS tubing Gunnar for him, fixing some cracks and installing dual seatpost bolts. It's diametrically opposed to this Trek and it works well for him. We have swapped bikes and both hated it and asked each other how the heck do you make this thing go fast!
The other reason I valued the frame enough to keep fixing it, is because I have done a lot of upgrades and brazed a lot of things onto it, is sort of as a way to teach myself framebuilding. I already know how to braze and weld, so I sorta went at it rather than taking a course. To start, I brazed a bunch of stuff onto this frame (including a homemade suicide front derailleur), so I increased the value to me of keeping the bike going. Then I built a fork for this thing after the original fork broke, and now I've done this headtube replacement. It's on 650x48 tires now, so the chainstays are very aggressively indented (with my homemade indenting tool). I think they will break next, because as I said earlier they are relatively soft hi-tensile steel, not 531 (as was the fork and headtube, both of which have broken). I will probably replace them with Columbus or something, and I will try either bending the stays and BB sockets to accommodate the tire, or I will build a "yoke" or "crown" out of alloy steel box-section and plate to do the same. Depends where the stays break, I guess, what will be easier. I think a sort of "biplane" type brazed chainstay crown would look a lot cooler than these CNC machined ones the high-end gravelbikes seem to all have.
Here are some links to the other threads I've made about this bike.
René Hubris Trek (brazing and rinko and making the front derailleur)
Fork rebuild
Finally, to answer your question, I coated the bare frame in linseed oil mixed with coleman fuel, after soaking/wiping off the flux. It looks like this:

Although I did fix the too-short housing on the front brake after I took this picture.
Before the chainstays break, it would be fun to machine a portacatena sort of chainrest to clamp in the dropout. I want to see if it's possible to make a chainrest that can be shifted onto, like the old Nivex ones. Just for fun, you know? That will require asymmetrically spreading the right side outward so there's room for an extra "cog" of sorts.
This morning, I rode this bike 10 miles out to a friend's home in the countryside where I have had to store my car due to the draconian city parking regulations - carrying a small car battery on the front minirack! I got there, rinko'd the bike, pumped up the car tires, installed the battery, and I'm off to have a merry holiday. Easier than taking an uber, and you get a free workout. Still kind of silly.
__________________
Owner & co-founder, Cycles René Hubris. Unfortunately attaching questionable braze-ons to perfectly good frames since about 2015. With style.
Owner & co-founder, Cycles René Hubris. Unfortunately attaching questionable braze-ons to perfectly good frames since about 2015. With style.
Last edited by scarlson; 12-20-22 at 03:34 PM.
Likes For scarlson:
12-20-22, 04:26 PM
#72
www.theheadbadge.com

Join Date: Sep 2005
Location: Southern Florida
Posts: 28,509
Bikes: https://www.theheadbadge.com
Mentioned: 124 Post(s)
Tagged: 0 Thread(s)
Quoted: 2420 Post(s)
Liked 4,381 Times
in
2,090 Posts
Bravo, bravo, bravo. I can't begin to express how much I enjoy seeing frame repairs here at C&V, and top notch work at that.
FYI, I've found the IceToolz reamers on Amazon (about $35-40 for the individual cutters) are surprisingly good quality, and I got them to work on a VAR reamer. For those looking to do the same job you did on the lathe - but don't have access to a lathe - these might be an option.
-Kurt
FYI, I've found the IceToolz reamers on Amazon (about $35-40 for the individual cutters) are surprisingly good quality, and I got them to work on a VAR reamer. For those looking to do the same job you did on the lathe - but don't have access to a lathe - these might be an option.
-Kurt
__________________


Likes For cudak888:
12-20-22, 05:30 PM
#73
blahblahblah chrome moly

Join Date: Apr 2009
Location: Seattle
Posts: 1,984
Mentioned: 92 Post(s)
Tagged: 0 Thread(s)
Quoted: 1172 Post(s)
Liked 2,566 Times
in
1,072 Posts
Your reamer leaves a sharp corner between the bore and the face. That should get a chamfer, typically 45° — angle and exact size of chamfer doesn't matter though, just enough to clear the tiny fillet on the matching inside corner of the headset. Not all headsets need the chamfer, some cups are relieved there to clear on frames with a sharp corner.
Campy and some other better brands of reamer/facer tools put that chamfer on automatically. Lacking that, most people just knock the edge back a skosh with a fine half-round file.
Maybe you have done the chamfer already though, just because it's in your nature to always chamfer sharp edges of anything? But worth mentioning.
Mark B
Campy and some other better brands of reamer/facer tools put that chamfer on automatically. Lacking that, most people just knock the edge back a skosh with a fine half-round file.
Maybe you have done the chamfer already though, just because it's in your nature to always chamfer sharp edges of anything?
But worth mentioning.Mark B
Last edited by bulgie; 12-20-22 at 05:34 PM.
12-20-22, 07:24 PM
#74
Senior Member
Join Date: Jun 2010
Location: Medford MA
Posts: 2,089
Bikes: Ron Cooper touring, 1959 Jack Taylor 650b ladyback touring tandem, Vitus 979, Joe Bell painted Claud Butler Dalesman, Colin Laing curved tube tandem, heavily-Dilberted 1982 Trek 6xx, René Herse tandem
Mentioned: 80 Post(s)
Tagged: 0 Thread(s)
Quoted: 964 Post(s)
Liked 1,451 Times
in
723 Posts
Your reamer leaves a sharp corner between the bore and the face. That should get a chamfer, typically 45° — angle and exact size of chamfer doesn't matter though, just enough to clear the tiny fillet on the matching inside corner of the headset. Not all headsets need the chamfer, some cups are relieved there to clear on frames with a sharp corner.
Campy and some other better brands of reamer/facer tools put that chamfer on automatically. Lacking that, most people just knock the edge back a skosh with a fine half-round file.
Maybe you have done the chamfer already though, just because it's in your nature to always chamfer sharp edges of anything? But worth mentioning.
Mark B
Campy and some other better brands of reamer/facer tools put that chamfer on automatically. Lacking that, most people just knock the edge back a skosh with a fine half-round file.
Maybe you have done the chamfer already though, just because it's in your nature to always chamfer sharp edges of anything?
But worth mentioning.Mark B

Anyway, the cups sit right down in the tube! They are Stronglight with the roller bearings. I don't use any other headsets! I am a huge fan of them. I have a pinch-bolt one, a couple with o-rings, a Nylock-style aero one (Mavic branded maybe?). I even have a Delrin one and it's fine. I think they are fillet-less.
__________________
Owner & co-founder, Cycles René Hubris. Unfortunately attaching questionable braze-ons to perfectly good frames since about 2015. With style.
Owner & co-founder, Cycles René Hubris. Unfortunately attaching questionable braze-ons to perfectly good frames since about 2015. With style.
12-20-22, 08:20 PM
#75
blahblahblah chrome moly
Join Date: Apr 2009
Location: Seattle
Posts: 1,984
Mentioned: 92 Post(s)
Tagged: 0 Thread(s)
Quoted: 1172 Post(s)
Liked 2,566 Times
in
1,072 Posts
Ahh, I think I used a big fat conical reamer (we call it the strawberry because it's sorta strawberry shaped, and the French word for an endmill is une fraise, which also is the word for strawberry) chucked in a hand drill for deburring and that added a little chamfer. Pretty sure anyway. I think this reamer is for chamfering actual gas pipes.
Anyway, the cups sit right down in the tube! They are Stronglight with the roller bearings. I don't use any other headsets! I am a huge fan of them. I have a pinch-bolt one, a couple with o-rings, a Nylock-style aero one (Mavic branded maybe?). I even have a Delrin one and it's fine. I think they are fillet-less.
Anyway, the cups sit right down in the tube! They are Stronglight with the roller bearings. I don't use any other headsets! I am a huge fan of them. I have a pinch-bolt one, a couple with o-rings, a Nylock-style aero one (Mavic branded maybe?). I even have a Delrin one and it's fine. I think they are fillet-less.
Mark B
Likes For bulgie:
