


Headtube Lug Crack
 03-25-22, 08:29 PM
#26
Senior Member
The question is what do you do about it if it isn't brazed on? It appears that it's just the front edge of the bottom lug. The critical part of the braze is at the junction of the head and down tube. As a mental experiment, what would happen if that little lip part of the lug wasn't there?
As long as the head tube isn't cracked, I'd let it be.
@repechage has good eyes. I looked again and it does appear that the bottom headset cup isn't pressed all the way in.
As long as the head tube isn't cracked, I'd let it be.
@repechage has good eyes. I looked again and it does appear that the bottom headset cup isn't pressed all the way in.
Is the inside diameter of the head tube uniform or bent out of shape?
What if this is all just paint damage caused by extremely ham-fisted installation of that cup.
 03-25-22, 10:15 PM
#27
Junior Member
Thread Starter

Join Date: Sep 2019
Location: Minnesota
Posts: 87
Bikes: Raleigh Mojave 4.0, Panasonic DX1000
Mentioned: 1 Post(s)
Tagged: 0 Thread(s)
Quoted: 46 Post(s)
Liked 22 Times
in
15 Posts
Start out knowing what is wrong. What if the upper edge of the lower head lug is brazed but just under-filled ? Jumping to the conclusion you have to do anything may be a mistake.
Is the inside diameter of the head tube uniform or bent out of shape?
What if this is all just paint damage caused by extremely ham-fisted installation of that cup.
Is the inside diameter of the head tube uniform or bent out of shape?
What if this is all just paint damage caused by extremely ham-fisted installation of that cup.
The only thing is I have to get a headset press and sort out how to properly remove and install a headset. (I might as well as just replace it since the headset feels a touch indexed and I'll have it apart anyway)
Likes For Aerzon:
03-25-22, 11:42 PM
#28
Senior Member
Join Date: Oct 2015
Location: PDX
Posts: 13,020
Bikes: Merz x 5 + Specialized Merz Allez x 2, Strawberry/Newlands/DiNucci/Ti x3, Gordon, Fuso/Moulton x2, Bornstein, Paisley,1958-74 Paramounts x3, 3rensho, 74 Moto TC, 73-78 Raleigh Pro's x5, Marinoni x2, 1960 Cinelli SC, 1980 Bianchi SC, PX-10 X 2
Mentioned: 267 Post(s)
Tagged: 0 Thread(s)
Quoted: 4501 Post(s)
Liked 6,367 Times
in
3,663 Posts
I think I'll take it apart eventually and sort it out by inspecting the headtube, since I'm quite attached to this bike/frame and would like to know if anything does need to be done. I'll update this thread at some point.
The only thing is I have to get a headset press and sort out how to properly remove and install a headset. (I might as well as just replace it since the headset feels a touch indexed and I'll have it apart anyway)
The only thing is I have to get a headset press and sort out how to properly remove and install a headset. (I might as well as just replace it since the headset feels a touch indexed and I'll have it apart anyway)
https://www.ebay.com/itm/30412352240...EAAOSwYg5hl8G-
And this,
https://www.ebay.com/itm/26556132687...gAAOSw71RiFGWw
Lastly, you will need to remove the crown race, a bit tricky and can be done with a bearing splitter type tool but requires very careful setup to keep from damaging the paint.
The Park tool is $200+ but can make very clean work of it but you still have to be careful of the paint.
Installing the crown race can be done with a piece of pipe but of course they make a tool for that too and I believe it is worth the investment.
All these tools are seldom used for many of us but what they do is not easy to wrangle without a good process and at least some of them.
I also strongly feel that they are worth it so that you can complete an infrequent job like this with minimal aggravation and far less chance of damage if you have the right tools.
Fortunately I was able to assemble them over time for a fraction of the normal cost, I had also gotten by with other methods before that.
Or you can try and find a shop that will take it on but unfortunately now days few of them have the skill, even if they have the tools in good working order.
And your situation will require full understanding of the problem, therein lies the rub, if the problem is not assessed correctly, the fix may not be correct either.

Likes For merziac:
03-26-22, 12:40 AM
#29
Junior Member
Thread Starter
Join Date: Sep 2019
Location: Minnesota
Posts: 87
Bikes: Raleigh Mojave 4.0, Panasonic DX1000
Mentioned: 1 Post(s)
Tagged: 0 Thread(s)
Quoted: 46 Post(s)
Liked 22 Times
in
15 Posts
I have a Nashbar press that is just like this, works great and isn't too bad $$$ wise.
https://www.ebay.com/itm/30412352240...EAAOSwYg5hl8G-
And this,
https://www.ebay.com/itm/26556132687...gAAOSw71RiFGWw
Lastly, you will need to remove the crown race, a bit tricky and can be done with a bearing splitter type tool but requires very careful setup to keep from damaging the paint.
The Park tool is $200+ but can make very clean work of it but you still have to be careful of the paint.
Installing the crown race can be done with a piece of pipe but of course they make a tool for that too and I believe it is worth the investment.
All these tools are seldom used for many of us but what they do is not easy to wrangle without a good process and at least some of them.
I also strongly feel that they are worth it so that you can complete an infrequent job like this with minimal aggravation and far less chance of damage if you have the right tools.
Fortunately I was able to assemble them over time for a fraction of the normal cost, I had also gotten by with other methods before that.
Or you can try and find a shop that will take it on but unfortunately now days few of them have the skill, even if they have the tools in good working order.
And your situation will require full understanding of the problem, therein lies the rub, if the problem is not assessed correctly, the fix may not be correct either.
Also, $200 tool to remove one part? Youch D:
03-26-22, 01:10 AM
#30
Senior Member
Join Date: Oct 2015
Location: PDX
Posts: 13,020
Bikes: Merz x 5 + Specialized Merz Allez x 2, Strawberry/Newlands/DiNucci/Ti x3, Gordon, Fuso/Moulton x2, Bornstein, Paisley,1958-74 Paramounts x3, 3rensho, 74 Moto TC, 73-78 Raleigh Pro's x5, Marinoni x2, 1960 Cinelli SC, 1980 Bianchi SC, PX-10 X 2
Mentioned: 267 Post(s)
Tagged: 0 Thread(s)
Quoted: 4501 Post(s)
Liked 6,367 Times
in
3,663 Posts
Paint $100?
Fork/threads $50-100?
Crown race $50?
Crown race`seat $50-100?
Proper tools seldom used, prove their value by facilitating a successful task with less chance of problems.
https://www.parktool.com/product/adj...e-puller-crp-2
03-26-22, 03:42 AM
#31

Senior Member
Join Date: Feb 2020
Posts: 2,811
Mentioned: 49 Post(s)
Tagged: 0 Thread(s)
Quoted: 1105 Post(s)
Likes: 0
Liked 1,324 Times
in
781 Posts
I use the centre section of one of those flat BB spanners, it's the right length and thickness and has nice square edges.
This only works if you have a portion of the crown race proud of (and normal to) the crown at the front and back of the crown; most do.
Kneeling, place the end of the steerer on something firm but yielding enough that it won't mar the steerer threads - a bit of hardwood will do.
Place the dropouts against your chest so you can hold the fork steady without your hands - you need them both for the next bit.
Place the bit of flat bar so that one edge rests on the bit of the race that is proud; hit the upper edge of the bar to drive the race off.
Rotate the fork, do the other side, repeat as required.
Done with care, the paint will be undamaged; if it's a particular worry drape a bit of thin cloth between the crown and the bar.
03-26-22, 06:40 AM
#32

Senior Member

Join Date: Apr 2005
Location: Ann Arbor, MI
Posts: 16,863
Bikes: 1980 Masi, 1984 Mondonico, 1984 Trek 610, 1980 Woodrup Giro, 2005 Mondonico Futura Leggera ELOS, 1967 PX10E, 1971 Peugeot UO-8
Mentioned: 49 Post(s)
Tagged: 0 Thread(s)
Quoted: 1853 Post(s)
Liked 659 Times
in
502 Posts
This is what I was thinking as well - plus, Ithink the photo shows the lower head tube lug and the head tube, not the top tube. In such a case where the crack might be miniscule but still a hazard, could Magnaflux be used to make cracks visible? (says Ken showing his age!)
03-26-22, 07:02 AM
#33
Senior Member
Join Date: Apr 2005
Location: Ann Arbor, MI
Posts: 16,863
Bikes: 1980 Masi, 1984 Mondonico, 1984 Trek 610, 1980 Woodrup Giro, 2005 Mondonico Futura Leggera ELOS, 1967 PX10E, 1971 Peugeot UO-8
Mentioned: 49 Post(s)
Tagged: 0 Thread(s)
Quoted: 1853 Post(s)
Liked 659 Times
in
502 Posts
I would be tempted to remove the headset and face the headtube, the appearance suggests that the lower headtube is not fully in contact with the headset cup.
the overall appearance suggests crack check dye time to me.
and chemical paint removal, wire brush can smudge things a bit.
the overall appearance suggests crack check dye time to me.
and chemical paint removal, wire brush can smudge things a bit.
03-26-22, 01:03 PM
#34
Senior Member
Join Date: Jun 2006
Posts: 20,305
Mentioned: 130 Post(s)
Tagged: 0 Thread(s)
Quoted: 3463 Post(s)
Liked 2,826 Times
in
1,994 Posts
This is where I'm at, and I may be facing (lol!) a similar problem on my Mondonico. I'd start with "clearing the decks" to make sure everything that might need to be seen can be seen. I would not reassemble without re-facing the head tube ends, possibly line-boring as well. On mine I haven't started it yet.
Likes For repechage:
03-26-22, 01:21 PM
#35
Senior Member
Join Date: Oct 2015
Location: PDX
Posts: 13,020
Bikes: Merz x 5 + Specialized Merz Allez x 2, Strawberry/Newlands/DiNucci/Ti x3, Gordon, Fuso/Moulton x2, Bornstein, Paisley,1958-74 Paramounts x3, 3rensho, 74 Moto TC, 73-78 Raleigh Pro's x5, Marinoni x2, 1960 Cinelli SC, 1980 Bianchi SC, PX-10 X 2
Mentioned: 267 Post(s)
Tagged: 0 Thread(s)
Quoted: 4501 Post(s)
Liked 6,367 Times
in
3,663 Posts
This is where I'm at, and I may be facing (lol!) a similar problem on my Mondonico. I'd start with "clearing the decks" to make sure everything that might need to be seen can be seen. I would not reassemble without re-facing the head tube ends, possibly line-boring as well. On mine I haven't started it yet.

Likes For merziac:
03-26-22, 01:26 PM
#36
Senior Member
Join Date: Oct 2015
Location: PDX
Posts: 13,020
Bikes: Merz x 5 + Specialized Merz Allez x 2, Strawberry/Newlands/DiNucci/Ti x3, Gordon, Fuso/Moulton x2, Bornstein, Paisley,1958-74 Paramounts x3, 3rensho, 74 Moto TC, 73-78 Raleigh Pro's x5, Marinoni x2, 1960 Cinelli SC, 1980 Bianchi SC, PX-10 X 2
Mentioned: 267 Post(s)
Tagged: 0 Thread(s)
Quoted: 4501 Post(s)
Liked 6,367 Times
in
3,663 Posts
This is what I was thinking as well - plus, Ithink the photo shows the lower head tube lug and the head tube, not the top tube. In such a case where the crack might be miniscule but still a hazard, could Magnaflux be used to make cracks visible? (says Ken showing his age!)
03-27-22, 05:39 AM
#37
Senior Member
Join Date: Apr 2005
Location: Ann Arbor, MI
Posts: 16,863
Bikes: 1980 Masi, 1984 Mondonico, 1984 Trek 610, 1980 Woodrup Giro, 2005 Mondonico Futura Leggera ELOS, 1967 PX10E, 1971 Peugeot UO-8
Mentioned: 49 Post(s)
Tagged: 0 Thread(s)
Quoted: 1853 Post(s)
Liked 659 Times
in
502 Posts
And I don't have the correct tools for frame machining or alignment. I bought a used face reamer, but have not used it. It was supposed to come with at least its parts list and other literature, but I got nothing at the end of the day.
Last edited by Road Fan; 03-27-22 at 05:45 AM.
03-27-22, 05:52 AM
#38
Senior Member
Join Date: Apr 2005
Location: Ann Arbor, MI
Posts: 16,863
Bikes: 1980 Masi, 1984 Mondonico, 1984 Trek 610, 1980 Woodrup Giro, 2005 Mondonico Futura Leggera ELOS, 1967 PX10E, 1971 Peugeot UO-8
Mentioned: 49 Post(s)
Tagged: 0 Thread(s)
Quoted: 1853 Post(s)
Liked 659 Times
in
502 Posts
Likes For Road Fan:
03-27-22, 07:00 AM
#39
framebuilder
Aerzon, as a framebuilder, my guess is that the head tube for your frame was not properly reamed to the right size before the head tube cups were installed. Because the inside of the head tube is too small for the OD of the headset cup, it spread the head tube/lug enough so it cracked. Another clue that it was not properly faced (that has already been mentioned) is that the bottom of the head tube is not aligned with the cup. There is a bit of a gap.
Removing the headset, reaming and facing the head tube and fork crown is an easy job for a framebuilder. He can also determine if any rebrazingq needs to be done at the same time. Even if your lug is cracked, it is doubtful from a safety standpoint it needs to be rebrazed. However since you are there the framebuilder can give a better assessment than home mechanics looking at pictures on the internet.
Removing the headset, reaming and facing the head tube and fork crown is an easy job for a framebuilder. He can also determine if any rebrazingq needs to be done at the same time. Even if your lug is cracked, it is doubtful from a safety standpoint it needs to be rebrazed. However since you are there the framebuilder can give a better assessment than home mechanics looking at pictures on the internet.
03-27-22, 08:27 AM
#40
Senior Member

Join Date: May 2008
Location: Fredericksburg, Va
Posts: 9,578
Bikes: '65 Frejus TDF, '73 Bottecchia Giro d'Italia, '83 Colnago Superissimo, '84 Trek 610, '84 Trek 760, '88 Pinarello Veneto, '88 De Rosa Pro, '89 Pinarello Montello, '94 Burley Duet, 97 Specialized RockHopper, 2010 Langster, Tern Link D8
Mentioned: 73 Post(s)
Tagged: 0 Thread(s)
Quoted: 1606 Post(s)
Liked 2,211 Times
in
1,102 Posts
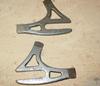
Purchased tools are great when you expect to use them frequently. I made my own.
 DIY Bike Tools on Flickr
The copper one is the head set cup removal tool.
DIY Bike Tools on FlickrThe copper one is the head set cup removal tool.
__________________
Bikes don't stand alone. They are two tired.
Bikes don't stand alone. They are two tired.
03-27-22, 09:13 AM
#41
Senior Member
Join Date: Aug 2013
Posts: 2,321
Mentioned: 35 Post(s)
Tagged: 0 Thread(s)
Quoted: 767 Post(s)
Liked 1,898 Times
in
889 Posts
Even the best of tools are useless in the wrong hands. And improvised tools can produce excellent results when used with care and attention.
I'm with SJX426. If I can't make it, I'll either spring for the tool or for the service at a shop. But if I can make it, I will. A functional bearing cup remover is pretty easy to fabricate. You can go all in with tool steel and heat treating, but it isn't necessary for infrequent usage. I used a length of 3/4" steel tubing, a drill, hacksaw, and a file on this one. It popped a very tight-fitting cup right out.
I've also made a smaller version to remove a pedal bearing cup by using the seat stay from a trashed frame. It worked exactly as it should have.
03-27-22, 04:00 PM
#42
Old fart
Join Date: Nov 2004
Location: Appleton WI
Posts: 24,774
Bikes: Several, mostly not name brands.
Mentioned: 153 Post(s)
Tagged: 0 Thread(s)
Quoted: 3580 Post(s)
Liked 3,393 Times
in
1,927 Posts
A functional bearing cup remover is pretty easy to fabricate. You can go all in with tool steel and heat treating, but it isn't necessary for infrequent usage. I used a length of 3/4" steel tubing, a drill, hacksaw, and a file on this one. It popped a very tight-fitting cup right out.

Likes For JohnDThompson:
03-30-22, 03:25 PM
#43
Junior Member
Thread Starter
Join Date: Sep 2019
Location: Minnesota
Posts: 87
Bikes: Raleigh Mojave 4.0, Panasonic DX1000
Mentioned: 1 Post(s)
Tagged: 0 Thread(s)
Quoted: 46 Post(s)
Liked 22 Times
in
15 Posts
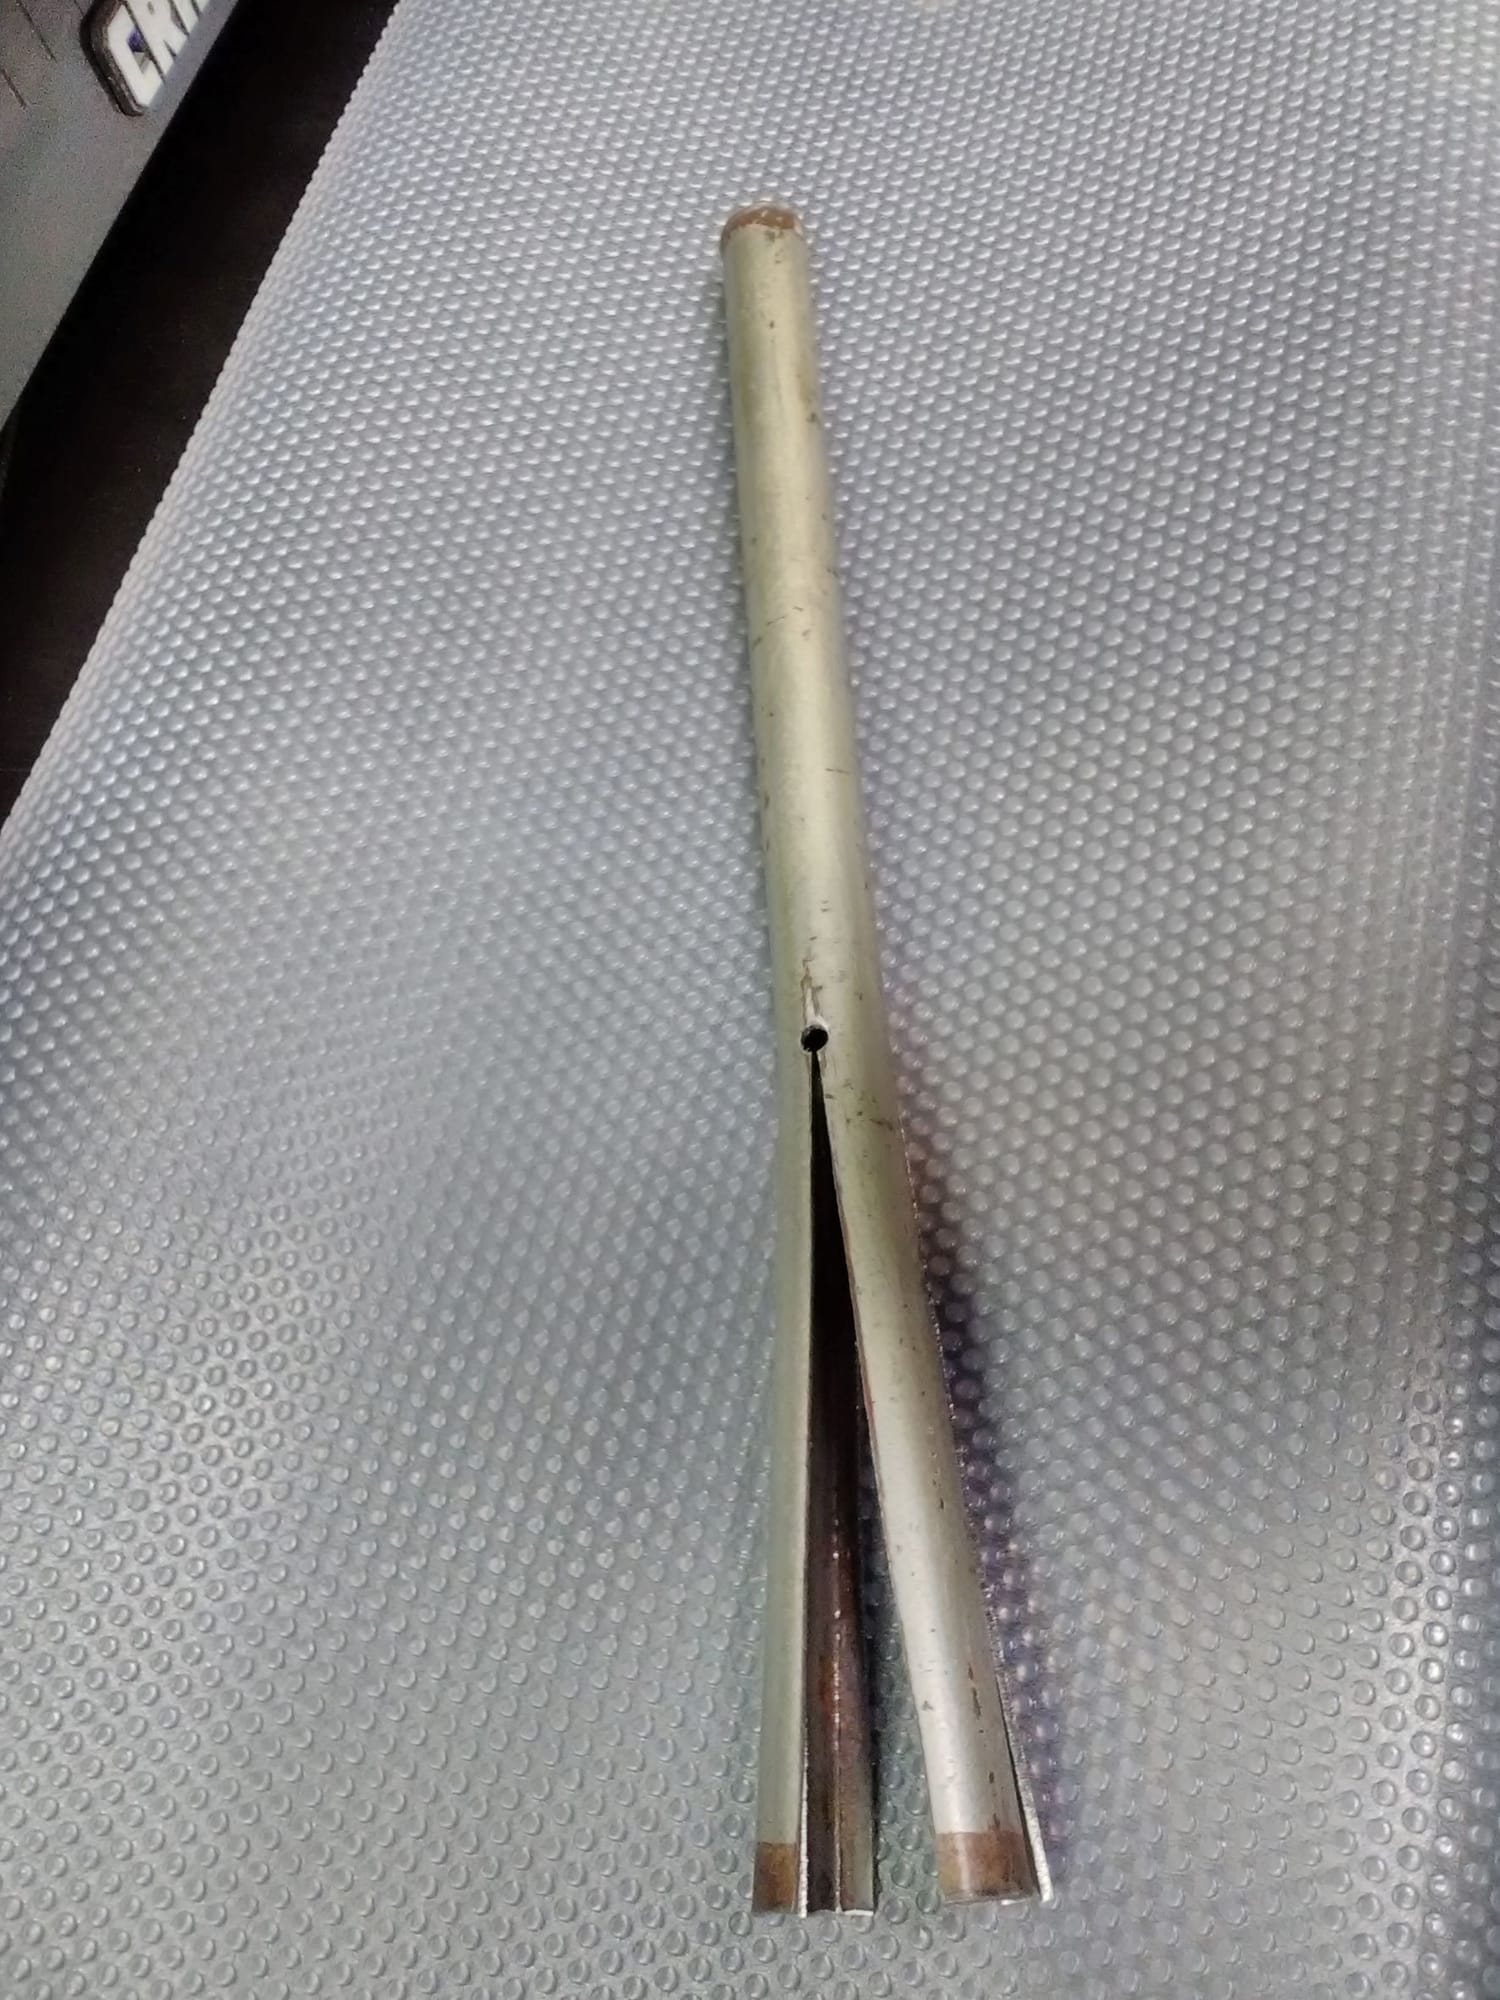
Bringing this thread back for a second. I have yet to disassemble the headset and lay eyes on the headtube, and I fully accept that this needs to happen. One of the concerns raised in this thread was that potentially the lower headset cup was fitting too tight/not seated properly, which could've stressed the headtube when it initially went in. I think this appearance could've been due to poor picture taking on my part+ some old grease around the cup giving the illusion of shadow and therefore excessive gap.
I retook the picture and cleaned this grease, I'm curious if this cup still appears to be seated improperly/not seated fully. For reference, I was curious to "measure" the gap in some way. I can't even appear to get a piece of floss in-between the seam formed by the headtube and crown. I know interpreting pictures online isn't the best, but I still find your interpretations valuable, since my eyes aren't very experienced with bikes quite yet.
I retook the picture and cleaned this grease, I'm curious if this cup still appears to be seated improperly/not seated fully. For reference, I was curious to "measure" the gap in some way. I can't even appear to get a piece of floss in-between the seam formed by the headtube and crown. I know interpreting pictures online isn't the best, but I still find your interpretations valuable, since my eyes aren't very experienced with bikes quite yet.
03-30-22, 04:01 PM
#44
Senior Member
Join Date: Oct 2015
Location: PDX
Posts: 13,020
Bikes: Merz x 5 + Specialized Merz Allez x 2, Strawberry/Newlands/DiNucci/Ti x3, Gordon, Fuso/Moulton x2, Bornstein, Paisley,1958-74 Paramounts x3, 3rensho, 74 Moto TC, 73-78 Raleigh Pro's x5, Marinoni x2, 1960 Cinelli SC, 1980 Bianchi SC, PX-10 X 2
Mentioned: 267 Post(s)
Tagged: 0 Thread(s)
Quoted: 4501 Post(s)
Liked 6,367 Times
in
3,663 Posts
Bringing this thread back for a second. I have yet to disassemble the headset and lay eyes on the headtube, and I fully accept that this needs to happen. One of the concerns raised in this thread was that potentially the lower headset cup was fitting too tight/not seated properly, which could've stressed the headtube when it initially went in. I think this appearance could've been due to poor picture taking on my part+ some old grease around the cup giving the illusion of shadow and therefore excessive gap.
I retook the picture and cleaned this grease, I'm curious if this cup still appears to be seated improperly/not seated fully. For reference, I was curious to "measure" the gap in some way. I can't even appear to get a piece of floss in-between the seam formed by the headtube and crown. I know interpreting pictures online isn't the best, but I still find your interpretations valuable, since my eyes aren't very experienced with bikes quite yet.
I retook the picture and cleaned this grease, I'm curious if this cup still appears to be seated improperly/not seated fully. For reference, I was curious to "measure" the gap in some way. I can't even appear to get a piece of floss in-between the seam formed by the headtube and crown. I know interpreting pictures online isn't the best, but I still find your interpretations valuable, since my eyes aren't very experienced with bikes quite yet.

Now, like you said, get that cup out of there and get the frame under some harsh light for a good hard look.
03-30-22, 04:59 PM
#45
Senior Member
Join Date: Jun 2006
Posts: 20,305
Mentioned: 130 Post(s)
Tagged: 0 Thread(s)
Quoted: 3463 Post(s)
Liked 2,826 Times
in
1,994 Posts
Be sure to invert the bike when you take the headset apart, That headset I am pretty sure uses loose bearings.
with the stem out, caliper off and wheel out, check the headset adjustment for free rotation. mark and note the orientation of the cups, the appearance inside and feel will guide if leave them clocked as is or rotate.
Does look much better after cleaning.
with the stem out, caliper off and wheel out, check the headset adjustment for free rotation. mark and note the orientation of the cups, the appearance inside and feel will guide if leave them clocked as is or rotate.
Does look much better after cleaning.
Likes For repechage:
03-31-22, 07:04 PM
#46
Senior Member
Join Date: May 2019
Location: Bloomington, IN
Posts: 2,936
Bikes: Paramount, Faggin, Ochsner, Ciocc, Basso
Mentioned: 115 Post(s)
Tagged: 0 Thread(s)
Quoted: 1296 Post(s)
Liked 1,885 Times
in
1,132 Posts
I'm sticking to my paint crack assessment, and at this point I would say take a rifling file and cut a small bit of the paint at the bottom of the lug. If the lug is not cracked the cut into the paint will show that the lug is not cracked. Just the way I would do it. Smiles. MH


