


"Get your 1950 Raleigh Superbe Kit Today!"
 06-07-21, 11:39 AM
#1

www.theheadbadge.com
Thread Starter

Join Date: Sep 2005
Location: Southern Florida
Posts: 28,496
Bikes: https://www.theheadbadge.com
Mentioned: 124 Post(s)
Tagged: 0 Thread(s)
Quoted: 2412 Post(s)
Liked 4,373 Times
in
2,086 Posts
"Get your 1950 Raleigh Superbe Kit Today!"
That's what it feels like, anyway! I wish all new projects came with Much Assembly Required. 
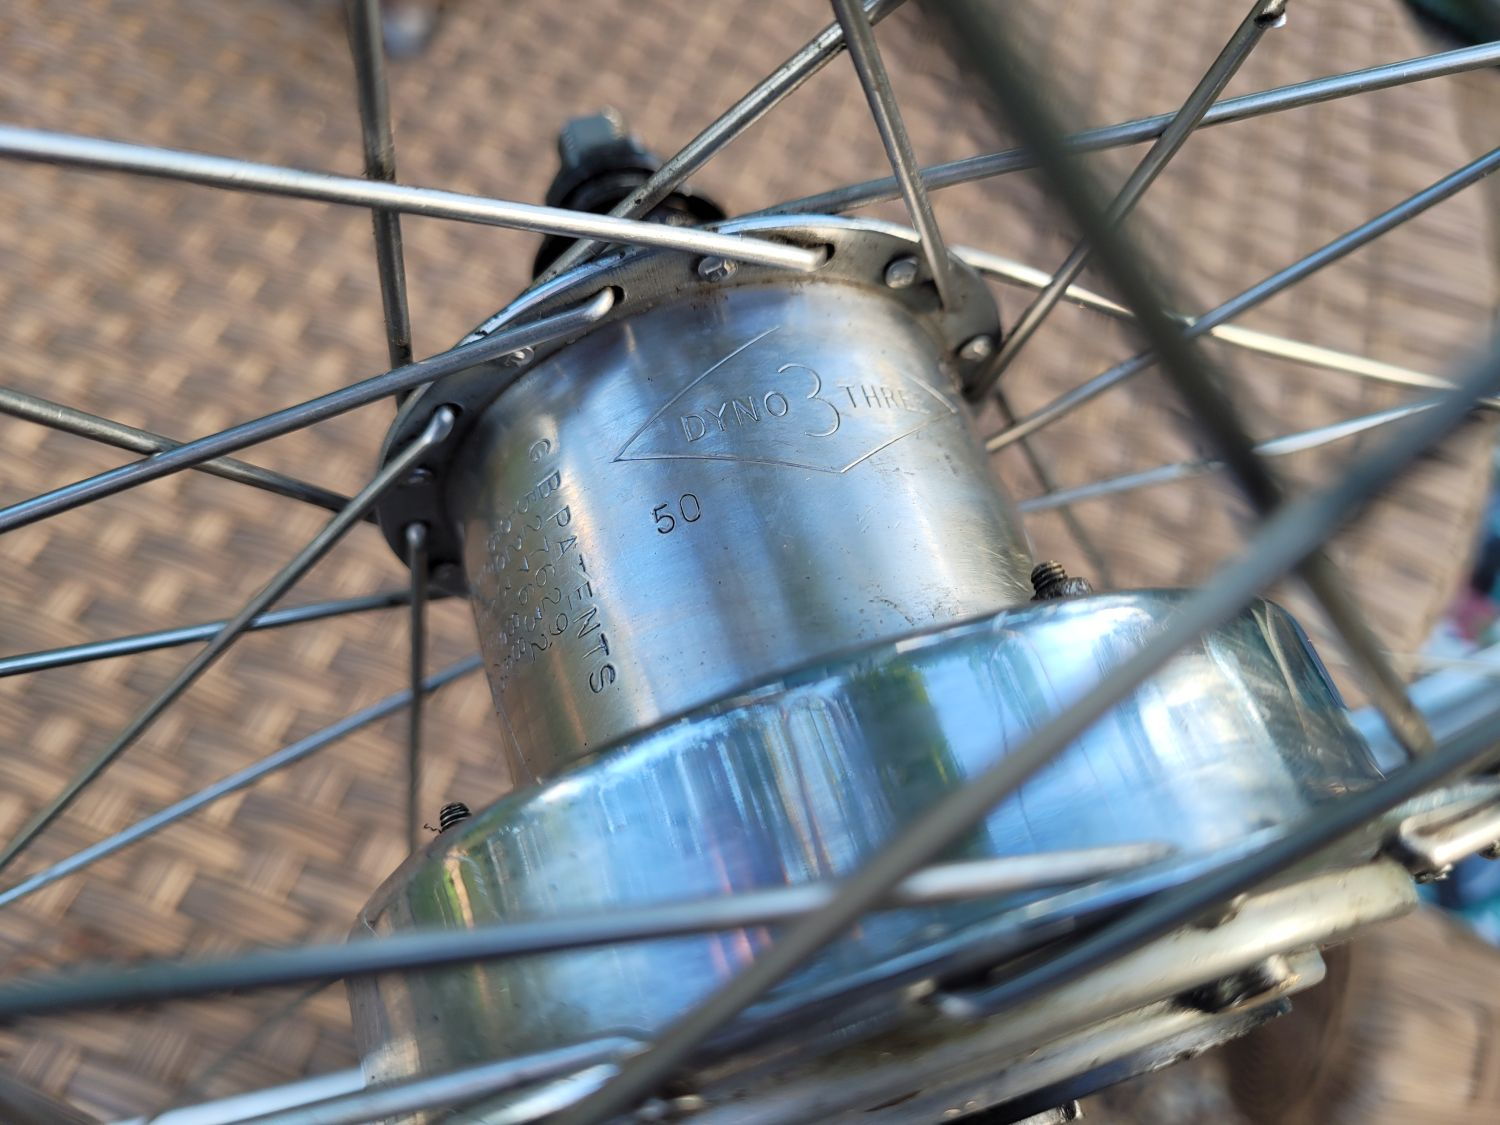
This is (was) Ged117's bike of which most of you have probably seen, adorned with a Cyclo 3-speed conversion on its Sturmey Dynothree. I sent him a chaincase for it about a year ago, and wouldn't you know, I wind up buying it back along with the whole bike - thus finally satisfying my desire for a '50s Superbe after all these years.
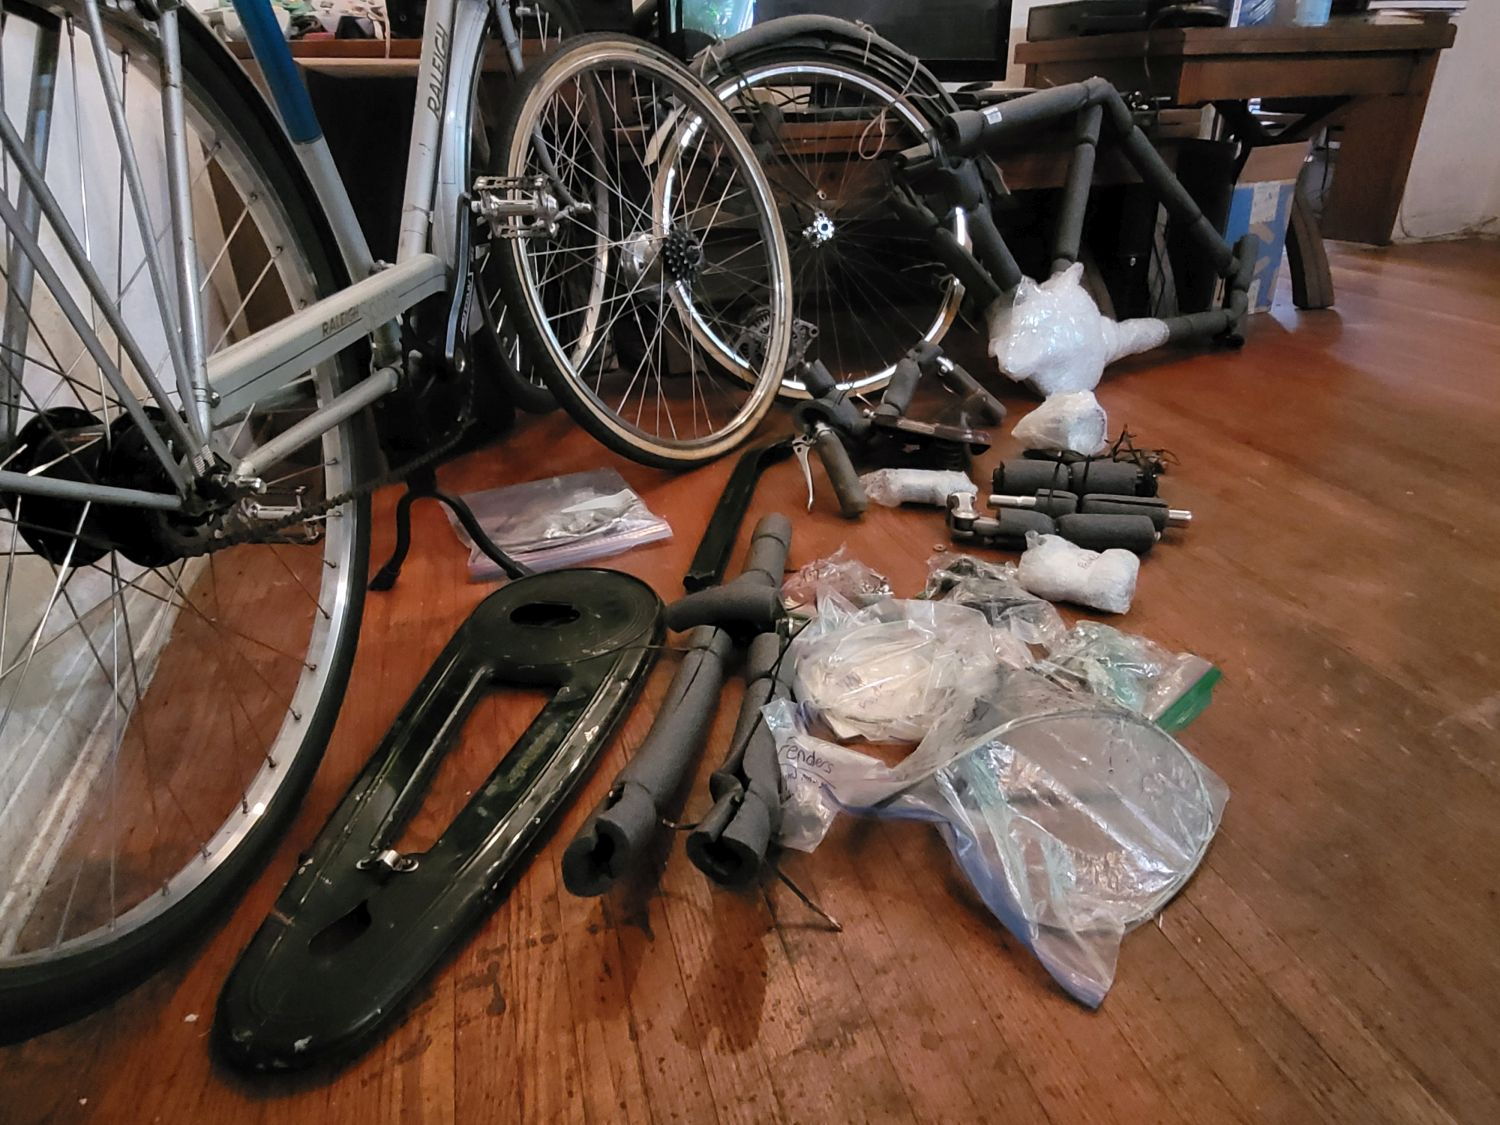
Pics after work. This may take some time; I'll probably oxalic dip some stuff given the opportunity I have here while its all off.
-Kurt
This is (was) Ged117's bike of which most of you have probably seen, adorned with a Cyclo 3-speed conversion on its Sturmey Dynothree. I sent him a chaincase for it about a year ago, and wouldn't you know, I wind up buying it back along with the whole bike - thus finally satisfying my desire for a '50s Superbe after all these years.
Pics after work. This may take some time; I'll probably oxalic dip some stuff given the opportunity I have here while its all off.
-Kurt
__________________


 06-07-21, 05:46 PM
#3
www.theheadbadge.com
Thread Starter
Join Date: Sep 2005
Location: Southern Florida
Posts: 28,496
Bikes: https://www.theheadbadge.com
Mentioned: 124 Post(s)
Tagged: 0 Thread(s)
Quoted: 2412 Post(s)
Liked 4,373 Times
in
2,086 Posts
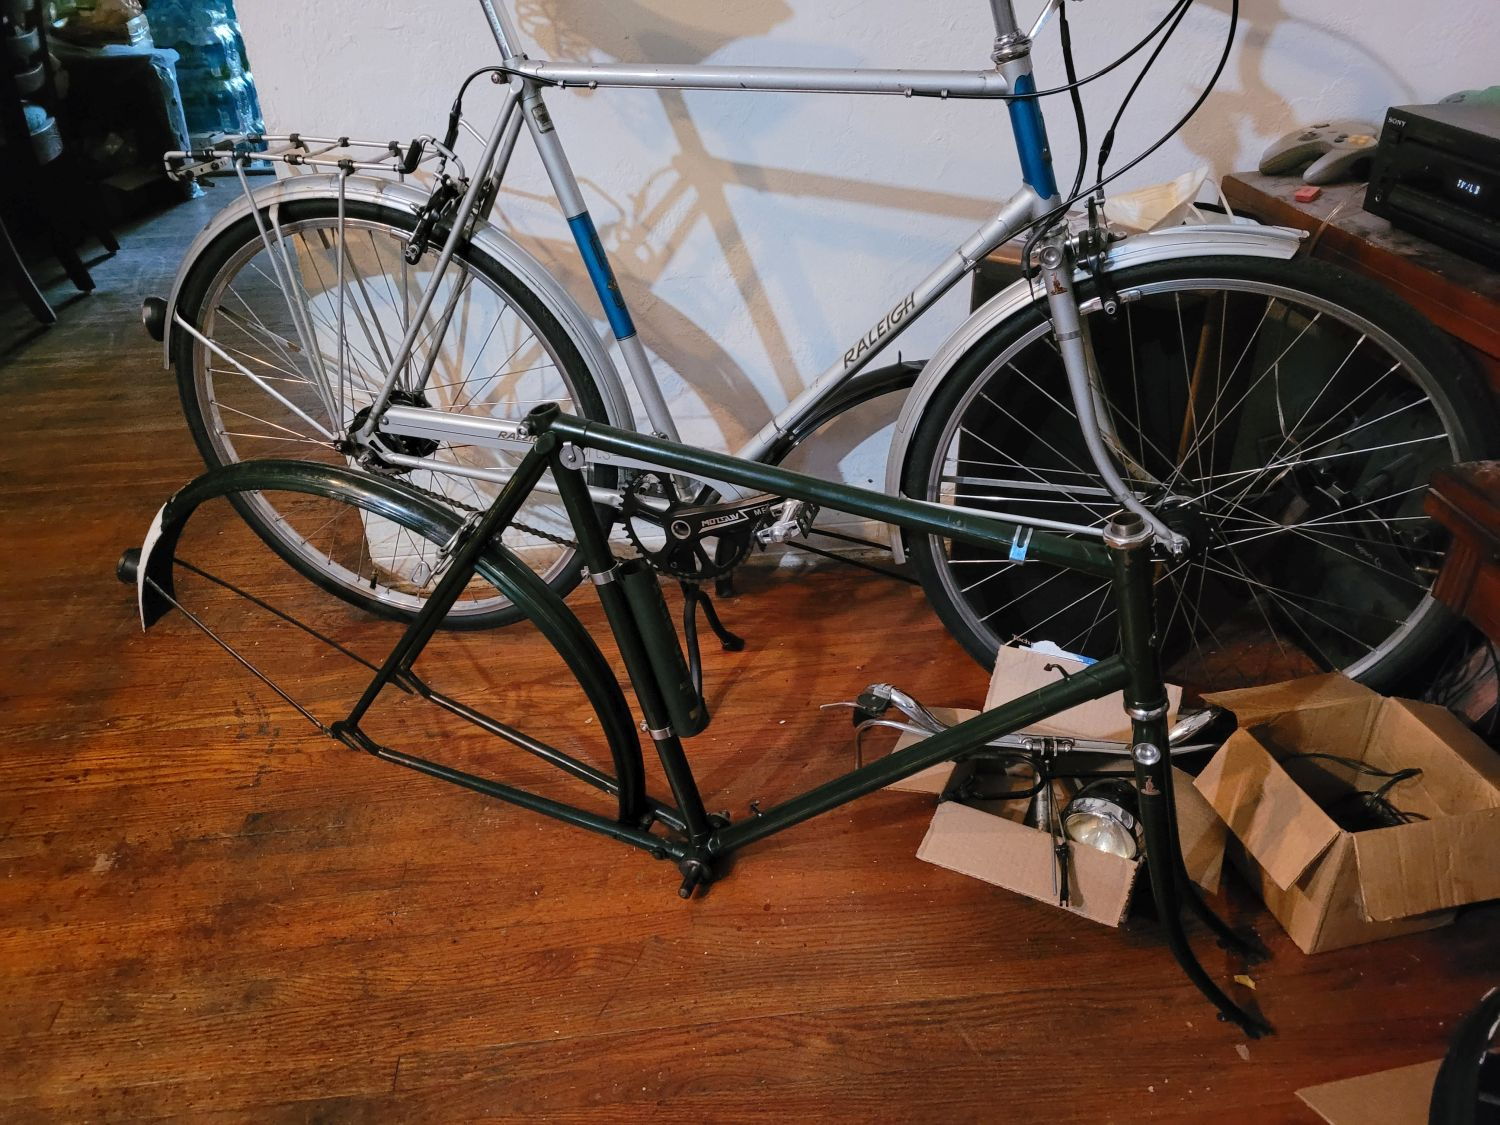
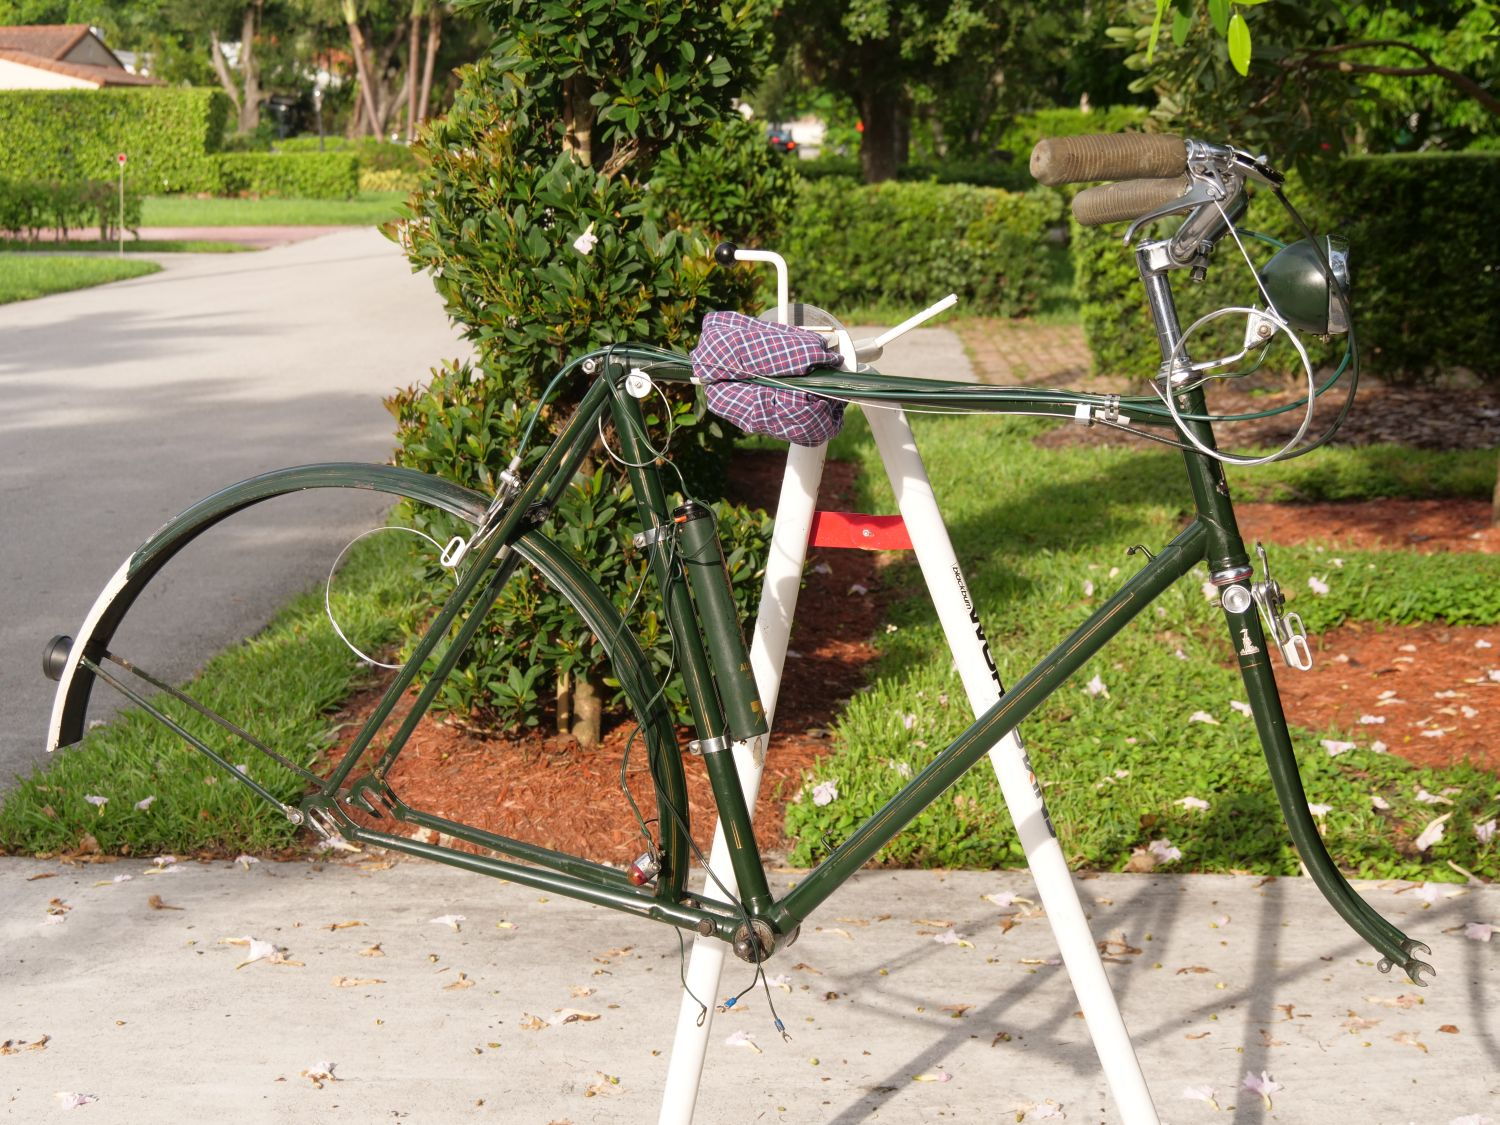
Much to report. I immediately unboxed everything and threw it in the stand once work was over.
First off...fork's bent. It wouldn't be a Raleigh if it wasn't bent
Easy fix.
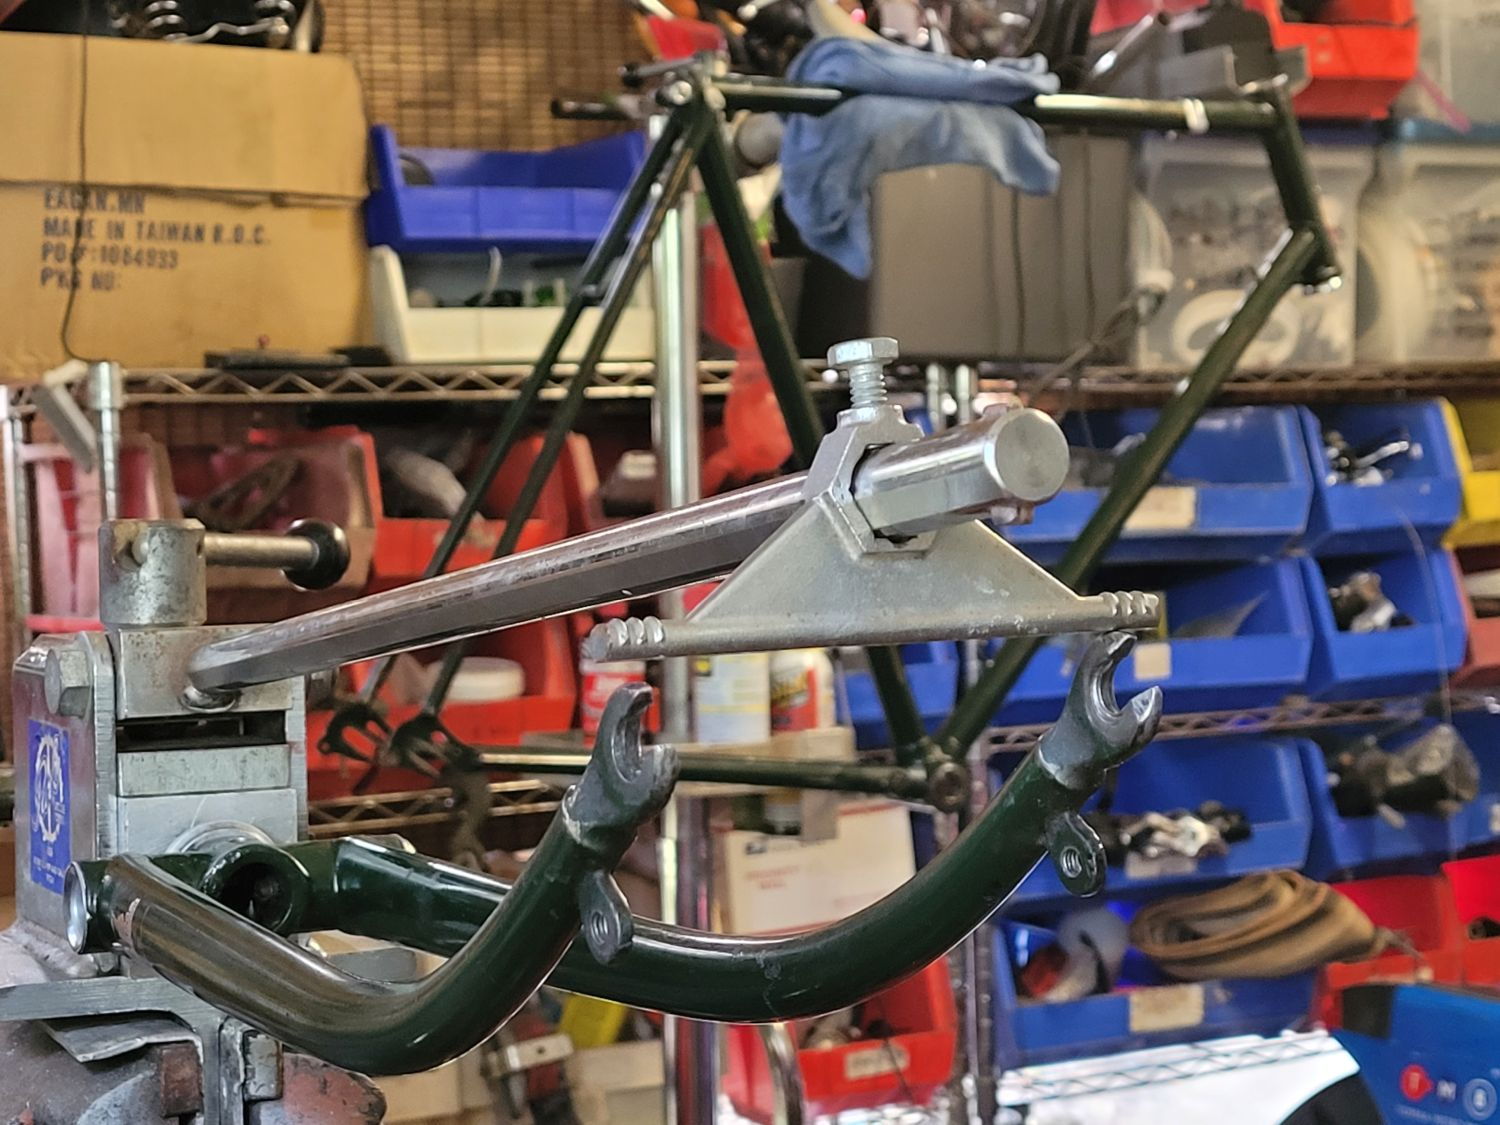
I left the fork straightening for another time, for I wanted to sort out the frame first.
Did I mention I'm contractually obligated never to acquire a Raleigh that doesn't have a tweaked rear triangle?

It's not unsurprising - the Cyclo 3-speed conversion apparently involved a lot of ill-advised rear triangle tinkering at one time.
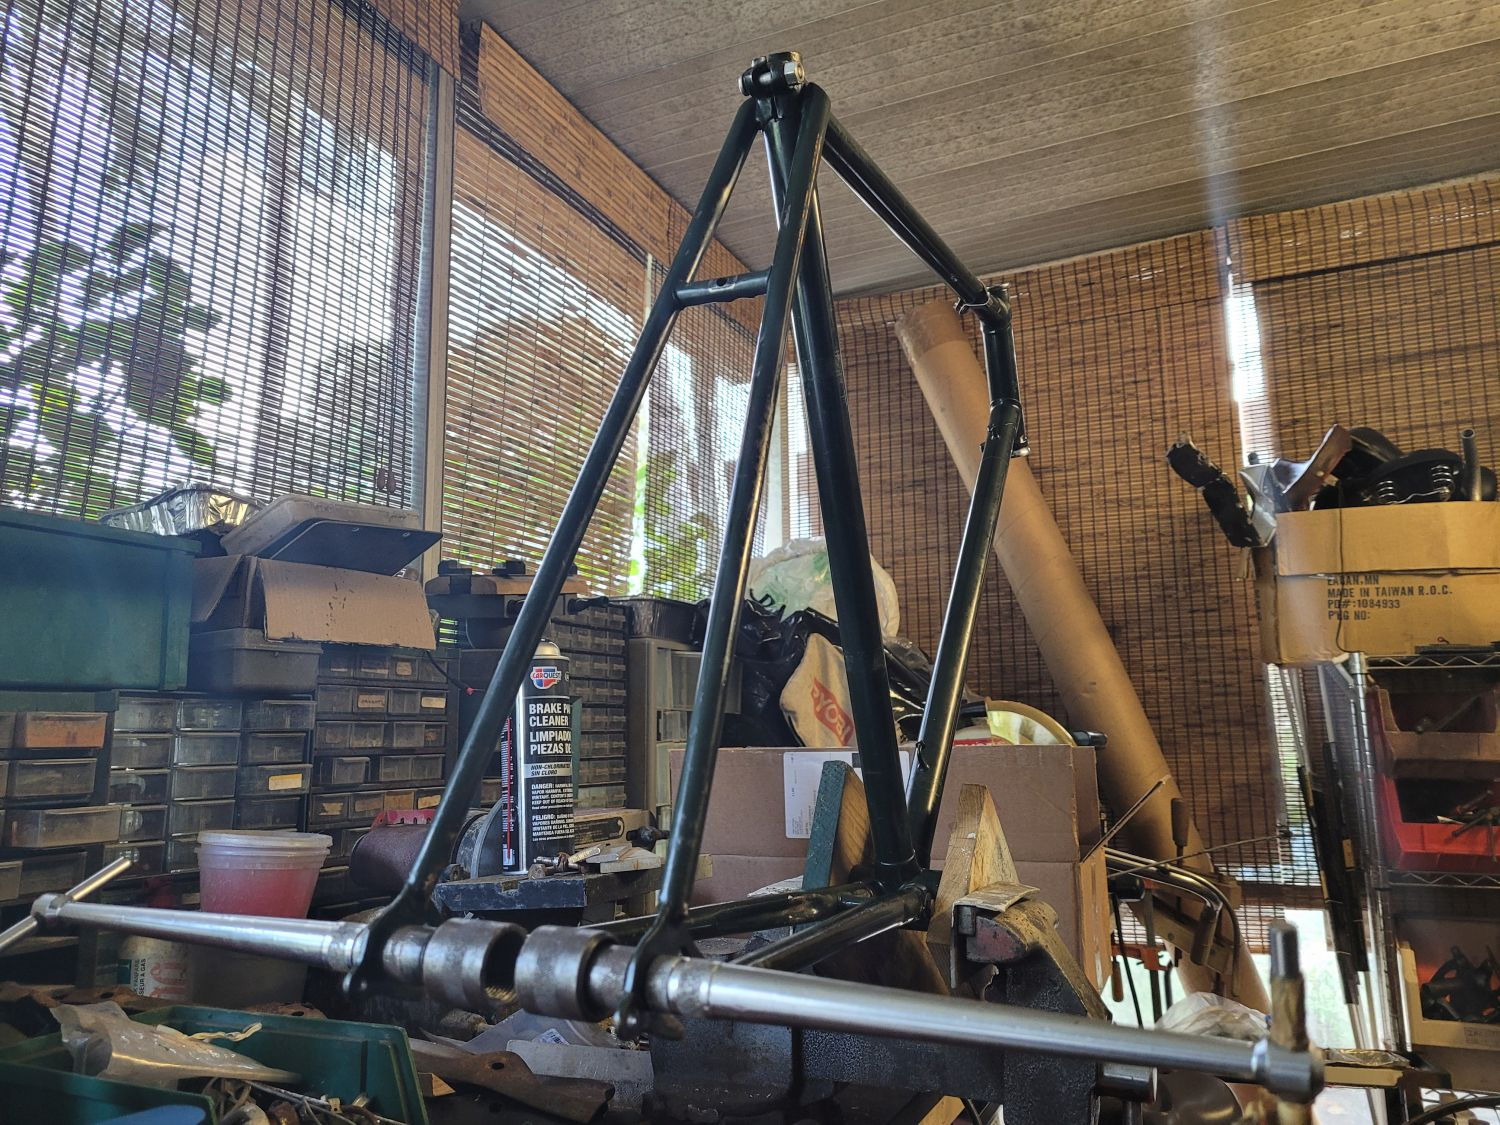
Not anymore. Straight as an arrow based on a Park frame alignment gauge and set to the proper 120mm now.
It's already a beautiful example, which means its cleanup has been exceptionally rewarding:

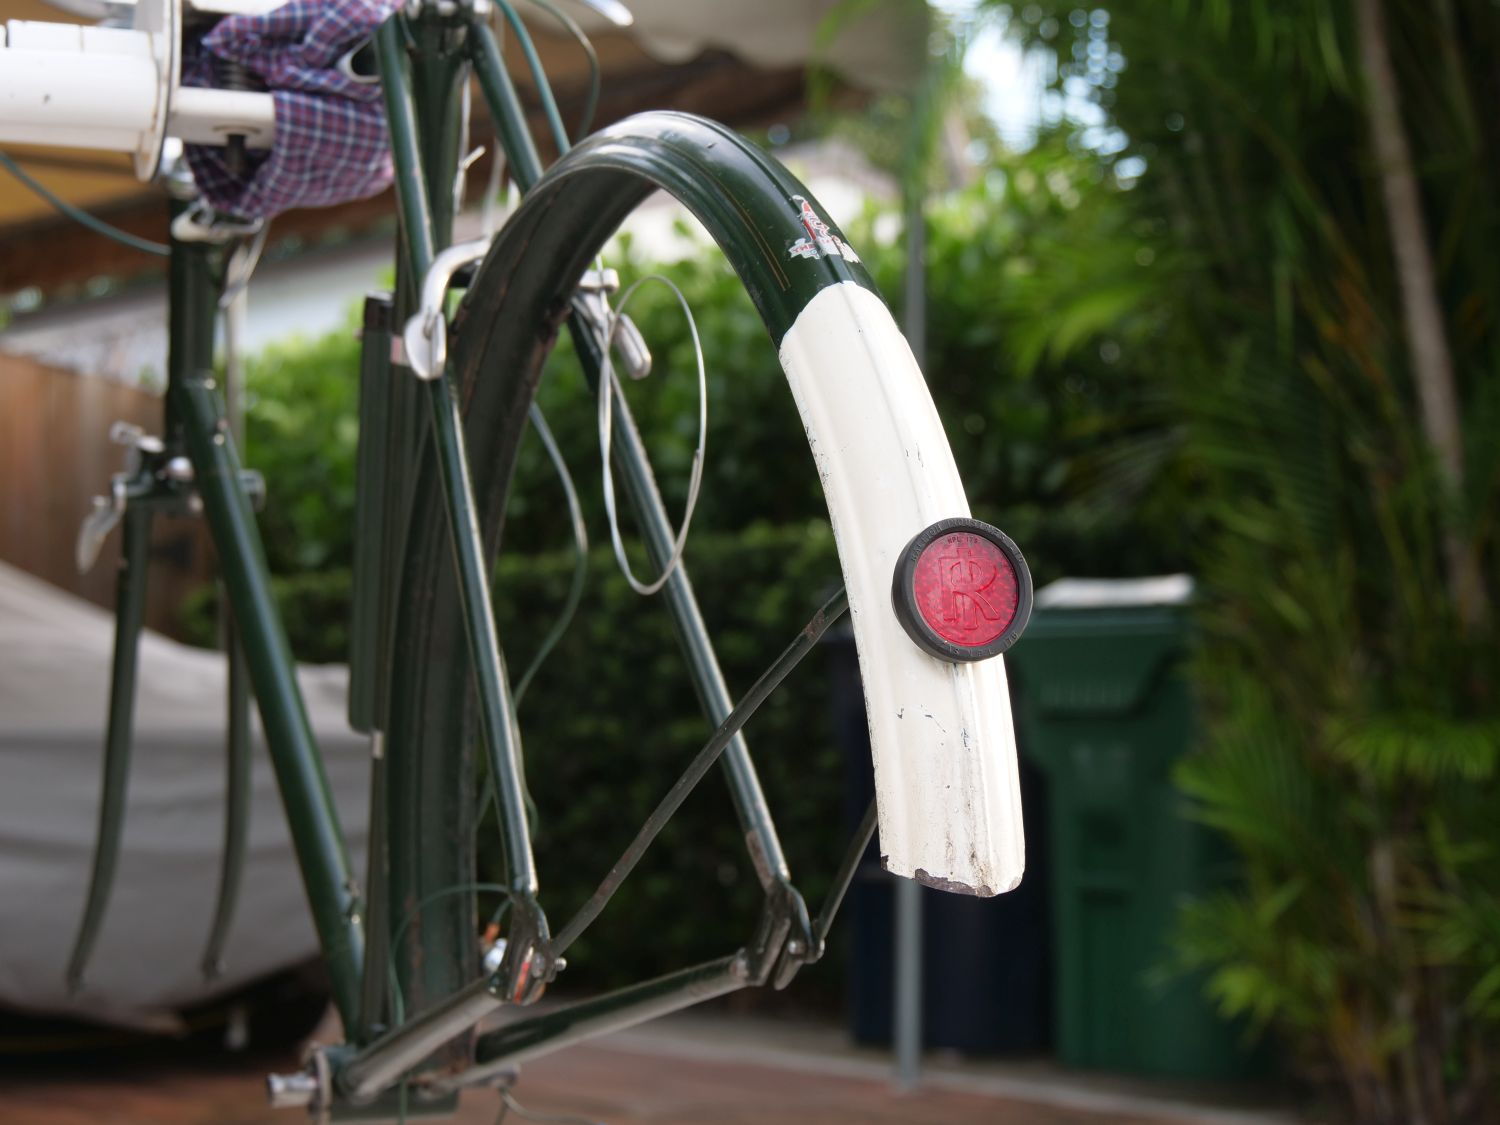
The tail has been touched up in the past. Debating whether to replace the rear reflector given the paint marks that are on it. We'll see.
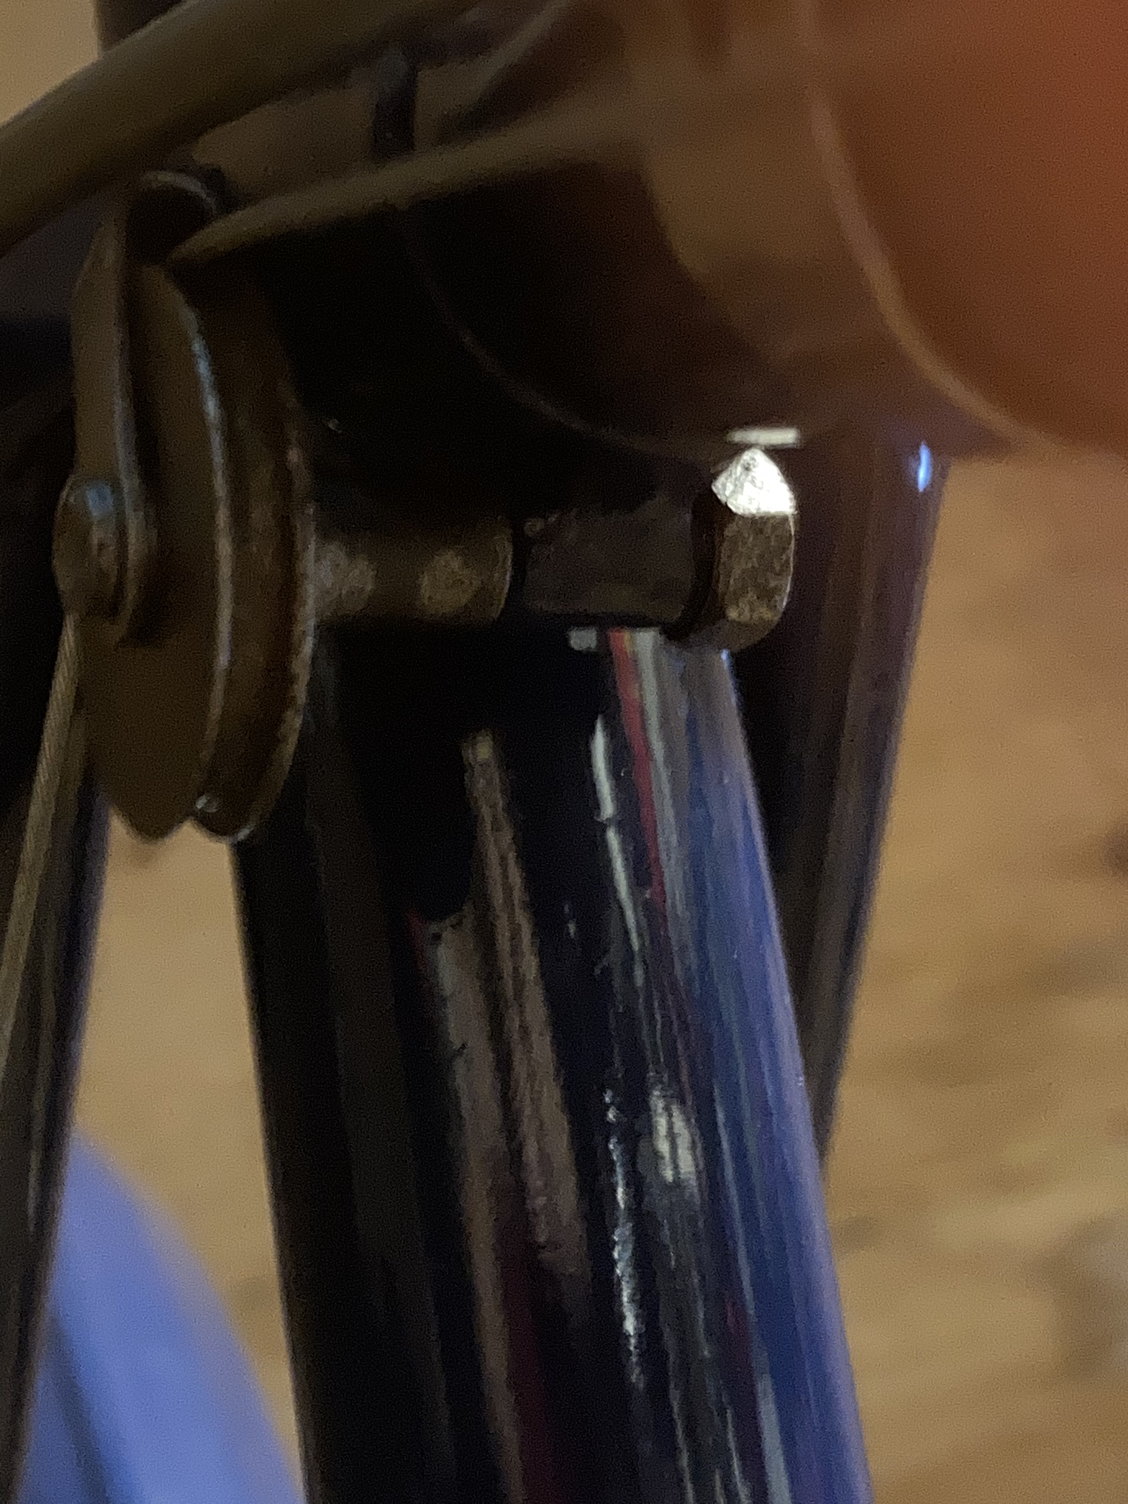
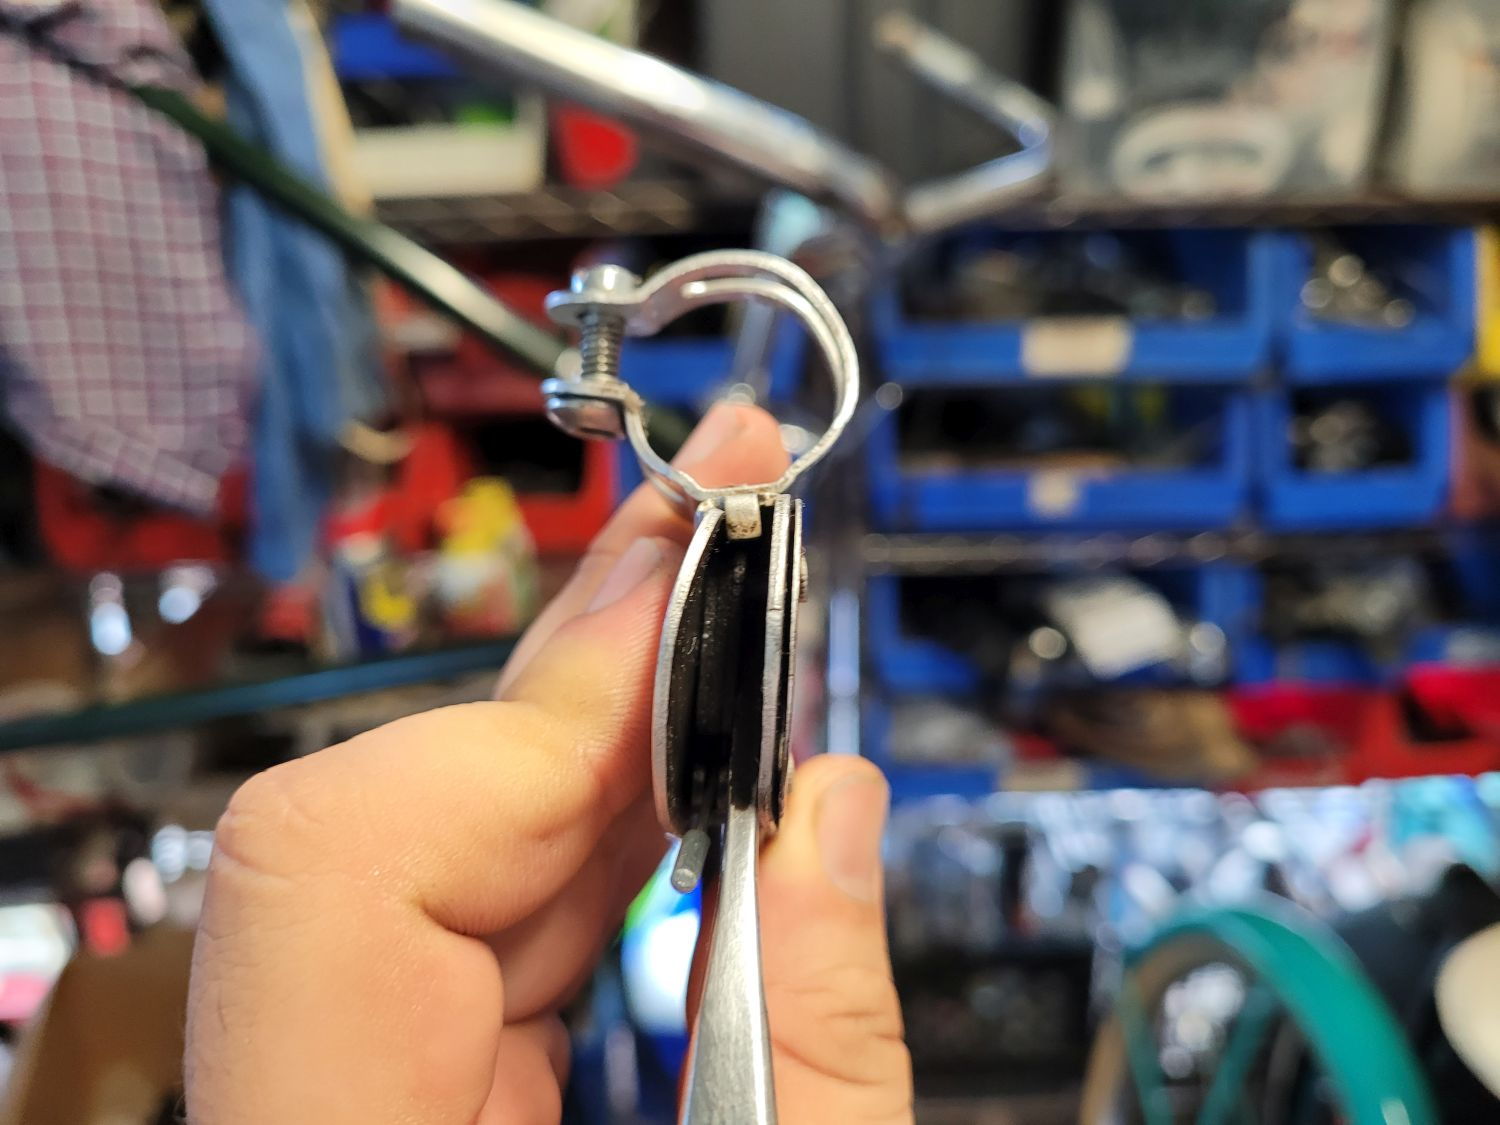
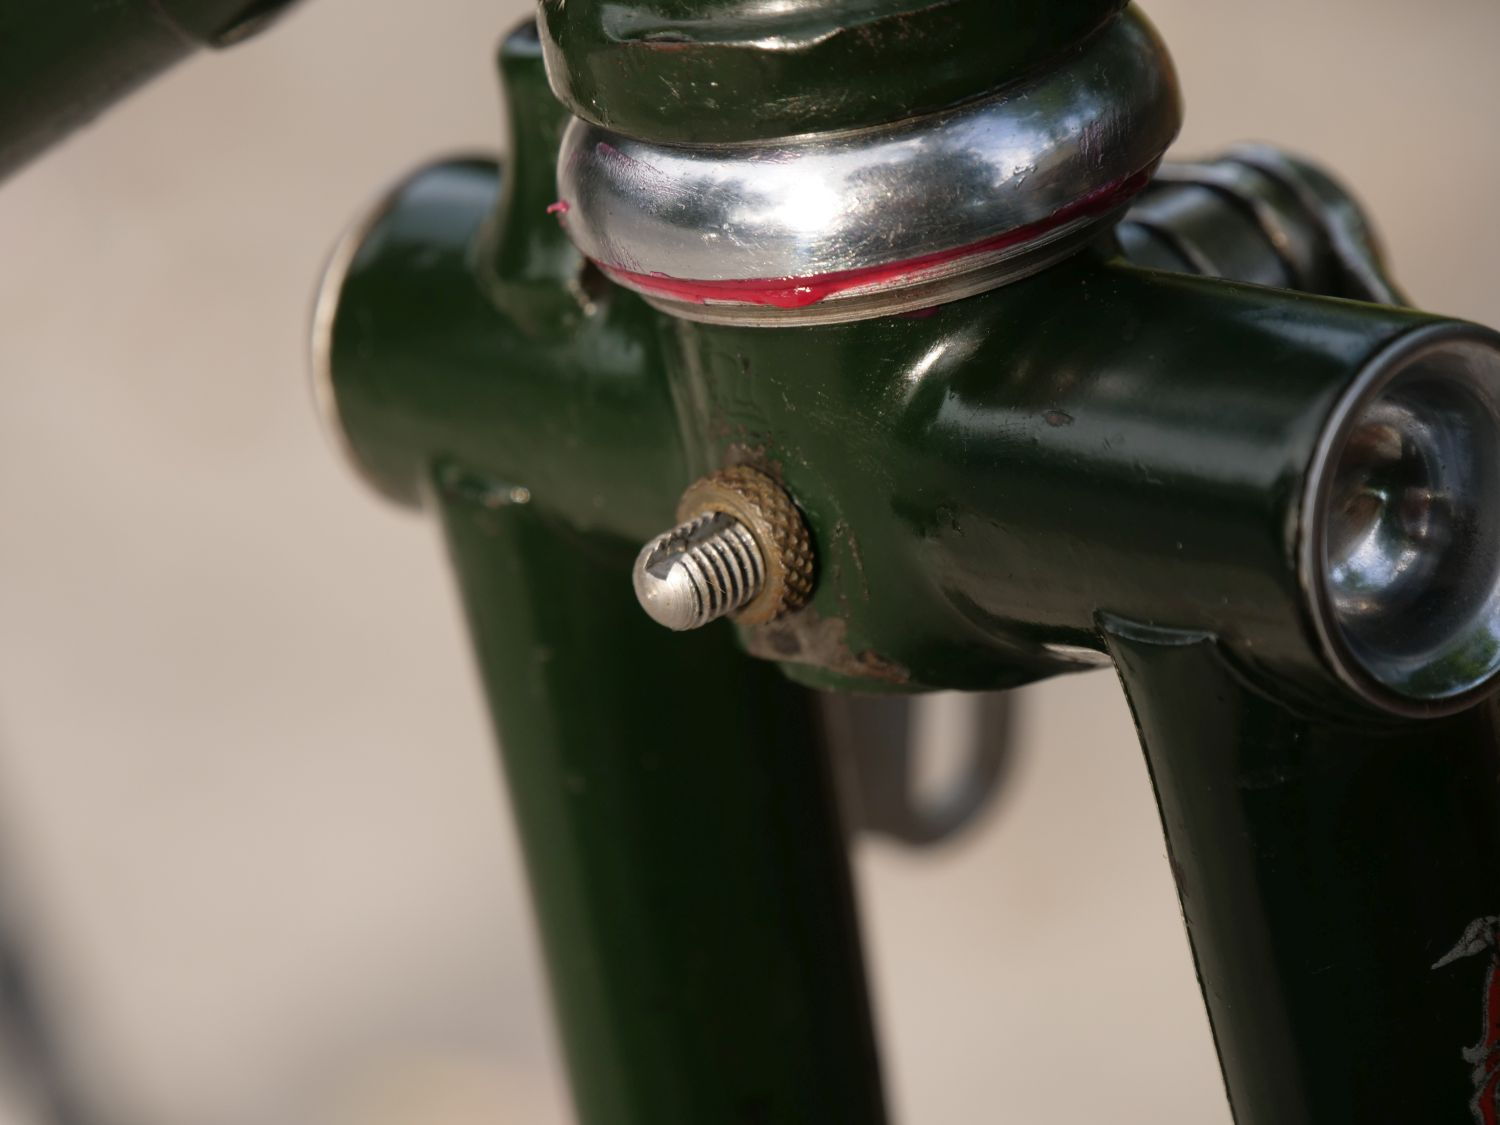
Incidentally, I can't seem to get the braze-on Sturmey cable pulley wheel to bottom out. I think the bolt might be just a wee bit too long. That's for another time, anyway. In the meantime:

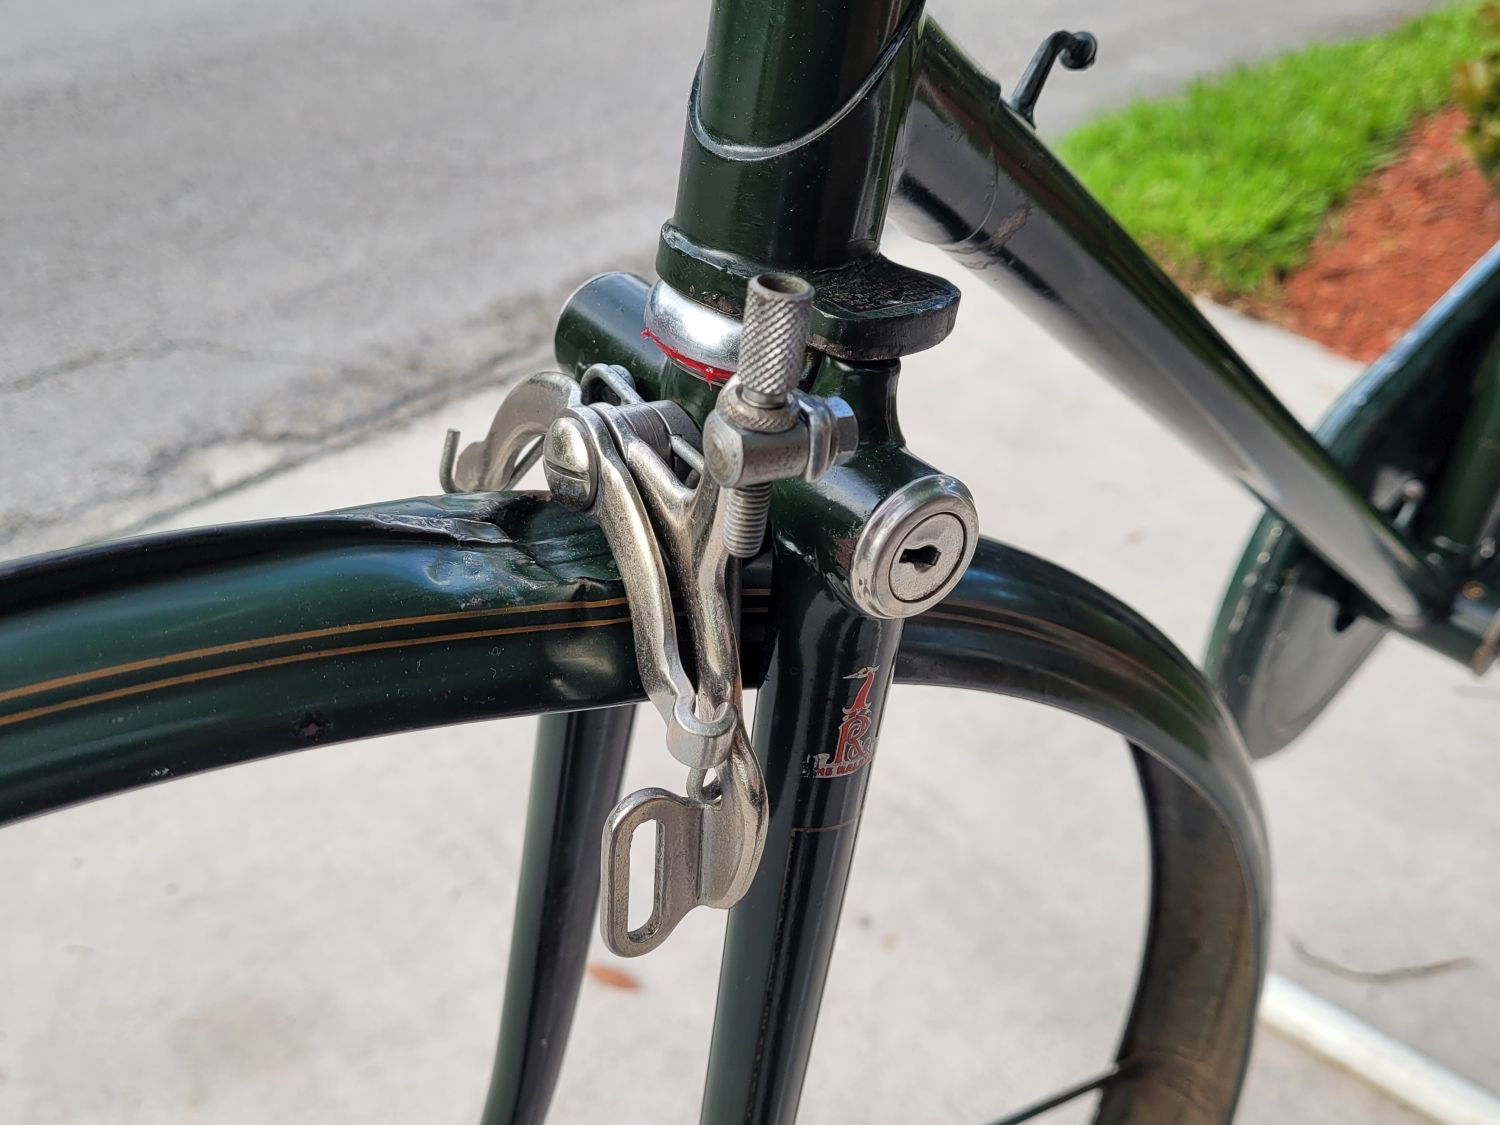
Fork lock. Because when you have a Superbe, you're required by law to post a picture of the thing.

Lots of Raleigh bits for lots of builds! I've never had two 1950's Superbes in the pipeline at once.

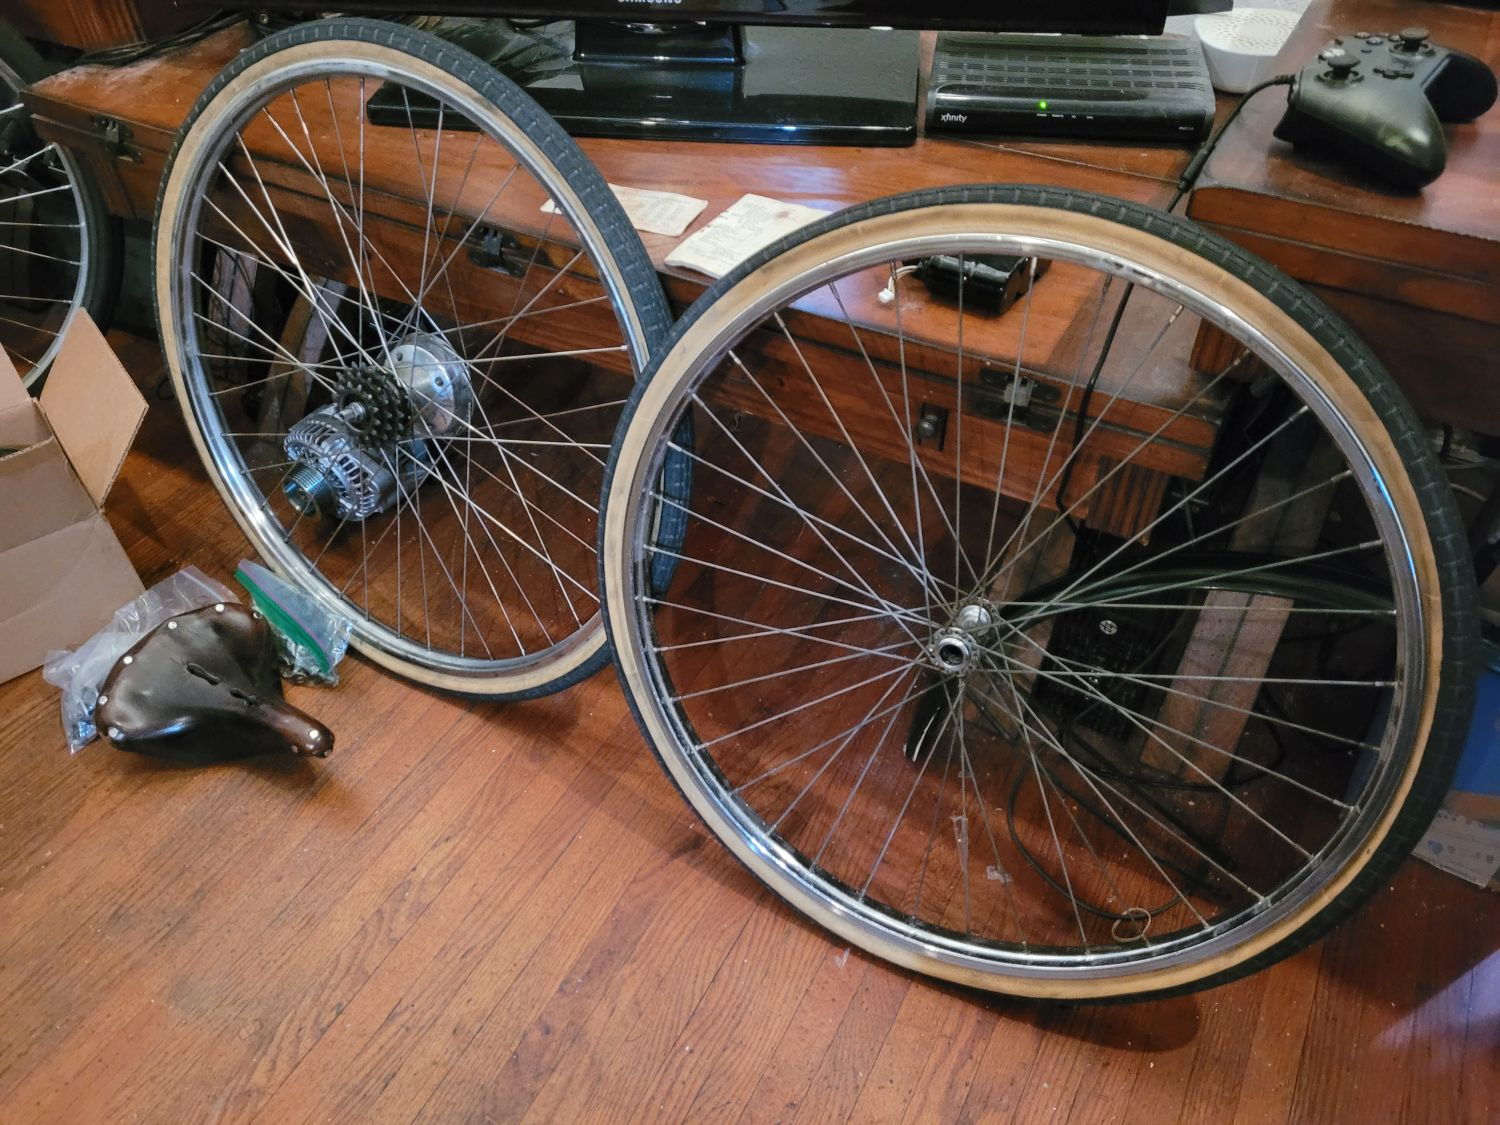
The wheels. That Cyclo 3-speed freewheel may or may not become my worst enemy, as I have a spare Sturmey threaded driver from a 1948 FW that I can drop right in. Look at how drop-dead beautiful that Brooks B.66 is!
While I have everyone's attention, I do have a shopping list for this thing:
It's been a whirlwind, that's for sure! Never thought I'd wind up with no less than three projects at once.
-Kurt
First off...fork's bent. It wouldn't be a Raleigh if it wasn't bent
Easy fix.
I left the fork straightening for another time, for I wanted to sort out the frame first.
Did I mention I'm contractually obligated never to acquire a Raleigh that doesn't have a tweaked rear triangle?
It's not unsurprising - the Cyclo 3-speed conversion apparently involved a lot of ill-advised rear triangle tinkering at one time.
Not anymore. Straight as an arrow based on a Park frame alignment gauge and set to the proper 120mm now.
It's already a beautiful example, which means its cleanup has been exceptionally rewarding:
The tail has been touched up in the past. Debating whether to replace the rear reflector given the paint marks that are on it. We'll see.
Incidentally, I can't seem to get the braze-on Sturmey cable pulley wheel to bottom out. I think the bolt might be just a wee bit too long. That's for another time, anyway. In the meantime:
Fork lock. Because when you have a Superbe, you're required by law to post a picture of the thing.
Lots of Raleigh bits for lots of builds! I've never had two 1950's Superbes in the pipeline at once.
The wheels. That Cyclo 3-speed freewheel may or may not become my worst enemy, as I have a spare Sturmey threaded driver from a 1948 FW that I can drop right in. Look at how drop-dead beautiful that Brooks B.66 is!
While I have everyone's attention, I do have a shopping list for this thing:
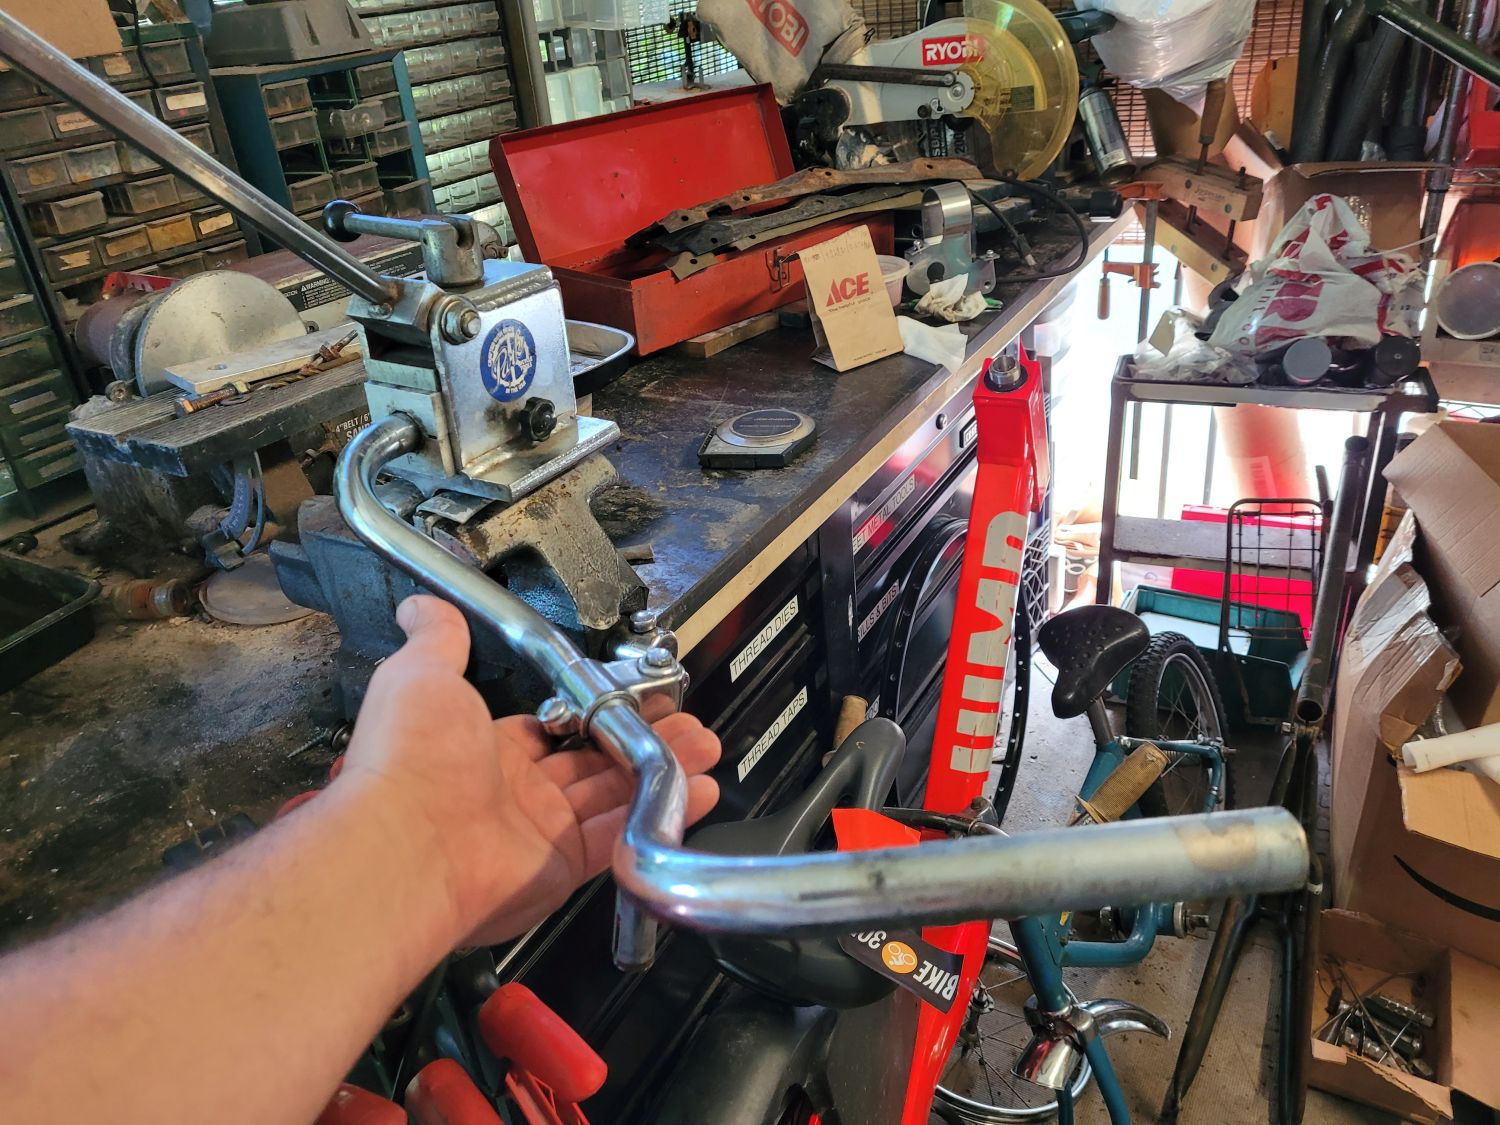
- Front handlebar is bent. It apparently took a hard hit on the right half at one point. I have an early 1970's bar on hand that would do, but the chrome just doesn't compare - I'd like to do it right. Only need the handlebar, stem is fine.
- The front wheel turns out to be a 1973+ replacement. Bright chrome throughout, galvanized spokes, and 36 holes. I'd like to find a correct 32h 1950's wheel (throwing out a hail mary here and paging the man of every old Raleigh part imaginable, nlerner). If you have a pair, I may be able to help, as dmark, who is helping me with my Humber purchase, has a Rudge that has a mismatched rear wheel.
- Even though I have a chaincase for it...I think I want to get another Superbe chaincase. I'm debating whether this one is nice enough for this bike.
- One 1950's Sturmey-Archer serrated hub washer - the serrated washer with knurling. It was used prior to the slotted anti-rotation type.
It's been a whirlwind, that's for sure! Never thought I'd wind up with no less than three projects at once.
-Kurt
__________________
Last edited by cudak888; 06-07-21 at 07:54 PM.
Likes For cudak888:
06-07-21, 08:07 PM
#4

feros ferio

Join Date: Jul 2000
Location: www.ci.encinitas.ca.us
Posts: 21,793
Bikes: 1959 Capo Modell Campagnolo; 1960 Capo Sieger (2); 1962 Carlton Franco Suisse; 1970 Peugeot UO-8; 1982 Bianchi Campione d'Italia; 1988 Schwinn Project KOM-10;
Mentioned: 44 Post(s)
Tagged: 0 Thread(s)
Quoted: 1390 Post(s)
Liked 1,322 Times
in
835 Posts
I am surprised you don't want to keep the 3x3 conversion. I loved my 4x3 (14-16-18-20 cogblock on an AW hub, providing 10 unique ratios / 2 overlap/redundancies from 39 to 99 gear-inches). I used the 3 largest cogs in L, all four in N, and the 3 smallest in H.
__________________
"Far and away the best prize that life offers is the chance to work hard at work worth doing." --Theodore Roosevelt
Capo: 1959 Modell Campagnolo, S/N 40324; 1960 Sieger (2), S/N 42624, 42597
Carlton: 1962 Franco Suisse, S/N K7911
Peugeot: 1970 UO-8, S/N 0010468
Bianchi: 1982 Campione d'Italia, S/N 1.M9914
Schwinn: 1988 Project KOM-10, S/N F804069
06-07-21, 08:33 PM
#5
www.theheadbadge.com
Thread Starter
Join Date: Sep 2005
Location: Southern Florida
Posts: 28,496
Bikes: https://www.theheadbadge.com
Mentioned: 124 Post(s)
Tagged: 0 Thread(s)
Quoted: 2412 Post(s)
Liked 4,373 Times
in
2,086 Posts
There's a part of me that wants to use it as an excuse to find a frame with a built-in Cyclo mount. That'd be a lot more interesting than the Cyclo clamped on the chainstay of the Superbe.
Personally, if I'm going to build something with North Roads, I want it to be purely IGH.
-Kurt
__________________
Last edited by cudak888; 06-07-21 at 08:39 PM.
06-08-21, 05:58 PM
#6
www.theheadbadge.com
Thread Starter
Join Date: Sep 2005
Location: Southern Florida
Posts: 28,496
Bikes: https://www.theheadbadge.com
Mentioned: 124 Post(s)
Tagged: 0 Thread(s)
Quoted: 2412 Post(s)
Liked 4,373 Times
in
2,086 Posts
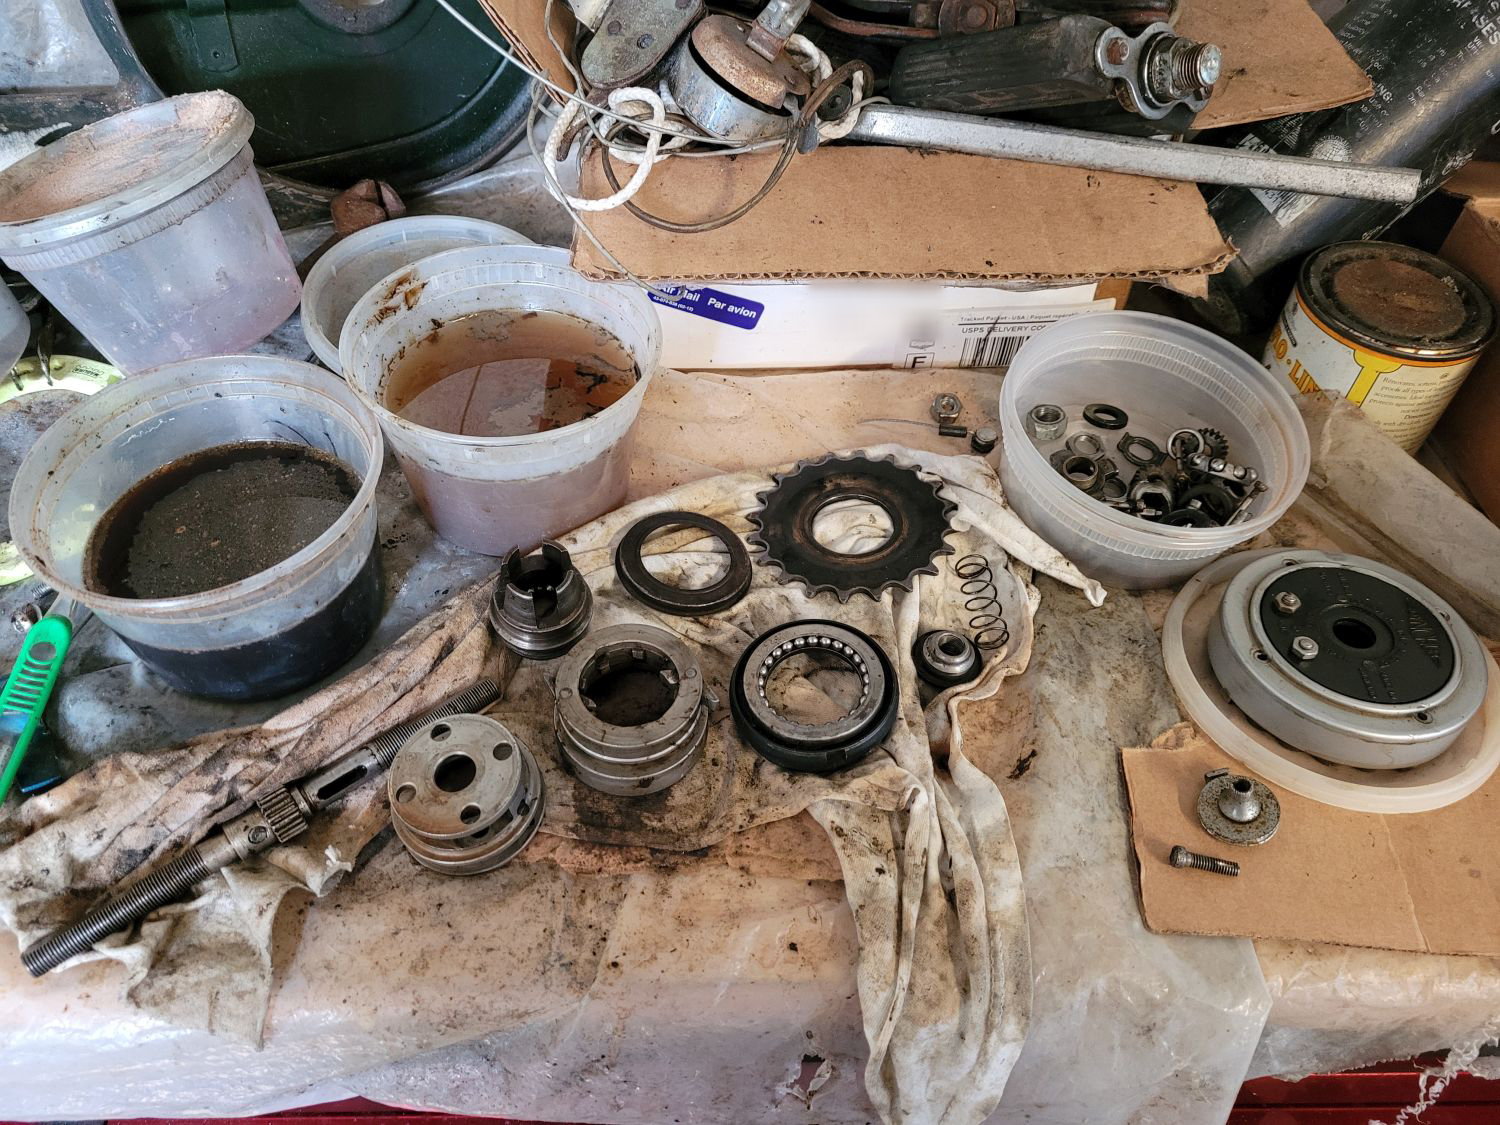
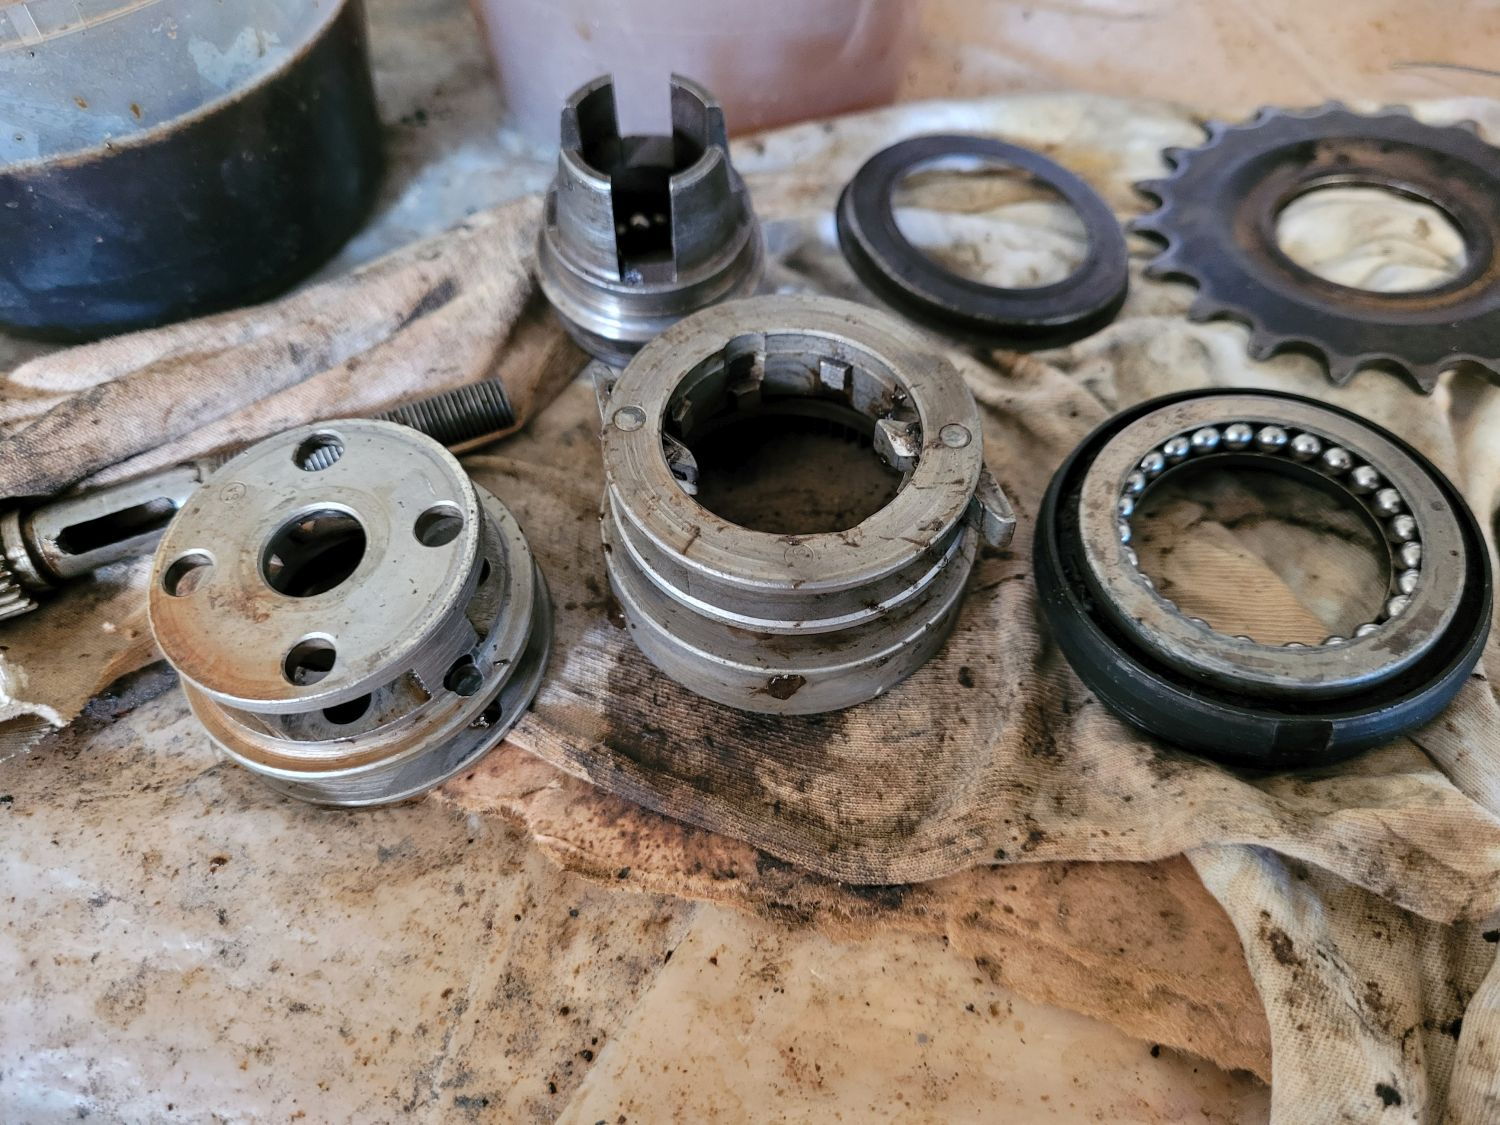
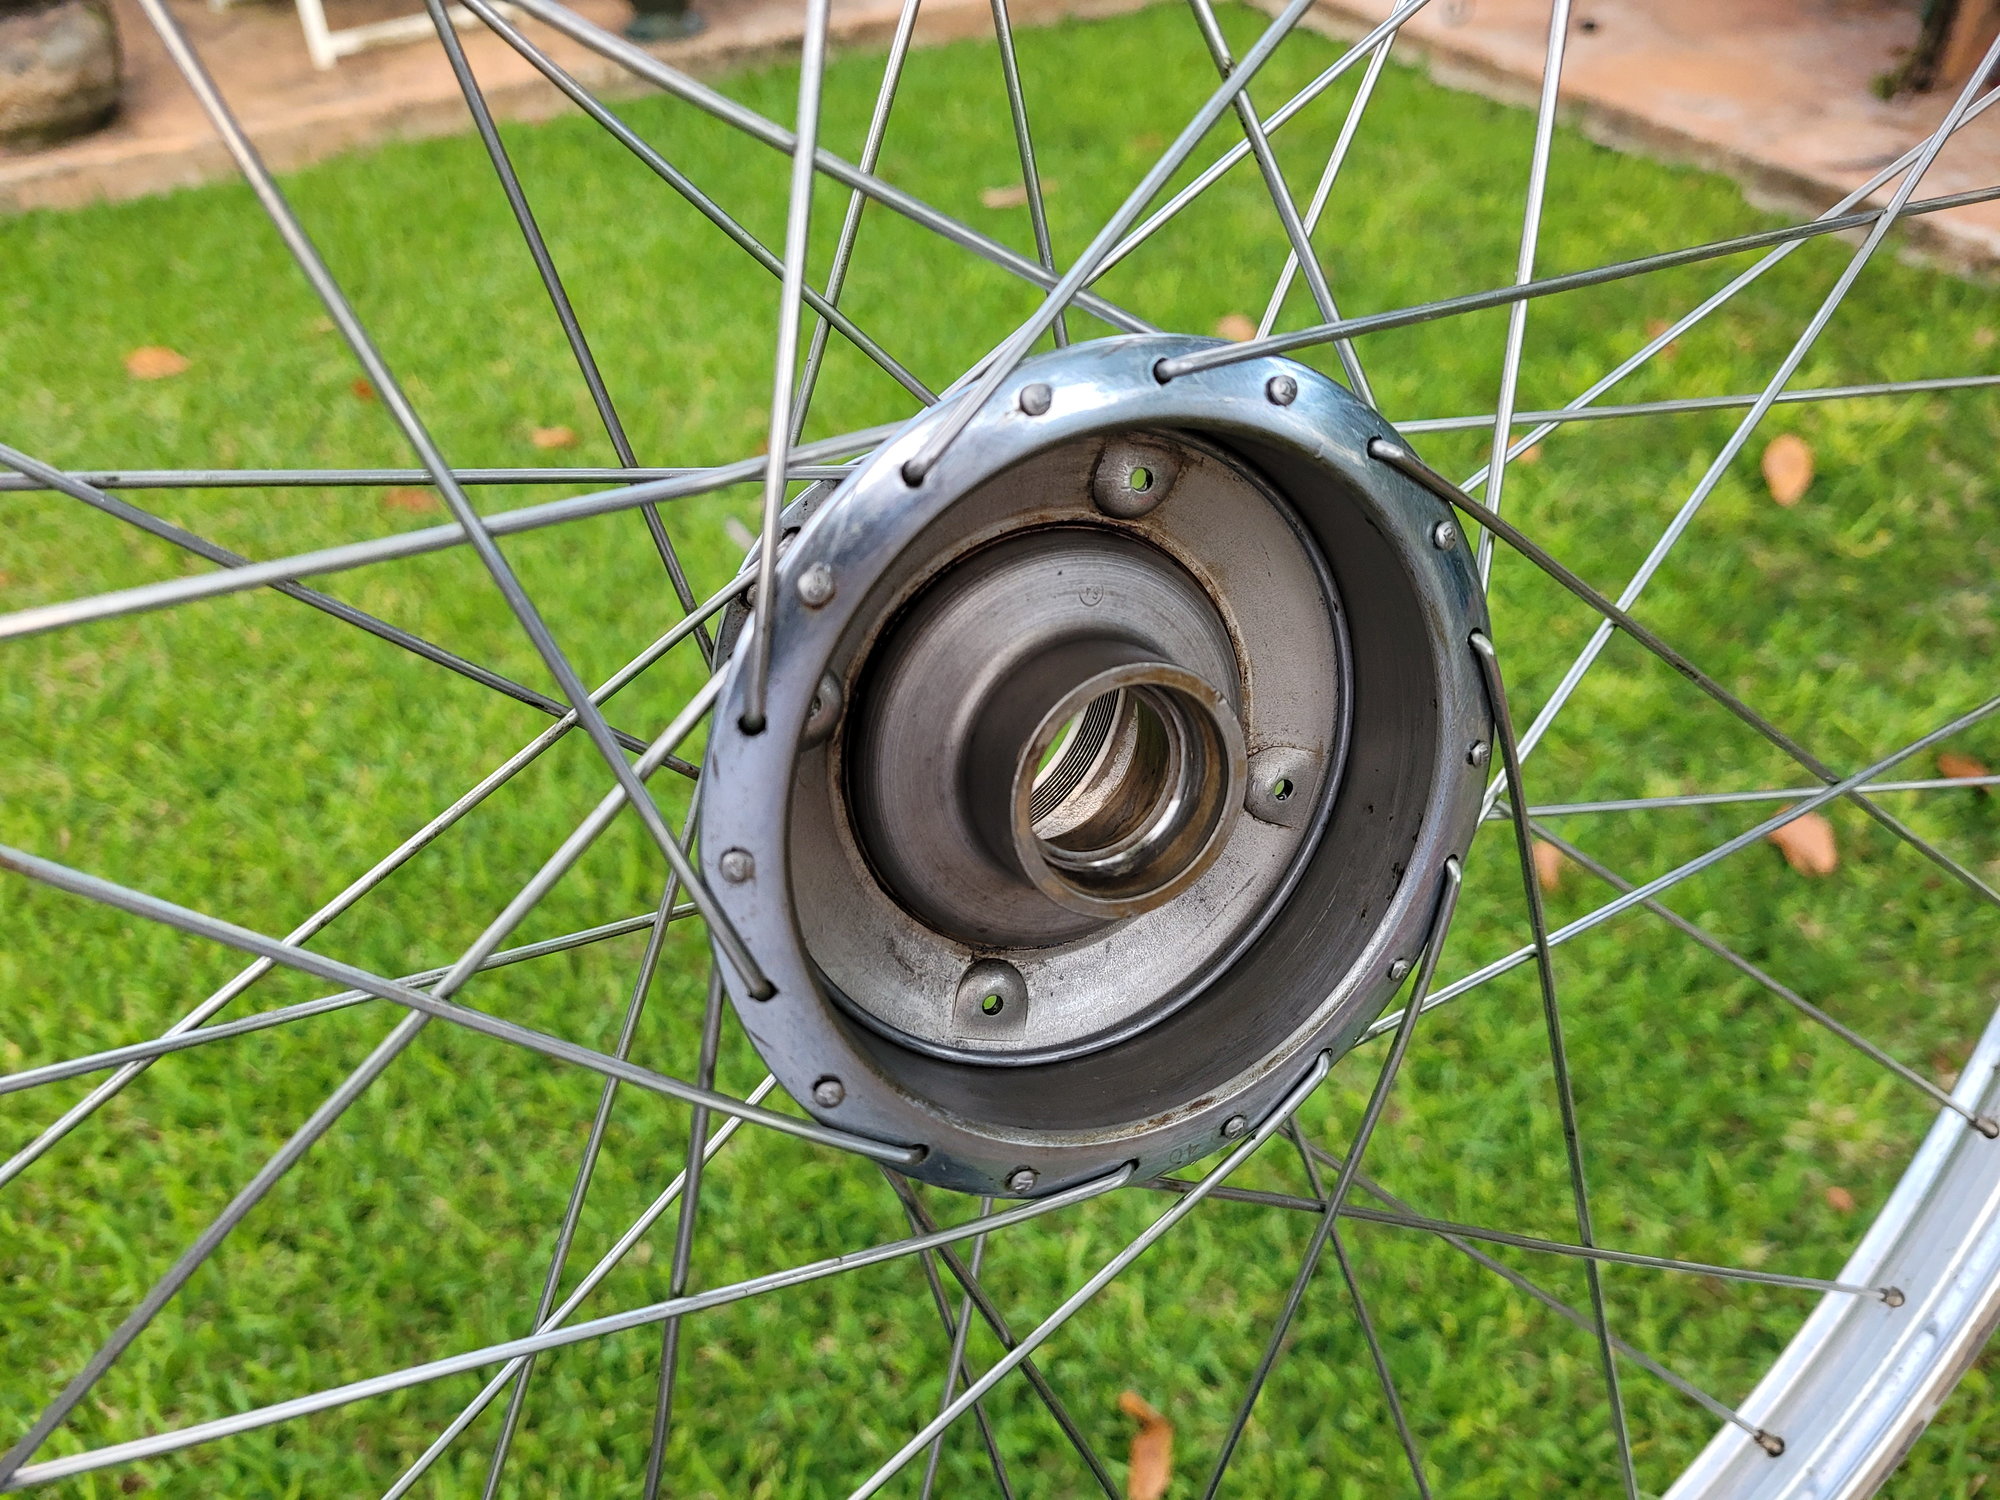
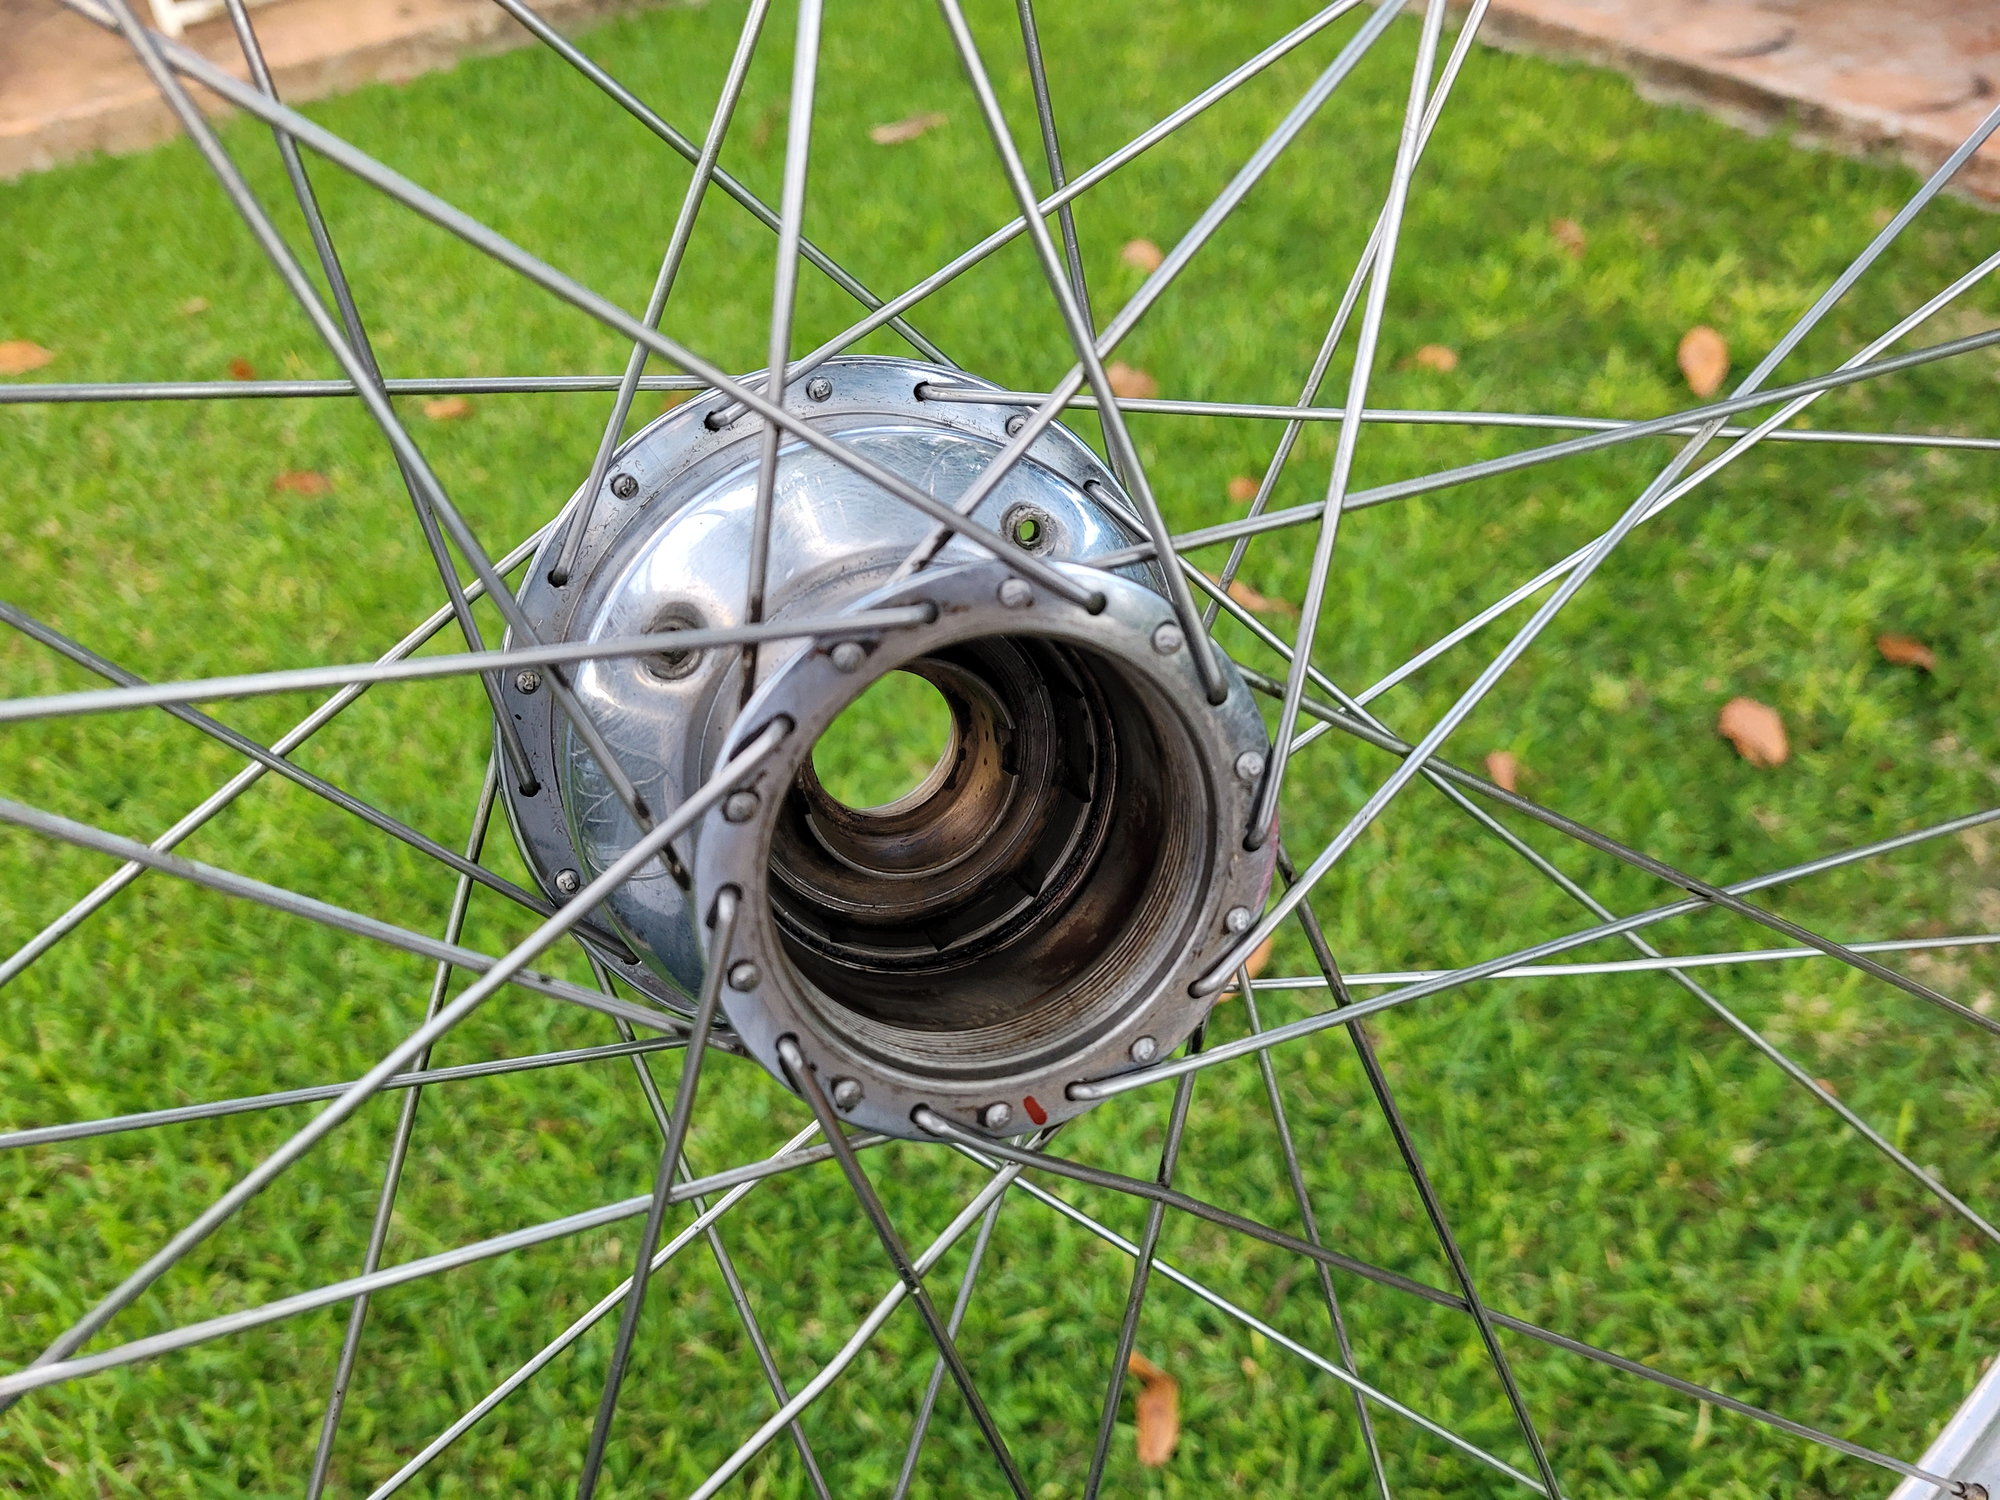
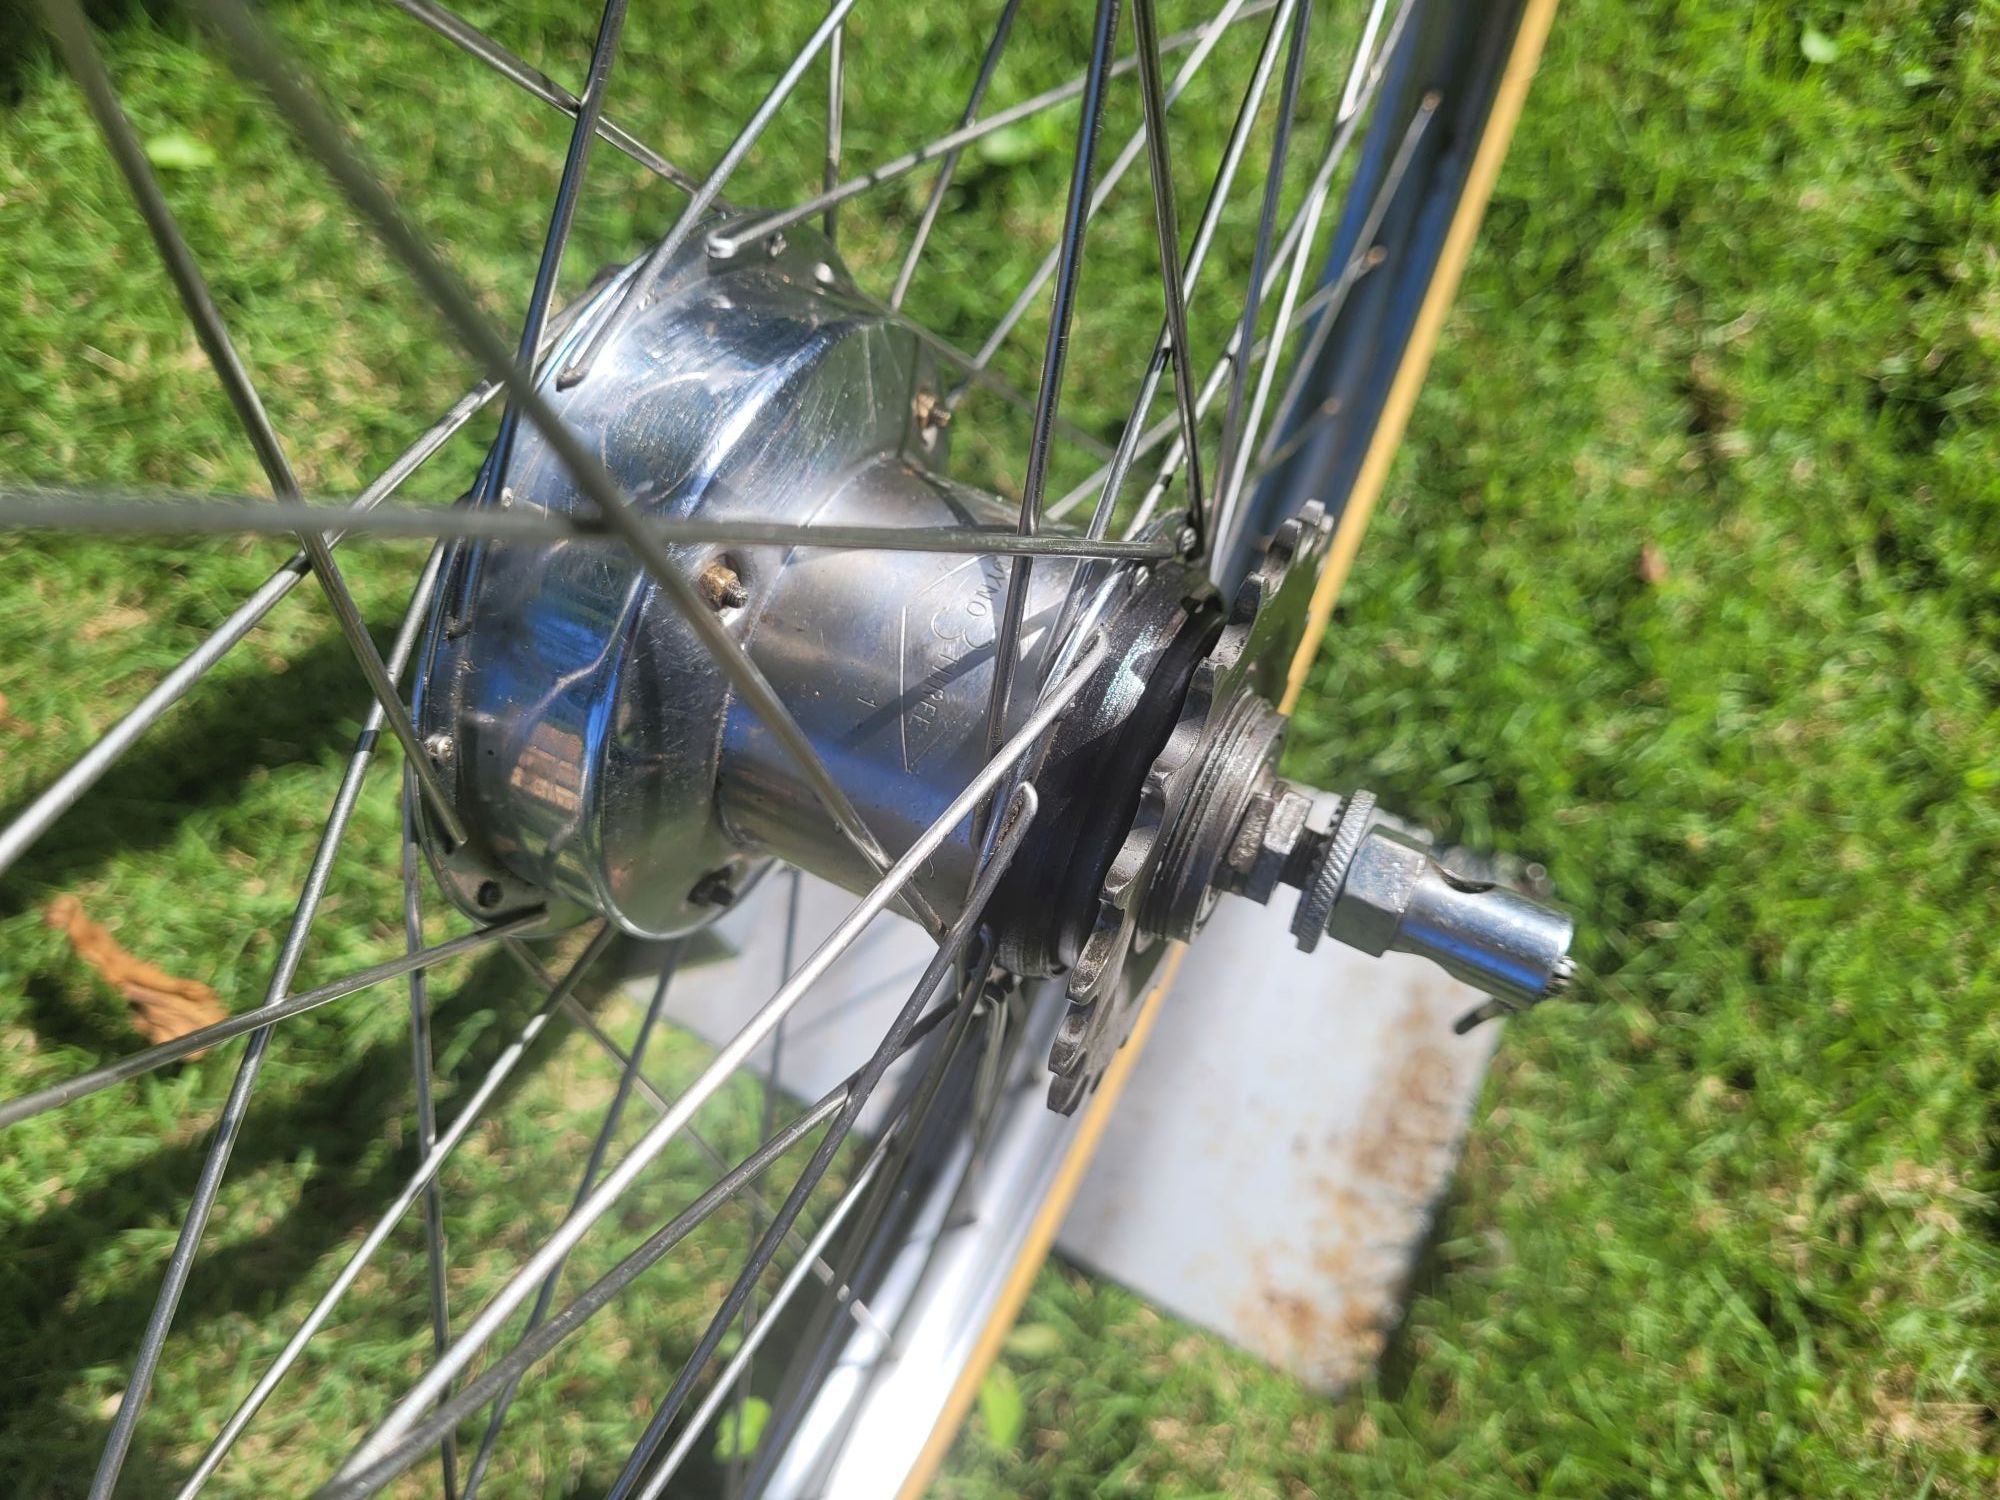
I partially disassembled the original rear wheel today to re-weave the spokes. Raleigh's approach BITD was not to weave them, which, frankly, I'm not a fan of.
The spoke tension was pretty slack around the entire wheel in the first place, and it turns out the non-drive-side spokes weren't clocked correctly either. This makes a huge difference in the amount of cursing it takes to get a pump head connected to the valve on these, so I went ahead and just re-laced the entire NTS side, which also gave me access to give the hub a cleaning:
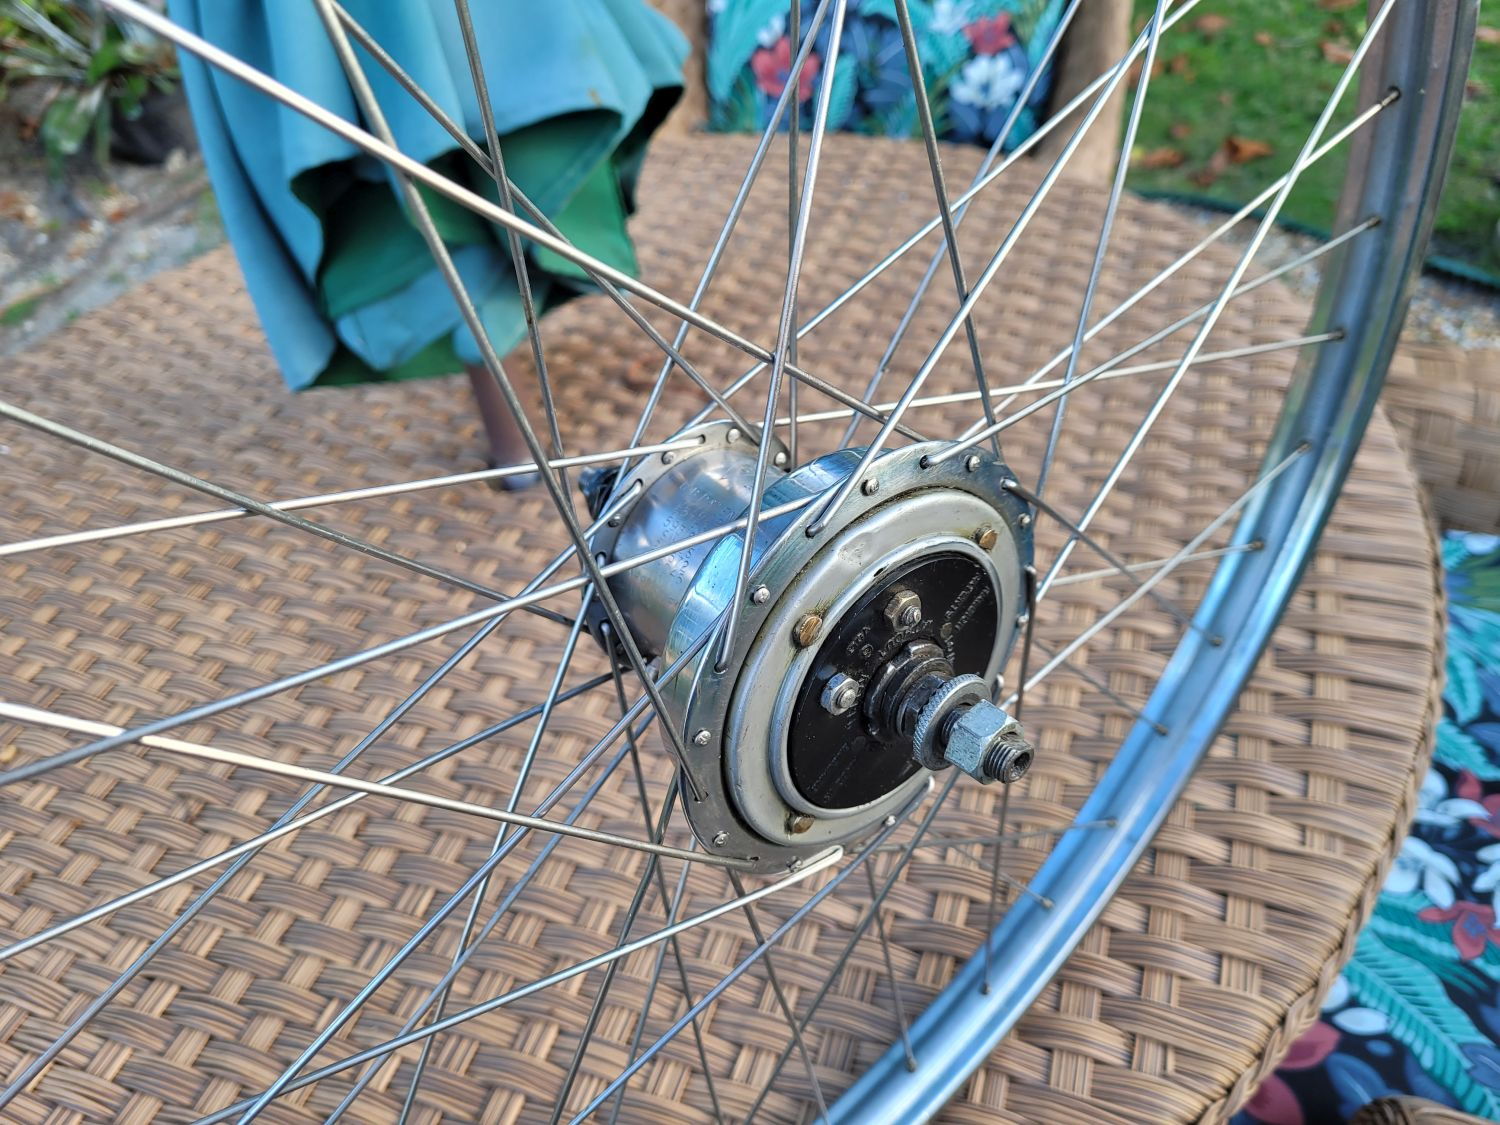
Hub was open when I did this, but it didn't matter: Next step is to pull the AW guts, take it apart for a mineral spirits bath, and reassemble it with some lovely "00" grease (and marine grease on the bearing raceways):
-Kurt
The spoke tension was pretty slack around the entire wheel in the first place, and it turns out the non-drive-side spokes weren't clocked correctly either. This makes a huge difference in the amount of cursing it takes to get a pump head connected to the valve on these, so I went ahead and just re-laced the entire NTS side, which also gave me access to give the hub a cleaning:
Hub was open when I did this, but it didn't matter: Next step is to pull the AW guts, take it apart for a mineral spirits bath, and reassemble it with some lovely "00" grease (and marine grease on the bearing raceways):
-Kurt
__________________
Likes For cudak888:
06-09-21, 07:18 AM
#7
Senior Member
Join Date: Jan 2007
Location: Ontario
Posts: 2,648
Mentioned: 16 Post(s)
Tagged: 0 Thread(s)
Quoted: 478 Post(s)
Liked 634 Times
in
336 Posts
First off Kurt, bike looks amazing! Looking forward to seeing it done.
You made a comment about the brazed on pulley; this may be something you already know but on my Humber of almost exactly the same vintage the pulley has a spacer behind it and is attached with a nut on the NDS. So not sure what you meant by �not bottoming ��.[sorry - the photos looked clearer on the camera!]

You made a comment about the brazed on pulley; this may be something you already know but on my Humber of almost exactly the same vintage the pulley has a spacer behind it and is attached with a nut on the NDS. So not sure what you meant by �not bottoming ��.[sorry - the photos looked clearer on the camera!]
Likes For markk900:
06-09-21, 07:41 AM
#8
www.theheadbadge.com
Thread Starter
Join Date: Sep 2005
Location: Southern Florida
Posts: 28,496
Bikes: https://www.theheadbadge.com
Mentioned: 124 Post(s)
Tagged: 0 Thread(s)
Quoted: 2412 Post(s)
Liked 4,373 Times
in
2,086 Posts
First off Kurt, bike looks amazing! Looking forward to seeing it done.
You made a comment about the brazed on pulley; this may be something you already know but on my Humber of almost exactly the same vintage the pulley has a spacer behind it and is attached with a nut on the NDS. So not sure what you meant by “not bottoming “….[sorry - the photos looked clearer on the camera!
You made a comment about the brazed on pulley; this may be something you already know but on my Humber of almost exactly the same vintage the pulley has a spacer behind it and is attached with a nut on the NDS. So not sure what you meant by “not bottoming “….[sorry - the photos looked clearer on the camera!
I'm familiar with the nutted version; I have it on my 1951 Sports (not to say that the nutted version is original to it - my '51 is a mutt build). This one is different; instead of a knurled shaft with a nut, mine has a bolt acting as the shaft, and the only thing used to center it is some light knurling at the end of the fixed pulley mount. I'm convinced at this point that the bolt is too long, but haven't had time to test that theory.

-Kurt
__________________
Last edited by cudak888; 09-12-22 at 10:34 AM.
Likes For cudak888:
06-10-21, 03:00 PM
#9
www.theheadbadge.com
Thread Starter
Join Date: Sep 2005
Location: Southern Florida
Posts: 28,496
Bikes: https://www.theheadbadge.com
Mentioned: 124 Post(s)
Tagged: 0 Thread(s)
Quoted: 2412 Post(s)
Liked 4,373 Times
in
2,086 Posts
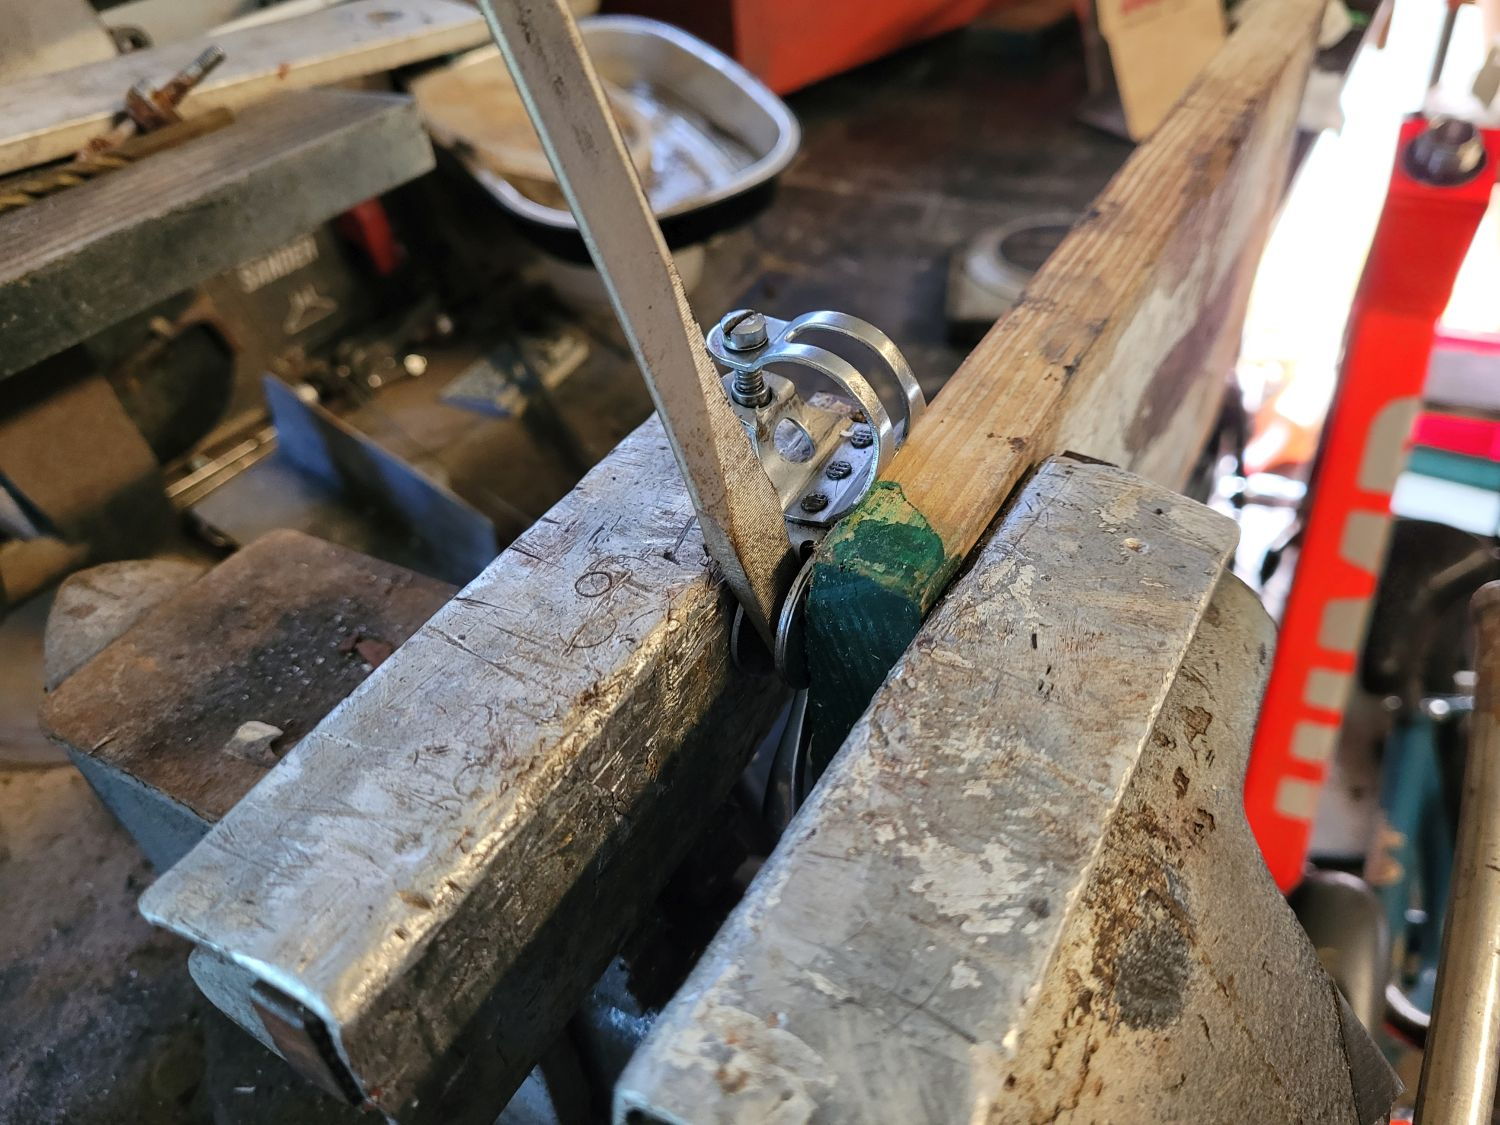
I brought out a rusty spare pulley wheel and compared the bolts. Turns out some pretty gnarly gunk had built up in the '50s original wheel, so I took the rougher of the two bolts and made a tap out of it:
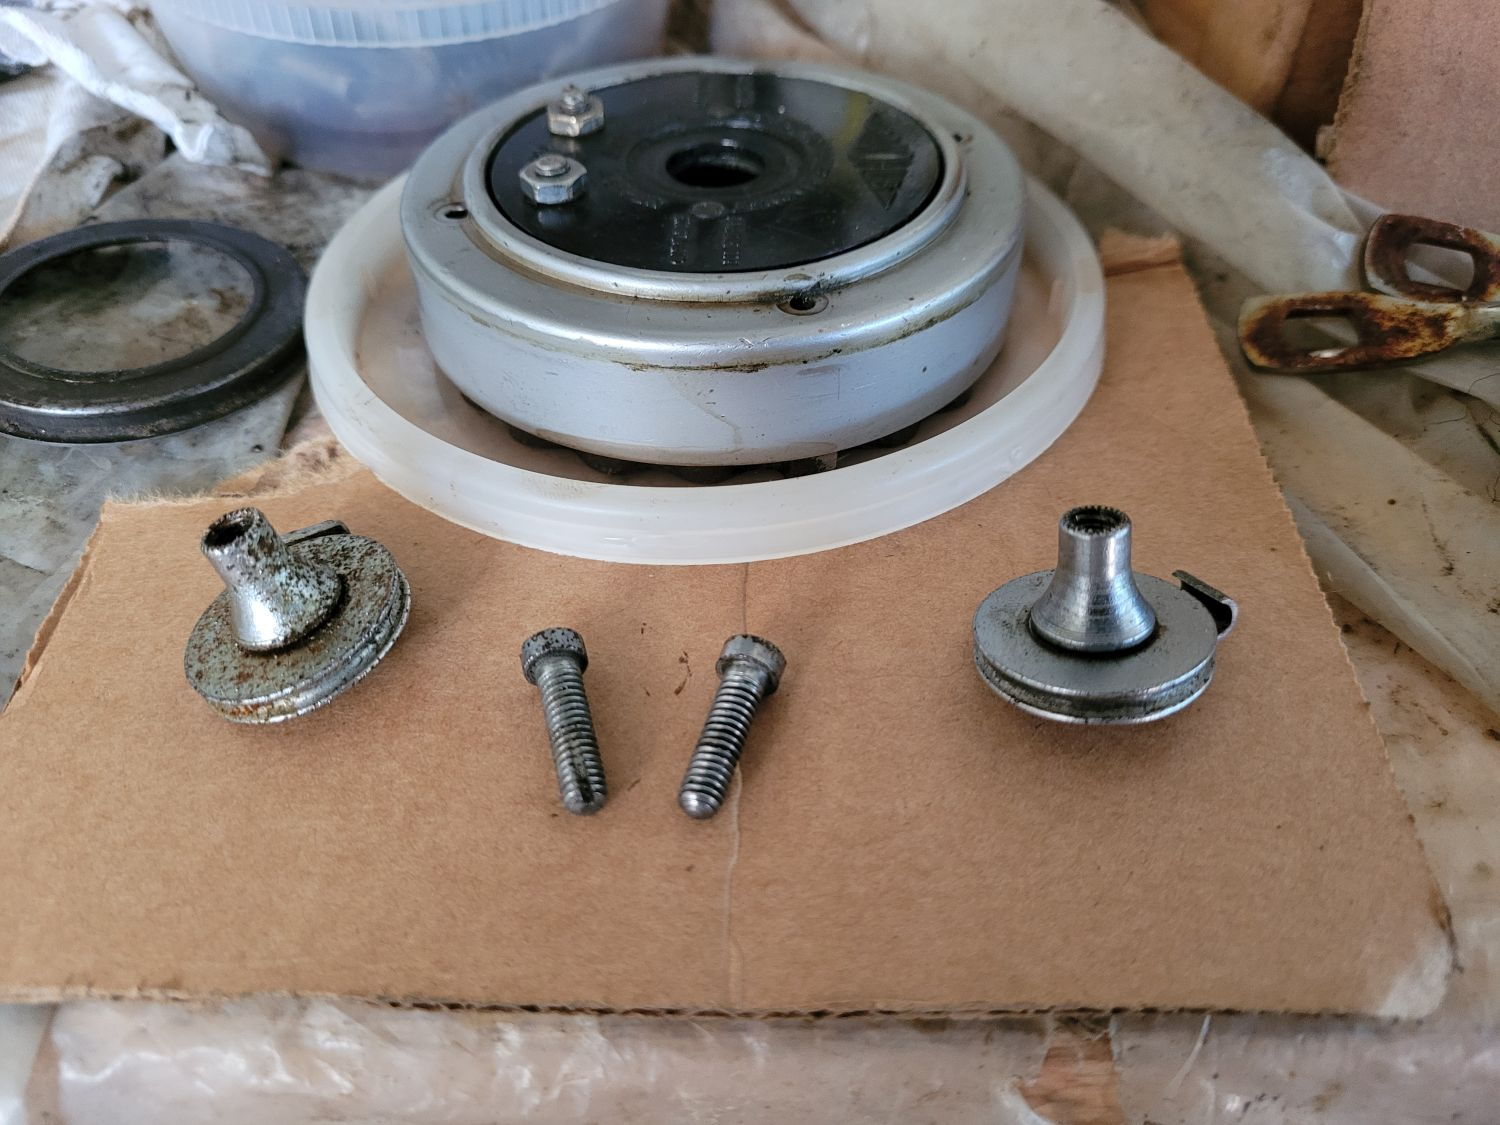
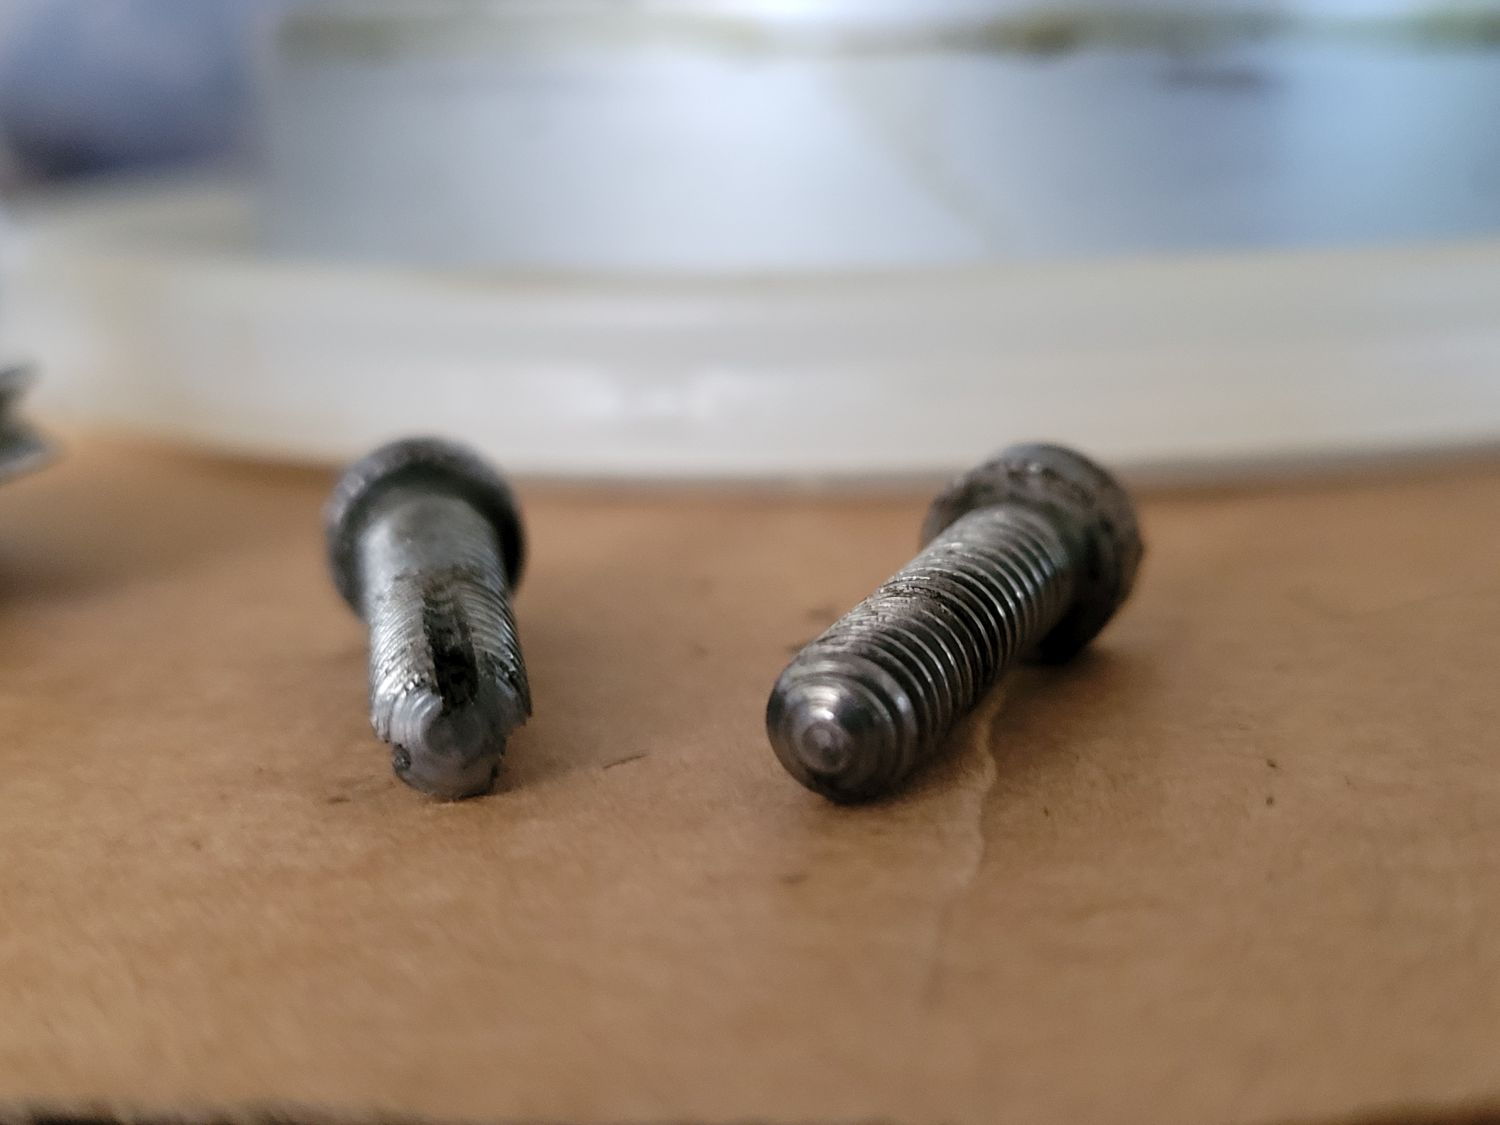
Problem solved. Also gave me a chance to grease it up too.

In the meantime, I've had the hub bits in a Formula 88 dip. Turns out my mineral spirits had lost its edge - 12 hours didn't do much. Even then, I think I'm going to get some more to do a final dunk on this, as there's still some gunk that hasn't come off.
This is what I started with. Gunky!

-Kurt
Problem solved. Also gave me a chance to grease it up too.
In the meantime, I've had the hub bits in a Formula 88 dip. Turns out my mineral spirits had lost its edge - 12 hours didn't do much. Even then, I think I'm going to get some more to do a final dunk on this, as there's still some gunk that hasn't come off.
This is what I started with. Gunky!
-Kurt
__________________
Likes For cudak888:
06-10-21, 03:14 PM
#10
feros ferio
Join Date: Jul 2000
Location: www.ci.encinitas.ca.us
Posts: 21,793
Bikes: 1959 Capo Modell Campagnolo; 1960 Capo Sieger (2); 1962 Carlton Franco Suisse; 1970 Peugeot UO-8; 1982 Bianchi Campione d'Italia; 1988 Schwinn Project KOM-10;
Mentioned: 44 Post(s)
Tagged: 0 Thread(s)
Quoted: 1390 Post(s)
Liked 1,322 Times
in
835 Posts
Having worked on a few 3-speeds myself (usually 3x4 or 3x3 hybrids, as mentioned above, but one early version 3-speed coaster), I am enjoying reading your progress report. I also envy your evident abundance of shop space. Mine is tolerable -- I push the cars out the garage, set up for a few-hour session, then put everything back at the end.
__________________
"Far and away the best prize that life offers is the chance to work hard at work worth doing." --Theodore Roosevelt
Capo: 1959 Modell Campagnolo, S/N 40324; 1960 Sieger (2), S/N 42624, 42597
Carlton: 1962 Franco Suisse, S/N K7911
Peugeot: 1970 UO-8, S/N 0010468
Bianchi: 1982 Campione d'Italia, S/N 1.M9914
Schwinn: 1988 Project KOM-10, S/N F804069
06-10-21, 07:57 PM
#11
www.theheadbadge.com
Thread Starter
Join Date: Sep 2005
Location: Southern Florida
Posts: 28,496
Bikes: https://www.theheadbadge.com
Mentioned: 124 Post(s)
Tagged: 0 Thread(s)
Quoted: 2412 Post(s)
Liked 4,373 Times
in
2,086 Posts
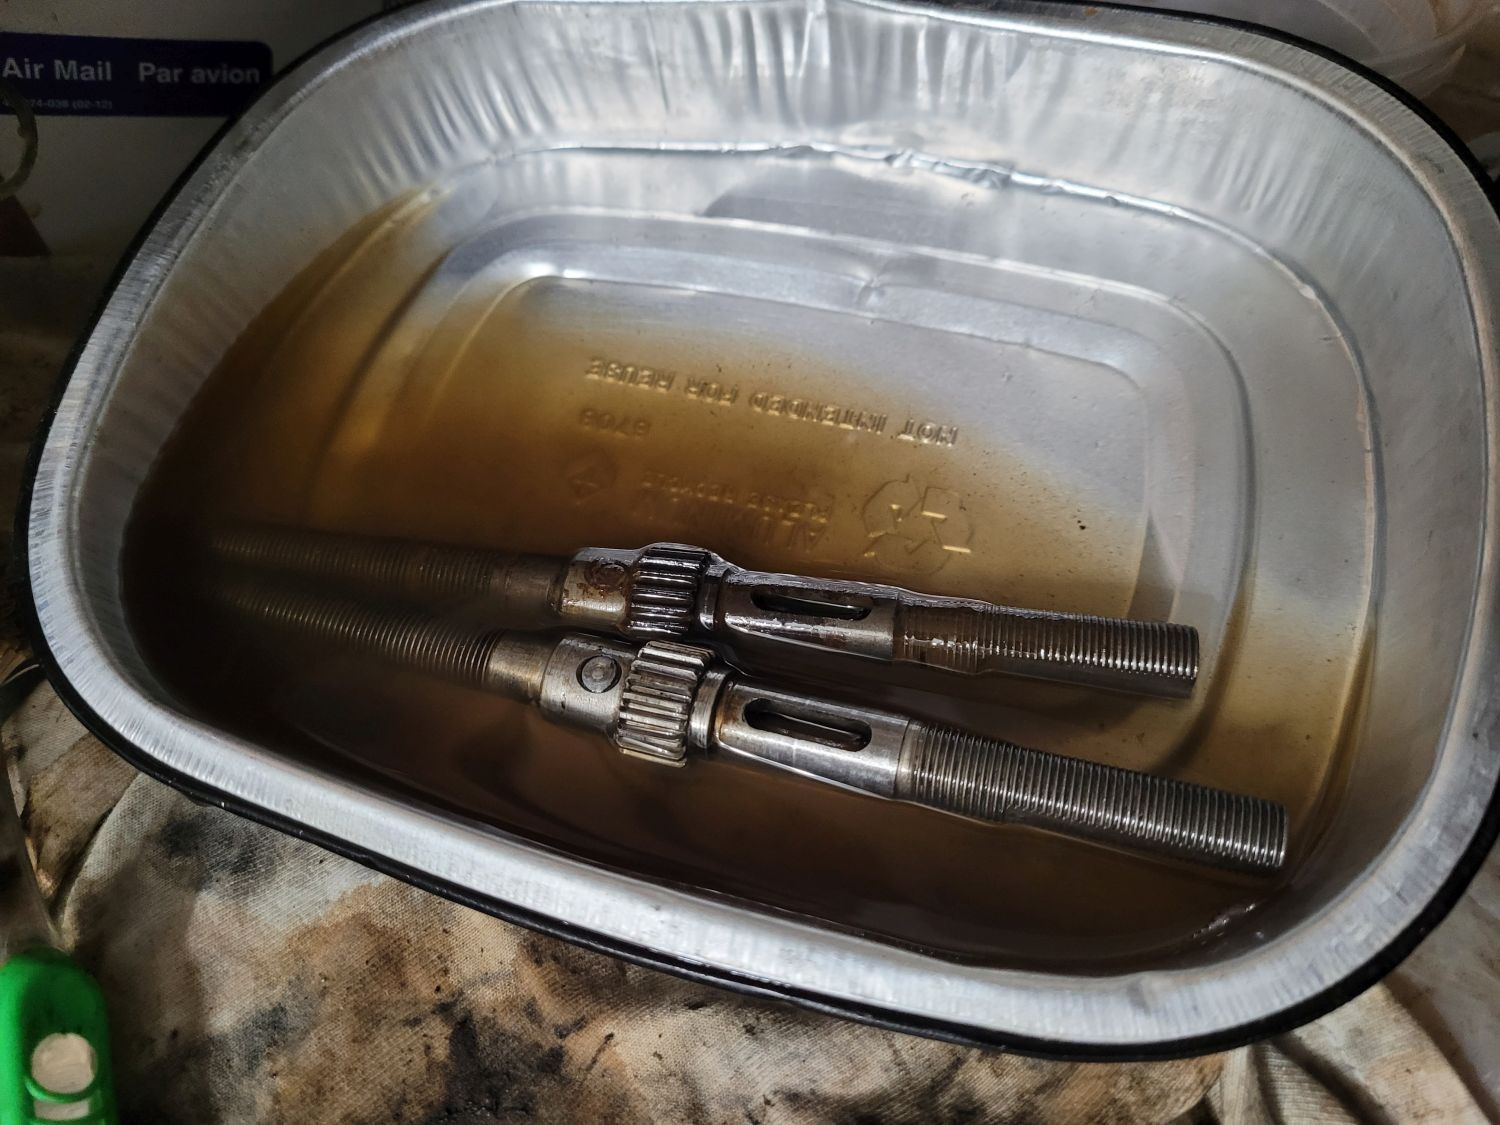
More updates. Finally dumped everything - again - in some fresh spirits. Mineral, that is.

The axle had cleaned up fairly well, but when I pulled it out, I realized the peened pin that holds the sun gear on the axle is loose - and so is the sun gear. First time I've seen this. Even the greaseball axle I have in the dip next to it doesn't budge at all.
Unfortunately, said spare axle is too narrow. Fortunately, new 158.8mm AW axles aren't uncommon at all, so I ordered one on FeePay.
Happy to hear you're getting enjoyment from it. I still have the threaded driver put aside for the right project; the current one you see in these photos is off a '48 FW hub from @nlerner.
It's nice to have the space, that's for sure. Only problem is that I'm constantly finding new ways to cram even more into it...and I could still use another toolbox.
-Kurt
The axle had cleaned up fairly well, but when I pulled it out, I realized the peened pin that holds the sun gear on the axle is loose - and so is the sun gear. First time I've seen this. Even the greaseball axle I have in the dip next to it doesn't budge at all.
Unfortunately, said spare axle is too narrow. Fortunately, new 158.8mm AW axles aren't uncommon at all, so I ordered one on FeePay.
Having worked on a few 3-speeds myself (usually 3x4 or 3x3 hybrids, as mentioned above, but one early version 3-speed coaster), I am enjoying reading your progress report. I also envy your evident abundance of shop space. Mine is tolerable -- I push the cars out the garage, set up for a few-hour session, then put everything back at the end.
It's nice to have the space, that's for sure. Only problem is that I'm constantly finding new ways to cram even more into it...and I could still use another toolbox.
-Kurt
__________________
Last edited by cudak888; 06-11-21 at 06:29 AM.
Likes For cudak888:
06-11-21, 11:52 PM
#12
www.theheadbadge.com
Thread Starter
Join Date: Sep 2005
Location: Southern Florida
Posts: 28,496
Bikes: https://www.theheadbadge.com
Mentioned: 124 Post(s)
Tagged: 0 Thread(s)
Quoted: 2412 Post(s)
Liked 4,373 Times
in
2,086 Posts
Waiting on the new hub axle, so took an opportunity to give the hub shell a good cleaning on the inside:
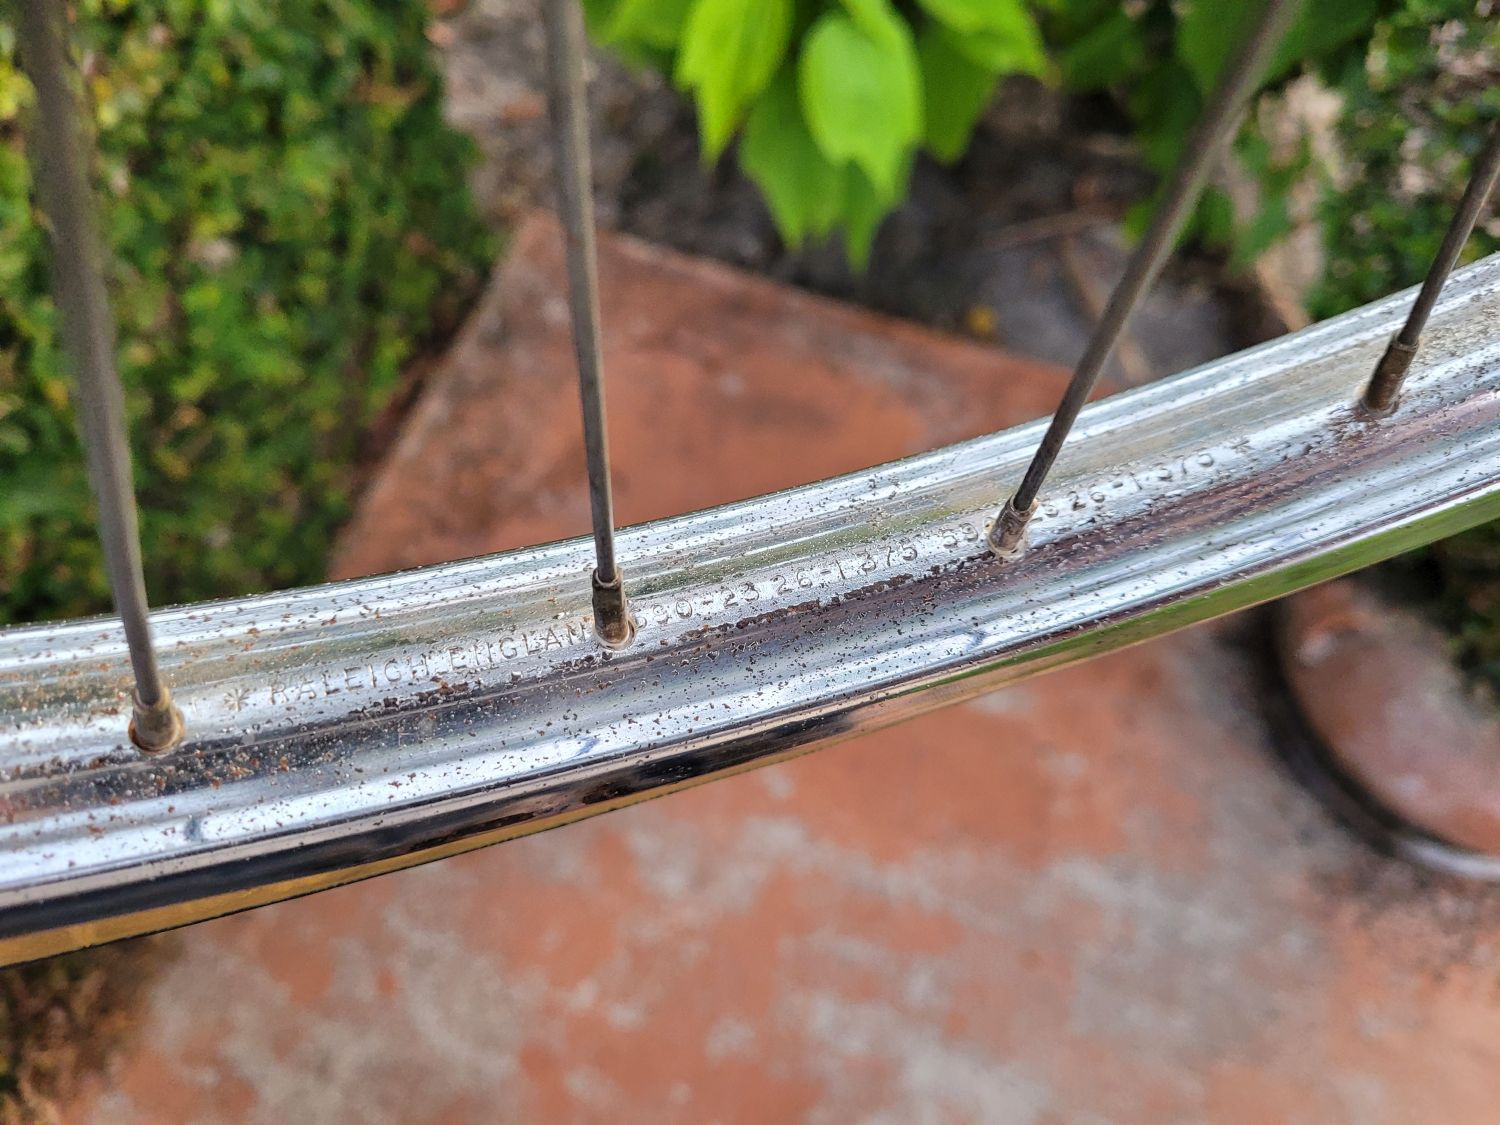
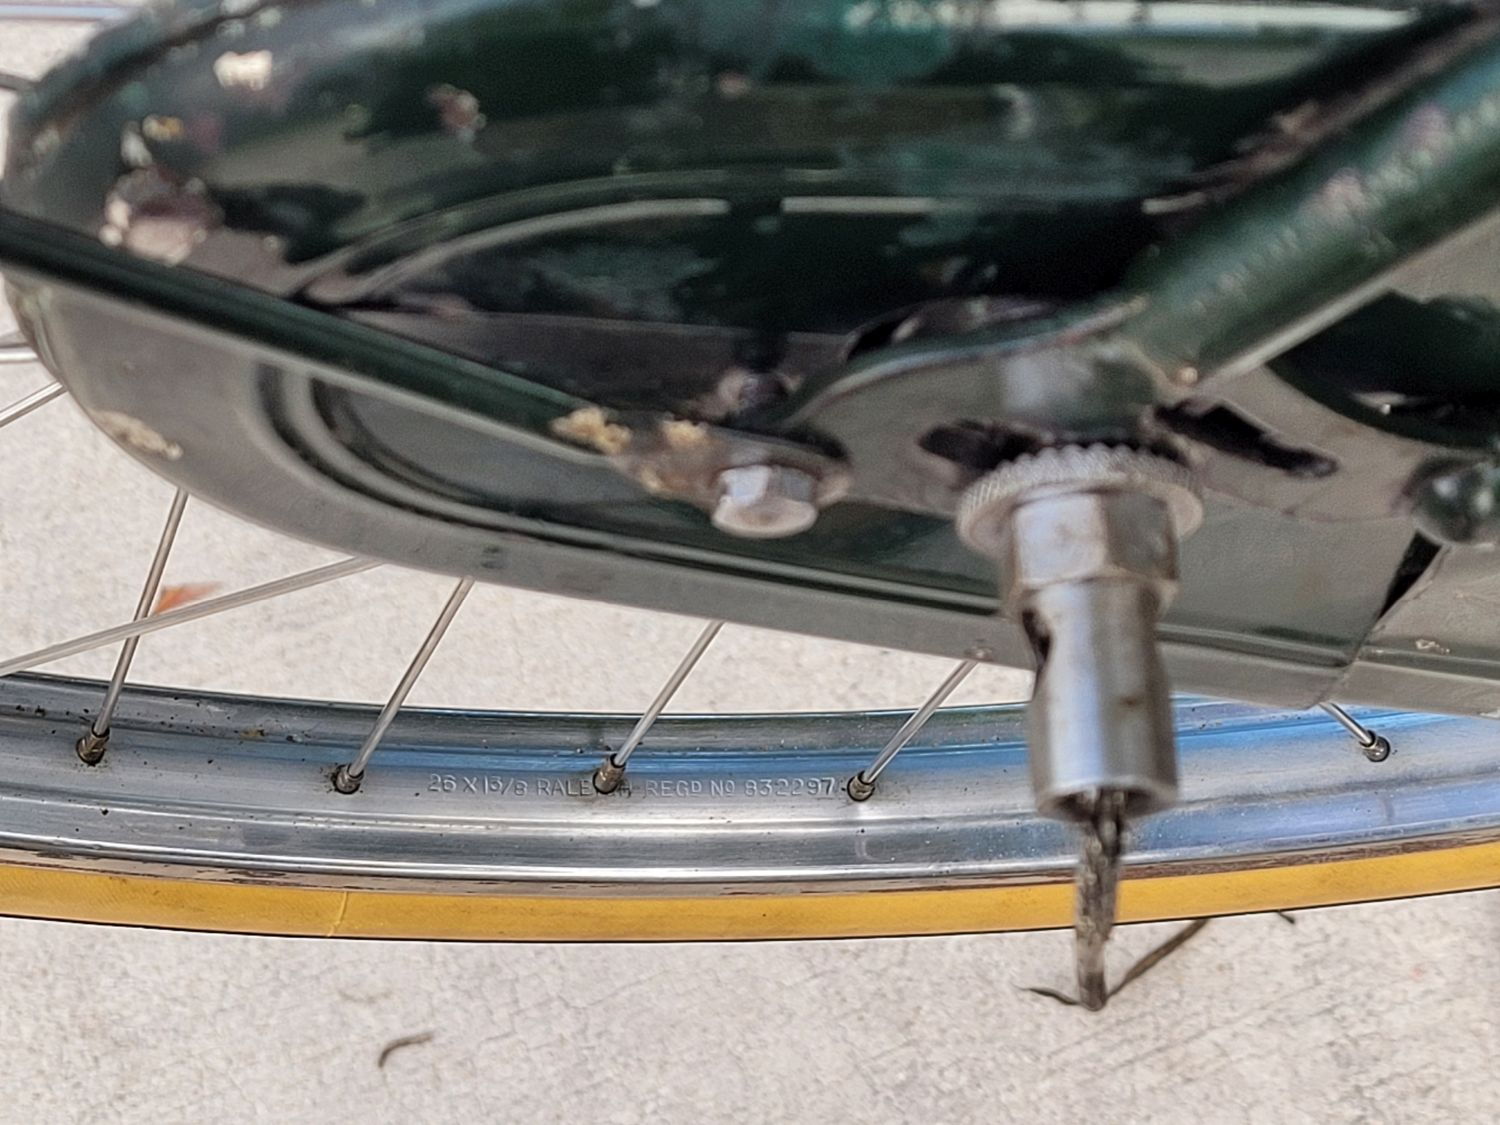
The rim isn't perfect, but it does display nicely. Have to love the dull-center Westricks from the 1950's. A very elegant rim (yes, steel rims stink for braking, but that's not the point of this buildup).
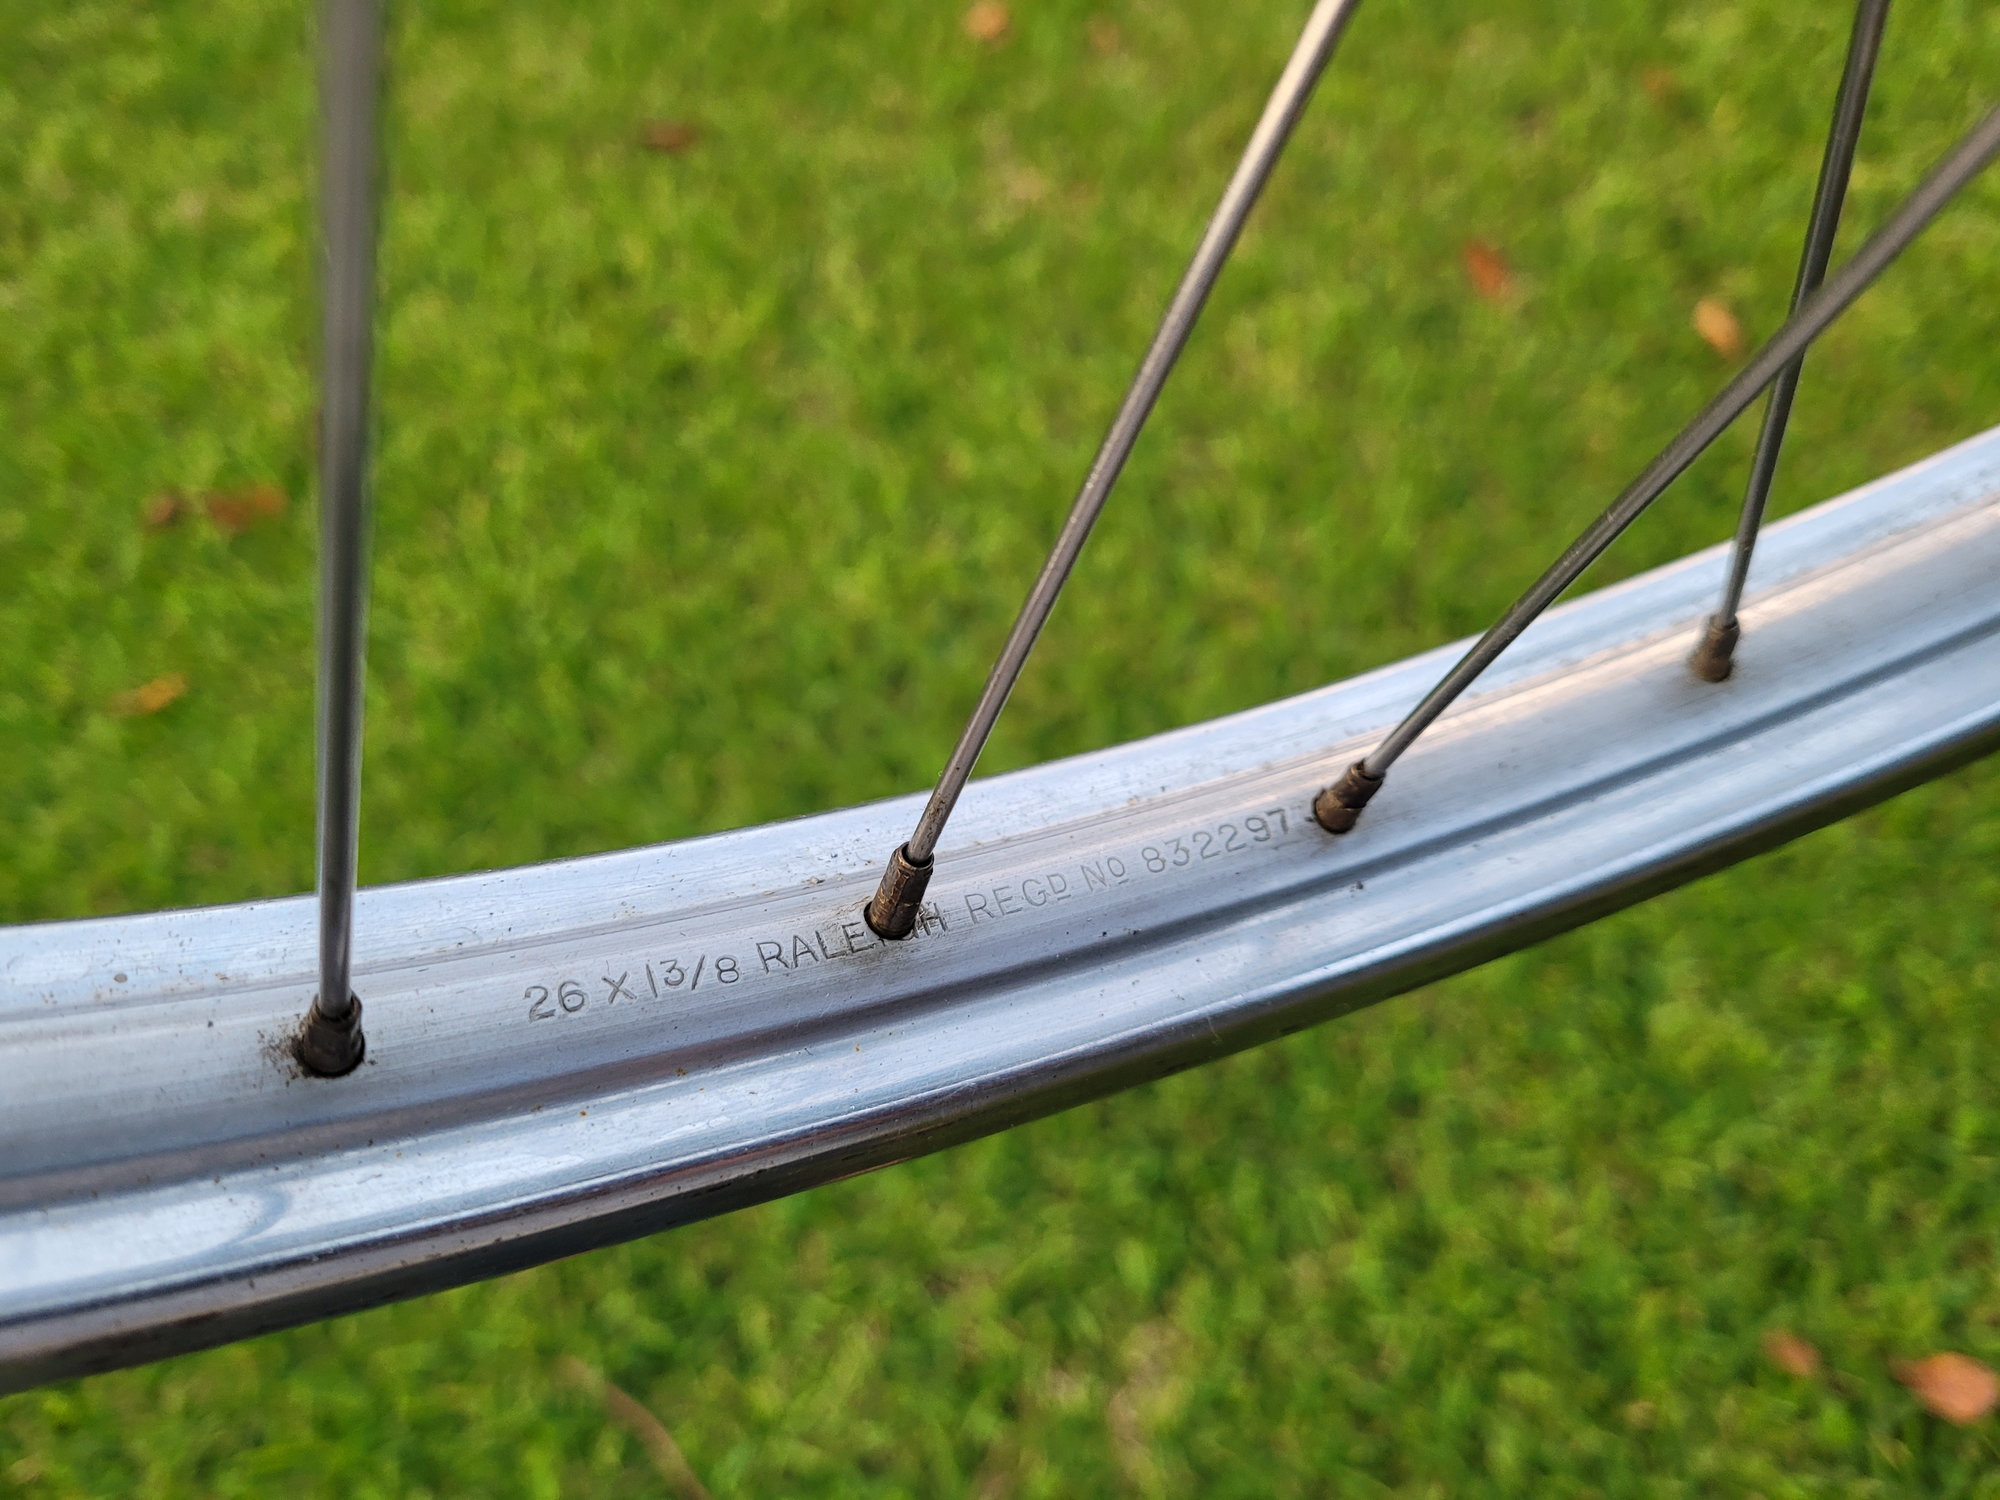
I also got off my duff and finally installed the front axle on the 1973+ front wheel which I still wish to replace as soon as I can locate something from the 1950's.
Ben had sent what I believe is one of those said-to-be Phillips front axles often seen on eBay, which was apparently installed in this front wheel before being disassembled for shipment. I had a rough Raleigh front hub kicking about with a good axle and cones, so decided to use those along with the Phillips axle washers and nuts. Tidy result.
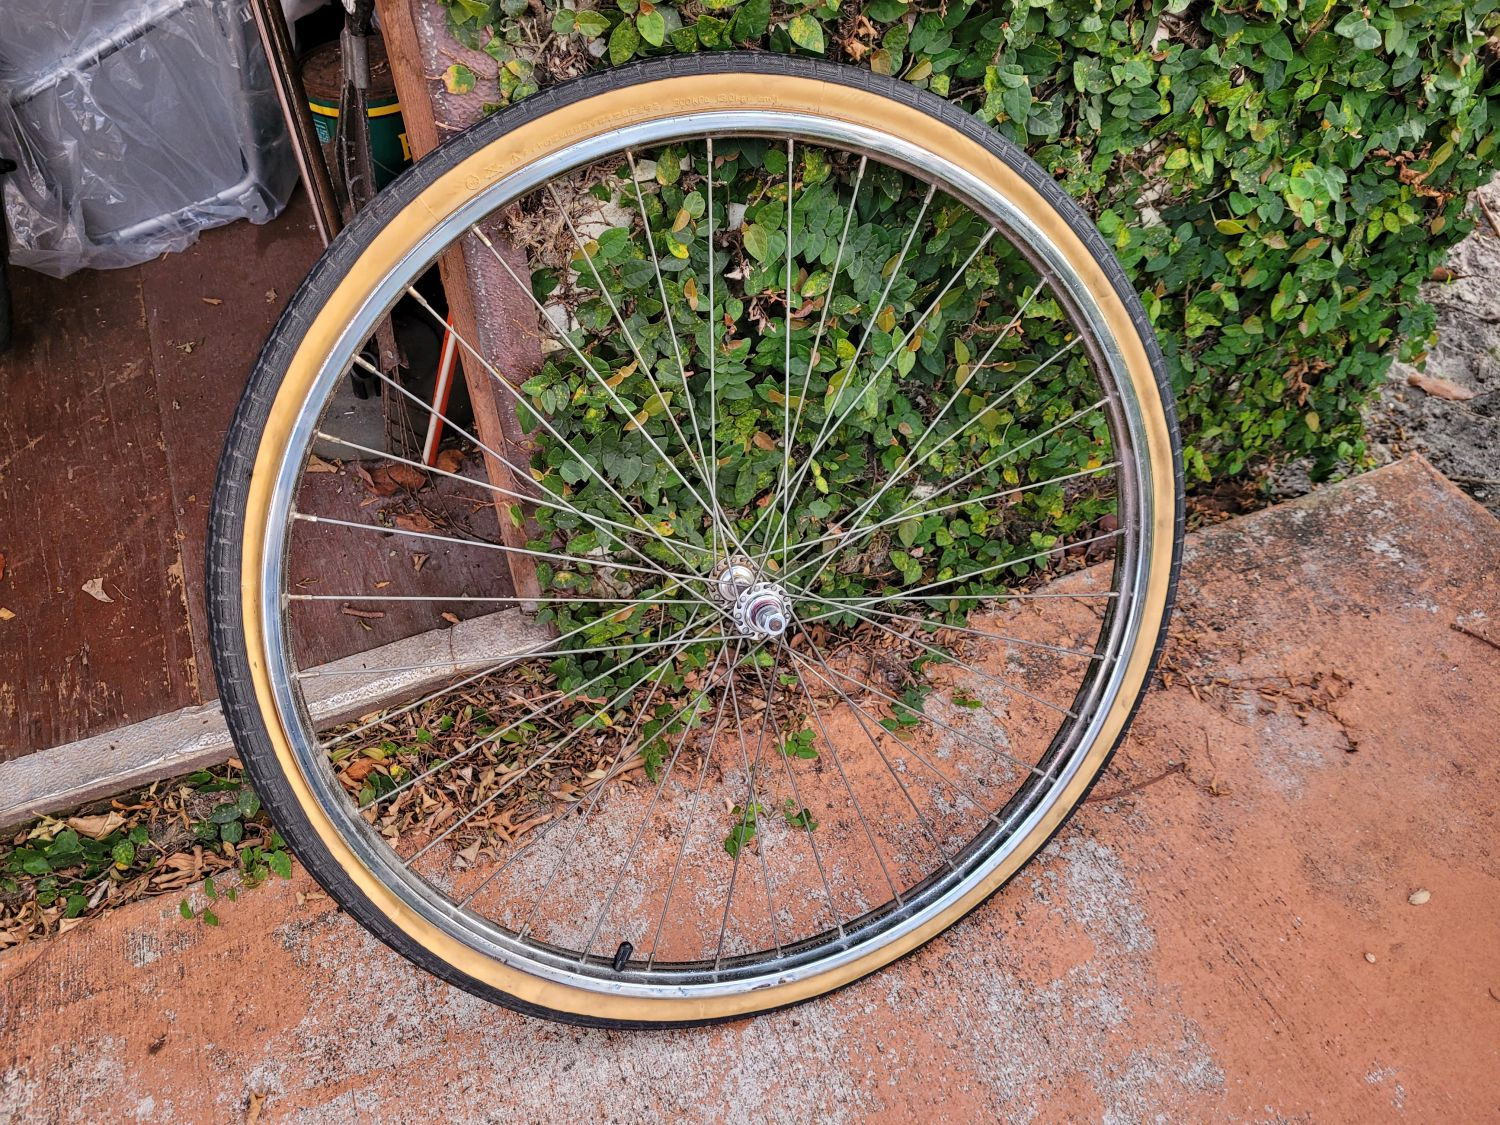
The rim is not in such great shape, but seeing as it's not the correct one to this bike, it doesn't really matter.
Now I have a front wheel in search of a rear...plus a 1973+ frameset to put them on
-Kurt
The rim isn't perfect, but it does display nicely. Have to love the dull-center Westricks from the 1950's. A very elegant rim (yes, steel rims stink for braking, but that's not the point of this buildup).
I also got off my duff and finally installed the front axle on the 1973+ front wheel which I still wish to replace as soon as I can locate something from the 1950's.
Ben had sent what I believe is one of those said-to-be Phillips front axles often seen on eBay, which was apparently installed in this front wheel before being disassembled for shipment. I had a rough Raleigh front hub kicking about with a good axle and cones, so decided to use those along with the Phillips axle washers and nuts. Tidy result.
The rim is not in such great shape, but seeing as it's not the correct one to this bike, it doesn't really matter.
Now I have a front wheel in search of a rear...plus a 1973+ frameset to put them on
-Kurt
__________________
Likes For cudak888:
06-14-21, 08:37 AM
#13
Senior Member

Join Date: May 2018
Location: Ottawa, Ontario, Canada
Posts: 578
Bikes: 1951 Sun Wasp, 1953 Armstrong Consort, 1975 Raleigh Competition, 1980 Apollo Gran Sport, 1988 Schwinn Voyageur, Mystery MTB
Mentioned: 31 Post(s)
Tagged: 0 Thread(s)
Quoted: 359 Post(s)
Liked 457 Times
in
190 Posts
Hi Kurt,
Happy as a peanut in salt to see the Superbe being treated with such attention to detail and consideration in your care. The seller told me this about the front wheel, and the dent on the headlamp: his father (who bought it new in 1950...) had a bad crash with the bike sometime in the 1970s, and the wheel was replaced with whatever the local shop had. Not long after that around 1980, or so the man gave up cycling and the Superbe went into the barn, where it waited until 2017 for me to show up and buy it. I changed out the front hub with whatever I had since the '70s one was in a poor condition. All classic bikes should enjoy the kind of semi-retirement level of conservation as evidenced in this thread. I'm looking forward to pics of it in the Florida sunshine with your other '50s bikes!
Happy as a peanut in salt to see the Superbe being treated with such attention to detail and consideration in your care. The seller told me this about the front wheel, and the dent on the headlamp: his father (who bought it new in 1950...) had a bad crash with the bike sometime in the 1970s, and the wheel was replaced with whatever the local shop had. Not long after that around 1980, or so the man gave up cycling and the Superbe went into the barn, where it waited until 2017 for me to show up and buy it. I changed out the front hub with whatever I had since the '70s one was in a poor condition. All classic bikes should enjoy the kind of semi-retirement level of conservation as evidenced in this thread. I'm looking forward to pics of it in the Florida sunshine with your other '50s bikes!
Likes For Ged117:
06-14-21, 12:03 PM
#14
www.theheadbadge.com
Thread Starter
Join Date: Sep 2005
Location: Southern Florida
Posts: 28,496
Bikes: https://www.theheadbadge.com
Mentioned: 124 Post(s)
Tagged: 0 Thread(s)
Quoted: 2412 Post(s)
Liked 4,373 Times
in
2,086 Posts
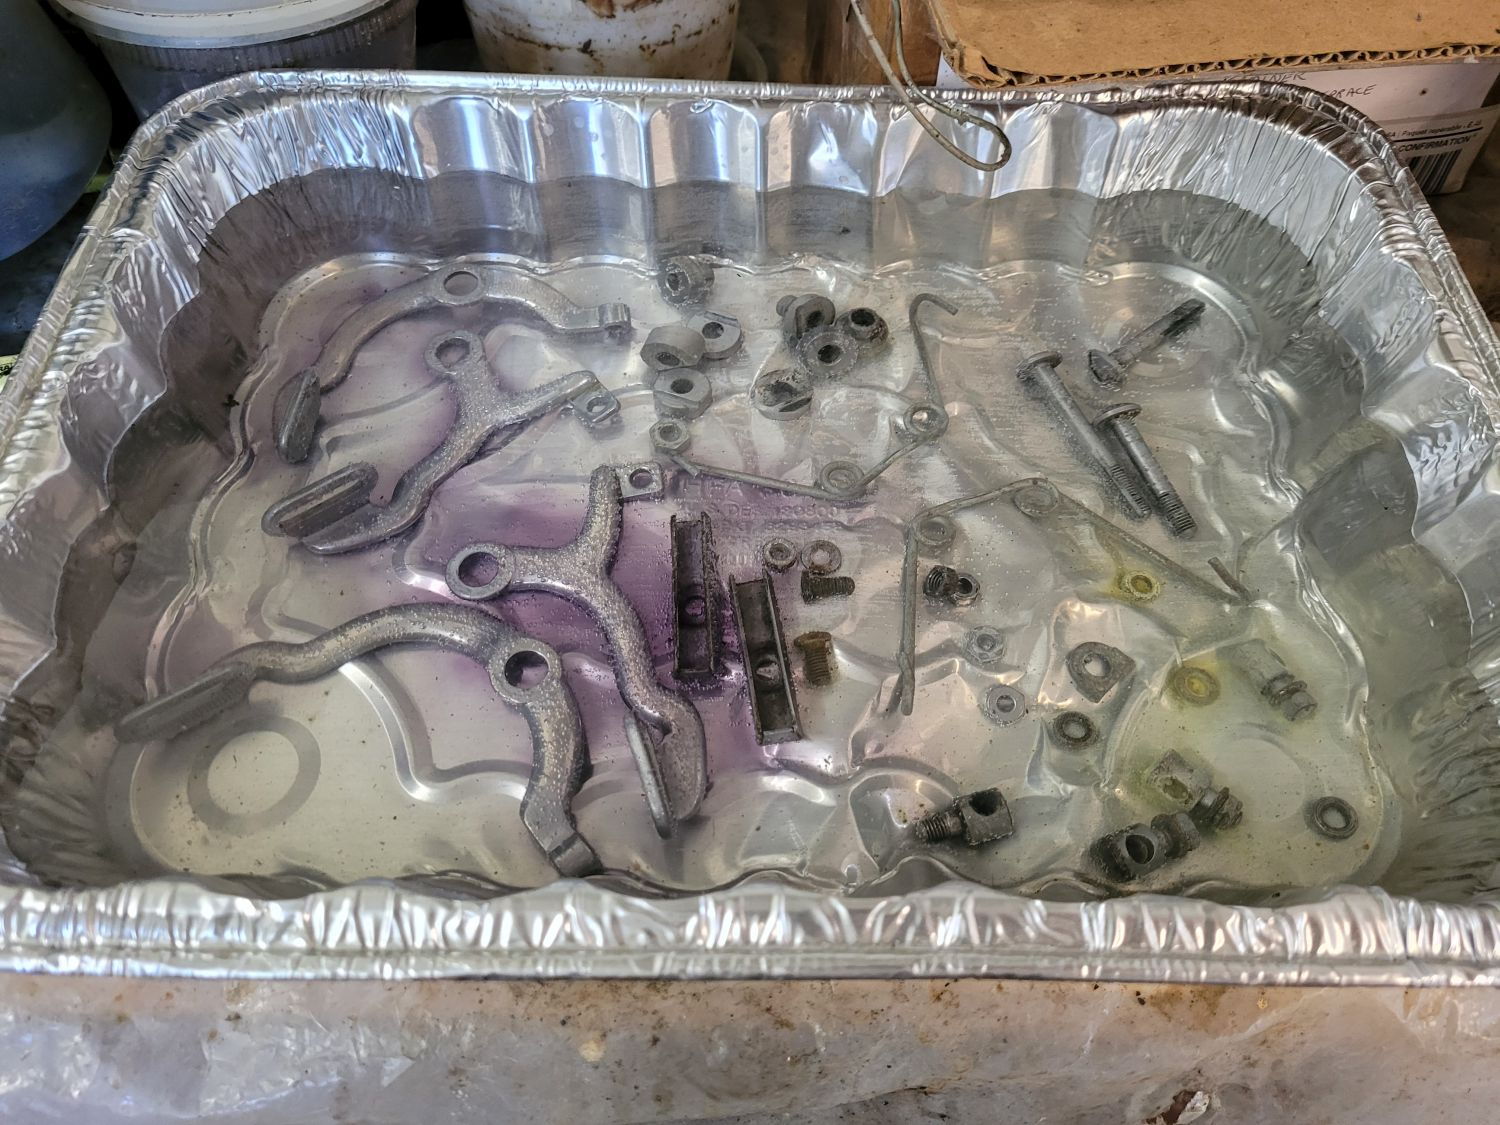
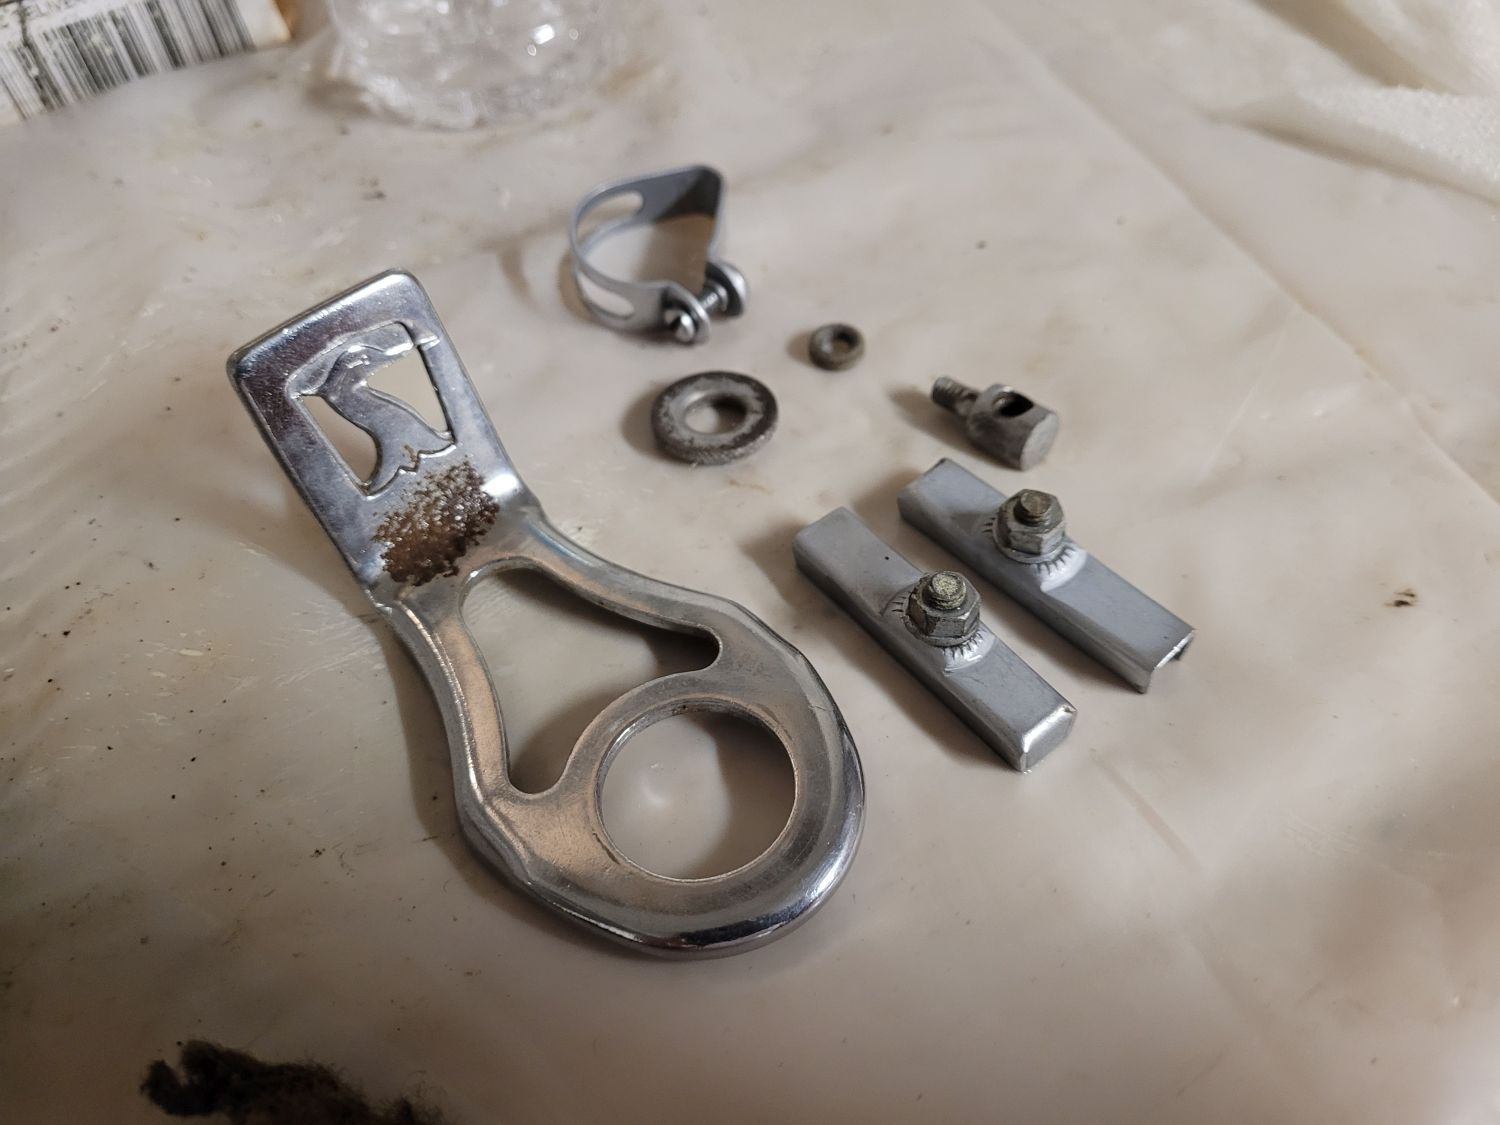
Brake bits visited the OA dip yesterday.
Most of the parts were exceptionally clean to begin with, so most of this was just to take the peppering around the matte chrome areas:


Ben, I haven't even unwrapped the headlight, so I haven't seen the dent. Curious what type of a crash would do that and then leave the frame virtually unscathed; I'm not even convinced the fork alignment issue is from that crash.
That hub on the front wheel is a Sturmey-Archer unit, so if you re-laced the front, it basically fits the bill. It's one of the slightly later ones with no oil port; its identical to the one on my '79/80 Rudge.
Love the backstory, by the way. If you have any additional tidbits, let me know!
-Kurt
Most of the parts were exceptionally clean to begin with, so most of this was just to take the peppering around the matte chrome areas:
Hi Kurt,
Happy as a peanut in salt to see the Superbe being treated with such attention to detail and consideration in your care. The seller told me this about the front wheel, and the dent on the headlamp: his father (who bought it new in 1950...) had a bad crash with the bike sometime in the 1970s, and the wheel was replaced with whatever the local shop had. Not long after that around 1980, or so the man gave up cycling and the Superbe went into the barn, where it waited until 2017 for me to show up and buy it. I changed out the front hub with whatever I had since the '70s one was in a poor condition. All classic bikes should enjoy the kind of semi-retirement level of conservation as evidenced in this thread. I'm looking forward to pics of it in the Florida sunshine with your other '50s bikes!
Happy as a peanut in salt to see the Superbe being treated with such attention to detail and consideration in your care. The seller told me this about the front wheel, and the dent on the headlamp: his father (who bought it new in 1950...) had a bad crash with the bike sometime in the 1970s, and the wheel was replaced with whatever the local shop had. Not long after that around 1980, or so the man gave up cycling and the Superbe went into the barn, where it waited until 2017 for me to show up and buy it. I changed out the front hub with whatever I had since the '70s one was in a poor condition. All classic bikes should enjoy the kind of semi-retirement level of conservation as evidenced in this thread. I'm looking forward to pics of it in the Florida sunshine with your other '50s bikes!
That hub on the front wheel is a Sturmey-Archer unit, so if you re-laced the front, it basically fits the bill. It's one of the slightly later ones with no oil port; its identical to the one on my '79/80 Rudge.
Love the backstory, by the way. If you have any additional tidbits, let me know!
-Kurt
__________________
Likes For cudak888:
06-17-21, 01:56 PM
#15
www.theheadbadge.com
Thread Starter
Join Date: Sep 2005
Location: Southern Florida
Posts: 28,496
Bikes: https://www.theheadbadge.com
Mentioned: 124 Post(s)
Tagged: 0 Thread(s)
Quoted: 2412 Post(s)
Liked 4,373 Times
in
2,086 Posts
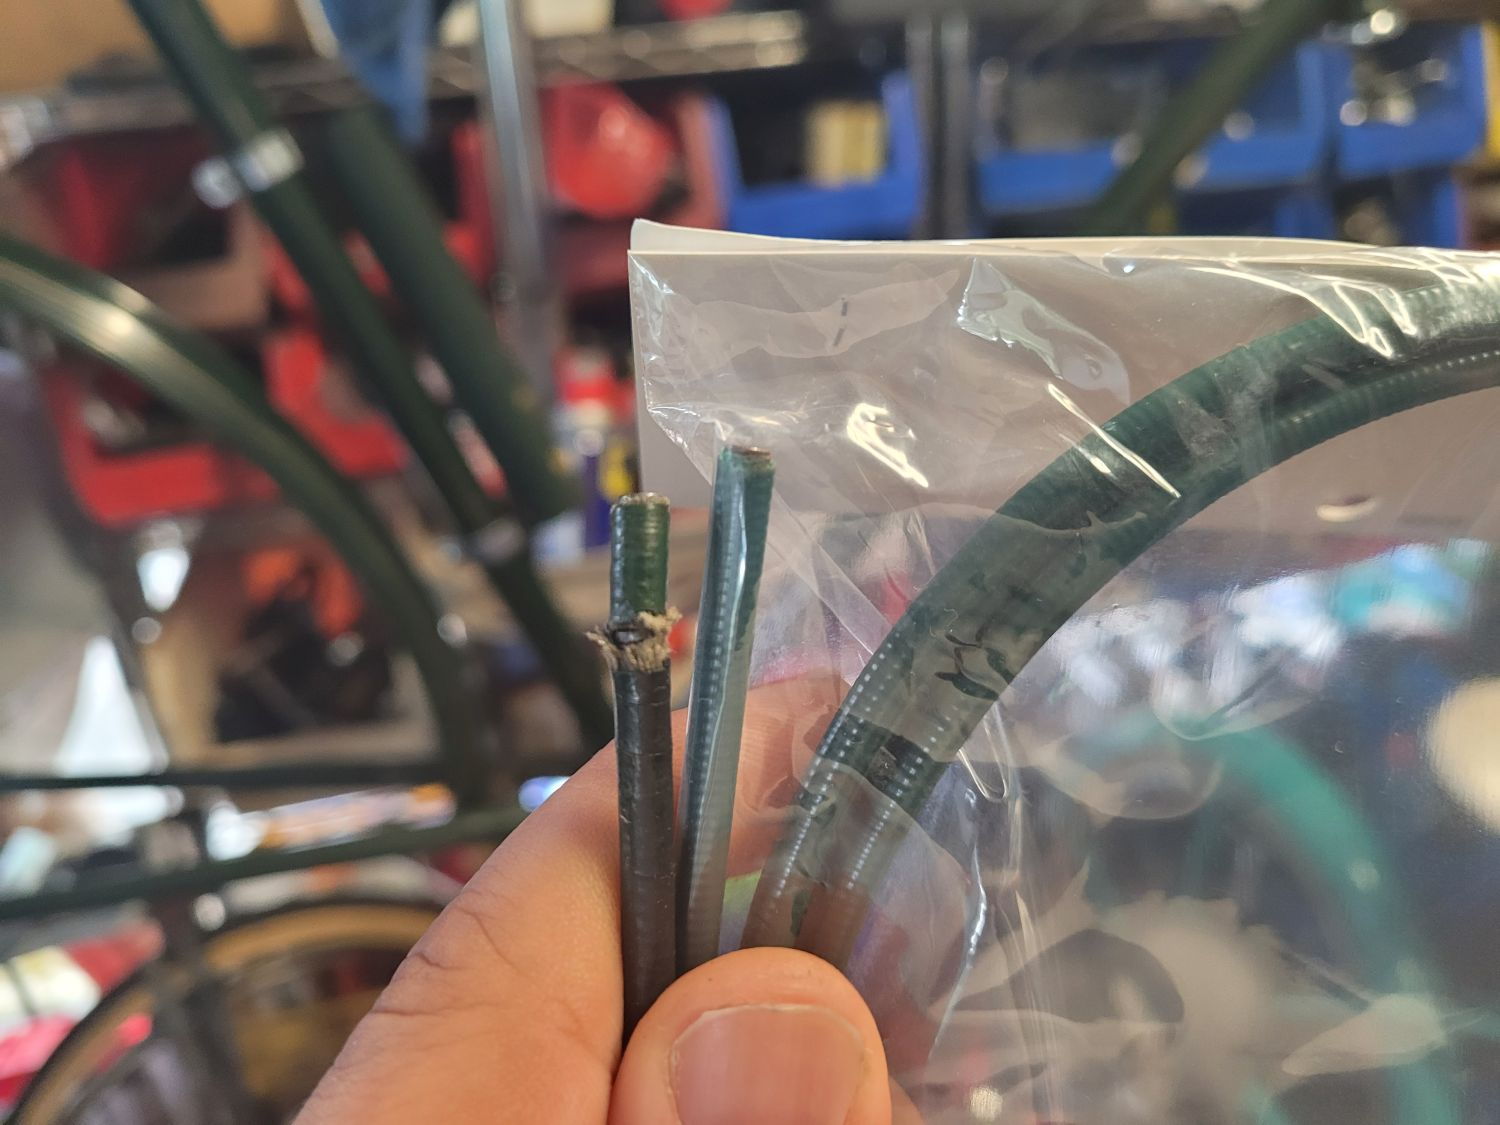
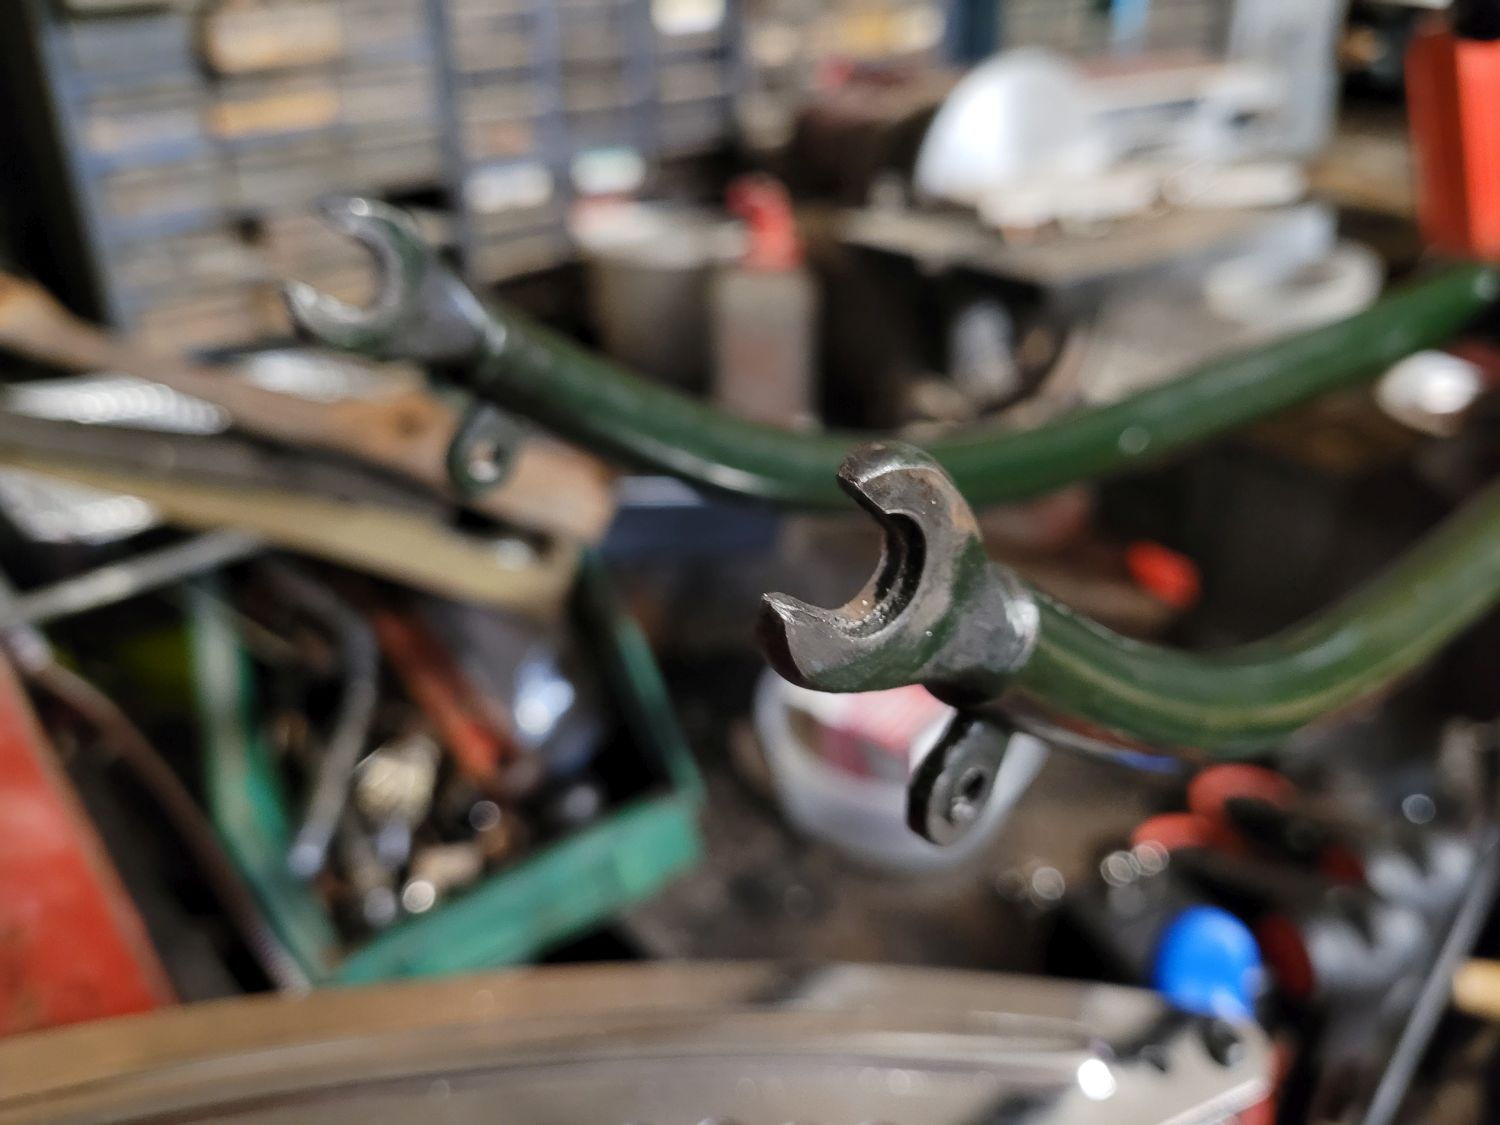
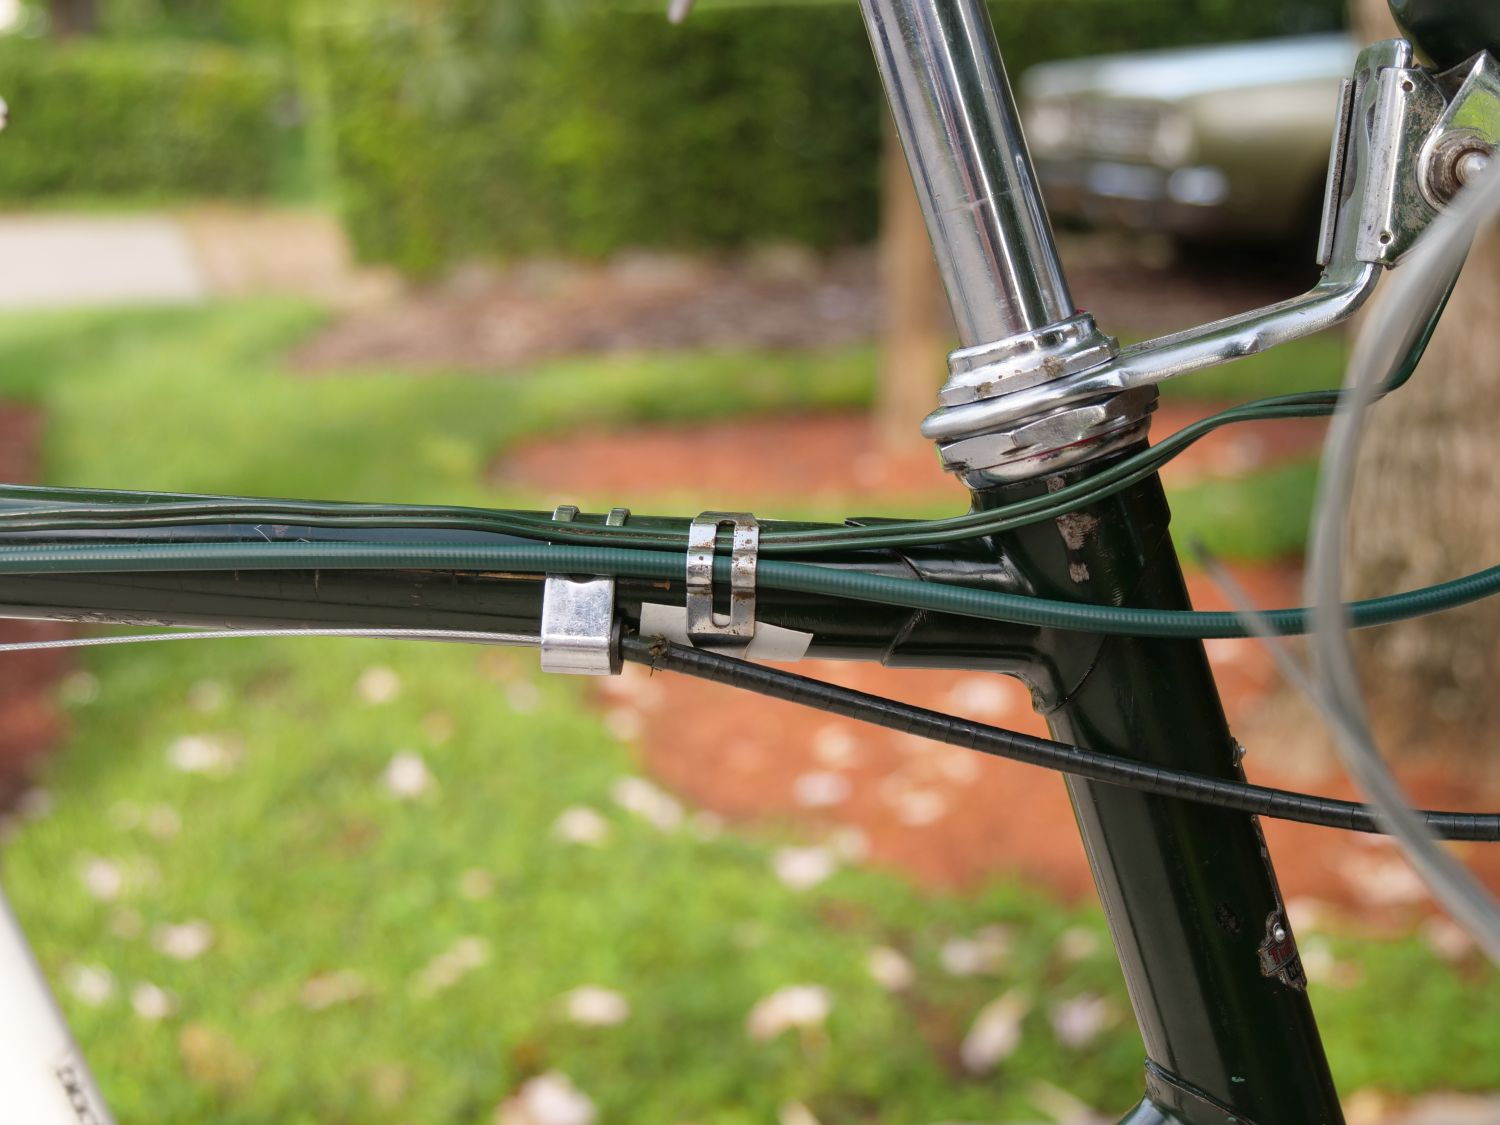
Here's a tidbit of info I didn't know until I looked at the cables on this very bike: Early Superbes had matching color cable housing.
Now, trying to find dark green cable housing, is, apparently, next to impossible. Velo-Orange's offering was on the teal side, so I wound up getting this ridiculously overpriced ($32 freaking dollars for two meters ) Yokozona housing, and will probably have to get a bit more if I don't give myself a bit of extra wiggle room. It also has a teal hue to it rather than forest green, but it's new, lined, and looks the part.
Close 'nuff.
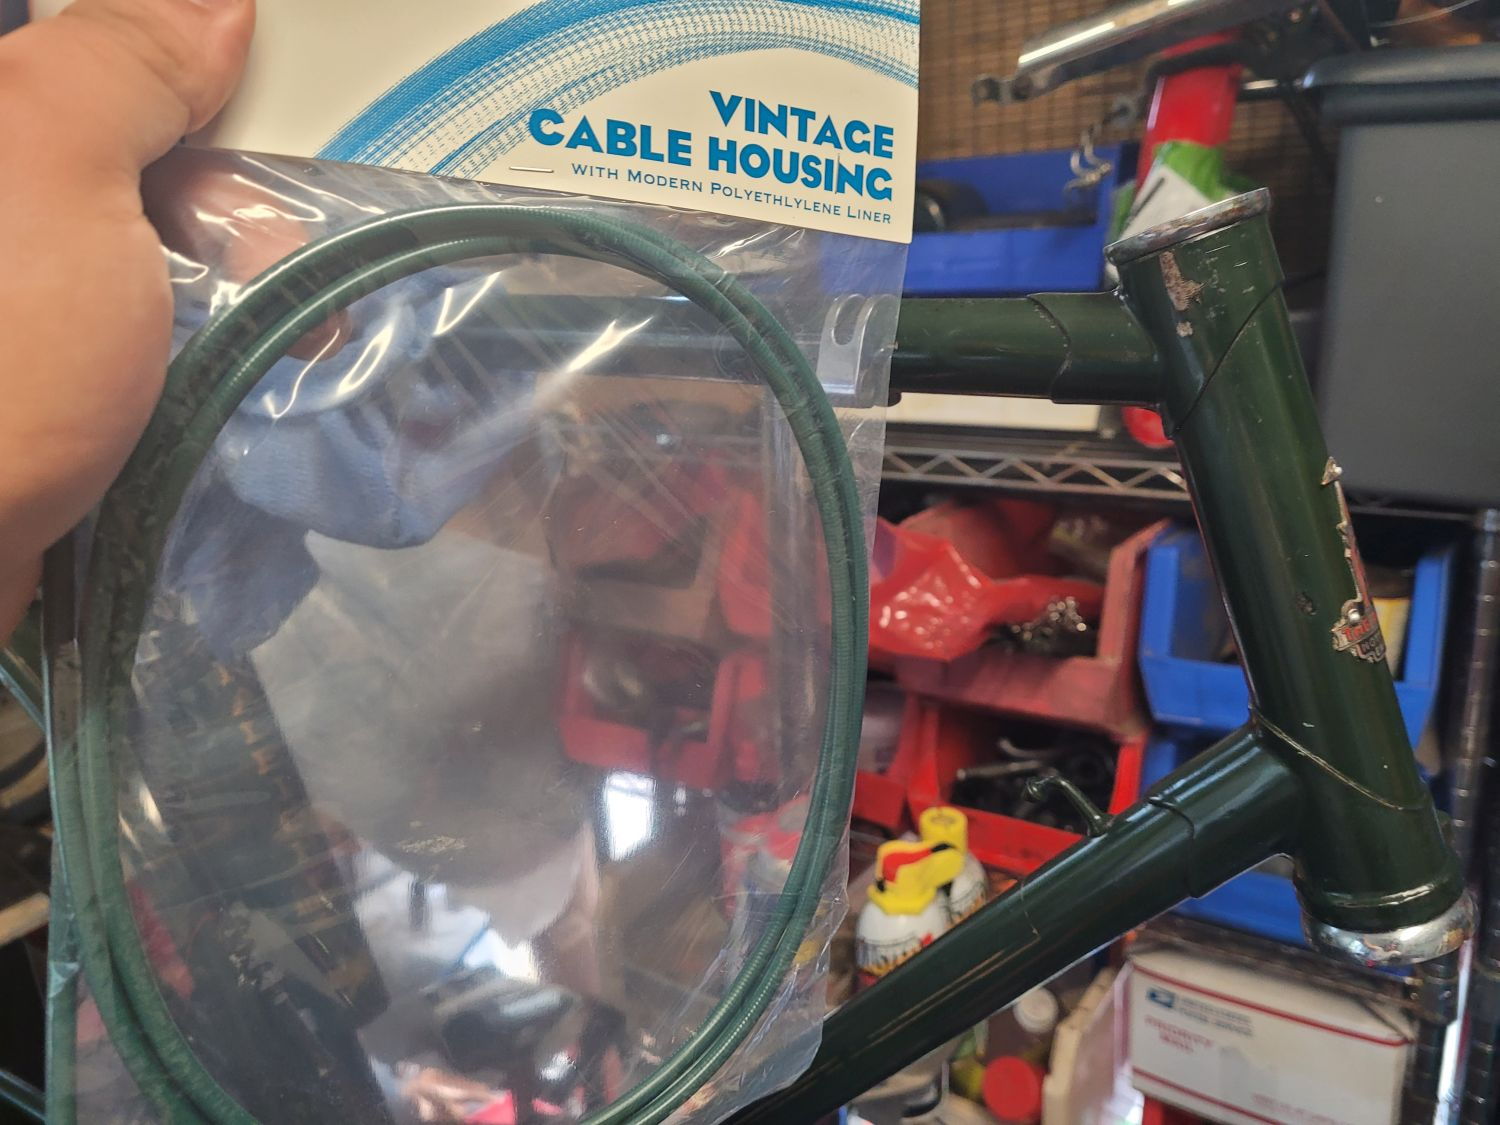
Also, I was able to get some solder-on brass ends for a motorcycle clutch cable which should serve as a perfect substitute for the original soldered brake cable ends. I'm going to try doing these with a small handheld butane torch this time, instead of a soldering iron.

-Kurt
Now, trying to find dark green cable housing, is, apparently, next to impossible. Velo-Orange's offering was on the teal side, so I wound up getting this ridiculously overpriced ($32 freaking dollars for two meters
) Yokozona housing, and will probably have to get a bit more if I don't give myself a bit of extra wiggle room. It also has a teal hue to it rather than forest green, but it's new, lined, and looks the part.Close 'nuff.
Also, I was able to get some solder-on brass ends for a motorcycle clutch cable which should serve as a perfect substitute for the original soldered brake cable ends. I'm going to try doing these with a small handheld butane torch this time, instead of a soldering iron.
-Kurt
__________________
Last edited by cudak888; 09-12-22 at 10:38 AM.
Likes For cudak888:
06-22-21, 01:54 PM
#16
Senior Member
Join Date: May 2018
Location: Ottawa, Ontario, Canada
Posts: 578
Bikes: 1951 Sun Wasp, 1953 Armstrong Consort, 1975 Raleigh Competition, 1980 Apollo Gran Sport, 1988 Schwinn Voyageur, Mystery MTB
Mentioned: 31 Post(s)
Tagged: 0 Thread(s)
Quoted: 359 Post(s)
Liked 457 Times
in
190 Posts
Here's a tidbit of info I didn't know until I looked at the cables on this very bike: Early Superbes had matching color cable housing.
Now, trying to find dark green cable housing, is, apparently, next to impossible. Velo-Orange's offering was on the teal side, so I wound up getting this ridiculously overpriced ($32 freaking dollars for two meters) Yokozona housing, and will probably have to get a bit more if I don't give myself a bit of extra wiggle room. It also has a teal hue to it rather than forest green, but it's new, lined, and looks the part.
Close 'nuff.
Also, I was able to get some solder-on brass ends for a motorcycle clutch cable which should serve as a perfect substitute for the original soldered brake cable ends. I'm going to try doing these with a small handheld butane torch as well instead of a soldering iron.
-Kurt
Now, trying to find dark green cable housing, is, apparently, next to impossible. Velo-Orange's offering was on the teal side, so I wound up getting this ridiculously overpriced ($32 freaking dollars for two meters
) Yokozona housing, and will probably have to get a bit more if I don't give myself a bit of extra wiggle room. It also has a teal hue to it rather than forest green, but it's new, lined, and looks the part.Close 'nuff.
Also, I was able to get some solder-on brass ends for a motorcycle clutch cable which should serve as a perfect substitute for the original soldered brake cable ends. I'm going to try doing these with a small handheld butane torch as well instead of a soldering iron.
-Kurt
Likes For Ged117:
06-22-21, 03:25 PM
#17
www.theheadbadge.com
Thread Starter
Join Date: Sep 2005
Location: Southern Florida
Posts: 28,496
Bikes: https://www.theheadbadge.com
Mentioned: 124 Post(s)
Tagged: 0 Thread(s)
Quoted: 2412 Post(s)
Liked 4,373 Times
in
2,086 Posts
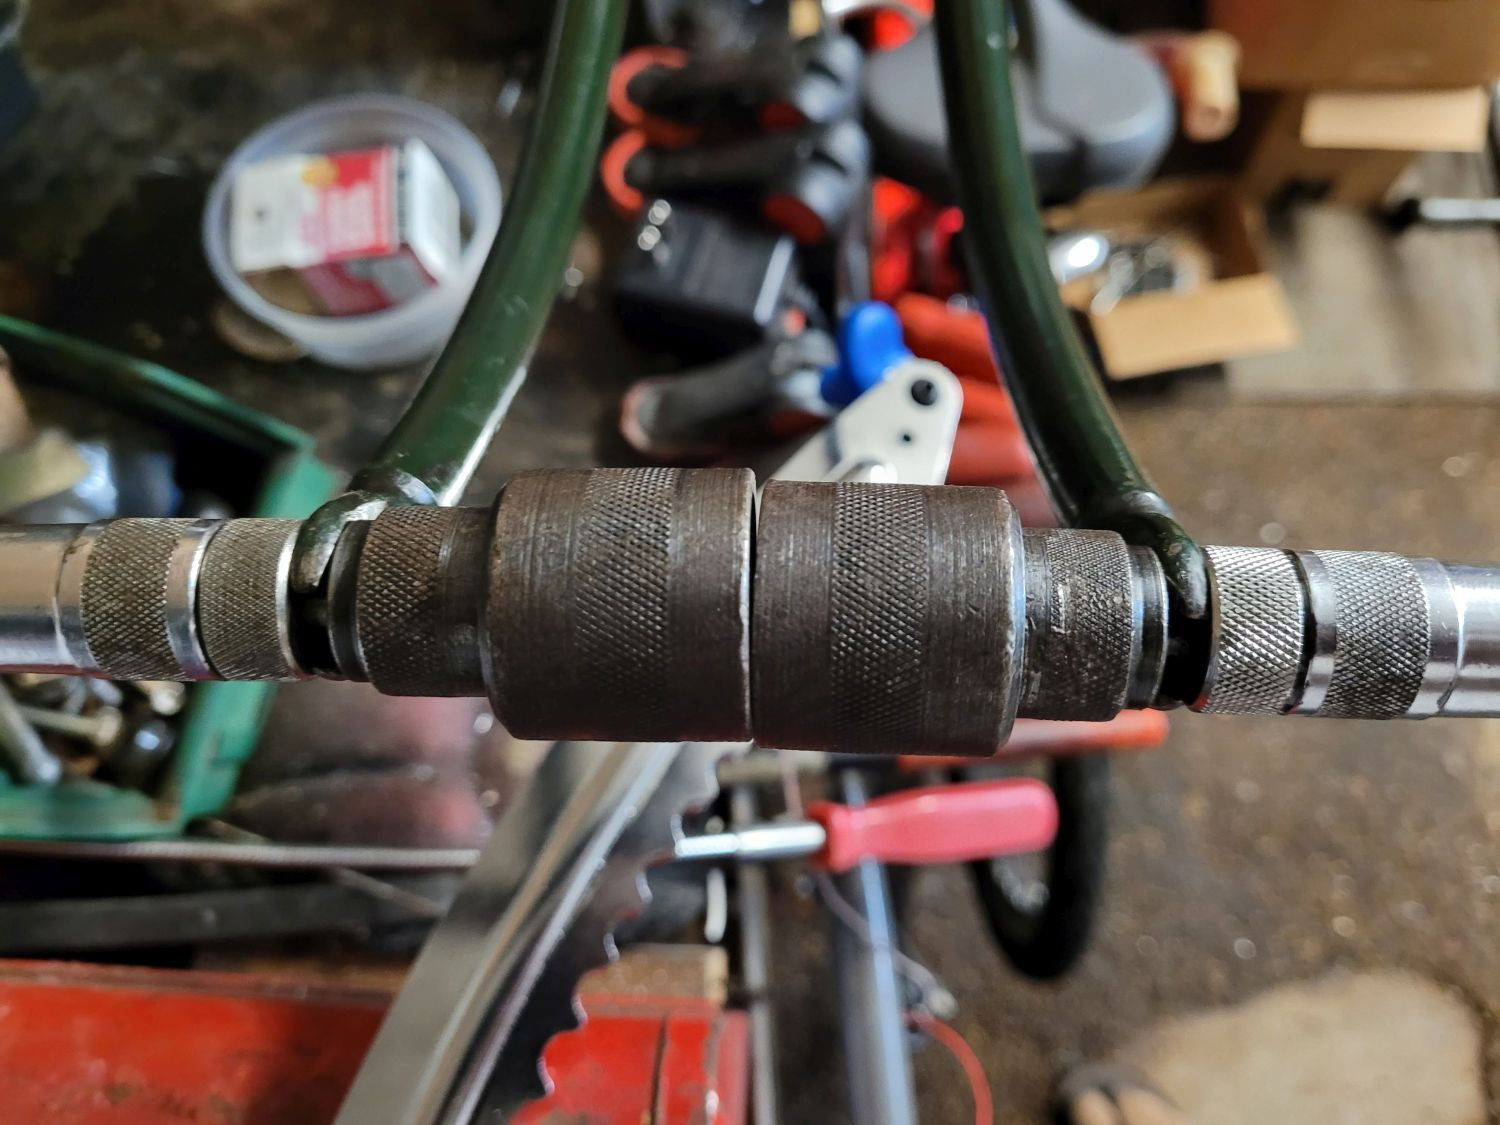
A care package from @nlerner arrived with one bit I had foolishly misplaced for the hub, which gave me a chance to put it all together. I also swapped on a different threaded driver from a '48 FW Neal had sent a few months back.
I also realized I had to downsize to a 146mm axle given the removal of the Cyclo 3-speed freewheel; gone is the 158.8.


Got my fingers crossed it looks good. Just realized today that the wiring is green as well. Should blend in nicely.
-Kurt
I also realized I had to downsize to a 146mm axle given the removal of the Cyclo 3-speed freewheel; gone is the 158.8.
-Kurt
__________________
Likes For cudak888:
06-27-21, 09:28 AM
#18
www.theheadbadge.com
Thread Starter
Join Date: Sep 2005
Location: Southern Florida
Posts: 28,496
Bikes: https://www.theheadbadge.com
Mentioned: 124 Post(s)
Tagged: 0 Thread(s)
Quoted: 2412 Post(s)
Liked 4,373 Times
in
2,086 Posts
Some additional parts arrived - for this bike, the '56, and the '52 Sports - from @clubman. Pre and post OA bath pics:

-Kurt
-Kurt
__________________
06-30-21, 09:26 PM
#19
www.theheadbadge.com
Thread Starter
Join Date: Sep 2005
Location: Southern Florida
Posts: 28,496
Bikes: https://www.theheadbadge.com
Mentioned: 124 Post(s)
Tagged: 0 Thread(s)
Quoted: 2412 Post(s)
Liked 4,373 Times
in
2,086 Posts
I'm back to working on this one again. Believe it or not, I had sold my Park FFS-2 many years back, and had been borrowing Mike Terraferma's whenever I needed to straighten a frame. I finally bit the bullet and rounded out my own framebuilding tools with one once again, seeing as I have not only this fork to straighten, but the fork on the '56 Superbe Tourist DL-5, and the '38+ Humber Cob Tourist.
So after a day that just ran too long with work, UPS delivered my new FFS-2. With it, I escaped to the shop to finally get this straightened out.
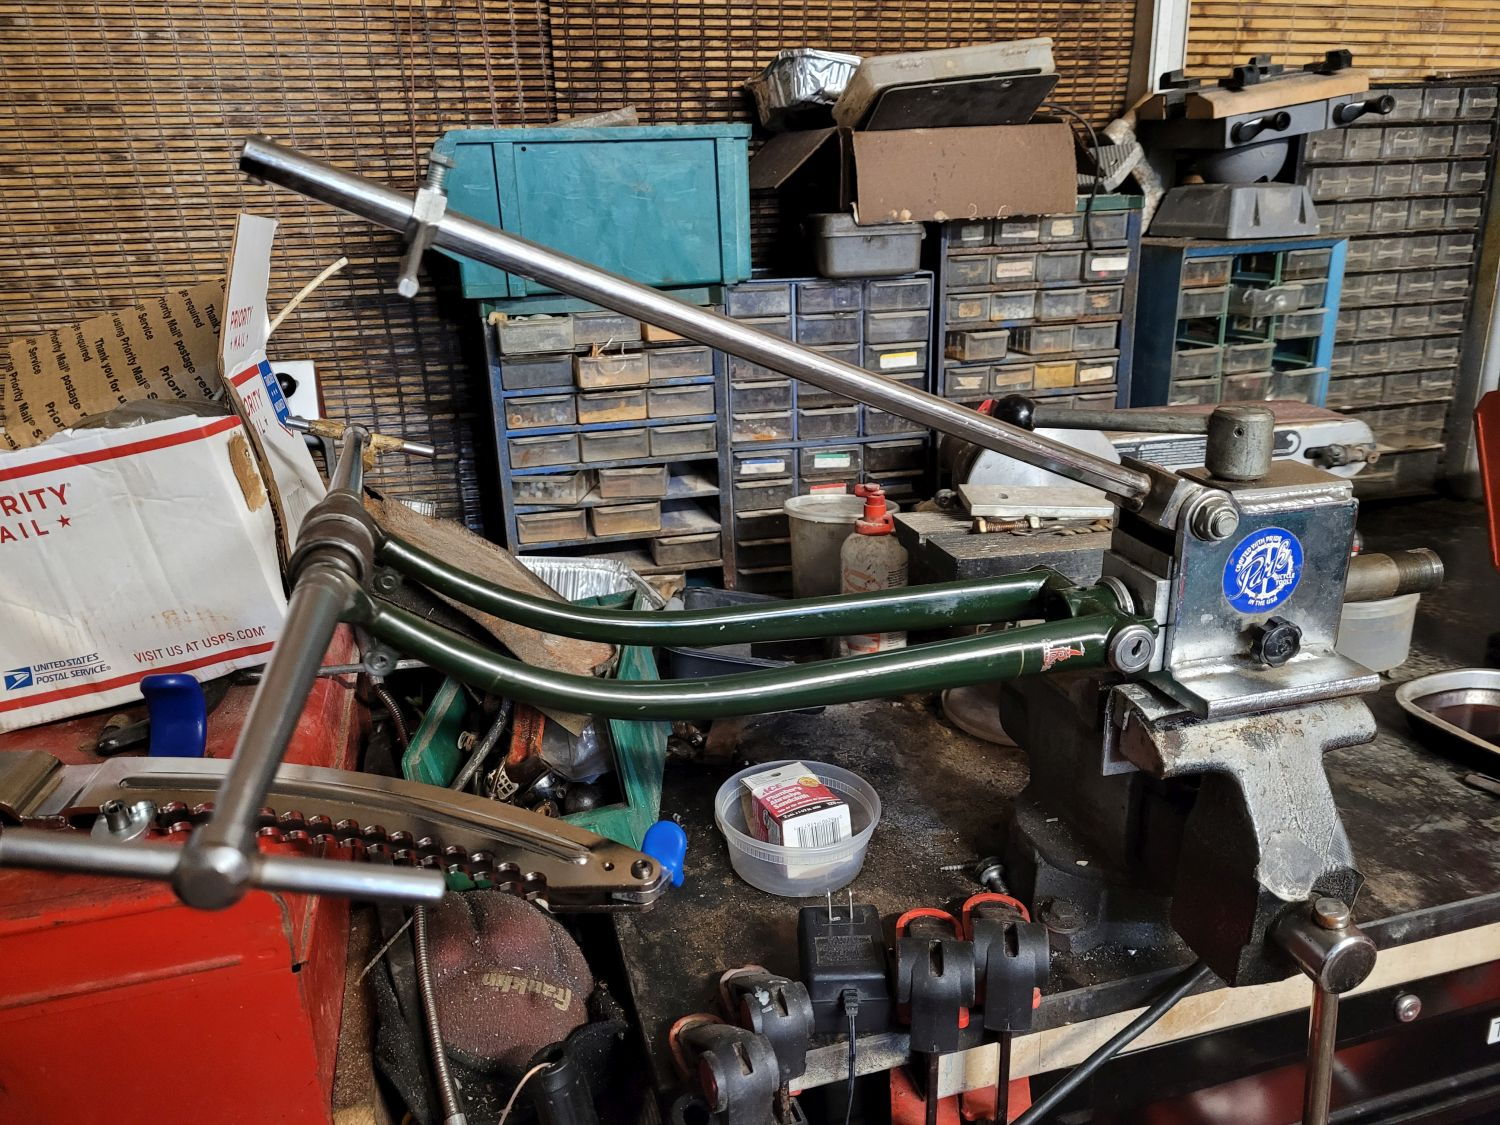
Come to think of it, I really need to clean this dump of a workbench.
I first had to clean up the inside edge of the dropouts, as they'd been gouged on the inside. Something about the flanges on the 1970's hub didn't jive with the earlier dropouts, even though Raleigh did have flanges on their hubs when this was made, and prior to that as well.
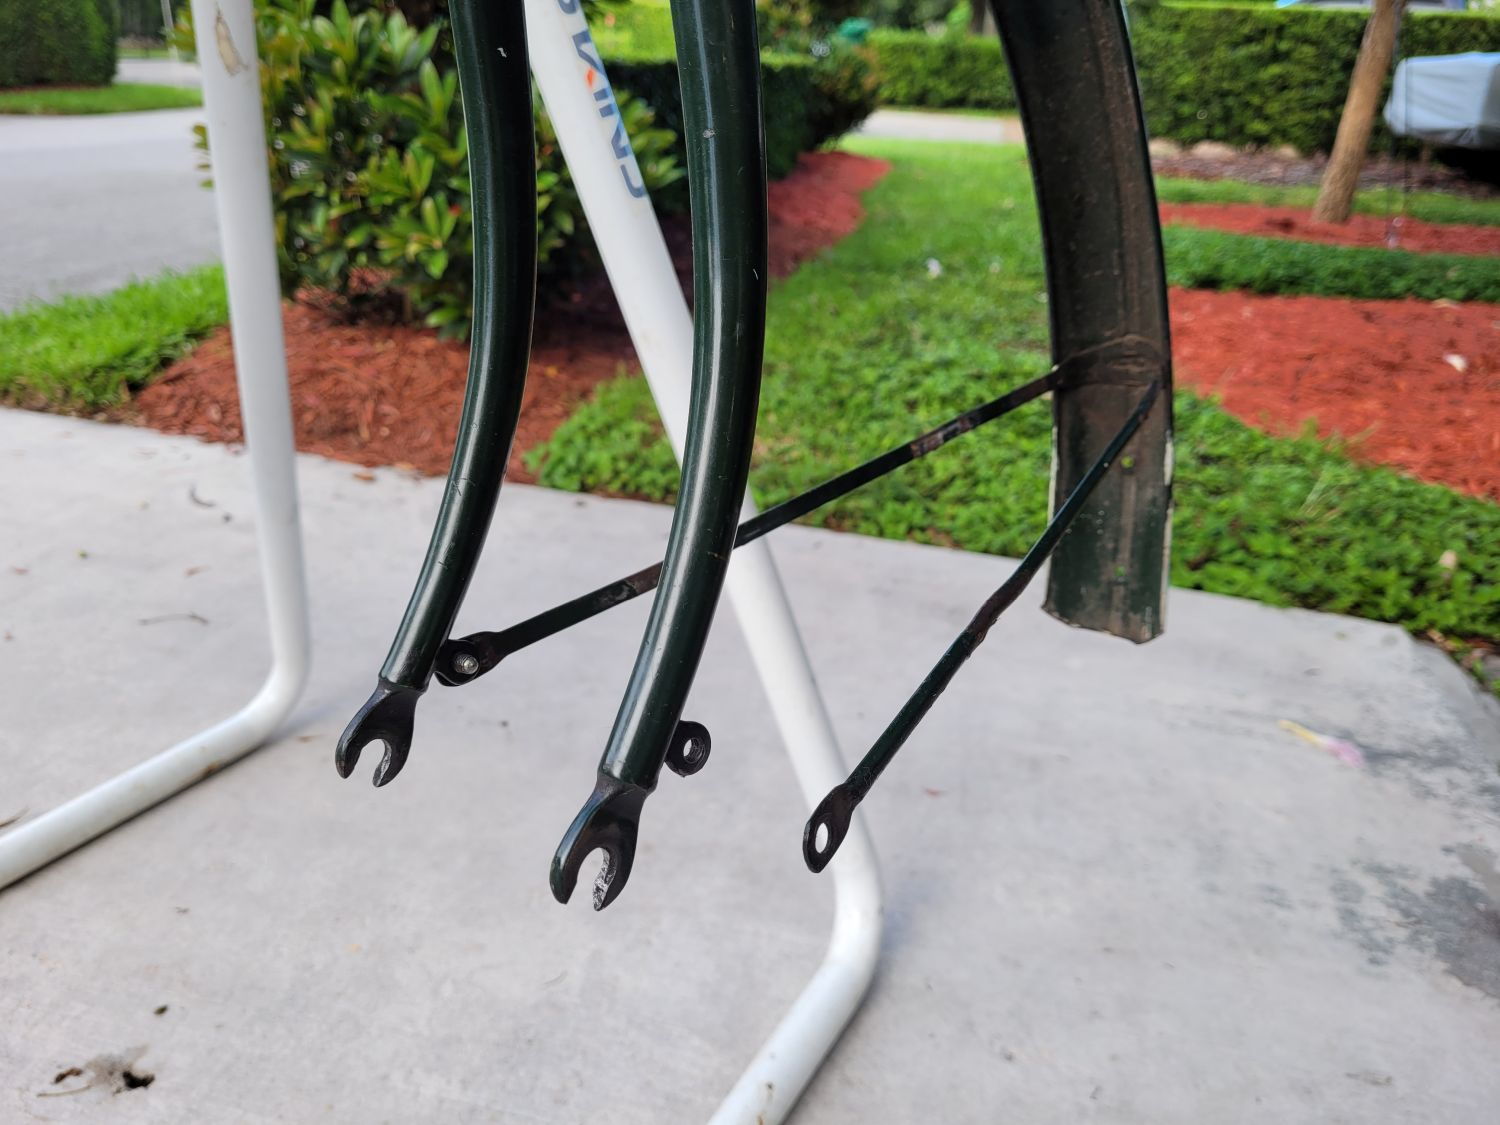
At any rate, the damage was bad enough that the Park dropout alignment tool would not fit. Some careful filing later (making sure not to remove material from the actual factory dropout curve) removed the displaced metal and returned the dropouts to the way they're supposed to be.
The dropouts, predictably, weren't square, but the left blade was also kinked back quite a bit - more so than the picture would lead one to believe.
I chose to verify the results with the front wheel off the '52 Sports. It took a bit of tweaking, but I'm very happy with the results now.

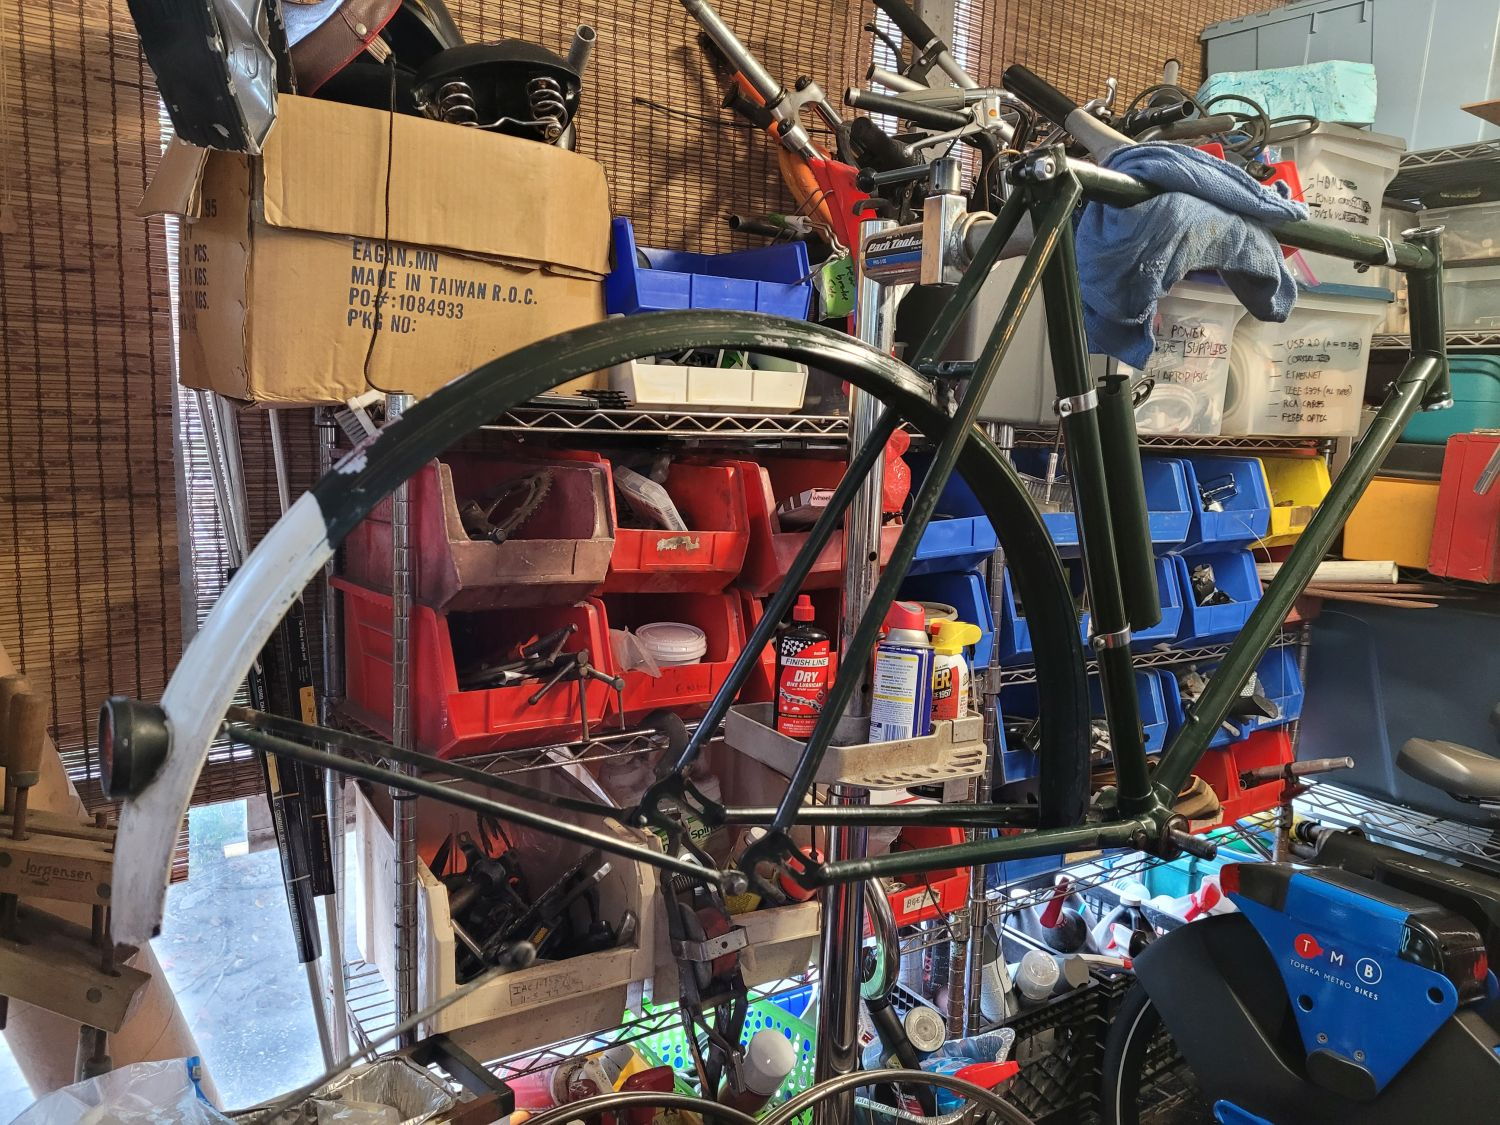
Lamp bracket is now in OA. I plan to mount the damaged handlebar for now so I can get an accurate length for the brake cables before soldering the ends.

-Kurt
So after a day that just ran too long with work, UPS delivered my new FFS-2. With it, I escaped to the shop to finally get this straightened out.
Come to think of it, I really need to clean this dump of a workbench.
I first had to clean up the inside edge of the dropouts, as they'd been gouged on the inside. Something about the flanges on the 1970's hub didn't jive with the earlier dropouts, even though Raleigh did have flanges on their hubs when this was made, and prior to that as well.
At any rate, the damage was bad enough that the Park dropout alignment tool would not fit. Some careful filing later (making sure not to remove material from the actual factory dropout curve) removed the displaced metal and returned the dropouts to the way they're supposed to be.
The dropouts, predictably, weren't square, but the left blade was also kinked back quite a bit - more so than the picture would lead one to believe.
I chose to verify the results with the front wheel off the '52 Sports. It took a bit of tweaking, but I'm very happy with the results now.
Lamp bracket is now in OA. I plan to mount the damaged handlebar for now so I can get an accurate length for the brake cables before soldering the ends.
-Kurt
__________________
Last edited by cudak888; 07-01-21 at 08:43 PM.
07-01-21, 03:46 PM
#20
www.theheadbadge.com
Thread Starter
Join Date: Sep 2005
Location: Southern Florida
Posts: 28,496
Bikes: https://www.theheadbadge.com
Mentioned: 124 Post(s)
Tagged: 0 Thread(s)
Quoted: 2412 Post(s)
Liked 4,373 Times
in
2,086 Posts
Just pulled the '50 out of the stand to get the '38 Humber into it.
Also ordered a repop rear reflector for it. Looking forward to putting the wheels on it, but a bit concerned that I can't seem to find the correct front wheel.
-Kurt
Also ordered a repop rear reflector for it. Looking forward to putting the wheels on it, but a bit concerned that I can't seem to find the correct front wheel.
-Kurt
__________________
07-03-21, 06:30 PM
#21
www.theheadbadge.com
Thread Starter
Join Date: Sep 2005
Location: Southern Florida
Posts: 28,496
Bikes: https://www.theheadbadge.com
Mentioned: 124 Post(s)
Tagged: 0 Thread(s)
Quoted: 2412 Post(s)
Liked 4,373 Times
in
2,086 Posts
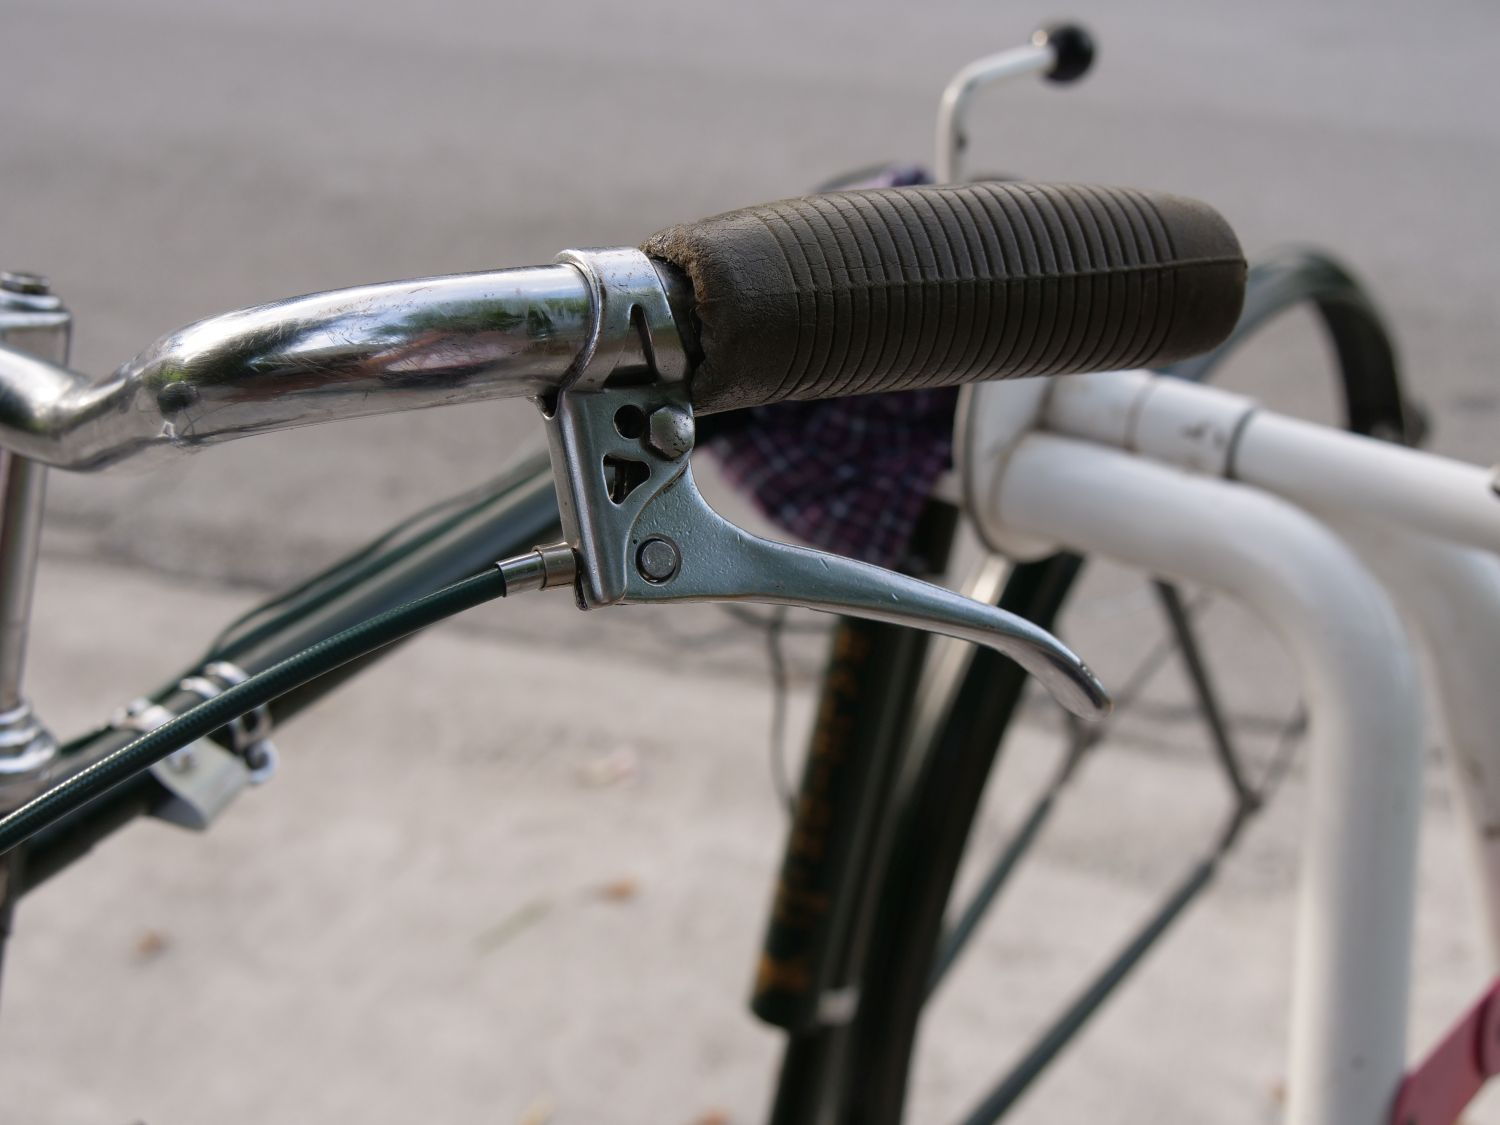
Made a lot of progress on this one today. First off - and I don't know why I didn't think of it until now - I simply cold-set the damage out of the handlebar using the fork tool (no, it wasn't a perfect fit, but it worked just fine). Checked stem-center-to-ID and both ends are now identical.
There are some bits that I haven't unpacked since the bike arrived - the shifter was one of them. And wouldn't you know...it was bent too.
Not anymore. If I got paid for how many times I've had to bend metal on Raleighs recently, I'd be a rich man.
Oh, the right brake lever was bent too. Probably from the same hit that damaged the bars and the shifter. I didn't get photos of it, but it's sorted as well.
I pulled the original reflector. Ugliness below.
Polished up a bit:
Replacement installed:
Done:

Beauty photos to follow.
-Kurt
There are some bits that I haven't unpacked since the bike arrived - the shifter was one of them. And wouldn't you know...it was bent too.
Not anymore. If I got paid for how many times I've had to bend metal on Raleighs recently, I'd be a rich man.
Oh, the right brake lever was bent too. Probably from the same hit that damaged the bars and the shifter. I didn't get photos of it, but it's sorted as well.
I pulled the original reflector. Ugliness below.
Polished up a bit:
Replacement installed:
Done:
Beauty photos to follow.
-Kurt
__________________
Likes For cudak888:
07-03-21, 06:53 PM
#22
www.theheadbadge.com
Thread Starter
Join Date: Sep 2005
Location: Southern Florida
Posts: 28,496
Bikes: https://www.theheadbadge.com
Mentioned: 124 Post(s)
Tagged: 0 Thread(s)
Quoted: 2412 Post(s)
Liked 4,373 Times
in
2,086 Posts
The progress, so far. The headlight was placed here just to make sure I cut the brake cable long enough not to interfere with the housing, hence why the wiring is dangling everywhere.

I'm very grateful the John Bull Super Club grips have survived. They appear to be on the Unobtanium list.

All the bent stuff isn't looking as bent anymore:
The new housing, as I figured, isn't a perfect color match, but it works. I consider myself lucky to be running green anything, instead of black.
The cable clamps haven't been OA bathed yet. I use a thin piece of styrene plastic on them to prevent scratches during these test fits. I pull the plastic when the clips are installed for the final time.
I had intended to solder the brake cables today, but that's when I discovered that only one side of the cables from the bike had their original ends and ferrule.
Though @clubman and @nlerner were very gracious sending me oodles of cable adjusters (which I'm now putting to good use), I'm now short three of the thick, Raleigh chromed steel cable ends and one of the specific brake cable ferrules used on these - as in the photo. If anyone has them...
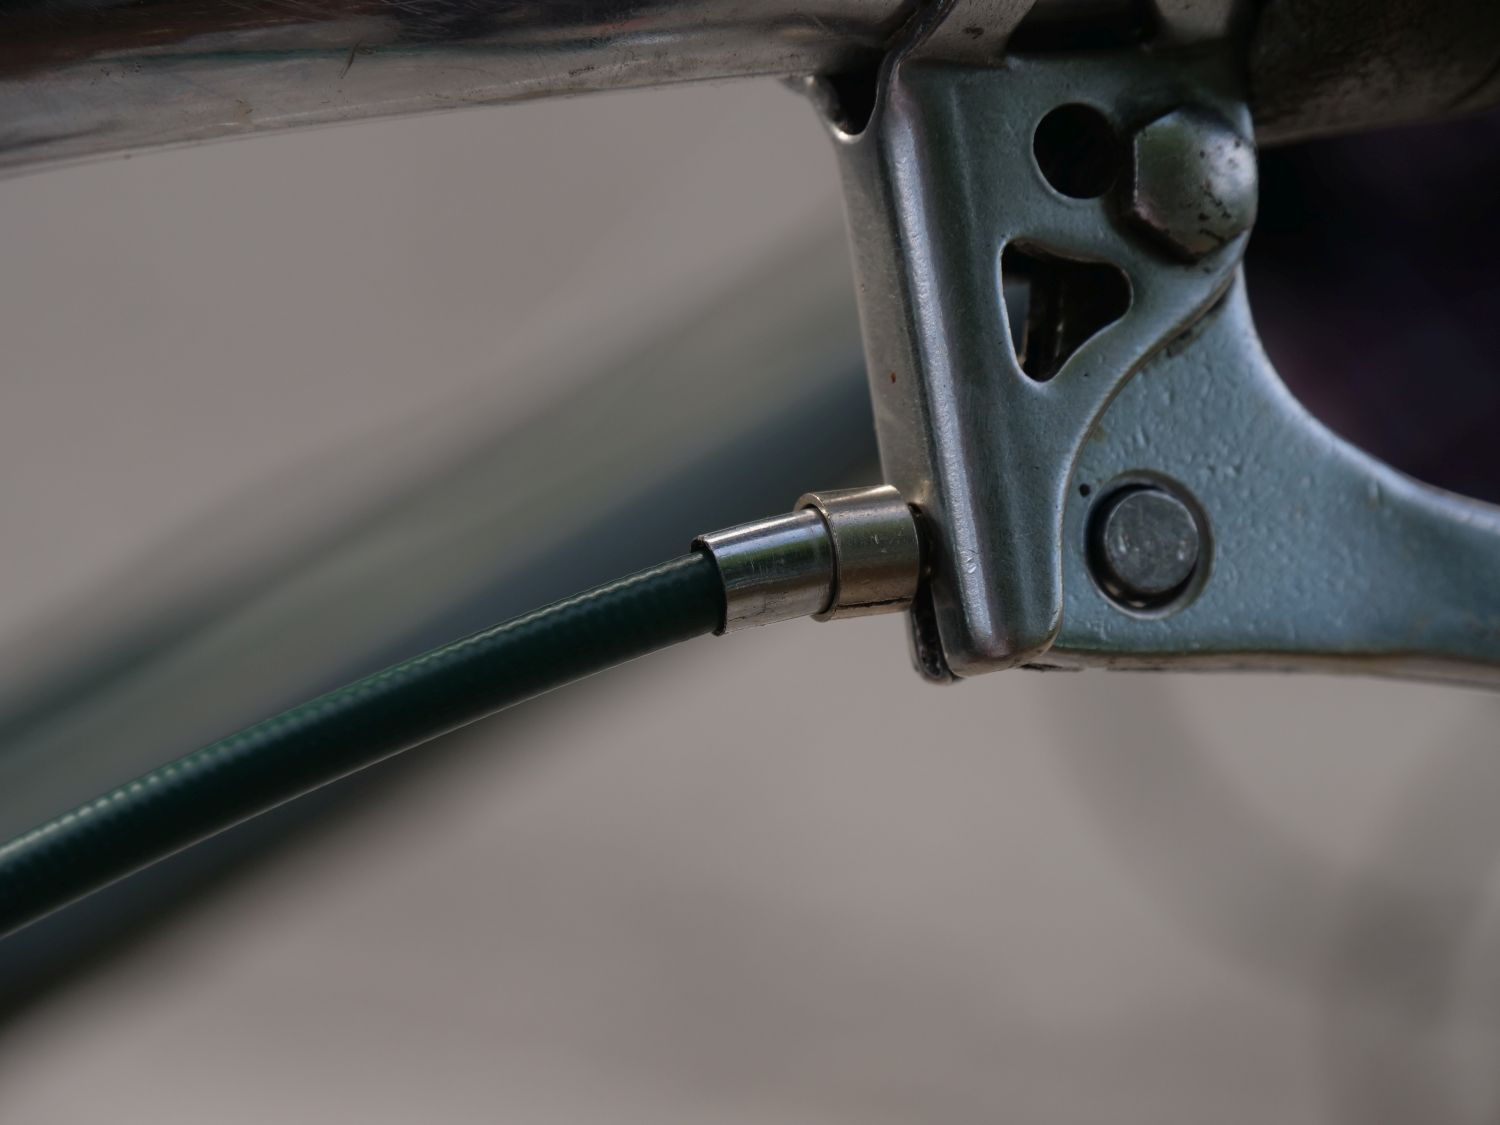
Caliper is looking good, and so is the adjuster.
Front caliper arms are a bit bent; have to straighten them.

Reflector looks nice. Photo is overexposed, so the white tail looks a LOT nicer than it is.
Also looking for the keyed washer and proper nut that'd be used on the back of this caliper.
This is why you don't let bike shops handle your Sturmey Cyclo 3x3 conversions. Thankfully, there's a lot of metal and brass in the joint. This would probably be a death knell for a 1970's Sports, by comparison:

-Kurt
I'm very grateful the John Bull Super Club grips have survived. They appear to be on the Unobtanium list.
All the bent stuff isn't looking as bent anymore:
The new housing, as I figured, isn't a perfect color match, but it works. I consider myself lucky to be running green anything, instead of black.
The cable clamps haven't been OA bathed yet. I use a thin piece of styrene plastic on them to prevent scratches during these test fits. I pull the plastic when the clips are installed for the final time.
I had intended to solder the brake cables today, but that's when I discovered that only one side of the cables from the bike had their original ends and ferrule.
Though @clubman and @nlerner were very gracious sending me oodles of cable adjusters (which I'm now putting to good use), I'm now short three of the thick, Raleigh chromed steel cable ends and one of the specific brake cable ferrules used on these - as in the photo. If anyone has them...
Caliper is looking good, and so is the adjuster.
Front caliper arms are a bit bent; have to straighten them.
Reflector looks nice. Photo is overexposed, so the white tail looks a LOT nicer than it is.
Also looking for the keyed washer and proper nut that'd be used on the back of this caliper.
This is why you don't let bike shops handle your Sturmey Cyclo 3x3 conversions. Thankfully, there's a lot of metal and brass in the joint. This would probably be a death knell for a 1970's Sports, by comparison:
-Kurt
__________________
Likes For cudak888:
07-03-21, 06:54 PM
#23
www.theheadbadge.com
Thread Starter
Join Date: Sep 2005
Location: Southern Florida
Posts: 28,496
Bikes: https://www.theheadbadge.com
Mentioned: 124 Post(s)
Tagged: 0 Thread(s)
Quoted: 2412 Post(s)
Liked 4,373 Times
in
2,086 Posts
3/4 beauty shot.
-Kurt
-Kurt
__________________
Likes For cudak888:
07-17-21, 05:49 PM
#24
www.theheadbadge.com
Thread Starter
Join Date: Sep 2005
Location: Southern Florida
Posts: 28,496
Bikes: https://www.theheadbadge.com
Mentioned: 124 Post(s)
Tagged: 0 Thread(s)
Quoted: 2412 Post(s)
Liked 4,373 Times
in
2,086 Posts
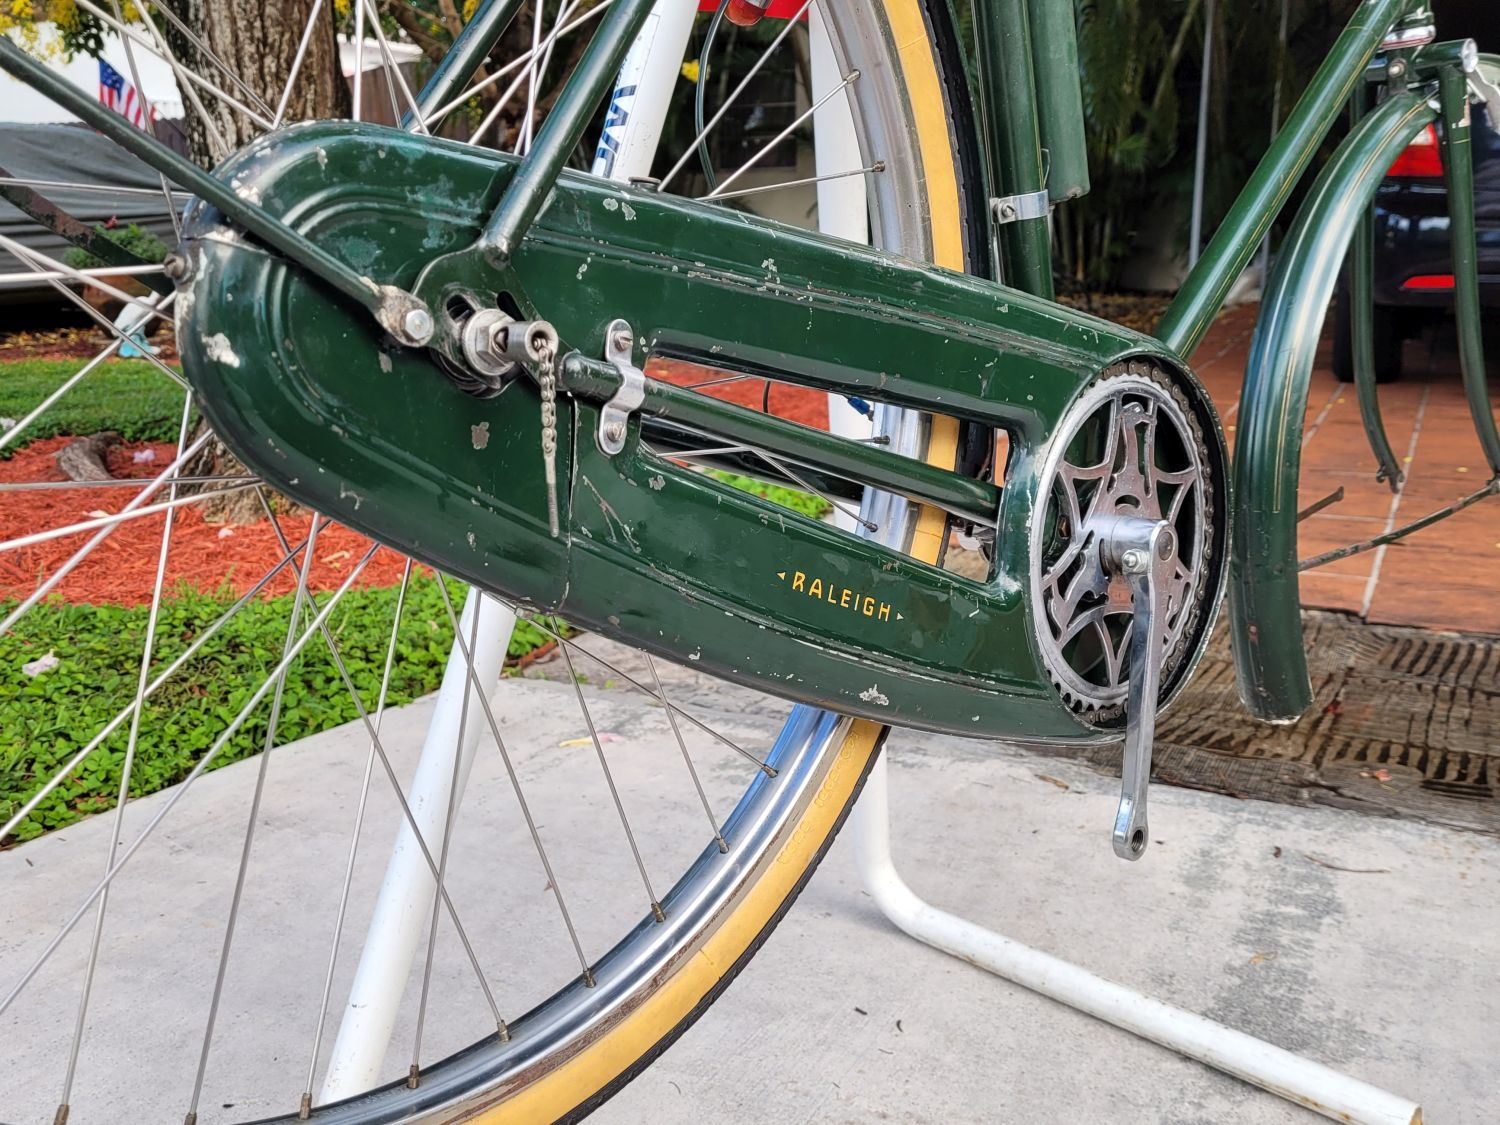
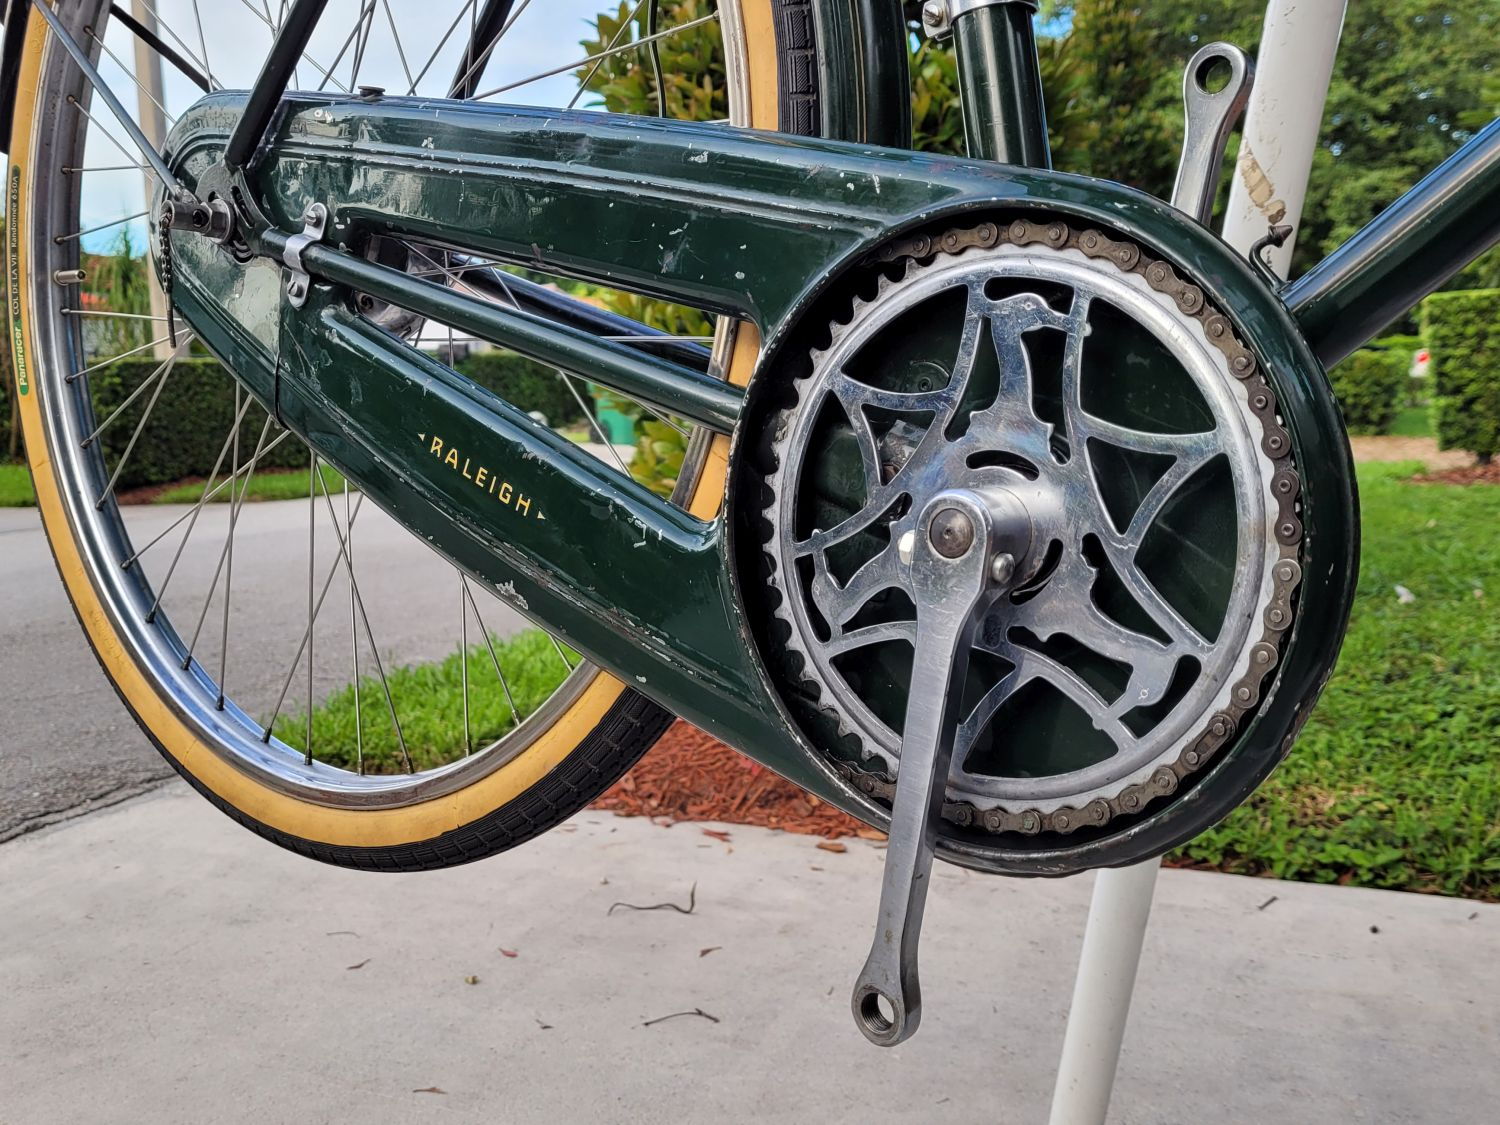
Lots of progress today - finished polishing the chaincase, slipped on the chain (which needs a half link; I ordered one a minute ago), installed the crank and crank cotters, and fitted the rear wheel:
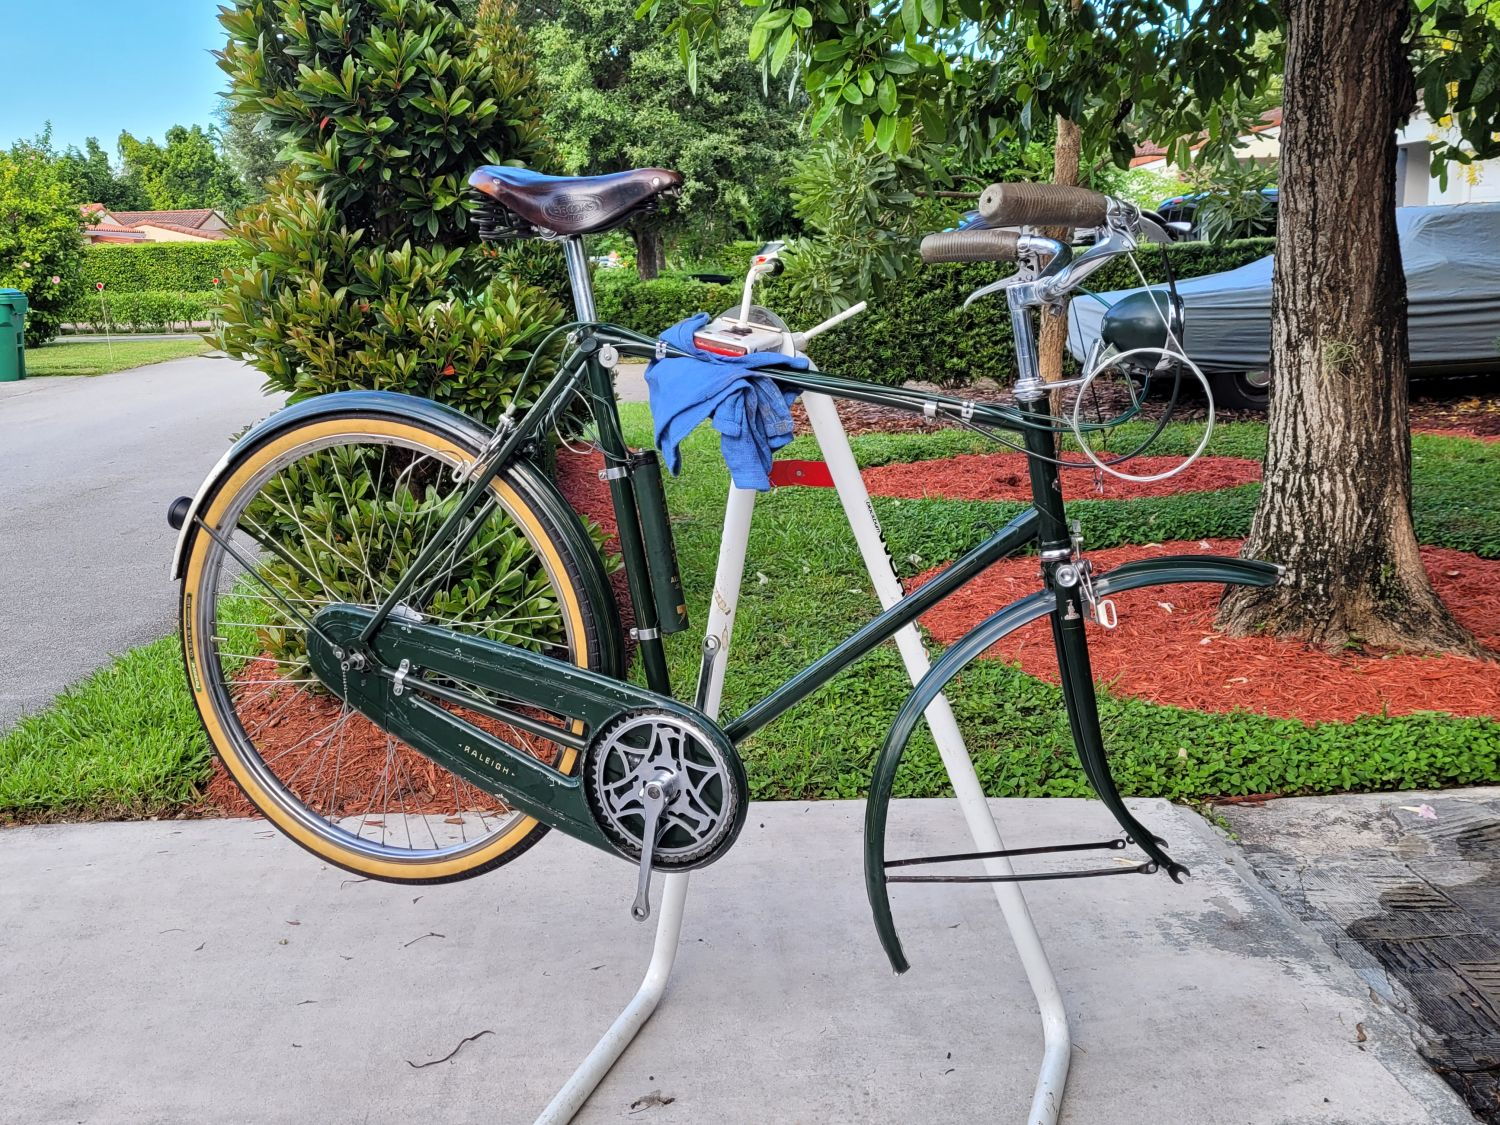
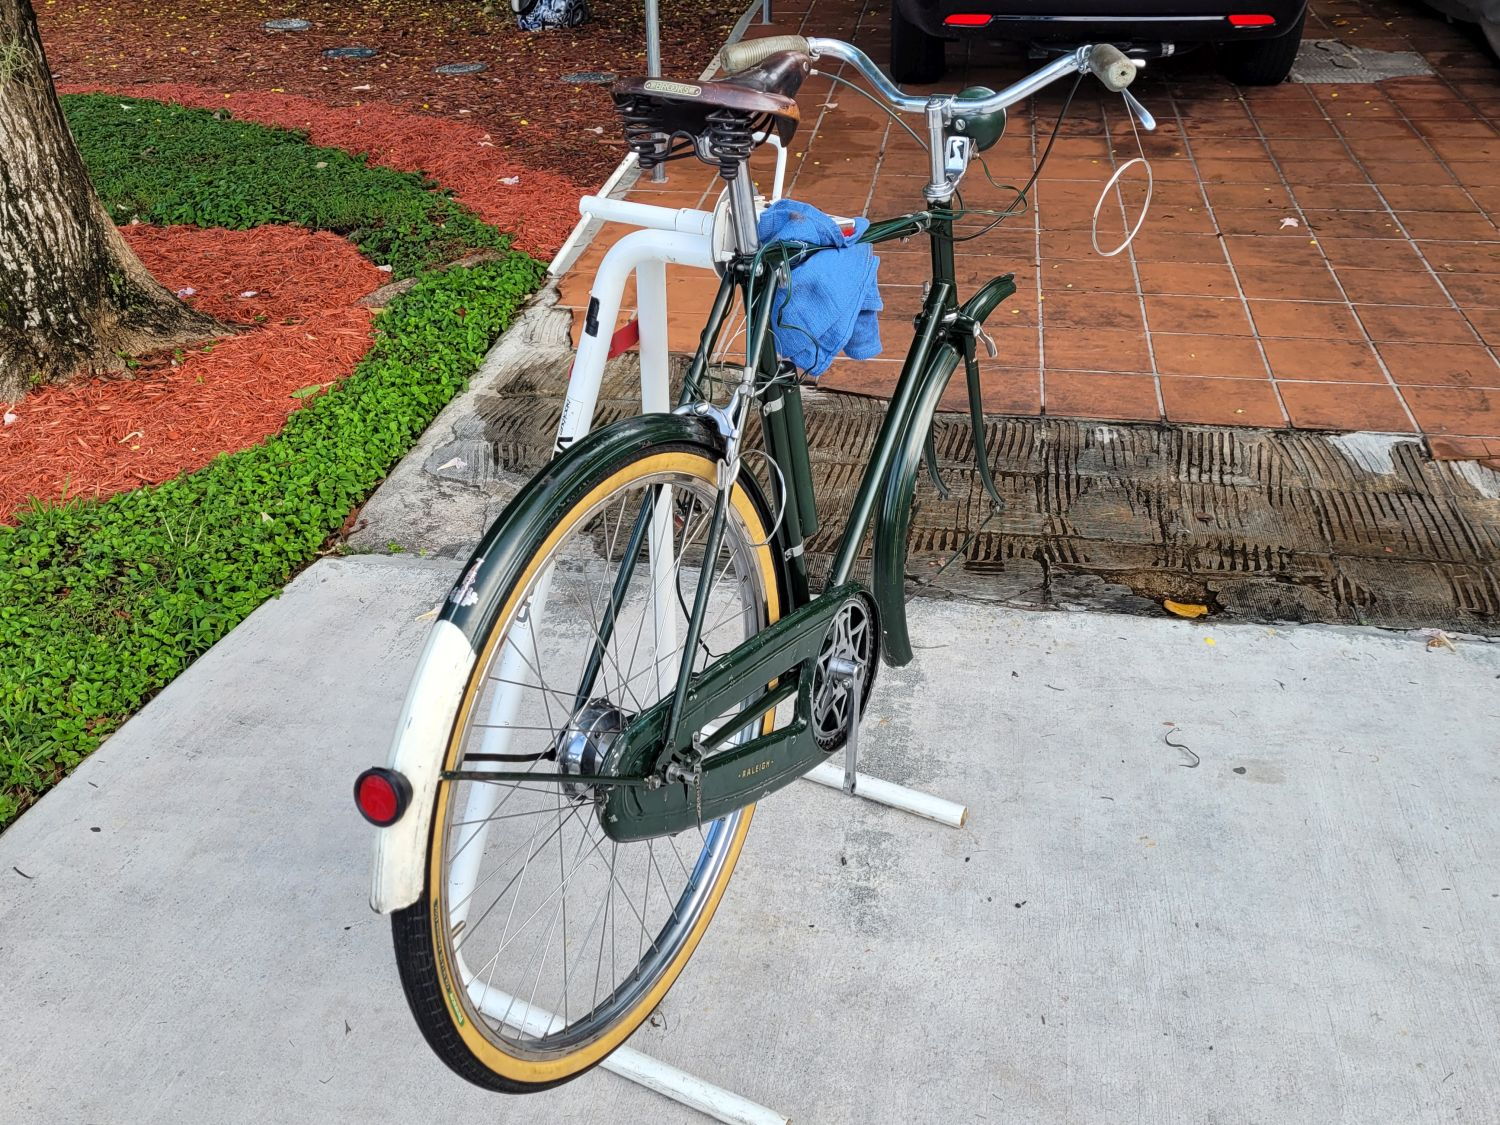
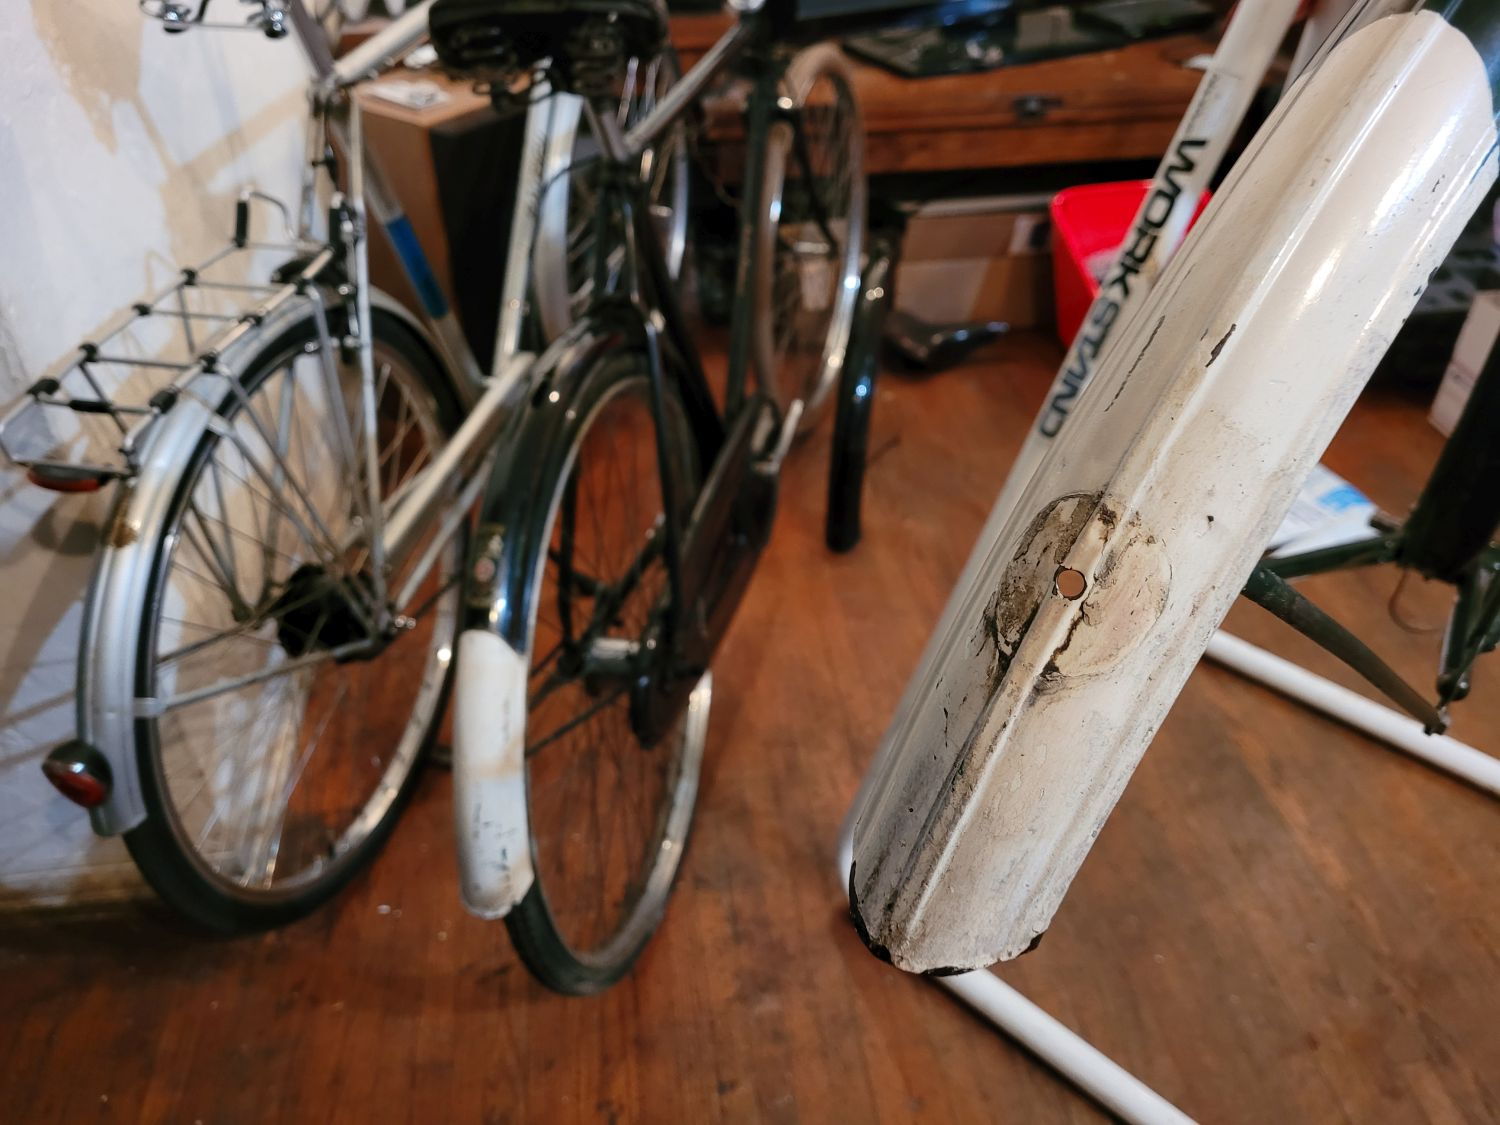
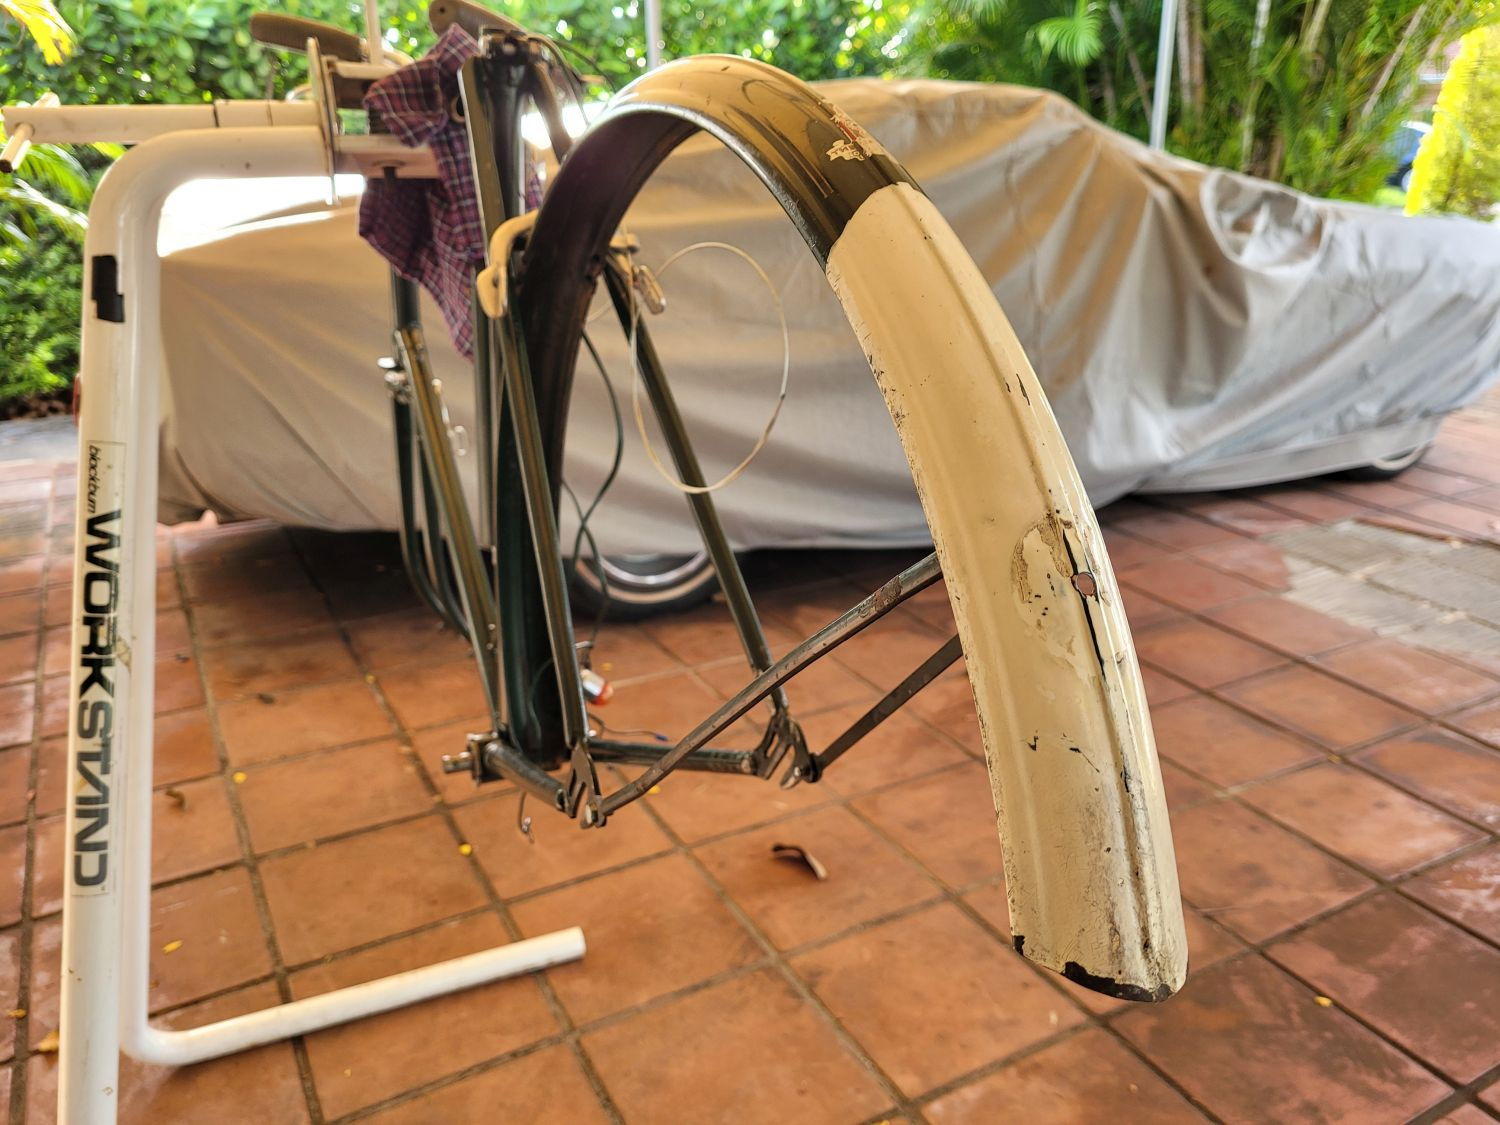
The chaincase does not match the frameset's condition, but regardless of the nicks and scrapes, it suits it. The front fender is a bit rough, so it all evens out.

Told you the front fender is rough. Need to clean the inside of the fender; it still hasn't been wiped down.
View from the non-drive side. I'm having a hard time figuring out what the factory routing of the Dynohub wires are, as they're too short no matter how I try to get around it.
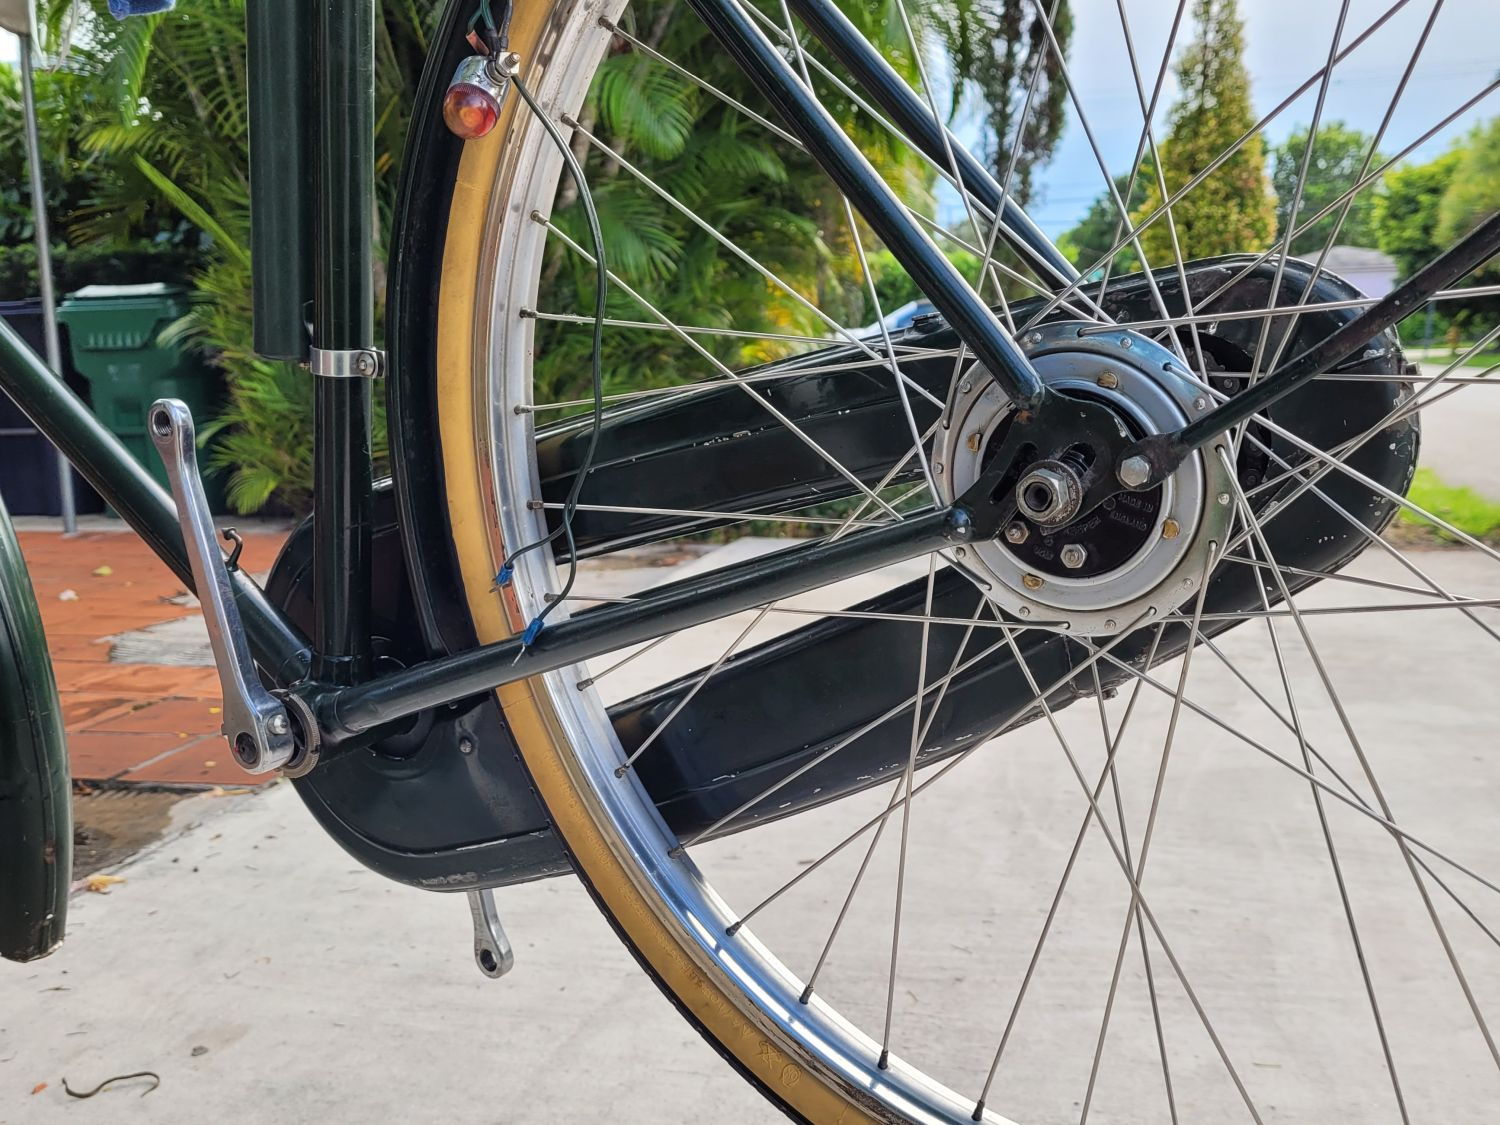
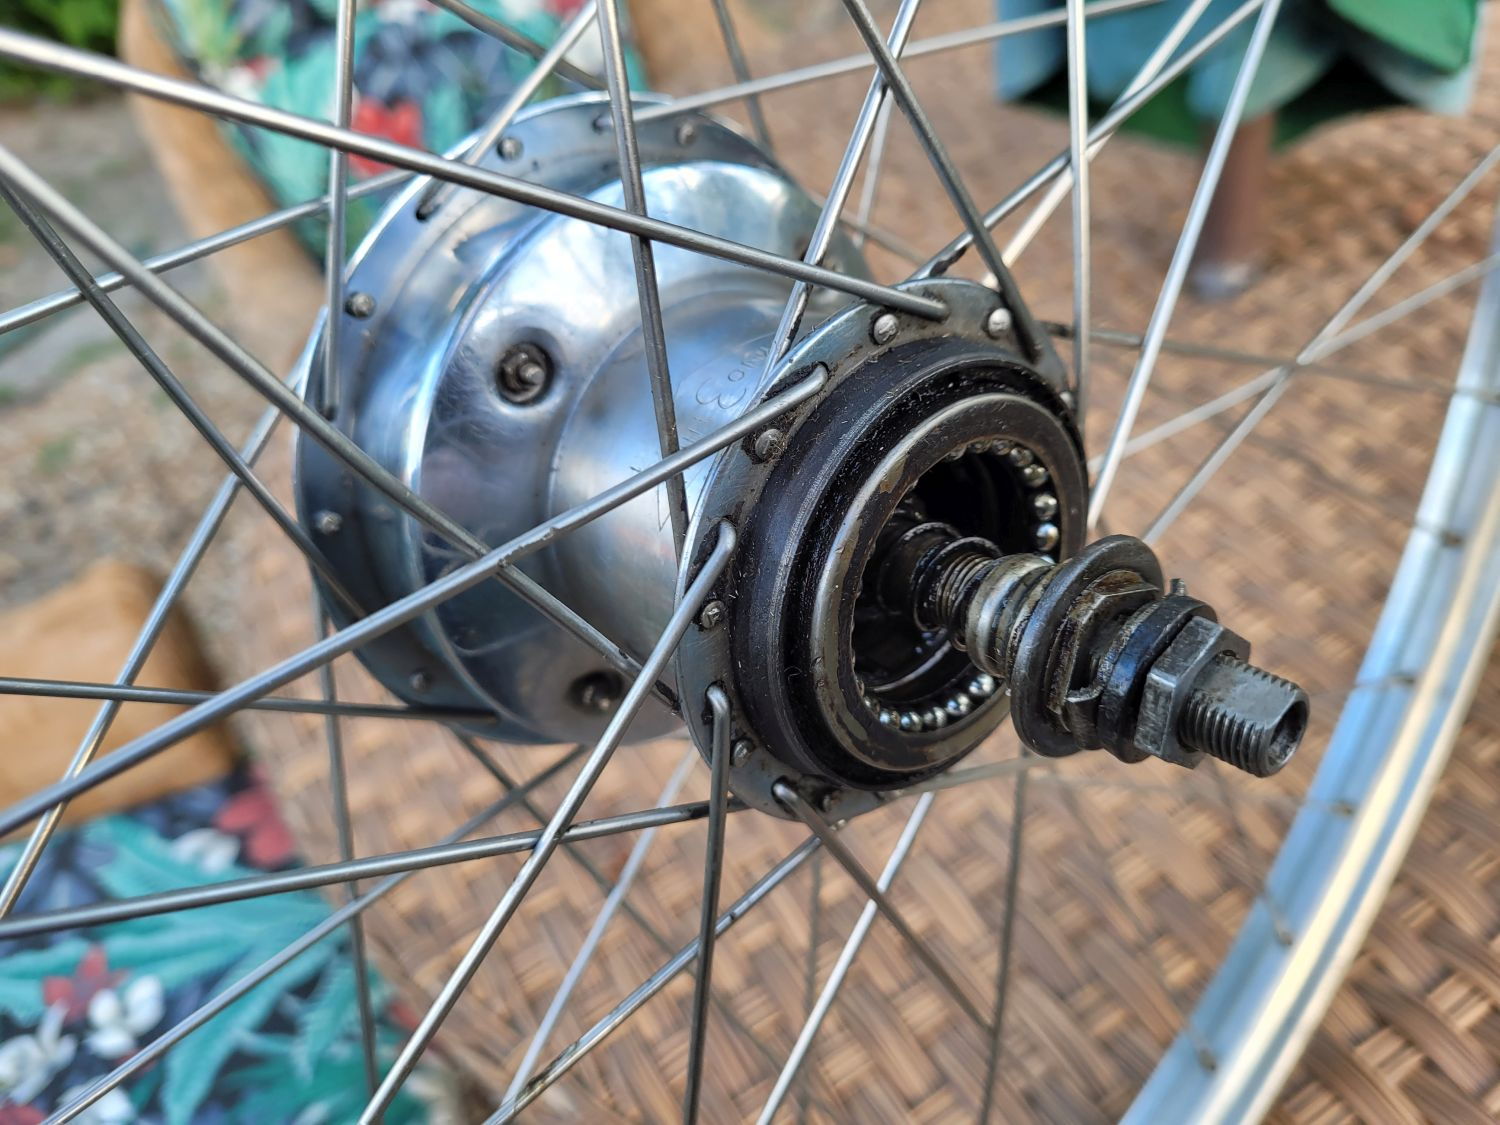
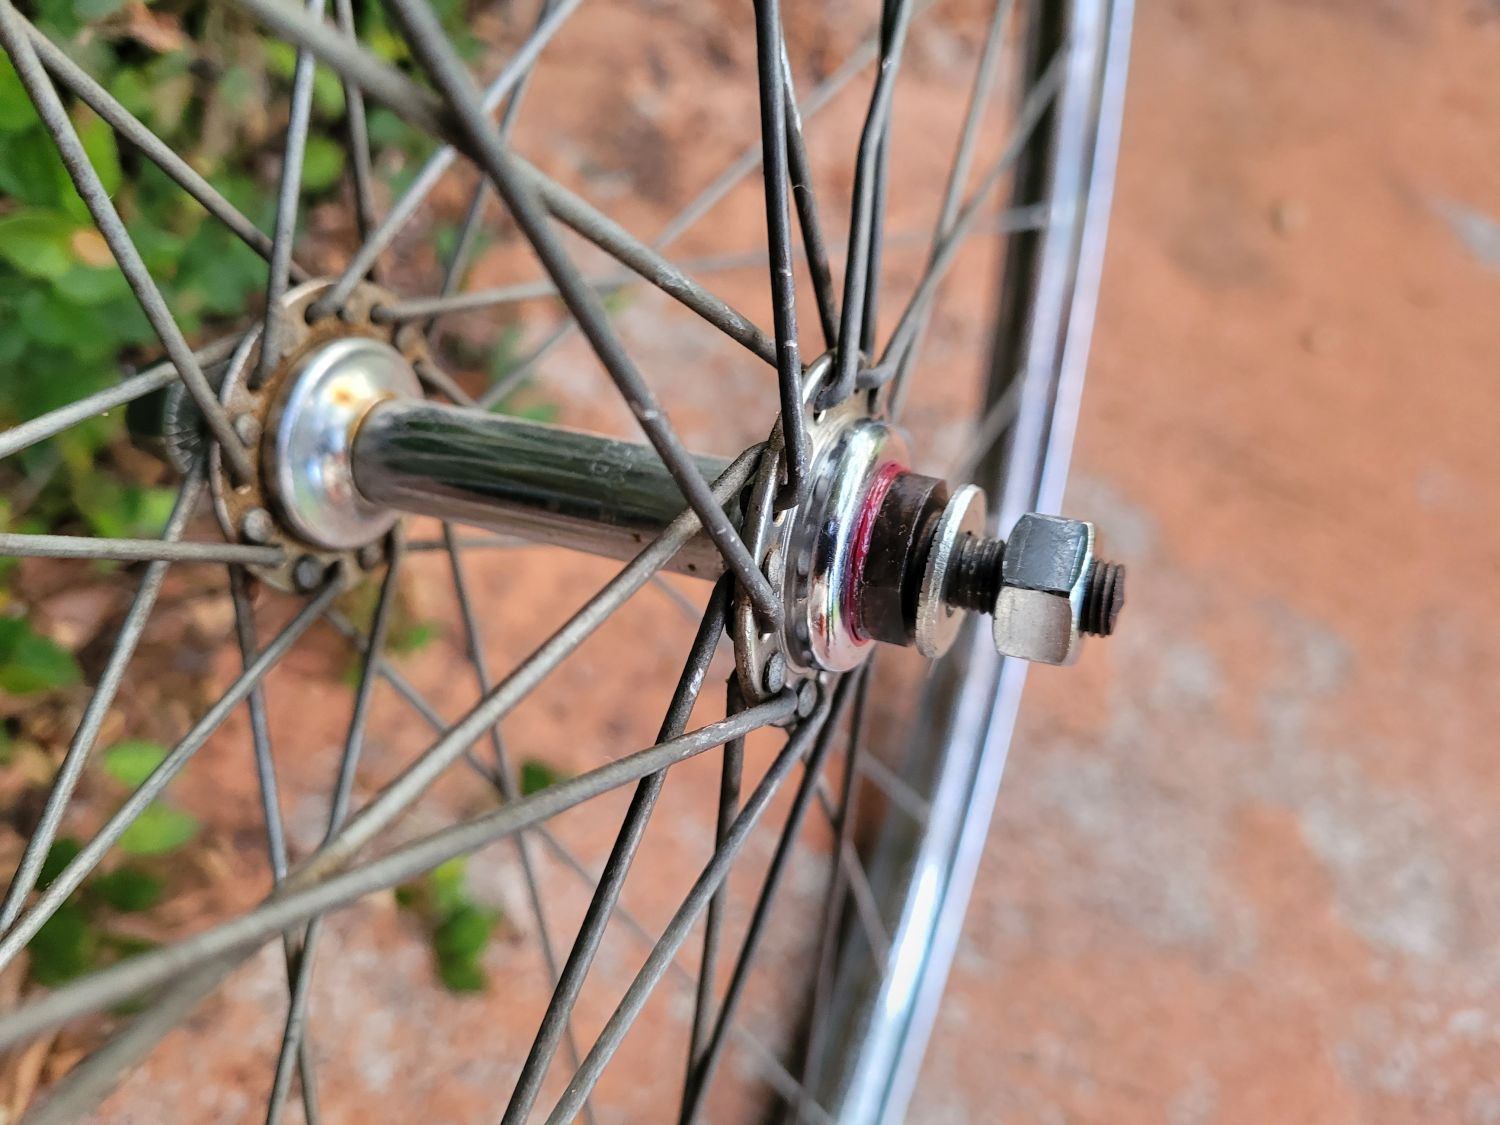
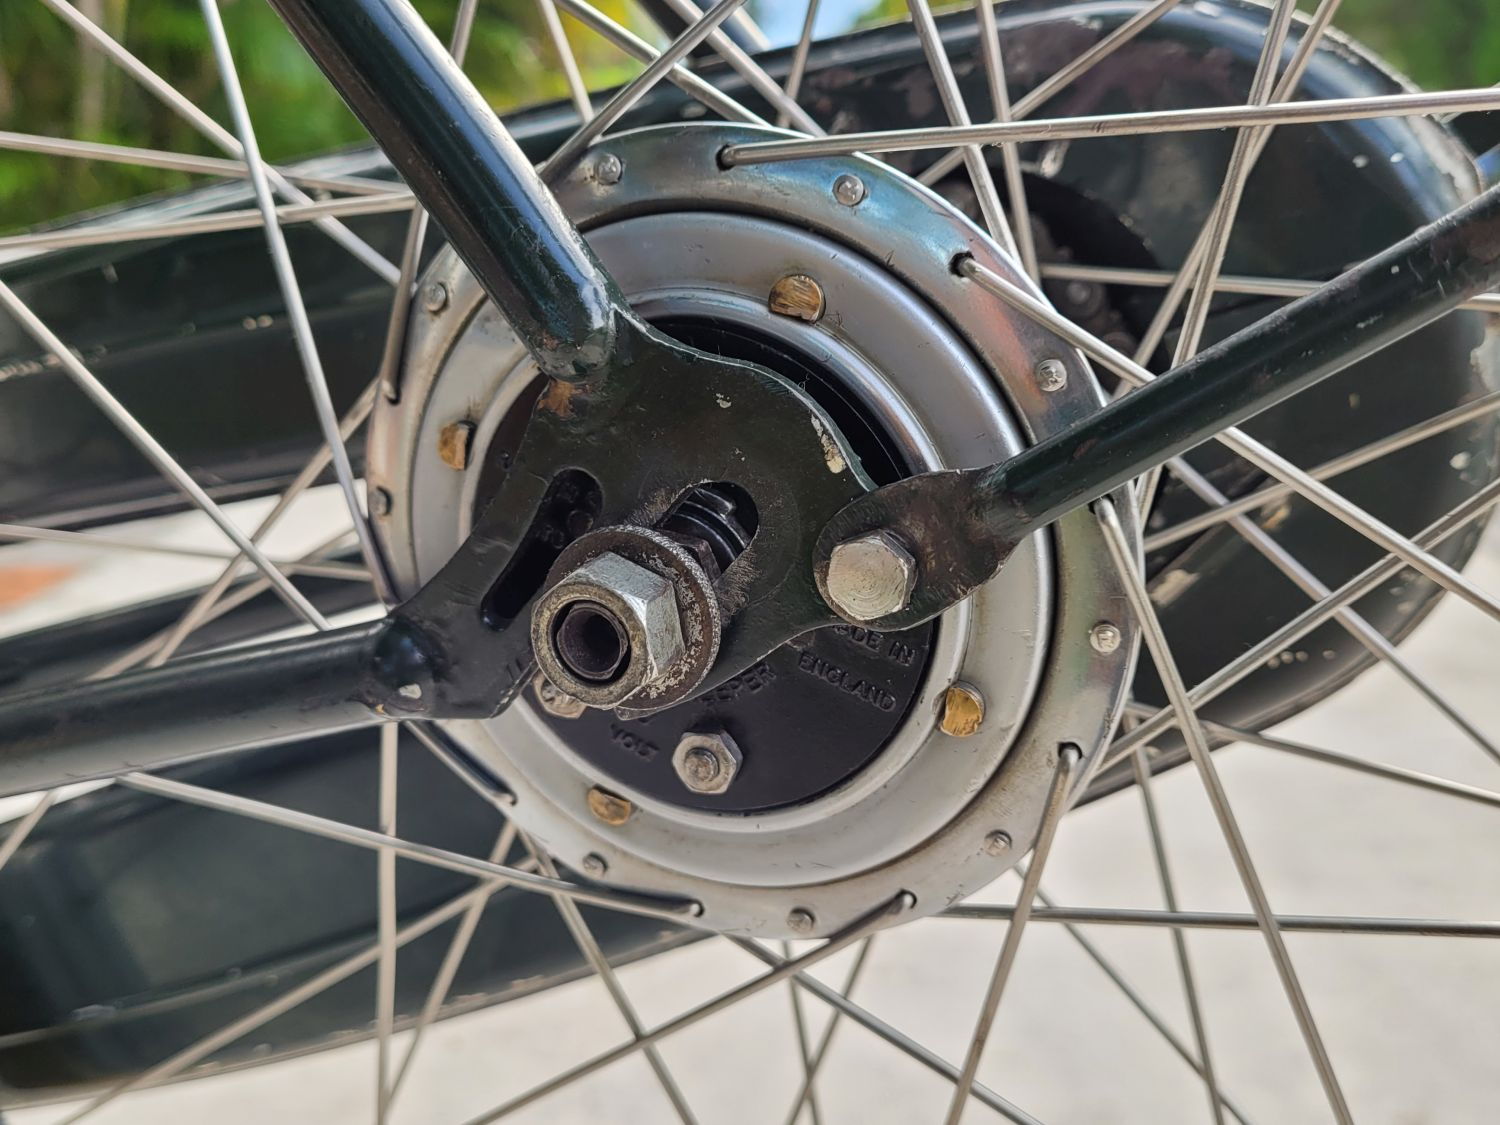
Left nut is completely stripped. It's a Sturmey-Archer hub; I wouldn't expect it any other way.
More pics coming up.
-Kurt
The chaincase does not match the frameset's condition, but regardless of the nicks and scrapes, it suits it. The front fender is a bit rough, so it all evens out.
Told you the front fender is rough. Need to clean the inside of the fender; it still hasn't been wiped down.
View from the non-drive side. I'm having a hard time figuring out what the factory routing of the Dynohub wires are, as they're too short no matter how I try to get around it.
Left nut is completely stripped. It's a Sturmey-Archer hub; I wouldn't expect it any other way.
More pics coming up.
-Kurt
__________________
Likes For cudak888:
07-17-21, 05:56 PM
#25
www.theheadbadge.com
Thread Starter
Join Date: Sep 2005
Location: Southern Florida
Posts: 28,496
Bikes: https://www.theheadbadge.com
Mentioned: 124 Post(s)
Tagged: 0 Thread(s)
Quoted: 2412 Post(s)
Liked 4,373 Times
in
2,086 Posts
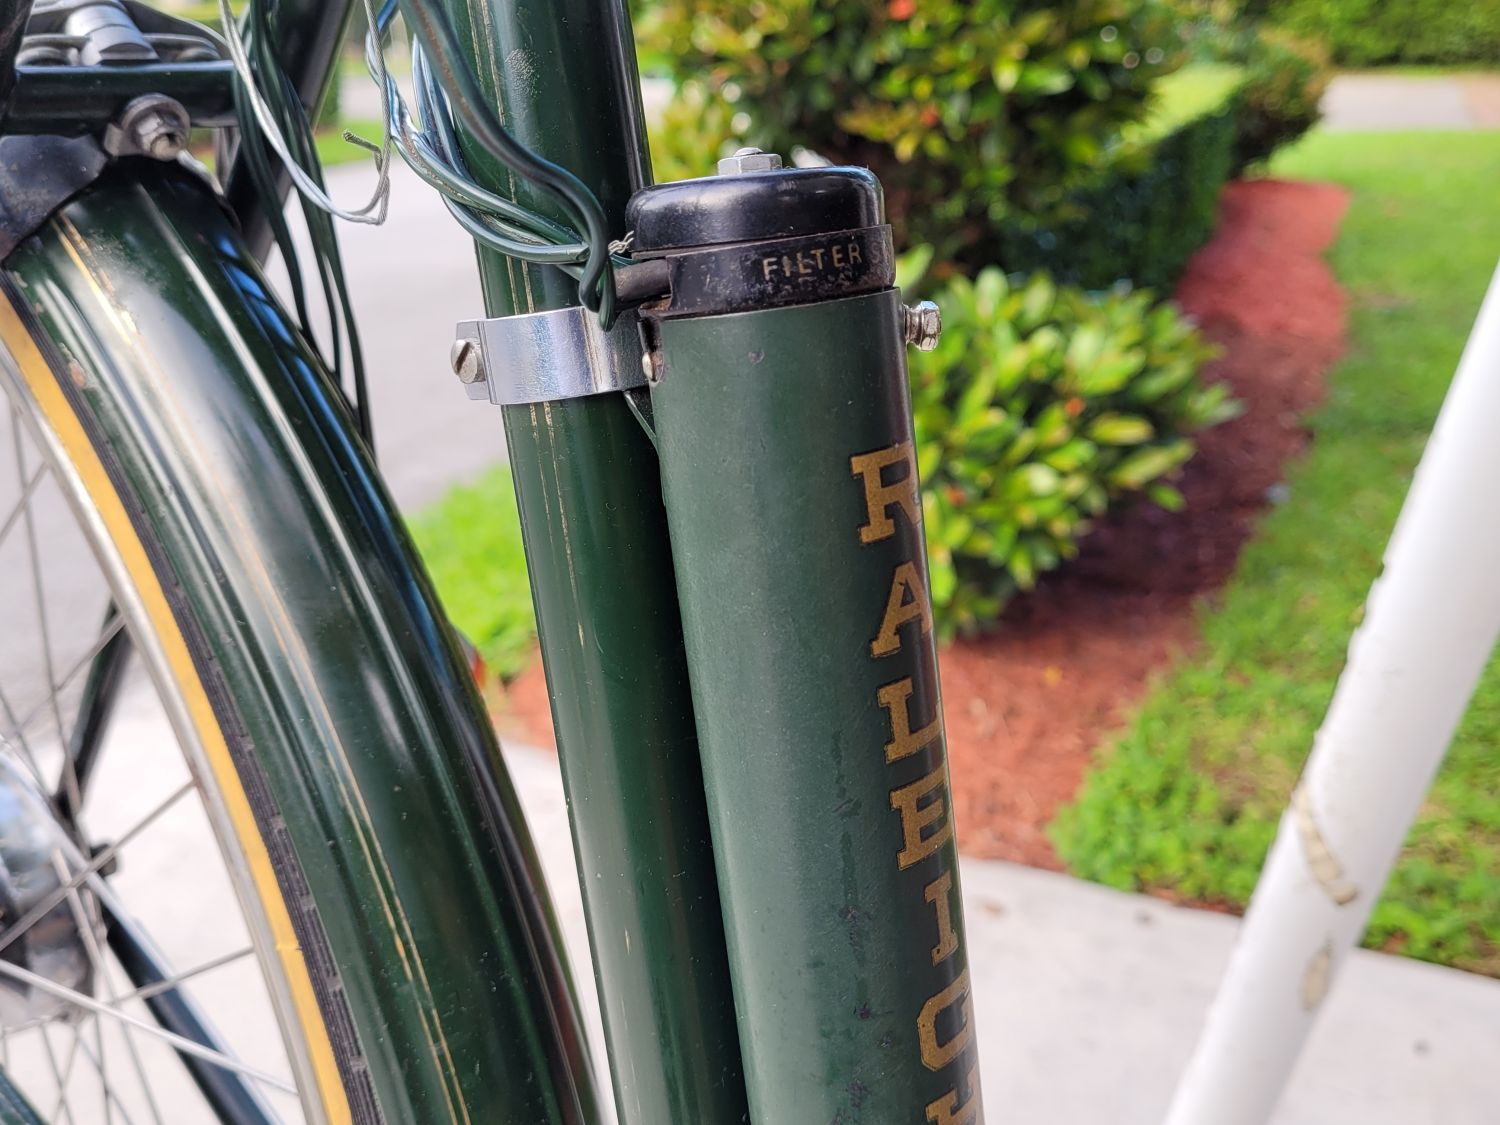
The DBU/filter switch has an interesting grounding wire that runs to the seat lug ears. It's the one wire that hasn't baffled me by being too short or too long.
A look down at all the unfinished stuff:
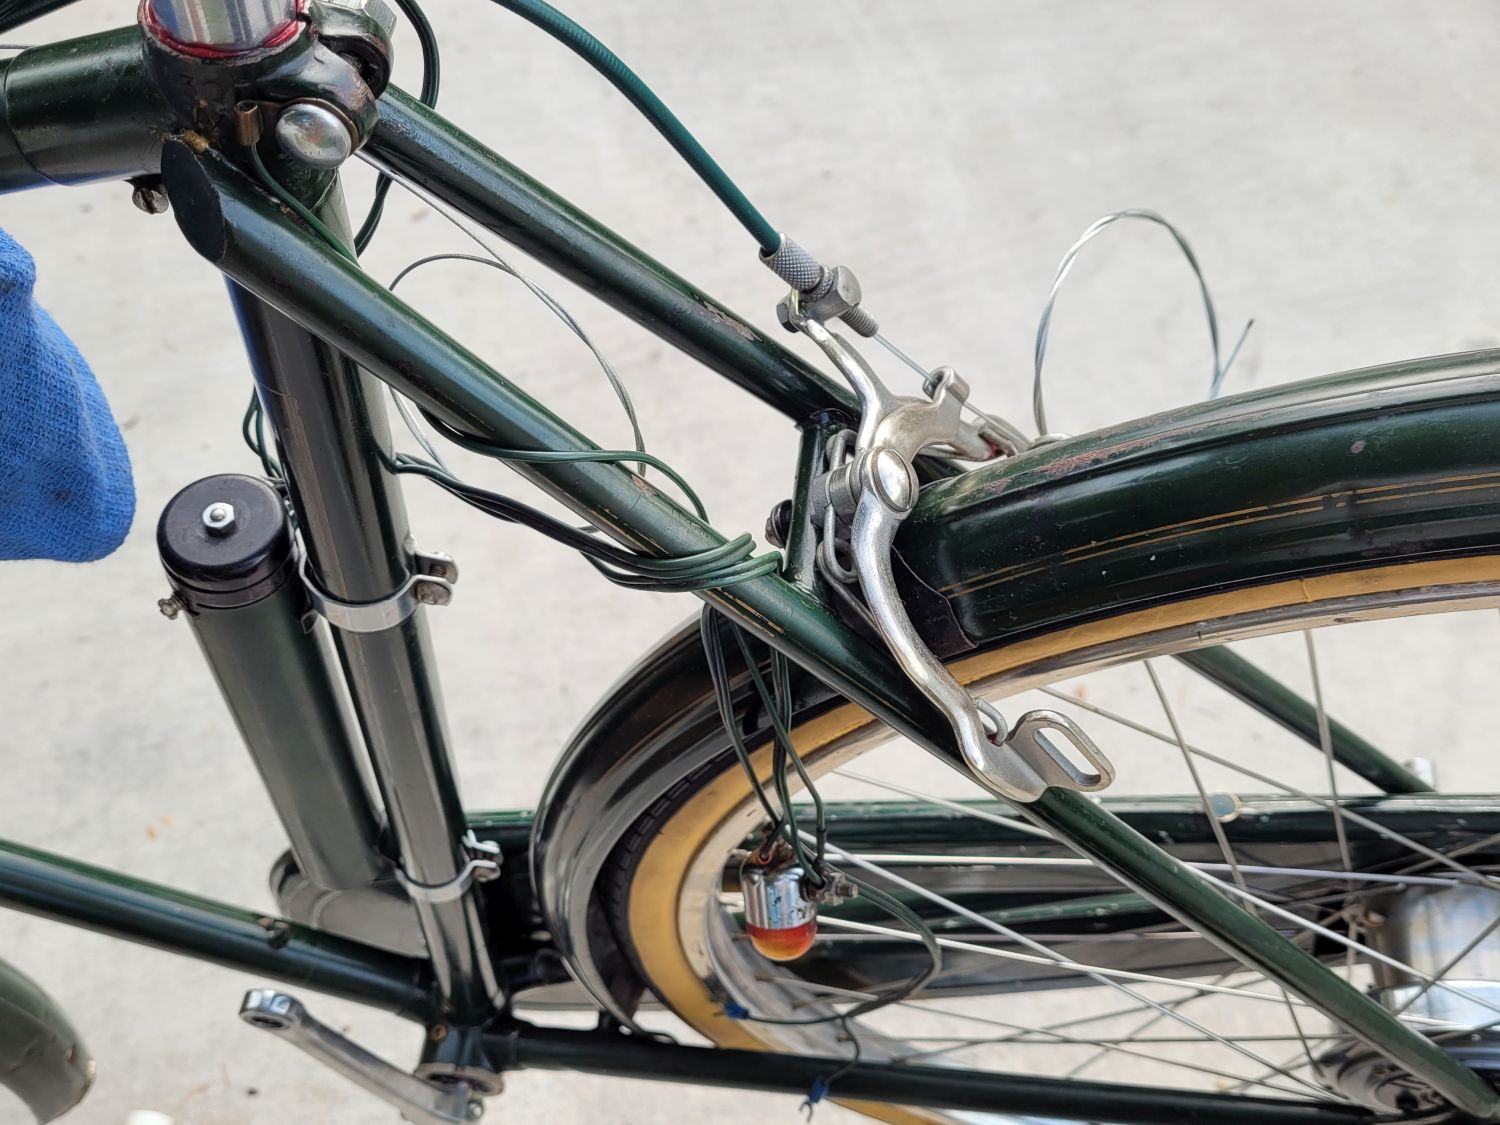
Still have to replace one lead missing on the filter switch wiring, but not until I figure out the wiring length.
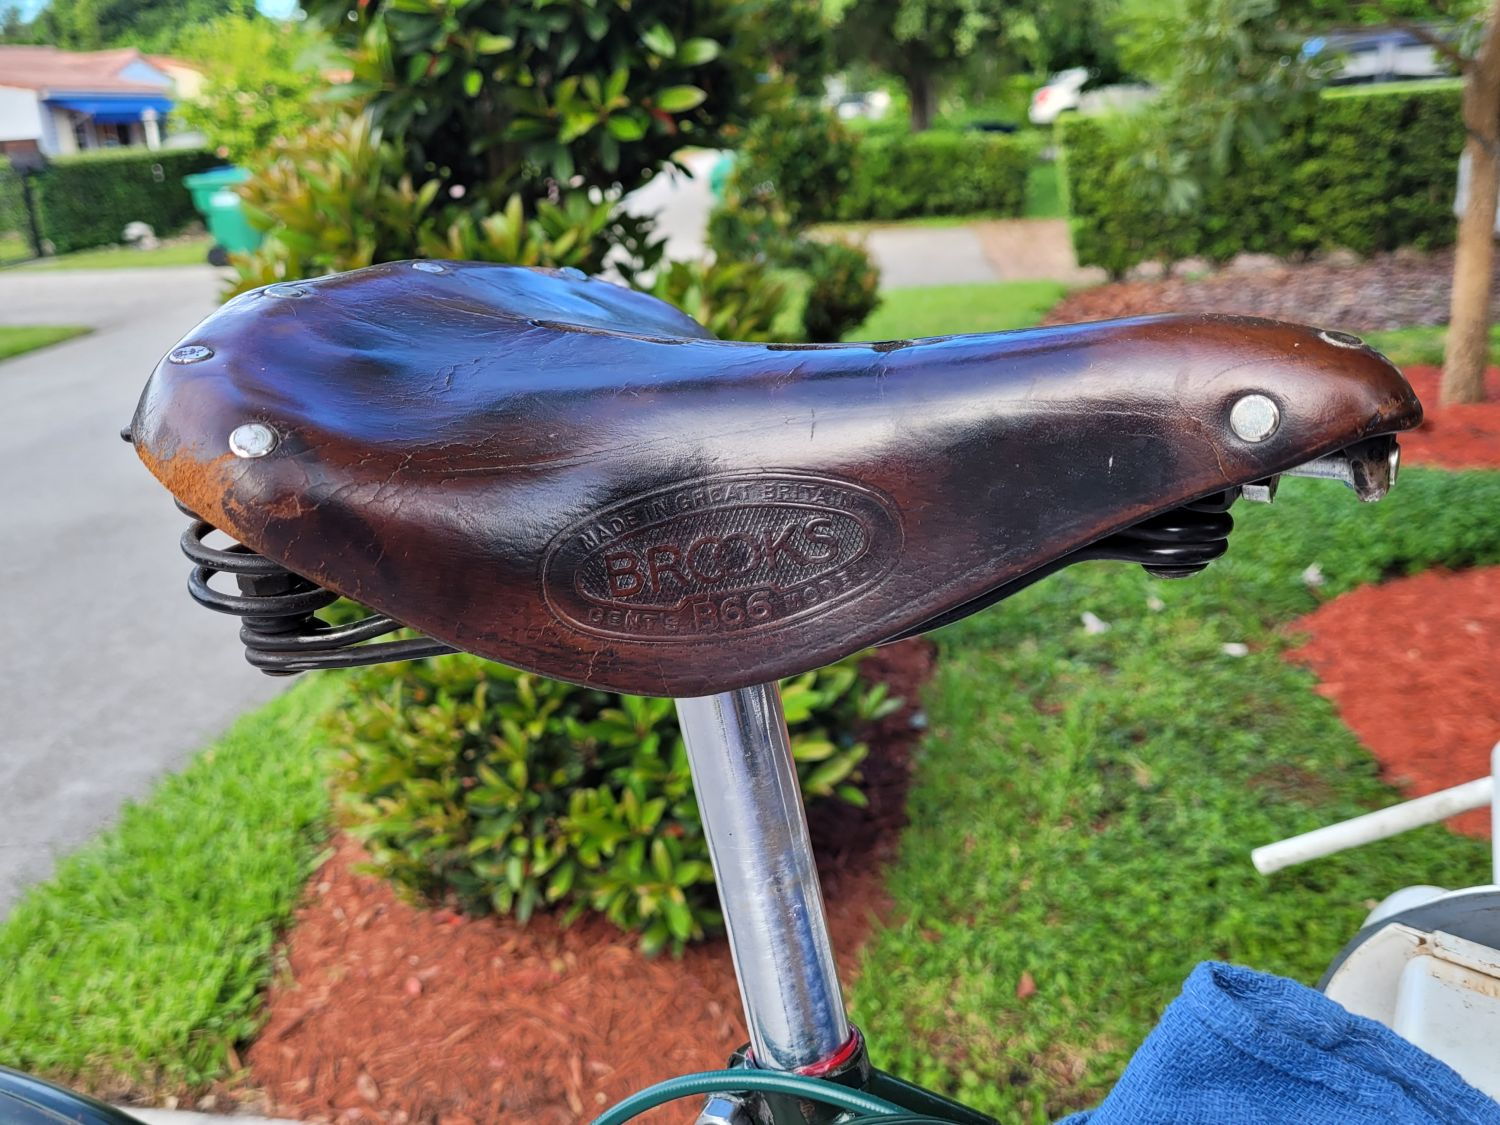
The original B.66 on this bike is drop-dead gorgeous. Makes the bike!

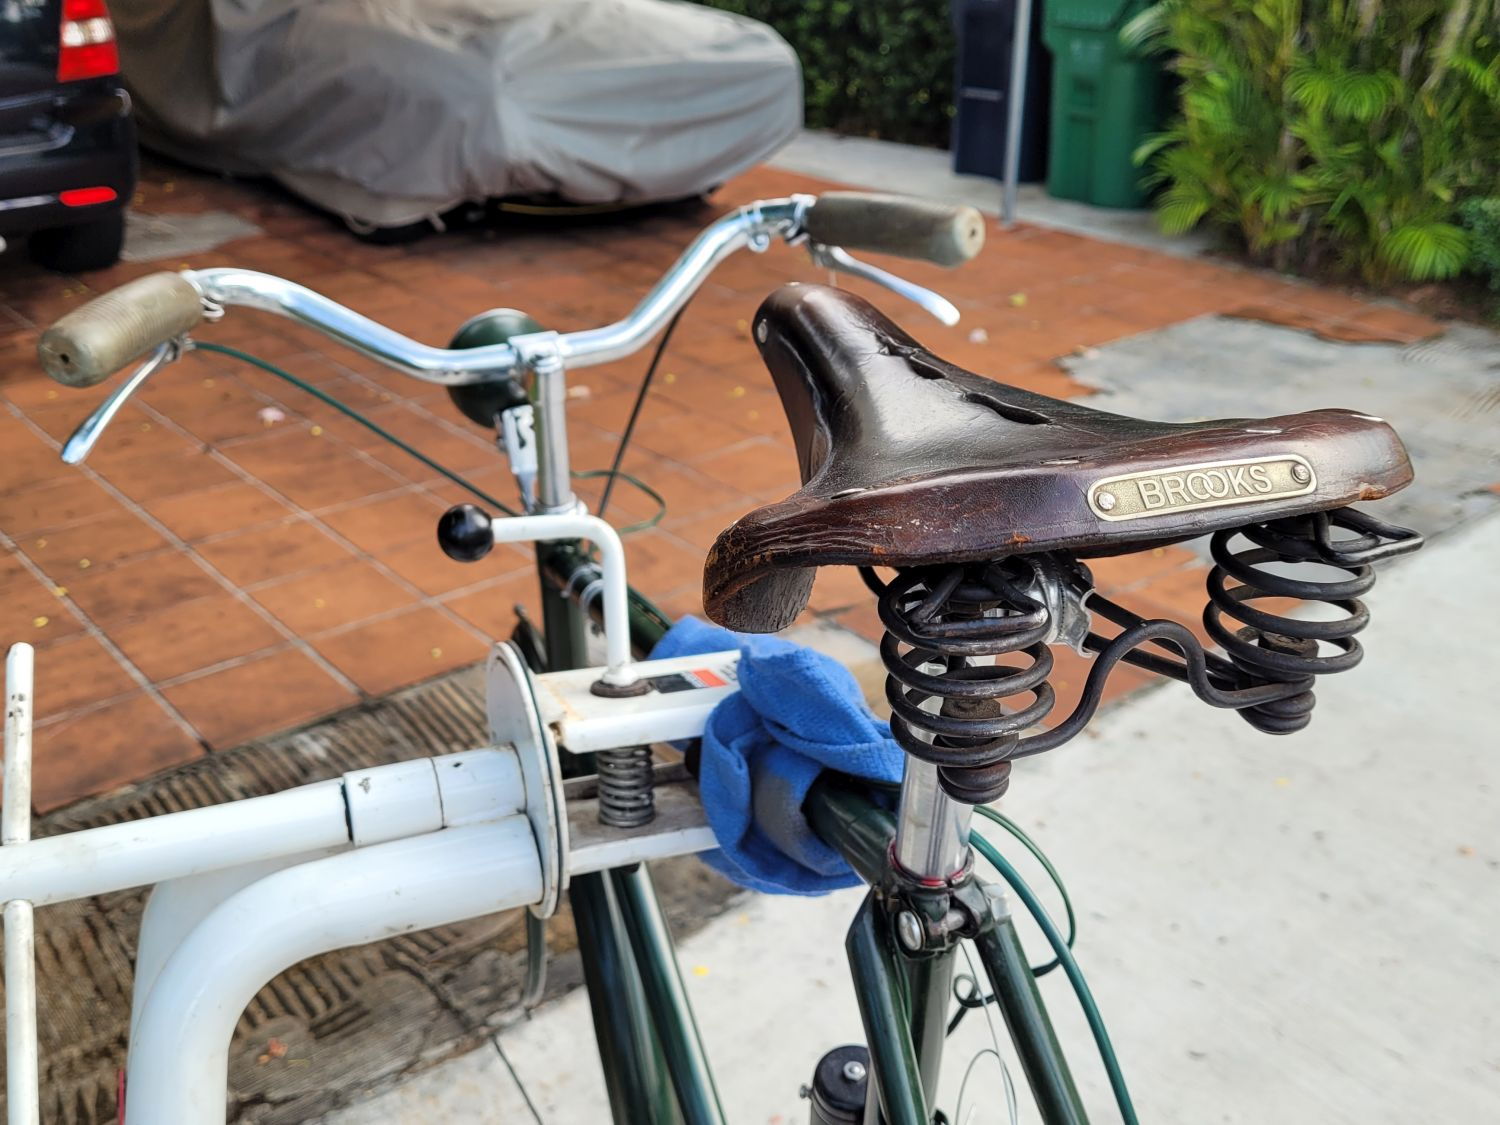
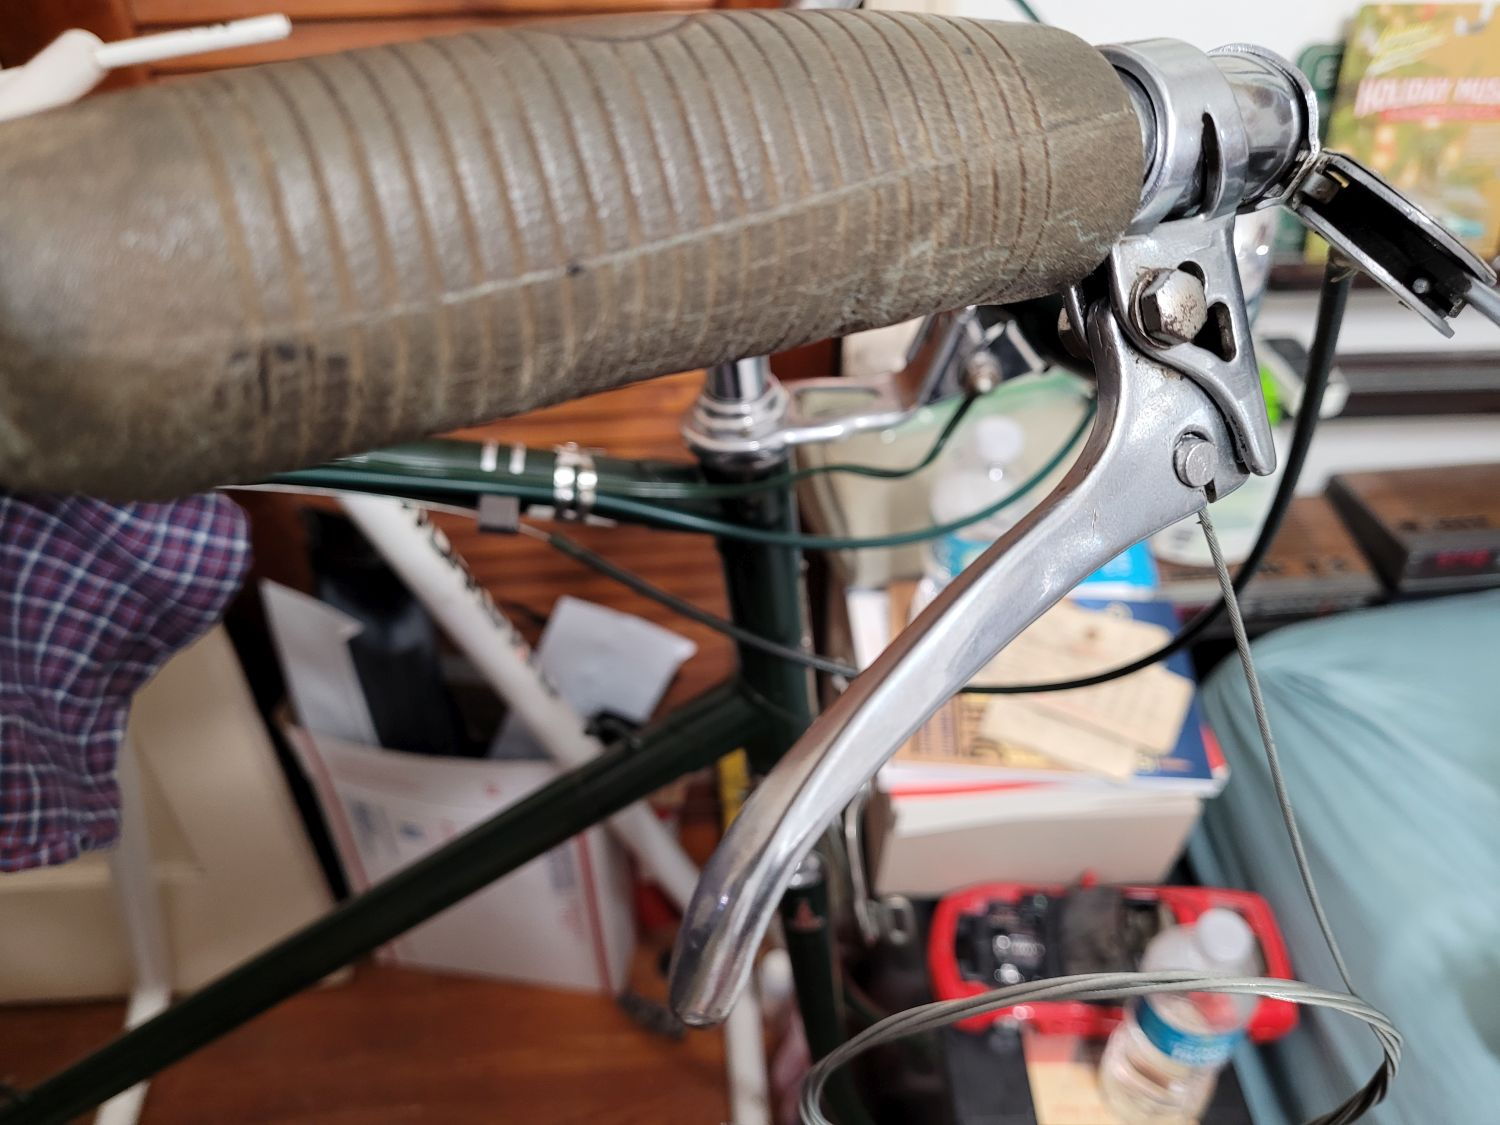
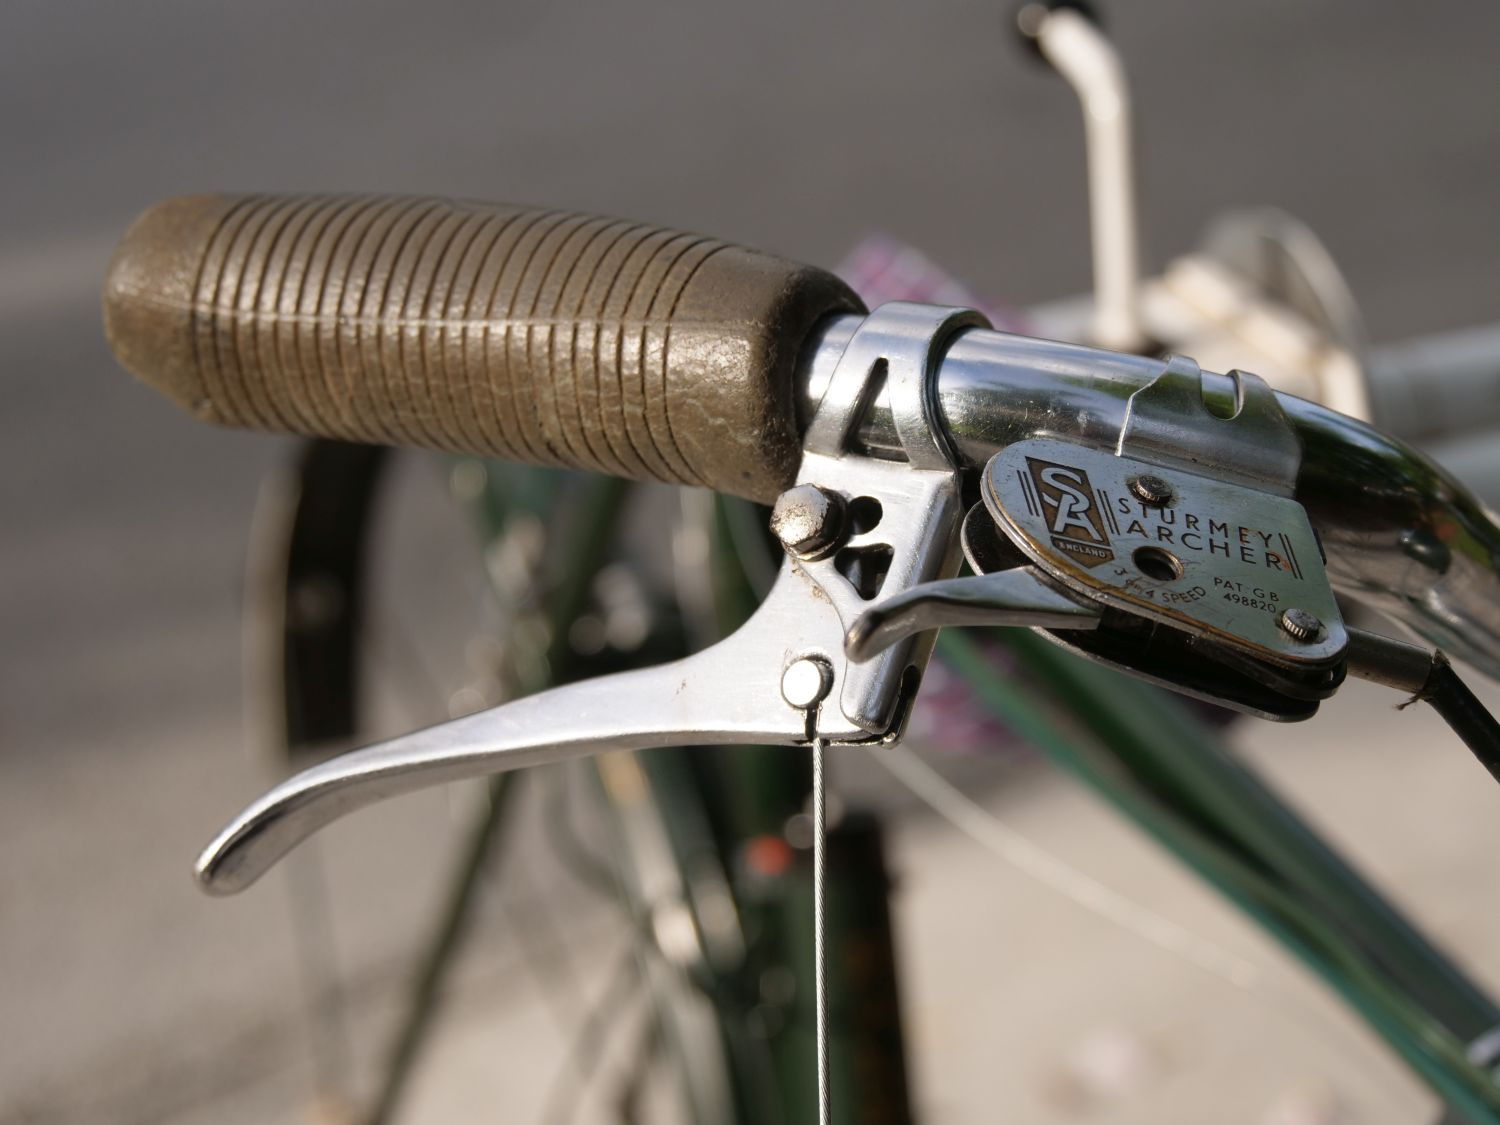
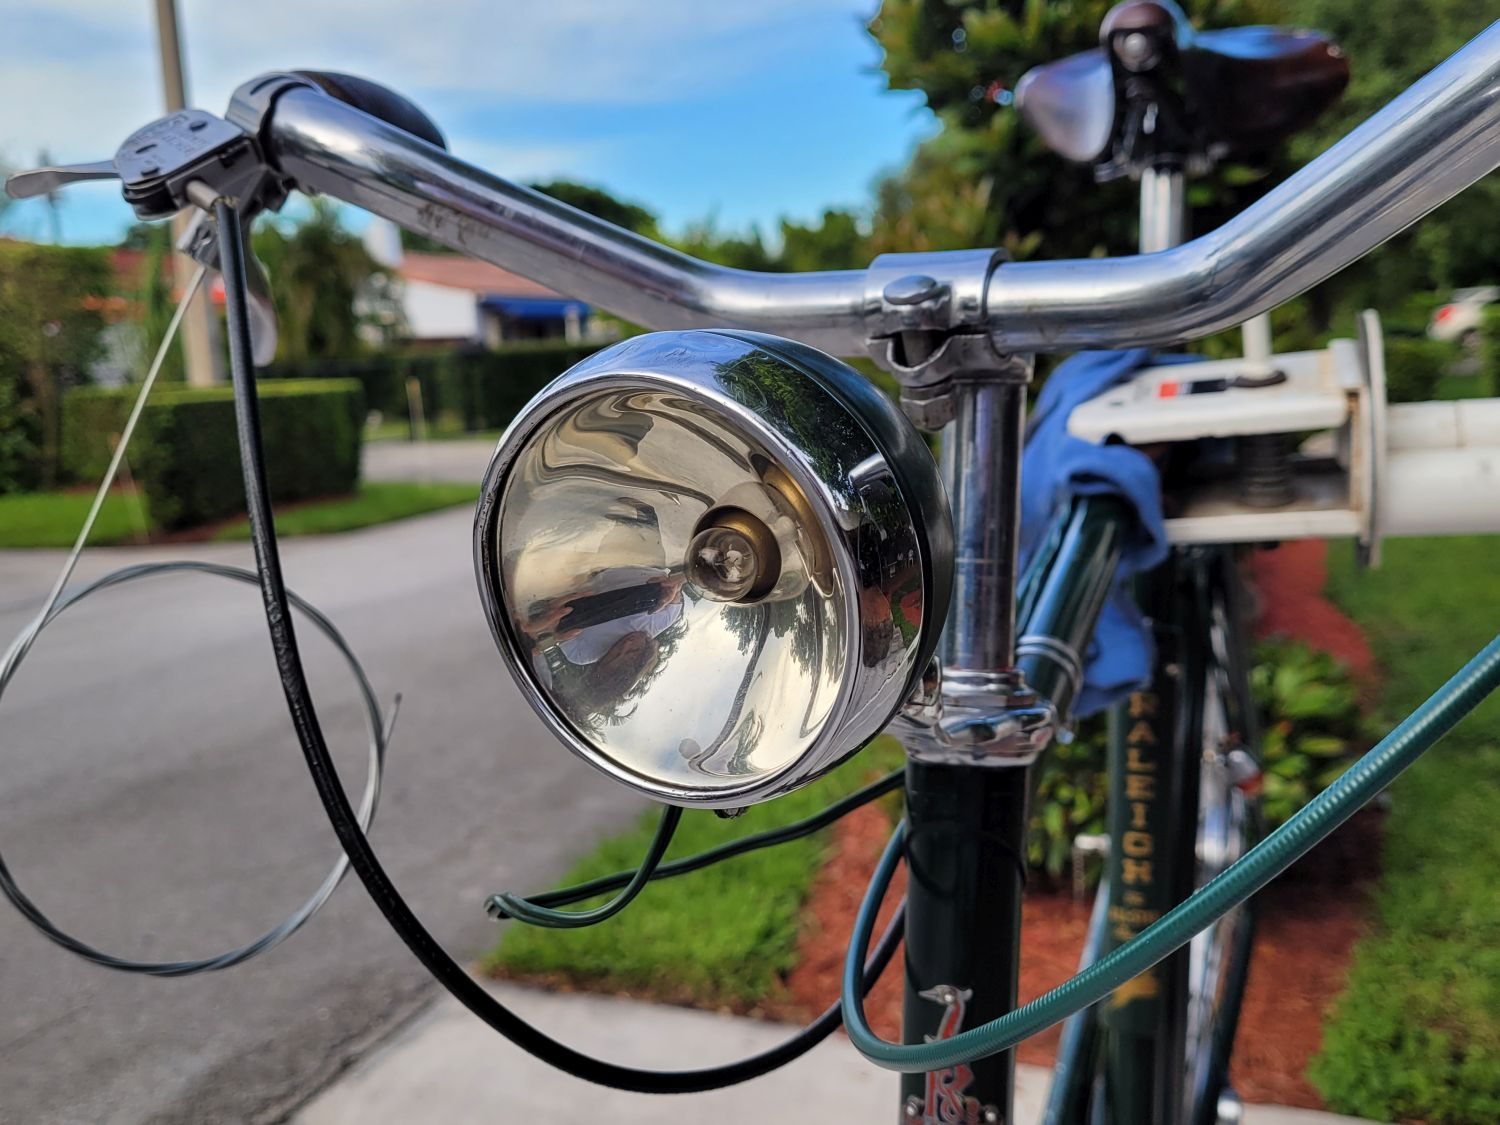
The cockpit:

Turns out I'm missing a chromed hex nut for this side. It had a 1970's slotted screw in its place:
-Kurt
A look down at all the unfinished stuff:
Still have to replace one lead missing on the filter switch wiring, but not until I figure out the wiring length.
The original B.66 on this bike is drop-dead gorgeous. Makes the bike!
The cockpit:
Turns out I'm missing a chromed hex nut for this side. It had a 1970's slotted screw in its place:
-Kurt
__________________

