


Cotter pin removal... Too easy!
 05-05-21, 11:53 AM
#1

Senior Member
Thread Starter
Cotter pin removal... Too easy!

Well that was easy. Removed cotter pins, serviced bottom bracket, and reassembled in 1/2 hour!
A couple years ago I bought a 70's Super Course, and the seller included a copy of "Anybodys Bike Book". I leafed thru it. Fun illustrations but nothing stuck out to me but this little device for cotter pin removal. A 9 1/2" inch piece of 1/2" pipe and a floor flange. Brilliant! Today I visited my local hardware store and purchased the two pieces and 1/2 an hour later my Gitane has a freshly serviced BB. Love it.
 05-05-21, 12:07 PM
#2
Senior Member
Join Date: Oct 2015
Location: PDX
Posts: 13,030
Bikes: Merz x 5 + Specialized Merz Allez x 2, Strawberry/Newlands/DiNucci/Ti x3, Gordon, Fuso/Moulton x2, Bornstein, Paisley,1958-74 Paramounts x3, 3rensho, 74 Moto TC, 73-78 Raleigh Pro's x5, Marinoni x2, 1960 Cinelli SC, 1980 Bianchi SC, PX-10 X 2
Mentioned: 267 Post(s)
Tagged: 0 Thread(s)
Quoted: 4507 Post(s)
Liked 6,374 Times
in
3,666 Posts
Well that was easy. Removed cotter pins, serviced bottom bracket, and reassembled in 1/2 hour!
A couple years ago I bought a 70's Super Course, and the seller included a copy of "Anybodys Bike Book". I leafed thru it. Fun illustrations but nothing stuck out to me but this little device for cotter pin removal. A 9 1/2" inch piece of 1/2" pipe and a floor flange. Brilliant! Today I visited my local hardware store and purchased the two pieces and 1/2 an hour later my Gitane has a freshly serviced BB. Love it.
 That is SIMPLY brilliant.
05-05-21, 12:35 PM
That is SIMPLY brilliant.
05-05-21, 12:35 PM
#3
Senior Member
How do you grease the bearings without the time tested secret additives of chain lube contaminated knuckle blood and sweat profusely dripping from one's forehead?
05-05-21, 12:46 PM
#4
Senior Member
Join Date: Aug 2010
Location: Utah
Posts: 8,651
Bikes: Paletti,Pinarello Monviso,Duell Vienna,Giordana XL Super,Lemond Maillot Juane.& custom,PDG Paramount,Fuji Opus III,Davidson Impulse,Pashley Guv'nor,Evans,Fishlips,Y-Foil,Softride, Tetra Pro, CAAD8 Optimo,
Mentioned: 156 Post(s)
Tagged: 0 Thread(s)
Quoted: 2323 Post(s)
Liked 4,933 Times
in
1,763 Posts
That's awesome....I bought the press and now feel like i wasted money. 
__________________
Steel is real...and comfy.
Steel is real...and comfy.
05-05-21, 02:36 PM
#5
Senior Member
Join Date: Aug 2017
Location: Wisconsin
Posts: 521
Bikes: 2015 Felt Z75 Disc, 2008 Fuji Cross Comp, 2010 Trek Navigator 1.0, 1974 Raleigh Sports, 1974 Schwinn Le Tour, 1981 Schwinn Super Le Tour, Surly Cross Check, 2021 Giant Talon 2
Mentioned: 1 Post(s)
Tagged: 0 Thread(s)
Quoted: 202 Post(s)
Liked 71 Times
in
60 Posts
Well that was easy. Removed cotter pins, serviced bottom bracket, and reassembled in 1/2 hour!
A couple years ago I bought a 70's Super Course, and the seller included a copy of "Anybodys Bike Book". I leafed thru it. Fun illustrations but nothing stuck out to me but this little device for cotter pin removal. A 9 1/2" inch piece of 1/2" pipe and a floor flange. Brilliant! Today I visited my local hardware store and purchased the two pieces and 1/2 an hour later my Gitane has a freshly serviced BB. Love it.
__________________
check out the Frugal Average Bicyclist
Frugal Average Bicyclist � The goal here is to help you keep cycling on a budget.
check out the Frugal Average Bicyclist
Frugal Average Bicyclist � The goal here is to help you keep cycling on a budget.
05-05-21, 02:37 PM
#6
Senior Member
05-05-21, 03:20 PM
#7
Senior Member
Join Date: Feb 2020
Posts: 2,812
Mentioned: 49 Post(s)
Tagged: 0 Thread(s)
Quoted: 1105 Post(s)
Likes: 0
Liked 1,326 Times
in
782 Posts
No drama, pin comes out, most times if nobody beat it with a hammer before you you can use it again.
And you can't blame the marks in the cups on the difficulty of removing the pin.
05-05-21, 03:39 PM
#8
PM me your cotters

Join Date: Jun 2015
Location: ATL
Posts: 3,241
Mentioned: 80 Post(s)
Tagged: 0 Thread(s)
Quoted: 1137 Post(s)
Liked 588 Times
in
420 Posts
I know, it's hard to get one for under $100. I know, there are other tools out there, including a variety of C-clamp presses, custom tools, BFH and pipe or wood, but none are as fast and effective.
__________________
███████████████
███████████████
05-05-21, 03:47 PM
#9
PM me your cotters
Join Date: Jun 2015
Location: ATL
Posts: 3,241
Mentioned: 80 Post(s)
Tagged: 0 Thread(s)
Quoted: 1137 Post(s)
Liked 588 Times
in
420 Posts
PS - I don't want to come off like I'm downplaying OP's tool. It's super clever. I wish I'd thought of it, and it goes to show the wealth of knowledge in old magazines and catalogs. Some of the old cycling catalogs have killer info on how to, for example, break down and reassemble a Campy NR rear mech, I think I posted that one here a few years ago when I found it.
The only thing that bothers me about using the back pipe method or a socket, or any other method using a hollow steel receiver to hammer in/out is after enough whacks with a BFH, you'll leave a ring print on both sides of your crank arm. It's definitely not something I'd do with some of the higher-end alloy cottered crank arms.
For replacing cotters on pre-80s cottered steel cranks, it's cheaply effective though. Make sure you swing straight and true!!
__________________
███████████████
███████████████
05-05-21, 04:10 PM
#10

Senior Member
Join Date: Dec 2005
Posts: 17,144
Mentioned: 481 Post(s)
Tagged: 0 Thread(s)
Quoted: 3803 Post(s)
Liked 6,634 Times
in
2,599 Posts
So the pipe stanchion approach is to support your BB, right? You still need to whack the cotter with a hammer. That's where all kinds of bad things could happen (I say from experience).
 05-05-21, 04:22 PM
#11
www.theheadbadge.com

Join Date: Sep 2005
Location: Southern Florida
Posts: 28,508
Bikes: https://www.theheadbadge.com
Mentioned: 124 Post(s)
Tagged: 0 Thread(s)
Quoted: 2420 Post(s)
Liked 4,381 Times
in
2,090 Posts
Otherwise, the results here aren't likely to be any better than beating it in a work stand if the cotter is well and truly tight.
-Kurt
__________________


05-05-21, 04:29 PM
#12
Senior Member
Join Date: Dec 2005
Posts: 17,144
Mentioned: 481 Post(s)
Tagged: 0 Thread(s)
Quoted: 3803 Post(s)
Liked 6,634 Times
in
2,599 Posts
That's what I thought. But i should also say that I've destroyed plenty of cotters using the BIkeSmith tool. It provides plenty of force, so much so that the threaded part of a reluctant cotter will mushroom before any movement happens.
05-05-21, 04:51 PM
#13
Senior Member
Thread Starter
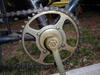
I removed nut and washer from cotter pins. Sprayed WD-40 into and around crank hole/cotter. Threaded nut back on so nut is level with top of threads. Put support under crank arm as in picture. Drive side took one hit with hammer and it came loose. Other side took three hits to break it free. I noted direction of cotters and kept them oriented same way for each crank arm. The cotters were pretty much in perfect condition, and the tapers fit tightly against BB spindle. I am guessing its the first time they were removed since installed at factory some 50 years ago.
Likes For big chainring:
05-05-21, 05:59 PM
#15
Senior Member
Thread Starter
On the other hand this bike has seen a lot of weather and use. Wheels were heavily rusted and numerous flat spots. Frame has quite a bit of rust under the top tube, probably from sitting outside in the rain. The front derailleur cage was so bent I replaced it. And the brake pads were extremely worn. This bike was well used and abused. But yes it was assembled well at the factory...50 years ago.
05-05-21, 06:15 PM
#16
Phyllo-buster
Join Date: Jan 2010
Location: Nova Scotia
Posts: 8,843
Bikes: roadsters, club bikes, fixed and classic
Mentioned: 133 Post(s)
Tagged: 0 Thread(s)
Quoted: 2295 Post(s)
Liked 2,044 Times
in
1,252 Posts
It's all those bloody 'one size fits all' soft steel cotters causing most removal issues. Harder steel, a good vice and file if needed and cotters last decades.
Likes For clubman:
05-05-21, 06:24 PM
#17
aka Tom Reingold

Join Date: Jan 2009
Location: New York, NY, and High Falls, NY, USA
Posts: 40,496
Bikes: 1962 Rudge Sports, 1971 Raleigh Super Course, 1971 Raleigh Pro Track, 1974 Raleigh International, 1975 Viscount Fixie, 1982 McLean, 1996 Lemond (Ti), 2002 Burley Zydeco tandem
Mentioned: 511 Post(s)
Tagged: 0 Thread(s)
Quoted: 7344 Post(s)
Liked 2,446 Times
in
1,427 Posts
I've been using this pipe stanchion method for ages. I remember buying the pipe at Home Depot. I chose a pipe that was damaged on one end, figuring I'd save the store the cost of one pipe since no one else could make use of it. The cashier asked me what size it was so she could ring it up properly, and I said I didn't know. She asked how I know it's going to work if it's not the right size. I told her I wouldn't be using it as a pipe, but then I immediately regretted saying that. I should have said I was planning to use it as a weapon. Well, maybe it's better I didn't.
__________________
Tom Reingold, tom@noglider.com
New York City and High Falls, NY
Blogs: The Experienced Cyclist; noglider's ride blog
�When man invented the bicycle he reached the peak of his attainments.� � Elizabeth West, US author
Please email me rather than PM'ing me. Thanks.
Tom Reingold, tom@noglider.com
New York City and High Falls, NY
Blogs: The Experienced Cyclist; noglider's ride blog
�When man invented the bicycle he reached the peak of his attainments.� � Elizabeth West, US author
Please email me rather than PM'ing me. Thanks.
Likes For noglider:
05-05-21, 06:25 PM
#18
Senior Member
Join Date: Feb 2020
Posts: 2,812
Mentioned: 49 Post(s)
Tagged: 0 Thread(s)
Quoted: 1105 Post(s)
Likes: 0
Liked 1,326 Times
in
782 Posts
On the other hand this bike has seen a lot of weather and use. Wheels were heavily rusted and numerous flat spots. Frame has quite a bit of rust under the top tube, probably from sitting outside in the rain. The front derailleur cage was so bent I replaced it. And the brake pads were extremely worn. This bike was well used and abused. But yes it was assembled well at the factory...50 years ago.
Were they clean when they came out - a single witness line from the axle flat, no galling or corrosion?
05-05-21, 06:34 PM
#19
Senior Member
Thread Starter
05-05-21, 07:05 PM
#20
minimalist cyclist

Join Date: Mar 2014
Location: North Carolina
Posts: 1,745
Bikes: yes please
Mentioned: 26 Post(s)
Tagged: 0 Thread(s)
Quoted: 1119 Post(s)
Liked 1,638 Times
in
943 Posts
There's good cotter pin removal info and 2 good YouTube videos on this thread:
https://www.bikeforums.net/classic-v...ll-needed.html
I'm finally getting the '73 Raleigh I posted about back on the stand to finish the job I started 2 years ago. The cotter pins look good enough to reuse

https://www.bikeforums.net/classic-v...ll-needed.html
I'm finally getting the '73 Raleigh I posted about back on the stand to finish the job I started 2 years ago. The cotter pins look good enough to reuse
Last edited by Deal4Fuji; 05-05-21 at 07:09 PM.
05-05-21, 09:26 PM
#21
Senior Member
Join Date: Oct 2020
Location: Phoenix, AZ
Posts: 905
Bikes: 1964(?) Frejus Tour de France, 1967(?) Dawes Double Blue, 1979 Trek 710, 1982 Claud Butler Dalesman, 1983 Schwinn Paramount Elite, 2014 Brompton, maybe a couple more
Mentioned: 8 Post(s)
Tagged: 0 Thread(s)
Quoted: 310 Post(s)
Liked 676 Times
in
329 Posts
I have used three methods to remove cotter pins:
(1) Banging on the pin with a hammer while it is on a bike stand. This works sometimes, but often not, and you end up doing something drastic like drilling out the pin. As far as I know I didn't destroy any bottom brackets, but I only did it on heavy old steel bikes.
(2) Banging on the pin with a hammer while the pedal is resting on a steel pipe. I think I got this from Sheldon Brown, and I do believe it works much better than banging without a steel pipe. I think the shock must be sharper or something, but the likelihood you will get the pin out without mushrooming seems significantly better.
(3) Bikesmith press/clamp. This works better than banging, but you still destroy a pin sometimes. Cotter pins just aren't very predictable.
05-06-21, 12:39 AM
#22
blahblahblah chrome moly

Join Date: Apr 2009
Location: Seattle
Posts: 1,984
Mentioned: 92 Post(s)
Tagged: 0 Thread(s)
Quoted: 1172 Post(s)
Liked 2,566 Times
in
1,072 Posts
I have a Var cotter press, and while it is a prized possession, I generally just reach for my hammer, punch and pipe for the occasional cotter I need to knock in or out. I agree the press is better for most people, who haven't spent as much time swinging a hammer as I have, but for me there's little downside to the hammer, and it's quicker.
I'm pretty sure I've never been defeated by a cotter, and very seldom had any problem at all, like mushrooming the thread. The bike shop I worked at in the early '70s had a half-price overhaul deal in the winter to keep from having to lay off mechanics. And so many bikes were cottered back then, easily the majority, maybe fair to say the vast majority. So we were hammering cotters out and back in multiple times per day on average during overhaul season. If I remember right, we each had our own pipe-with-floor-flange, because sharing one would have slowed us down, it'd be in use all the time.
If I suspect the cotter is in tight and/or corroded in place, I'll apply heat before I even try it. Just a heat gun, no need for the blow torch, though I did use a propane torch before I had a heat gun. Heat works like magic. Not sure why, since all the parts (usually) are steel, all with the same thermal expansion coefficient, but the effect is real. Actually for last few I've done, I went straight to the heat gun without even trying a whack first. Since I'm not trying to make a living at it, I can afford the heat-up time, a couple minutes � pays off in reduced stomach acid.
The other trick is to use a stout punch with a concave end that holds it centered on the cotter. My punch is actually a cottered BB spindle that has dimples on the ends, that just happen to match the curved ends on cotters (most cotters anyway; maybe not all have curved ends). Whatever metal that spindle is made of, it's about perfect, hard but not brittle. Been using that same one since about '72. If I didn't have that, I'd make one, from a 3/8" or larger punch (example), grinding the concave shape into the end with a spherical stone or maybe a carbide burr in the Dremel. Chuck the handle end of the punch in a drill chuck and hold the drill motor in the vise; set it spinning and use the trigger lock to hold it "on" (poor man's lathe). Then you have both hands free to hold the Dremel tool precisely against the business end of the punch. Use a stone or burr with about the same radius as the ends of the cotters, but it doesn't need to be an exact match. There are "cup tip" punches that come with the concave end, but I haven't seen them in a large enough size for bike cotters. Mostly a gunsmith thing, with 1/8" or 3 mm being about the biggest I saw when I looked.
For knocking the pin out (or in), hold the punch with some pliers or vise-grips, because otherwise fear of hitting your hand will cause you to "pull your punches" (pun not intended, I swear!). I like a framing hammer. Not a ball-peen, which doesn't have a flat striking face, so it's more likely to kick your punch out sideways. And a decently large hammer too; mine is 22 ounces. Hold the hammer handle out at the end like a Real Man (I see people choking up sometimes, holding the handle near the head). Experience will teach you how hard to swing the hammer. Sneaking up on it by hitting it more softly at first is acceptable, but I pride myself in whacking the pin out with one swing. Show it who's boss!
Ooh I just remembered when my dad taught me how to knock cotter pins out. Probably about 1969, when I was twelve. He was an engineer at Rocketdyne in the '60s, making moon rockets. We had a stout bench vise at home, and that was his preferred method: open the jaws of the vise just enough to let the cotter slip between them (not clamped), with the crank sitting on top of the vise. It takes a second person to hold the bike in position while you swing the hammer, but it's pretty effective, about as good as the pipe method for increasing the sharpness of the impulse to the pin. Keep that method in your back pocket as it were, in case you ever need to git 'er done and you don't have a pipe, but you do have a vise and a helper/holder.
Mark B
05-06-21, 02:56 AM
#23
Senior Member
Join Date: Feb 2020
Posts: 2,812
Mentioned: 49 Post(s)
Tagged: 0 Thread(s)
Quoted: 1105 Post(s)
Likes: 0
Liked 1,326 Times
in
782 Posts
Of course it helps to keep the flame away from the ends of the pin, but for pins that are corroded at the interface that actually helps. Rust is more of an insulator than steel, by about two orders of magnitude, so with heat the worse it looks the better it works - as long as you heat the hole, not the pin.
Likes For oneclick:
05-06-21, 04:18 AM
#24
Senior Member
Join Date: Oct 2016
Location: Cambridge UK
Posts: 852
Bikes: 1903 24 spd Sunbeam, 1927 Humber, 3 1930 Raleighs, 2 1940s Sunbeams, 2 1940s Raleighs, Rudge, 1950s Robin Hood, 1958 Claud Butler, 2 1973 Colnago Supers, Eddie Merckx, 2 1980 Holdsworth, EG Bates funny TT bike, another 6 or so 1990s bikes
Mentioned: 15 Post(s)
Tagged: 0 Thread(s)
Quoted: 331 Post(s)
Liked 332 Times
in
185 Posts
Heat works because the gunge/rust binding the two steels together doesn't expand at the same rate so the bond is broken.
With a vice you can crack the nut a thread, lay the bike up sideways on the vice, place a socket over the other end of the cotter pin that gives clearance and use the jaws of the vice to press the pin out.
Whacking with a hammer usually wrecks the thread but an M6 metric die straight over the damaged imperial thread renders a result that will give you back a good thread for reusing the same pin albeit with a M6 nut.
Likes For Johno59:
05-06-21, 06:21 AM
#25
Senior Member
Join Date: Feb 2020
Posts: 2,812
Mentioned: 49 Post(s)
Tagged: 0 Thread(s)
Quoted: 1105 Post(s)
Likes: 0
Liked 1,326 Times
in
782 Posts
For what it's worth the numeric values for rust were about half of the numbers elsewhere for steel, but without units what can you tell. If so that's even better for the use of heat, the hole gets MORE bigger than the rust.

