


Bottom Bracket upgrade for Koga Miyata Roadwinner - from roughly 1981?
 07-26-20, 07:39 PM
#1
Junior Member
Thread Starter
Join Date: Jul 2020
Location: Bronx, NY
Posts: 12
Bikes: Koga Miyata Roadwinner
Mentioned: 0 Post(s)
Tagged: 0 Thread(s)
Quoted: 4 Post(s)
Likes: 0
Liked 0 Times
in
0 Posts
Bottom Bracket upgrade for Koga Miyata Roadwinner - from roughly 1981?
Hey all,
I have been looking around the web & can't seem to easily find information about this, so I thought I would ask here. I am trying to find out what’s the right size bottom bracket and spindle for a new frame that I got, or vintage Koga Miyata Roadwinner from about 1981. It looks like the spindle measures 145 mm with a 68 mm bottom bracket. Does this sound right? I'm sure that there are standard measurements, but can't seem to locate them.
I’m pulling all the Shimano parts off of another frame and trying to make them fit for this, but the bottom bracket & spindle really need replacing and I would like to upgrade.
if you haven’t guessed, I don’t do this a lot. Any help is very welcome.
thanks!
Keith
 07-26-20, 07:52 PM
#2
Newbie

Something seems amiss. My Miyata 610 has a spindle that measures about 123mm and it has a triple.
How are you measuring the spindle? Mabye converting from inches and getting something weird?
I'd suggest posting pics but I'm in the same situation with not having enough posts. I did just make an album though, so maybe upload there?
If you look at Sheldon Brown's site it shows what to measure. Sheldonbrown/bbsize dot html
07-26-20, 08:23 PM
#3
Junior Member
Thread Starter
Join Date: Jul 2020
Location: Bronx, NY
Posts: 12
Bikes: Koga Miyata Roadwinner
Mentioned: 0 Post(s)
Tagged: 0 Thread(s)
Quoted: 4 Post(s)
Likes: 0
Liked 0 Times
in
0 Posts
I think that I am doing this right, although something is clearly off. Maybe I'll be able to post the images by the time this discussion is over.
I've got a triple Custom crankset off a 1971 Univega that I am trying to make this work with. A longer spindle may clear this frame, but it will not with the current one, which looks like it was set up for a fixie. What size did you use on your 610?
I've got a triple Custom crankset off a 1971 Univega that I am trying to make this work with. A longer spindle may clear this frame, but it will not with the current one, which looks like it was set up for a fixie. What size did you use on your 610?
07-26-20, 08:24 PM
#4
SE Wis
Join Date: Apr 2005
Location: Milwaukee, WI
Posts: 10,505
Bikes: '68 Raleigh Sprite, '02 Raleigh C500, '84 Raleigh Gran Prix, '91 Trek 400, 2013 Novara Randonee, 1990 Trek 970
Mentioned: 40 Post(s)
Tagged: 0 Thread(s)
Quoted: 2743 Post(s)
Liked 3,390 Times
in
2,053 Posts
Bottom bracket spindles are determined by the crankset used, not the frame other than shell width and threading

Likes For dedhed:
07-26-20, 08:24 PM
#5
Junior Member
Thread Starter
Join Date: Jul 2020
Location: Bronx, NY
Posts: 12
Bikes: Koga Miyata Roadwinner
Mentioned: 0 Post(s)
Tagged: 0 Thread(s)
Quoted: 4 Post(s)
Likes: 0
Liked 0 Times
in
0 Posts
I also need some suggestions for downtime shifters for this bike - I'd like them to be vintage as much as possible with some upgrades (the BB, for example) that will keep the style of the bike. My old downtime shifters from the Univega will not fit, it looks like.
07-26-20, 08:25 PM
#6
Junior Member
Thread Starter
Join Date: Jul 2020
Location: Bronx, NY
Posts: 12
Bikes: Koga Miyata Roadwinner
Mentioned: 0 Post(s)
Tagged: 0 Thread(s)
Quoted: 4 Post(s)
Likes: 0
Liked 0 Times
in
0 Posts
Thank you. That makes a lot of sense to me. I am trying to put on a Custom triple crankset onto this frame. Is there anywhere to locate standard info on shell width and threading upgrade options? It's been surprisingly hard to find that info.
07-26-20, 08:51 PM
#7
Newbie
I think that I am doing this right, although something is clearly off. Maybe I'll be able to post the images by the time this discussion is over.
I've got a triple Custom crankset off a 1971 Univega that I am trying to make this work with. A longer spindle may clear this frame, but it will not with the current one, which looks like it was set up for a fixie. What size did you use on your 610?
I've got a triple Custom crankset off a 1971 Univega that I am trying to make this work with. A longer spindle may clear this frame, but it will not with the current one, which looks like it was set up for a fixie. What size did you use on your 610?
Soooo that's what is throwing me about a 145mm measurement when a triple is about 122.5 and the longest BB spindle for a Shimano UN-55 is 127mm.
Last edited by judeen_buck; 07-26-20 at 08:53 PM. Reason: typo
07-26-20, 10:11 PM
#8
SE Wis
Join Date: Apr 2005
Location: Milwaukee, WI
Posts: 10,505
Bikes: '68 Raleigh Sprite, '02 Raleigh C500, '84 Raleigh Gran Prix, '91 Trek 400, 2013 Novara Randonee, 1990 Trek 970
Mentioned: 40 Post(s)
Tagged: 0 Thread(s)
Quoted: 2743 Post(s)
Liked 3,390 Times
in
2,053 Posts
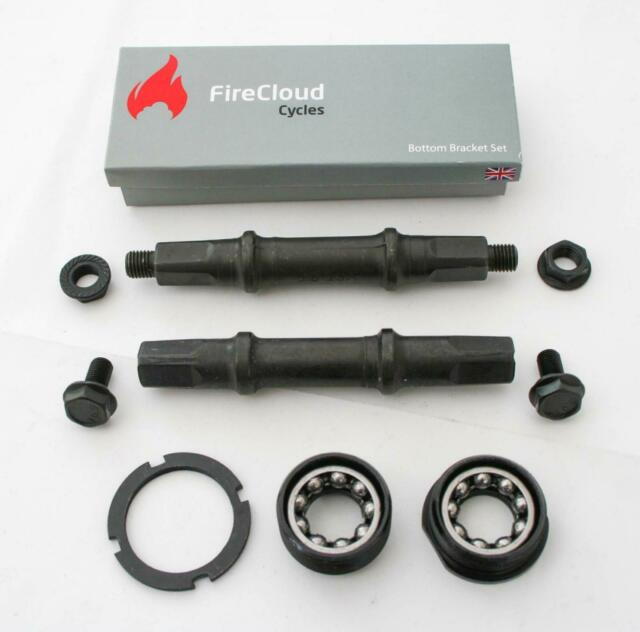
What I surmise
OP's spindle probably has threaded ends using nuts to hold the arms on rather than internal threaded using bolts and is measuring the entire length .
Should be measuring only to the end of the taper
Like the upper one in this ebay photo
Last edited by dedhed; 07-26-20 at 10:15 PM.
07-27-20, 07:51 AM
#9

Old fart

Join Date: Nov 2004
Location: Appleton WI
Posts: 24,782
Bikes: Several, mostly not name brands.
Mentioned: 153 Post(s)
Tagged: 0 Thread(s)
Quoted: 3587 Post(s)
Liked 3,398 Times
in
1,932 Posts
If we subtract 21mm (the combined length of the two threaded stubs) from the 145mm stated length, we get 124mm, which is quite plausible for a triple crank.
07-27-20, 07:39 PM
#10
Junior Member
Thread Starter
Join Date: Jul 2020
Location: Bronx, NY
Posts: 12
Bikes: Koga Miyata Roadwinner
Mentioned: 0 Post(s)
Tagged: 0 Thread(s)
Quoted: 4 Post(s)
Likes: 0
Liked 0 Times
in
0 Posts
Oh wow. That is exactly what I am doing. I included the threaded ends in the measurements. Thanks for that clarification.
I appreciate all of the information & encouragement. Right now, it seems like every bike shop near me is just jammed and really can't be pestered with questions. Out of curiosity, I asked about this job and they said they couldn't do it this month (!). However, I feel like this is something I would like to know how to do. I take all kinds of things apart - and put them back together with very few extra parts... This is really the first time I've done this and I imagine I'll need to get some new tools to handle this. Rookie mistake. Anything else I should be careful about?
I was thinking of putting in sealed bearing sets for this. Right now, the Miyata's BB feels like it has a lot of grit and is really not moving smoothly at all. Any suggestions? I figure that, once I have the tools and become familiar, I won't mind replacing the bearing set every few years.
07-27-20, 07:42 PM
#11
Junior Member
Thread Starter
Join Date: Jul 2020
Location: Bronx, NY
Posts: 12
Bikes: Koga Miyata Roadwinner
Mentioned: 0 Post(s)
Tagged: 0 Thread(s)
Quoted: 4 Post(s)
Likes: 0
Liked 0 Times
in
0 Posts
Also, any recommended makes for a good upgrade? I imagine that this site has some limits on product promotion, but I'd like to get a quality replacements/upgrade. Any tool suggestions? Thanks in advance.
07-28-20, 01:36 AM
#12
Senior Member
Join Date: Oct 2015
Location: PDX
Posts: 13,034
Bikes: Merz x 5 + Specialized Merz Allez x 2, Strawberry/Newlands/DiNucci/Ti x3, Gordon, Fuso/Moulton x2, Bornstein, Paisley,1958-74 Paramounts x3, 3rensho, 74 Moto TC, 73-78 Raleigh Pro's x5, Marinoni x2, 1960 Cinelli SC, 1980 Bianchi SC, PX-10 X 2
Mentioned: 267 Post(s)
Tagged: 0 Thread(s)
Quoted: 4510 Post(s)
Liked 6,377 Times
in
3,667 Posts
Oh wow. That is exactly what I am doing. I included the threaded ends in the measurements. Thanks for that clarification.
I appreciate all of the information & encouragement. Right now, it seems like every bike shop near me is just jammed and really can't be pestered with questions. Out of curiosity, I asked about this job and they said they couldn't do it this month (!). However, I feel like this is something I would like to know how to do. I take all kinds of things apart - and put them back together with very few extra parts... This is really the first time I've done this and I imagine I'll need to get some new tools to handle this. Rookie mistake. Anything else I should be careful about?
I was thinking of putting in sealed bearing sets for this. Right now, the Miyata's BB feels like it has a lot of grit and is really not moving smoothly at all. Any suggestions? I figure that, once I have the tools and become familiar, I won't mind replacing the bearing set every few years.
I appreciate all of the information & encouragement. Right now, it seems like every bike shop near me is just jammed and really can't be pestered with questions. Out of curiosity, I asked about this job and they said they couldn't do it this month (!). However, I feel like this is something I would like to know how to do. I take all kinds of things apart - and put them back together with very few extra parts... This is really the first time I've done this and I imagine I'll need to get some new tools to handle this. Rookie mistake. Anything else I should be careful about?
I was thinking of putting in sealed bearing sets for this. Right now, the Miyata's BB feels like it has a lot of grit and is really not moving smoothly at all. Any suggestions? I figure that, once I have the tools and become familiar, I won't mind replacing the bearing set every few years.
 Welcome aboard, glad you found us, you're in the right place.
You should absolutely take this on and see it through, it will pave the way to learn and do it all.
I would see the standard BB through for just that reason, it can take some trial and error that will be an invaluable skill moving forward.
If the bearings and spindle are pitted they will grind, if it is dirty, dry or tight it may be savable, correct setup and new grease can work wonders.
The bike shop may not have wanted to work on it, many now days can't and or don't want to bother with C+V, doesn't fit into the cartridge, threadless, disposable program they embrace.
Get after it man, we got you.

Last edited by merziac; 07-28-20 at 01:42 AM.
07-28-20, 07:57 AM
#13
Junior Member
Thread Starter
Join Date: Jul 2020
Location: Bronx, NY
Posts: 12
Bikes: Koga Miyata Roadwinner
Mentioned: 0 Post(s)
Tagged: 0 Thread(s)
Quoted: 4 Post(s)
Likes: 0
Liked 0 Times
in
0 Posts
Right - so if things look to be in good shape, not pitted, etc., then I don't have to replace anything?
I think I need some specific tools.
Also, a little advice on down shifters? This seems like it should be really standard sizing, by my thinking, but mine don't seem to fit. Is this a case where you force them and by force them, I mean carefully, but purposefully make them fit because it's just some variation within standard manufacture, wear over time, etc.) or are there other sizes?
07-28-20, 05:12 PM
#14
Old fart
Join Date: Nov 2004
Location: Appleton WI
Posts: 24,782
Bikes: Several, mostly not name brands.
Mentioned: 153 Post(s)
Tagged: 0 Thread(s)
Quoted: 3587 Post(s)
Liked 3,398 Times
in
1,932 Posts
I think I need some specific tools.
https://www.parktool.com/blog/repair...e-cup-and-cone
Also, a little advice on down shifters? This seems like it should be really standard sizing, by my thinking, but mine don't seem to fit. Is this a case where you force them and by force them, I mean carefully, but purposefully make them fit because it's just some variation within standard manufacture, wear over time, etc.) or are there other sizes?
07-30-20, 08:55 AM
#15
Junior Member
Thread Starter
Join Date: Jul 2020
Location: Bronx, NY
Posts: 12
Bikes: Koga Miyata Roadwinner
Mentioned: 0 Post(s)
Tagged: 0 Thread(s)
Quoted: 4 Post(s)
Likes: 0
Liked 0 Times
in
0 Posts
Yeah - these shifters are definitely braised onto the frame. I imagined that they were standard and I was pretty sure that the Suntour shifters I have would fit the Shimano bosses, but I see that they are half a mm off. Thanks a lot for that illustration. Incredibly helpful.
I am going to start tackling this rebuild next week. Just getting =some tools together and now, the downtime shifters. Thanks!
I am going to start tackling this rebuild next week. Just getting =some tools together and now, the downtime shifters. Thanks!
07-30-20, 09:07 AM
#16
Full Member
Join Date: Mar 2017
Location: Arnhem NL
Posts: 229
Bikes: Might as well, now that I am here...
Mentioned: 3 Post(s)
Tagged: 0 Thread(s)
Quoted: 79 Post(s)
Liked 78 Times
in
66 Posts
You might want to look at this too:
https://www.koga.com/nl/service/broc...er-(2000-1976)
Cheers,
Jan
https://www.koga.com/nl/service/broc...er-(2000-1976)
Cheers,
Jan
07-30-20, 09:33 AM
#17
Junior Member
Thread Starter
Join Date: Jul 2020
Location: Bronx, NY
Posts: 12
Bikes: Koga Miyata Roadwinner
Mentioned: 0 Post(s)
Tagged: 0 Thread(s)
Quoted: 4 Post(s)
Likes: 0
Liked 0 Times
in
0 Posts
Those are fantastic! I was going through them the other day. The more I look at it, I think that this is a 1979 frame.
07-30-20, 12:32 PM
#18
Junior Member
Thread Starter
Join Date: Jul 2020
Location: Bronx, NY
Posts: 12
Bikes: Koga Miyata Roadwinner
Mentioned: 0 Post(s)
Tagged: 0 Thread(s)
Quoted: 4 Post(s)
Likes: 0
Liked 0 Times
in
0 Posts
I think that I can post pictures here now, so here's what I am looking at. The red frame is the Koga Miyata - any suggestions on paint touch ups are welcomed. After all of this stuff, why not go for pretty?
The blue is my long-serving 1971 Univega Sportour, which I cracked earlier this summer.

The "new" Koga Miyata frame.

My older, now cracked, 1971 Univega frame.

The triple crankset I want to move to the new frame.
The blue is my long-serving 1971 Univega Sportour, which I cracked earlier this summer.
The "new" Koga Miyata frame.
My older, now cracked, 1971 Univega frame.
The triple crankset I want to move to the new frame.
08-06-20, 07:34 AM
#19
Newbie
Looks like what is in the red frame is a Shimano UN55 bottom bracket or similar already. It is screwed out using a tool like Park Tool BBT-2 driven by a ratchet.I had the tool in a set so I don't know the part number for sure so check with a bike shop. The tool has splines that lock into the multiple grooves on the bottom bracket.
I can't post links but RJ The Bike Guy has the exact video that explains the process: youtube watch?v=1BrVjDFqotE
Park Tool has a video too but it jumps around a lot.
Good luck.
I can't post links but RJ The Bike Guy has the exact video that explains the process: youtube watch?v=1BrVjDFqotE
Park Tool has a video too but it jumps around a lot.
Good luck.
