


How to remove anodizing?
 06-30-22, 03:48 PM
#1
Full Member
Thread Starter
Join Date: Oct 2020
Location: Portland
Posts: 357
Mentioned: 5 Post(s)
Tagged: 0 Thread(s)
Quoted: 161 Post(s)
Likes: 0
Liked 267 Times
in
98 Posts
How to remove anodizing?
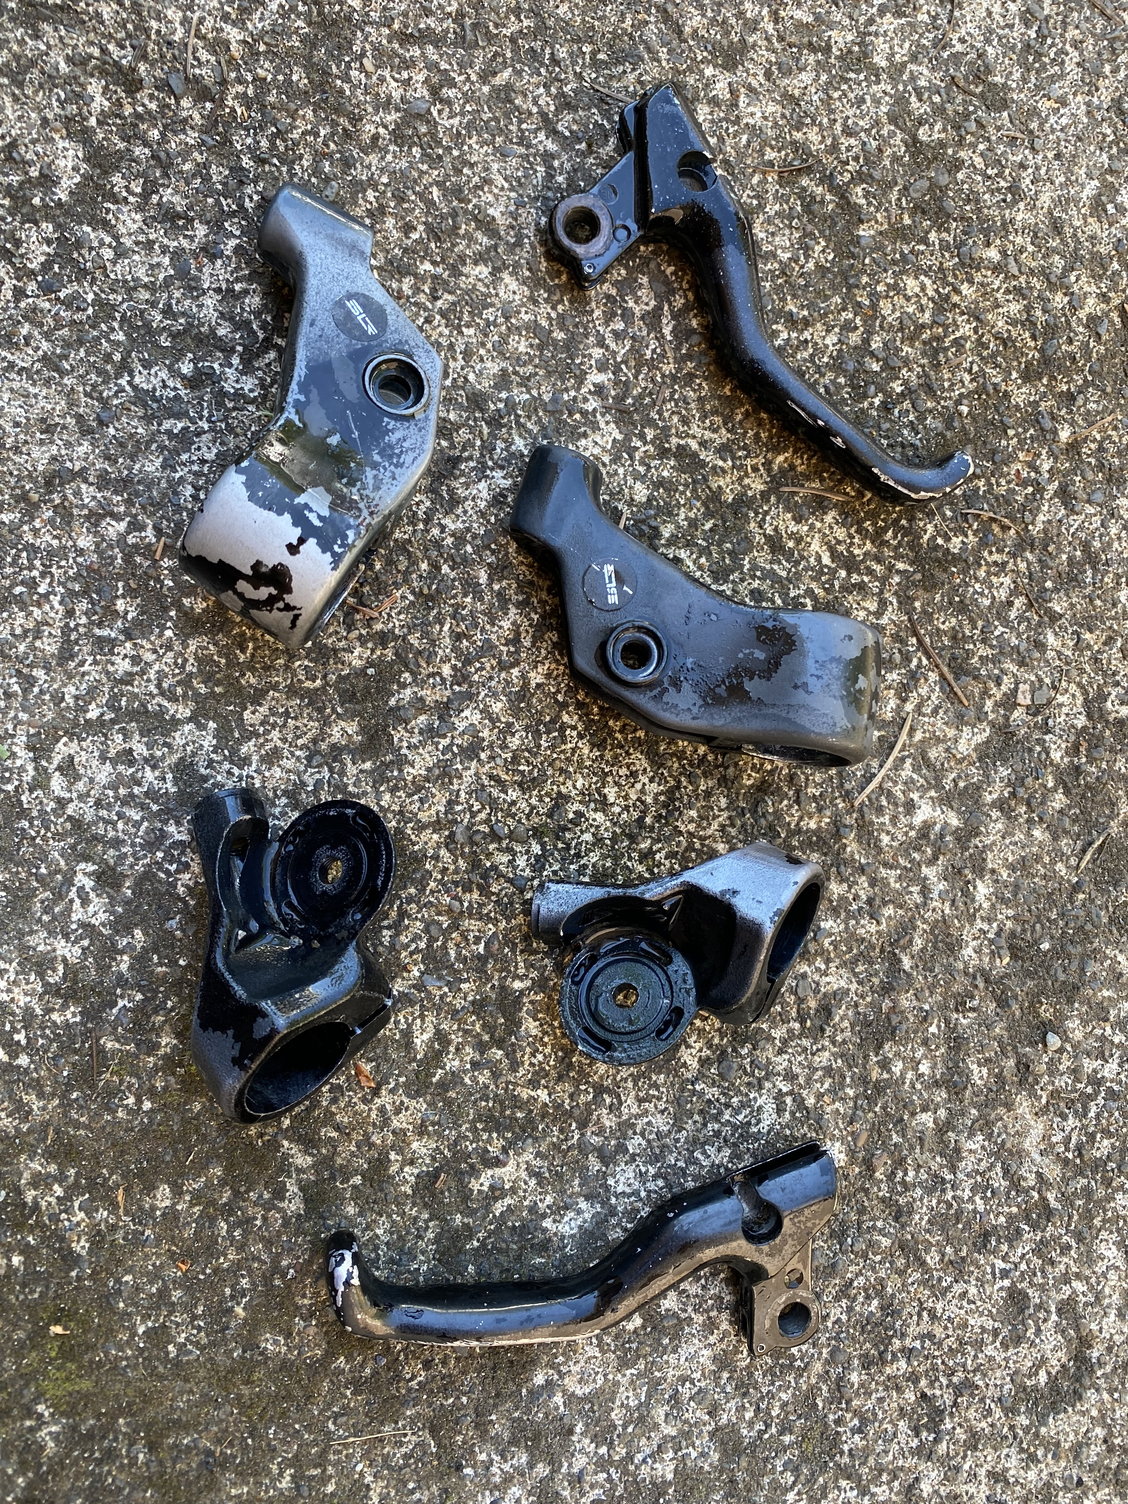
I salvaged some old XT thumb shifters and brake levers for a rebuild, but the black anodizing is terribly faded. What is the preferred method of removing the anodizing?
 06-30-22, 04:14 PM
#2

Senior Member

Join Date: Nov 2015
Posts: 4,485
Mentioned: 102 Post(s)
Tagged: 0 Thread(s)
Quoted: 1639 Post(s)
Likes: 0
Liked 829 Times
in
538 Posts
Better double check whether that's anodizing or just black paint.......
__________________
72 Line Seeker
83 Davidson Signature
84 Peugeot PSV
84 Peugeot PY10FC
84 Gitane Tour de France.
85 Vitus Plus Carbone 7
86 ALAN Record Carbonio
86 Medici Aerodynamic (Project)
88 Pinarello Montello
89 Bottecchia Professional Chorus SL
95 Trek 5500 OCLV (Project)
72 Line Seeker
83 Davidson Signature
84 Peugeot PSV
84 Peugeot PY10FC
84 Gitane Tour de France.
85 Vitus Plus Carbone 7
86 ALAN Record Carbonio
86 Medici Aerodynamic (Project)
88 Pinarello Montello
89 Bottecchia Professional Chorus SL
95 Trek 5500 OCLV (Project)
06-30-22, 04:41 PM
#4
Senior Member

I have used Drano (I use Target equivalent) to remove anodizing. I put some Drano in a zip lock bag along with the part. Watch it carefully because it doesn't take to long. I then put it in water with baking soda to neutralize it then rinse it off well.
Likes For rjhammett:
06-30-22, 04:50 PM
#5
Senior Member
Join Date: Oct 2015
Location: PDX
Posts: 13,038
Bikes: Merz x 5 + Specialized Merz Allez x 2, Strawberry/Newlands/DiNucci/Ti x3, Gordon, Fuso/Moulton x2, Bornstein, Paisley,1958-74 Paramounts x3, 3rensho, 74 Moto TC, 73-78 Raleigh Pro's x5, Marinoni x2, 1960 Cinelli SC, 1980 Bianchi SC, PX-10 X 2
Mentioned: 267 Post(s)
Tagged: 0 Thread(s)
Quoted: 4511 Post(s)
Liked 6,378 Times
in
3,667 Posts
Lbxpdx
I soak in the cleaner and dip in water, scrub very carefully with stainless brush, gloves and resoak as needed.
If its a mix, acetone, stripper would be my first assault.
I soak in the cleaner and dip in water, scrub very carefully with stainless brush, gloves and resoak as needed.
If its a mix, acetone, stripper would be my first assault.
Likes For Steel Charlie:
07-01-22, 08:31 AM
#7
Bike Butcher of Portland

Join Date: Jul 2014
Location: Portland, OR
Posts: 11,635
Bikes: It's complicated.
Mentioned: 1299 Post(s)
Tagged: 0 Thread(s)
Quoted: 4678 Post(s)
Liked 5,796 Times
in
2,282 Posts
I stripped hard anodizing from a pair of rims once.
Never again. Once you remove the anodizing, you'll have a mottled mess, and you'll want to polish the parts. Polishing will hold up fine until you sweat on them, and then they'll look mottled again.
Never again. Once you remove the anodizing, you'll have a mottled mess, and you'll want to polish the parts. Polishing will hold up fine until you sweat on them, and then they'll look mottled again.
__________________
If someone tells you that you have enough bicycles and you don't need any more, stop talking to them. You don't need that kind of negativity in your life.
If someone tells you that you have enough bicycles and you don't need any more, stop talking to them. You don't need that kind of negativity in your life.
07-01-22, 08:36 AM
#8
Senior Member
Join Date: Apr 2007
Location: Thunder Bay, Ontario, Canada - burrrrr!
Posts: 11,674
Bikes: 1958 Rabeneick 120D, 1968 Legnano Gran Premio, 196? Torpado Professional, 2000 Marinoni Piuma
Mentioned: 210 Post(s)
Tagged: 0 Thread(s)
Quoted: 1372 Post(s)
Likes: 0
Liked 1,751 Times
in
938 Posts
I use Extra Strength Eazy Off. Slap on some EO, wait a few minutes (two to three tops) and wipe/water wash the goo off. Repeat as required. Caution - if you leave the EO on too long it will attack the aluminum alloy and that would be an unsolvable problem. Good luck.
__________________
"98% of the bikes I buy are projects".
"98% of the bikes I buy are projects".
Likes For randyjawa:
07-01-22, 09:50 AM
#9
Senior Member
As an aside, I have read that just pure lye from the Ace Hardware store might be better, since it doesnt have all of the additives (scents, surfactants, etc.) that Drano or Easy Off has. Anecdotaly, I have heard this helps with the blotchy, post strip apearance. I have no actual experience, but I read the internet A LOT!
 07-01-22, 10:29 AM
#10
Senior Member
Join Date: Aug 2020
Location: Saratoga, CA
Posts: 825
Bikes: 1981 Bianchi Specialissim, 1976 Colnago Super. 1971 Bob Jackson. 2012 Kestrel 4000. 2012 Willier. 2016 Fuji Cross 1.1
Mentioned: 25 Post(s)
Tagged: 0 Thread(s)
Quoted: 276 Post(s)
Liked 952 Times
in
389 Posts
I use Easy Off also. You still need to polish after, but much less work. My first attempt, which looked great when done but a lot of work, was to just sand the anodization off, then go finer and finer until I got to the final polishing compound.
Likes For SwimmerMike:
09-27-22, 09:26 PM
#13
Newbie
I have looked at a number ot of these recipes form removing anadizing on the forum, and decided there had to be a safer way to do this where I did not expose myself to a bunch of caustic fumes in either my house or my garage. I am a chemist so I ran several tries on some old pieces in my lab.
Here is a detailed version of what I came up with recently after reading someone else's post a few years back about a general description of using sodium hydroxide and vinegar.
It involves two baths and the size of the bath will depend on the size of your parts you are stripping
.
1) Make an appropriate size bath of 5% w/v Sodium hydroxide- This is 5 grams per every 100 ml or 50 grams for every liter (4 cups). You can buy a pound (454 grams) of sodium hydroxide on Amazon for $12.99. So that is enough to make more or less 40 cups of the solution.
2) Make a similar size bath of vinegar, which is essentially 5-10% acetic acid. I used 10% acetic acid, but not everyone has acetic acid at their disposal. So household vinegar is a simpler solution
3) Place the part(s) in the sodium hydroxide bath for 1 minute (You will see bubbles forming don't panic, it will not explode, but there will be some heat generated)
4) Transfer the part to the acetic acid bath for 1 minute.
5) Rinse with cold water and rub with a rag to clean.
6) Place the part a second time in the sodium hydroxide bath for 1 minute.
7) Place the part a second time in the acetic acid bath for 1 minute.
8) Rinse with cold water and rub with a rag to clean.
Notes:
1) There are no fumes to worry about breathing in.
2) I would wear some plastic gloves
3) You can reuse the solutions several times, but you might want to store them in a sealed bottle. Particles will settle on the bottom so you can decant them away
4) Plan on polishing a lot if you strip the parts. Maintaining beautiful shiny bike parts requires work.
Likes For omijay:
09-27-22, 10:03 PM
#14
Junior Member
Just want to point out that actual true anodizing penetrates into the surface of the aluminum and serves to prevent corrosion and also hardens the aluminum as far as the anodization penetrates. So the best course depends on what the goal is. If it is just color change, then a good, durable paint in the color of choice is best. Actual removal of the anodization, weakens the item (somewhat). There are other surface colorization methods, which aren’t actually anodization. Chipping is a condition of painted parts. Fading to lighter color, (purple, gray) is true anodization affected by sunlight.
Sorry to complicate things, but accuracy is important to some folks.
Sorry to complicate things, but accuracy is important to some folks.
09-28-22, 09:50 AM
#15
Senior Member

Join Date: Aug 2009
Posts: 2,394
Mentioned: 14 Post(s)
Tagged: 0 Thread(s)
Quoted: 1561 Post(s)
Liked 1,734 Times
in
974 Posts
I have looked at a number ot of these recipes form removing anadizing on the forum, and decided there had to be a safer way to do this where I did not expose myself to a bunch of caustic fumes in either my house or my garage. I am a chemist so I ran several tries on some old pieces in my lab.
Here is a detailed version of what I came up with recently after reading someone else's post a few years back about a general description of using sodium hydroxide and vinegar.
It involves two baths and the size of the bath will depend on the size of your parts you are stripping
.
1) Make an appropriate size bath of 5% w/v Sodium hydroxide- This is 5 grams per every 100 ml or 50 grams for every liter (4 cups). You can buy a pound (454 grams) of sodium hydroxide on Amazon for $12.99. So that is enough to make more or less 40 cups of the solution.
2) Make a similar size bath of vinegar, which is essentially 5-10% acetic acid. I used 10% acetic acid, but not everyone has acetic acid at their disposal. So household vinegar is a simpler solution
3) Place the part(s) in the sodium hydroxide bath for 1 minute (You will see bubbles forming don't panic, it will not explode, but there will be some heat generated)
4) Transfer the part to the acetic acid bath for 1 minute.
5) Rinse with cold water and rub with a rag to clean.
6) Place the part a second time in the sodium hydroxide bath for 1 minute.
7) Place the part a second time in the acetic acid bath for 1 minute.
8) Rinse with cold water and rub with a rag to clean.
Notes:
1) There are no fumes to worry about breathing in.
2) I would wear some plastic gloves
3) You can reuse the solutions several times, but you might want to store them in a sealed bottle. Particles will settle on the bottom so you can decant them away
4) Plan on polishing a lot if you strip the parts. Maintaining beautiful shiny bike parts requires work.
Here is a detailed version of what I came up with recently after reading someone else's post a few years back about a general description of using sodium hydroxide and vinegar.
It involves two baths and the size of the bath will depend on the size of your parts you are stripping
.
1) Make an appropriate size bath of 5% w/v Sodium hydroxide- This is 5 grams per every 100 ml or 50 grams for every liter (4 cups). You can buy a pound (454 grams) of sodium hydroxide on Amazon for $12.99. So that is enough to make more or less 40 cups of the solution.
2) Make a similar size bath of vinegar, which is essentially 5-10% acetic acid. I used 10% acetic acid, but not everyone has acetic acid at their disposal. So household vinegar is a simpler solution
3) Place the part(s) in the sodium hydroxide bath for 1 minute (You will see bubbles forming don't panic, it will not explode, but there will be some heat generated)
4) Transfer the part to the acetic acid bath for 1 minute.
5) Rinse with cold water and rub with a rag to clean.
6) Place the part a second time in the sodium hydroxide bath for 1 minute.
7) Place the part a second time in the acetic acid bath for 1 minute.
8) Rinse with cold water and rub with a rag to clean.
Notes:
1) There are no fumes to worry about breathing in.
2) I would wear some plastic gloves
3) You can reuse the solutions several times, but you might want to store them in a sealed bottle. Particles will settle on the bottom so you can decant them away
4) Plan on polishing a lot if you strip the parts. Maintaining beautiful shiny bike parts requires work.
09-28-22, 10:10 AM
#16
Senior Member
Join Date: Dec 2016
Location: Long Island, NY
Posts: 2,109
Bikes: Trek 800 x 2, Schwinn Heavy Duti, Schwinn Traveler, Schwinn Le Tour Luxe, Schwinn Continental, Cannondale M400 and Lambert, Schwinn Super Sport
Mentioned: 14 Post(s)
Tagged: 0 Thread(s)
Quoted: 809 Post(s)
Liked 1,022 Times
in
665 Posts
It looks like the brake levers that @Lbxpdx is posting a picture of looks to is painted black. The black paint is in poor condition.
Use paint remover to remove the black stuff. Follow up with sanding, Scotchbrite or similar abrasive.
It is also possible that this is powder coat, but it look like paint to me.
Whether there is anodizing on there I cannot say. But once you have the black off, you can repaint if that is your goal. If you want to get a polished finish and think that the finish is anodized then you can follow one of the above solutions.
By the way, there is a way to check if a piece of aluminum is anodized or not. Aluminum is electrically conductive. If you have a multimeter, set it to ohms and place the two probes on a the surface of the aluminum part. If the aluminum surface has no anodizing the reading will be under 2 ohms. If the part is anodized it will be well above 2 ohms, likely in the k-ohms range or higher.
Don't insert the points of the probes into the surface because the sharp point may penetrate through the anodized layer. Just touch the surface.
09-28-22, 10:36 AM
#18
se�or miembro

Join Date: Dec 2018
Location: Pac NW
Posts: 6,623
Bikes: '70s - '80s Campagnolo
Mentioned: 92 Post(s)
Tagged: 0 Thread(s)
Quoted: 3886 Post(s)
Liked 6,480 Times
in
3,206 Posts
On the other hand, I've found every other deanodized component super easy to keep polished and looking great. But I don't ride in the rain.
Likes For SurferRosa:
09-28-22, 09:05 PM
#19
Newbie
I have not had any trouble with threading after the treatment, but I see where this could be a concern on delicate threading.
One simple solution might be to fill the threads with a layer of petroleum jelly/vaseline during the treatment. This would act as a waterproof
barrier that would be easy to wipe off.
Someone might have a better idea, but this would be a cheap and safe option.
Likes For omijay:
