


Grail Bike (a build thread of sorts)
 02-12-22, 08:47 AM
#1

Senior Member
Thread Starter
Grail Bike (a build thread of sorts)
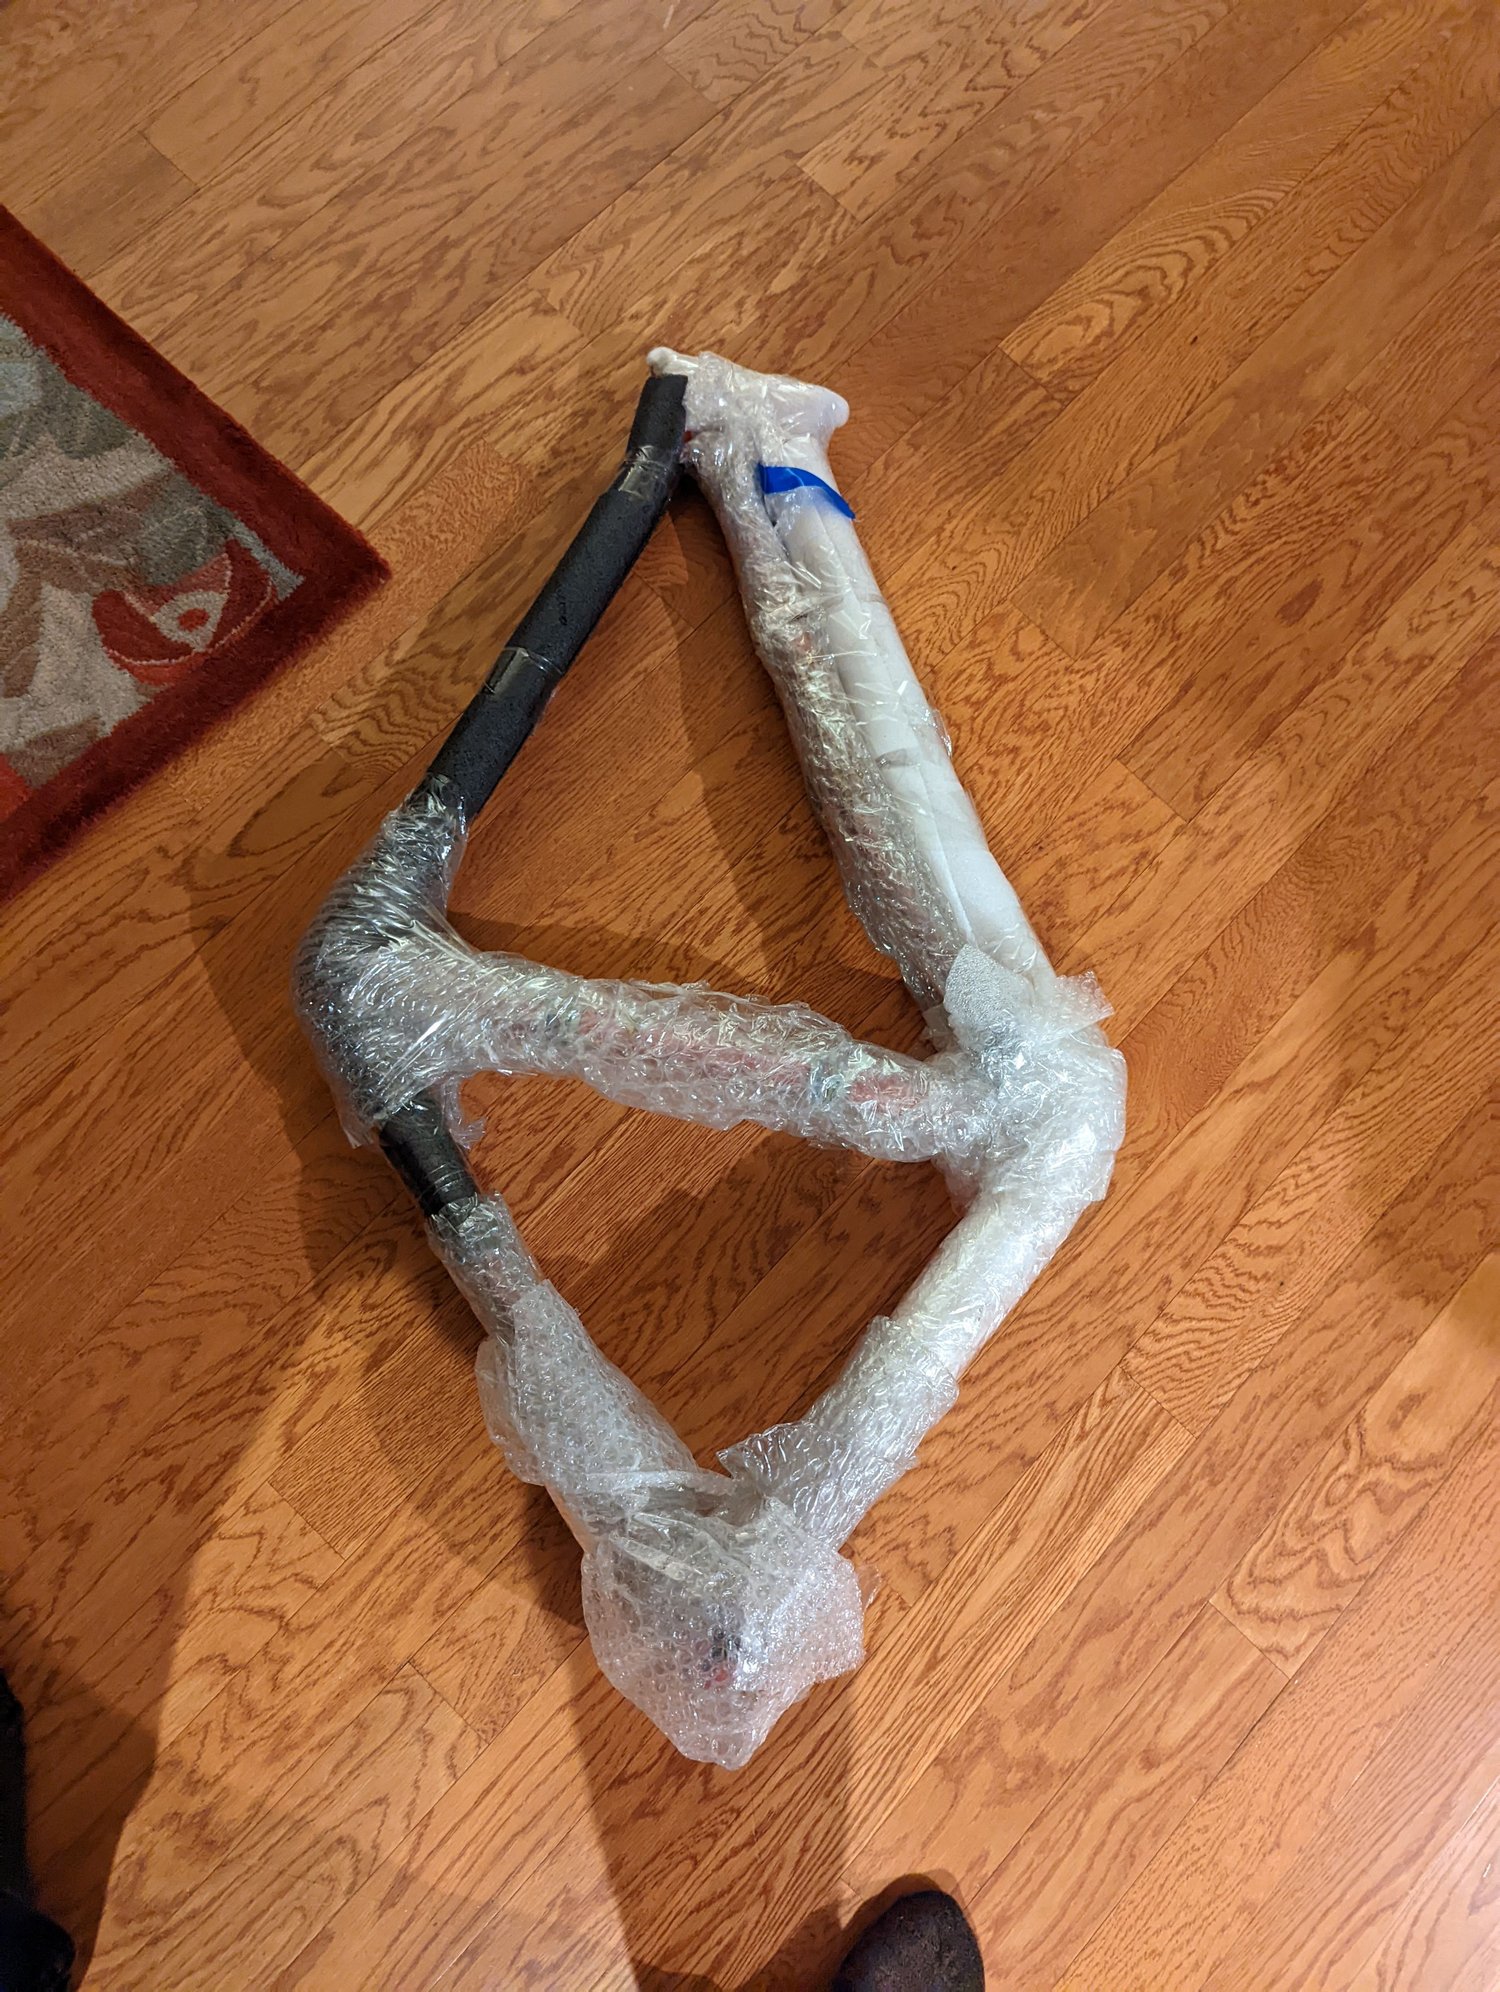
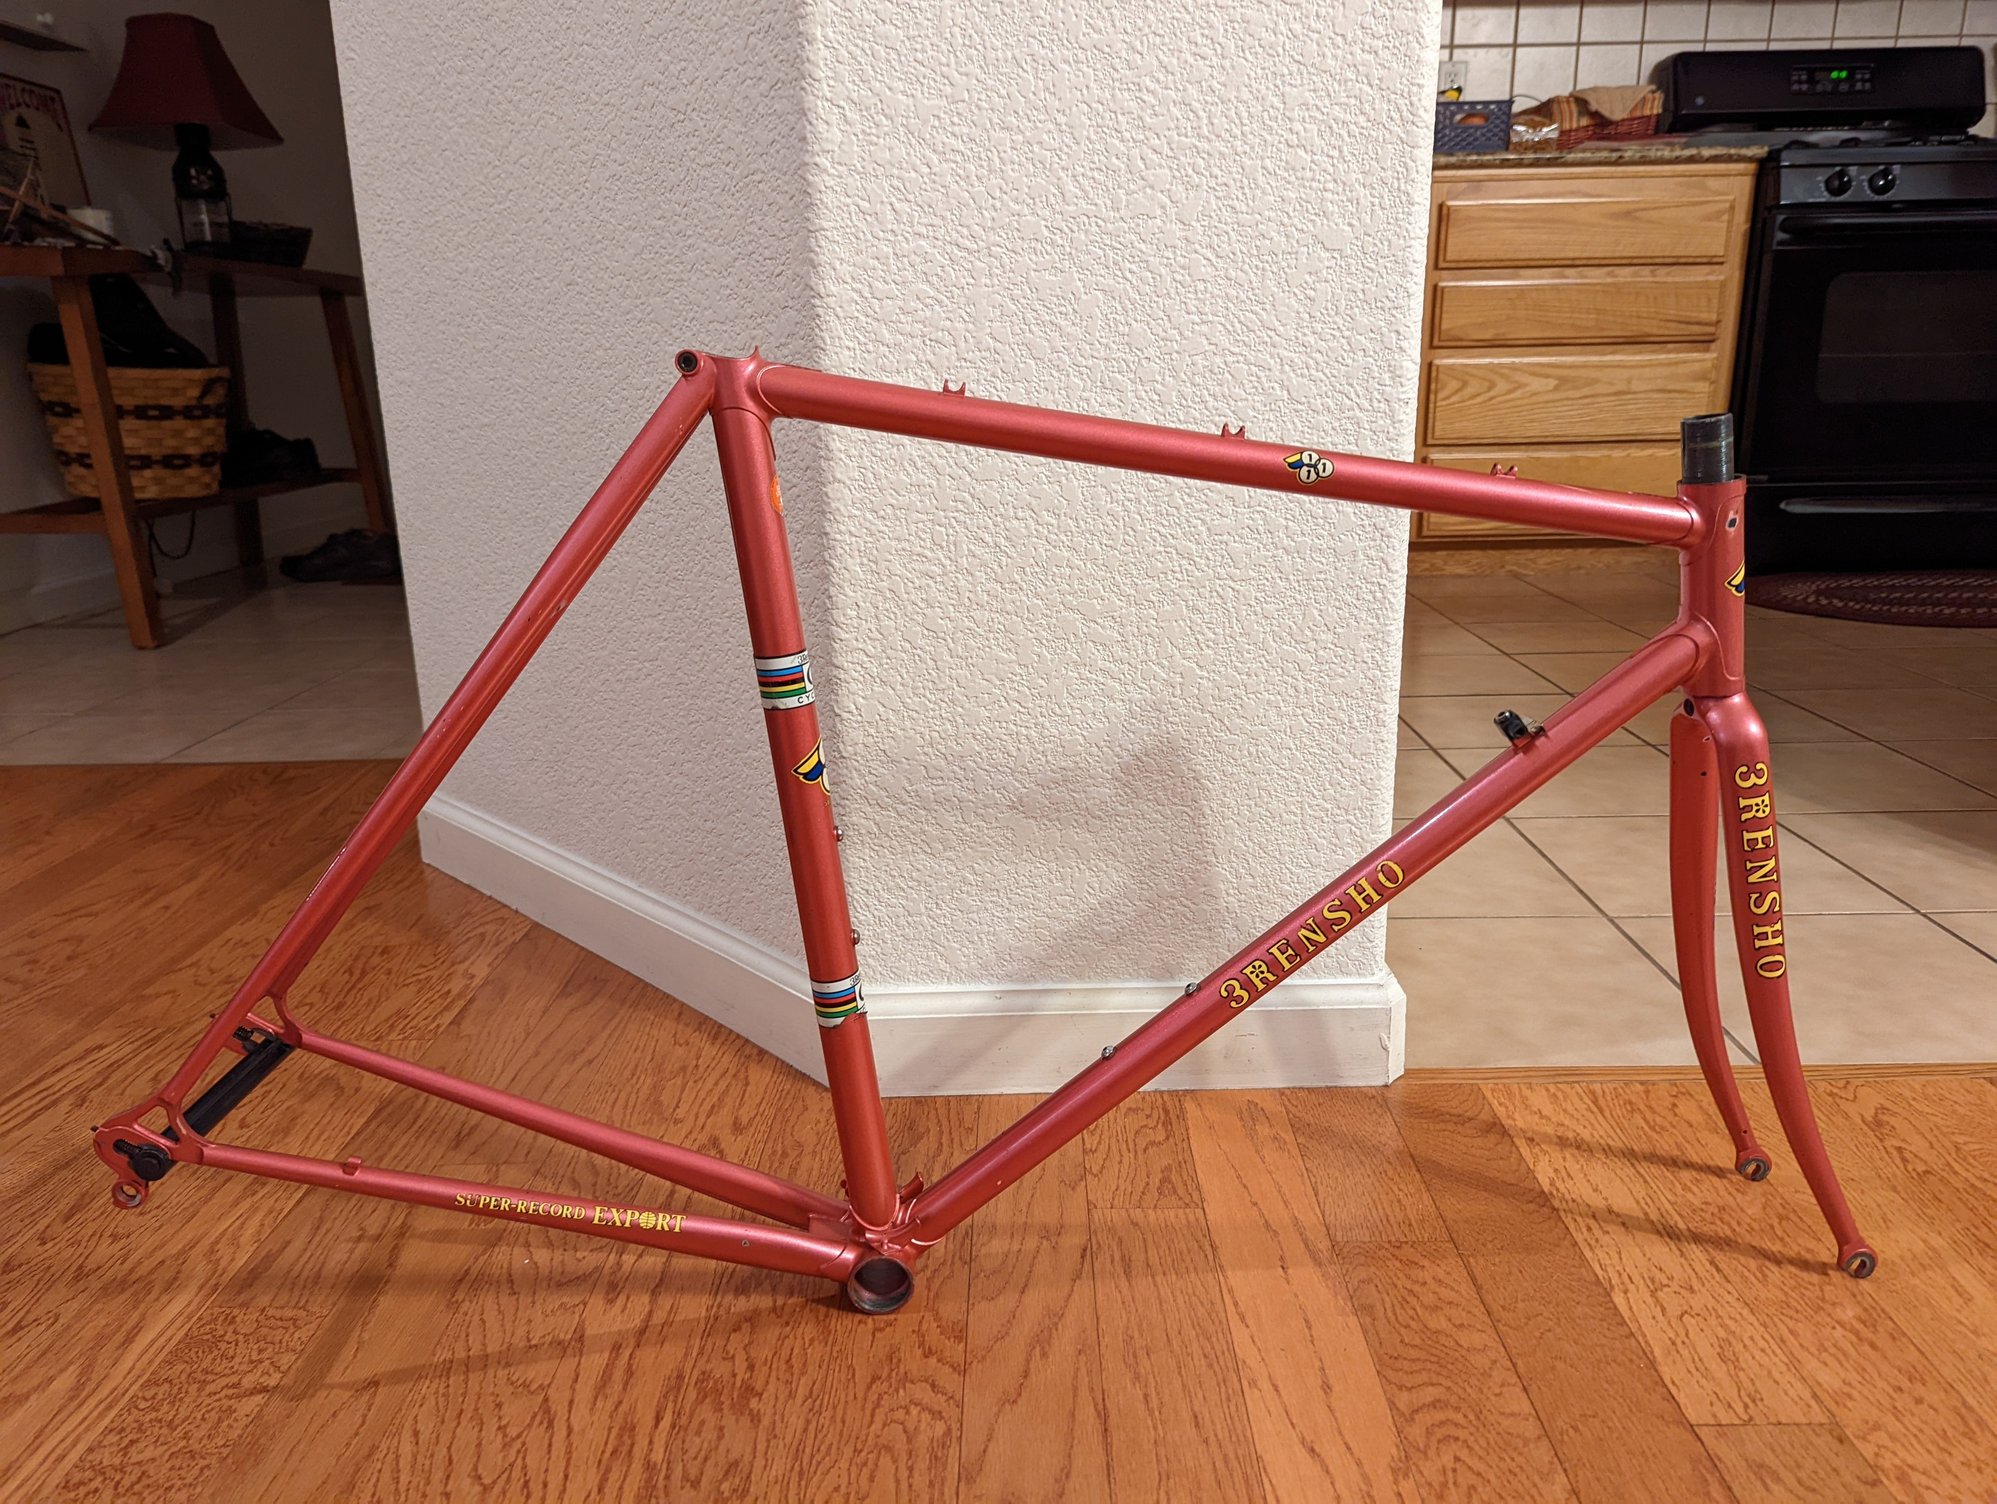
I have read with interest, a lot of threads asking "What is your grail bike". I always found people's answers interesting and the bikes exciting and varied. But when I really thought about what a grail bike for me would be I wasn't sure I had one. Thinking back to my college days, I had a custom Patereck that we made while I worked for him, but that cannot be replicated. Another shop DID have a frame on the wall that I always listed after, but I could not afford. It was beautiful, and I had never heard of it before that. I decided if I were to see a good example for sale, in my size, I would buy it . Well a member on this forum posted a frame last month, and it arrived last night. After unpacking and unwrapping the frame, the box was still packed tight with foam, bubble wrap etc.

Likes For mgopack42:
02-12-22, 08:59 AM
#2
Senior Member
Thread Starter
The build plan is full (or as close to it as I can do without breaking the bank) 7400 DA. Since this is a SRA (Super Record Aero) I should aspire to DA,AX, but the rarity equates to high price. I have the 7400 group on my Italian made Masi 3V, and a full first gen Campagnolo Chorus group in a drawer. Time to get the Italian, kitted out properly, and to do full Japanese justice to this Japanese work of art.
THe 3Rensho is as finely crafted as any frame I have seen. The details, like how the seat stays transition from roundish to an aerofoil shape as they continue to the fast back seat lug cluster is amazing. The fine pointed lugs are a thing of beauty. I have always been a sucker for sloping fork crowns, and in fact had one on my custom, but this fork is the most amazing I have seen.

Knowing I have a bike that may have been touched by a master frame builder is quite exciting. I am thinking of naming the bike Yoshi, but that might be a bit pretentious. Hope to be able to bring him to Eroica CA, in 12 weeks, maybe I will put him in the Concours.
THe 3Rensho is as finely crafted as any frame I have seen. The details, like how the seat stays transition from roundish to an aerofoil shape as they continue to the fast back seat lug cluster is amazing. The fine pointed lugs are a thing of beauty. I have always been a sucker for sloping fork crowns, and in fact had one on my custom, but this fork is the most amazing I have seen.
Knowing I have a bike that may have been touched by a master frame builder is quite exciting. I am thinking of naming the bike Yoshi, but that might be a bit pretentious. Hope to be able to bring him to Eroica CA, in 12 weeks, maybe I will put him in the Concours.
Last edited by mgopack42; 02-12-22 at 09:03 AM.
02-12-22, 10:25 AM
#3
Senior Member

Join Date: Aug 2009
Posts: 2,385
Mentioned: 14 Post(s)
Tagged: 0 Thread(s)
Quoted: 1557 Post(s)
Liked 1,732 Times
in
972 Posts
Very nice. What is the situation with the top mount shifter mount? Top mounts are always troublesome. The square Suntour mount is different from the rounded rectangular Shimano mount and the older Shimano mount seemingly doesn�t work with SIS shifters.
02-12-22, 11:14 AM
#4
Senior Member

Join Date: Sep 2005
Location: Oakland, CA
Posts: 3,265
Bikes: '82 Univega Competizione, '72 Motobecane Grand Record, '83 Mercian KOM Touring, '85 Univega Alpina Uno, '76 Eisentraut Limited
Mentioned: 57 Post(s)
Tagged: 0 Thread(s)
Quoted: 1088 Post(s)
Liked 1,205 Times
in
701 Posts
Getting a suitable adapter mounted is most of the battle, and this one already has the Gipiemme adapter fitted. Beautiful frame!
02-12-22, 12:22 PM
#5
Crawlin' up, flyin' down

Join Date: Jan 2006
Location: Democratic Peoples' Republic of Berkeley
Posts: 5,645
Bikes: 1967 Paramount; 1982-ish Ron Cooper; 1978 Eisentraut "A"; two mid-1960s Cinelli Speciale Corsas; and others in various stages of non-rideability.
Mentioned: 40 Post(s)
Tagged: 0 Thread(s)
Quoted: 1021 Post(s)
Liked 2,513 Times
in
1,051 Posts
Beautiful. Just beautiful. I look forward to seeing it in Cambria come late April
__________________
"I'm in shape -- round is a shape." Andy Rooney
"I'm in shape -- round is a shape." Andy Rooney
02-12-22, 12:29 PM
#6
Banned.

Join Date: Jul 2009
Location: PAZ
Posts: 12,294
Mentioned: 255 Post(s)
Tagged: 0 Thread(s)
Quoted: 2588 Post(s)
Liked 4,824 Times
in
1,709 Posts
Beautiful frame! A lot of work must have gone into that seat lug/seat stay transition. Hopefully we will see some close-ups of the details; looking forward to updates!
DD
DD
 02-12-22, 04:03 PM
#7
Senior Member
Join Date: Nov 2015
Posts: 4,475
Mentioned: 102 Post(s)
Tagged: 0 Thread(s)
Quoted: 1636 Post(s)
Likes: 0
Liked 824 Times
in
533 Posts
Congratulations! Beautiful Rensho frameset!
A definite grail bike for many C&Vers, including me.
Curious, if you also considered building this one up with a late version Suntour Superbe Pro group, instead of the DA 7400?
I just find the Suntour's design much more aesthetically appealing than the DA 7400......
.......which I think will compliment this frame better.
Last edited by Chombi1; 02-12-22 at 04:06 PM.
02-12-22, 06:05 PM
#8
Senior Member
Thread Starter
Congratulations! Beautiful Rensho frameset!
A definite grail bike for many C&Vers, including me.
Curious, if you also considered building this one up with a late version Suntour Superbe Pro group, instead of the DA 7400?
I just find the Suntour's design much more aesthetically appealing than the DA 7400......
.......which I think will compliment this frame better.
A definite grail bike for many C&Vers, including me.
Curious, if you also considered building this one up with a late version Suntour Superbe Pro group, instead of the DA 7400?
I just find the Suntour's design much more aesthetically appealing than the DA 7400......
.......which I think will compliment this frame better.
02-12-22, 06:08 PM
#9
Senior Member
Thread Starter
Last edited by mgopack42; 02-13-22 at 08:01 PM.
02-12-22, 06:51 PM
#10
Senior Member
Join Date: Aug 2009
Posts: 2,385
Mentioned: 14 Post(s)
Tagged: 0 Thread(s)
Quoted: 1557 Post(s)
Liked 1,732 Times
in
972 Posts
It just so happens there is a Dura Ace SIS top mount on Ebay:
https://www.ebay.com/itm/134018464007
https://www.ebay.com/itm/134018464007
02-13-22, 07:14 PM
#11
Senior Member
Thread Starter
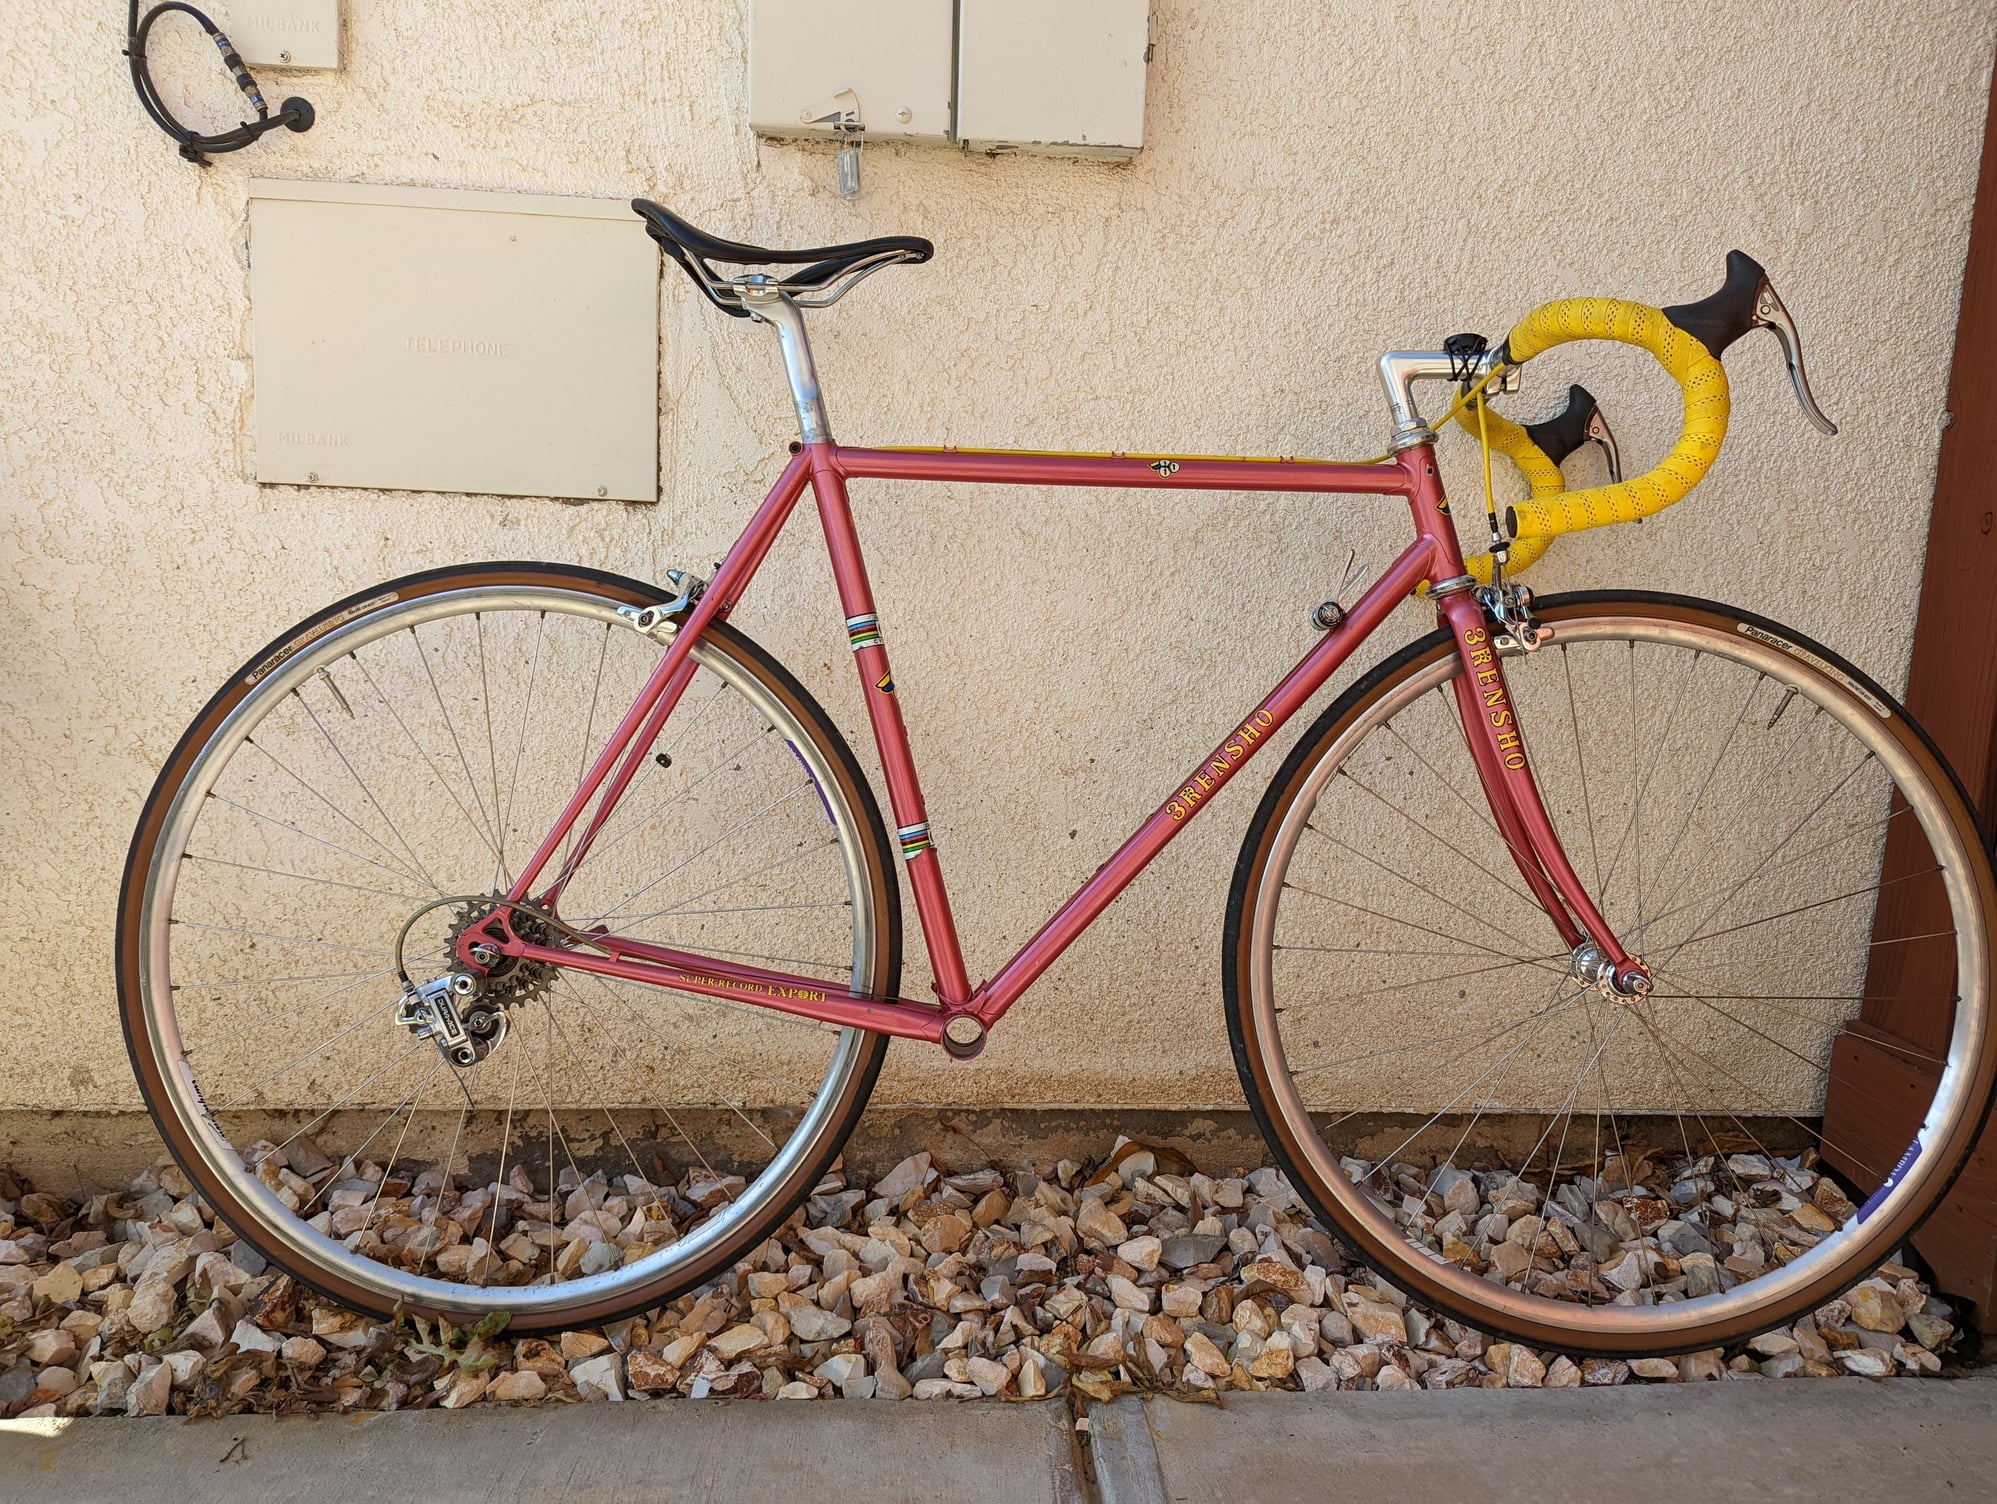
Started the build. Mostly transferring the DA parts from the Masi to the 3Rensho. Took the headset out and cleaned and regreased it. I was worried about fork steerer length. All was good.

Had to leave out one washer, but it seemed alright.
Now that I was satisfied that this hurdle was passed, I moved on to the brakes. They were pretty grimey from riding on and a little off road, so I decided to totally disassemble and clean them. Laid out in proper order to make sure I didn't lose parts or screw up reassembly.

Rear brake parts.

After toothbrush, degreaser and water rinse.
I thought it was cool that DA brakes had a ball bearing between the calipers. Cool solution to defeating friction.
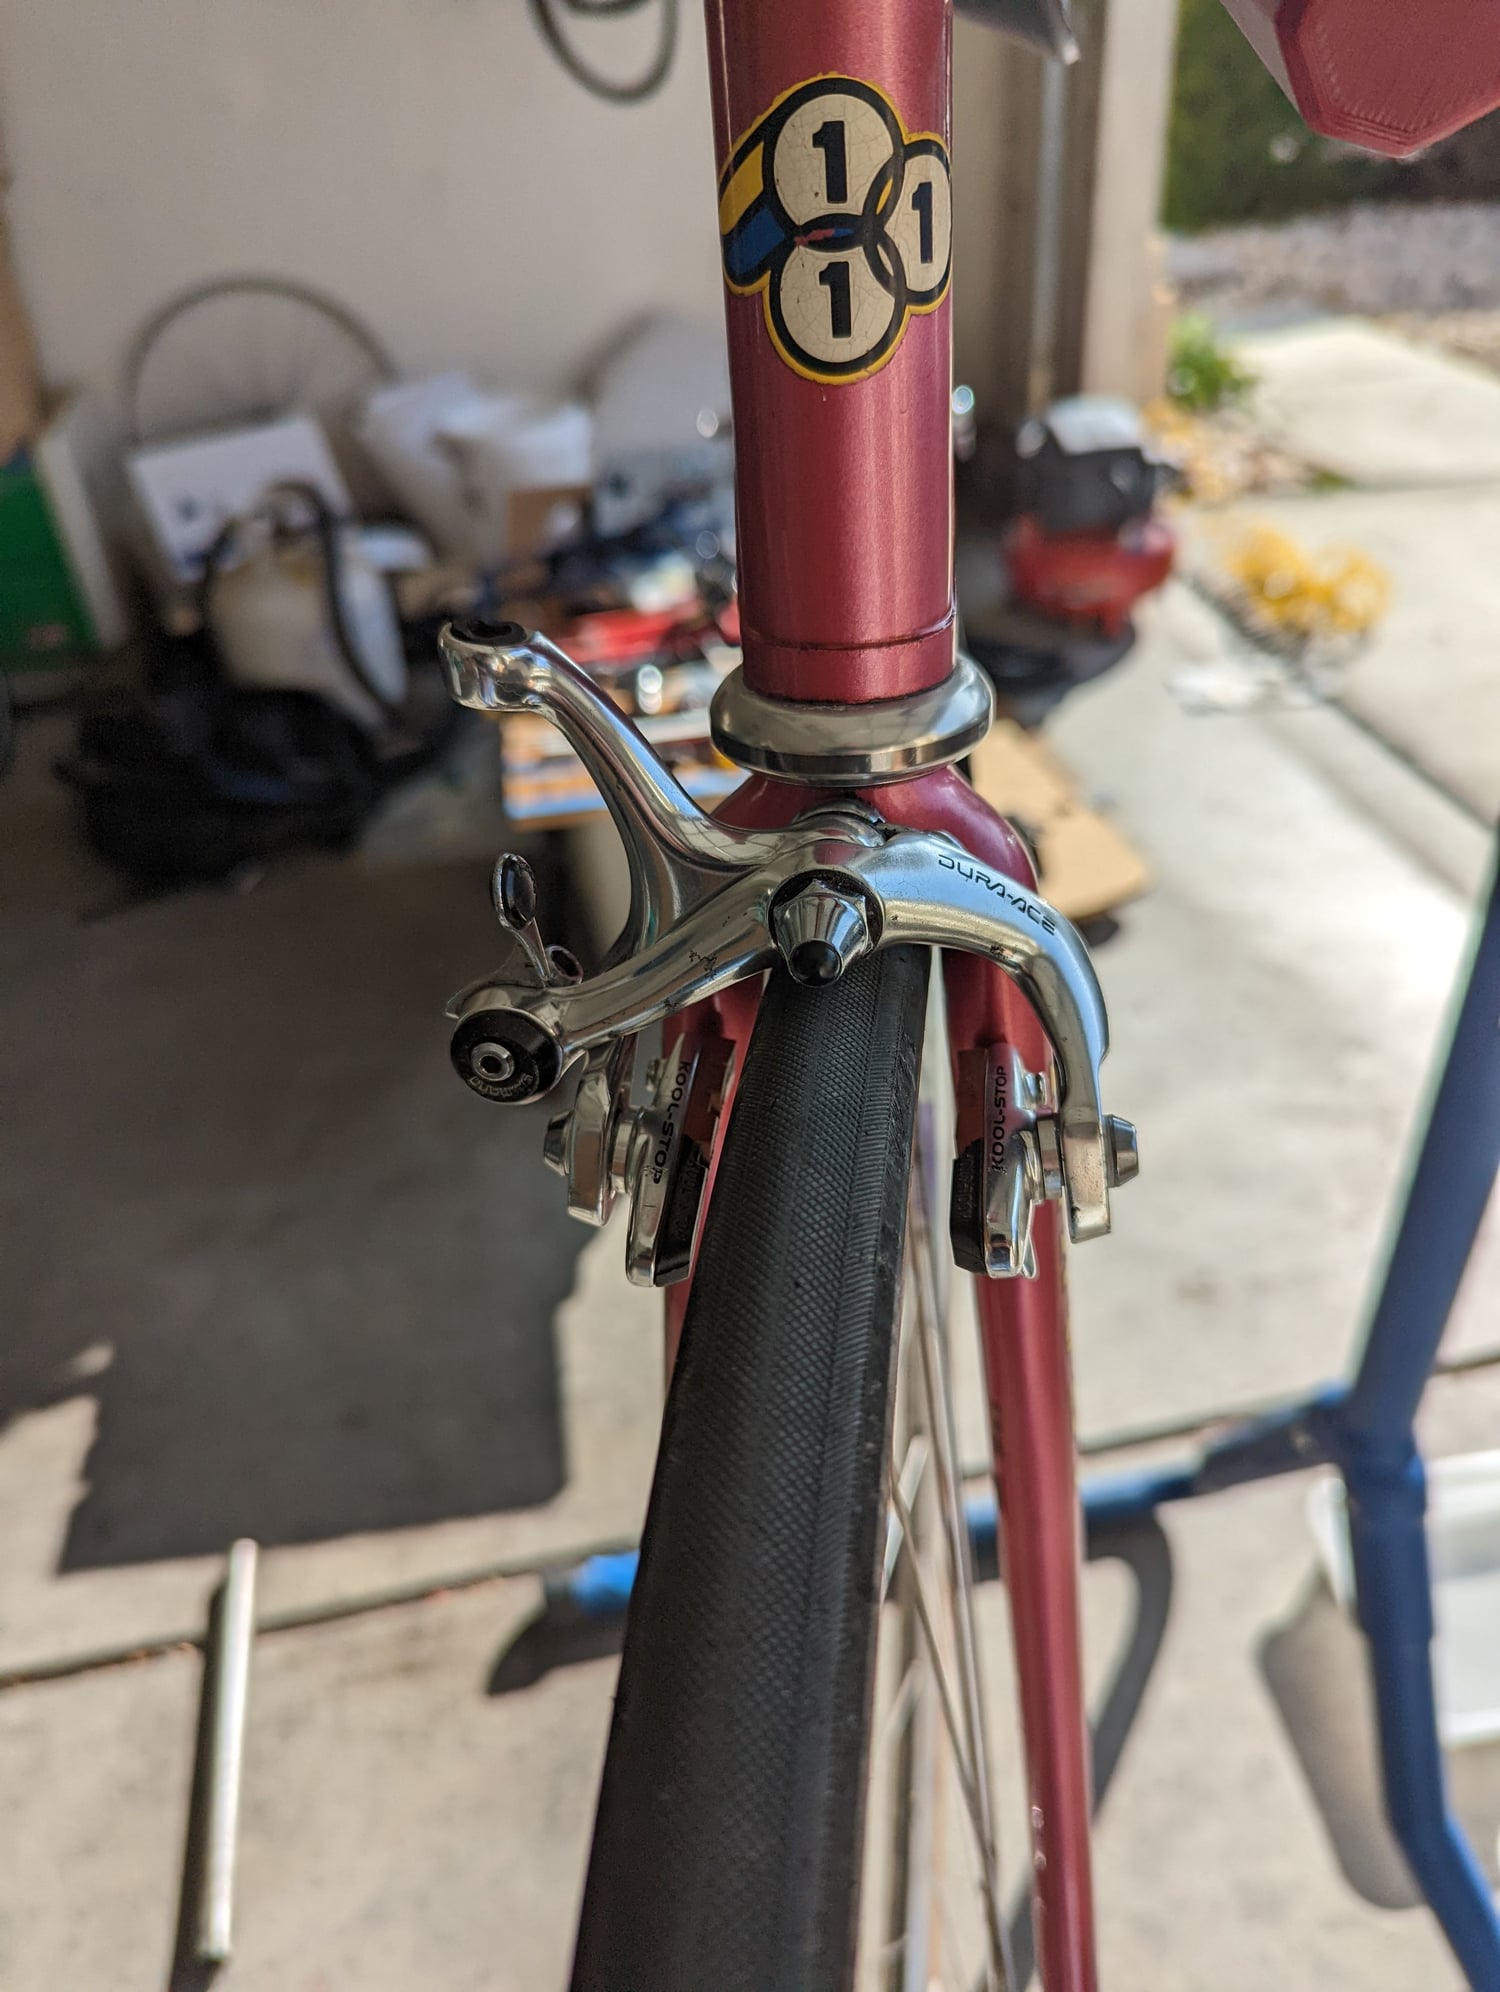
Front brake clean and mounted.
 o
o
My favorite third hand, I have been using this thing since 1979!
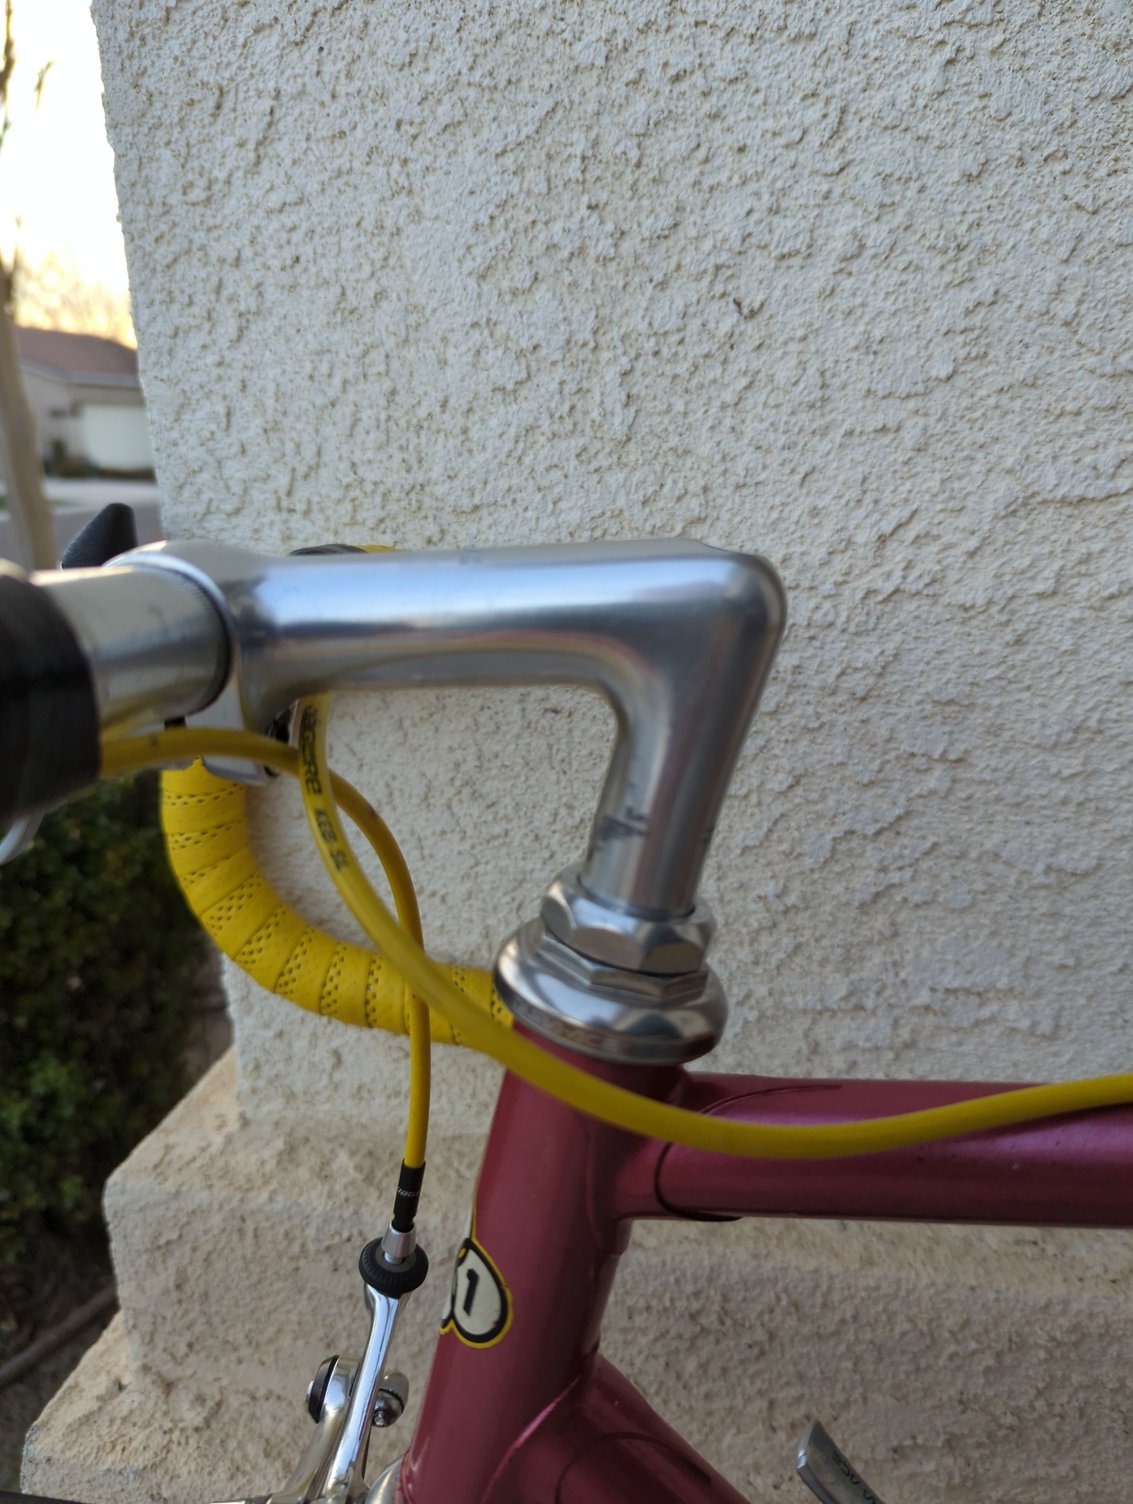
I decided the yellow housing, and bar tape would offset the Rose color and highlight the yellow "3Rensho" decals. Plus it meant that I could just transfer the Cinelli bar and stem from Masi to this frame.
Same treatment for the rear brake.
Had to leave out one washer, but it seemed alright.
Now that I was satisfied that this hurdle was passed, I moved on to the brakes. They were pretty grimey from riding on and a little off road, so I decided to totally disassemble and clean them. Laid out in proper order to make sure I didn't lose parts or screw up reassembly.
Rear brake parts.
After toothbrush, degreaser and water rinse.
I thought it was cool that DA brakes had a ball bearing between the calipers. Cool solution to defeating friction.
Front brake clean and mounted.
oMy favorite third hand, I have been using this thing since 1979!
I decided the yellow housing, and bar tape would offset the Rose color and highlight the yellow "3Rensho" decals. Plus it meant that I could just transfer the Cinelli bar and stem from Masi to this frame.
Same treatment for the rear brake.
02-13-22, 07:39 PM
#12
Senior Member
Thread Starter
I had a couple of issues with the stem and fork interface. I ,first found the top race wouldn't thread into the steerer. Got out my one big file and gave the top of the steerer a couple of swipes.


I didn't have the proper tool for pressing on the crown race, but I did have a chunk of delrin with a 1 1/8 inch hole drilled into it. That and a hammer got it seated.
When I tried to insert the stem, it wouldn't slide in. I took out the expander, and futzed around with it. Tried to force it in by twisting back and forth in hopes of figuring out the issue. Got some big scratches below the insertion line. Took a half round jewelers file, and cleaned up the inside of the stearer , they same way I cleaned up the top the threads on the outside. Then I used the big file to clean up the scratches I made on the stem. Test fit worked, so out it came, and reinstalled the bolt and expander, set the height, and tightened up for now.
Next transfered the seat and post directly over. Seat post was pretty short, so I put it at minimum insertion (this frame is 1.5 cm smaller, so that may be a future issue.
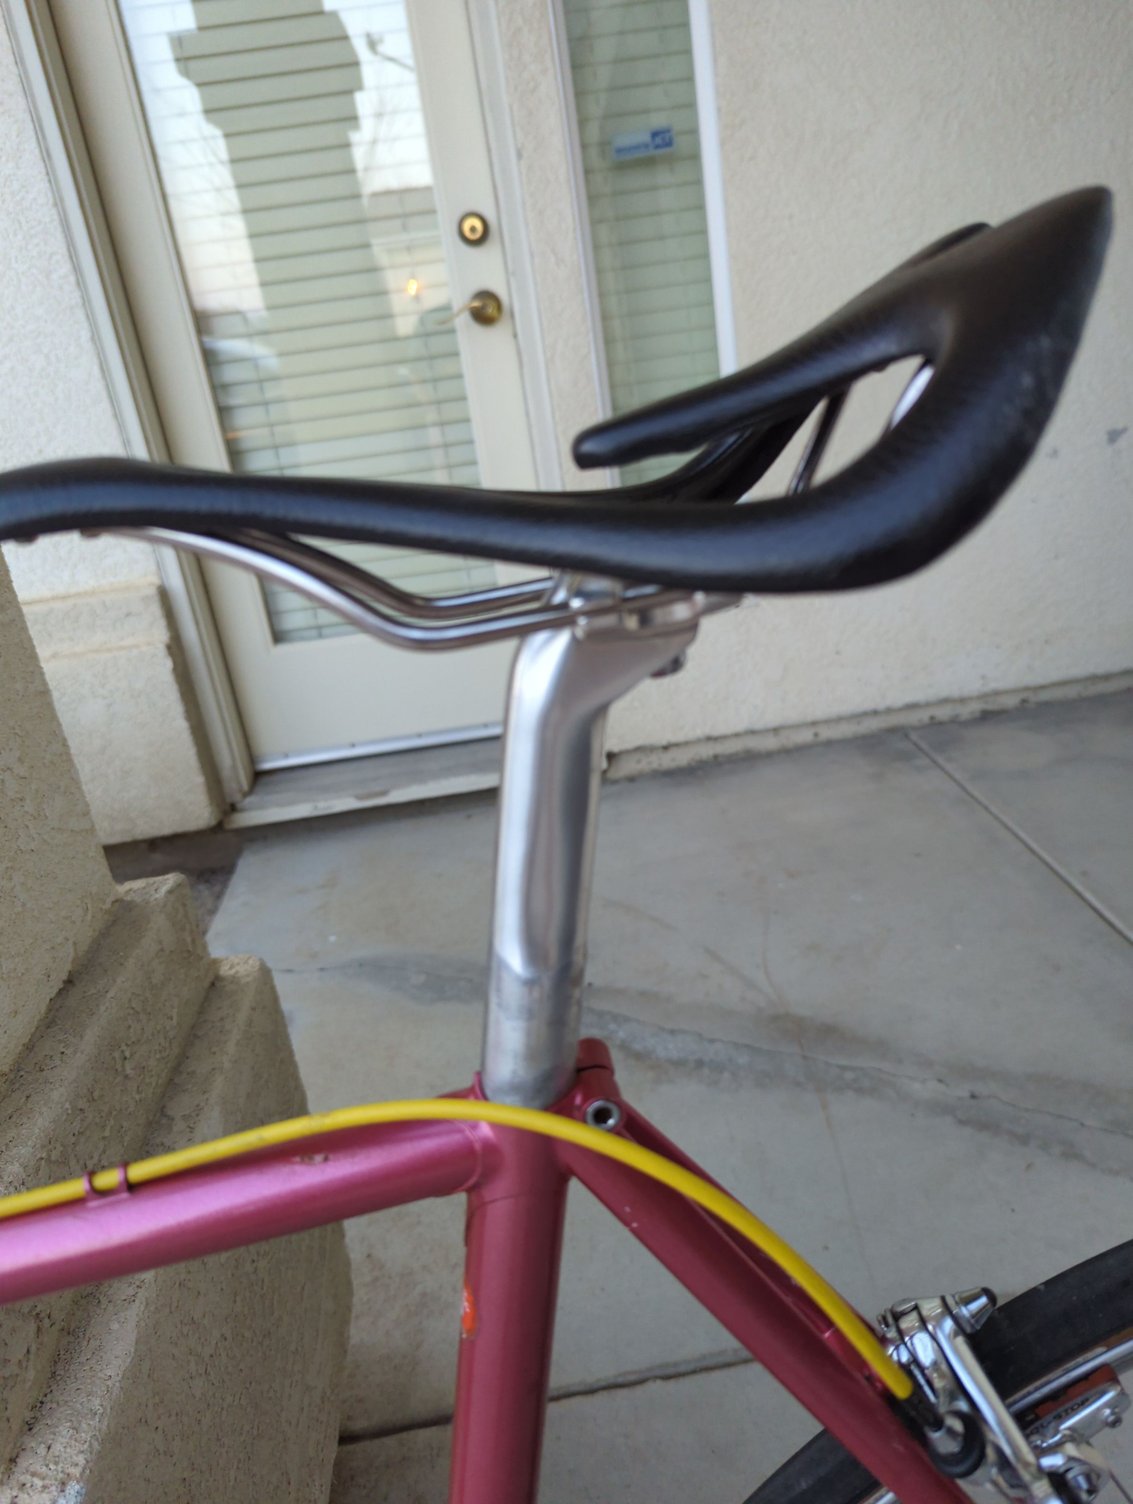
I may be in the market for a DA seatpost in the near future. Also waiting for first rides to evaluate stem length, again since this frame is smaller.
I didn't have the proper tool for pressing on the crown race, but I did have a chunk of delrin with a 1 1/8 inch hole drilled into it. That and a hammer got it seated.
When I tried to insert the stem, it wouldn't slide in. I took out the expander, and futzed around with it. Tried to force it in by twisting back and forth in hopes of figuring out the issue. Got some big scratches below the insertion line. Took a half round jewelers file, and cleaned up the inside of the stearer , they same way I cleaned up the top the threads on the outside. Then I used the big file to clean up the scratches I made on the stem. Test fit worked, so out it came, and reinstalled the bolt and expander, set the height, and tightened up for now.
Next transfered the seat and post directly over. Seat post was pretty short, so I put it at minimum insertion (this frame is 1.5 cm smaller, so that may be a future issue.
I may be in the market for a DA seatpost in the near future. Also waiting for first rides to evaluate stem length, again since this frame is smaller.
Last edited by mgopack42; 02-13-22 at 08:05 PM.
02-13-22, 07:48 PM
#13
Senior Member
Thread Starter
Installed the RD, mostly so I could start on the shifters and mount.i wanted to be able to get the right lever on with tension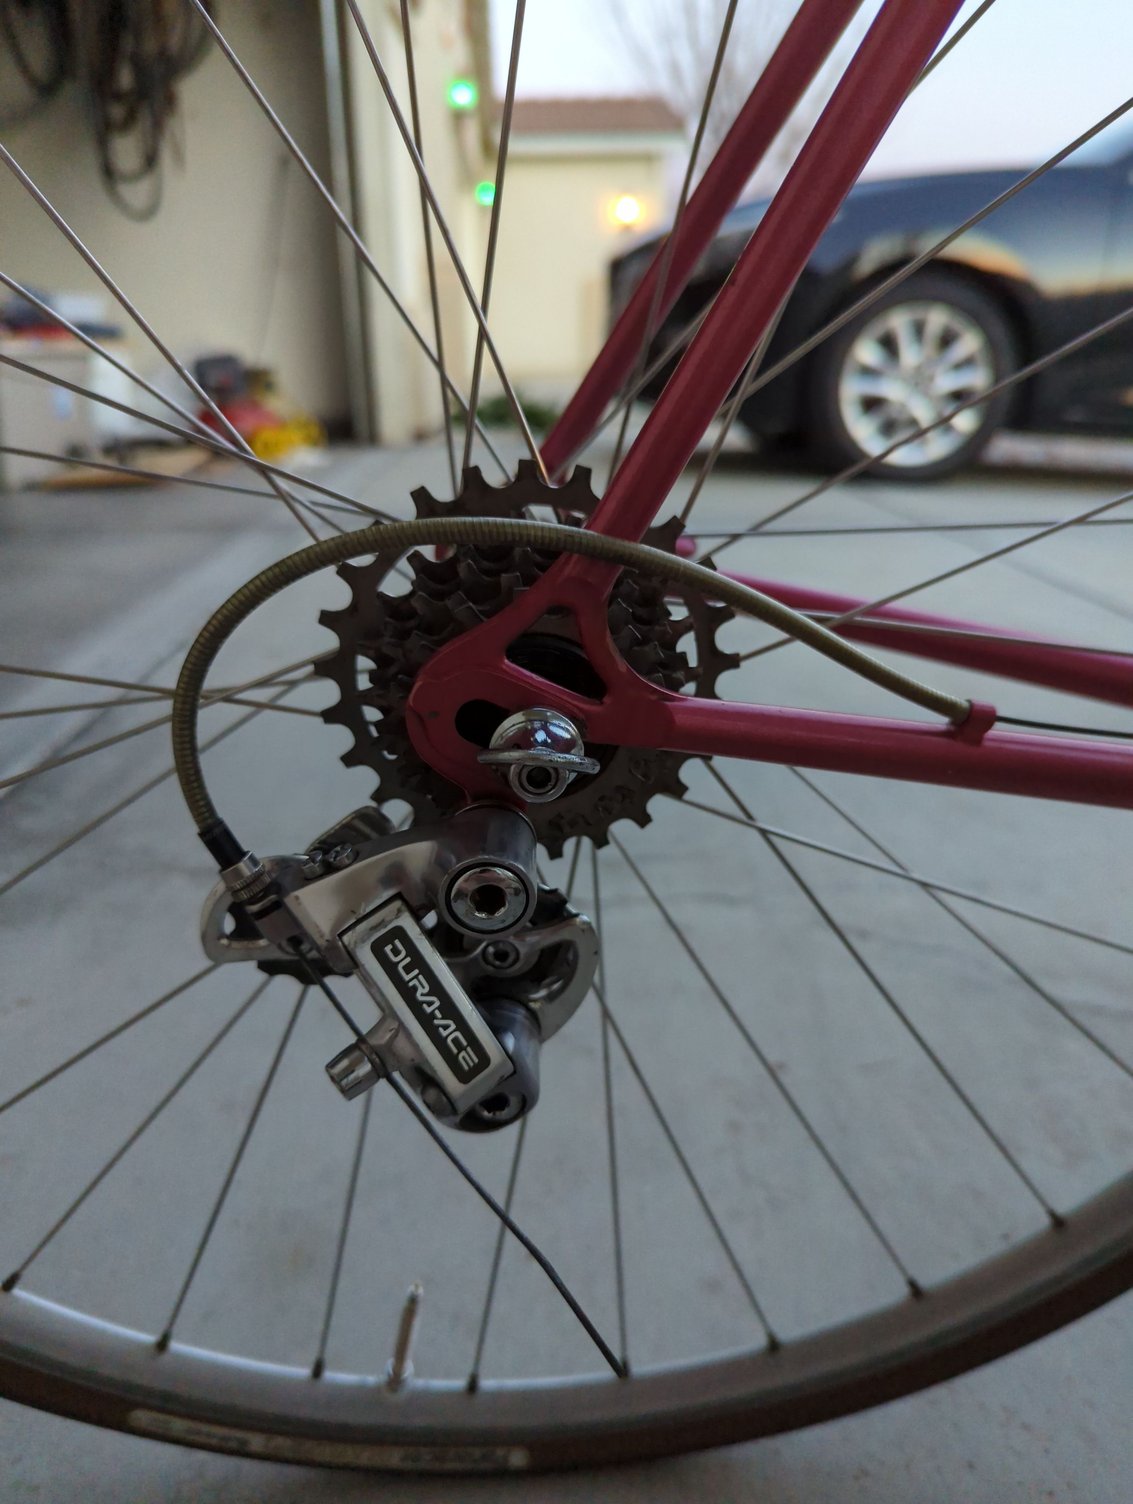
THe Gipemme adapter threads for the shifter was mostly stripped on one side (of course that is the side I tried first for the right shifter. I took it all apart, flipped the adapter so the partially stripped side was on the left and reinstalled the right shifter. The left side had 5 or so threads, but not where the screw with the D-ring could reach them, so a trip to Ace, I got a couple of lengths of M5 X 0.8 button head screws, and a couple of M5 washers, and mounted the left shifter.
More AERO! Maybe I need to do this on the right side too!
02-13-22, 07:58 PM
#14
Senior Member
Thread Starter
Things to be done/issues to be worked out are:
I need to source a BSA BB. All my bikes have had Italian BBs. Prefer a DA 7400 but I will work my way through that issue, by checking E(vil) Bay, or posting a WTB on here. The other major issue, is the FD. My DA one is braze on, so I either need a problem solvers adapter, or to source a new clamp on DA FD. I still have some minor ferrule issues to sort out, and get the chain cleaned up and installed. Here is how he sits after a few hours of work.
comments, leads on missing pieces, advice on proper ferrules, etc. are all welcome.
Last edited by mgopack42; 02-13-22 at 08:08 PM.
02-13-22, 08:02 PM
#15
Senior Member
Thread Starter
It just so happens there is a Dura Ace SIS top mount on Ebay:
https://www.ebay.com/itm/134018464007
https://www.ebay.com/itm/134018464007
02-13-22, 08:25 PM
#16
Senior Member
Thread Starter
A couple of misc pictures.

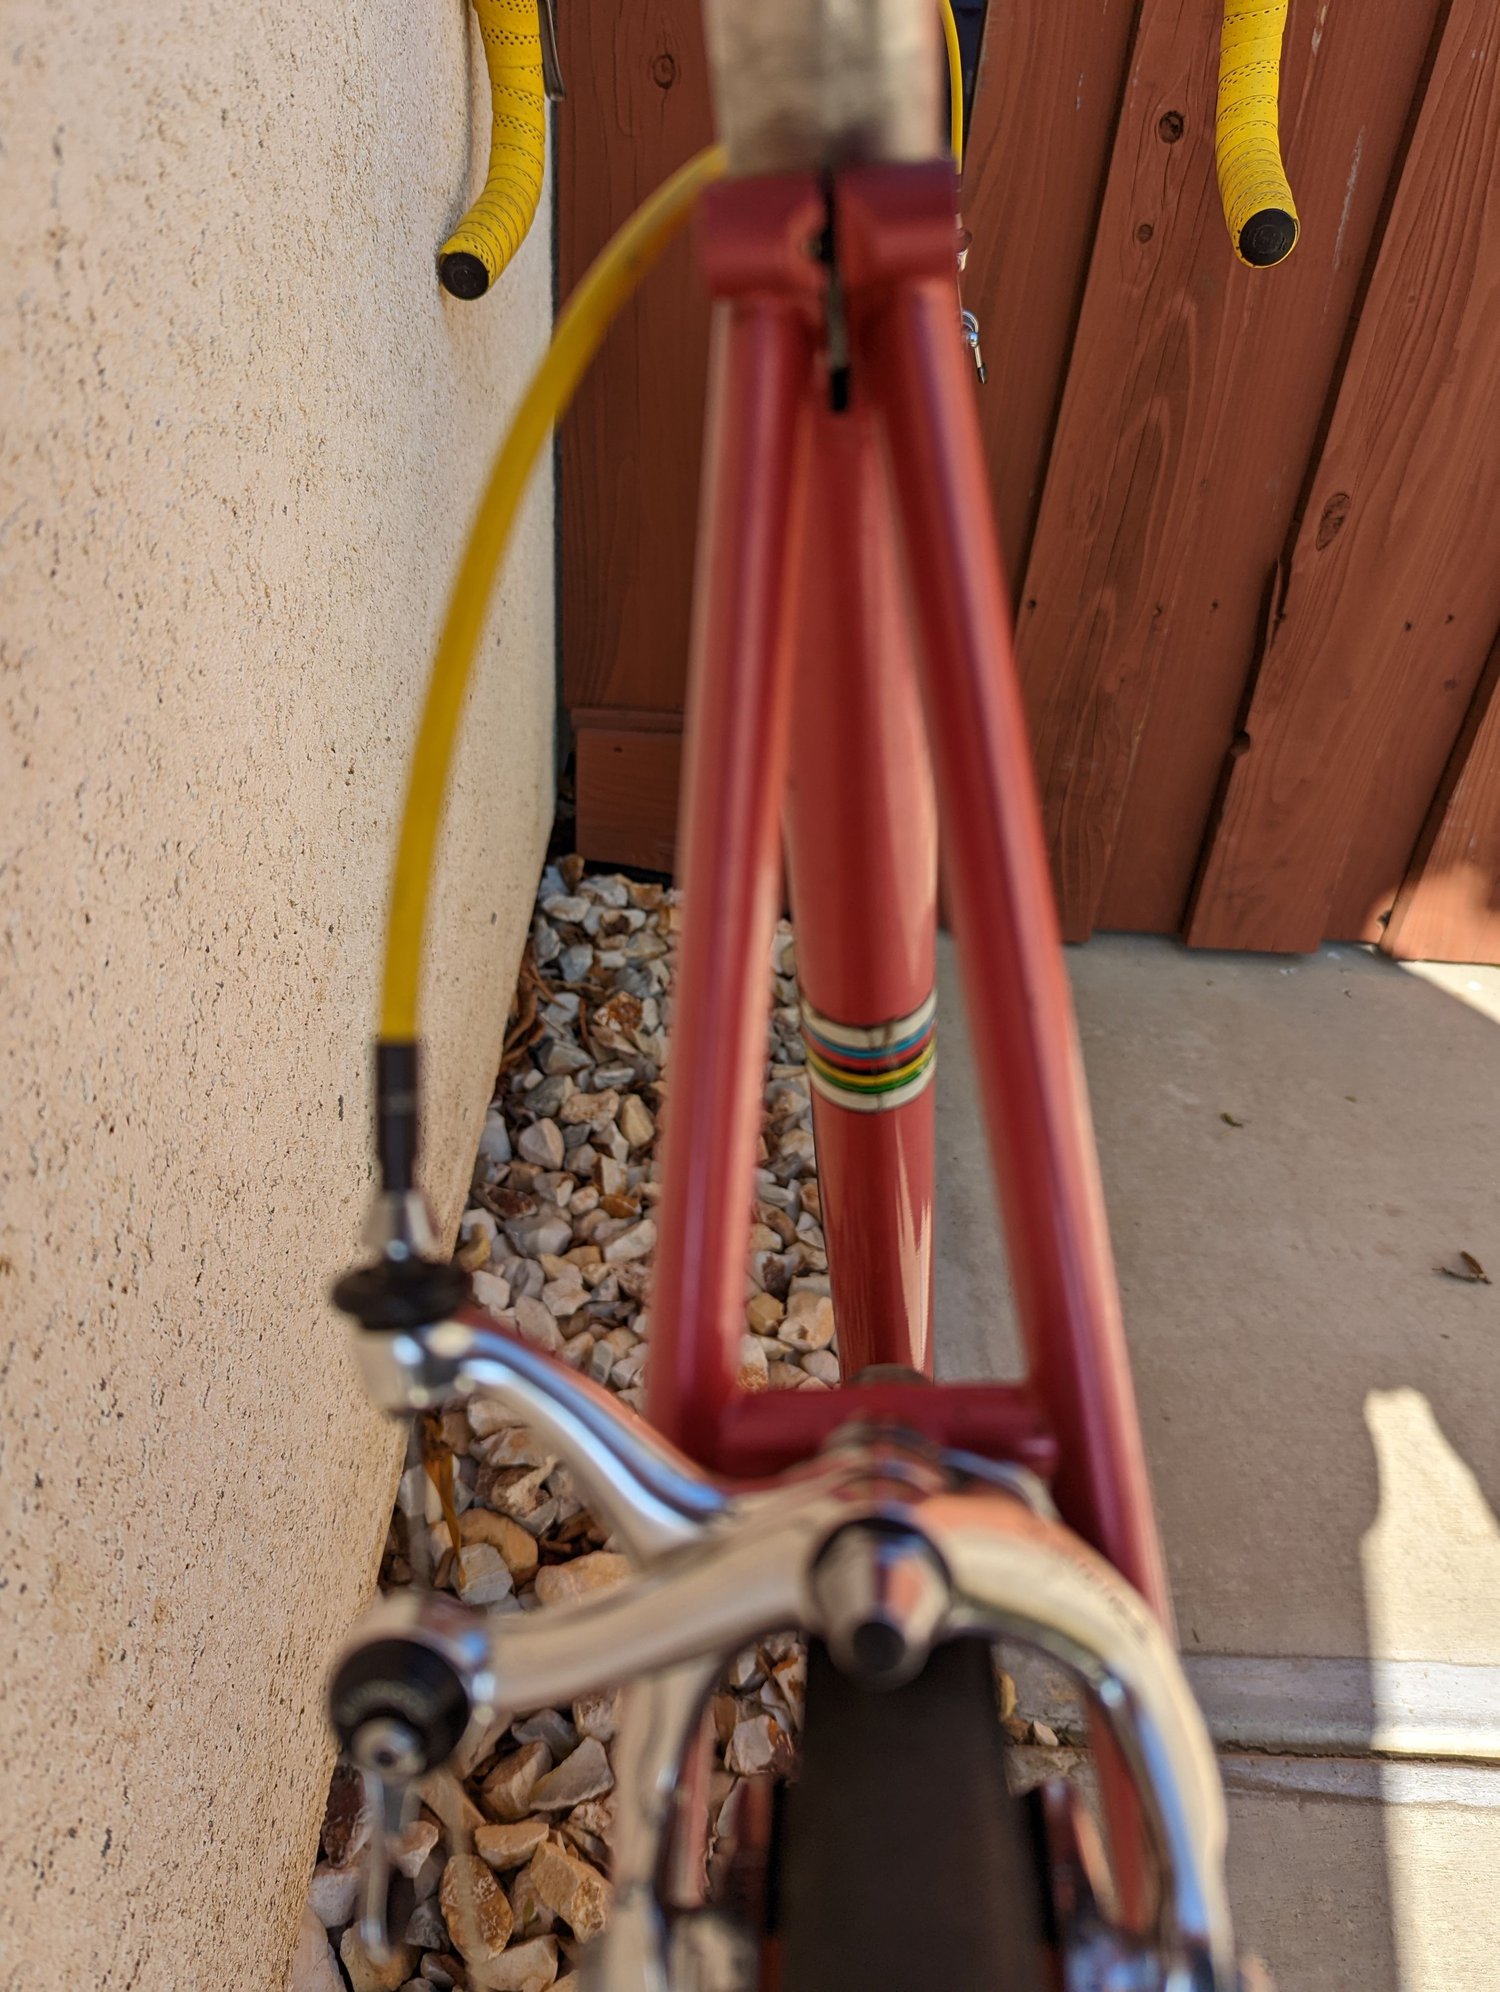
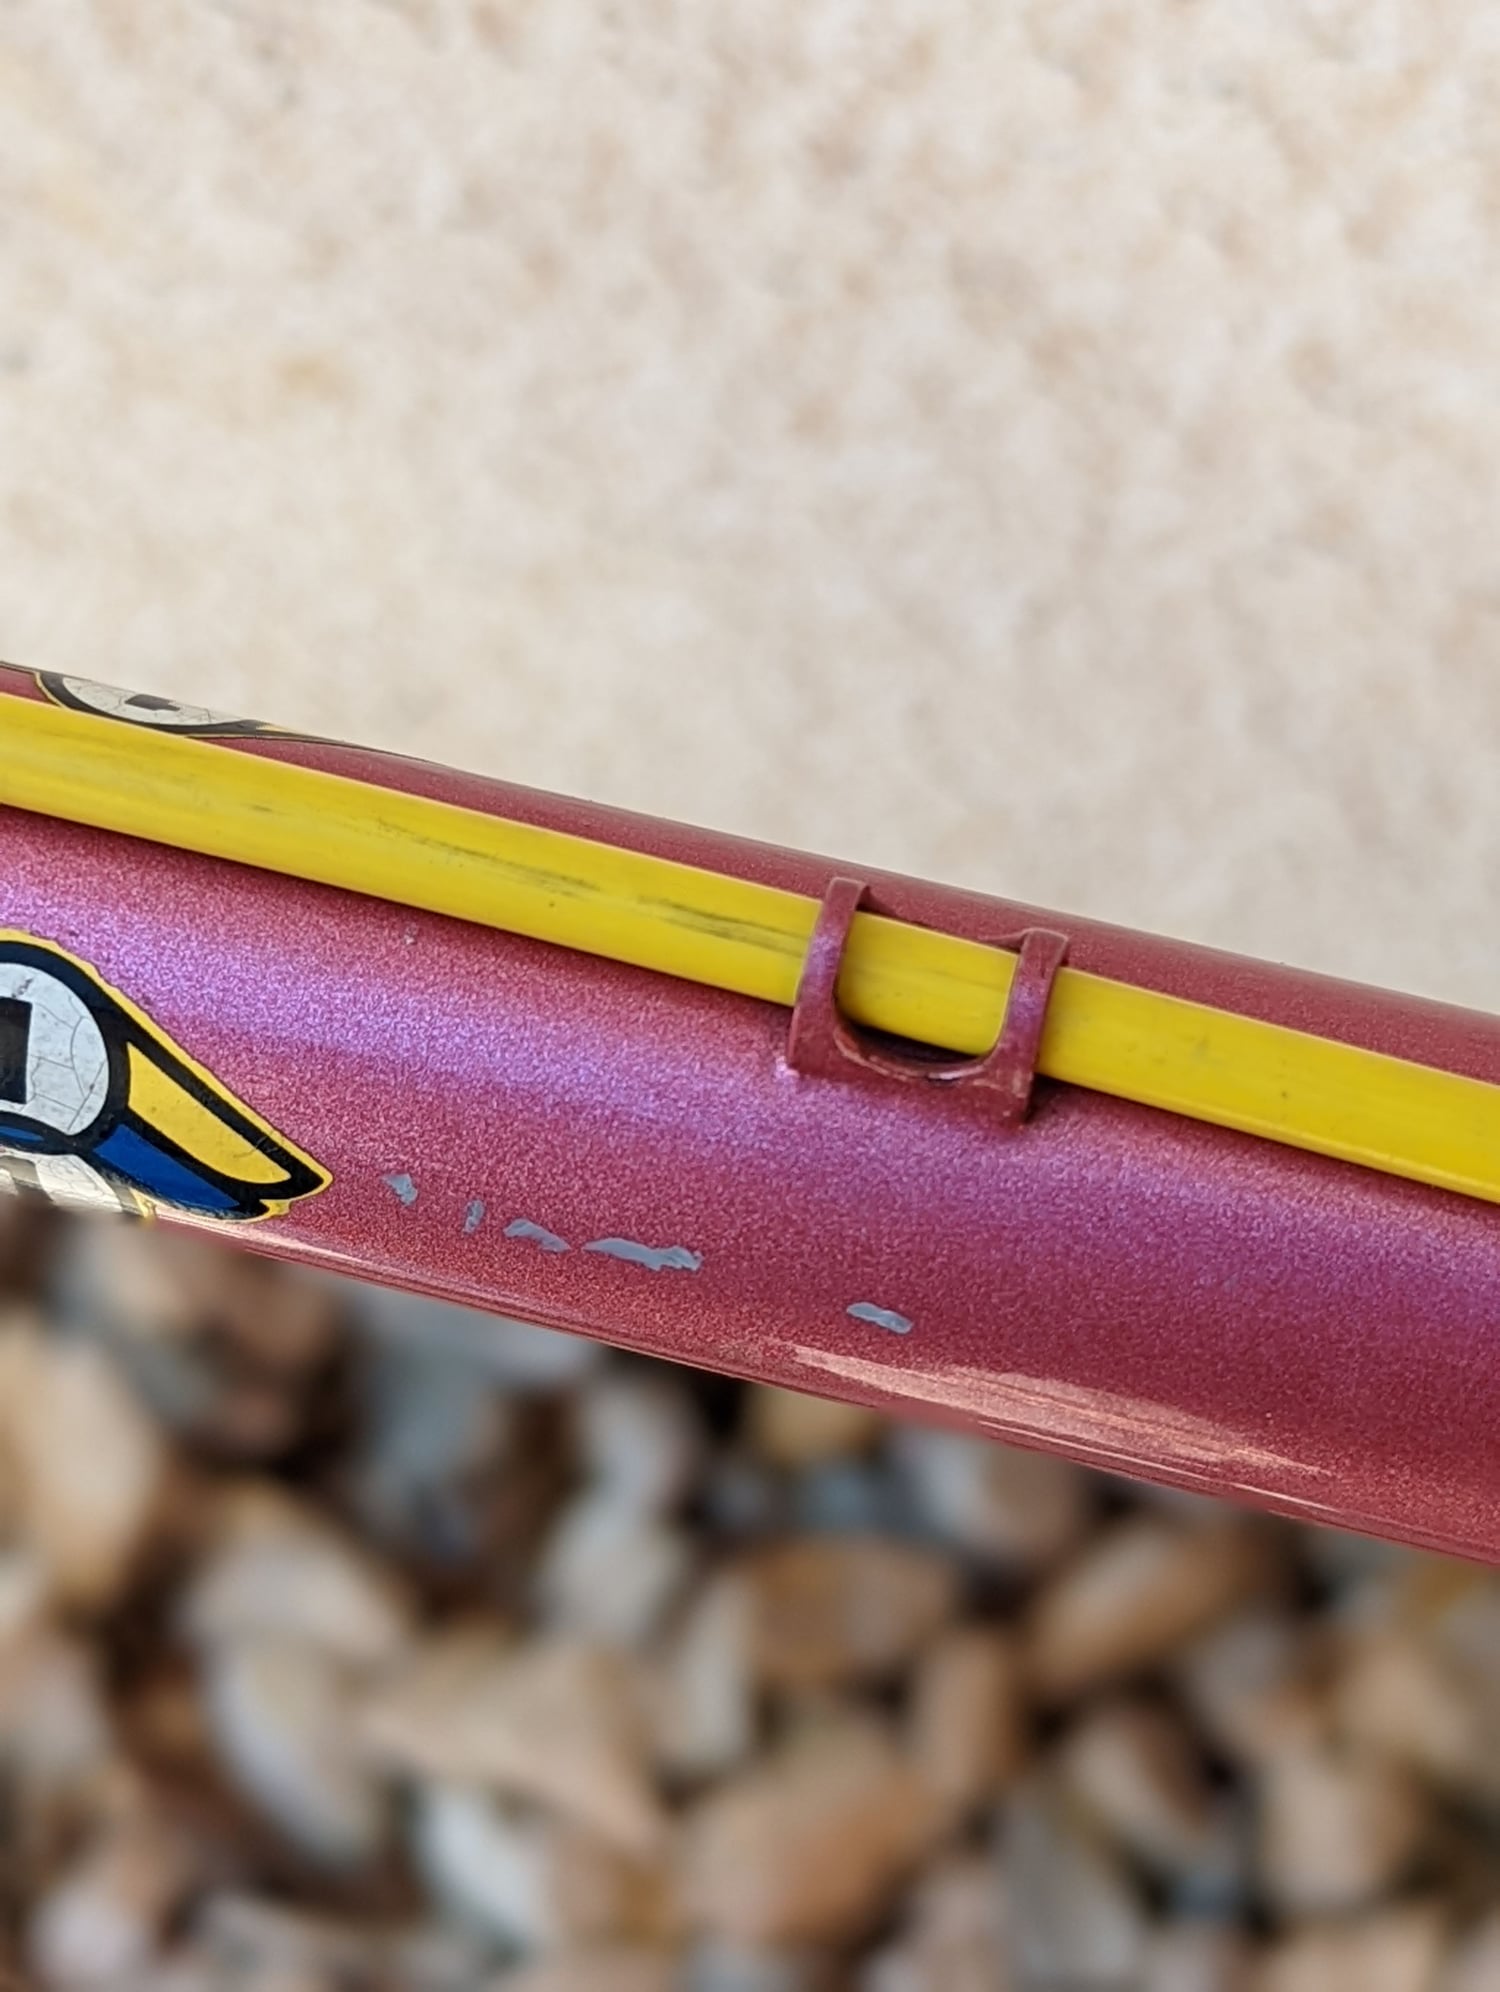
Tried to show the cool aerofoil shape of the seat stays, but it must be a trade secret, because I can't even get it in focus.
Detail of the top tube cable guide. I like this style of guide.

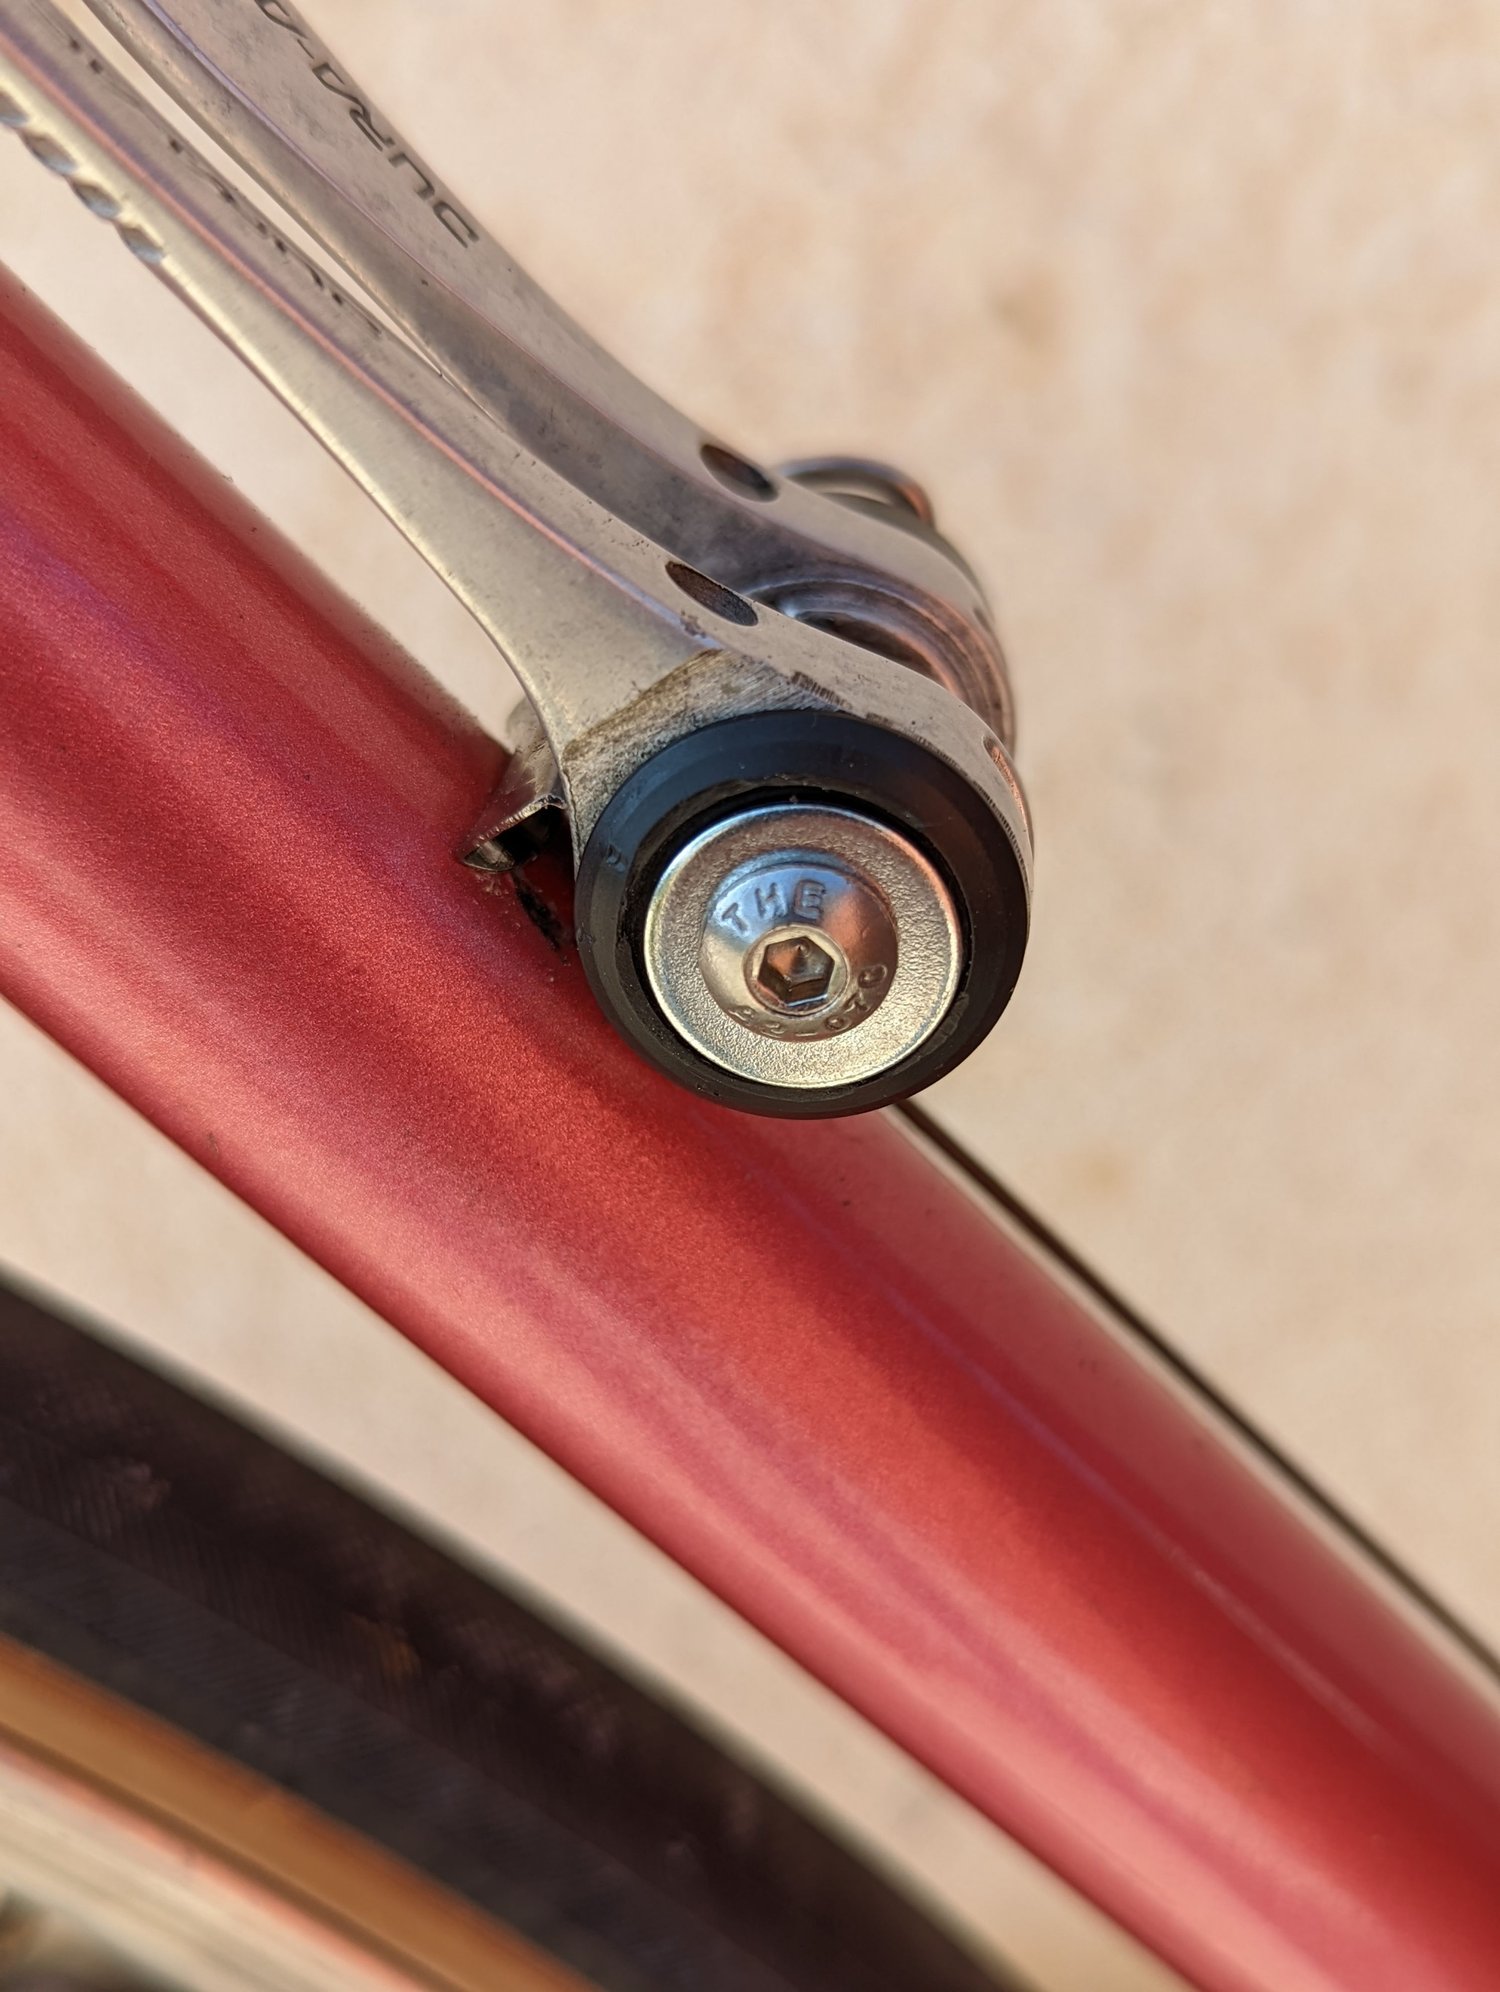
Long point lug, and a bit of paint rub from a previous cable routing

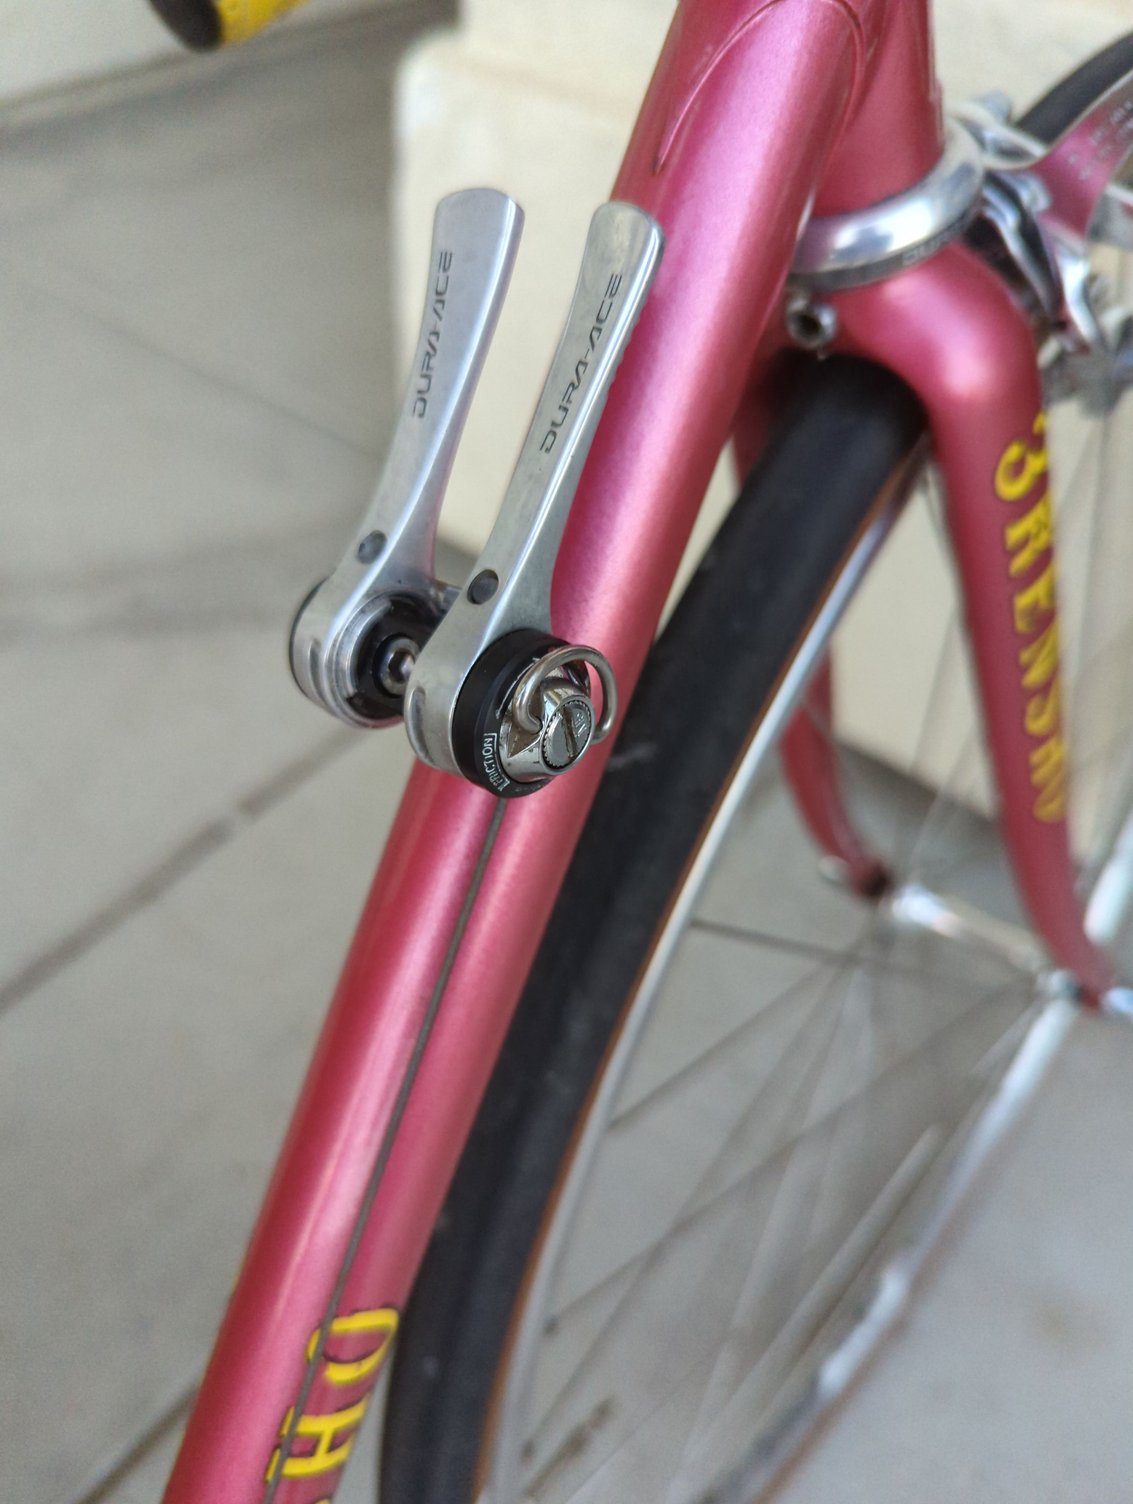
Showing the SIS levers mounted on the adapter, and another long point finely filed lug.
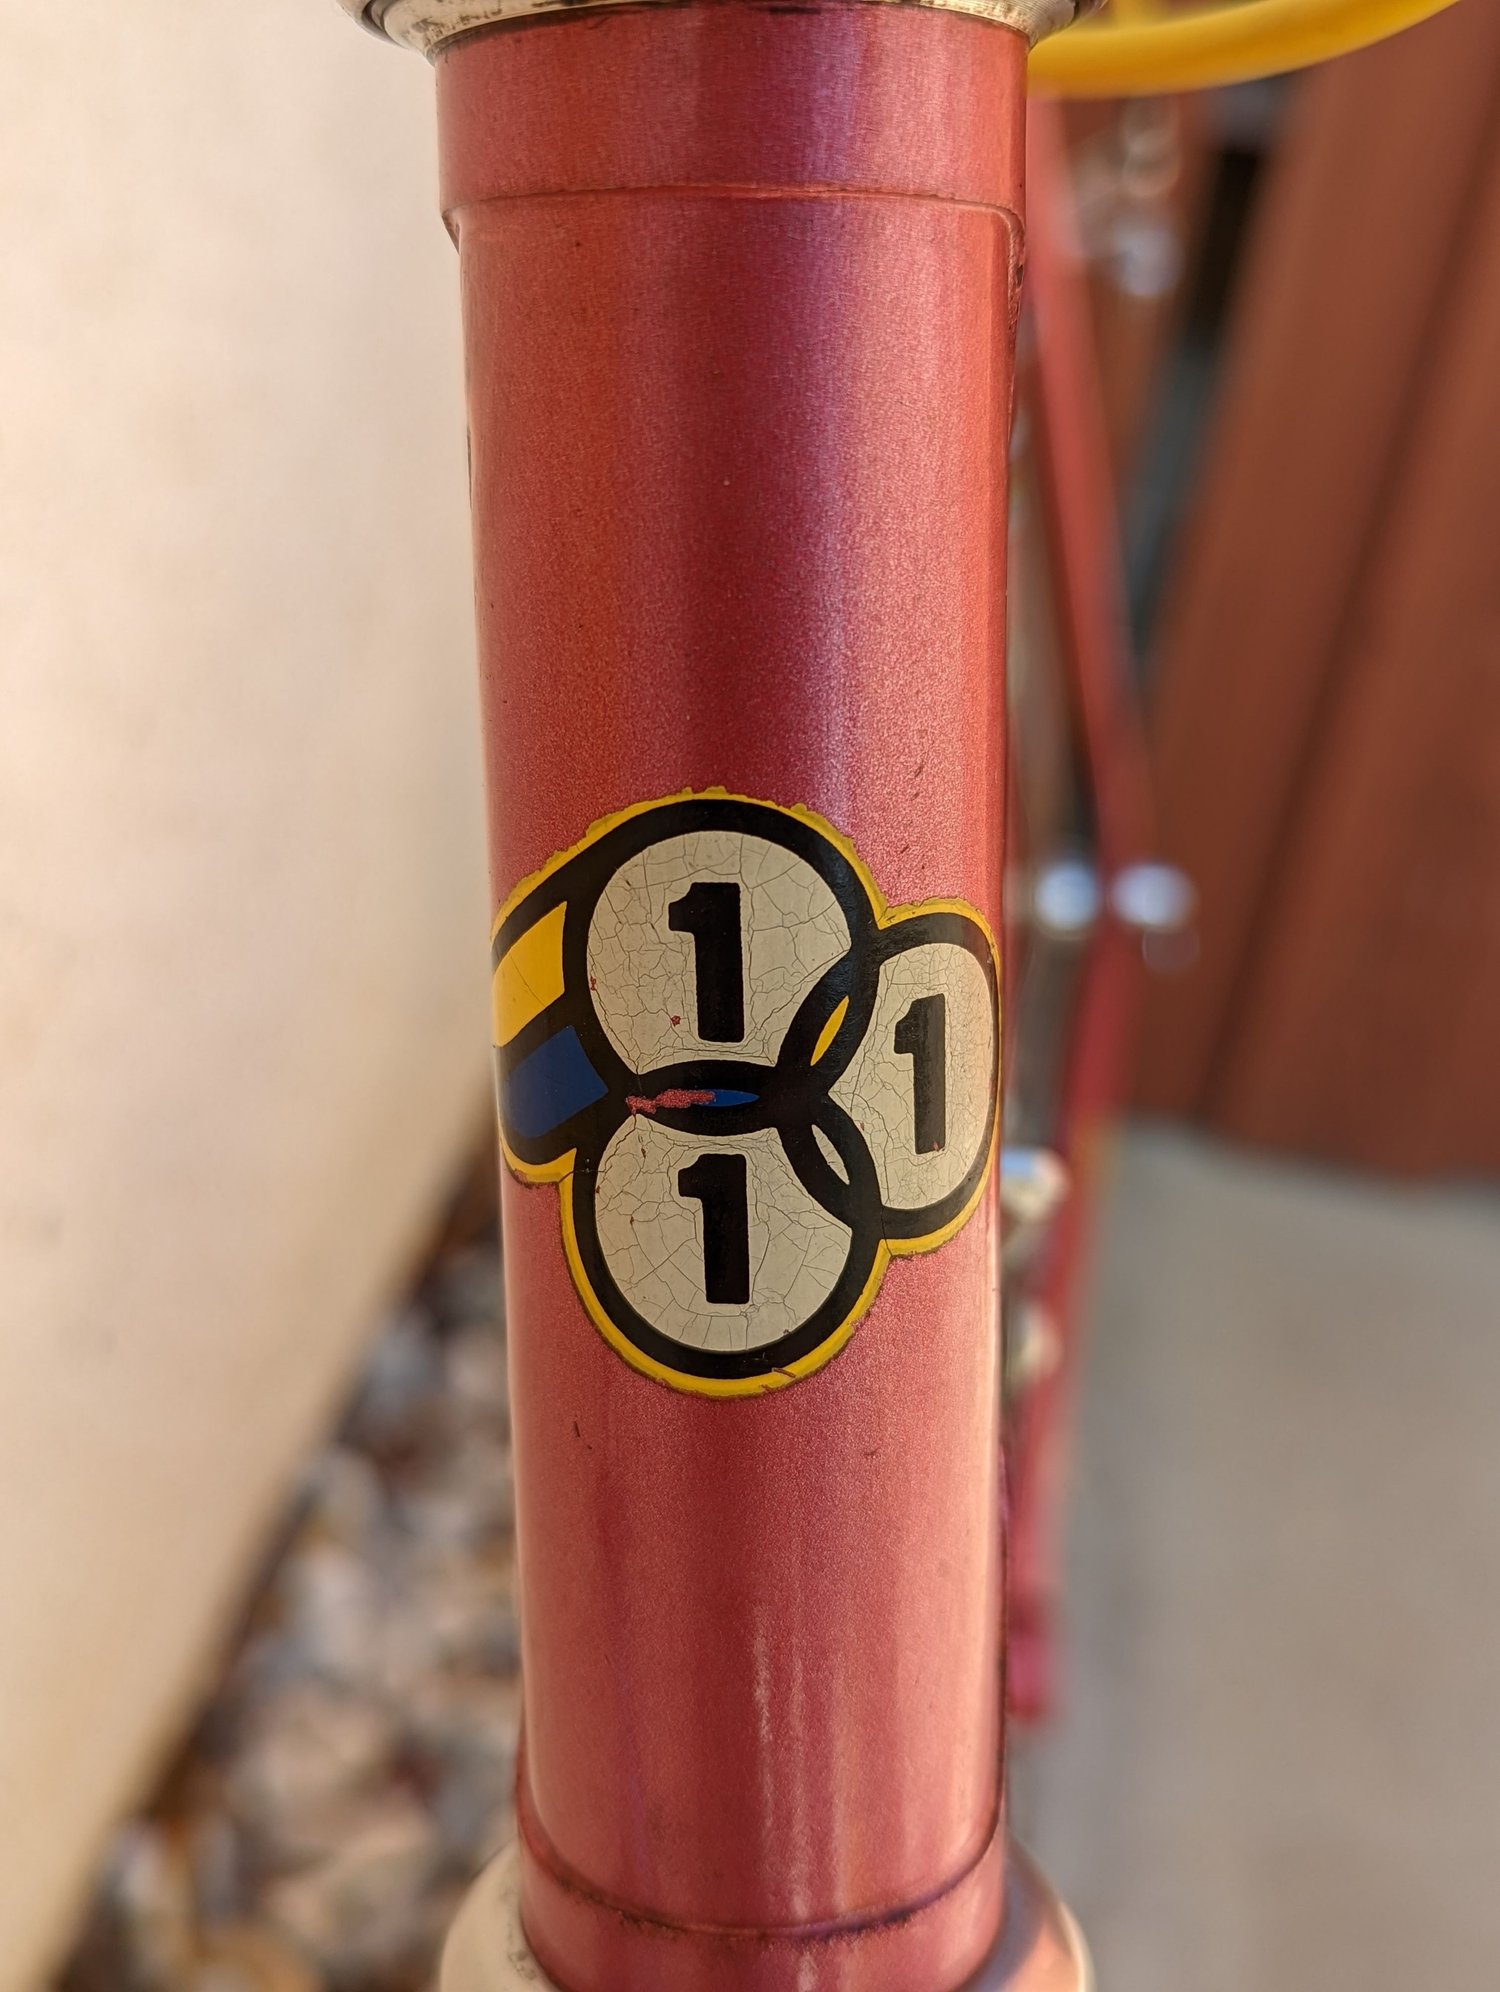
Head badge, all or the decals look a little yellowed on the white portions.

I used the cave man mechanic technique to mount the bottom bearing cup, and top race...and when I was putting away my tools, I noticed my headset press in the tool box! DOH!
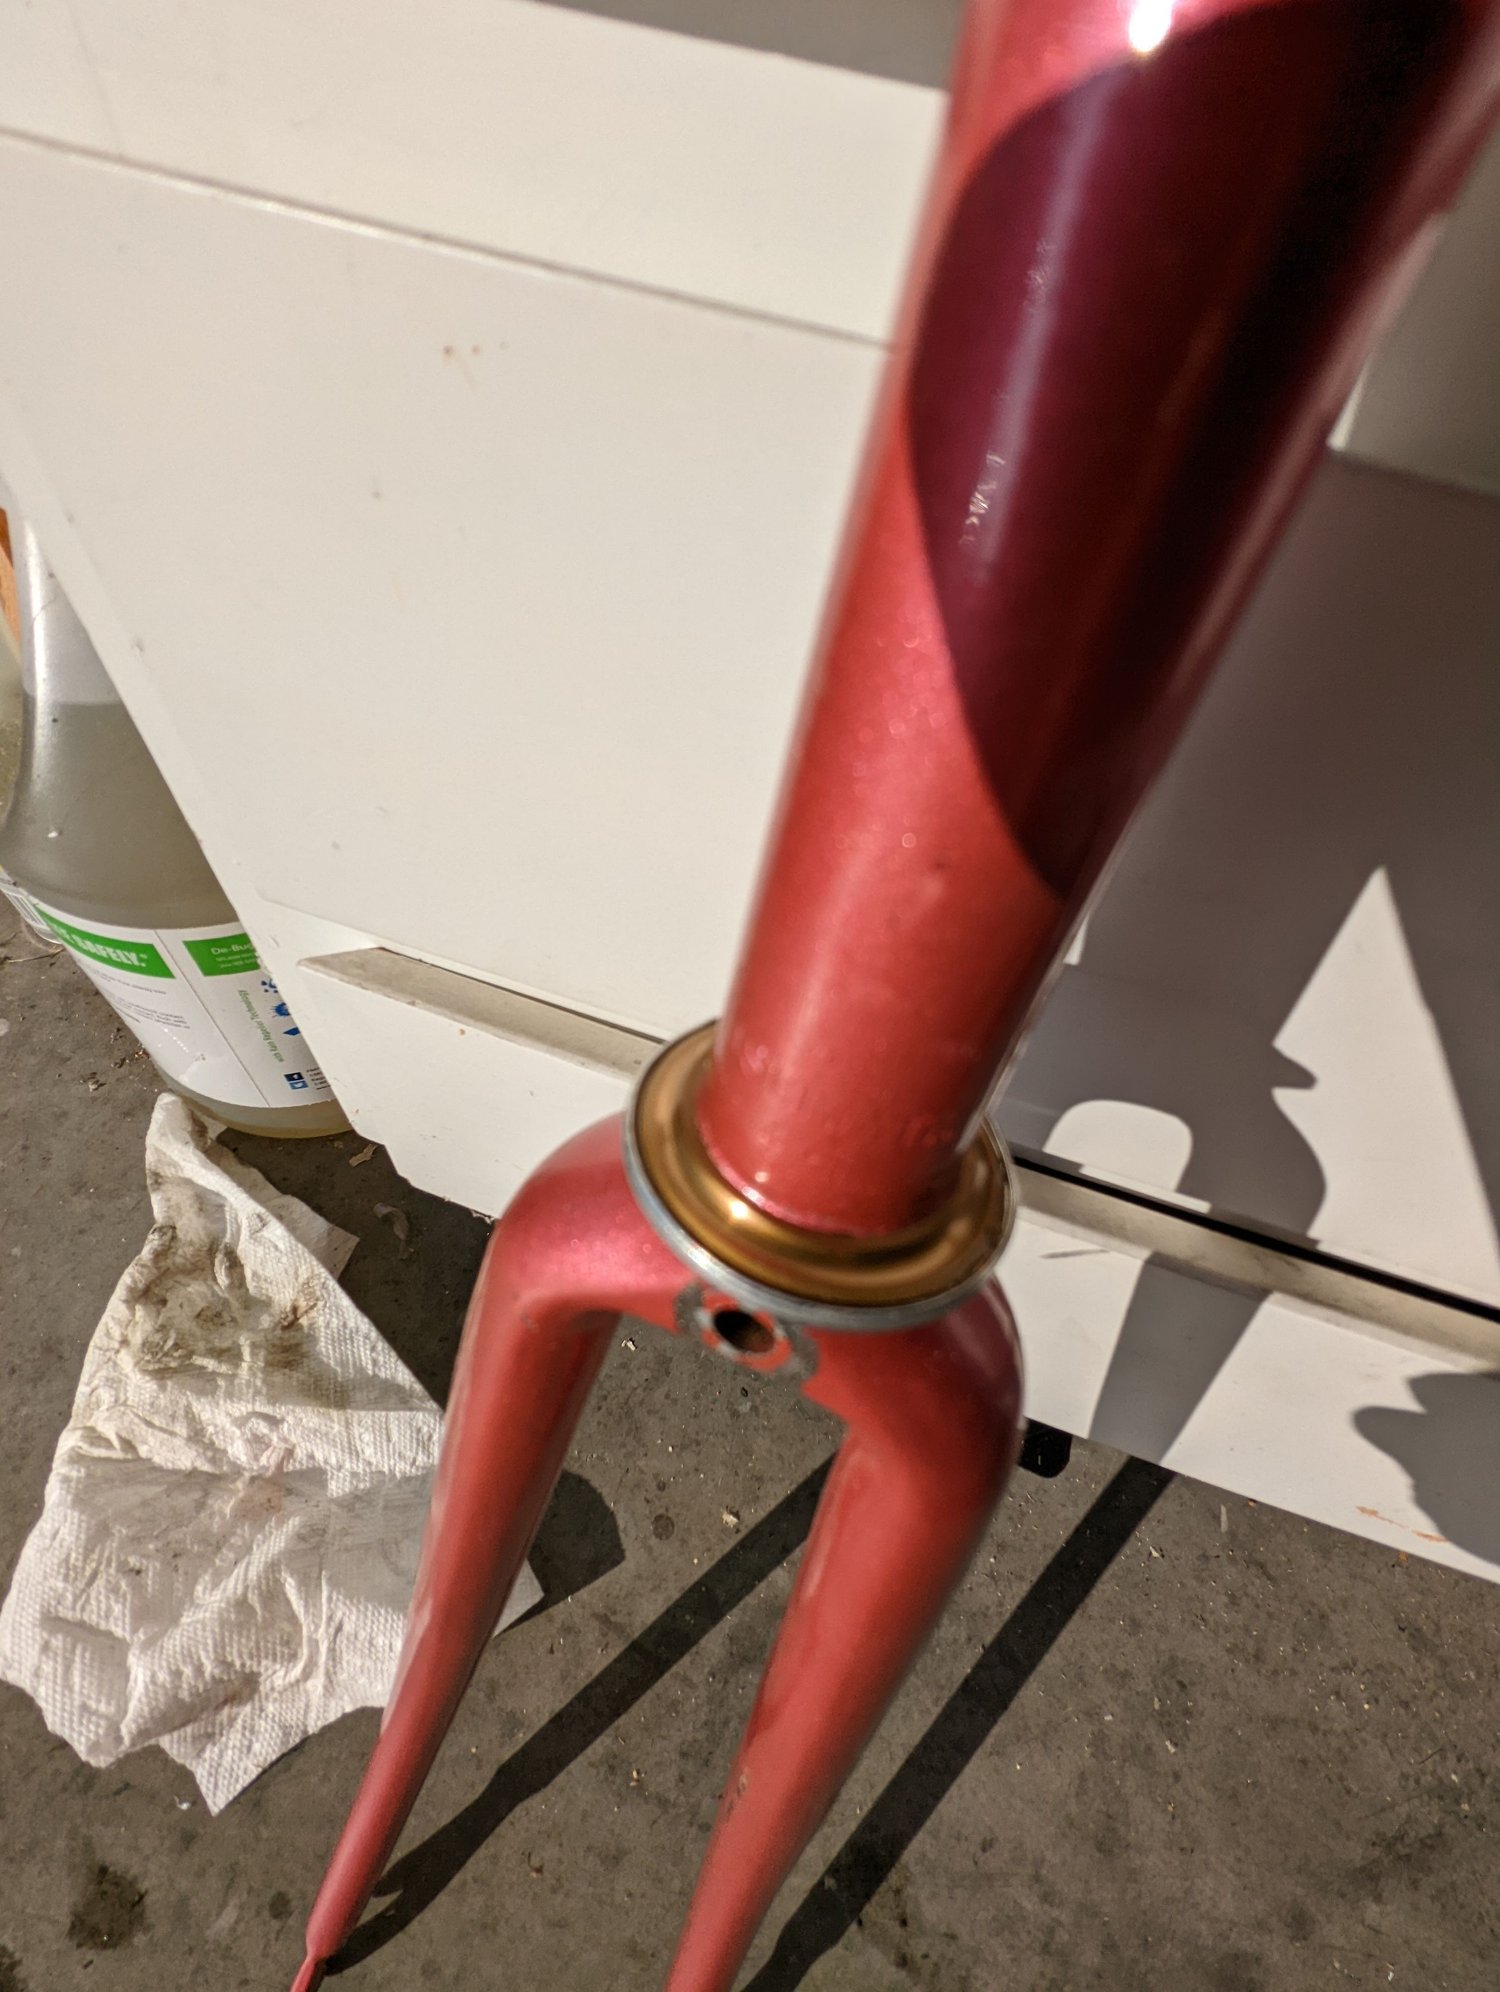
I was afraid a color like Pearl Rose would be very faded, but the painted portion of the steerer matches almost exactly.

Now I can watch the game with a nice DIPA, Lagunitas Maximus Collosal. Very tasty!
Tried to show the cool aerofoil shape of the seat stays, but it must be a trade secret, because I can't even get it in focus.
Detail of the top tube cable guide. I like this style of guide.
Long point lug, and a bit of paint rub from a previous cable routing
Showing the SIS levers mounted on the adapter, and another long point finely filed lug.
Head badge, all or the decals look a little yellowed on the white portions.
I used the cave man mechanic technique to mount the bottom bearing cup, and top race...and when I was putting away my tools, I noticed my headset press in the tool box! DOH!
I was afraid a color like Pearl Rose would be very faded, but the painted portion of the steerer matches almost exactly.
Now I can watch the game with a nice DIPA, Lagunitas Maximus Collosal. Very tasty!
Likes For mgopack42:
