


Huffy + Campagnolo Super Record = The Ultimate C&V Sacrilege build
 03-28-23, 10:28 PM
#526

Senior Member
Join Date: Nov 2013
Location: Southern California
Posts: 1,466
Mentioned: 14 Post(s)
Tagged: 0 Thread(s)
Quoted: 799 Post(s)
Liked 750 Times
in
409 Posts
I dunno, don't you think 'LE GRANDE Campagnolo' on the top tube has a nice ring to it? If people don't know it's campy when you lift the Huffster above your head on podium, what's the point of using it?

Likes For Piff:
03-28-23, 10:32 PM
#527
The Huffmeister
Thread Starter

Join Date: Jul 2008
Location: The Le Grande HQ
Posts: 2,734
Bikes: '79 Trek 938, '86 Jim Merz Allez SE, '90 Miyata 1000, '68 PX-10, '80 PXN-10, '73 Super Course, '87 Guerciotti, '83 Trek 600, '80 Huffy Le Grande
Mentioned: 45 Post(s)
Tagged: 0 Thread(s)
Quoted: 1225 Post(s)
Liked 3,535 Times
in
1,407 Posts
Likes For AdventureManCO:
03-28-23, 10:34 PM
#528
The Huffmeister
Thread Starter
Join Date: Jul 2008
Location: The Le Grande HQ
Posts: 2,734
Bikes: '79 Trek 938, '86 Jim Merz Allez SE, '90 Miyata 1000, '68 PX-10, '80 PXN-10, '73 Super Course, '87 Guerciotti, '83 Trek 600, '80 Huffy Le Grande
Mentioned: 45 Post(s)
Tagged: 0 Thread(s)
Quoted: 1225 Post(s)
Liked 3,535 Times
in
1,407 Posts
One of the original early names that kinda crossed my mind as I was slugging out the miles in the freezing cold trying to stay sane wondering what the heck I was even doing was 'the Le Grandepagnolo'. Pretty sure it was escapism. Good times.
Likes For AdventureManCO:
03-29-23, 01:35 AM
#529
Edumacator
Join Date: Jan 2018
Location: Goose Creek, SC
Posts: 6,789
Bikes: '87 Crestdale, '87 Basso Gap, '92 Rossin Performance EL-OS, 1990 VanTuyl, 1980s Losa, 1985 Trek 670, 1982 AD SLE, 1987 PX10, etc...
Mentioned: 59 Post(s)
Tagged: 0 Thread(s)
Quoted: 2436 Post(s)
Liked 3,118 Times
in
1,962 Posts
stoneageyosh dddd Mad Honk jdawginsc
So I haven't touched the rear brake bridge but I've had an idea kicking around in my head. It was based on some ideas that were thrown around earlier in this thread.
I sketched out the design I had in my mind, and was curious to get the collective critique on it, and to see how it jived with any of y'alls designs as well.
Good news is that I have the material on hand for it - just some 1.5" aluminum angle, it's basically a drop plate utilizing the stays as support, and also uses the 90 degree drop as a 'lock' in-between the stays to correct any of the lateral movement we've been talking about. Also don't mind using a couple of small pieces of leather between it and the stays to keep it from marring that gorgeous quality finish.
You might consider flattening the bulge rather than having the step up?
__________________
1987 Crest Cannondale, 1987 Basso Gap, 1992 Rossin Performance EL, 1990ish Van Tuyl, 1985 Trek 670, 1982 AD SLE, 2003 Pinarello Surprise, 1990ish MBK Atlantique, 1987 Peugeot Competition, 1987 Nishiki Tri-A, 1981 Faggin, 1996 Cannondale M500, 1984 Mercian, 1982 AD SuperLeicht, 1985 Massi (model unknown), 1988 Daccordi Griffe , 1989 Fauxsin MTB, 1981 Ciocc Mockba, 1992 Bianchi Giro, 1977 Colnago Super
1987 Crest Cannondale, 1987 Basso Gap, 1992 Rossin Performance EL, 1990ish Van Tuyl, 1985 Trek 670, 1982 AD SLE, 2003 Pinarello Surprise, 1990ish MBK Atlantique, 1987 Peugeot Competition, 1987 Nishiki Tri-A, 1981 Faggin, 1996 Cannondale M500, 1984 Mercian, 1982 AD SuperLeicht, 1985 Massi (model unknown), 1988 Daccordi Griffe , 1989 Fauxsin MTB, 1981 Ciocc Mockba, 1992 Bianchi Giro, 1977 Colnago Super
03-29-23, 04:16 AM
#530
www.theheadbadge.com

Join Date: Sep 2005
Location: Southern Florida
Posts: 28,512
Bikes: https://www.theheadbadge.com
Mentioned: 124 Post(s)
Tagged: 0 Thread(s)
Quoted: 2421 Post(s)
Liked 4,388 Times
in
2,092 Posts

Likes For cudak888:
03-29-23, 04:55 AM
#531
Senior Member
I got curious, so I ran the numbers. It actually worked out to a 0.278067+% weight loss: (2869 / 2877) = 0.99721932+.
Calculations were done pre-coffee, so hopefully I didn't hose 'em up.

Last edited by Hondo6; 03-29-23 at 05:28 AM.
Likes For Hondo6:
03-29-23, 05:13 PM
#532
The Huffmeister
Thread Starter
Join Date: Jul 2008
Location: The Le Grande HQ
Posts: 2,734
Bikes: '79 Trek 938, '86 Jim Merz Allez SE, '90 Miyata 1000, '68 PX-10, '80 PXN-10, '73 Super Course, '87 Guerciotti, '83 Trek 600, '80 Huffy Le Grande
Mentioned: 45 Post(s)
Tagged: 0 Thread(s)
Quoted: 1225 Post(s)
Liked 3,535 Times
in
1,407 Posts
Likes For AdventureManCO:
03-29-23, 06:10 PM
#533
Senior Member
Join Date: May 2019
Location: Bloomington, IN
Posts: 2,945
Bikes: Paramount, Faggin, Ochsner, Ciocc, Basso
Mentioned: 116 Post(s)
Tagged: 0 Thread(s)
Quoted: 1303 Post(s)
Liked 1,908 Times
in
1,139 Posts
Well my molten slag is looking better. I am off from coaching for a couple of days after three days of tournament this week. I have started to do the shaping of the needed drop-bolt for the SR brakes on the Huffy. Here are a few pictures of the first round of trimming away everything that doesn't look like a Campy drop bolt. My design requires a slight cut away of the existing bridge on the bottom side to control lateral movement. I will make a mock up of how to hold the drop extender in place later this evening and post pictures. Smiles, MH

The parts: an aluminum bar cut to size and shaped for the end that will house the recessed nut for the brake. Recessed nut that fits correctly and holds the brake bolt in place. A special washer shall be used to hold the caliper in place while in use.
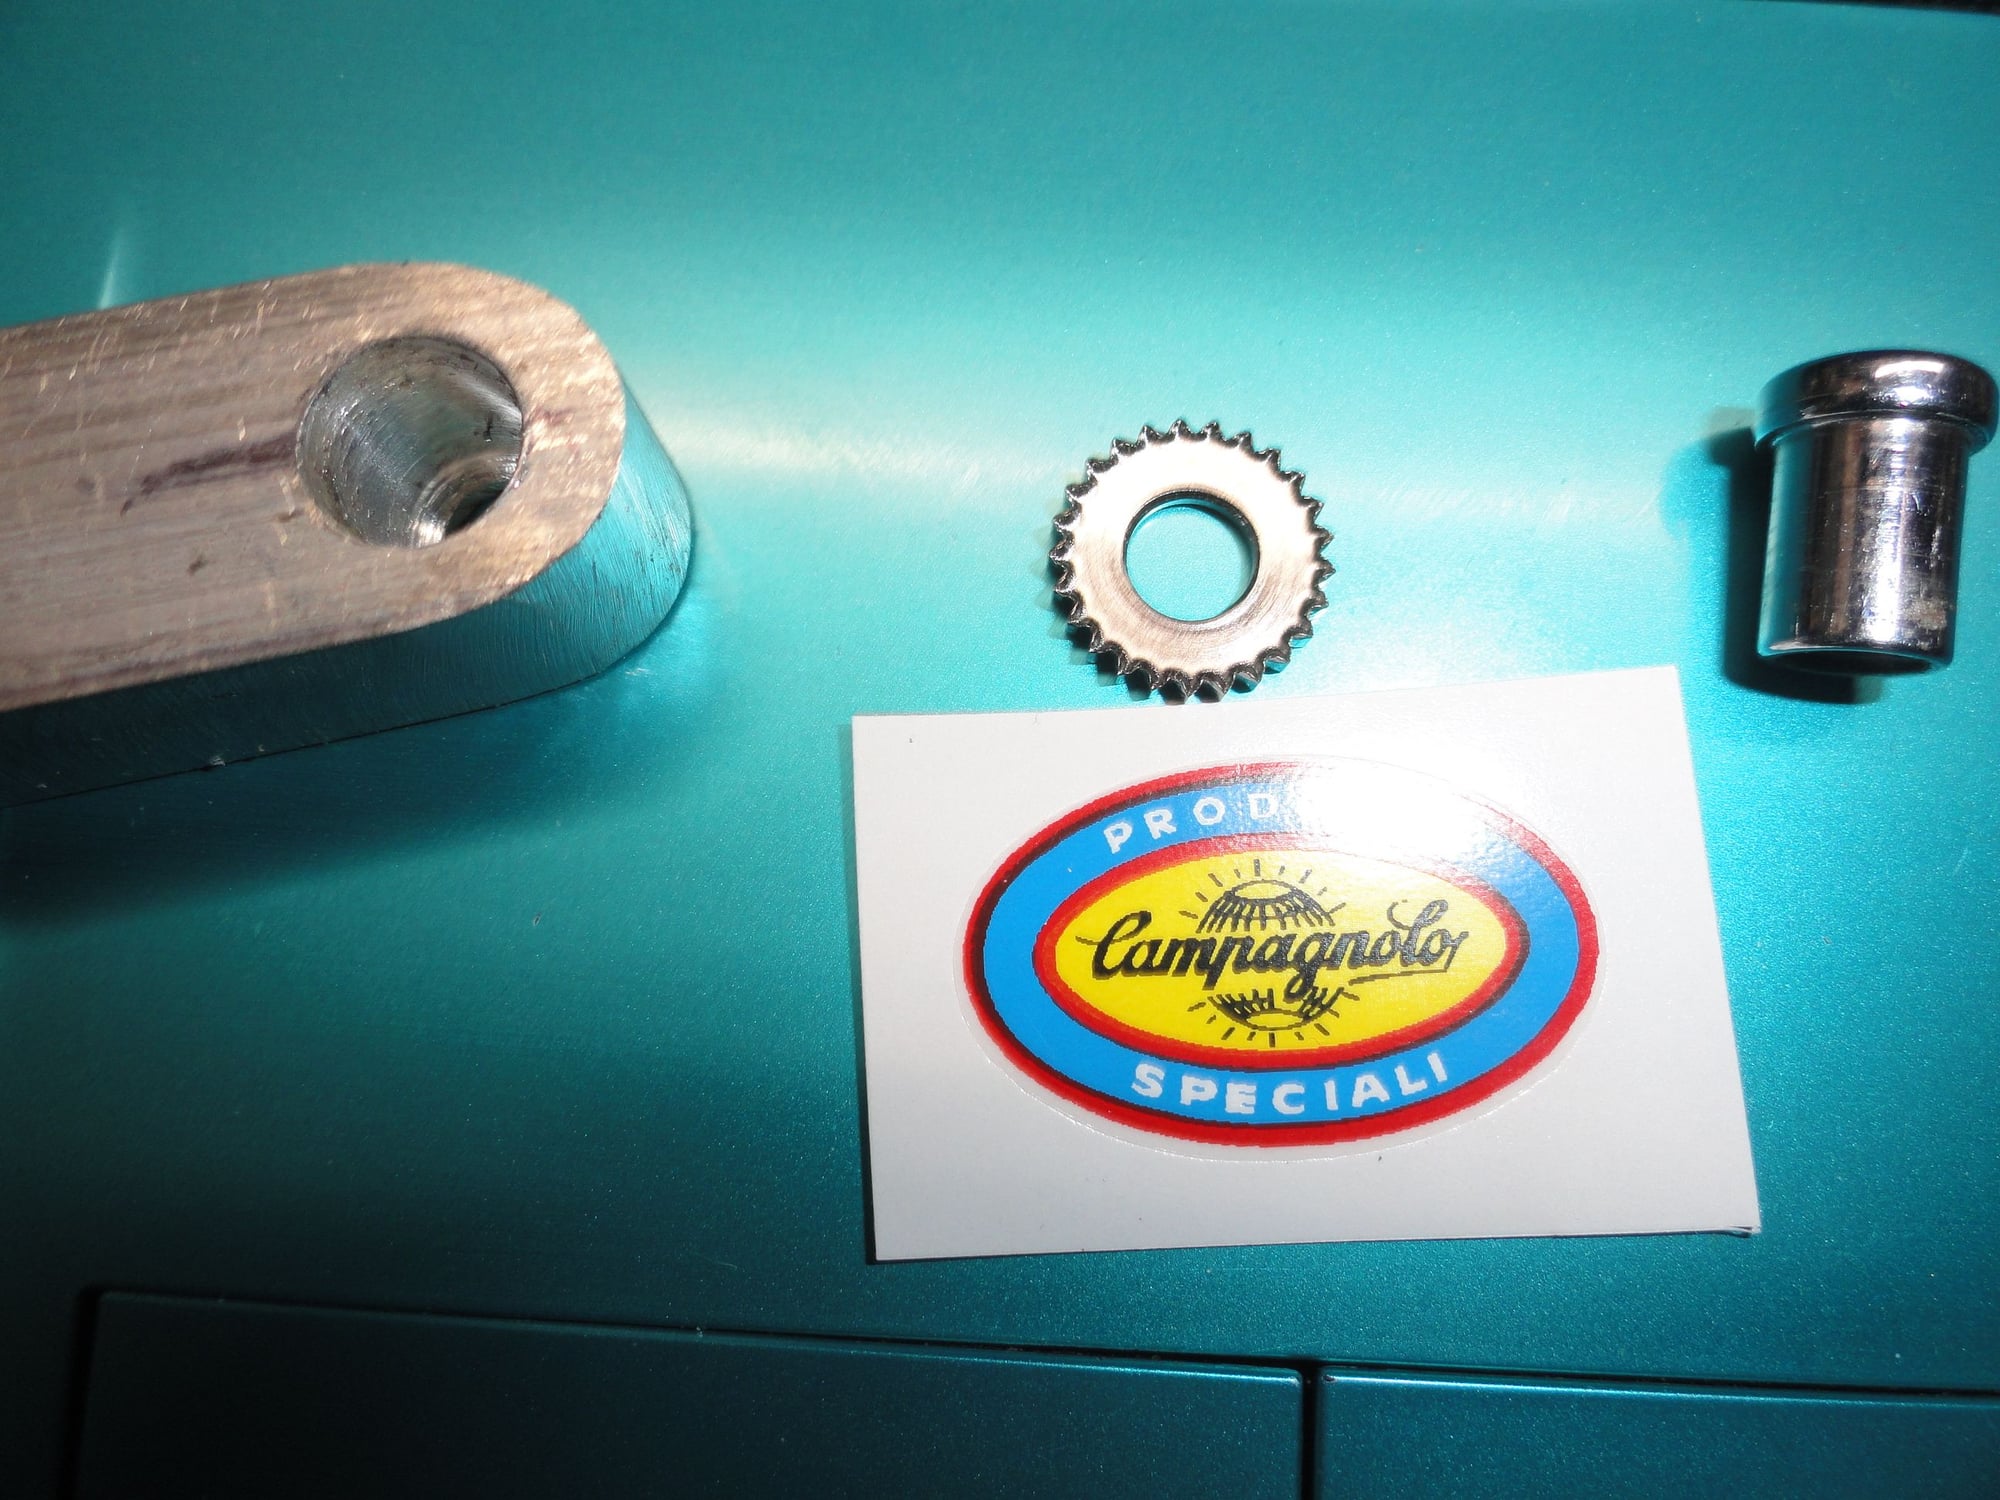
The cut out section that holds the recessed nut for the brake bolt. The serrated washer to hold the caliper in place. The Campy decal for authenticity. and the recessed nut for the extension.

What it looks like so far. Note the cut away part to reduce weight for the extender. The maximum side to side distance is 5/8" to keep the Huffy non-metric thing going. The brake will sit at the same height as it would on the original bridge when installed. Lateral play will be discussed later this evening.
The parts: an aluminum bar cut to size and shaped for the end that will house the recessed nut for the brake. Recessed nut that fits correctly and holds the brake bolt in place. A special washer shall be used to hold the caliper in place while in use.
The cut out section that holds the recessed nut for the brake bolt. The serrated washer to hold the caliper in place. The Campy decal for authenticity. and the recessed nut for the extension.
What it looks like so far. Note the cut away part to reduce weight for the extender. The maximum side to side distance is 5/8" to keep the Huffy non-metric thing going. The brake will sit at the same height as it would on the original bridge when installed. Lateral play will be discussed later this evening.
03-29-23, 06:33 PM
#534
The Huffmeister
Thread Starter
Join Date: Jul 2008
Location: The Le Grande HQ
Posts: 2,734
Bikes: '79 Trek 938, '86 Jim Merz Allez SE, '90 Miyata 1000, '68 PX-10, '80 PXN-10, '73 Super Course, '87 Guerciotti, '83 Trek 600, '80 Huffy Le Grande
Mentioned: 45 Post(s)
Tagged: 0 Thread(s)
Quoted: 1225 Post(s)
Liked 3,535 Times
in
1,407 Posts
Well my molten slag is looking better. I am off from coaching for a couple of days after three days of tournament this week. I have started to do the shaping of the needed drop-bolt for the SR brakes on the Huffy. Here are a few pictures of the first round of trimming away everything that doesn't look like a Campy drop bolt. My design requires a slight cut away of the existing bridge on the bottom side to control lateral movement. I will make a mock up of how to hold the drop extender in place later this evening and post pictures. Smiles, MH
The parts: an aluminum bar cut to size and shaped for the end that will house the recessed nut for the brake. Recessed nut that fits correctly and holds the brake bolt in place. A special washer shall be used to hold the caliper in place while in use.
The cut out section that holds the recessed nut for the brake bolt. The serrated washer to hold the caliper in place. The Campy decal for authenticity. and the recessed nut for the extension.
What it looks like so far. Note the cut away part to reduce weight for the extender. The maximum side to side distance is 5/8" to keep the Huffy non-metric thing going. The brake will sit at the same height as it would on the original bridge when installed. Lateral play will be discussed later this evening.
Oooh me likey! At first I was a little opposed to cutting into the Huffy but seeing as how 1) It is a boat anchor so any weight removed is objectively a more virtuous operation than alternatives and 2) the bike drew blood this evening so ITS ON. The bike wants to cause me pain? I'm gonna give it right back in return.
I'm open to ALL OPTIONS, especially violence.
03-29-23, 06:43 PM
#535
Senior Member
Join Date: May 2019
Location: Bloomington, IN
Posts: 2,945
Bikes: Paramount, Faggin, Ochsner, Ciocc, Basso
Mentioned: 116 Post(s)
Tagged: 0 Thread(s)
Quoted: 1303 Post(s)
Liked 1,908 Times
in
1,139 Posts
Ok folks,
I have put together a mock up of how this drop bolt part will work. The rear seat stays are the chrome tubes in the picture. The cardboard piece is what the bottom of the existing bridge looks like. I used a bit of masking tape to hold it all together for the picture but this is what we have to work with. The black dot in the picture is where the current bolt hole is in the bridge. The drop part will be held in place using the current bolt hole utilizing a 6X1 button head bolt that screws into the drop part. You can see that we will only need to remove a 5/8" wide section of the current bridge plate. The picture should make it clear the way the part works.

The way the current bridge is installed with the cut out section of the card board mock-up shown to put a picture of how the drop part will be held in place laterally.

The way the drop part will fit into the existing bridge. A minimal amount of material removal should make the drop part fully functional. The only thing missing is where I will need to drill and thread the drop part for distance of drop. Finish will commence after the machining is done.
I intend to do a satin finish to the drop part after giving a rounding out of the edges to a nice smooth finish that this project deserves. Smiles, MH
I have put together a mock up of how this drop bolt part will work. The rear seat stays are the chrome tubes in the picture. The cardboard piece is what the bottom of the existing bridge looks like. I used a bit of masking tape to hold it all together for the picture but this is what we have to work with. The black dot in the picture is where the current bolt hole is in the bridge. The drop part will be held in place using the current bolt hole utilizing a 6X1 button head bolt that screws into the drop part. You can see that we will only need to remove a 5/8" wide section of the current bridge plate. The picture should make it clear the way the part works.
The way the current bridge is installed with the cut out section of the card board mock-up shown to put a picture of how the drop part will be held in place laterally.
The way the drop part will fit into the existing bridge. A minimal amount of material removal should make the drop part fully functional. The only thing missing is where I will need to drill and thread the drop part for distance of drop. Finish will commence after the machining is done.
I intend to do a satin finish to the drop part after giving a rounding out of the edges to a nice smooth finish that this project deserves. Smiles, MH
Likes For Mad Honk:
03-29-23, 06:58 PM
#536
Senior Member
Join Date: May 2019
Location: Bloomington, IN
Posts: 2,945
Bikes: Paramount, Faggin, Ochsner, Ciocc, Basso
Mentioned: 116 Post(s)
Tagged: 0 Thread(s)
Quoted: 1303 Post(s)
Liked 1,908 Times
in
1,139 Posts
Given that drop bolts have been done in the past with a single bolt, that might just be a bit over the top, don't you think? There's not really that much side-to-side force on a sidepull brake, so long as they're centered.
I wish I still had that drop bolt; it would do exactly what @AdventureManCO needs.
-Kurt
I wish I still had that drop bolt; it would do exactly what @AdventureManCO needs.
-Kurt
I think I can provide your wish. Please look at my postings and let me know if you want me to make you one with the scrap from the drop part I am making. Har! smiles, MH
Likes For Mad Honk:
03-29-23, 07:03 PM
#537
Senior Member
Join Date: May 2019
Location: Bloomington, IN
Posts: 2,945
Bikes: Paramount, Faggin, Ochsner, Ciocc, Basso
Mentioned: 116 Post(s)
Tagged: 0 Thread(s)
Quoted: 1303 Post(s)
Liked 1,908 Times
in
1,139 Posts
Mad Honk and jdawginsc
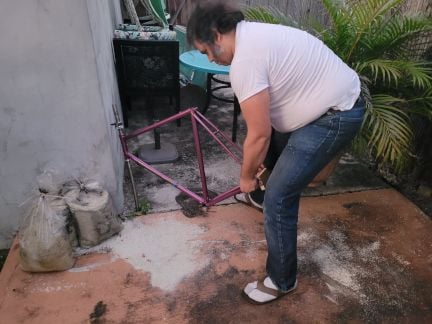
Wanted y'all to see these pictures, just in case it helps in the thought process of a rear brake extender.
Bout .86 c-to-c on the bolt drop.

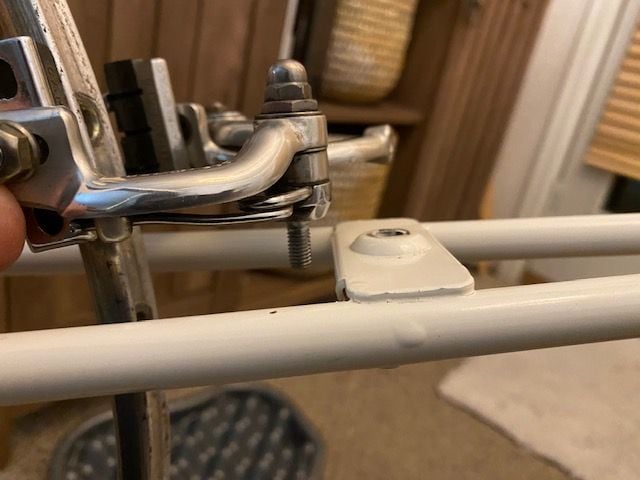

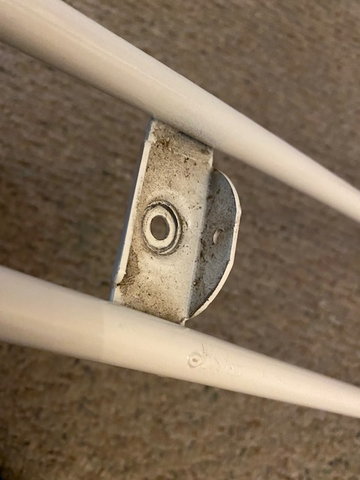
Also in this last picture, it shows the bottom of the brake bridge (along with the lovely gloopy paint) - it is bent down 90 degrees on the backside to give it rigidity. I'm not sure a 'slide in' type of device would work here, since it would have to clear this mess.
Let me know your thoughts. Also that was some sweet drawing earlier. Thanks guys!
Wanted y'all to see these pictures, just in case it helps in the thought process of a rear brake extender.
Bout .86 c-to-c on the bolt drop.
Also in this last picture, it shows the bottom of the brake bridge (along with the lovely gloopy paint) - it is bent down 90 degrees on the backside to give it rigidity. I'm not sure a 'slide in' type of device would work here, since it would have to clear this mess.
Let me know your thoughts. Also that was some sweet drawing earlier. Thanks guys!
03-29-23, 07:05 PM
#538
www.theheadbadge.com
Join Date: Sep 2005
Location: Southern Florida
Posts: 28,512
Bikes: https://www.theheadbadge.com
Mentioned: 124 Post(s)
Tagged: 0 Thread(s)
Quoted: 2421 Post(s)
Liked 4,388 Times
in
2,092 Posts


-Kurt
__________________


Likes For cudak888:
03-29-23, 09:13 PM
#539
The Huffmeister
Thread Starter
Join Date: Jul 2008
Location: The Le Grande HQ
Posts: 2,734
Bikes: '79 Trek 938, '86 Jim Merz Allez SE, '90 Miyata 1000, '68 PX-10, '80 PXN-10, '73 Super Course, '87 Guerciotti, '83 Trek 600, '80 Huffy Le Grande
Mentioned: 45 Post(s)
Tagged: 0 Thread(s)
Quoted: 1225 Post(s)
Liked 3,535 Times
in
1,407 Posts
MAJOR SUCCESS TONIGHT!!!
Ruffians and scoundrels following along,
Today was a great day! The frame straightening was a complete success. It got a bit hairy at times, but I trusted my gut and things came out better than I could have imagined. WWWWWHHHHHhhhheeeewwwwwww!!!
After pinging some of our esteemed builders and repairmen and hearing nary a peep, I decided that the show must go on!
Major props to jdawginsc and nlerner who either suggested and encouraged moving forward with the brute force idea, or didn't outright condemn it, because it worked.
As you recall from previous posts, 2 major issues loomed, both of which no doubt showed up when riding and likely contributed to the left pull to the bike. The first one is that the fork legs were visibly off to one side and not symmetrical to the steerer tube. After looking at the fork, its probably from the fork crown not being brazed on completely straight.
The second issue is that the bottom bracket was not completely perpendicular to the seat tube. You could just barely make it out when looking at it.
So, I've got a vise and some metal. Let's get started!
At first I threw the old steel bb cups back in the frame, but then punched them back out as they were creating tolerance issues. I blocked up the BB with some pieces of oak, and they simultaneously made it more difficult to 'feel' out the elasticity of the frame, but yet also protected the bb. I'm glad I used them.

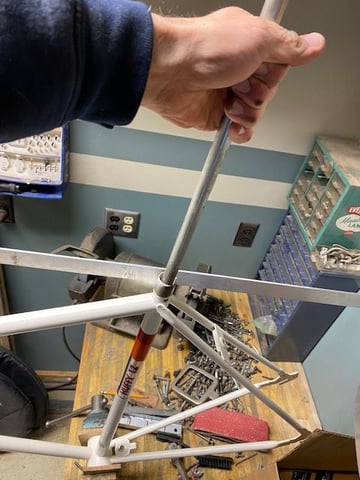
View from the top
I stood on a ladder and threw a metal rod down the seat tube and used that to yank on, while bracing myself against the upper cabinet ledge. I didn't want to have something suddenly release, like the bb accidentally popping out of the vise and then go flying back off the ladder and get major injured, so I stayed pretty stationary and used a little more arm and shoulder than I would have liked. I took this piece of angle aluminum just as a rough locator for how far I was bending. However, due to the movement of the wood and such, it would frequently throw me a false positive, and I would think the frame moved far more than it did. This, however, ended up providing me a little bit of a buffer. Overall, I probably pulled and measured it about 10 times total.
The bike started to fight back. At one point I definitely heard a 'click' sound? Wasn't a 'crack' per se, but something was moving! I checked the paint and everything looked hunky dory, so I kept at it. Pull, and check. Pull and check.
Finally, it was 'eyeball' straight!
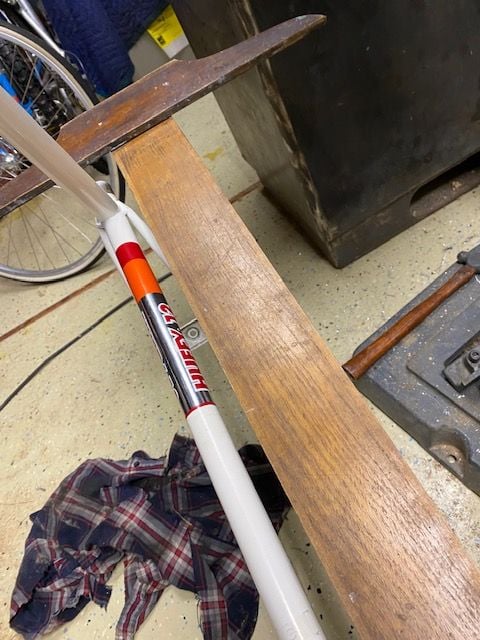

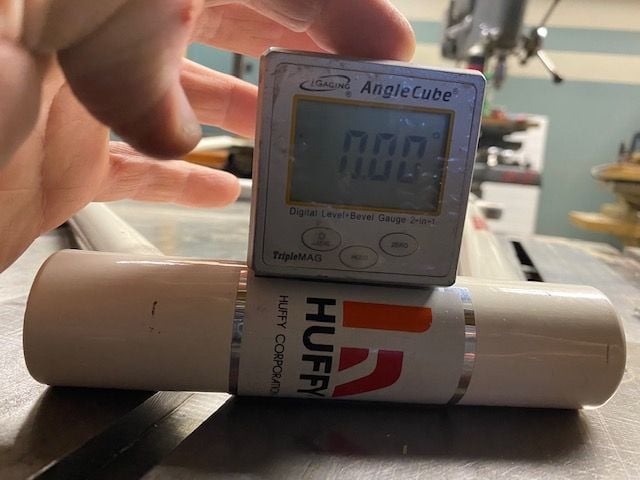
I used this old antique framing square which has seen plenty of duty on all kinds of projects. Holding it up against the BB, it was easy to get a straight line up the seat tube. While a little crude, it worked a charm, and I did use the same edge for measuring both sides (just flipped it when I moved to the other side). I'm sure it is still off somewhere, but everything is if you drill down far enough. Since I can no longer perceive a visible difference, I'm calling that good. Let's just say plenty of the big boys have had Raleighs come through that looked a lot worse (indeed, my '73 is way more sloppily built than the Huffy)! I don't have access to a framebuilders table, but before I'm done I might clamp the BB to my table saw and see where the seat tube is in relation to the surface, then flip over and see what we get.

While the table saw could work well as a makeshift flat surface to test things on, I really don't want to trust the extensions, since they may not have a completely parallel surface to the main table. I would just stay within the main table if to measure the BB/seat tube alignment.

Good news here too - the head tube and the seat tube are just about perfectly in plane with each other, or they are darn close.

On to the fork next...
Ruffians and scoundrels following along,
Today was a great day! The frame straightening was a complete success. It got a bit hairy at times, but I trusted my gut and things came out better than I could have imagined. WWWWWHHHHHhhhheeeewwwwwww!!!
After pinging some of our esteemed builders and repairmen and hearing nary a peep, I decided that the show must go on!
Major props to jdawginsc and nlerner who either suggested and encouraged moving forward with the brute force idea, or didn't outright condemn it, because it worked.
As you recall from previous posts, 2 major issues loomed, both of which no doubt showed up when riding and likely contributed to the left pull to the bike. The first one is that the fork legs were visibly off to one side and not symmetrical to the steerer tube. After looking at the fork, its probably from the fork crown not being brazed on completely straight.
The second issue is that the bottom bracket was not completely perpendicular to the seat tube. You could just barely make it out when looking at it.
So, I've got a vise and some metal. Let's get started!
At first I threw the old steel bb cups back in the frame, but then punched them back out as they were creating tolerance issues. I blocked up the BB with some pieces of oak, and they simultaneously made it more difficult to 'feel' out the elasticity of the frame, but yet also protected the bb. I'm glad I used them.
View from the top
I stood on a ladder and threw a metal rod down the seat tube and used that to yank on, while bracing myself against the upper cabinet ledge. I didn't want to have something suddenly release, like the bb accidentally popping out of the vise and then go flying back off the ladder and get major injured, so I stayed pretty stationary and used a little more arm and shoulder than I would have liked. I took this piece of angle aluminum just as a rough locator for how far I was bending. However, due to the movement of the wood and such, it would frequently throw me a false positive, and I would think the frame moved far more than it did. This, however, ended up providing me a little bit of a buffer. Overall, I probably pulled and measured it about 10 times total.
The bike started to fight back. At one point I definitely heard a 'click' sound? Wasn't a 'crack' per se, but something was moving! I checked the paint and everything looked hunky dory, so I kept at it. Pull, and check. Pull and check.
Finally, it was 'eyeball' straight!
I used this old antique framing square which has seen plenty of duty on all kinds of projects. Holding it up against the BB, it was easy to get a straight line up the seat tube. While a little crude, it worked a charm, and I did use the same edge for measuring both sides (just flipped it when I moved to the other side). I'm sure it is still off somewhere, but everything is if you drill down far enough. Since I can no longer perceive a visible difference, I'm calling that good. Let's just say plenty of the big boys have had Raleighs come through that looked a lot worse (indeed, my '73 is way more sloppily built than the Huffy)! I don't have access to a framebuilders table, but before I'm done I might clamp the BB to my table saw and see where the seat tube is in relation to the surface, then flip over and see what we get.
While the table saw could work well as a makeshift flat surface to test things on, I really don't want to trust the extensions, since they may not have a completely parallel surface to the main table. I would just stay within the main table if to measure the BB/seat tube alignment.
Good news here too - the head tube and the seat tube are just about perfectly in plane with each other, or they are darn close.
On to the fork next...
03-29-23, 09:16 PM
#540
www.theheadbadge.com
Join Date: Sep 2005
Location: Southern Florida
Posts: 28,512
Bikes: https://www.theheadbadge.com
Mentioned: 124 Post(s)
Tagged: 0 Thread(s)
Quoted: 2421 Post(s)
Liked 4,388 Times
in
2,092 Posts
That's impressive to have pulled that off so well with improvised tools. Bravo.
-Kurt
-Kurt
__________________
Likes For cudak888:
03-29-23, 09:40 PM
#541
The Huffmeister
Thread Starter
Join Date: Jul 2008
Location: The Le Grande HQ
Posts: 2,734
Bikes: '79 Trek 938, '86 Jim Merz Allez SE, '90 Miyata 1000, '68 PX-10, '80 PXN-10, '73 Super Course, '87 Guerciotti, '83 Trek 600, '80 Huffy Le Grande
Mentioned: 45 Post(s)
Tagged: 0 Thread(s)
Quoted: 1225 Post(s)
Liked 3,535 Times
in
1,407 Posts
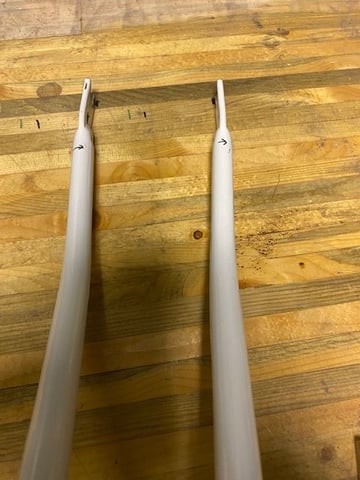
The fork was borked
I had to laugh when I first saw how off the fork was. The joke in the guitar world is that when you see something sort of 'off', you say that it was built on a Friday afternoon. Well, this thing must have been built on a Saturday morning on a holiday weekend in the year of Jubilee by a disgrunted factory 'artisan' who then must have decided to get revenge.

The fork legs are off, the crown is off, and the brake hole is even drilled off to one side! The thing is a total mess. Which makes this even more incredible as the perfect redemption arc.
I thought I would block up the fork and rotate it to see how badly we were off.
Here's the basic setup -

I locked the vise in place, then would bring the fork legs down onto the the table (as a reference point), and mark the inside of the dropouts, the lift the fork back up, rotate the fork blades over, then put them back on the table.
Okay! Lets see how close we are, kids!


lol...it's pretty bad! About 3/8" to 1/2" difference.
No...wonder...
So many things make sense now.
So, time to get things straight. I turn the vise around, and block up the steerer again, and clamp it down good and tight. I know the direction I have to go.
Push! Push! Push! No we are not having a baby, but its basically the same amount of work. PUSH!!!!
Well, after about 10-15 attempts of really leaning into it, I was finally able to get the Super Record front wheel through the dropouts!!! This has not happened before.
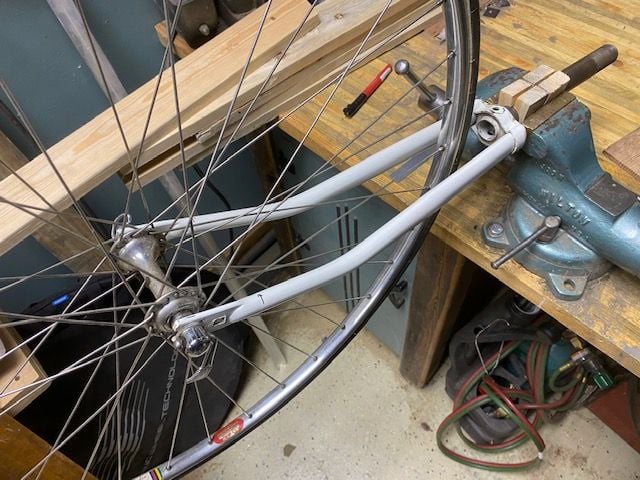
Okay! I'm getting close!
Now, I don't know what happened, or how it happened, but I pushed a few more times, and either I had an angel on my shoulder, or something else divine intervened, and when I was done, this was the result -


It is just dead on perfectly straight!!!! Y'all have no idea how ecstatic I am that I didn't kill me, or the bike, and that things got aligned. Now, I'm not using precision instruments, nor any precision gauges, but I think this will make a huge difference to the ride quality, and I'm so curious to see how the bike will track once I have it built up.
Next up with be aligning the dropouts, in a similar ghettotastic fashion.
Also, I wanted to ask about the crown race. Here is what I'm seeing on the Huffy. Does anyone have any specs on the Super Record headset's crown race dimensions? I've got one, but I figured I'd ask before pulling it and measuring it, just to see what I might be able to expect (well I expect nothing but problems of course)

The fork legs are off, the crown is off, and the brake hole is even drilled off to one side! The thing is a total mess. Which makes this even more incredible as the perfect redemption arc.
I thought I would block up the fork and rotate it to see how badly we were off.
Here's the basic setup -
I locked the vise in place, then would bring the fork legs down onto the the table (as a reference point), and mark the inside of the dropouts, the lift the fork back up, rotate the fork blades over, then put them back on the table.
Okay! Lets see how close we are, kids!
lol...it's pretty bad! About 3/8" to 1/2" difference.
No...wonder...
So many things make sense now.
So, time to get things straight. I turn the vise around, and block up the steerer again, and clamp it down good and tight. I know the direction I have to go.
Push! Push! Push! No we are not having a baby, but its basically the same amount of work. PUSH!!!!
Well, after about 10-15 attempts of really leaning into it, I was finally able to get the Super Record front wheel through the dropouts!!! This has not happened before.
Okay! I'm getting close!
Now, I don't know what happened, or how it happened, but I pushed a few more times, and either I had an angel on my shoulder, or something else divine intervened, and when I was done, this was the result -
It is just dead on perfectly straight!!!! Y'all have no idea how ecstatic I am that I didn't kill me, or the bike, and that things got aligned. Now, I'm not using precision instruments, nor any precision gauges, but I think this will make a huge difference to the ride quality, and I'm so curious to see how the bike will track once I have it built up.
Next up with be aligning the dropouts, in a similar ghettotastic fashion.
Also, I wanted to ask about the crown race. Here is what I'm seeing on the Huffy. Does anyone have any specs on the Super Record headset's crown race dimensions? I've got one, but I figured I'd ask before pulling it and measuring it, just to see what I might be able to expect (well I expect nothing but problems of course)
Last edited by AdventureManCO; 03-29-23 at 09:56 PM.
03-29-23, 09:42 PM
#542
The Huffmeister
Thread Starter
Join Date: Jul 2008
Location: The Le Grande HQ
Posts: 2,734
Bikes: '79 Trek 938, '86 Jim Merz Allez SE, '90 Miyata 1000, '68 PX-10, '80 PXN-10, '73 Super Course, '87 Guerciotti, '83 Trek 600, '80 Huffy Le Grande
Mentioned: 45 Post(s)
Tagged: 0 Thread(s)
Quoted: 1225 Post(s)
Liked 3,535 Times
in
1,407 Posts
Yep, inches!
03-29-23, 10:09 PM
#543
Senior Member
Join Date: Jun 2019
Posts: 639
Mentioned: 16 Post(s)
Tagged: 0 Thread(s)
Quoted: 346 Post(s)
Likes: 0
Liked 396 Times
in
259 Posts
The original MacGyver would seriously be proud of the work that yall are doing.
Your problem solving and craftsmanship is just great.
I think that is why so many people are tuned in to watching this. They are following this ongoing build saga of a brilliant sharp inventive person taking on the challenge of making something really special out of an ordinary old run of the mill basic Huffy, without breaking the bank and without ending up with an expensive turd.
As Hannibal Smith was known to say, " I love it when a plan comes together".
Likes For Vintage Schwinn:
03-29-23, 10:14 PM
#544
The Huffmeister
Thread Starter
Join Date: Jul 2008
Location: The Le Grande HQ
Posts: 2,734
Bikes: '79 Trek 938, '86 Jim Merz Allez SE, '90 Miyata 1000, '68 PX-10, '80 PXN-10, '73 Super Course, '87 Guerciotti, '83 Trek 600, '80 Huffy Le Grande
Mentioned: 45 Post(s)
Tagged: 0 Thread(s)
Quoted: 1225 Post(s)
Liked 3,535 Times
in
1,407 Posts
 03-29-23, 10:45 PM
#545
The Huffmeister
Thread Starter
Join Date: Jul 2008
Location: The Le Grande HQ
Posts: 2,734
Bikes: '79 Trek 938, '86 Jim Merz Allez SE, '90 Miyata 1000, '68 PX-10, '80 PXN-10, '73 Super Course, '87 Guerciotti, '83 Trek 600, '80 Huffy Le Grande
Mentioned: 45 Post(s)
Tagged: 0 Thread(s)
Quoted: 1225 Post(s)
Liked 3,535 Times
in
1,407 Posts
Likes For AdventureManCO:
Likes For Millstone:
03-30-23, 07:07 PM
#547
Senior Member
Join Date: May 2019
Location: Bloomington, IN
Posts: 2,945
Bikes: Paramount, Faggin, Ochsner, Ciocc, Basso
Mentioned: 116 Post(s)
Tagged: 0 Thread(s)
Quoted: 1303 Post(s)
Liked 1,908 Times
in
1,139 Posts
Now that I know it is .8" the cutting of threads will begin. After that some shaping and finishing should have the drop bolt fixture should be finished. I am suspecting that a new problem shall arise next in the way to a complete this project . Smiles, MH
Likes For Mad Honk:
03-30-23, 09:34 PM
#548
The Huffmeister
Thread Starter
Join Date: Jul 2008
Location: The Le Grande HQ
Posts: 2,734
Bikes: '79 Trek 938, '86 Jim Merz Allez SE, '90 Miyata 1000, '68 PX-10, '80 PXN-10, '73 Super Course, '87 Guerciotti, '83 Trek 600, '80 Huffy Le Grande
Mentioned: 45 Post(s)
Tagged: 0 Thread(s)
Quoted: 1225 Post(s)
Liked 3,535 Times
in
1,407 Posts
This one's for rideandgoseek
I'm freakin' tired so no work on the Huffy tonight, but I did get something else completed...

And of course, gotta represent...

Now there is no way out. The deadline is set. June 3. Bike's gotta be ready. Wouldn't be caught dead with anything but the Le Grande.
I'm freakin' tired so no work on the Huffy tonight, but I did get something else completed...
And of course, gotta represent...
Now there is no way out. The deadline is set. June 3. Bike's gotta be ready. Wouldn't be caught dead with anything but the Le Grande.
Last edited by AdventureManCO; 03-30-23 at 09:43 PM.
Likes For AdventureManCO:
03-30-23, 09:50 PM
#549
The Huffmeister
Thread Starter
Join Date: Jul 2008
Location: The Le Grande HQ
Posts: 2,734
Bikes: '79 Trek 938, '86 Jim Merz Allez SE, '90 Miyata 1000, '68 PX-10, '80 PXN-10, '73 Super Course, '87 Guerciotti, '83 Trek 600, '80 Huffy Le Grande
Mentioned: 45 Post(s)
Tagged: 0 Thread(s)
Quoted: 1225 Post(s)
Liked 3,535 Times
in
1,407 Posts
That 90 degree bend...its pretty tall, and it already has a small hole in it (for a fender bolt?) ...I wonder what the possibility of enlarging that hole and having that extender in the shape of a circular rod and extending it through that hole to get the benefit of the stiffener brace? Or perhaps keep the squarish shape, but reduce the thickness right before the end of the bridge, and slide it through the stiffener brace after cutting a rectangular hole in it? Just thinking out loud.
Edit: Not great with words so here is what was in my head, drawn out:
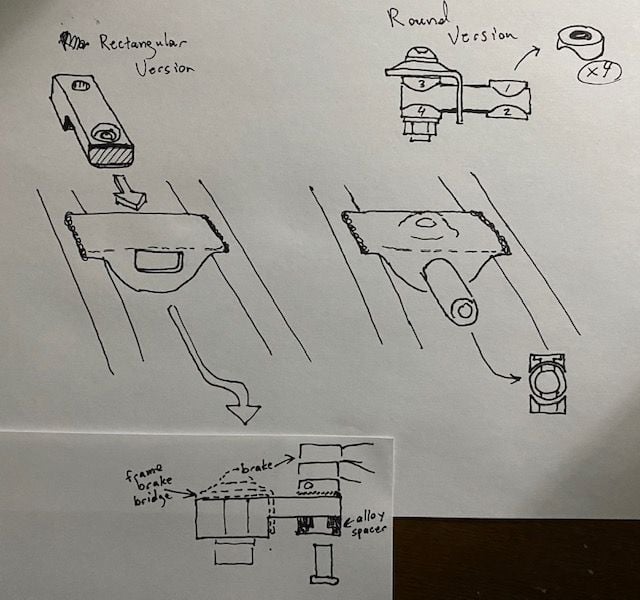
This would allow the adapter to have the benefit of no side-to-side sway (which was the original intent of the cutout, to keep it locked in place) but allows the down bend of the bridge to cradle the adapter as well to gain a better leverage point and stiffen the whole thing up. Only detractor is I'm not sure you could get the entire thickness of the adapter as-is. You'd have to thin the adapter down a bit on that end and then use a spacer to gain back the original height of the recessed brake bolt, which still could be easily done, and even recess a small lip for a spacer to set down in so it doesn't wander.
Sorry I'm complicating things I'll go to bed now
Last edited by AdventureManCO; 03-30-23 at 10:24 PM.
03-31-23, 12:27 AM
#550
Full Member
This thread is educational, inspirational, and at times an "emotional rollercoaster". But once the Huffissimo is complete and has wowed the crowds at various concours d'�l�gance, I hope to relive the thrilling saga by reading it (trimmed in some places, augmented in others) in codex form. Perhaps suggest this to Mondadori, as a celebration of Italian technology and a worthy complement to Gianluca Zaghi's Vintage Bicycles?