


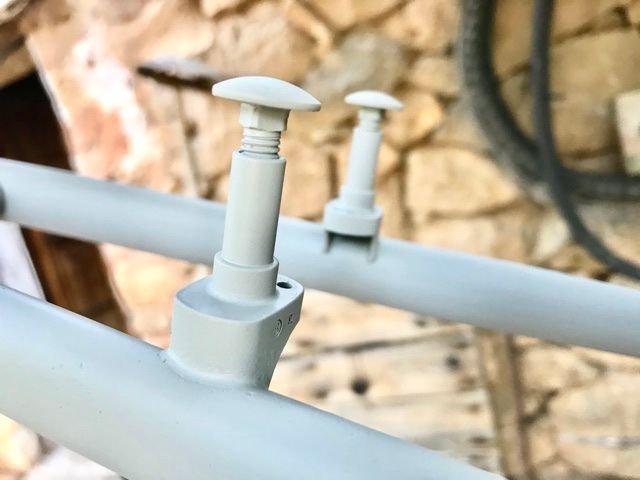
Poor old Stumpy - 1993 StumpJumper
 03-17-21, 09:32 PM
#51
Happy banana slug

Join Date: Sep 2015
Location: Arcata, California, U.S., North America, Earth, Saggitarius Arm, Milky Way
Posts: 3,693
Bikes: 1984 Araya MB 261, 1992 Specialized Rockhopper Sport, 1993 Hard Rock Ultra, 1994 Trek Multitrack 750, 1995 Trek Singletrack 930
Mentioned: 31 Post(s)
Tagged: 0 Thread(s)
Quoted: 1531 Post(s)
Liked 1,527 Times
in
915 Posts
I won't debate you as I know you know your stuff..and then some..but the issue with broad brush generalities is that no one rides a generality..they ride a specific bike. I'm guessing the Spec Stumpjumper/Rockhopper frame geometries were about the same as Treks in the 1993 timeframe(71* HT, 73* ST angles..same as the Trek 520 tourer, 750 Multitrack, and Surly LHT until recently). "Generalities" while useful, can steer people away from very good options. I converted my '93 Trek 970 to a tourer. Very comfortable and capable bike. My size 12 riding shoes don't come close to any heelstrike issues(near 60L pannier set in back). While I don't doubt for a second that pannier weight behind the rear axel isn't a good thing, in practice, with about 23 pounds back there, I don't notice any issues at all(I've experienced tail-wag in the past with another bike). My stock low gear is 22.5 GI..ya..a bit high compared to the preferred 16-18 inches, but I don't tour in the mountains and so far I've seldom shifted into the low gear. If it becomes an issue at some point..I'll address it then. My bike would be inadequate for you & the trips you take. It isn't the perfect adventure bike by any means, but it was fun to build and is working great for me.. a pleasure to ride, loaded or not. Super stable platform...with how I use it.

Likes For Korina:
03-26-21, 10:52 AM
#52
Off grid off road
Thread Starter

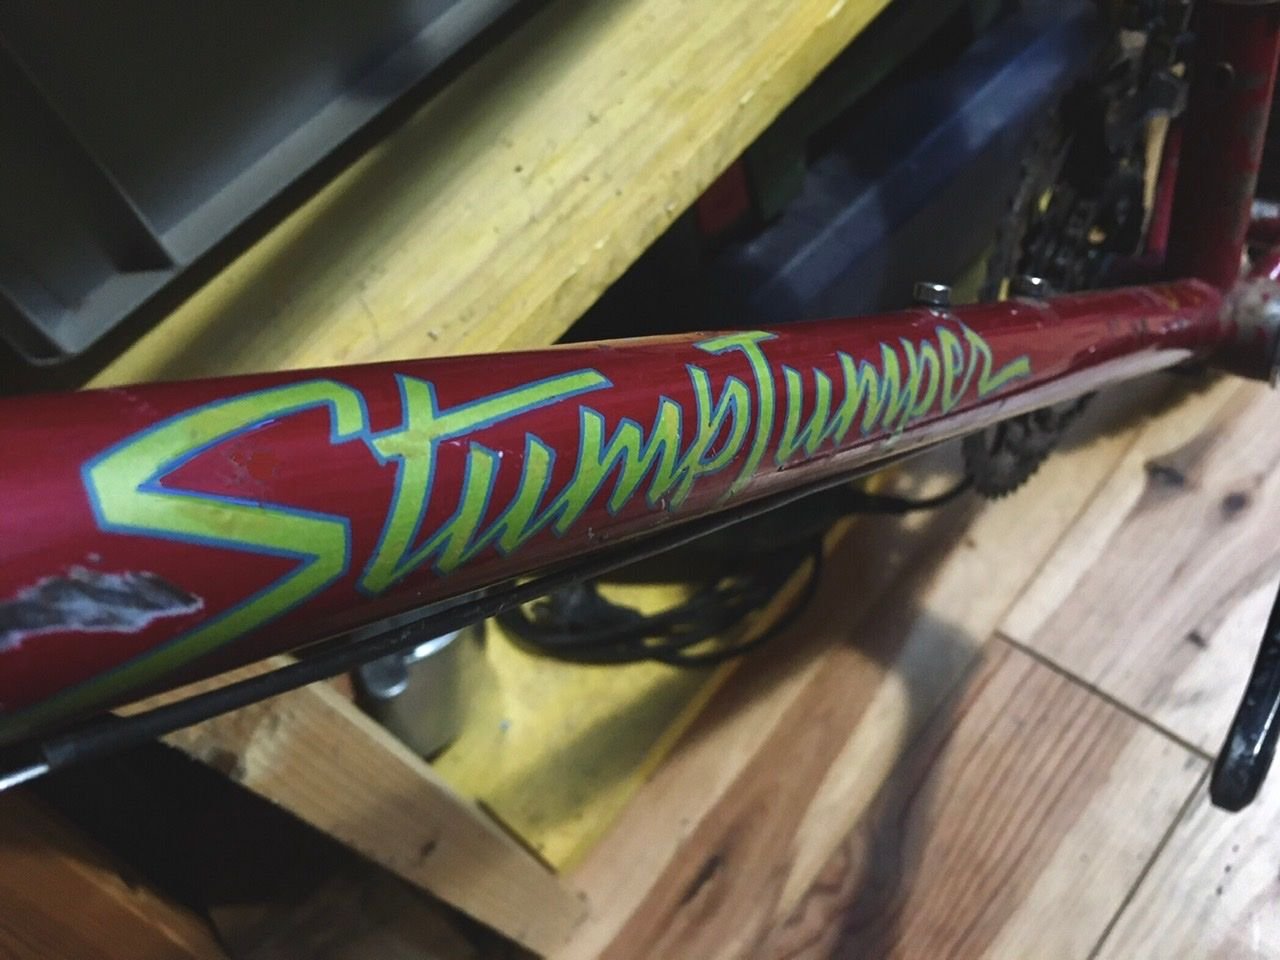
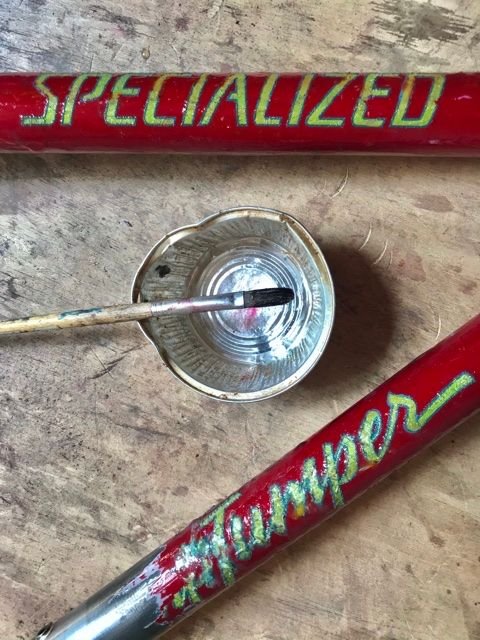
About as much as I am able to do physically, I got out some acrylic paint to try and rough out some repair work on the old shredded zombie decals.
🧟♀️
I love their colour, acidic green metallic with electric blue border, in direct contrast with the chipped cherry red paint. I am not yet convinced to fit vinyl repros on this battered but undamaged frame.
It requires more work to finish, but I got bored.
"Now and then" pics..
Thanks


🧟♀️
I love their colour, acidic green metallic with electric blue border, in direct contrast with the chipped cherry red paint. I am not yet convinced to fit vinyl repros on this battered but undamaged frame.
It requires more work to finish, but I got bored.
"Now and then" pics..
Thanks
Last edited by Deepcherry; 03-27-21 at 09:33 AM.
04-01-21, 12:28 PM
#53
Off grid off road
Thread Starter
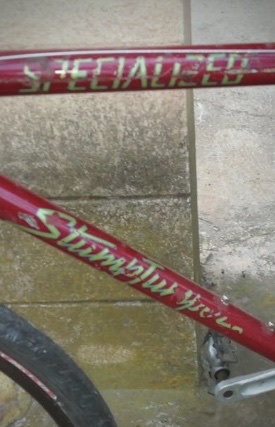
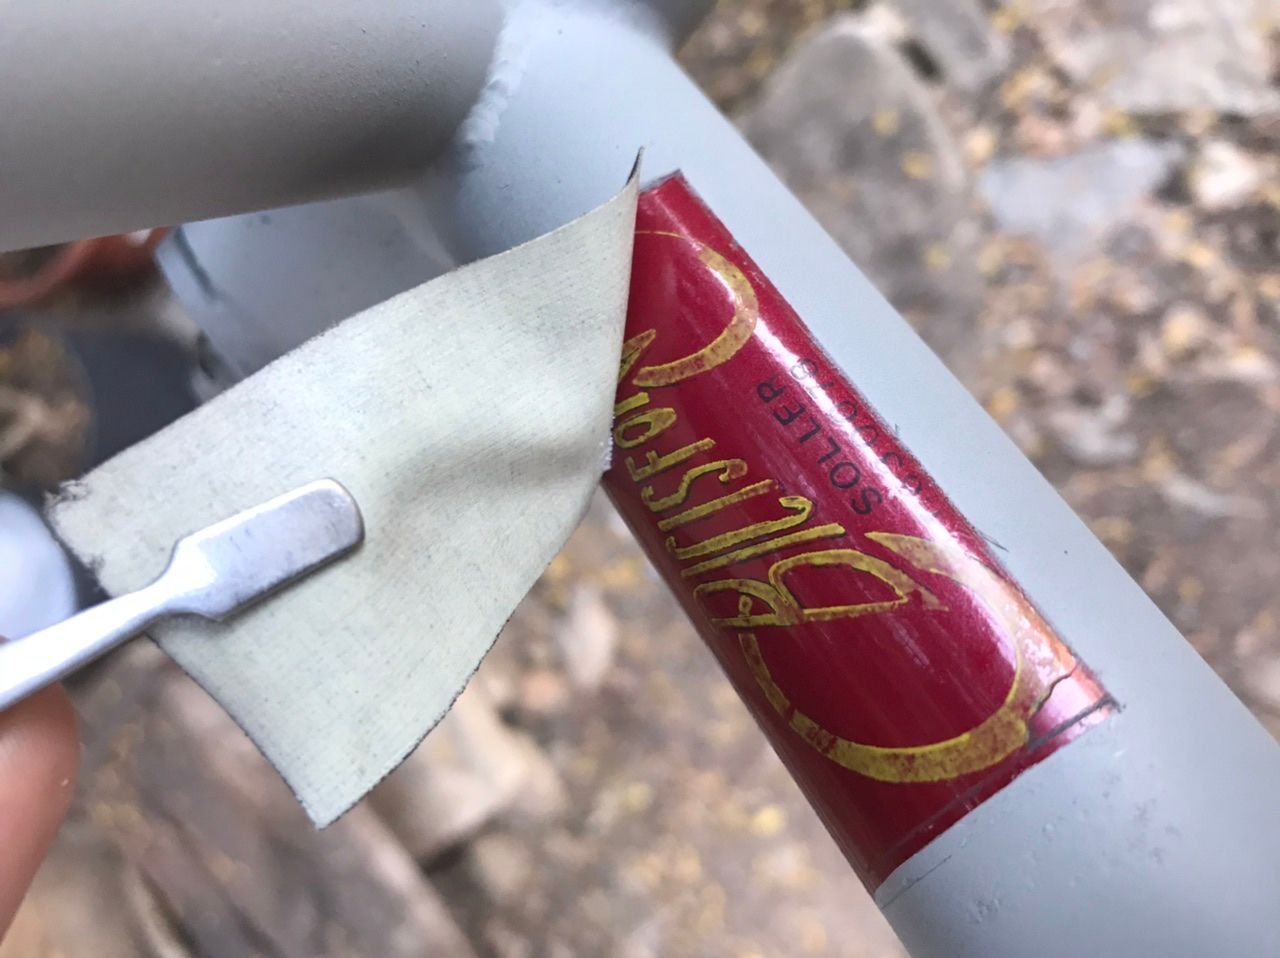
Got better at one-handedly fixing up the tatty decals, here is today's repair to the other side.
This side is much worse than the drive-side, huge areas of decals missing. That top tube is going to be a tricky one.
Notwithstanding a bust collarbone I cannot help fiddling with my bikes although mechanical work is out of the question. At least these little jobs keep Netflix at bay.
Thanks
This side is much worse than the drive-side, huge areas of decals missing. That top tube is going to be a tricky one.
Notwithstanding a bust collarbone I cannot help fiddling with my bikes although mechanical work is out of the question. At least these little jobs keep Netflix at bay.
Thanks
Likes For Deepcherry:
04-01-21, 02:31 PM
#54

Senior Member

^ Mad skilz! That looks amazing.
What is the paint that you�re using?
Sorry to hear about the collarbone. Heal well and quickly!
What is the paint that you�re using?
Sorry to hear about the collarbone. Heal well and quickly!
Last edited by due ruote; 04-01-21 at 03:28 PM.
Likes For due ruote:
04-01-21, 03:18 PM
#55
Full Member
Join Date: Mar 2020
Location: California
Posts: 211
Bikes: 2020 Lynskey GR300, 1987 Diamondback Ascent, 1991 Skykomish Marble Point, 1994 Specialized Stumpjumper FSR, 1996 Specialized Stumpjumper M2 FS, 1992 GT Karakoram
Mentioned: 2 Post(s)
Tagged: 0 Thread(s)
Quoted: 69 Post(s)
Liked 226 Times
in
84 Posts
Resurrected this 94 FSR with Cowchipper dropbars and Velo Orange steep angled stem. Cockpit is nice and upright now for my old back. And 1x10 oval because I was curious.

Likes For Wilbur76:
04-01-21, 04:38 PM
#56
Off grid off road
Thread Starter
For the decals I am using Vallejo model acrylics for the decals with a tiny liner brush. Not perfect, although the paintwork is quite rough, having 'complete' looking decals makes a huge difference.
When these are done I shall touch up the met red paintwork and then give it all a good clear coat and polish.
04-01-21, 04:39 PM
#57
Happy banana slug
Join Date: Sep 2015
Location: Arcata, California, U.S., North America, Earth, Saggitarius Arm, Milky Way
Posts: 3,693
Bikes: 1984 Araya MB 261, 1992 Specialized Rockhopper Sport, 1993 Hard Rock Ultra, 1994 Trek Multitrack 750, 1995 Trek Singletrack 930
Mentioned: 31 Post(s)
Tagged: 0 Thread(s)
Quoted: 1531 Post(s)
Liked 1,527 Times
in
915 Posts
04-01-21, 10:46 PM
#58
Live not by lies.
Join Date: Nov 2020
Posts: 1,306
Bikes: BigBox bikes.
Mentioned: 3 Post(s)
Tagged: 0 Thread(s)
Quoted: 860 Post(s)
Liked 784 Times
in
582 Posts
If there were any justice in the world, old mountain bikes would end their lives as a twisted broken hulk at the bottom of a cliff. (Whether their riders ended up at the bottom of the cliff is a different story.). Mountain bikes are the Vikings of bicycles and they should end their lives in battle with an ascension to Valhalla! The worst possible fate for a mountain bike...especially a Stumpjumper!...is to have someone slap a pair of slicks on them and use them for cruising the local bike path!
Put parts on it, put knobbies on it, even put a suspension fork on it, and try to ride it until it breaks. It looks like it has been through lots of battles and it may have some more in it but, please, don�t make it into a bike path bike!
Put parts on it, put knobbies on it, even put a suspension fork on it, and try to ride it until it breaks. It looks like it has been through lots of battles and it may have some more in it but, please, don�t make it into a bike path bike!
04-02-21, 12:26 AM
#59
Full Member
Join Date: Mar 2020
Location: California
Posts: 211
Bikes: 2020 Lynskey GR300, 1987 Diamondback Ascent, 1991 Skykomish Marble Point, 1994 Specialized Stumpjumper FSR, 1996 Specialized Stumpjumper M2 FS, 1992 GT Karakoram
Mentioned: 2 Post(s)
Tagged: 0 Thread(s)
Quoted: 69 Post(s)
Liked 226 Times
in
84 Posts
Clunky (compared to Shimano GRX on my gravel bike) but precise. Shifts are fairly predictable. Had to bring it in to my LBS for fine tuning after the build so it�s dialed. Haven�t really noticed the clutch which I always keep on.
The oval chainring is weird on the flats because there�s a little lag in the half stroke but works well and not noticeable in a climb.
Brake engagement at the levers is a little lower than what I�m used to. Requires upturning my wrists a little when pulling from the hoods.
Overall good but different. And cheap.
Likes For Wilbur76:
04-20-21, 07:42 AM
#60
Off grid off road
Thread Starter
Now that my recovery is coming along nicely, it is time to start playing again.
Picked up a nice NOS SR slingshot stem, except it was an incredible metallic fuchsia colour. Lovely for another bike...
A bit of paint stripper sorted that out.
Next up is to shorten the wiiiiiide 22mm handle bar, picked up on Amazon.

So pink

I'm so boring, it had to be natural aluminium
Picked up a nice NOS SR slingshot stem, except it was an incredible metallic fuchsia colour. Lovely for another bike...
A bit of paint stripper sorted that out.
Next up is to shorten the wiiiiiide 22mm handle bar, picked up on Amazon.
So pink
I'm so boring, it had to be natural aluminium
04-20-21, 09:49 AM
#61
Senior Member
Join Date: Nov 2014
Location: Saratoga calif.
Posts: 1,049
Bikes: Miyata 610(66cm), GT Vantara Hybrid (64cm), Nishiki International (64cm), Peugeot rat rod (62 cm), Trek 800 Burning Man helicopter bike, Bob Jackson frame (to be restored?) plus a never ending stream of neglected waifs from the Bike exchange.
Mentioned: 28 Post(s)
Tagged: 0 Thread(s)
Quoted: 339 Post(s)
Likes: 0
Liked 631 Times
in
229 Posts
Before doing a complete repaint you might consider this:
Strip bike to frame, wipe down with wd40 or paint thinner soaked rag to get caked grease off .
Wash with dawn dish soap to get rest of dirt off
rub out with Dupont no. 7 white polishing compound to remove ground in grease dirt, and scuff marks.
Repaint the fork with Rustoleum automotive grade black ( after treating rust, then undercoating)
Spray frame with Rustoleum automotive clear (I heat the can under hot water to about body temp to make it spray better)
Clean and polish all brightwork
Show off your beutifull survivor to your friends.
Likes For capnjonny:
04-20-21, 11:01 AM
#62
Senior Member
Join Date: Oct 2005
Location: Upper Left, USA
Posts: 1,915
Mentioned: 50 Post(s)
Tagged: 0 Thread(s)
Quoted: 634 Post(s)
Liked 444 Times
in
298 Posts
If there were any justice in the world, old mountain bikes would end their lives as a twisted broken hulk at the bottom of a cliff. (Whether their riders ended up at the bottom of the cliff is a different story.). Mountain bikes are the Vikings of bicycles and they should end their lives in battle with an ascension to Valhalla! The worst possible fate for a mountain bike...especially a Stumpjumper!...is to have someone slap a pair of slicks on them and use them for cruising the local bike path!
Put parts on it, put knobbies on it, even put a suspension fork on it, and try to ride it until it breaks. It looks like it has been through lots of battles and it may have some more in it but, please, don’t make it into a bike path bike!
Put parts on it, put knobbies on it, even put a suspension fork on it, and try to ride it until it breaks. It looks like it has been through lots of battles and it may have some more in it but, please, don’t make it into a bike path bike!
If a certain configuration gets someone to ride the heck out of a bike, then that's what matters. The bike I rode the most in 2018-2019 was an '87 Gary Fisher Hoo-koo-e-koo with Compass tires, racks and fenders. It was one of those grab and go bikes in my fleet that ended up getting the most miles. I loved commuting on it.
edit: I see that you've responded to this a couple times re: modern vs vintage geometries. You have lots of personal experience on this, and make valid points, but we'll just need to agree to disagree on this one.


Last edited by tricky; 04-20-21 at 04:45 PM.
06-18-21, 09:58 AM
#63
Off grid off road
Thread Starter
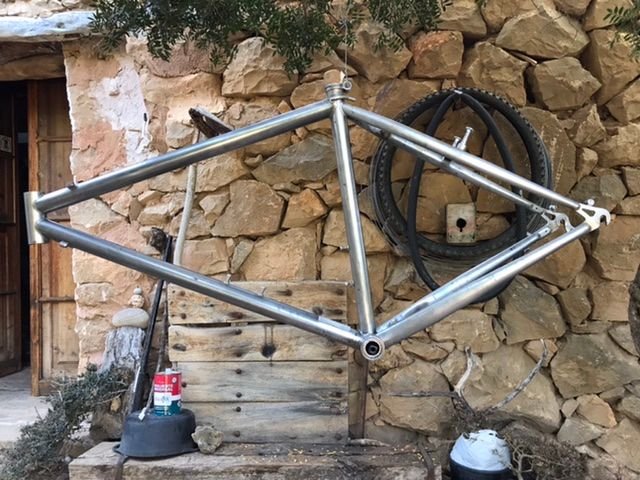
After a long time looking at this frame with its 'natural' patina, I decided to go ahead and give it a new finish.
I shall give this frame a fresh coat of the same original colour, deep red (RAL 3004) over grey etch primer, followed by a light dusting of red metallic flake and clear coat.
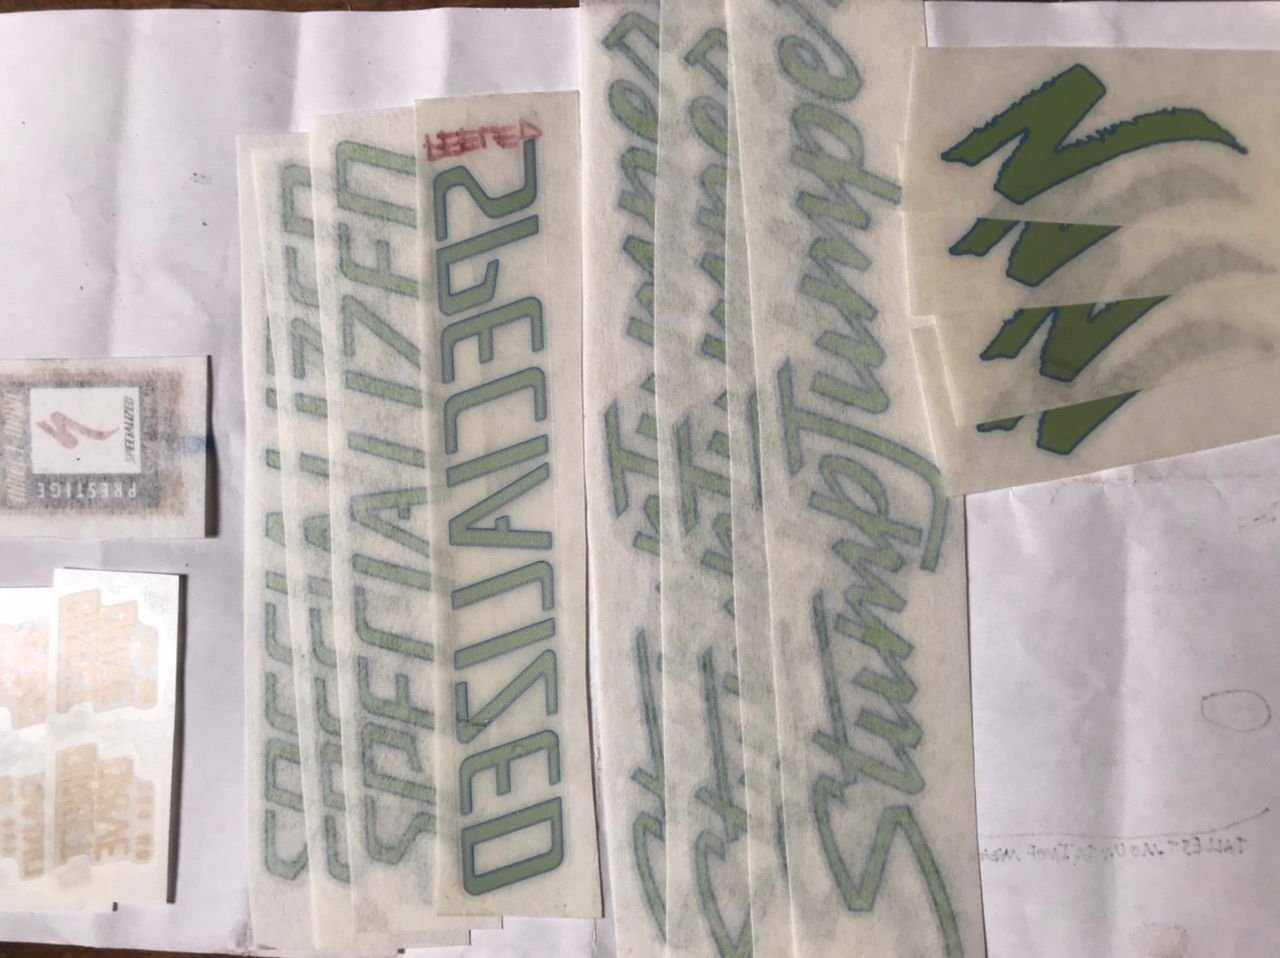
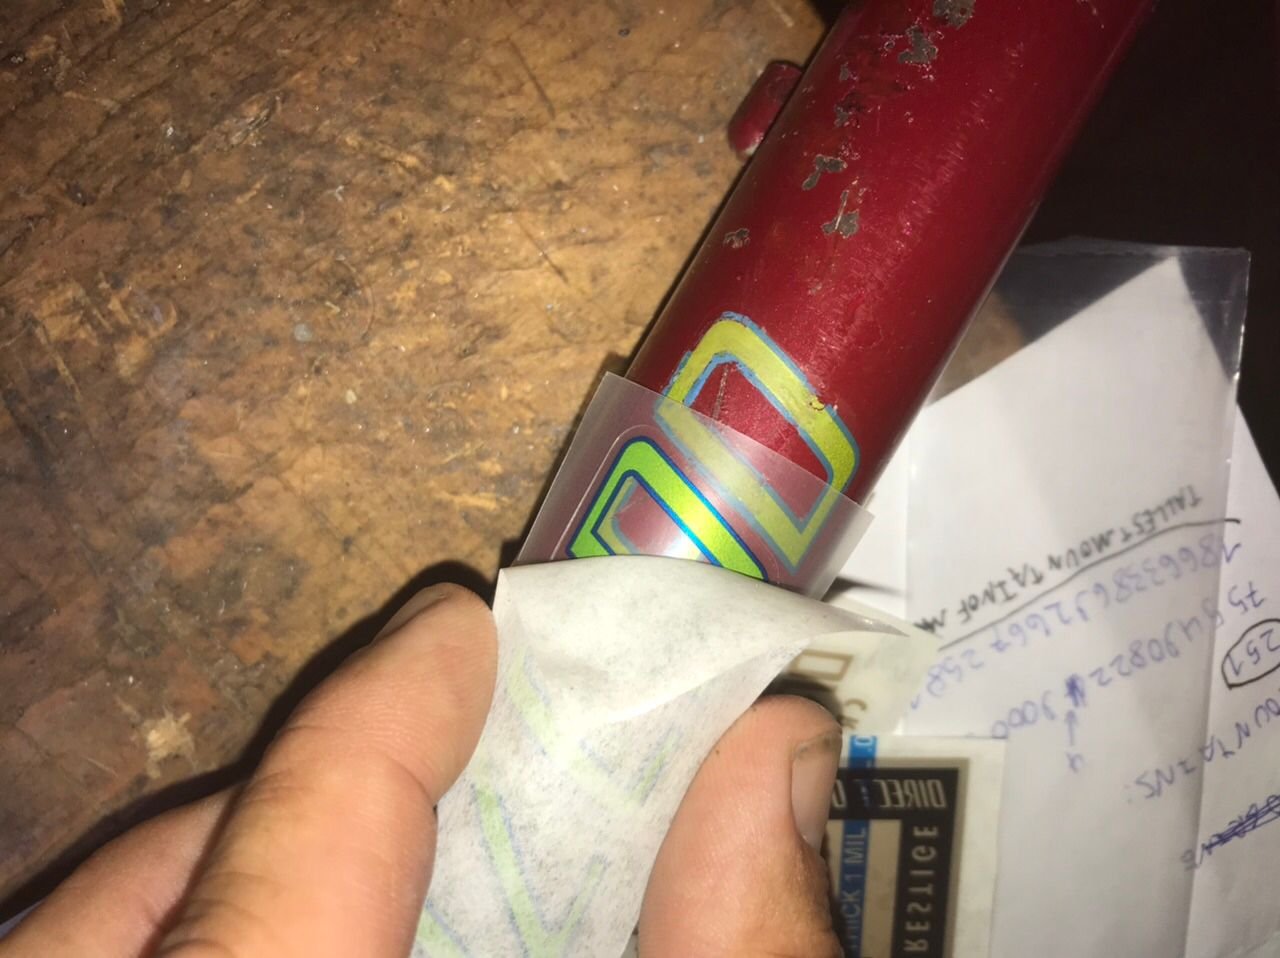
First off was to order a new set of decals from Velocals. Wow, am I impressed with their products and service! They custom made a full set of decals to my specifications, not quite a 100% color match but more than good enough. (I should add that I ordered these colours by eye, over the Internet, Velocals had no reference other than my photographs.)
-The detail and cut is perfecto. 👌
They even sent double (quadruple for the head tube!) quantities of everything 'to allow me to play and get the feel for a perfect job'. Brilliant.
Can't wait to get this hand stripped right down and get painting!

I' ve started, so now I have to finish.

I shall give this frame a fresh coat of the same original colour, deep red (RAL 3004) over grey etch primer, followed by a light dusting of red metallic flake and clear coat.
First off was to order a new set of decals from Velocals. Wow, am I impressed with their products and service! They custom made a full set of decals to my specifications, not quite a 100% color match but more than good enough. (I should add that I ordered these colours by eye, over the Internet, Velocals had no reference other than my photographs.)
-The detail and cut is perfecto. 👌
They even sent double (quadruple for the head tube!) quantities of everything 'to allow me to play and get the feel for a perfect job'. Brilliant.
Can't wait to get this hand stripped right down and get painting!
I' ve started, so now I have to finish.
Last edited by Deepcherry; 06-25-21 at 01:49 AM.
06-18-21, 10:04 AM
#64
Full Member
Join Date: Jun 2020
Posts: 458
Bikes: 91 Ritchey Ultra, 1992 Specialized Stumpjumper, 1990 Klein Rascal, 97 Trek OCLV9700, 90 Minnelli Eclipse, 95 Marin Bear Valley SE, 1991 Breezer Lightning Flash 1991 Diamondback Axis 1992 Stumpjumper Comp 1983 Stumpjumper Sport
Mentioned: 2 Post(s)
Tagged: 0 Thread(s)
Quoted: 101 Post(s)
Liked 645 Times
in
236 Posts
Well done can’t wait to see finished product.
Likes For victorm:
06-23-21, 02:31 PM
#65
Off grid off road
Thread Starter
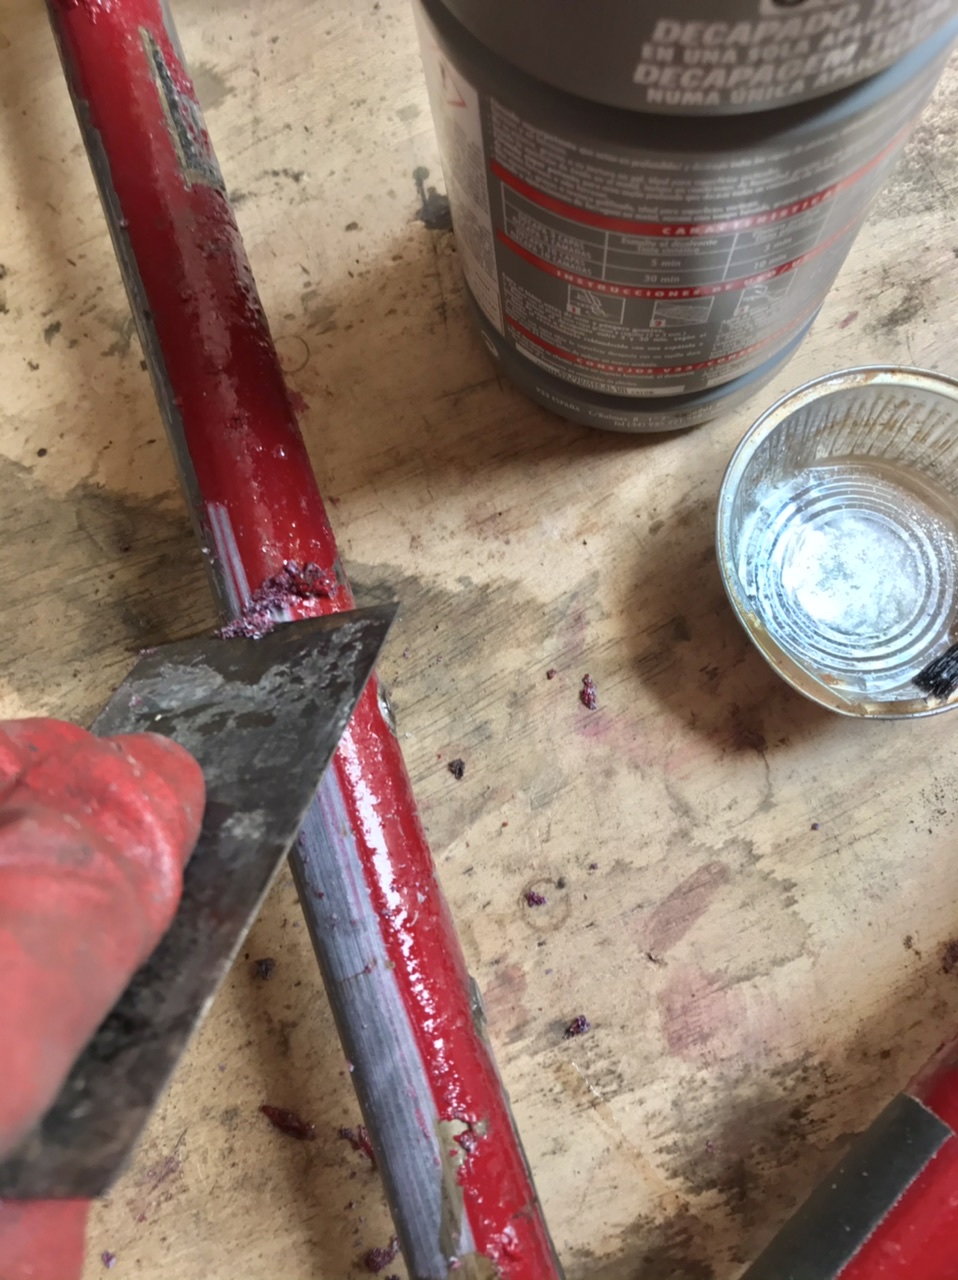
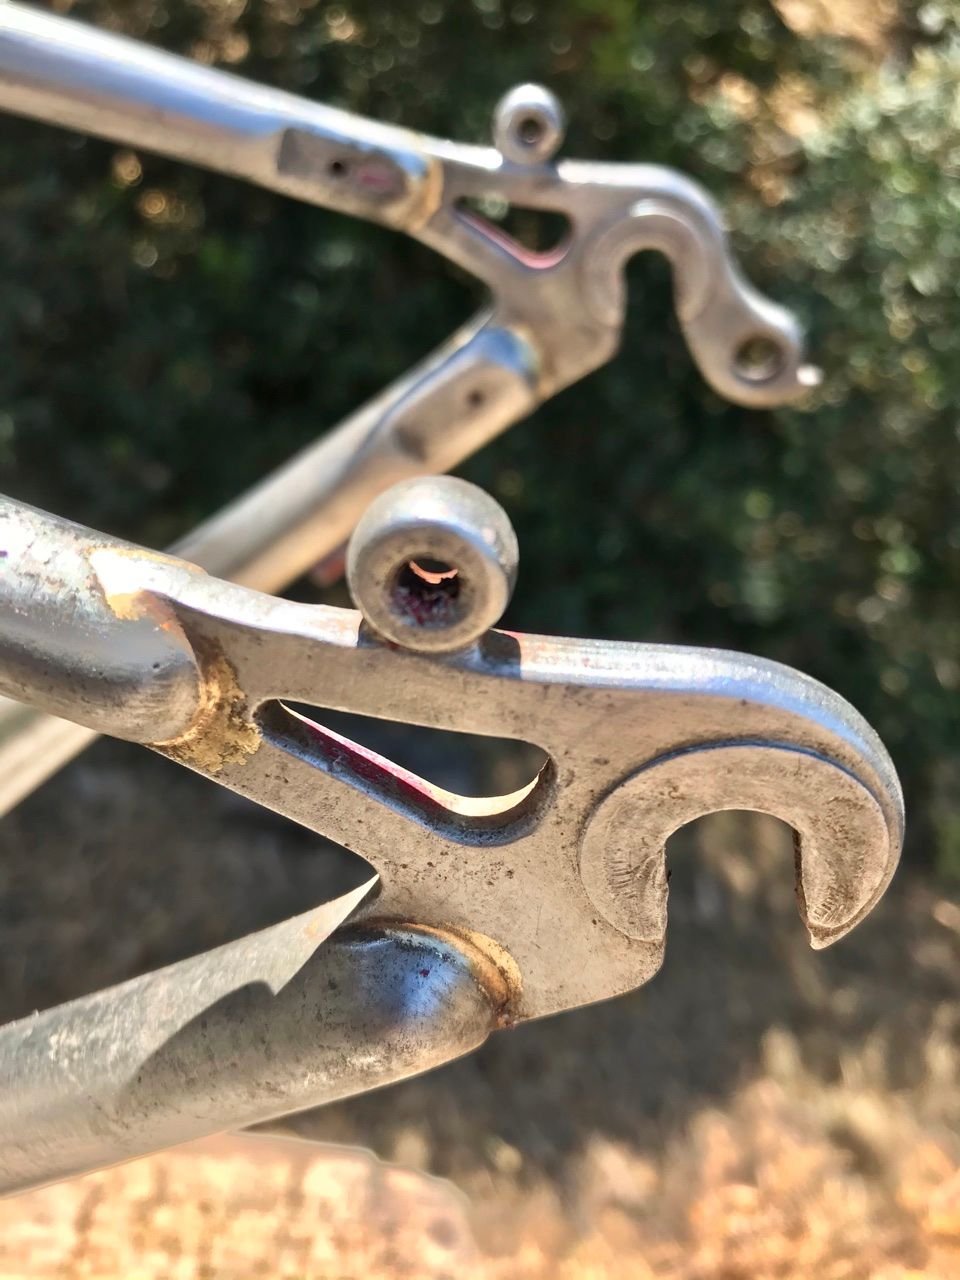
Removing the coats using good old paint stripper and a steel spatula, and a rub with some sanding pads.
So far so good, and no serious rust, though there was considerable spidering and staining beneath the old primer where the moisture had got in via the many chips in the paint.
The welds and brazing are not the most beautiful in the world.


So far so good, and no serious rust, though there was considerable spidering and staining beneath the old primer where the moisture had got in via the many chips in the paint.
The welds and brazing are not the most beautiful in the world.
06-24-21, 09:20 AM
#66
Senior Member
Join Date: May 2013
Location: Kips Bay, NY
Posts: 2,212
Bikes: Ritchey Swiss Cross | Teesdale Kona Hot | Haro Extreme | Specialized Stumpjumper Comp | Cannondale F1000 | Shogun 1000 | Cannondale M500 | Norco Charger | Marin Muirwoods 29er | Shogun Kaze | Breezer Lightning
Mentioned: 8 Post(s)
Tagged: 0 Thread(s)
Quoted: 576 Post(s)
Liked 1,000 Times
in
488 Posts
That's looking good. If you haven't already planned on it, I'd recommend using Framesaver on the interior after the paint dries.
06-24-21, 09:29 AM
#67
Senior Member
Join Date: Feb 2016
Location: SE Wisconsin
Posts: 1,851
Bikes: Lemond '01 Maillot Jaune, Lemond '02 Victoire, Lemond '03 Poprad, Lemond '03 Wayzata DB conv(Poprad), '79 AcerMex Windsor Carrera Professional(pur new), '88 GT Tequesta(pur new), '01 Bianchi Grizzly, 1993 Trek 970 DB conv, Trek 8900 DB conv
Mentioned: 12 Post(s)
Tagged: 0 Thread(s)
Quoted: 758 Post(s)
Likes: 0
Liked 809 Times
in
471 Posts
What paint and painting process do you plan on using.
I have a stripped frame and currently waiting for decals to arrive. When they get here..I'll be picking up primer & paint and start the road back.
I have a stripped frame and currently waiting for decals to arrive. When they get here..I'll be picking up primer & paint and start the road back.
06-24-21, 11:18 AM
#68
Off grid off road
Thread Starter
That's looking good. If you haven't already planned on it, I'd recommend using Framesaver on the interior after the paint dries.
I have since "pickled" the bare steel surface for an hour or two with cleaning vinegar-soaked paper towel, pulling the surface rust from the pitted areas.

-Edit- I should mention that any difficult corners with surface rust should be treated with brush-on rust converter.
Then the threaded holes and seat tube were blocked by whatever means. Mask that which does not need painting.
Hung up in my favourite frame-painting tree.
Degreaser now to remove any barrier to the etch primer.
A dusting coat of primer.

Let that dry for 15 minutes (25C / 77F ambiente temp in the shade).
Two wet coats with suitable drying time between. Pay special attention covering properly the welded tube intersections and braze-ons.
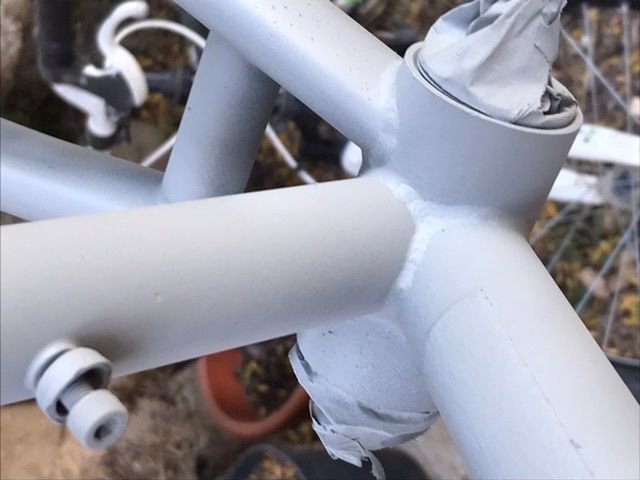

I forgot to mask the brake bosses, so I shall gently sand off the primer here when dry, and mask off before adding more paint.
Leave for two weeks or as long as you can bear for the primer to really dry hard. I usually wait until I cannot smell solvent at all.
Next to come will be a light sanding and more primer!
Last edited by Deepcherry; 06-25-21 at 02:07 AM.
06-24-21, 11:35 AM
#69
Off grid off road
Thread Starter
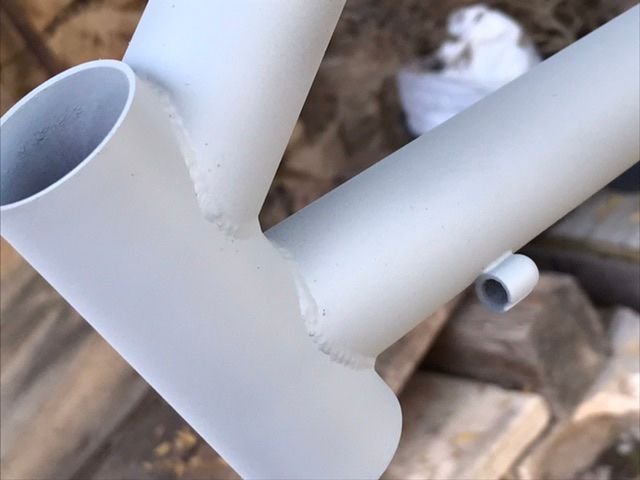
I am using a fast drying anti-oxidant etch-primer in aerosol. One rattle can gave me one dust coat and two wet coats. Looks like good complete coverage.
There was just enough primer left in the can to apply a good third wet coat to the rear dropouts and lower seat tube/BB area, especially just ahead of the rear tire.
As I am a bit of a masochist I decided to save that long-gone dealer sticker.
When totally dry and gassed off I will lightly sand and decide whether I need to re apply primer.
Last edited by Deepcherry; 06-25-21 at 07:29 AM.
Likes For Deepcherry:
06-24-21, 12:20 PM
#70
buy my bikes

Join Date: Jun 2014
Location: Michigan
Posts: 1,799
Bikes: my very own customized GUNNAR CrossHairs
Mentioned: 19 Post(s)
Tagged: 0 Thread(s)
Quoted: 519 Post(s)
Liked 426 Times
in
248 Posts
thanks for posting - i'm too lazy to go into this much detail and post for folks.
06-24-21, 02:54 PM
#71
Off grid off road
Thread Starter
quick question: did you investigate trying to bake after painting? I've been contemplating building an insulated box and heating it with a hot air gun. I'm a bit worried about sucking dust in and just having small bits of dust in the paint to deal with.
thanks for posting - i'm too lazy to go into this much detail and post for folks.
thanks for posting - i'm too lazy to go into this much detail and post for folks.
The quick- drying paint is a great help regarding dust adhesion.
If the primer is gently sanded down to a really smooth fine finish, the colour paint usually goes down very well. It's a question of good preparation for the next layer.
I'll build up the colour coat with light layers, let that cure in the same way as the primer, and then add as as many coats of clear as I see fit. I'm expecting at least two coats of clear over the colour, some fine, fine sanding if there is texture, then the application of the new decals and then three or more clear coats on top, some fine sanding and a good polish.
Hopefully that should do it without taking the frame over 2kg.
Last edited by Deepcherry; 06-25-21 at 07:30 AM.
Likes For Deepcherry:
06-24-21, 07:17 PM
#72
Senior Member
Golly - all that detail work on the old decals melted away! But it looks like you are doing a great job with the new finish.
O/T: that stonework is amazing. Is that a barn?
O/T: that stonework is amazing. Is that a barn?
06-25-21, 12:59 AM
#73
Off grid off road
Thread Starter
Deep down I knew that I would be stripping it all off again.
I just made sure I had my new custom decals in hand before the strip down...
Could make one's eyes water
Off-topic:-
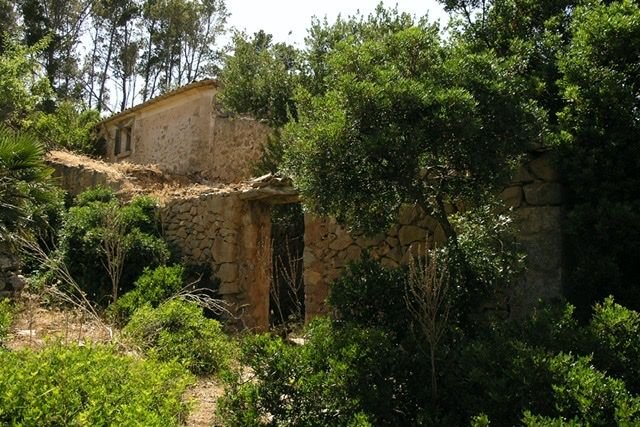
The stonework is possibly medieval, certainly pre-rococo, in the traditional rural mediterranean style. It was a small stable, then a ruin, and is now our little workshop/playroom.
The main house dates from the Spanish Arabic era, so earlier than 1228 for our area.
Here it is thirteen years ago, as a ruin. Foreground center-right by the doorway is my frame painting zone:
Last edited by Deepcherry; 06-25-21 at 01:55 AM.
06-25-21, 06:34 PM
#74
Full Member
Join Date: Mar 2020
Location: California
Posts: 211
Bikes: 2020 Lynskey GR300, 1987 Diamondback Ascent, 1991 Skykomish Marble Point, 1994 Specialized Stumpjumper FSR, 1996 Specialized Stumpjumper M2 FS, 1992 GT Karakoram
Mentioned: 2 Post(s)
Tagged: 0 Thread(s)
Quoted: 69 Post(s)
Liked 226 Times
in
84 Posts
After a long time looking at this frame with its 'natural' patina, I decided to go ahead and give it a new finish.
I shall give this frame a fresh coat of the same original colour, deep red (RAL 3004) over grey etch primer, followed by a light dusting of red metallic flake and clear coat.
First off was to order a new set of decals from Velocals. Wow, am I impressed with their products and service! They custom made a full set of decals to my specifications, not quite a 100% color match but more than good enough. (I should add that I ordered these colours by eye, over the Internet, Velocals had no reference other than my photographs.)
-The detail and cut is perfecto. 👌
They even sent double (quadruple for the head tube!) quantities of everything 'to allow me to play and get the feel for a perfect job'. Brilliant.
Can't wait to get this hand stripped right down and get painting!
06-26-21, 03:10 AM
#75
Off grid off road
Thread Starter
I ordered them on the website, after consulting with them about colour choices. I didn't see my colour scheme offered in the online shop but they were happy to create this order to my specifications.
Likes For Deepcherry:

