


Make your own tent!
 10-26-11, 02:35 PM
#1
Senior Member
Thread Starter
Join Date: Sep 2007
Location: Gaseous Cloud around Uranus
Posts: 3,741
Mentioned: 0 Post(s)
Tagged: 0 Thread(s)
Quoted: 38 Post(s)
Likes: 0
Liked 11 Times
in
7 Posts
Make your own tent!
Over the years I have had many tents,from cheap to middle of the road types.Ive tried single wall,double wall,tarps ect. ect.
I decided that I liked single wall over double wall types.Some people don't like single wall for different reasons,they want to look at the stars,they get too hot in the summer,to much condensation.....whatever it may be.
After years of fooling around modifying tents for this or that,I decided that I would try to make what I wanted.I went to the local Salvation Army and bought an old White Jean Machine sewing machine,it cost a whopping $35.I figured if it can sew jeans,it can sew a tent with all of the tie downs.
I knew NOTHING about sewing with a machine really,just some little stuff through the years.How hard can it be? Other humans do it?
Researched what materials were used,what type of thread,how to make seams....you get the idea.Come to find out,everything is pretty common stuff,all available online.
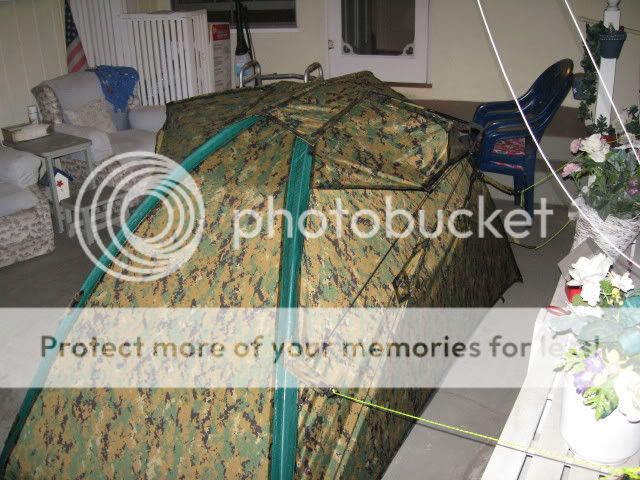
So with a couple hours practice making flat felled seams,I bought everything I needed for about $125 and set out to see what I could do.After 4 weekends and what seems like 20 miles of thread,here's what you get:

I decided that I liked single wall over double wall types.Some people don't like single wall for different reasons,they want to look at the stars,they get too hot in the summer,to much condensation.....whatever it may be.
After years of fooling around modifying tents for this or that,I decided that I would try to make what I wanted.I went to the local Salvation Army and bought an old White Jean Machine sewing machine,it cost a whopping $35.I figured if it can sew jeans,it can sew a tent with all of the tie downs.
I knew NOTHING about sewing with a machine really,just some little stuff through the years.How hard can it be? Other humans do it?
Researched what materials were used,what type of thread,how to make seams....you get the idea.Come to find out,everything is pretty common stuff,all available online.
So with a couple hours practice making flat felled seams,I bought everything I needed for about $125 and set out to see what I could do.After 4 weekends and what seems like 20 miles of thread,here's what you get:
 10-26-11, 03:34 PM
#2

Dirt Bomb

Join Date: Aug 2006
Location: Illinois
Posts: 2,865
Mentioned: 64 Post(s)
Tagged: 0 Thread(s)
Quoted: 5464 Post(s)
Liked 288 Times
in
239 Posts
I'm impressed. From time-to-time I've wished I could sew. My wife won't let me use her machine. Well, she would, but everytime I ask her to show me how she drags her feet until I lose interest and quit asking.
__________________
10-26-11, 03:45 PM
#3
Senior Member
thats brilliant but why copy another maker why not come up with you own design you must by now know exactly what makes the perfect cycling tent.

 10-26-11, 06:49 PM
#7
Senior Member
Thread Starter
Join Date: Sep 2007
Location: Gaseous Cloud around Uranus
Posts: 3,741
Mentioned: 0 Post(s)
Tagged: 0 Thread(s)
Quoted: 38 Post(s)
Likes: 0
Liked 11 Times
in
7 Posts
What makes you think I copied somebody? I didn't copy anybody,I knew what I wanted,that's what it turned out like.Granted,I didn't reinvent the wheel,I used ideas from everybody and a couple of my own.Like the back window has an eyebrow over it,so you can leave it open when it rains,you won't see that on many(if any)other backpack style tents.
The camo fabric is 1.9oz before coatings,and it is double coated.One for waterproofness,one for blackout.If you have a light on inside at night,it doesn't light up the tent on the outside.
The camo material is USMC Marpat,it's heavy by today's standards.Total weight,tent,aluminum poles,stakes,groundcloth,stuffsack,everything,is 4.5 pounds.It stuffs loosely into a sack,12" x 6",less the poles and ground cloth,that gets carried on my rear rack.I like to have the ground cloth available in case I need to get some shade or get out of the rain during the day.
Measures 92"L x 46"W x 40"H.Has 2 inside pockets and an attic,2 vents in the top and a window in the rear.It's big for one person but I keep my panniers inside so the varments don't chew holes in them.
I've had it out for a few weekend overnighters,rain,fog,95 degree weather,desert,beach.So far so good,no condensation at all,has good flow thru the vents,you can leave the door and rear window open in the rain....so far so good.
Last edited by Booger1; 10-26-11 at 07:29 PM.
10-26-11, 08:40 PM
#8
Senior Member

Join Date: Jan 2007
Location: NE Tx
Posts: 2,766
Bikes: Tour Easy, Linear USS, Lightening Thunderbolt, custom DF, Raleigh hybrid, Felt time trial
Mentioned: 0 Post(s)
Tagged: 0 Thread(s)
Quoted: 0 Post(s)
Likes: 0
Liked 0 Times
in
0 Posts
Make mine 90x40 with double entry, zippered mesh. 25 sq ft. Perfect for a short fellow and panniers. Do like the black out coating idea. What's it coated with to do that?
10-27-11, 12:54 AM
#9
Senior Member
Excellent work, Booger!
Just tell me, how do you stop the fabric from slipping under the foot of the sewing machine? I have an old cheap sewing machine, too, but for ordinary fabrics, not heavy duty stuff. I've tried sewing lycra before, and a slippery plastic fabric that I had great trouble feeding through the foot because of its slick surface.
I have to say that my days of using double-walled tents might be numbered. I frankly don't see the point in carrying around what effectively are two tents to make one. The condensation issue is one that might be tricky in cool weather, but the inner of a double wall tent often doesn't stop the occupants from pressing up against the damp outer wall anyway. And when Machka's bike was stolen from right next to our tent, the opportunity to apprehend the culprit was hindered by having to get through two zippers first.
10-27-11, 03:07 AM
#10
Senior Member
ah now i was not slagging you, the tent looks great fair play to you, i just taught the shape would be different in some way thats all.
so give us some pic's of the inside and when are you going into manufacturing if the price is right i'll buy one.
so give us some pic's of the inside and when are you going into manufacturing if the price is right i'll buy one.
10-27-11, 03:36 AM
#11
totally louche

Join Date: Oct 2004
Location: A land that time forgot
Posts: 18,023
Bikes: the ever shifting stable loaded with comfortable road bikes and city and winter bikes
Mentioned: 0 Post(s)
Tagged: 0 Thread(s)
Quoted: 0 Post(s)
Likes: 0
Liked 10 Times
in
9 Posts
VERY impressive!!
unbelievable to me this is your first machine sewing project. I'm not positive we're seeing the entire picture here.
unbelievable to me this is your first machine sewing project. I'm not positive we're seeing the entire picture here.
10-27-11, 08:22 AM
#12
Senior Member
Join Date: Jul 2011
Posts: 2,441
Mentioned: 0 Post(s)
Tagged: 0 Thread(s)
Quoted: 33 Post(s)
Likes: 0
Liked 4 Times
in
3 Posts
Yeah very impressive. The way you have the poles running through tunnels in what I gather is you only layer is a big problem for future waterproofness, though. Tunnels work out in a double wall because the inner layer isn't waterproof anyway, and the fly is simply stretched over. When doing a single layer dome, the simplest rig is basically just poles sitting inside pressing the fabric out. Since the whole thing is like a big plastic ziplock bag, there isn't anywhere for the poles to go in a basic dome, and they can be controlled with nothing more than a few tie-ins. Something to consider should there ever be a problem.
10-27-11, 09:13 AM
#13
Senior Member

Join Date: Jul 2007
Posts: 2,114
Mentioned: 0 Post(s)
Tagged: 0 Thread(s)
Quoted: 0 Post(s)
Likes: 0
Liked 1 Time
in
1 Post
The only problem with it is that it is hit or miss of what is in stock. They might have the 1.9 or the 1.1 or both or neither.
To start, you could try simple things like stuff sacks.
10-27-11, 09:37 AM
#14
Senior Member
Thread Starter
Join Date: Sep 2007
Location: Gaseous Cloud around Uranus
Posts: 3,741
Mentioned: 0 Post(s)
Tagged: 0 Thread(s)
Quoted: 38 Post(s)
Likes: 0
Liked 11 Times
in
7 Posts
For slippery fabric(silicone nylon say) you can sew through a piece of paper.Pin it together,use some paper on the dog side and it will feed evenly.
I did find I needed some more practice when I got down to sewing the netting.You end up stretching the netting if your not careful.So you cut 2 pieces the same size,1 fabric,1 netting.Start sewing and by the time you get to the end,the netting has magically grown longer.It took some practice so this didn't get out of hand.
It has flat felled seams throughout,so the only way water can get through,is the stitching,seal the thread holes = no leaky.
It's not my first time using a machine,I have modified other things,panniers and tents.But this is my first time actually making something from scratch,short of some stuff sacks and some tiedowns,simple stuff.
If I can do this,anybody can.If you can follow a straight line,you can do this.The hardest part of the whole thing is making sure your only sewing what needs to be done.
Weaving all of the material under the foot and not have something you DON'T want under there is time consuming.The trick is to try and keep all of your seams to the outside,so you don't have to run 8 yards of material between the foot and the machine.It not always possible to do that,but I tried to keep it to a minimum.
After all is said and done,I think a regular machine would work fine.Use Gutterman thread and a # 10-11 needle.A smaller needle and the thread doesn't feed well through the hole,a bigger needle and the hole has too much room,the holes open when under tension.Not a big deal really,just looks funky.
I'm good at mechanical things,I couldn't program a computer,but I CAN make the machines/dies that make them.
I WON'T be taking orders anytime soon.......
Last edited by Booger1; 10-27-11 at 09:55 AM.
10-27-11, 09:46 AM
#15
Senior Member
Join Date: Jul 2007
Posts: 2,114
Mentioned: 0 Post(s)
Tagged: 0 Thread(s)
Quoted: 0 Post(s)
Likes: 0
Liked 1 Time
in
1 Post
After all is said and done,I think a regular machine would work fine.Use Gutterman thread and a # 10-11 needle.A smaller needle and the thread doesn't feed well through the hole,a bigger needle and the hole has too much room,the holes open when under tension.

 10-27-11, 12:28 PM
#17
Senior Member
Thread Starter
Join Date: Sep 2007
Location: Gaseous Cloud around Uranus
Posts: 3,741
Mentioned: 0 Post(s)
Tagged: 0 Thread(s)
Quoted: 38 Post(s)
Likes: 0
Liked 11 Times
in
7 Posts
I'm guessing you can use a smaller needle on sil-nylon because it IS slippery.The urethane coating is stickier than sil-nylon.
I practiced with a #9 needle but I had trouble getting the tension correct without puckering the material.
I'm not sure what is on here for the blackout coating,the backside of the material is tan.
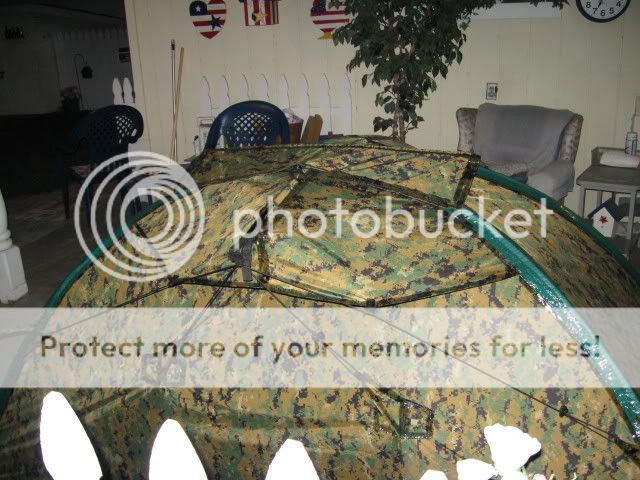
Here's a couple more pictures:

I practiced with a #9 needle but I had trouble getting the tension correct without puckering the material.
I'm not sure what is on here for the blackout coating,the backside of the material is tan.
Here's a couple more pictures:
Last edited by Booger1; 10-27-11 at 12:52 PM.
10-28-11, 08:43 AM
#20
Senior Member
yes me too please. can i just ask now that you have it made how would you honestly rate it against any of the top makers.will it survive a storm ,can you see how you could improve it even further,did you work off a pattern or was it all guess work, is all the seams fully waterproof seam sealed.
thats it for now sure hope you dont mind me asking questions .
thanks
Anto.
thats it for now sure hope you dont mind me asking questions .
thanks
Anto.
10-29-11, 06:56 AM
#21
Senior Member

Join Date: Oct 2011
Location: Normal, Illinois
Posts: 2,714
Bikes: Trek 600 ,1980Raleigh Competition G.S., 1986 Schwinn Passage, Facet Biotour 2000, Falcon San Remo 531,Schwinn Sierra, Sun Seeker tricycle recumbent,1985 Bianchi Squadra
Mentioned: 1 Post(s)
Tagged: 0 Thread(s)
Quoted: 33 Post(s)
Liked 12 Times
in
9 Posts
A pretty impressive first effort. A pretty impressive piece of work in general. Are you planning any field/range testing soon?
10-29-11, 07:06 AM
#22
totally louche
Join Date: Oct 2004
Location: A land that time forgot
Posts: 18,023
Bikes: the ever shifting stable loaded with comfortable road bikes and city and winter bikes
Mentioned: 0 Post(s)
Tagged: 0 Thread(s)
Quoted: 0 Post(s)
Likes: 0
Liked 10 Times
in
9 Posts
as it is waterproof, non breathable fabric, i'm predicting a damp night inside. unless left totally wide open and even then it will still be moist.
This is my experience owning many tents over the years and having spent some time field testing gear for MSR in the Northwest. massive breathability is crucial in tents and tough to attain in small, WP fabric domes.
but the work is first rate if what we're seeing is a homemade tent project, and one i applaud you for accomplishing, boog.
10-29-11, 03:38 PM
#23
Senior Member
Thread Starter
Join Date: Sep 2007
Location: Gaseous Cloud around Uranus
Posts: 3,741
Mentioned: 0 Post(s)
Tagged: 0 Thread(s)
Quoted: 38 Post(s)
Likes: 0
Liked 11 Times
in
7 Posts
It's already been out 6-7 times for a couple overnighters and a couple 4 days trips this summer.Been to the beach and desert a couple times each.The strongest winds it has survived were maybe 20mph,tops...nothing really.It's as stable as anything thing I owned before,and it can get WINDY in the high desert.
I made it as low as I could for me because of the desert winds.I like deserts,I go alot.I crawl around in a drunken stupor and look at the belly flowers....
I just went 4 days a couple weeks ago in the pouring rain north on PCH from L.A. to Santa Barbara.....POURING RAIN the mostof the time.Stayed at Leo Carrillo and ElCap campgrounds.
Did just fine.
There's a vent at the top,that allows a breeze to run through the top of the tent,and carry moisture away.I "borrowed" that idea.Some big name tents do that on their single wall tents.It works.
Basically,if you look closely at how good single wall tents(or any tent really) are vented,all you need is a big enough area for the expected moisture to be able to excape.The inside of your tent is hopefully warmer than the outside air.Hot air goes up,you need enough circulation through the top of the tent to capture that air,then move it out.Fresh air come from the vestibule in front(for most single wall).Zip and unzip the vestibule as needed to control moisture.You have a sleeping bag to keep warm.
If the vestibule is designed correcty,you can open it up without it raining inside your tent.That's just so that you can get in/out without drenching your stuff,it's nice to not have to stare at four walls for days on end also..
Venting a tent is basically like building a chimney for your house...Cold air comes in the bottom,warm air leaves at the top,If I leave the top of the door open a crack,I have 4 way venting at the top,so no matter which way the wind blows,the tent gets vented,raining or not.As your breath cools,moisture drops out of the air and collects on the wall,single or double.The more warm air you move from UNDER the canopy,to the outside,the less water there is to drop out.Double wall tents don't need vents and stuff,they whole idea is to seperate you from the water with netting,the let the water drip outside.Single wall you need to prevent/limit it from the start.You keep good airflow going from bottom to the top(a chimney) and that limits the amount of moisture that drops out.Just like if you blow air across a tube,it will lift a liquid,in the case of a single wall tent,it's your breath.
Do I like to be in it when it rains for a couple days in a row? not really,but I can say that about any tent.Is it livable?It's as good as any tent I've owned.There isn't pools of water in the corners,it doesn't drip on my head in the morning,doesn't soak my shirt if I touch the wall or create rivers of water heading towards the floor.I've done my time in tents,in all conditions,let's face it,if you have to be in a tent when it's raining,I don't care if it's in Florida or the deserts of SoCal,40*-100*,it's not much fun.....Really.......,it's not.....I don't care how many walls it has.....or a tarp with no walls at all....those of you that have had the pleasure of using a shelter half when it's pouring down rain while in the service will understand...don't forget that trench goes on the uphill side...unless you NEED a mudbath.
I didn't work from a pattern.I used masking tape on the patio floor to decide how big I wanted it,and fudged a couple inches just in case,didn't want to end up in a cocoon.I wanted poles 16" long,so made some poles up,screwed around until the walls were steep enough,height was right and there was enough tension in the poles to carry the weight of the material.I used the groudsheet to dummy up the poles.
Next the poles sleeves were made to lenght.The pole sleeves were made,complete with pockets and adjusters.I left plenty of material for making seams for the panels to come.So basically,I have a tensioned tent with no panels.
Cut out the camo material for the back and 2 sides.Pin in place,allow for seam allowance,trim,remove the poles.Start at one side and work my way around to sew the panels in,making flatfelled seams.I now have a 3 wall tent.I ran a 1' poly strap from the front top,down to the ground to figure out the vestibule size,sewed it on.I used poly because that is the only means of support for the doors,just thought it would be much stronger than making a seam.Made the panels for the vestible,same as the others,flatfelled to the pole sleeve,flatfelled seam sewn to the 1" poly.
The floor just hangs from the back and side walls,it's supported in front by the netting.There are 2 seams in the netting to add some strenght,they attach from the floor to the pole sleeves.They give the floor front support,the netting is stretchy in one direction,so the seam helps hold the floor up in front.The floor seam on the 3 walls is folded back on itself and sewn,basically to make a drip ledge,so that water does not follow the wall around to the floor and get caught between the floor at the groundcover....been there done that!
That's the short version.Basically I had a tent shaped object starring at me.I added all of the other crap on,netting,zippers,window,eyebrow,tiedowns,floor,pockets,attic,everything.Seam sealed it inside and out.
That concludes todays lecture on the world of tent making according to Booger1....
I made it as low as I could for me because of the desert winds.I like deserts,I go alot.I crawl around in a drunken stupor and look at the belly flowers....
I just went 4 days a couple weeks ago in the pouring rain north on PCH from L.A. to Santa Barbara.....POURING RAIN the mostof the time.Stayed at Leo Carrillo and ElCap campgrounds.
Did just fine.
There's a vent at the top,that allows a breeze to run through the top of the tent,and carry moisture away.I "borrowed" that idea.Some big name tents do that on their single wall tents.It works.
Basically,if you look closely at how good single wall tents(or any tent really) are vented,all you need is a big enough area for the expected moisture to be able to excape.The inside of your tent is hopefully warmer than the outside air.Hot air goes up,you need enough circulation through the top of the tent to capture that air,then move it out.Fresh air come from the vestibule in front(for most single wall).Zip and unzip the vestibule as needed to control moisture.You have a sleeping bag to keep warm.
If the vestibule is designed correcty,you can open it up without it raining inside your tent.That's just so that you can get in/out without drenching your stuff,it's nice to not have to stare at four walls for days on end also..
Venting a tent is basically like building a chimney for your house...
Cold air comes in the bottom,warm air leaves at the top,If I leave the top of the door open a crack,I have 4 way venting at the top,so no matter which way the wind blows,the tent gets vented,raining or not.As your breath cools,moisture drops out of the air and collects on the wall,single or double.The more warm air you move from UNDER the canopy,to the outside,the less water there is to drop out.Double wall tents don't need vents and stuff,they whole idea is to seperate you from the water with netting,the let the water drip outside.Single wall you need to prevent/limit it from the start.You keep good airflow going from bottom to the top(a chimney) and that limits the amount of moisture that drops out.Just like if you blow air across a tube,it will lift a liquid,in the case of a single wall tent,it's your breath.Do I like to be in it when it rains for a couple days in a row? not really,but I can say that about any tent.Is it livable?It's as good as any tent I've owned.There isn't pools of water in the corners,it doesn't drip on my head in the morning,doesn't soak my shirt if I touch the wall or create rivers of water heading towards the floor.I've done my time in tents,in all conditions,let's face it,if you have to be in a tent when it's raining,I don't care if it's in Florida or the deserts of SoCal,40*-100*,it's not much fun.....Really.......,it's not.....I don't care how many walls it has.....or a tarp with no walls at all....those of you that have had the pleasure of using a shelter half when it's pouring down rain while in the service will understand...don't forget that trench goes on the uphill side...unless you NEED a mudbath.
I didn't work from a pattern.I used masking tape on the patio floor to decide how big I wanted it,and fudged a couple inches just in case,didn't want to end up in a cocoon.I wanted poles 16" long,so made some poles up,screwed around until the walls were steep enough,height was right and there was enough tension in the poles to carry the weight of the material.I used the groudsheet to dummy up the poles.
Next the poles sleeves were made to lenght.The pole sleeves were made,complete with pockets and adjusters.I left plenty of material for making seams for the panels to come.So basically,I have a tensioned tent with no panels.
Cut out the camo material for the back and 2 sides.Pin in place,allow for seam allowance,trim,remove the poles.Start at one side and work my way around to sew the panels in,making flatfelled seams.I now have a 3 wall tent.I ran a 1' poly strap from the front top,down to the ground to figure out the vestibule size,sewed it on.I used poly because that is the only means of support for the doors,just thought it would be much stronger than making a seam.Made the panels for the vestible,same as the others,flatfelled to the pole sleeve,flatfelled seam sewn to the 1" poly.
The floor just hangs from the back and side walls,it's supported in front by the netting.There are 2 seams in the netting to add some strenght,they attach from the floor to the pole sleeves.They give the floor front support,the netting is stretchy in one direction,so the seam helps hold the floor up in front.The floor seam on the 3 walls is folded back on itself and sewn,basically to make a drip ledge,so that water does not follow the wall around to the floor and get caught between the floor at the groundcover....been there done that!
That's the short version.Basically I had a tent shaped object starring at me.I added all of the other crap on,netting,zippers,window,eyebrow,tiedowns,floor,pockets,attic,everything.Seam sealed it inside and out.
That concludes todays lecture on the world of tent making according to Booger1....
Last edited by Booger1; 10-29-11 at 06:25 PM.
10-31-11, 12:25 AM
#24
Senior Member
Join Date: Jul 2011
Posts: 2,441
Mentioned: 0 Post(s)
Tagged: 0 Thread(s)
Quoted: 33 Post(s)
Likes: 0
Liked 4 Times
in
3 Posts
I have heard of doing this. I have never had a problem with silnylon not running through the machine so I don't use the paper.
I use a #9 for silnylon without any problems with the thread, maybe your tension is off a bit? I think I use that size because that what was recommended by some manufacturer. I do recommend Gutterman polyester thread.
I use a #9 for silnylon without any problems with the thread, maybe your tension is off a bit? I think I use that size because that what was recommended by some manufacturer. I do recommend Gutterman polyester thread.
Normal problem with tension is failure to adjust the bobbin. Get that as low as will work then screw down the upper tension to center the knots. SO long as the material has good contact, there are no points for higher tension in backpacking gear. And the fabric will tell you.