


Let's Get Crackin': Bar Tape Shellackin'
 03-14-23, 01:19 PM
#1

Banned.
Thread Starter

Join Date: Jul 2009
Location: PAZ
Posts: 12,294
Mentioned: 255 Post(s)
Tagged: 0 Thread(s)
Quoted: 2588 Post(s)
Liked 4,824 Times
in
1,709 Posts
Let's Get Crackin': Bar Tape Shellackin'
Let's get this out of the way first: this isn't a debate about whether 'top-to-bottom' or 'bottom-to-top' is the superior method for wrapping bars. I mean, let's face it: everyone knows the 'top-to-bottom' variation is best!
Anyhoo, on to the subject matter at hand.
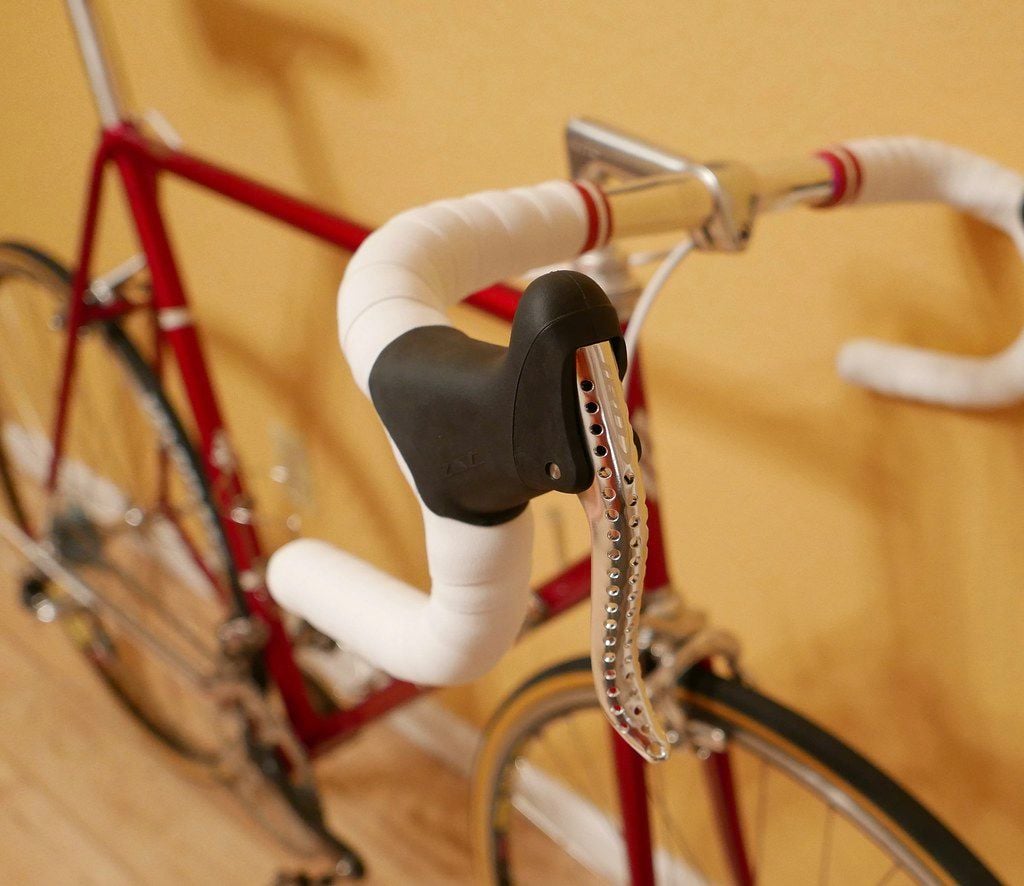
Today I'm presenting a short tutorial on mixing your own shellac and applying it to the the cloth tape of your choice (I'm a Newbaum's man, myself) gracing your bars. Cloth tape is de rigueur when it comes to wrapping a vintage rig's bars - unless you possess F-You Money, in which case stitched leather is more than within your financial reach. However, cloth tape has a couple disadvantages: (1) it's not very colorfast; (2) once it begins fraying from constant contact with your paws, it becomes dirty, dingy, dusty - and can even tear and curl at the overlaps.
How many times have you bemoaned the fact that you found the perfect 'Eggplant' shade to match your one-of-a-kind purple Brooks Professional, only to realize a short month later the tape hue has deteriorated to something approaching lavender - or worse, bright 'Ferrari Red' to pink? Or spent a couple days wrenching away at the tops of the bars, putting in thousands of feet of climbing - only to come away from the wonderful experience totally bummed out because your tape is slipping and curling at the shallow curve preceding the drops?
Both scenarios suck - but we're here to help!
(TL/DR: Step-by-step bar tape shellacking process, as performed on the '83 Colnago Mexico, follows)
(1) Everything needed to mix and apply the shellac. The bag contains orange shellac flakes provided a number of years ago by my late friend Scott Gabriel. I'd used one of the bags years ago to seal the bars of the Medici - my first-ever shellac job. That experience - and the performance of the shellac with regard to longevity/damage resistance - sold me on the process. Within weeks, I'd purchased more shellac and repeated the process with every other bike (sans the Davidson, which is outfitted with aero cable routing under Cinelli cork tape):
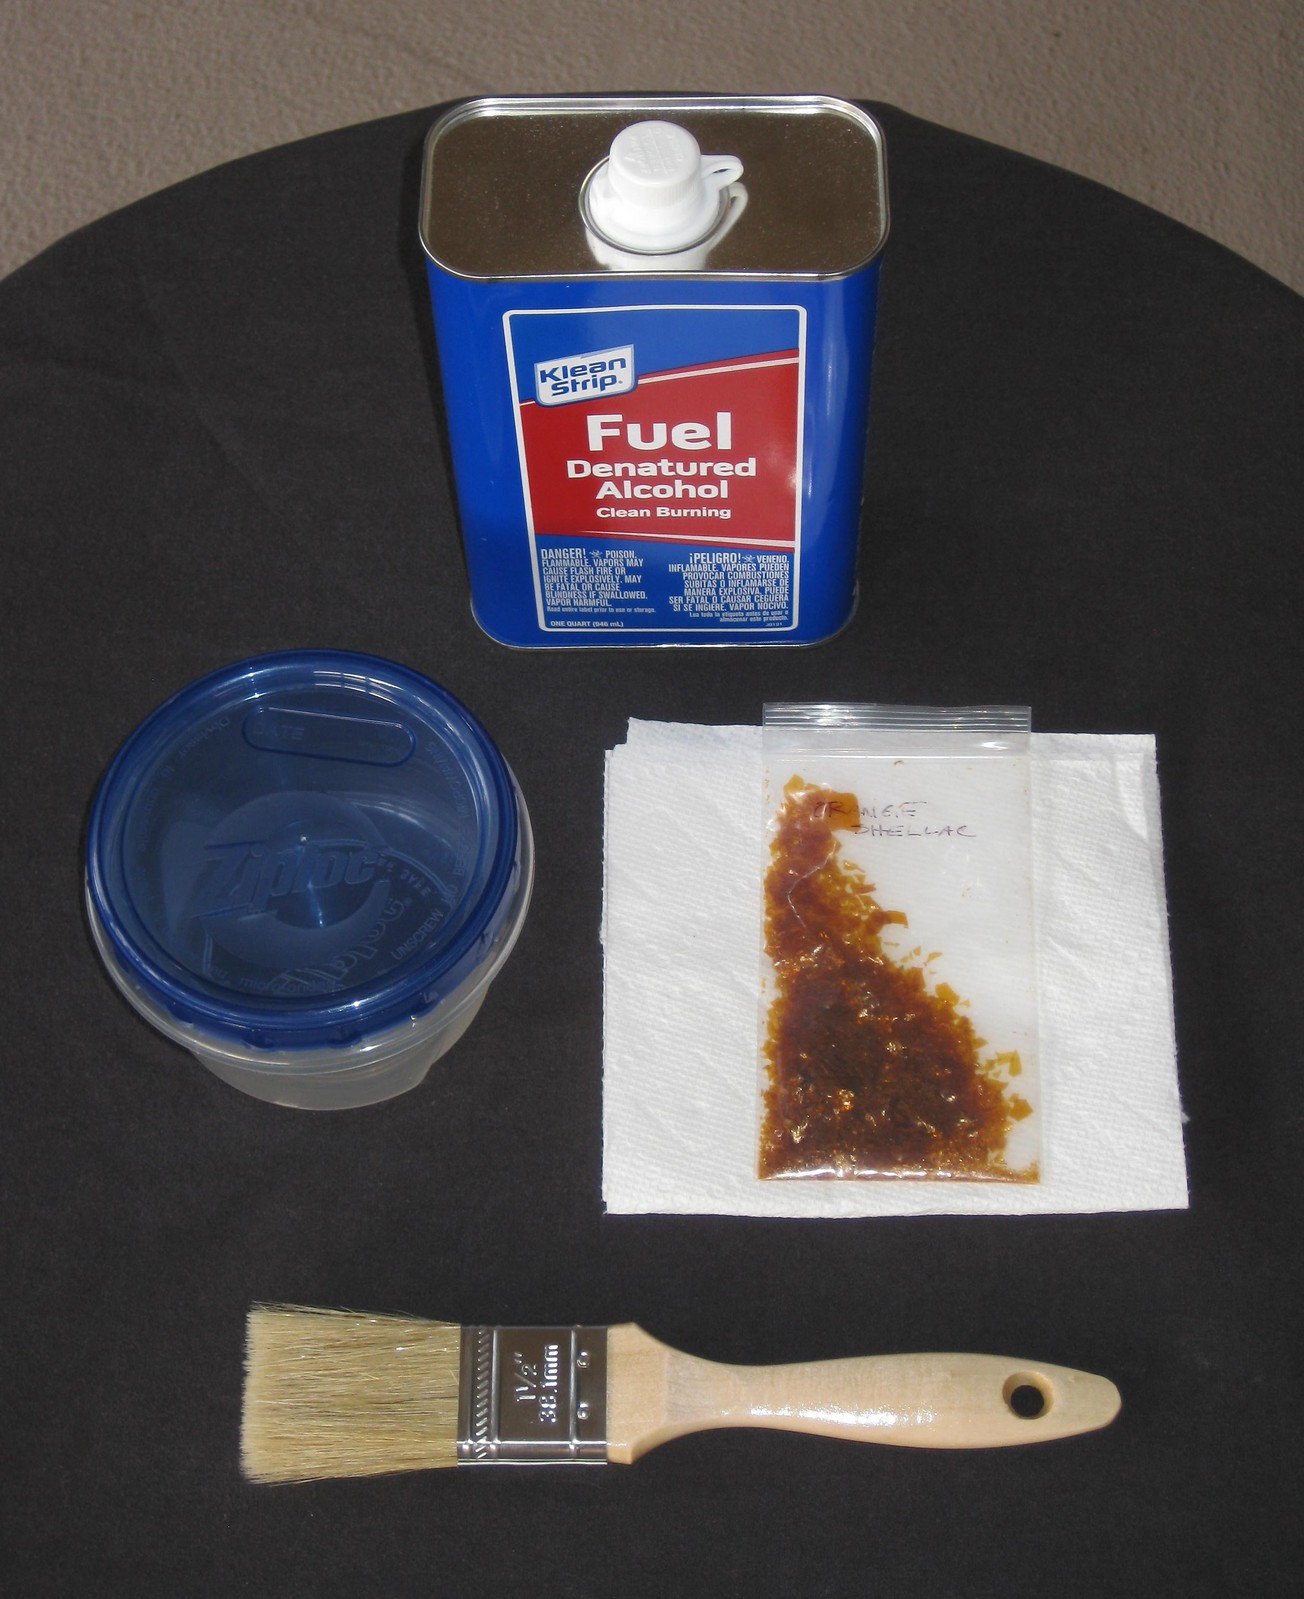
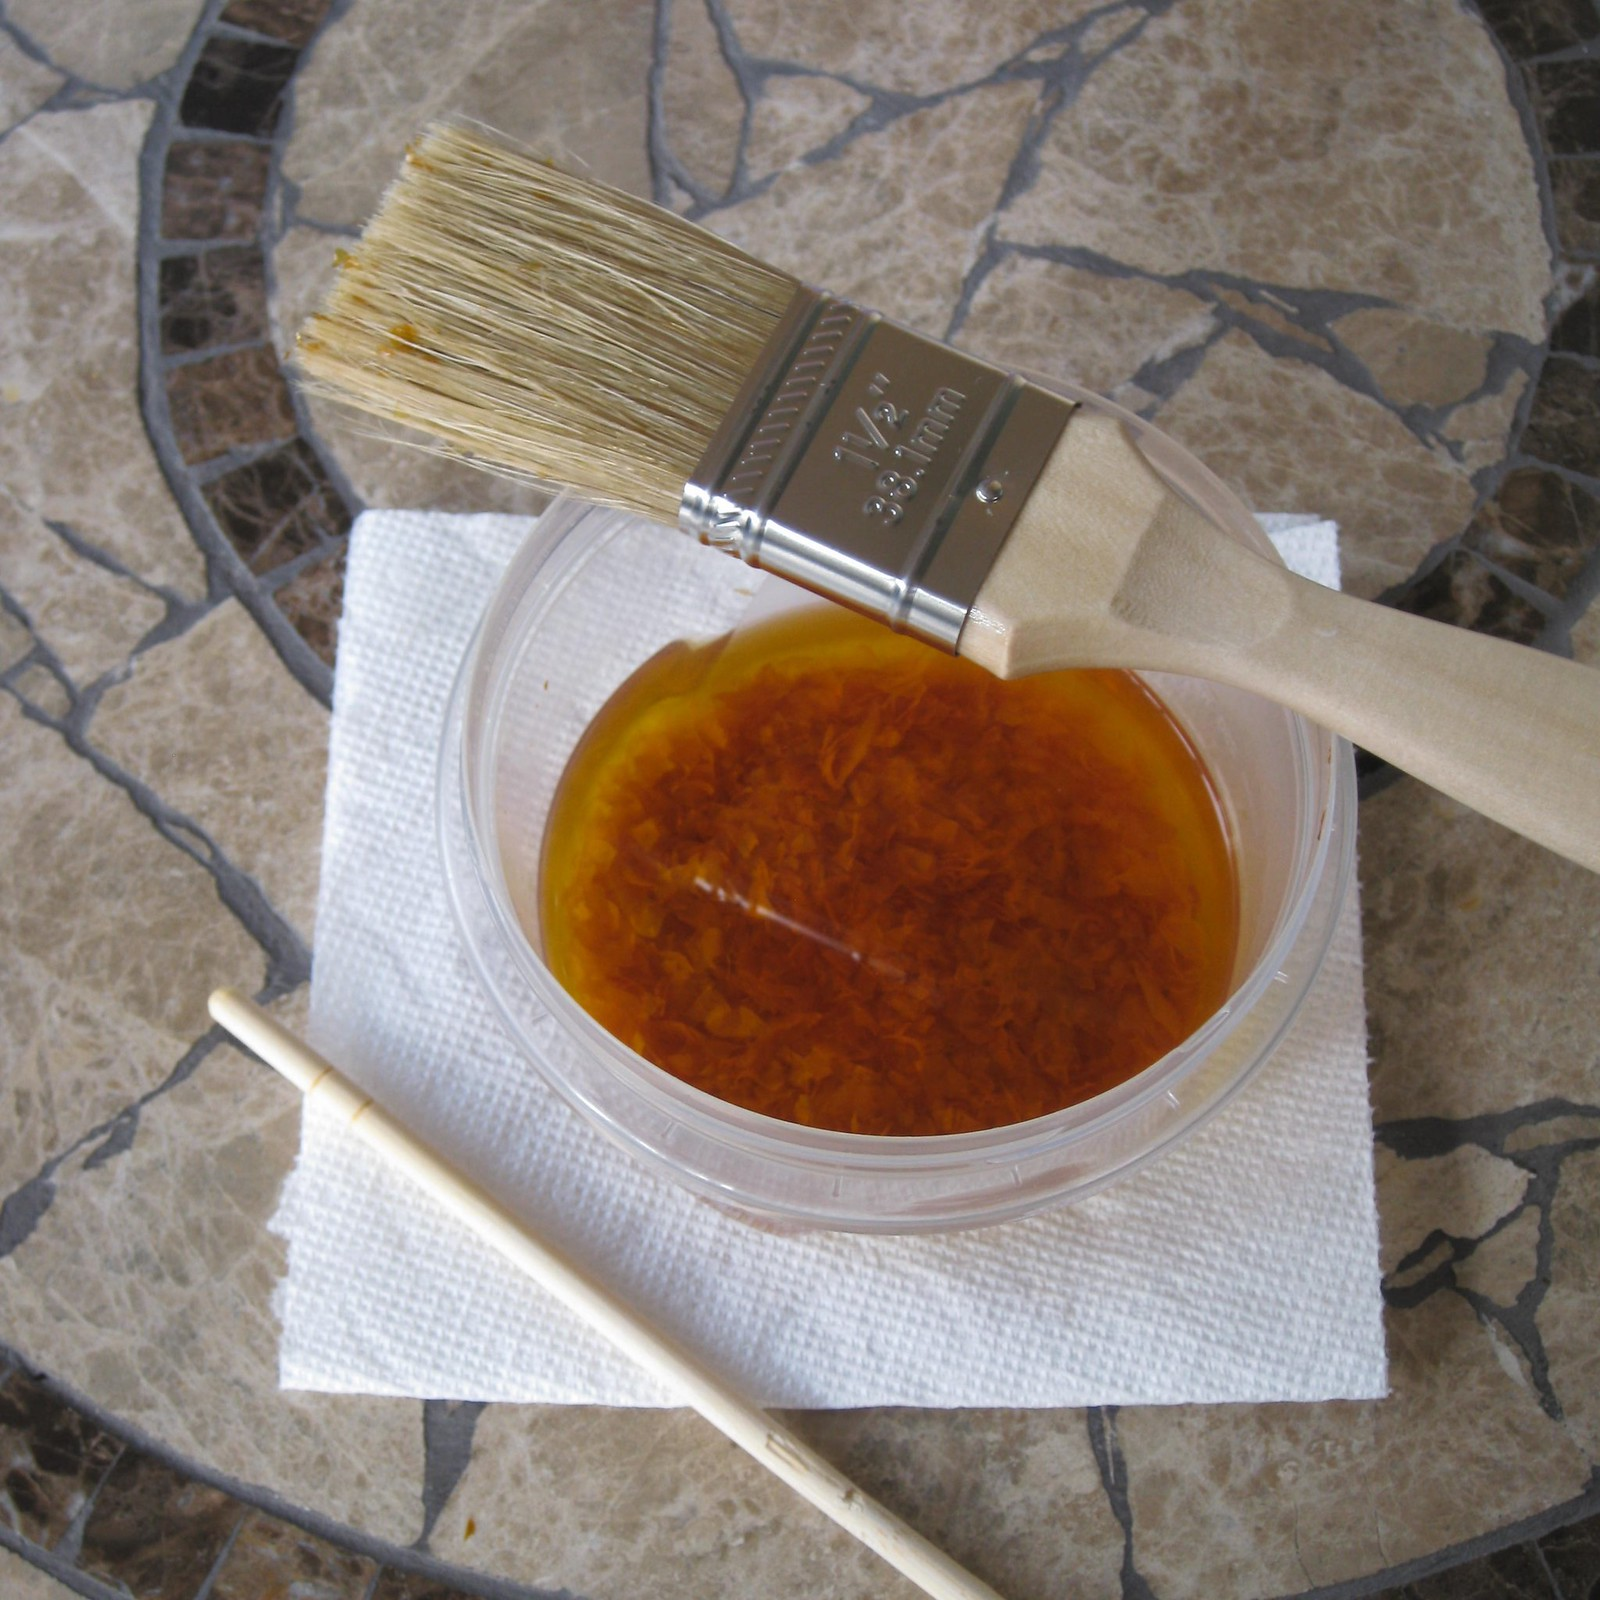
(2) Mixing the shellac flakes with fuel denatured alcohol. The flakes have been sitting in my spares box forever, so I left them to completely dissolve (covered) overnight in this plastic container. The chopstick was employed to stir the flakes once they'd began to soften up and break down into solution. The brush is designed for varnish finishes - the perfect tool for this particular job:
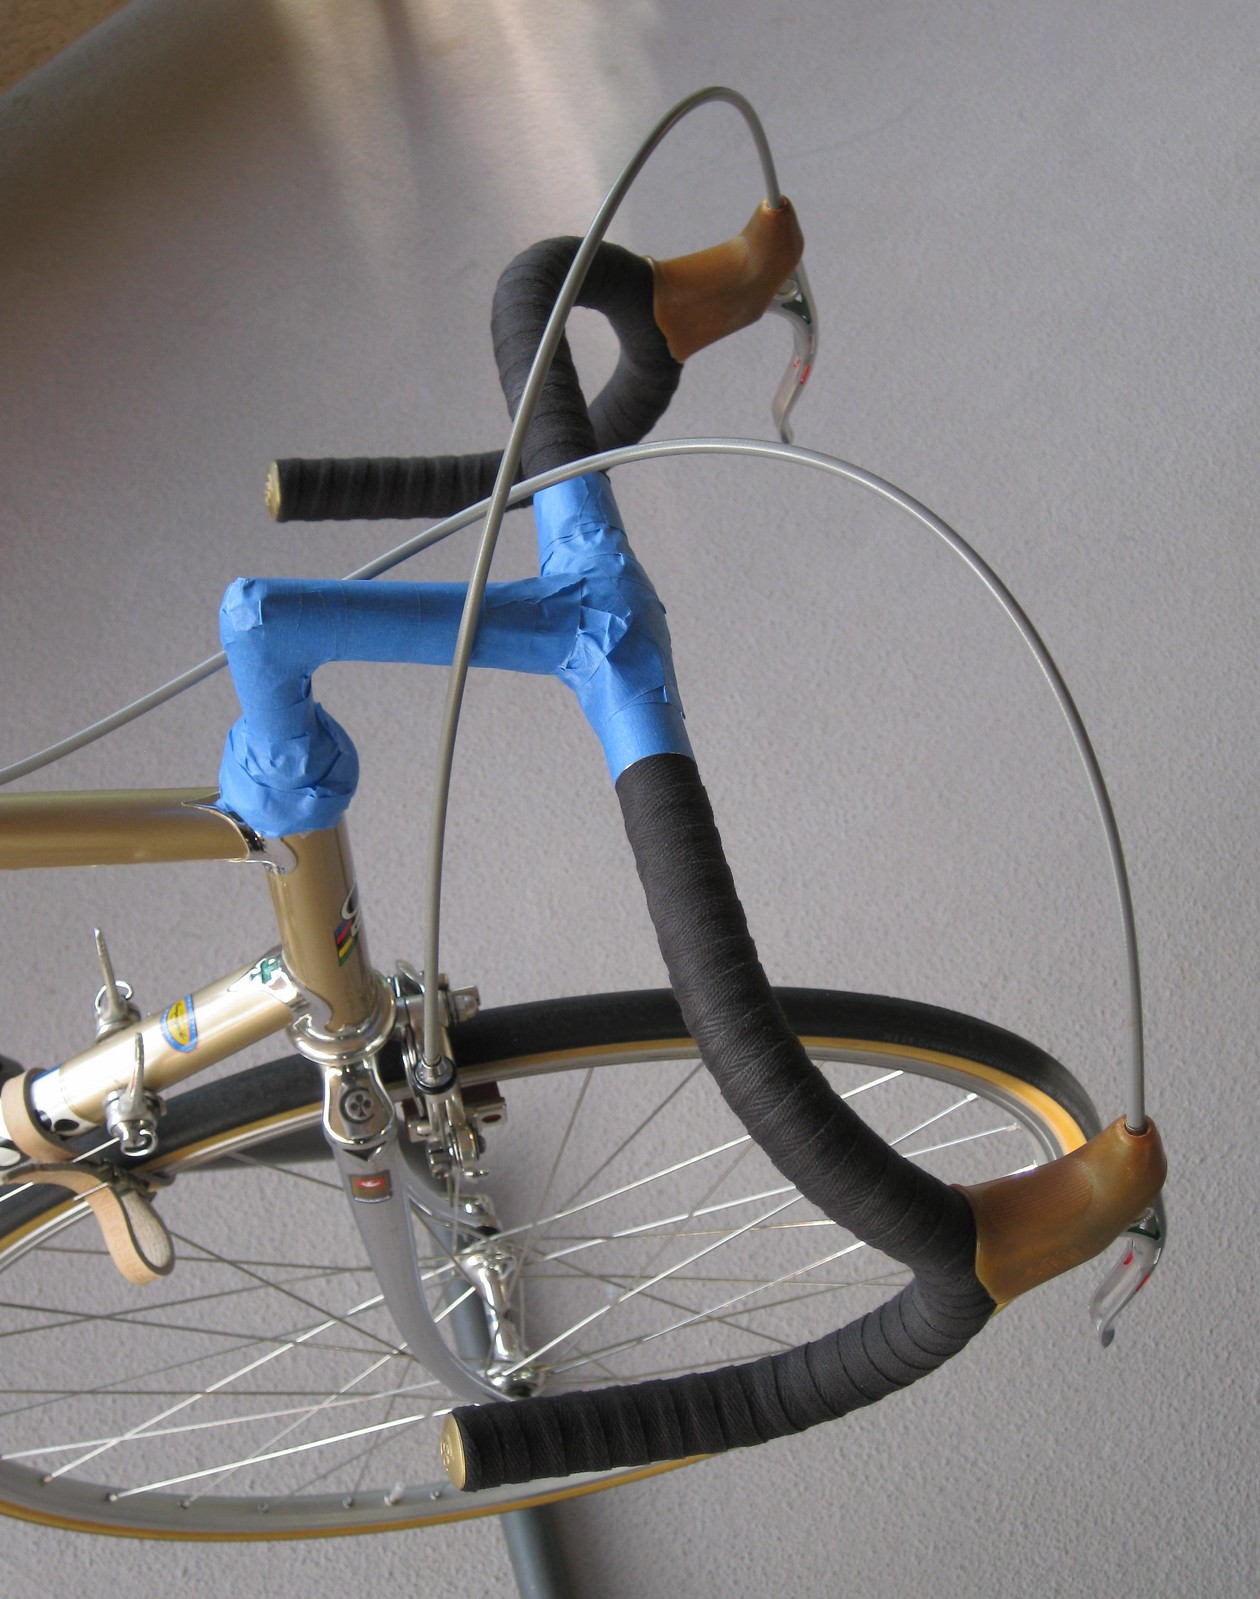
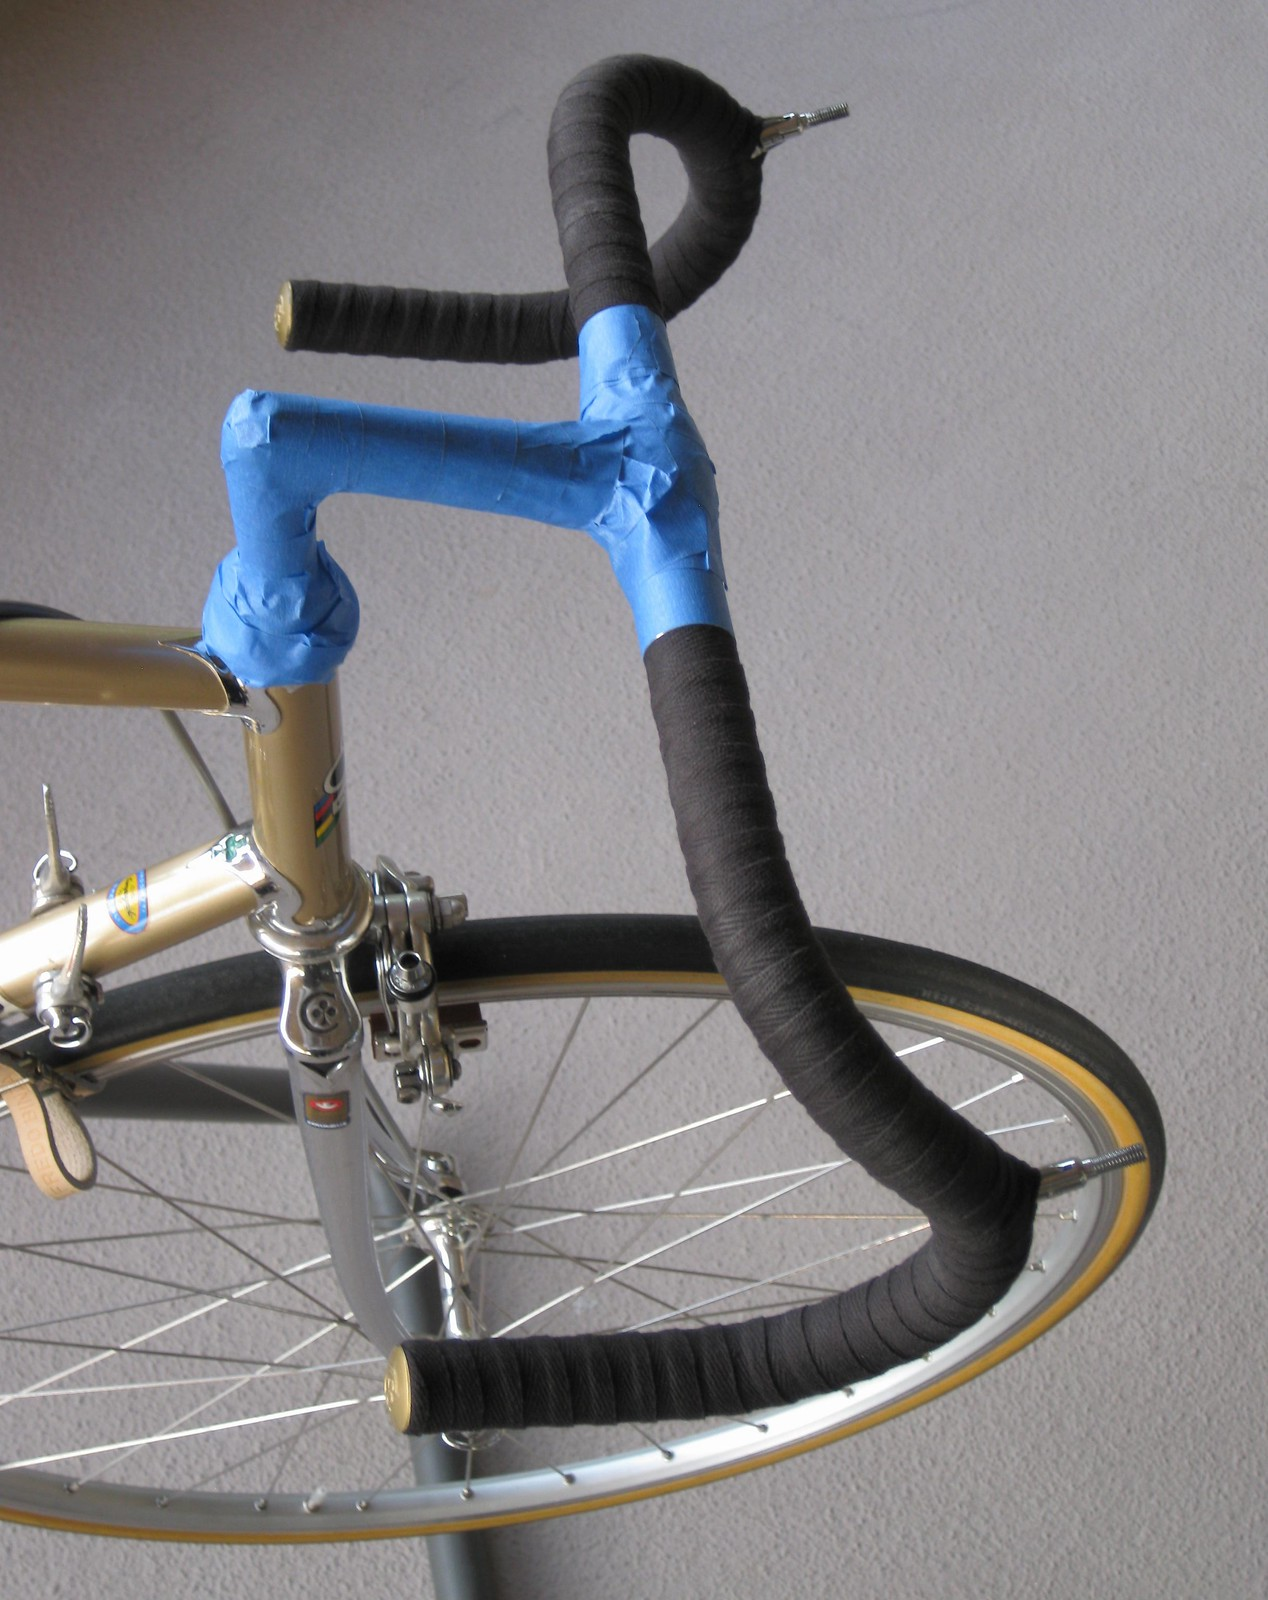
(3) Stem and center sleeve covered with painter's tape to prevent any errant shellac from mucking them up. The next step is to disconnect the brake housings and inner cables:
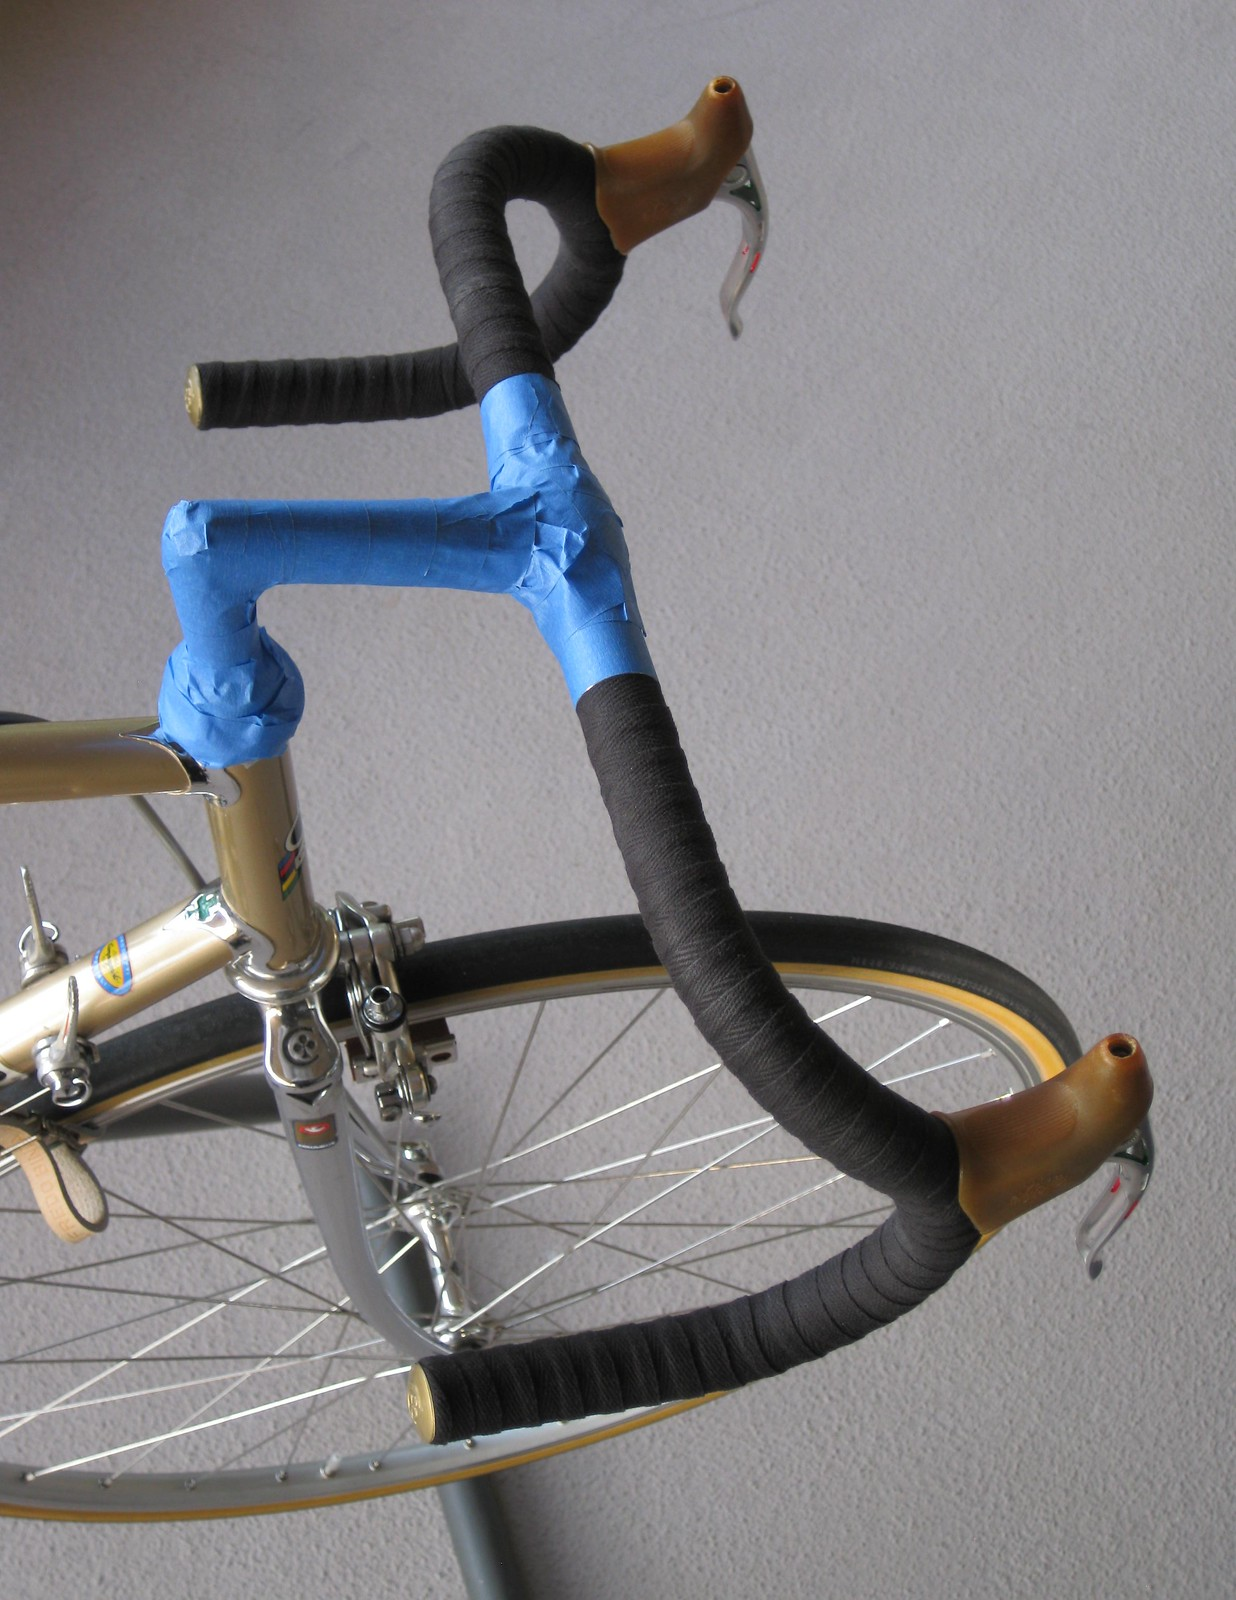
(4) Poof! And they're gone. Housings and cables disconnected and removed. Next step: brake lever removal:
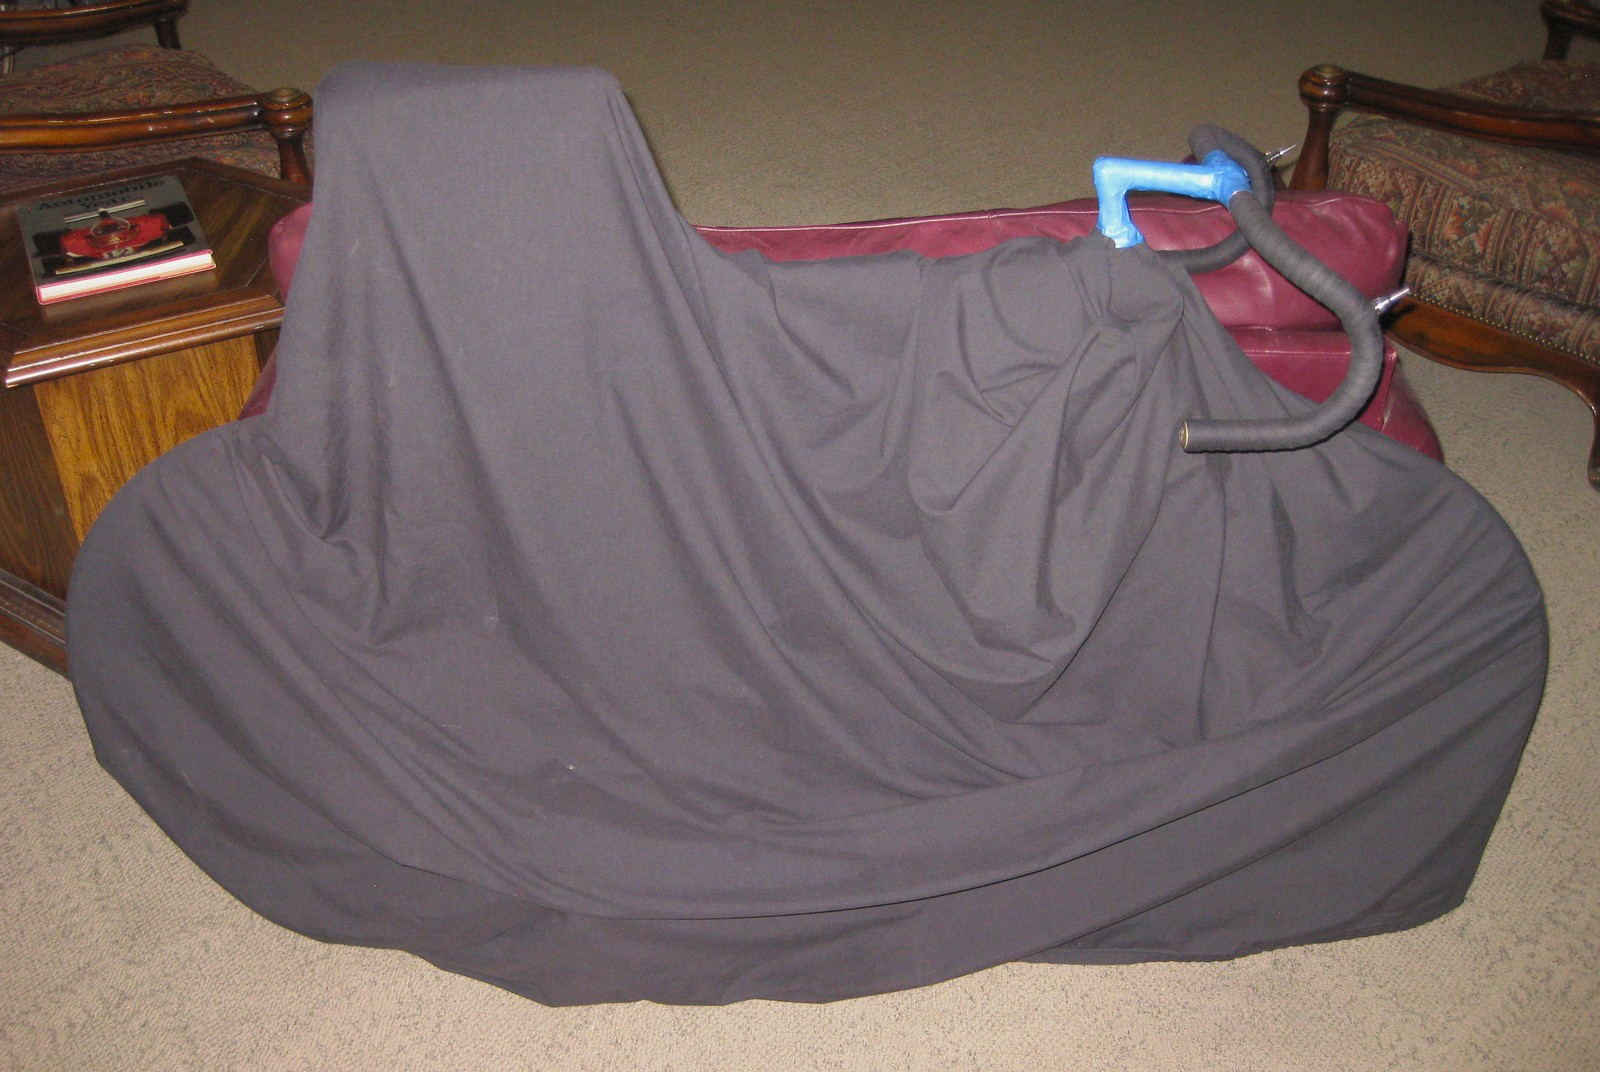
(5) Brake levers removed. We're now ready to begin brushing on the shellac - once the flakes have completely dissolved. They sure were taking their sweet time to do so! As a result of this minor delay, I put the bike aside for the evening, and gave the shellac flakes a good 12 hours to completely return to solution. In the meantime, I covered the entire bike with an old sheet, then made plans to begin the final stage early the next morning:
(6) Nope - we're definitely not going to be concerned with any wayward droplets of orange shellac landing upon this Golden Princess!
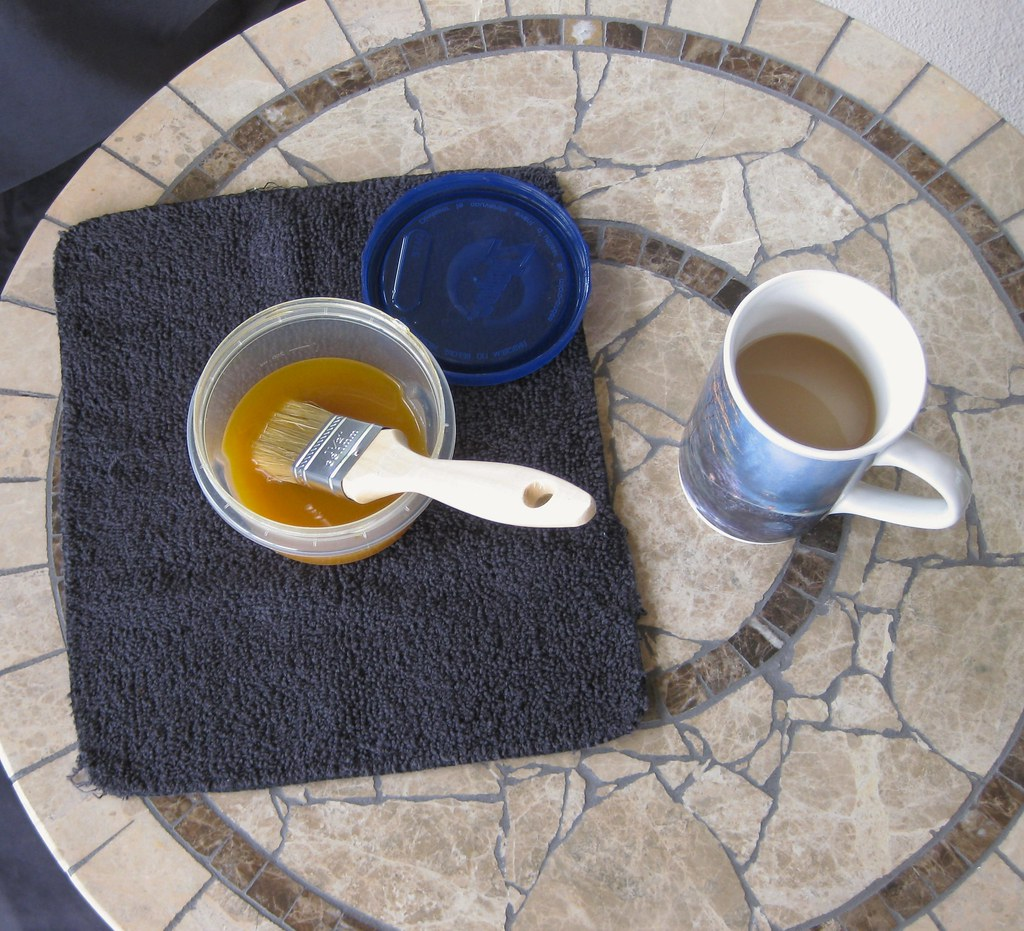
(7) Tools for today's trade. Note the shellac flakes have (finally!) completely dissolved. We're now ready to begin!
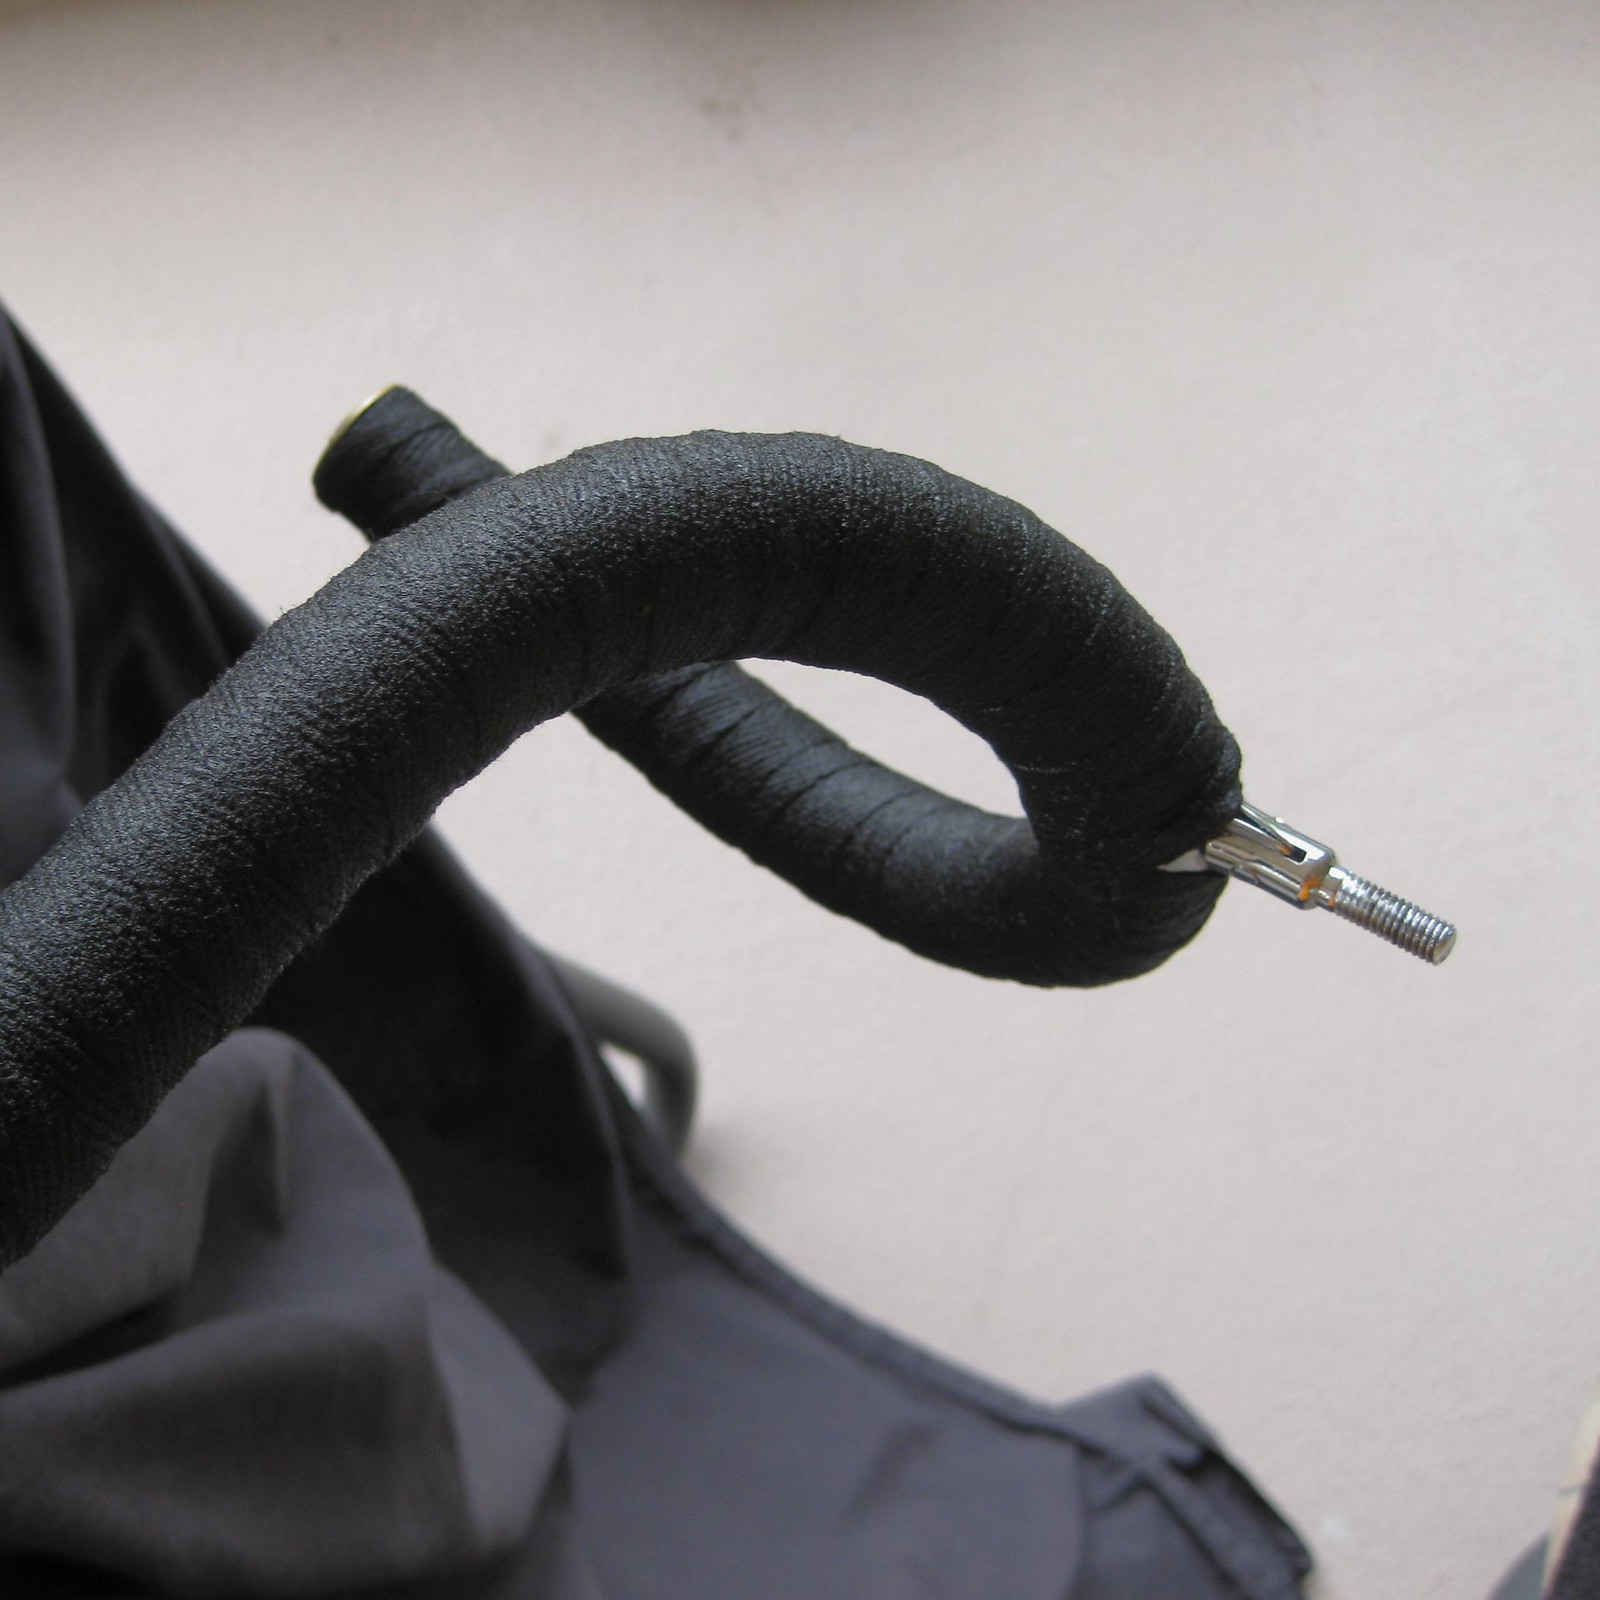
(8) Starting from the stem and working our way outboard (first pass - I did three coats per side, using up the entire container of shellac):
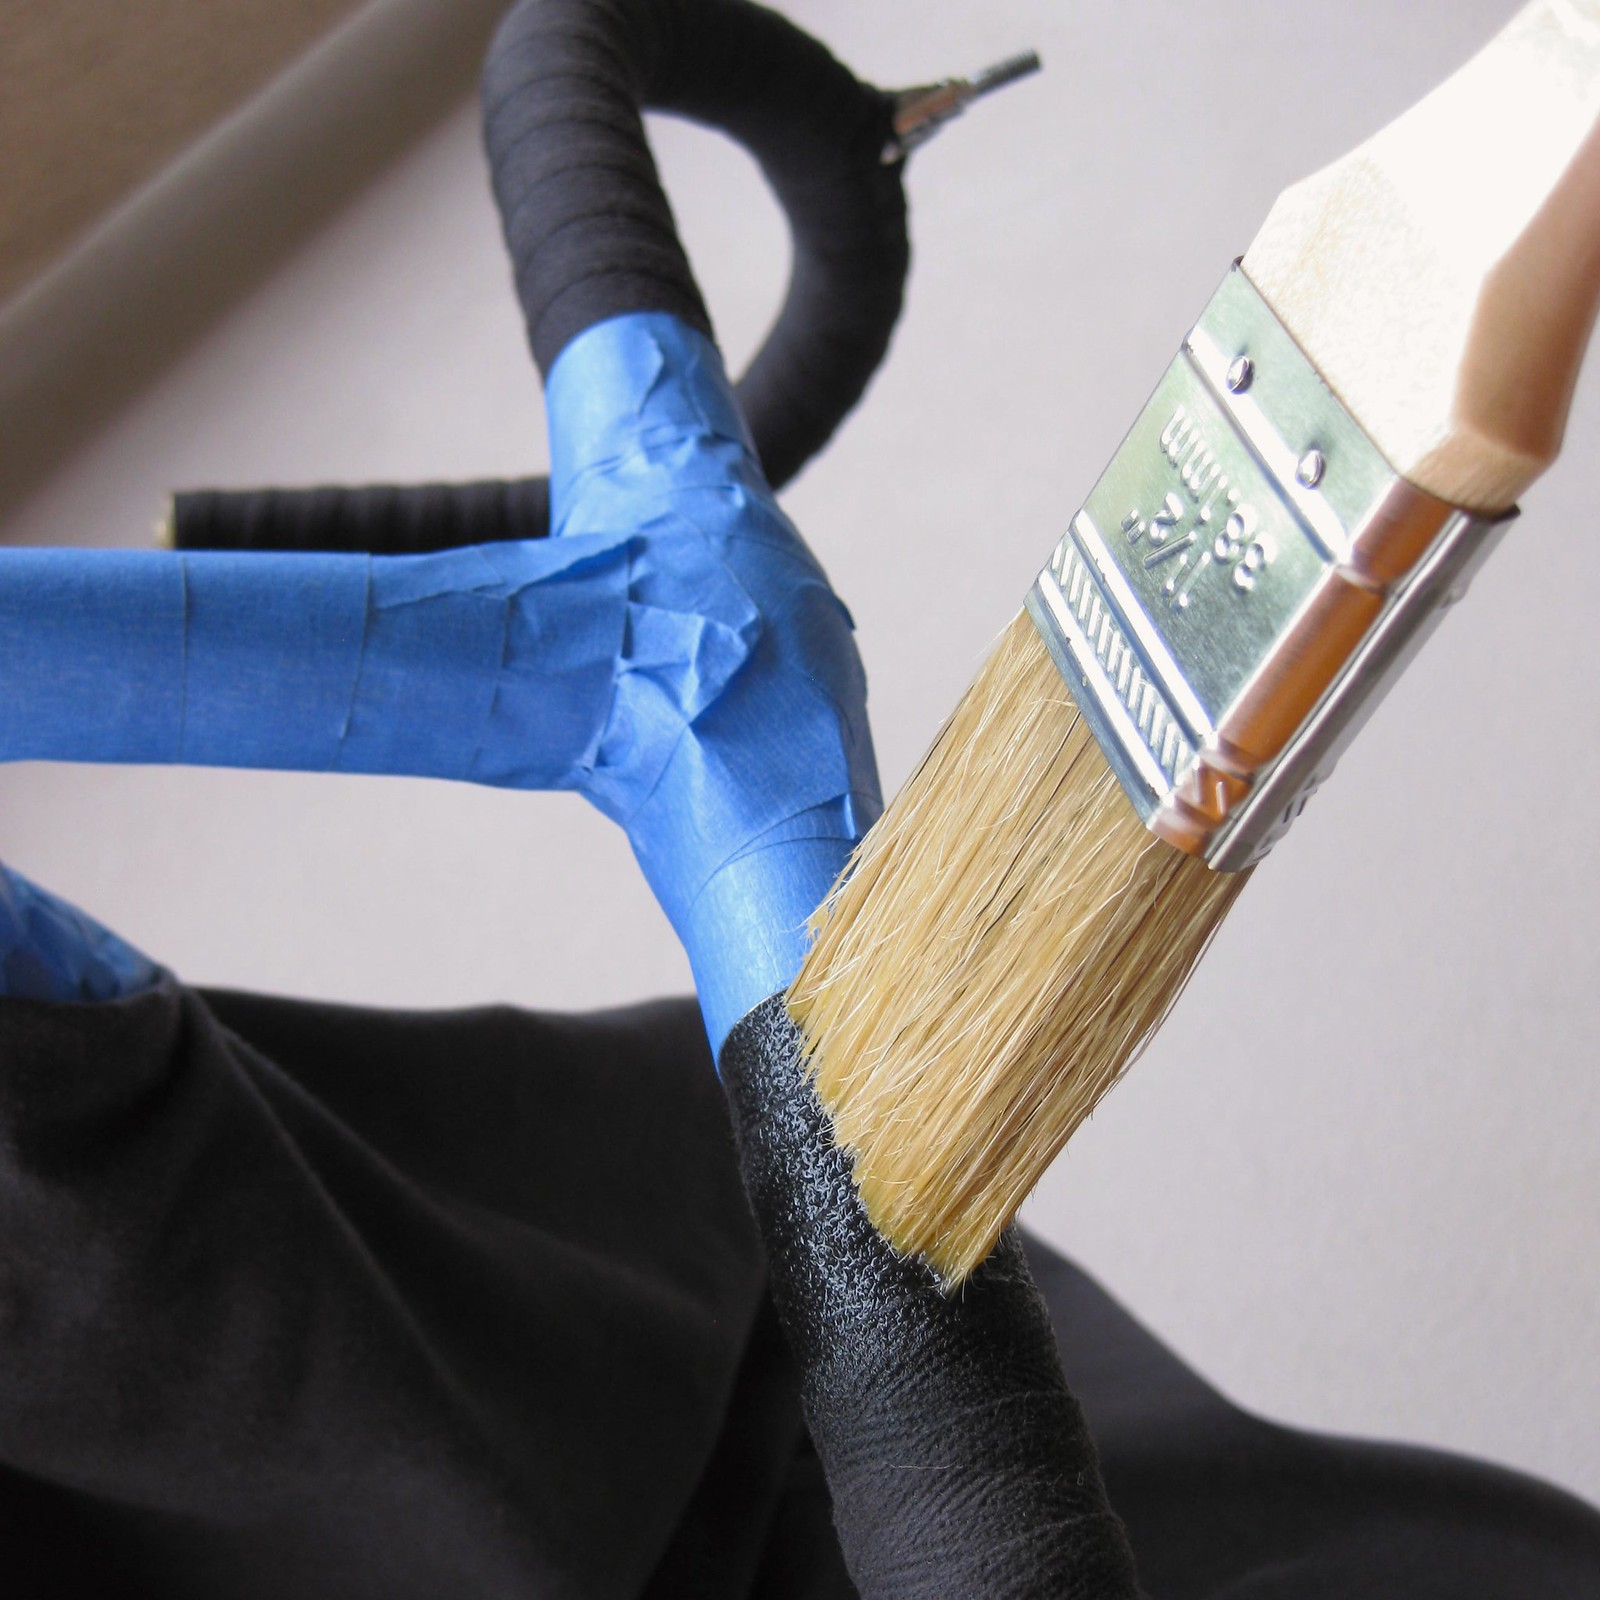
(9) If we load up the brush just right - and dab it onto the tape with just the right amount of pressure - the shellac will weep all the way around the circumference, thus coating from top to bottom in one smooth action. A nice and clean way to git 'er done; attempting to brush it on upside-down is sure to produce messy and sucky results!

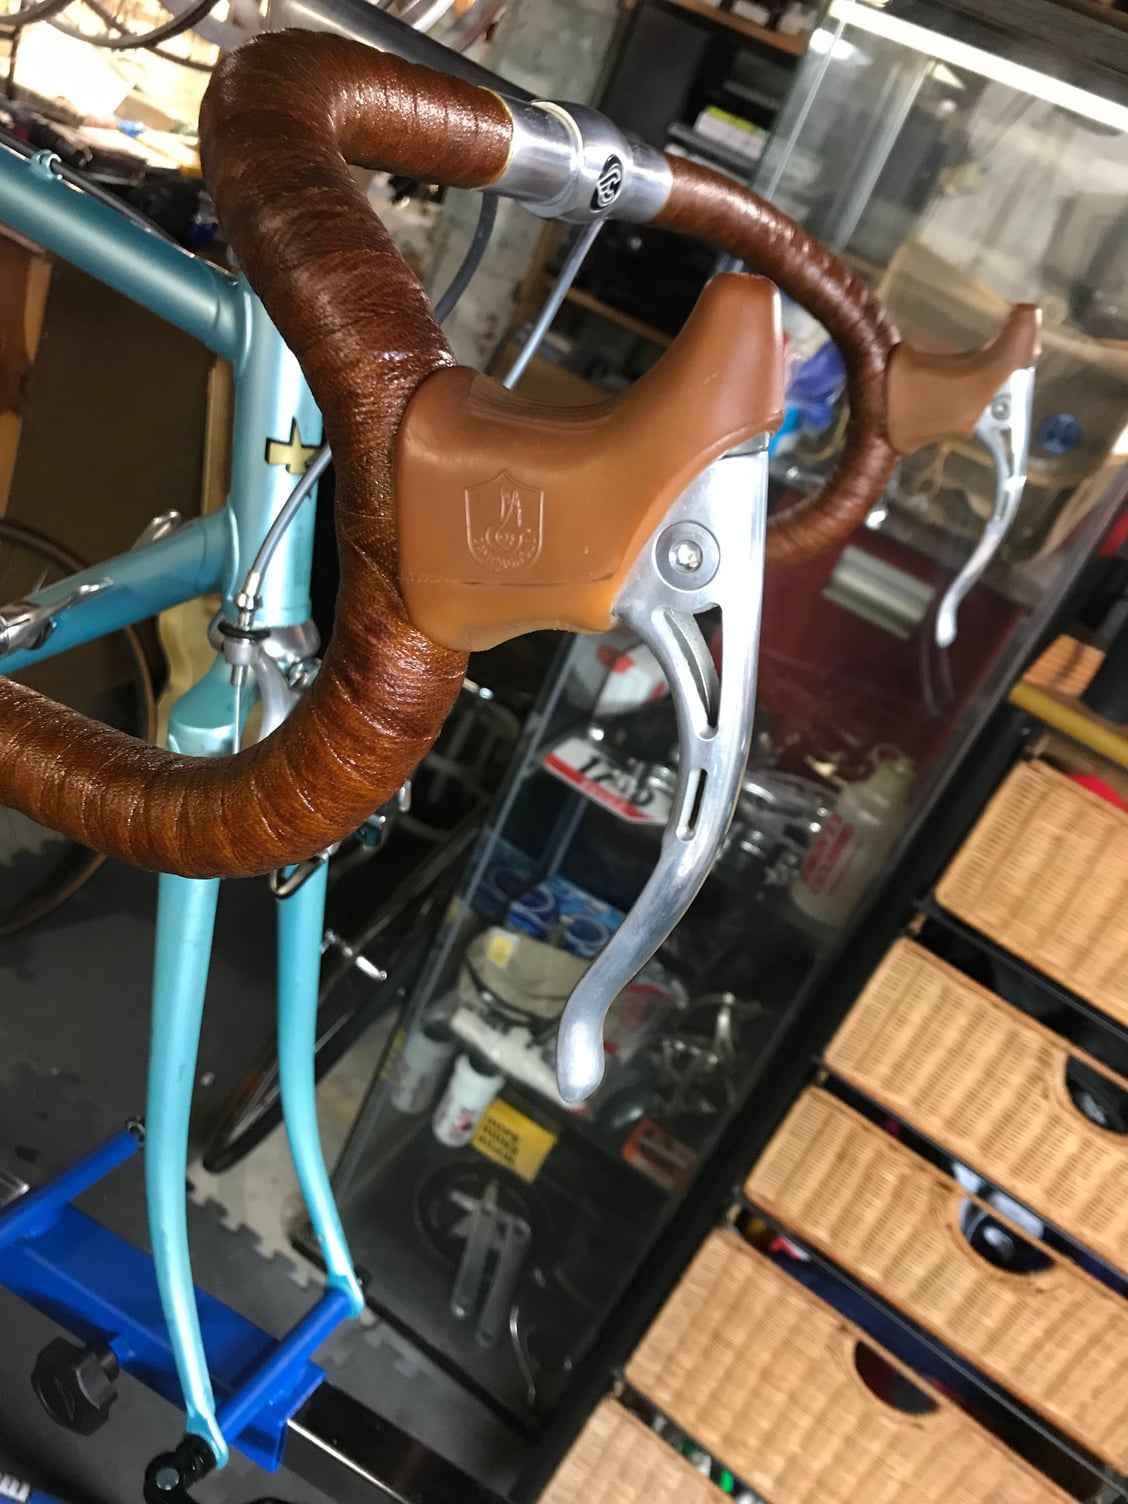
(10) All done! Note the semi-gloss finish when compared to the flat finish of the raw tape in the preceding pics. Ready-made shellac tends to be quite a bit more high-gloss; I prefer this rather muted look. Time to re-mount the brake levers, then re-install the inner cables and their associated housings.
DD
Anyhoo, on to the subject matter at hand.
Today I'm presenting a short tutorial on mixing your own shellac and applying it to the the cloth tape of your choice (I'm a Newbaum's man, myself) gracing your bars. Cloth tape is de rigueur when it comes to wrapping a vintage rig's bars - unless you possess F-You Money, in which case stitched leather is more than within your financial reach. However, cloth tape has a couple disadvantages: (1) it's not very colorfast; (2) once it begins fraying from constant contact with your paws, it becomes dirty, dingy, dusty - and can even tear and curl at the overlaps.
How many times have you bemoaned the fact that you found the perfect 'Eggplant' shade to match your one-of-a-kind purple Brooks Professional, only to realize a short month later the tape hue has deteriorated to something approaching lavender - or worse, bright 'Ferrari Red' to pink? Or spent a couple days wrenching away at the tops of the bars, putting in thousands of feet of climbing - only to come away from the wonderful experience totally bummed out because your tape is slipping and curling at the shallow curve preceding the drops?
Both scenarios suck - but we're here to help!
(TL/DR: Step-by-step bar tape shellacking process, as performed on the '83 Colnago Mexico, follows)
(1) Everything needed to mix and apply the shellac. The bag contains orange shellac flakes provided a number of years ago by my late friend Scott Gabriel. I'd used one of the bags years ago to seal the bars of the Medici - my first-ever shellac job. That experience - and the performance of the shellac with regard to longevity/damage resistance - sold me on the process. Within weeks, I'd purchased more shellac and repeated the process with every other bike (sans the Davidson, which is outfitted with aero cable routing under Cinelli cork tape):
(2) Mixing the shellac flakes with fuel denatured alcohol. The flakes have been sitting in my spares box forever, so I left them to completely dissolve (covered) overnight in this plastic container. The chopstick was employed to stir the flakes once they'd began to soften up and break down into solution. The brush is designed for varnish finishes - the perfect tool for this particular job:
(3) Stem and center sleeve covered with painter's tape to prevent any errant shellac from mucking them up. The next step is to disconnect the brake housings and inner cables:
(4) Poof! And they're gone. Housings and cables disconnected and removed. Next step: brake lever removal:
(5) Brake levers removed. We're now ready to begin brushing on the shellac - once the flakes have completely dissolved. They sure were taking their sweet time to do so! As a result of this minor delay, I put the bike aside for the evening, and gave the shellac flakes a good 12 hours to completely return to solution. In the meantime, I covered the entire bike with an old sheet, then made plans to begin the final stage early the next morning:
(6) Nope - we're definitely not going to be concerned with any wayward droplets of orange shellac landing upon this Golden Princess!
(7) Tools for today's trade. Note the shellac flakes have (finally!) completely dissolved. We're now ready to begin!
(8) Starting from the stem and working our way outboard (first pass - I did three coats per side, using up the entire container of shellac):
(9) If we load up the brush just right - and dab it onto the tape with just the right amount of pressure - the shellac will weep all the way around the circumference, thus coating from top to bottom in one smooth action. A nice and clean way to git 'er done; attempting to brush it on upside-down is sure to produce messy and sucky results!
(10) All done! Note the semi-gloss finish when compared to the flat finish of the raw tape in the preceding pics. Ready-made shellac tends to be quite a bit more high-gloss; I prefer this rather muted look. Time to re-mount the brake levers, then re-install the inner cables and their associated housings.
DD

Last edited by Drillium Dude; 03-17-23 at 04:20 AM. Reason: Had to fix somepin...

Likes For Drillium Dude:
03-14-23, 01:46 PM
#2
Banned.
Thread Starter
Join Date: Jul 2009
Location: PAZ
Posts: 12,294
Mentioned: 255 Post(s)
Tagged: 0 Thread(s)
Quoted: 2588 Post(s)
Liked 4,824 Times
in
1,709 Posts
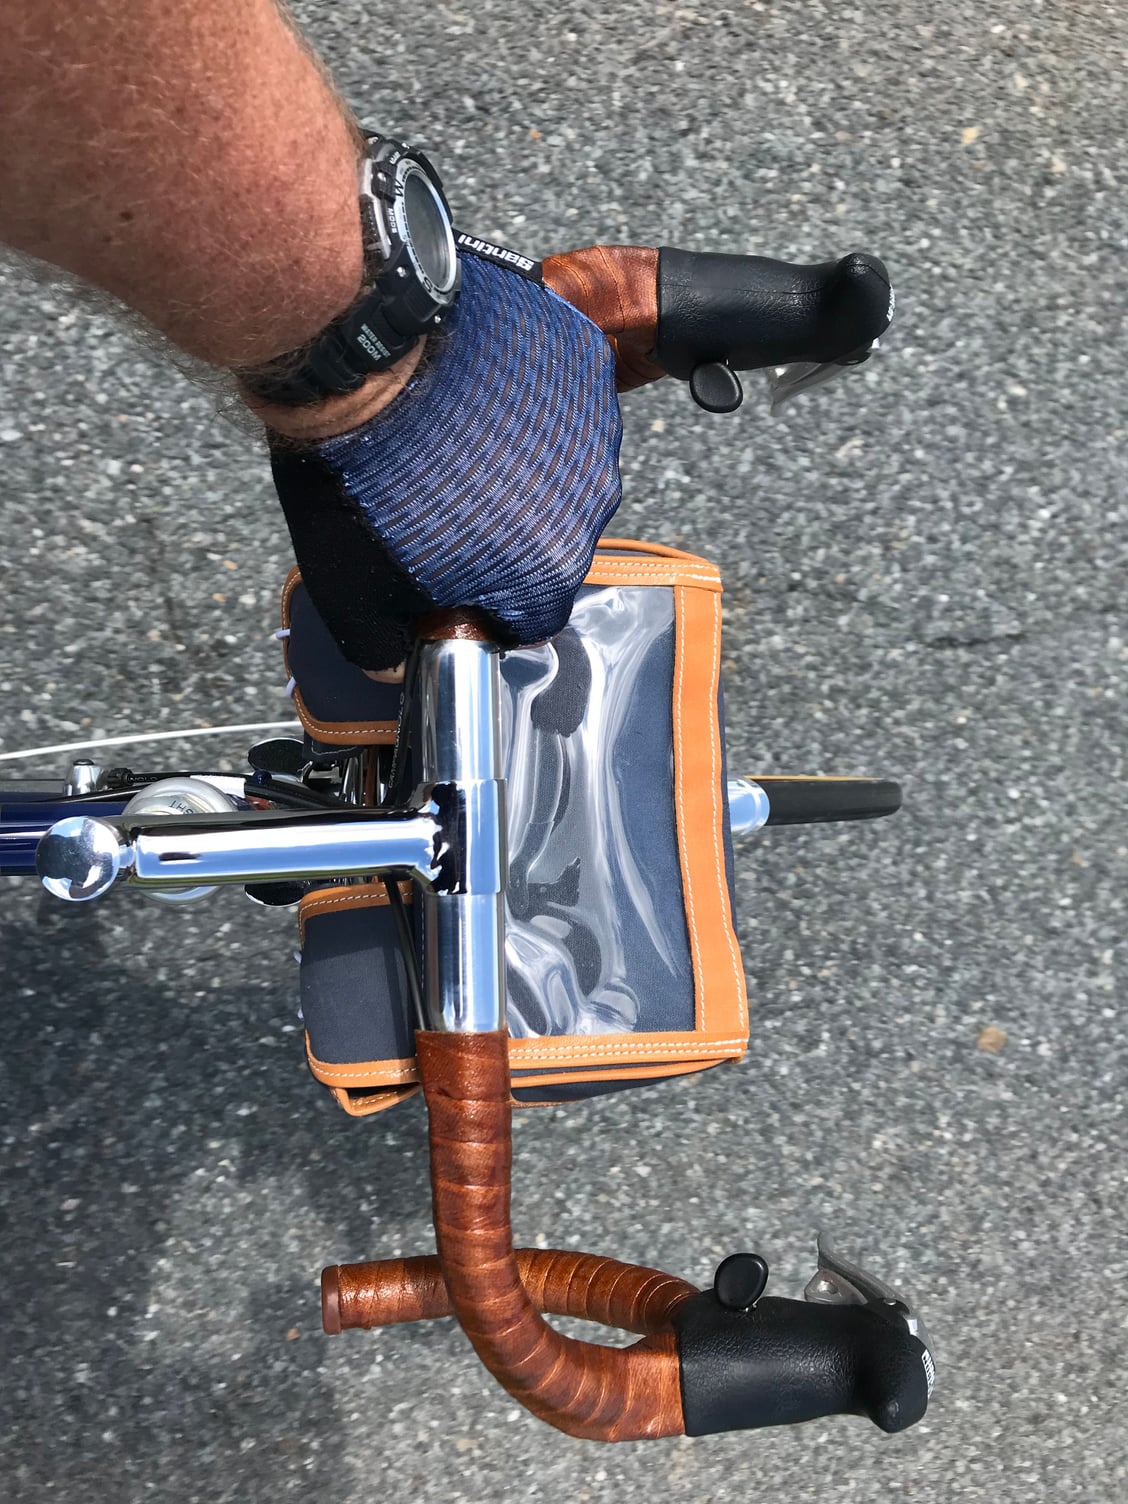
To wrap up (get it? 'Wrap up'? Yeah, I know - I gots dad jokes), here are some pics of the finished product:

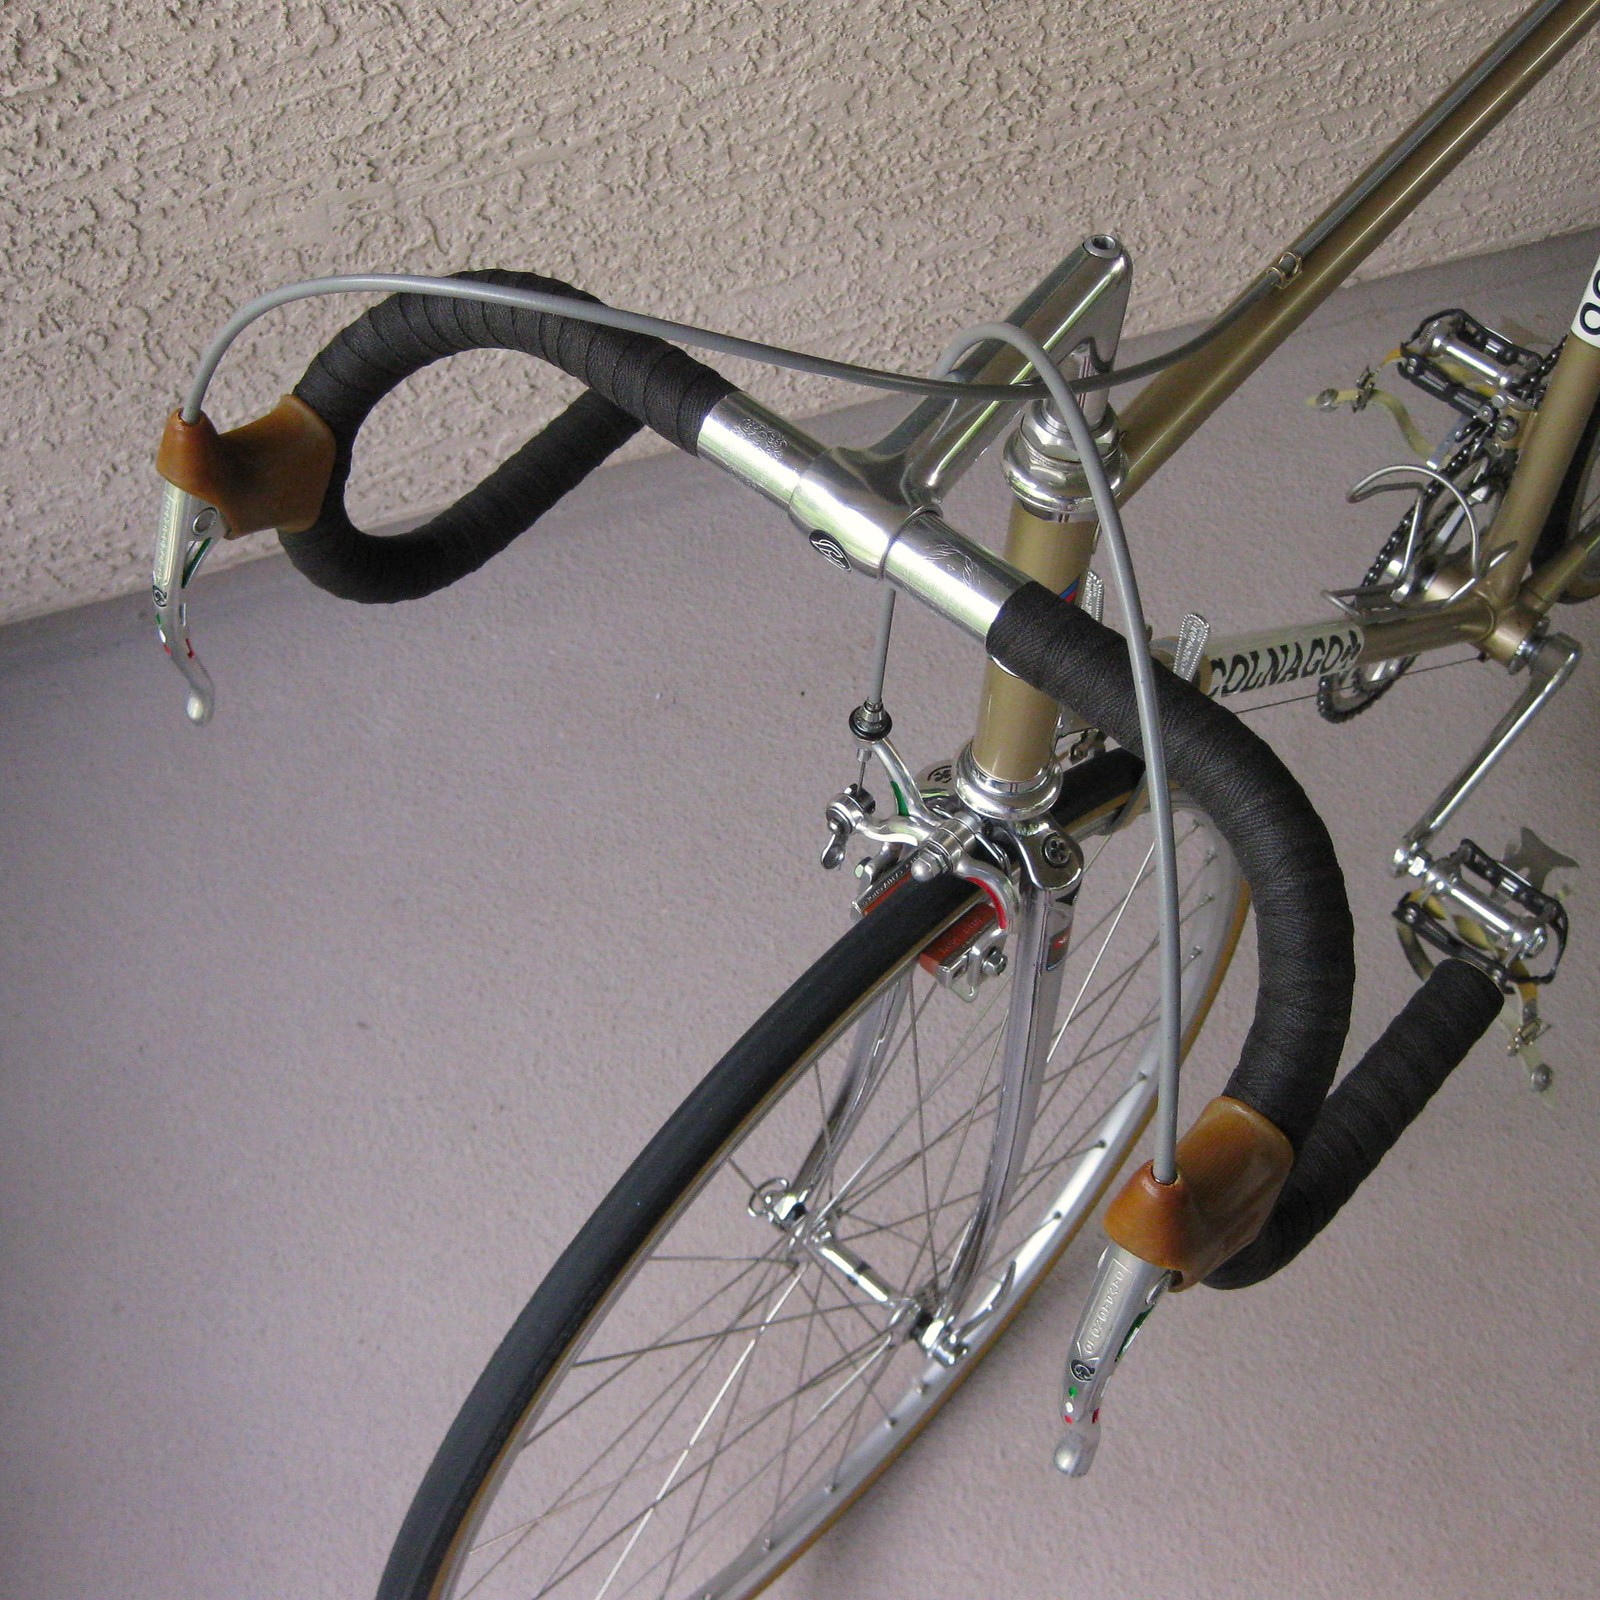

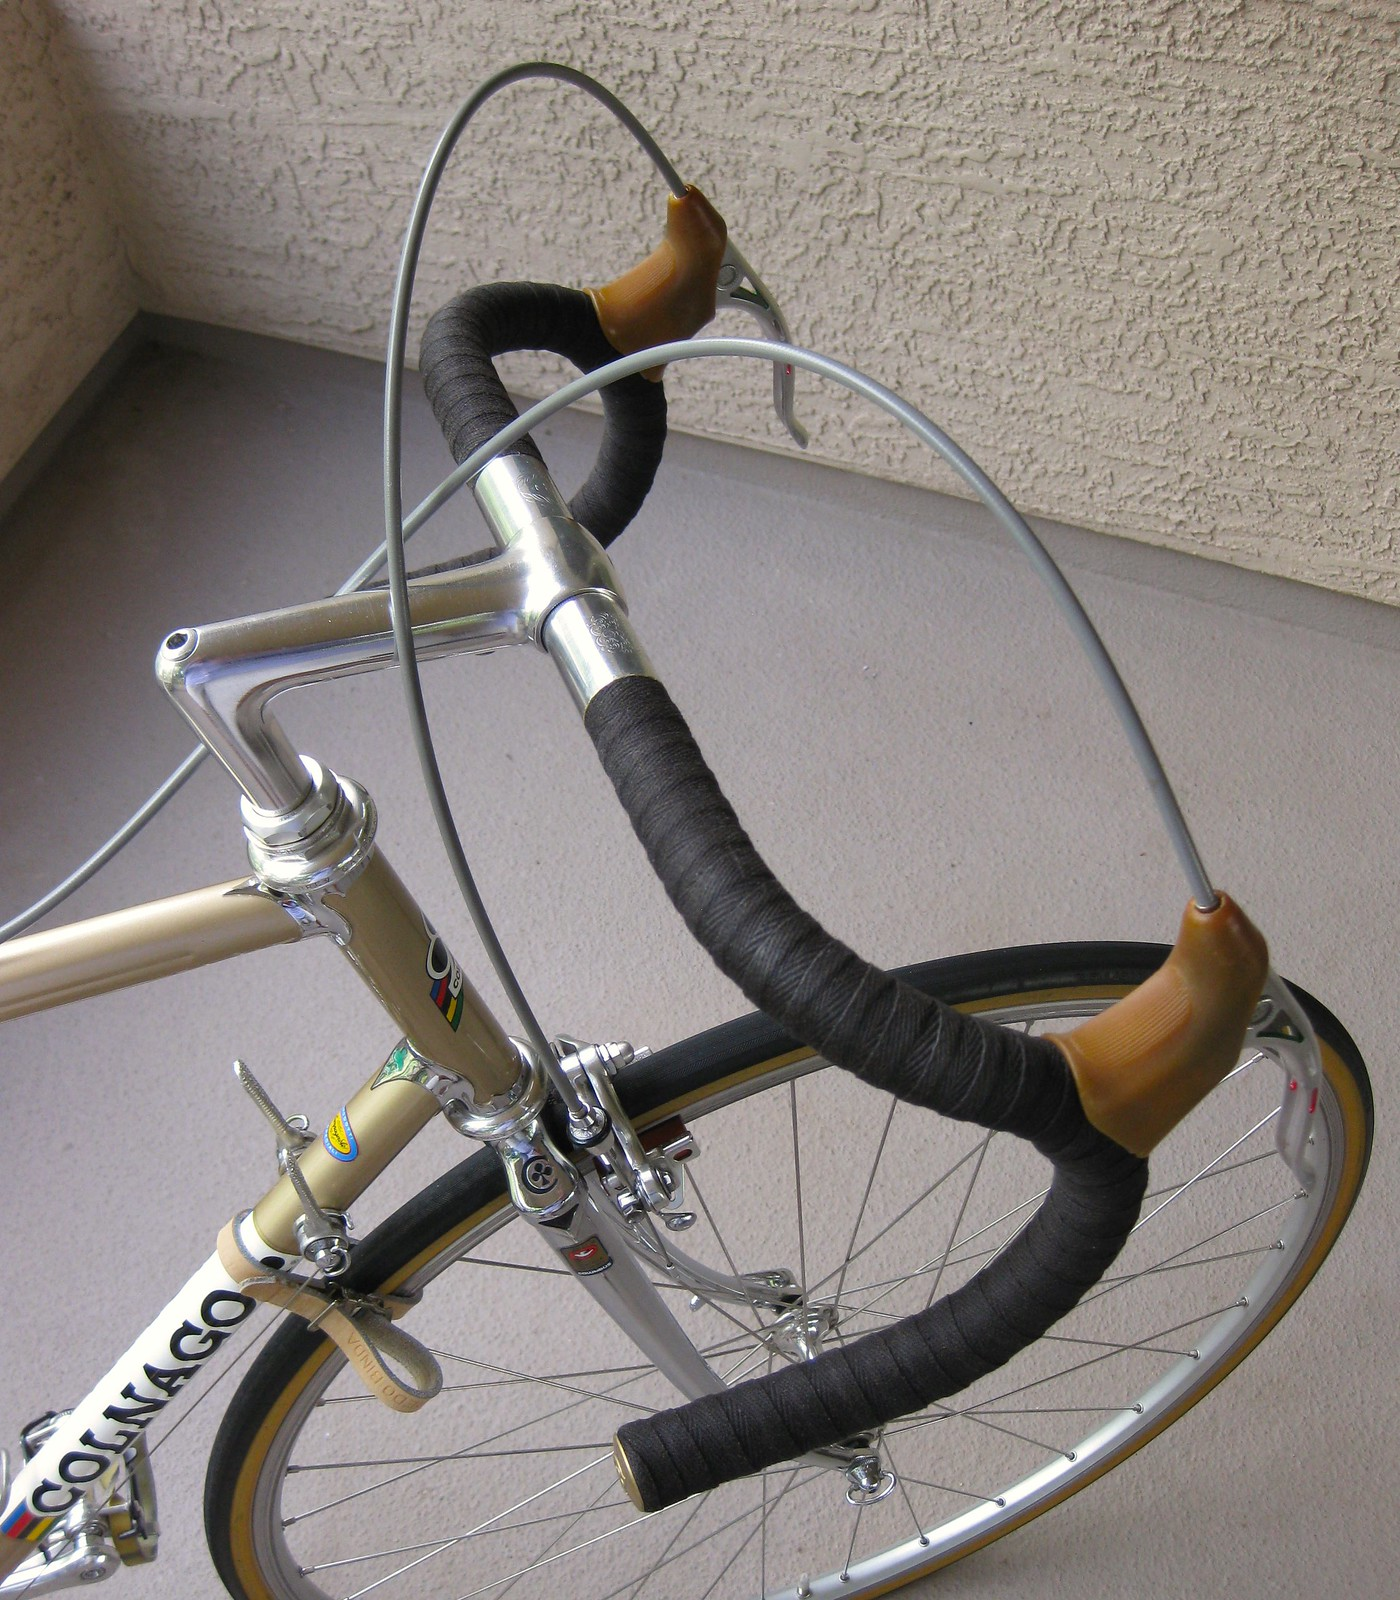
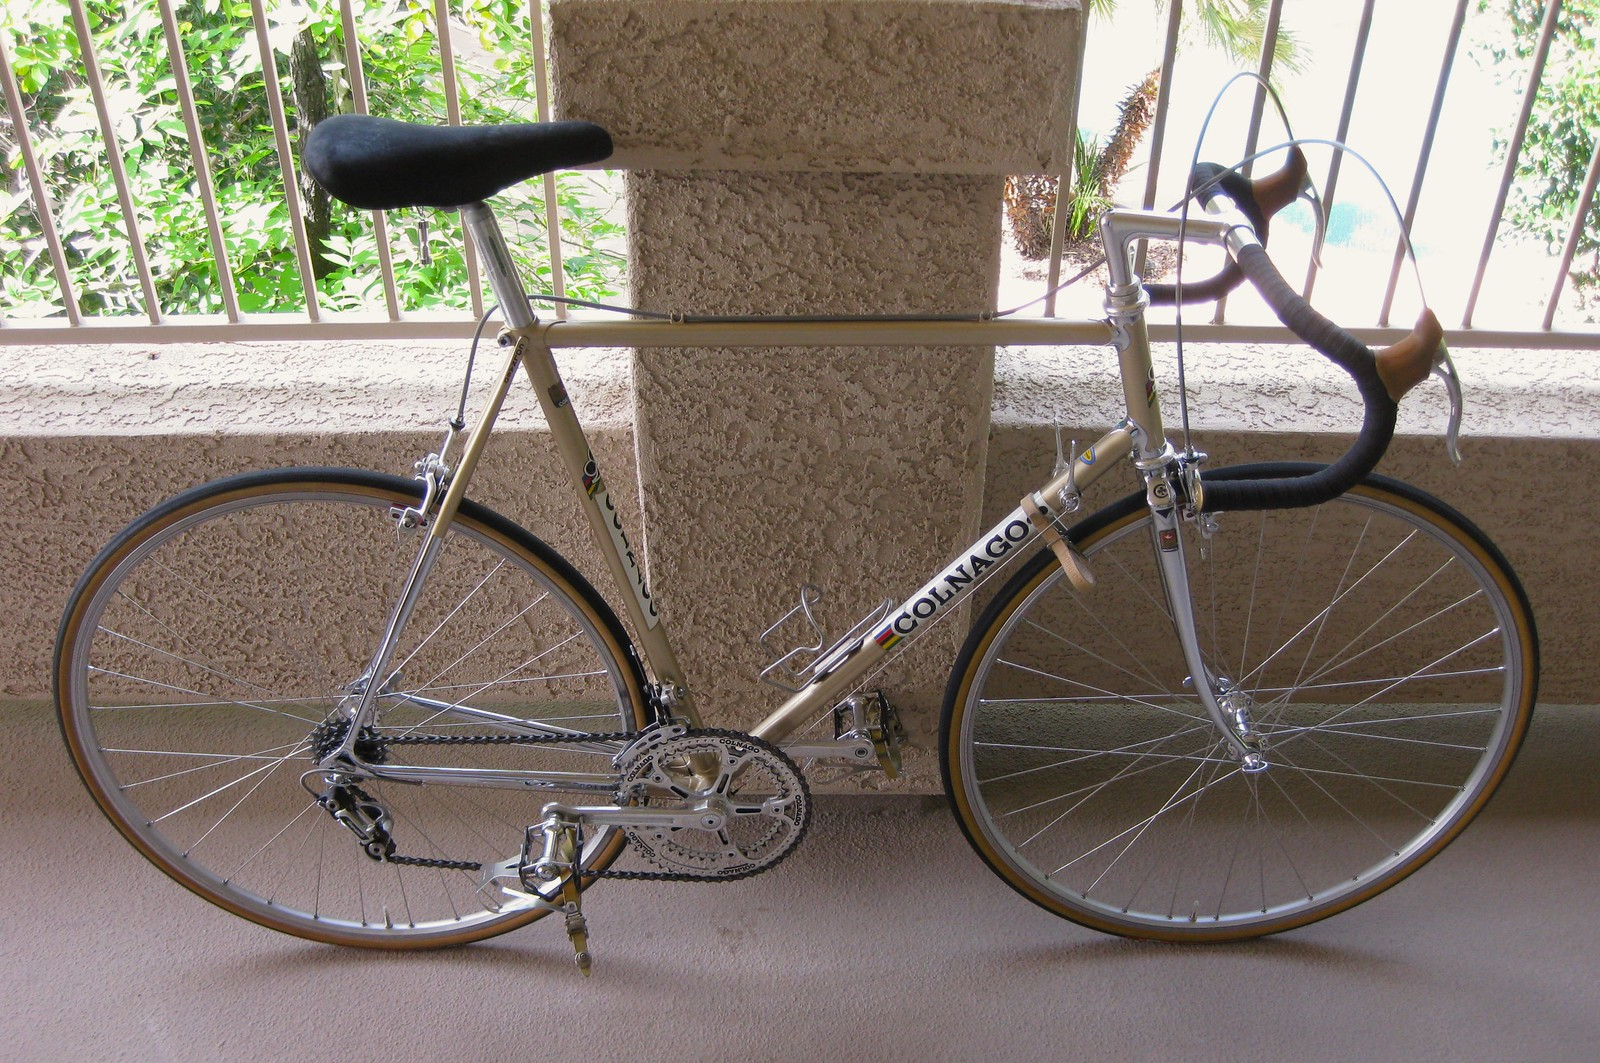
I hope you all enjoyed this little educational diversion! Perhaps you'll want to give it a go - it sure beats replacing bar tape every couple of months when it becomes dirty, faded, and tore up
Until next time: keep the rubber side down!
DD
I hope you all enjoyed this little educational diversion! Perhaps you'll want to give it a go - it sure beats replacing bar tape every couple of months when it becomes dirty, faded, and tore up
Until next time: keep the rubber side down!
DD
Last edited by Drillium Dude; 03-15-23 at 03:18 PM. Reason: Inserted dad joke, 'coz I wanna be like Kurt
Likes For Drillium Dude:
03-14-23, 01:54 PM
#3
Bike Butcher of Portland

Join Date: Jul 2014
Location: Portland, OR
Posts: 11,634
Bikes: It's complicated.
Mentioned: 1299 Post(s)
Tagged: 0 Thread(s)
Quoted: 4678 Post(s)
Liked 5,795 Times
in
2,281 Posts
Thanks for the tutorial! I was sold on shellaced cloth tape years ago. It outlasts every single other tape job you can think of, and it's easy to touch up once a year to get it back to the "like new" condition. The shellac "glues" all the cloth together, so it's damn near impossible to even unwind it - a razor knife is required.
Jeff, you show one coat on dark tape. With lighter colors you'll need more coats. You can play around with the base color, white, yellow, brown, whatever. You can even use cotton or hemp twill tape - available in fabric stores - and save a lot of money if you're doing a few bikes.
@northbend showed me a neat trick for white handlebar tape. Zinnser makes a white shellac used an exterior primer. He told me to mix 1 part Zinsser bullseye white with 4 parts Zinsser bullseye clear, otherwise it's too thick. Since the pigment can wear off on your hands, finish off with a couple of coats of the clear to seal the pigment in. It cleans off easily.
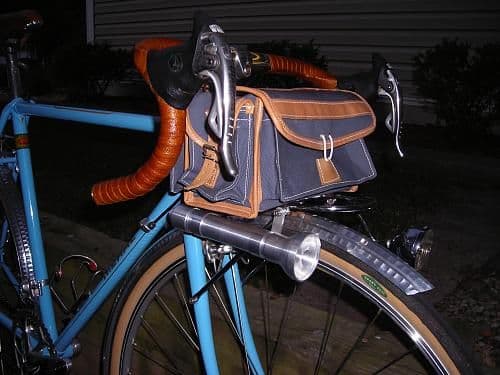
Matt's beautiful red Holland with white shellaced tape on the bars. Pic stolen from Matt's Flickr site
Jeff, you show one coat on dark tape. With lighter colors you'll need more coats. You can play around with the base color, white, yellow, brown, whatever. You can even use cotton or hemp twill tape - available in fabric stores - and save a lot of money if you're doing a few bikes.
@northbend showed me a neat trick for white handlebar tape. Zinnser makes a white shellac used an exterior primer. He told me to mix 1 part Zinsser bullseye white with 4 parts Zinsser bullseye clear, otherwise it's too thick. Since the pigment can wear off on your hands, finish off with a couple of coats of the clear to seal the pigment in. It cleans off easily.
Matt's beautiful red Holland with white shellaced tape on the bars. Pic stolen from Matt's Flickr site
__________________
If someone tells you that you have enough bicycles and you don't need any more, stop talking to them. You don't need that kind of negativity in your life.
If someone tells you that you have enough bicycles and you don't need any more, stop talking to them. You don't need that kind of negativity in your life.
Likes For gugie:
03-14-23, 02:18 PM
#4

Stop reading my posts!

Join Date: Sep 2004
Posts: 12,582
Mentioned: 90 Post(s)
Tagged: 0 Thread(s)
Quoted: 1443 Post(s)
Liked 1,062 Times
in
787 Posts
Yeah I'm for multiple coats, myself, regardless of the color but if you apply anything "dark", that is from orange to garnet, the more coats the darker effect on light tape.
But I generally always use "super blonde" which is close to "clear", maybe straw-colored.
DD uses a cheap (but pure bristle) chip brush: that's a good choice for shellac, better than synthetic brushes. And because they are cheap you don't worry if the shellac hardens and can just toss the old brush when done. I have some much higher grade bristle brushes that I bother to clean and dry (and keep out of the trash), but for a use like handlebar tape you don't need a "good brush".
I'm so jealous of you lucky ducks that can still buy denatured alcohol right off the hardware store shelf, no such luck in California!
Thanks for the tutorial, DD!
Last edited by unworthy1; 03-14-23 at 11:24 PM.
Likes For unworthy1:
03-14-23, 02:30 PM
#5
Full Member
Join Date: Jan 2023
Posts: 486
Mentioned: 0 Post(s)
Tagged: 0 Thread(s)
Quoted: 175 Post(s)
Likes: 0
Liked 452 Times
in
232 Posts
Really nice work and in keeping with the old school. The tradition evolved from the poverty and out of necessity 1930's. Task seems akin to patching tubular 'sew-up' tires.
Cloth tape wrap is still cheap, readily available and quick job. I'll stay the course.
Cloth tape wrap is still cheap, readily available and quick job. I'll stay the course.
Likes For chain_whipped:
03-14-23, 02:49 PM
#6
Banned.
Join Date: May 2010
Location: Snohomish, WA.
Posts: 2,866
Mentioned: 33 Post(s)
Tagged: 0 Thread(s)
Quoted: 469 Post(s)
Liked 2,443 Times
in
646 Posts
@northbend showed me a neat trick for white handlebar tape. Zinnser makes a white shellac used an exterior primer. He told me to mix 1 part Zinsser bullseye white with 4 parts Zinsser bullseye clear, otherwise it's too thick. Since the pigment can wear off on your hands, finish off with a couple of coats of the clear to seal the pigment in. It cleans off easily.
Matt's beautiful red Holland with white shellaced tape on the bars. Pic stolen from Matt's Flickr site
03-14-23, 02:55 PM
#7
Bike Butcher of Portland
Join Date: Jul 2014
Location: Portland, OR
Posts: 11,634
Bikes: It's complicated.
Mentioned: 1299 Post(s)
Tagged: 0 Thread(s)
Quoted: 4678 Post(s)
Liked 5,795 Times
in
2,281 Posts

__________________
If someone tells you that you have enough bicycles and you don't need any more, stop talking to them. You don't need that kind of negativity in your life.
If someone tells you that you have enough bicycles and you don't need any more, stop talking to them. You don't need that kind of negativity in your life.
Likes For gugie:
03-14-23, 04:06 PM
#8
Banned.
Thread Starter
Join Date: Jul 2009
Location: PAZ
Posts: 12,294
Mentioned: 255 Post(s)
Tagged: 0 Thread(s)
Quoted: 2588 Post(s)
Liked 4,824 Times
in
1,709 Posts
And if it is, again we're in agreement: the only good removal method is an X-Acto blade - and a lot of patience!
Glad you enjoyed the diversion, buddy
DD
03-14-23, 04:15 PM
#9
Banned.
Thread Starter
Join Date: Jul 2009
Location: PAZ
Posts: 12,294
Mentioned: 255 Post(s)
Tagged: 0 Thread(s)
Quoted: 2588 Post(s)
Liked 4,824 Times
in
1,709 Posts
In France, you can buy redi-mixed gum-lacq as they call it, in a wide variety of colors, usually applied over white tape. Also, "usually" applied to the bar/stem combo nowhere near the bike, like in a vise.
For a more permanent job, several DAYS of multiple coats are used with ample dry time too.
DD
03-14-23, 04:23 PM
#10
Banned.
Thread Starter
Join Date: Jul 2009
Location: PAZ
Posts: 12,294
Mentioned: 255 Post(s)
Tagged: 0 Thread(s)
Quoted: 2588 Post(s)
Liked 4,824 Times
in
1,709 Posts
DD uses a cheap (but pure bristle) chip brush: that's a good choice for shellac, better than synthetic brushes. And because they are cheap you don't worry if the shellac hardens and can just toss the old brush when done. I have some much higher grade bristle brushes that I bother to clean and dry (and keep out of the trash), but for a use like handlebar tape you don't need a "good brush".
I'm so jealous of you lucky ducks that can still buy denatured alcohol right off the hardware store shelf, no such luck in California!
Thanks for the tutorial, DD!
It's true: that brush cost all of $5.95, heh he heh! Even so (cheap bastage that I am), I cleaned and saved it for future shellackin' use. I figured, if it was good enough to be used varnishing furniture, it'd suffice for my humble application.
Wow - you can't get simple denatured alcohol in CA?!
 is up with that? Wonder if you can have it shipped to you...? Yet more proof CA is gettin' crazier and crazier (IMHO, of course)...
DD
03-14-23, 04:39 PM
#11
Banned.
Thread Starter
Join Date: Jul 2009
Location: PAZ
Posts: 12,294
Mentioned: 255 Post(s)
Tagged: 0 Thread(s)
Quoted: 2588 Post(s)
Liked 4,824 Times
in
1,709 Posts
Oh, it's not all the difficult - I mean, if I can do it, anybody can
But seriously, it's waaaaaay easier than patching sewups - or mounting them, for that matter. A bit more effort using pre-mixed stuff, but if you do your own wrenching, removing the brake hardware is cake. In fact, the most time-consuming step was waiting for the shellac flakes to dissolve into solution - and I finished up another project in the meantime; win/win.
Because the mixture I used was alcohol based - and I did the job outdoors - each side of the bar dried during the time it took to shellac the opposing side. I was done with my three coats in less than an hour. Took almost as long to prep the protective coverings, to be honest.
Who knows, you might want to give it a go someday. After all, the benefits are many - not to mention awesome!
DD


Likes For El Chaba:
03-14-23, 05:03 PM
#13
Junior Member

Why is everyone using shellac instead of a polyurethane.either oil or water based. The poly stuff seems to be better on all counts from ease of use to uv proof in the case of the exterior poly. I know it is traditional and super cool, but...what is the actual benefit?
Likes For robobike316:
03-14-23, 05:13 PM
#14
Senior Member

Join Date: Aug 2009
Location: Berkeley, CA
Posts: 7,244
Bikes: '72 Cilo Pacer, '72 Gitane Gran Tourisme, '72 Peugeot PX10, '73 Speedwell Ti, '74 Peugeot UE-8, '75 Peugeot PR-10L, '80 Colnago Super, '85 De Rosa Pro, '86 Look Equipe 753, '86 Look KG86, '89 Parkpre Team, '90 Parkpre Team MTB, '90 Merlin
Mentioned: 87 Post(s)
Tagged: 0 Thread(s)
Quoted: 834 Post(s)
Liked 2,125 Times
in
554 Posts

Thanks for the tutorial!
Likes For gaucho777:
03-14-23, 05:14 PM
#15
Senior Member
Join Date: Dec 2016
Posts: 589
Mentioned: 12 Post(s)
Tagged: 0 Thread(s)
Quoted: 192 Post(s)
Liked 566 Times
in
197 Posts
Why is everyone using shellac instead of a polyurethane.either oil or water based. The poly stuff seems to be better on all counts from ease of use to uv proof in the case of the exterior poly. I know it is traditional and super cool, but...what is the actual benefit?
Likes For El Chaba:
03-14-23, 05:18 PM
#16
Junior Member
Thanks, that is a reasonable reason, but so does lacquer if I'm not mistaken.
03-14-23, 05:50 PM
#17
Banned.
Thread Starter
Join Date: Jul 2009
Location: PAZ
Posts: 12,294
Mentioned: 255 Post(s)
Tagged: 0 Thread(s)
Quoted: 2588 Post(s)
Liked 4,824 Times
in
1,709 Posts
Why is everyone using shellac instead of a polyurethane.either oil or water based. The poly stuff seems to be better on all counts from ease of use to uv proof in the case of the exterior poly. I know it is traditional and super cool, but...what is the actual benefit?
'Coz it's cheap
Benefits are spelled out in the opening salvo.
DD
03-14-23, 05:54 PM
#18
Banned.
Thread Starter
Join Date: Jul 2009
Location: PAZ
Posts: 12,294
Mentioned: 255 Post(s)
Tagged: 0 Thread(s)
Quoted: 2588 Post(s)
Liked 4,824 Times
in
1,709 Posts

Likes For Drillium Dude:
03-14-23, 05:58 PM
#19
Senior Member
Yeah I'm for multiple coats, myself, regardless of the color but if you apple anything "dark", that is from orange to garnet, the more coats the darker effect on light tape.
But I generally always use "super blonde" which is close to "clear", maybe straw-colored.
DD uses a cheap (but pure bristle) chip brush: that's a good choice for shellac, better than synthetic brushes. And because they are cheap you don't worry if the shellac hardens and can just toss the old brush when done. I have some much higher grade bristle brushes that I bother to clean and dry (and keep out of the trash), but for a use like handlebar tape you don't need a "good brush".
I'm so jealous of you lucky ducks that can still buy denatured alcohol right off the hardware store shelf, no such luck in California!
Thanks for the tutorial, DD!
Button shellac (button-lac) is way harder of a finish than flake shellac, but takes a good, long time to dissolve. It's also more expensive, I guess :shrug:
Drillium Dude consider straining your shellac first. Not a huge deal for flaked shellac, nor cloth tape, but you'd probably be surprised what "comes out".
Likes For wschruba:
03-14-23, 06:01 PM
#20
Banned.
Thread Starter
Join Date: Jul 2009
Location: PAZ
Posts: 12,294
Mentioned: 255 Post(s)
Tagged: 0 Thread(s)
Quoted: 2588 Post(s)
Liked 4,824 Times
in
1,709 Posts
I'm only the second owner of the Colnago, and have owned it since 1994. It get's ridden plenty, and if I want to continue to do so, gotta keep up maintenance - to say nothing of appearances. After all, if I'd not done some protective work, you're absolutely right: the front end at the very least would've looked similar to this:
No thanky
DD
03-14-23, 06:11 PM
#21
Banned.
Thread Starter
Join Date: Jul 2009
Location: PAZ
Posts: 12,294
Mentioned: 255 Post(s)
Tagged: 0 Thread(s)
Quoted: 2588 Post(s)
Liked 4,824 Times
in
1,709 Posts
Drillium Dude consider straining your shellac first. Not a huge deal for flaked shellac, nor cloth tape, but you'd probably be surprised what "comes out".
The flakes didn't all completely melt; you can see tiny flakes in the second brushing photo. No biggie, as they didn't adhere - in fact, the stiff breeze we've been experiencing lately took care of most of them! Anything remaining would likely be removed post-haste by my grubby paws on the very first ride
This was the last of the shellac flakes I received from @rootboy (AKA Scott Gabriel - may he rest easy). This exercise was as much in tribute to that man as it was to the longest-serving bike I own.
DD
Last edited by Drillium Dude; 03-14-23 at 08:10 PM. Reason: Fixed an 'oops'...
Likes For Drillium Dude:
03-14-23, 06:14 PM
#22
Senior Member
Out of flaked shellac, not much will (should) come out, other than undissolved clumps of shellac--there always seems to be some--but other types of shellac, particularly button or stick, will have bug bits in them.
After all, it is an all-natural(tm) product.
You even really should strain pre-mixed stuff, since it typically has clumps, too. You can find medium and fine strainers that work well in the paint department of box stores.
After all, it is an all-natural(tm) product.
You even really should strain pre-mixed stuff, since it typically has clumps, too. You can find medium and fine strainers that work well in the paint department of box stores.
Likes For wschruba:
03-14-23, 07:27 PM
#23
Junior Member


My 2001 Mercian (since sold) with 3 layers of 'clear' shellac (the pre-mixed stuff) applied. I wore nitrile plastic gloves to tape the handlebars, to avoid soiling the tape before first use.
After a couple or rides, the outer layer of shellac wore down a bit, and then the tape color closely matched the creamy white head tube panel (and the creamy white decals).
I didn't remove the brake levers; I simply peeled the back edge of the hoods back when applying each layer of shellac.
Andrew G.
Likes For Andrew_G:
03-14-23, 08:02 PM
#24
Banned.
Thread Starter
Join Date: Jul 2009
Location: PAZ
Posts: 12,294
Mentioned: 255 Post(s)
Tagged: 0 Thread(s)
Quoted: 2588 Post(s)
Liked 4,824 Times
in
1,709 Posts
DD
03-14-23, 08:18 PM
#25
Banned.
Thread Starter
Join Date: Jul 2009
Location: PAZ
Posts: 12,294
Mentioned: 255 Post(s)
Tagged: 0 Thread(s)
Quoted: 2588 Post(s)
Liked 4,824 Times
in
1,709 Posts
My 2001 Mercian (since sold) with 3 layers of 'clear' shellac (the pre-mixed stuff) applied. I wore nitrile plastic gloves to tape the handlebars, to avoid soiling the tape before first use.
After a couple or rides, the outer layer of shellac wore down a bit, and then the tape color closely matched the creamy white head tube panel (and the creamy white decals).
I didn't remove the brake levers; I simply peeled the back edge of the hoods back when applying each layer of shellac.
Andrew G.
I also neglected to add that I wore nitrile gloves when applying the shellac; used them while spraying clearcoat on a carbon fiber saddle, too. Gone are the days of having to deep-clean my hands of spray paint, clearcoat, and shellac after completing the job. The gloves are easier on the hands - not to mention relatively inexpensive protection.
Others have noted that the shellac will wear off with time, but when it does, it does so with style. Patina, baby! That's how I roll
DD