


Another “which BB tool” thread, thanks
 01-29-22, 11:17 AM
#1
Newbie
Thread Starter
Another “which BB tool” thread, thanks
Hi,
Could anyone advise on a suitable tool to remove the BB from a 1995 Specialized Hardrock GS? I seem to have loads but nothing with the right combination / spacing of notches.
Many thanks, Richard


Could anyone advise on a suitable tool to remove the BB from a 1995 Specialized Hardrock GS? I seem to have loads but nothing with the right combination / spacing of notches.
Many thanks, Richard
 01-29-22, 11:26 AM
#2

Senior Member
Join Date: Feb 2012
Location: Rochester, NY
Posts: 18,056
Bikes: Stewart S&S coupled sport tourer, Stewart Sunday light, Stewart Commuting, Stewart Touring, Co Motion Tandem, Stewart 3-Spd, Stewart Track, Fuji Finest, Mongoose Tomac ATB, GT Bravado ATB, JCP Folder, Stewart 650B ATB
Mentioned: 0 Post(s)
Tagged: 0 Thread(s)
Quoted: 4195 Post(s)
Liked 3,837 Times
in
2,295 Posts
The universal hook end wrench has one hook so is compatible with all lockrings that have at least one notch. Sugino, Hozan, Park, ATD, Bicycle Research (and likely others) all made them. In a pinch (bad pun coming) one could use a large slip joint pliers and mar the lockring but it will do the job.
The cup will use a common pin tool. Either an adjustable or a fixed (at the right distance apart) one. Park, Campy, Var, Bicycle Research Sugino and Shimano (among others) all made them. The Park SPA-1 (green) is what many use as it's low cost and adjustable.
The fixed cup likely has 32mm between the flats. These wrenches are also made by mentioned companies. Do know the fixed cup will be REALLY tight (hence the term "fixed") and any wrench will want to slip off the cup unless it's bolted down against the cup. A simple large bolt and big washers do this. Andy
__________________
AndrewRStewart
AndrewRStewart
01-29-22, 11:35 AM
#3
Mad bike riding scientist

Join Date: Nov 2004
Location: Denver, CO
Posts: 27,342
Bikes: Some silver ones, a red one, a black and orange one, and a few titanium ones
Mentioned: 152 Post(s)
Tagged: 1 Thread(s)
Quoted: 6200 Post(s)
Liked 4,202 Times
in
2,358 Posts
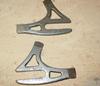
You need at least 2 tools and maybe 3. The HCW-5 will work on the lockring. Use the 3 pin part but if you are unlucky, you can use the hook spanner. For the pins, use the HCW-4 tool. The other end of the HCW-4 is used for removing the fixed cup. If the pins on the HCW-4 don’t fit, you may need to use a HCW-5 pin spanner. Check the bottom bracket service page on the Park site for how to use the tools.
I would suggest using this method for servicing the bottom bracket. I find that starting with the fixed cup removal rather than the adjustable cup is much easier with the tool modification in the link.
I would suggest using this method for servicing the bottom bracket. I find that starting with the fixed cup removal rather than the adjustable cup is much easier with the tool modification in the link.
__________________
Stuart Black
Plan Epsilon Around Lake Michigan in the era of Covid
Old School…When It Wasn’t Ancient bikepacking
Gold Fever Three days of dirt in Colorado
Pokin' around the Poconos A cold ride around Lake Erie
Dinosaurs in Colorado A mountain bike guide to the Purgatory Canyon dinosaur trackway
Solo Without Pie. The search for pie in the Midwest.
Picking the Scablands. Washington and Oregon, 2005. Pie and spiders on the Columbia River!
01-29-22, 11:37 AM
#4
Newbie
Thread Starter
The universal hook end wrench has one hook so is compatible with all lockrings that have at least one notch. Sugino, Hozan, Park, ATD, Bicycle Research (and likely others) all made them. In a pinch (bad pun coming) one could use a large slip joint pliers and mar the lockring but it will do the job. Andy
01-29-22, 11:44 AM
#5
Senior Member
Join Date: Feb 2012
Location: Rochester, NY
Posts: 18,056
Bikes: Stewart S&S coupled sport tourer, Stewart Sunday light, Stewart Commuting, Stewart Touring, Co Motion Tandem, Stewart 3-Spd, Stewart Track, Fuji Finest, Mongoose Tomac ATB, GT Bravado ATB, JCP Folder, Stewart 650B ATB
Mentioned: 0 Post(s)
Tagged: 0 Thread(s)
Quoted: 4195 Post(s)
Liked 3,837 Times
in
2,295 Posts
Yes there are multi hooked wrenches but the ring's diameter becomes a factor as well as the notch spacing. This is when one finds that the tool made for one brand lockring almost but not quite fits another brand ring. Another option is to use a hammer and a punch/chisel/flat bladed screwdriver. Place the tip in a notch, close to a tangent to the ring, and hammer the other end till the ring begins to move. Then use the hook wrench. Andy
__________________
AndrewRStewart
AndrewRStewart
01-29-22, 11:45 AM
#6
Newbie
Thread Starter
You need at least 2 tools and maybe 3. The HCW-5 will work on the lockring. Use the 3 pin part but if you are unlucky, you can use the hook spanner. For the pins, use the HCW-4 tool. The other end of the HCW-4 is used for removing the fixed cup. If the pins on the HCW-4 don’t fit, you may need to use a HCW-5 pin spanner. Check the bottom bracket service page on the Park site for how to use the tools.
I would suggest using this method for servicing the bottom bracket. I find that starting with the fixed cup removal rather than the adjustable cup is much easier with the tool modification in the link.
I would suggest using this method for servicing the bottom bracket. I find that starting with the fixed cup removal rather than the adjustable cup is much easier with the tool modification in the link.
01-29-22, 11:49 AM
#7
Newbie
Thread Starter
Yes there are multi hooked wrenches but the ring's diameter becomes a factor as well as the notch spacing. This is when one finds that the tool made for one brand lockring almost but not quite fits another brand ring. Another option is to use a hammer and a punch/chisel/flat bladed screwdriver. Place the tip in a notch, close to a tangent to the ring, and hammer the other end till the ring begins to move. Then use the hook wrench. Andy

Likes For rmwesley:
01-29-22, 08:34 PM
#9
Old fart
Join Date: Nov 2004
Location: Appleton WI
Posts: 24,777
Bikes: Several, mostly not name brands.
Mentioned: 153 Post(s)
Tagged: 0 Thread(s)
Quoted: 3582 Post(s)
Liked 3,395 Times
in
1,929 Posts
A lockring pliers like the VAR-16 or Hozan C-203 provides a secure grip on any lockring with an even number of notches. An adjustable pin tool can deal with the adjustable cup if your current pin tool doesn't fit.
Likes For JohnDThompson:
01-30-22, 01:52 PM
#10
Constant tinkerer
I realize I'm late, but FWIW I've just used needle nose pliers for adjustable cups like that. With the lockring removed they should never be tight unless the threads are bunged up.
Lots of ways to remove the fixed cup and lockring, including some good suggestions here.
Some suggest leaving the fixed cup alone but I always remove it on bikes I'm not familiar with. Surprisingly often, it's loose. Regardless, it's good to remove it and grease the threads so it can be (more easily) removed at some point in the future.
Likes For FastJake:
02-01-22, 06:04 PM
#12
Senior Member
Most often, I find the “hook” wrenches less than satisfying to use  . The “punch” method usually works well but I’ve learned using one that is “softer” than the steel of the locking ring does the least amount of damage. Unless the locking ring is rusted to the adjustable cup, a few taps on the drift placed (as mentioned) tangentially to a notch on the ring will loosen it. Also as mentioned, once the locking ring is removed, again unless the adjustable cup is rusted to the frame, it’s generally easily removed. I have pin spanners but if I’m not close to my bike tool box, I’ve used the needle nose pliers technique.
While it isn’t always necessary to remove the fixed cup, I usually do to better clean out the threads of the bottom bracket. 32mm may be a common distance across the flats but I’ve many times had to use a 36mm wrench. Using a large washer to hold the wrench against the fixed cup IS very helpful AND don’t forget that most often (except on some European frames) the drive side is “left hand threaded”!
. The “punch” method usually works well but I’ve learned using one that is “softer” than the steel of the locking ring does the least amount of damage. Unless the locking ring is rusted to the adjustable cup, a few taps on the drift placed (as mentioned) tangentially to a notch on the ring will loosen it. Also as mentioned, once the locking ring is removed, again unless the adjustable cup is rusted to the frame, it’s generally easily removed. I have pin spanners but if I’m not close to my bike tool box, I’ve used the needle nose pliers technique. While it isn’t always necessary to remove the fixed cup, I usually do to better clean out the threads of the bottom bracket. 32mm may be a common distance across the flats but I’ve many times had to use a 36mm wrench. Using a large washer to hold the wrench against the fixed cup IS very helpful AND don’t forget that most often (except on some European frames) the drive side is “left hand threaded”!
Likes For sovende:
02-07-22, 01:01 AM
#13
Newbie
Thread Starter
02-07-22, 01:07 AM
#14
Guest
Join Date: Sep 2020
Posts: 2,888
Mentioned: 13 Post(s)
Tagged: 0 Thread(s)
Quoted: 1346 Post(s)
Liked 3,270 Times
in
1,439 Posts
