


Loosey lefty or righty tighty?
 09-27-22, 10:25 AM
#1
Newbie
Thread Starter
Loosey lefty or righty tighty?
Bought a Peugeot Optimum road bike (I'm in the UK & it's a UK spec bike, though Peugeot's obviously French).
Bottom bracket fixed cup's tighter than a camel's backside in a sandstorm.
Tried "sandwiching" on the 36mm spanner with blocks of wood/washers, hammering the spanner but it just forces itself off (open ended, not full circle tool).
Given the markings on the face of the cup (I've clarified those on the photo) is it safe to assume it's British thread & therefore clockwise to remove?
Also, the cable guide shown in the second photo - is removal simply a case of removing the central rivet, then re-rivetting once painted?
Thanks for any help.
 09-27-22, 10:38 AM
#2
Really Old Senior Member

It's a left hand thread, so opposite of "normal".
Get the correct wrench-
Lay the bike on its right side and dribble in penetrating oil from the "top" and let soak for a few hours first.


Get the correct wrench-
Lay the bike on its right side and dribble in penetrating oil from the "top" and let soak for a few hours first.
Last edited by Bill Kapaun; 09-27-22 at 05:25 PM.
09-27-22, 10:47 AM
#3
Senior Member
Join Date: Oct 2014
Location: Portland, OR
Posts: 12,892
Bikes: (2) ti TiCycles, 2007 w/ triple and 2011 fixed, 1979 Peter Mooney, ~1983 Trek 420 now fixed and ~1973 Raleigh Carlton Competition gravel grinder
Mentioned: 129 Post(s)
Tagged: 0 Thread(s)
Quoted: 4791 Post(s)
Liked 3,918 Times
in
2,548 Posts
Peugeot traditionally was French threaded, meaning the fixed cup was right-hand thread (righty-tightie) but later Peugeots with Japanese BBs could well be English. As I recall, my ~1990 Reynolds 501 Peugeot is English. (I don't know that I ever pulled the Sugino cup out. Picked the bike up used, BB was serviceable and compatible with the crankset I put on. Only rode it about 8000 miles before retiring it.)
Yours is Shimano. I don't see any clues on it that it is not English and I would guess that BC (G?) 1.37 means English. It so, your crankset removes clockwise as viewed looking at the bike from the drive side. Lefty-loosie it isn't.
If I am right, be glad. Left pedals and fixed cups should be left hand thread so they tend to tighten through the reversed forces caused by the bearing. So decently tight is all you need to prevent loosing on the road and a real blessing at times like this. Right hand fixed cups have to be tight! just to not misbehave on the road. (I used to clamp my Peugeot's cup flange in a big bench vise and turn the frame to tighten and loosen.)
Likes For 79pmooney:
09-27-22, 10:49 AM
#4
Half way there

Join Date: Sep 2015
Location: North Carolina
Posts: 2,955
Bikes: Many, and the list changes frequently
Mentioned: 5 Post(s)
Tagged: 0 Thread(s)
Quoted: 985 Post(s)
Liked 879 Times
in
526 Posts
1.37 is ISO/BS so this is a left-handed thread. It's neither lefty-loosey or righty-tighty, rather it's lefty-tighty and righty-loosey. You are correct: clockwise to remove. I have access to a tool similar to a VAR 30 for ornery fixed cups and it works beautifully. Another option that has worked well is to clamp the cup in a bench vise and then use the frame as leverage while turning.
Also, if you don't plan to replace the bottom bracket you can leave the cup in place.
Good luck,
Also, if you don't plan to replace the bottom bracket you can leave the cup in place.
Good luck,
Likes For Moe Zhoost:
09-27-22, 11:35 AM
#5

Senior Member

Join Date: Jul 2006
Location: San Jose (Willow Glen) Ca
Posts: 9,835
Bikes: Kirk Custom JK Special, '84 Team Miyata,(dura ace old school) 80?? SR Semi-Pro 600 Arabesque
Mentioned: 106 Post(s)
Tagged: 0 Thread(s)
Quoted: 2337 Post(s)
Liked 2,813 Times
in
1,536 Posts
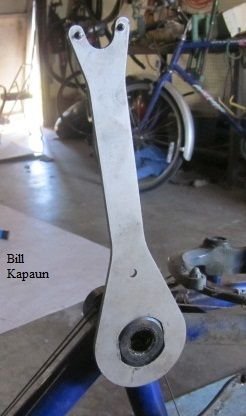
you can build a var 30 like tool from the hardware store
it has worked well for me. also I like freeze-off and it helps to whack what ever tool your are using to add some shock, this tool allows for adding leverage easily
from sheldon
https://www.sheldonbrown.com/tooltips/bbcups.htmlThe tool is an imitation of a $40 shop tool that fits into the fixed cup as a crank spindle would, and pinches the cup. You apply unscrewing force to the tool, and it transfers this force to the cup with this tight friction fit.
The tool consists of a large bolt, a nut or two, and a few washers. The size of the bolt is not particularly critical, as long as the bolt is strong enough not to break, but small enough to fit through the hole in the cup. I used to use an ordinary 1/2-inch, 13 TPI hex bolt (also called a "cap screw"), which served me well for quite a while. It finally met its match on friend's Schwinn that had an unusually tight fixed cup; the bolt snapped in two before I could remove the cup.
Now I use a 5/8-inch 18 TPI hex bolt 1 1/2inches long, with a nut, a flat washer, and four lockwashers. The 5/8-inch size is the largest standard size that will fit through the hole in the cup. This bolt and nut both take a 15/16-inch wrench. With my 1/2 inch drive Craftsman six-point socket set, the 15/16-inch socket is also the largest size that will fit into a normal bottom bracket shell.
If you have some other brand of socket, check the fit before you buy the bolt and nut-you might need the next size down (9/16-inch).
__________________
Life is too short not to ride the best bike you have, as much as you can
(looking for Torpado Super light frame/fork or for Raleigh International frame fork 58cm)
Life is too short not to ride the best bike you have, as much as you can
(looking for Torpado Super light frame/fork or for Raleigh International frame fork 58cm)
Likes For squirtdad:
09-27-22, 02:48 PM
#6
Senior Member
Join Date: Apr 2016
Posts: 1,179
Mentioned: 3 Post(s)
Tagged: 0 Thread(s)
Quoted: 476 Post(s)
Liked 426 Times
in
326 Posts
Clockwise to loosen it - 1.37" is British, French would be 35mm. If you can't shift it, I've removed cups in the past by welding or brazing on a piece of scrap steel that's easier to grip (the heat probably helps too).
09-27-22, 04:24 PM
#7

Old fart

Join Date: Nov 2004
Location: Appleton WI
Posts: 24,779
Bikes: Several, mostly not name brands.
Mentioned: 153 Post(s)
Tagged: 0 Thread(s)
Quoted: 3583 Post(s)
Liked 3,395 Times
in
1,929 Posts
BC 1.37 on the cup indicates English thread, so clockwise to loosen. If you can't get it loose even after blocking your 36mm tool against the cup, try the Sheldon Brown method. If that fails, you may need to take it to a shop where a shop-grade tool can be used (e.g. Campagnolo #793, VAR #30, Hozan C-358).
09-28-22, 01:20 PM
#8
Newbie
Thread Starter
Thank you everyone - even SurferRosa 
Had a productive day today....the bottom bracket cup came out using the pipe wrench, held in place with bolt & large washers - it was VERY tight, and was the British thread, as confirmed.
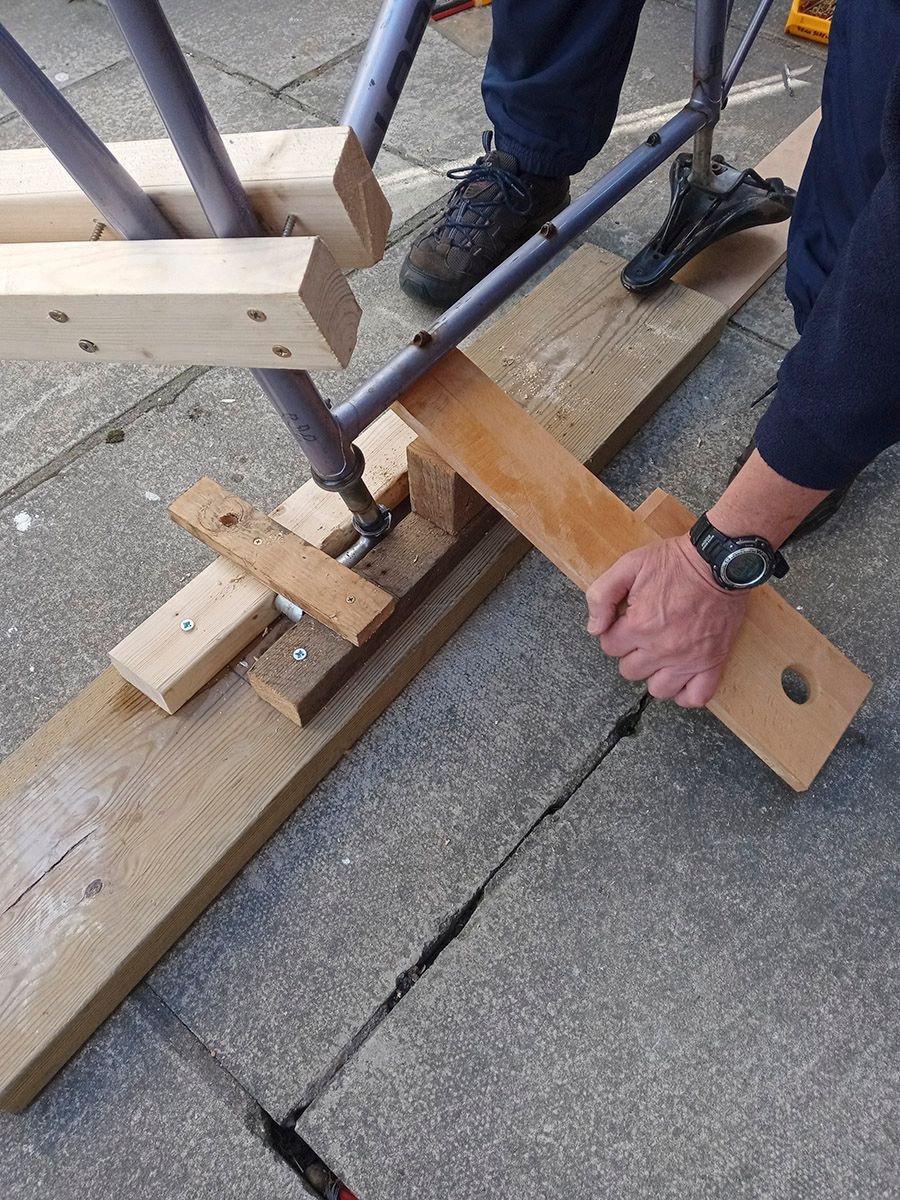
My pal & I proceeded to attack a very stuck stem - I rigged up the apparatus shown and twisting the forks with the parallel fixed batons of wood we got it to turn, after a few very loud cracking noises....a lot of twisting, levering & panting later and it was out.
Next.....the very stuck-in aluminium seatpost/steel frame tube.
Had a productive day today....the bottom bracket cup came out using the pipe wrench, held in place with bolt & large washers - it was VERY tight, and was the British thread, as confirmed.
My pal & I proceeded to attack a very stuck stem - I rigged up the apparatus shown and twisting the forks with the parallel fixed batons of wood we got it to turn, after a few very loud cracking noises....a lot of twisting, levering & panting later and it was out.
Next.....the very stuck-in aluminium seatpost/steel frame tube.
Likes For wellerchap:
09-28-22, 02:01 PM
#9
Senior Member
Join Date: Oct 2014
Location: Portland, OR
Posts: 12,892
Bikes: (2) ti TiCycles, 2007 w/ triple and 2011 fixed, 1979 Peter Mooney, ~1983 Trek 420 now fixed and ~1973 Raleigh Carlton Competition gravel grinder
Mentioned: 129 Post(s)
Tagged: 0 Thread(s)
Quoted: 4791 Post(s)
Liked 3,918 Times
in
2,548 Posts
My dad would like. "Don't use force, get a bigger hammer."
A tool I find many uses for is a good block and tackle pull system. I used to race sailboats. Took all the gear off my last, a 15' racing dinghy. Made up an 8:1 block and tackle mounted on a short plank with a cam cleat. If I were doing this, I'd anchor the block and tackle in a convenient place, lash the other end around the stem, put in a front hub or just a QR axle and tie that off to something solid. Anchor the frame however and put one of your 2/4s in between the fork blades. Tighten the pulley and twist that 2X4.
A tool I find many uses for is a good block and tackle pull system. I used to race sailboats. Took all the gear off my last, a 15' racing dinghy. Made up an 8:1 block and tackle mounted on a short plank with a cam cleat. If I were doing this, I'd anchor the block and tackle in a convenient place, lash the other end around the stem, put in a front hub or just a QR axle and tie that off to something solid. Anchor the frame however and put one of your 2/4s in between the fork blades. Tighten the pulley and twist that 2X4.
09-28-22, 02:25 PM
#10
Really Old Senior Member
And apparently, using penetrating oil is too expensive?
09-28-22, 03:34 PM
#11
Senior Member
Join Date: Oct 2013
Location: Mich
Posts: 7,354
Bikes: RSO E-tire dropper fixie brifter
Mentioned: 0 Post(s)
Tagged: 0 Thread(s)
Quoted: 6 Post(s)
Liked 2,946 Times
in
1,906 Posts
Lose it left, snap it right!
__________________
-Oh Hey!
-Oh Hey!
Likes For Troul:
09-28-22, 03:44 PM
#12
Senior Member
Join Date: Apr 2009
Location: New Rochelle, NY
Posts: 38,670
Bikes: too many bikes from 1967 10s (5x2)Frejus to a Sumitomo Ti/Chorus aluminum 10s (10x2), plus one non-susp mtn bike I use as my commuter
Mentioned: 140 Post(s)
Tagged: 1 Thread(s)
Quoted: 5767 Post(s)
Liked 2,539 Times
in
1,405 Posts
The easiest way to break loose a frozen stem is to drive it deeper.
Do so by supporting the base of the steerer tube (under the crown) on a pipe or other brace, extending to something solid like an anvil or concrete floor. Then drive the stem in with a hammer (of course assuming the wedge has been freed). This method produces the least stress on the fork and frame, since ALL the force is isolated as a compressing of the steerer tube which can handle it.
BTW- a long soak in either ammonia, or a penetration oil formulated for corrosion is recommended before starting.
If the steerer won't budge this way, the remaining, PIA, option is the old cut and ream approach.
FWIW - the method shown isn't recommended because if the stem is at all resistant, there's a good chance of denting or buckling the top tube which, I assure you, is not designed for any concentrated force applied this way.
__________________
FB
Chain-L site
An ounce of diagnosis is worth a pound of cure.
Just because I'm tired of arguing, doesn't mean you're right.
�One accurate measurement is worth a thousand expert opinions� - Adm Grace Murray Hopper - USN
WARNING, I'm from New York. Thin skinned people should maintain safe distance.
FB
Chain-L site
An ounce of diagnosis is worth a pound of cure.
Just because I'm tired of arguing, doesn't mean you're right.
�One accurate measurement is worth a thousand expert opinions� - Adm Grace Murray Hopper - USN
WARNING, I'm from New York. Thin skinned people should maintain safe distance.
Last edited by FBinNY; 09-28-22 at 03:54 PM.

Likes For FBinNY:
09-29-22, 07:54 AM
#13
Senior Member
Join Date: Feb 2012
Location: Rochester, NY
Posts: 18,056
Bikes: Stewart S&S coupled sport tourer, Stewart Sunday light, Stewart Commuting, Stewart Touring, Co Motion Tandem, Stewart 3-Spd, Stewart Track, Fuji Finest, Mongoose Tomac ATB, GT Bravado ATB, JCP Folder, Stewart 650B ATB
Mentioned: 0 Post(s)
Tagged: 0 Thread(s)
Quoted: 4195 Post(s)
Liked 3,837 Times
in
2,295 Posts
I describe thread directions as "clockwise" or "counter clockwise" and never "righty tighty". This way no mater how the wrench is placed (above or below) on the part it can be turned in the correct direction by someone who can't think things out upside down Andy
Andy
__________________
AndrewRStewart
AndrewRStewart
Likes For Andrew R Stewart:
09-29-22, 04:13 PM
#14
Senior Member
Join Date: Apr 2009
Location: New Rochelle, NY
Posts: 38,670
Bikes: too many bikes from 1967 10s (5x2)Frejus to a Sumitomo Ti/Chorus aluminum 10s (10x2), plus one non-susp mtn bike I use as my commuter
Mentioned: 140 Post(s)
Tagged: 1 Thread(s)
Quoted: 5767 Post(s)
Liked 2,539 Times
in
1,405 Posts
People run into problems when their perspective is from an opposite angle. One example which demonstrates the problem is wheel alignment. One might find themselves turning a nipple at the opposite side of the rim from themselves. In this case tightening the spoke means turning the nipple to the left.
To help people avoid this type of error I prefer teaching the "right hand rule" ------ close your right hand with thumb pointing out and place it near the object to be turned. Now if you turn the object in the direction your fingers point, it will advance in the direction the thumb points. For left hand threads substitute your left hand.
Last edited by FBinNY; 09-29-22 at 08:09 PM.
Likes For FBinNY:
09-30-22, 04:22 AM
#15
Senior Member

Join Date: Jan 2005
Location: Baltimore, MD
Posts: 5,364
Mentioned: 15 Post(s)
Tagged: 0 Thread(s)
Quoted: 2479 Post(s)
Liked 2,948 Times
in
1,674 Posts
I found FBinNY's post (see no. 16 above) potentially very useful but hard to follow, so here's a rewording that might be helpful to anyone else who is interested in what he had to say:
Summarizing: for conventional (i.e., right hand) threading, pretend that your right hand is a screwdriver. Your thumb is the business end of the tool. The tip of your thumb is on the head of the screw, ready to turn. To tighten, turn the screw in the direction in which your fingers curl into your palm. To loosen, turn in the opposite direction.
For left hand threads substitute your left hand.
Last edited by Trakhak; 09-30-22 at 11:52 AM.
09-30-22, 05:59 AM
#16
Full Member
Join Date: Jul 2005
Posts: 494
Bikes: Kona Dew, Gary Fisher Paragon, Salsa Campeon
Mentioned: 0 Post(s)
Tagged: 0 Thread(s)
Quoted: 116 Post(s)
Liked 126 Times
in
80 Posts
If I dont true a wheel a couple of times a year I dick up the counter intuitive nature of spoke tightening and loosening....
Likes For boozergut:
09-30-22, 09:47 AM
#17
Senior Member
Join Date: Apr 2009
Location: New Rochelle, NY
Posts: 38,670
Bikes: too many bikes from 1967 10s (5x2)Frejus to a Sumitomo Ti/Chorus aluminum 10s (10x2), plus one non-susp mtn bike I use as my commuter
Mentioned: 140 Post(s)
Tagged: 1 Thread(s)
Quoted: 5767 Post(s)
Liked 2,539 Times
in
1,405 Posts
The lengths some people will go to criticize and nit-pick.
It would have been easy to simply post something to the effect of ------
I offer an alternate right hand rule, which I think is easier to understand ------ followed by your screwdriver analogy.
__________________
FB
Chain-L site
An ounce of diagnosis is worth a pound of cure.
Just because I'm tired of arguing, doesn't mean you're right.
�One accurate measurement is worth a thousand expert opinions� - Adm Grace Murray Hopper - USN
WARNING, I'm from New York. Thin skinned people should maintain safe distance.
FB
Chain-L site
An ounce of diagnosis is worth a pound of cure.
Just because I'm tired of arguing, doesn't mean you're right.
�One accurate measurement is worth a thousand expert opinions� - Adm Grace Murray Hopper - USN
WARNING, I'm from New York. Thin skinned people should maintain safe distance.
09-30-22, 11:07 AM
#18
Senior Member
Join Date: Jan 2005
Location: Baltimore, MD
Posts: 5,364
Mentioned: 15 Post(s)
Tagged: 0 Thread(s)
Quoted: 2479 Post(s)
Liked 2,948 Times
in
1,674 Posts
Sorry! No offence meant. I've deleted all the parts of my post that you objected to.
Last edited by Trakhak; 09-30-22 at 11:55 AM.
09-30-22, 11:18 AM
#19
Senior Member
Join Date: Apr 2009
Location: New Rochelle, NY
Posts: 38,670
Bikes: too many bikes from 1967 10s (5x2)Frejus to a Sumitomo Ti/Chorus aluminum 10s (10x2), plus one non-susp mtn bike I use as my commuter
Mentioned: 140 Post(s)
Tagged: 1 Thread(s)
Quoted: 5767 Post(s)
Liked 2,539 Times
in
1,405 Posts
None was taken. And there's no need to placate me by sanitizing your post.
I was simply trying to point out the difference between a nitpicky critique and a constructive addition or improvement.
It was more a commentary about the tone in some (many?) of the posts on BF.
I was simply trying to point out the difference between a nitpicky critique and a constructive addition or improvement.
It was more a commentary about the tone in some (many?) of the posts on BF.
Last edited by FBinNY; 09-30-22 at 11:23 AM.
10-01-22, 09:33 AM
#20
Senior Member

Join Date: Jul 2005
Location: Boulder County, CO
Posts: 4,390
Bikes: '80 Masi Gran Criterium, '12 Trek Madone, early '60s Frejus track
Mentioned: 6 Post(s)
Tagged: 0 Thread(s)
Quoted: 513 Post(s)
Liked 445 Times
in
335 Posts
The easiest way to break loose a frozen stem is to drive it deeper.
Do so by supporting the base of the steerer tube (under the crown) on a pipe or other brace, extending to something solid like an anvil or concrete floor. Then drive the stem in with a hammer (of course assuming the wedge has been freed). This method produces the least stress on the fork and frame, since ALL the force is isolated as a compressing of the steerer tube which can handle it.
BTW- a long soak in either ammonia, or a penetration oil formulated for corrosion is recommended before starting.
10-01-22, 11:58 AM
#21
Senior Member
Join Date: Apr 2009
Location: New Rochelle, NY
Posts: 38,670
Bikes: too many bikes from 1967 10s (5x2)Frejus to a Sumitomo Ti/Chorus aluminum 10s (10x2), plus one non-susp mtn bike I use as my commuter
Mentioned: 140 Post(s)
Tagged: 1 Thread(s)
Quoted: 5767 Post(s)
Liked 2,539 Times
in
1,405 Posts
My instruction was to drive the STEM deeper into the fork, AFTER freeing the wedge, and bracing the fork crown.
In any case, it's moot as to the OP who's already freed the his stem, but I want to clarify this for anyone else who might have a similar issue.
__________________
FB
Chain-L site
An ounce of diagnosis is worth a pound of cure.
Just because I'm tired of arguing, doesn't mean you're right.
�One accurate measurement is worth a thousand expert opinions� - Adm Grace Murray Hopper - USN
WARNING, I'm from New York. Thin skinned people should maintain safe distance.
FB
Chain-L site
An ounce of diagnosis is worth a pound of cure.
Just because I'm tired of arguing, doesn't mean you're right.
�One accurate measurement is worth a thousand expert opinions� - Adm Grace Murray Hopper - USN
WARNING, I'm from New York. Thin skinned people should maintain safe distance.
10-04-22, 06:41 PM
#22
Senior Member
Re bb cup removal, I've only once done the "stick bb extending lip in vice and twist entire frame after putting penetrating oil in" method to work very well.
Replaced the old bb on my wife's very used commuter bike and the vice technique really made it easier.
Replaced the old bb on my wife's very used commuter bike and the vice technique really made it easier.
10-06-22, 05:40 PM
#23
Newbie
you can build a var 30 like tool from the hardware store
it has worked well for me. also I like freeze-off and it helps to whack what ever tool your are using to add some shock, this tool allows for adding leverage easily
from sheldon
https://www.sheldonbrown.com/tooltips/bbcups.htmlThe tool is an imitation of a $40 shop tool that fits into the fixed cup as a crank spindle would, and pinches the cup. You apply unscrewing force to the tool, and it transfers this force to the cup with this tight friction fit.
The tool consists of a large bolt, a nut or two, and a few washers. The size of the bolt is not particularly critical, as long as the bolt is strong enough not to break, but small enough to fit through the hole in the cup. I used to use an ordinary 1/2-inch, 13 TPI hex bolt (also called a "cap screw"), which served me well for quite a while. It finally met its match on friend's Schwinn that had an unusually tight fixed cup; the bolt snapped in two before I could remove the cup.
Now I use a 5/8-inch 18 TPI hex bolt 1 1/2inches long, with a nut, a flat washer, and four lockwashers. The 5/8-inch size is the largest standard size that will fit through the hole in the cup. This bolt and nut both take a 15/16-inch wrench. With my 1/2 inch drive Craftsman six-point socket set, the 15/16-inch socket is also the largest size that will fit into a normal bottom bracket shell.
If you have some other brand of socket, check the fit before you buy the bolt and nut-you might need the next size down (9/16-inch).
it has worked well for me. also I like freeze-off and it helps to whack what ever tool your are using to add some shock, this tool allows for adding leverage easily
from sheldon
https://www.sheldonbrown.com/tooltips/bbcups.htmlThe tool is an imitation of a $40 shop tool that fits into the fixed cup as a crank spindle would, and pinches the cup. You apply unscrewing force to the tool, and it transfers this force to the cup with this tight friction fit.
The tool consists of a large bolt, a nut or two, and a few washers. The size of the bolt is not particularly critical, as long as the bolt is strong enough not to break, but small enough to fit through the hole in the cup. I used to use an ordinary 1/2-inch, 13 TPI hex bolt (also called a "cap screw"), which served me well for quite a while. It finally met its match on friend's Schwinn that had an unusually tight fixed cup; the bolt snapped in two before I could remove the cup.
Now I use a 5/8-inch 18 TPI hex bolt 1 1/2inches long, with a nut, a flat washer, and four lockwashers. The 5/8-inch size is the largest standard size that will fit through the hole in the cup. This bolt and nut both take a 15/16-inch wrench. With my 1/2 inch drive Craftsman six-point socket set, the 15/16-inch socket is also the largest size that will fit into a normal bottom bracket shell.
If you have some other brand of socket, check the fit before you buy the bolt and nut-you might need the next size down (9/16-inch).
10-06-22, 05:54 PM
#24
Senior Member

Easy way to remember how the cups go on and off is always tighten rotate forward TOWARD the front of the bike. Remove is the opposite. In other words, the cups tighten the same direction as the pedals rotate to make the bike go forward.
10-06-22, 06:00 PM
#25
Senior Member
Join Date: Jul 2006
Location: San Jose (Willow Glen) Ca
Posts: 9,835
Bikes: Kirk Custom JK Special, '84 Team Miyata,(dura ace old school) 80?? SR Semi-Pro 600 Arabesque
Mentioned: 106 Post(s)
Tagged: 0 Thread(s)
Quoted: 2337 Post(s)
Liked 2,813 Times
in
1,536 Posts
__________________
Life is too short not to ride the best bike you have, as much as you can
(looking for Torpado Super light frame/fork or for Raleigh International frame fork 58cm)
Life is too short not to ride the best bike you have, as much as you can
(looking for Torpado Super light frame/fork or for Raleigh International frame fork 58cm)