


Having serious Issues disassembling Vintage Campy Brake Calipers
 08-17-22, 03:07 AM
#1
Newbie
Thread Starter
Join Date: Aug 2022
Location: Switzerland, Zurich
Posts: 3
Bikes: Full Campagnolo Record built by Jaap Huissoon
Mentioned: 0 Post(s)
Tagged: 0 Thread(s)
Quoted: 1 Post(s)
Likes: 0
Liked 0 Times
in
0 Posts
Having serious Issues disassembling Vintage Campy Brake Calipers
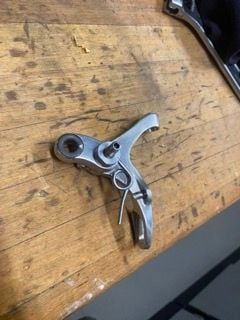
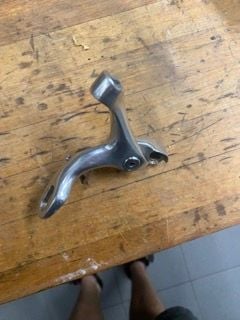
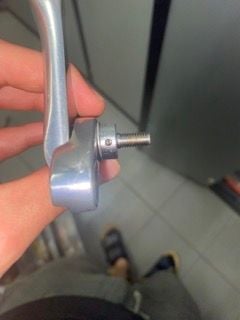
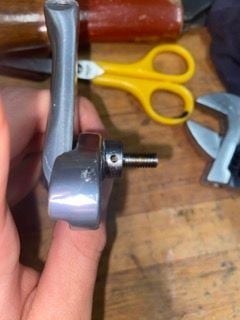
Hello, I am currently in the process of fully tearing down my campy Brakes and polishing them. I am hard stuck right now with the issue of removing the nut that secures (Ive attached a schematic to make it clear what i mean, and wrote the Part names)Br-Re015 to Br-Re002. The Nut has a securing screw which i have removed. On another Thread(campy-brake-disassemble-help) someone was having similar issues and was given some advice but he never said if it worked for him. I've done everything, Using Heat using penetrative oil and just force, but nothing was able to get the nut to budge. Furthermore i found that the Threads on bold seem to have been damaged by the securing screw. Below are Images of the part and the damaged theads on the bolt.
If anyone has any advice for me i would greatly appreciate it.
Airchair
ibb. co/ vZ985kG
ibb. co/ ws1b93X
ibb. co/ d6nwygQ
ibb. co/ r035cpG
ibb. co/ C1SFspH
ibb. co/ qJrdy3Z
Had to do some tirckery to sneak the url for the images through(Sorry mods) just remove the spaces
If anyone has any advice for me i would greatly appreciate it.
Airchair
ibb. co/ vZ985kG
ibb. co/ ws1b93X
ibb. co/ d6nwygQ
ibb. co/ r035cpG
ibb. co/ C1SFspH
ibb. co/ qJrdy3Z
Had to do some tirckery to sneak the url for the images through(Sorry mods) just remove the spaces
 08-17-22, 08:30 AM
#2

Senior Member
Join Date: Feb 2012
Location: Rochester, NY
Posts: 18,073
Bikes: Stewart S&S coupled sport tourer, Stewart Sunday light, Stewart Commuting, Stewart Touring, Co Motion Tandem, Stewart 3-Spd, Stewart Track, Fuji Finest, Mongoose Tomac ATB, GT Bravado ATB, JCP Folder, Stewart 650B ATB
Mentioned: 0 Post(s)
Tagged: 0 Thread(s)
Quoted: 4201 Post(s)
Liked 3,857 Times
in
2,305 Posts
Sorry but was unable to open up and view the photos (the links asked me to sign up for an account which I don't do to just look at stuff). I tried a google search for the BR-RE105 part and believe you have a dual pivot side pull brake (and these are no where near "vintage" status yet being still used design wise). I also think the stuck screw is in the plate that the holds the arms' pivots and is to insure the pivot bolts don't self loosen. Shimano and other dual pivot calipers use the same design. These set screws can become stuck in place from overly strong thread locking compounds used during initial assembly or corrosion built up over the years. Many have a tiny allen wrench fitting for their heads and the wrench's fit can lack the strength to not "strip out" during removal attempts.
How much heat have you tried? Did you use an oven or a hair drier? Yes, these types of retention screws do bare against threads with enough pressure to slightly damage that thread where the screw contacts it. Of course, if the bolt is removed with the screw still in place that damage can "travel" as the bolt is unthreaded. Cleaning up the bolt's threads might be easy, chasing the threads with a die is the usual method. Can you do the polishing w/o removing the screw? Is there a backing nut to additionally secure the pivot bolt? If so than the screw is somewhat redundant. Andy
How much heat have you tried? Did you use an oven or a hair drier? Yes, these types of retention screws do bare against threads with enough pressure to slightly damage that thread where the screw contacts it. Of course, if the bolt is removed with the screw still in place that damage can "travel" as the bolt is unthreaded. Cleaning up the bolt's threads might be easy, chasing the threads with a die is the usual method. Can you do the polishing w/o removing the screw? Is there a backing nut to additionally secure the pivot bolt? If so than the screw is somewhat redundant. Andy
__________________
AndrewRStewart
AndrewRStewart
08-17-22, 08:45 AM
#3
Senior Member
Join Date: Mar 2007
Location: SF Bay Area, East bay
Posts: 7,658
Bikes: Miyata 618 GT, Marinoni, Kestral 200 2002 Trek 5200, KHS Flite, Koga Miyata, Schwinn Spitfire 5, Mondia Special, Univega Alpina, Miyata team Ti, Santa Cruz Highball
Mentioned: 53 Post(s)
Tagged: 0 Thread(s)
Quoted: 1609 Post(s)
Liked 2,590 Times
in
1,224 Posts
Pic assist
Likes For curbtender:
08-17-22, 01:48 PM
#4
Friendship is Magic

Join Date: Nov 2010
Location: Sacramento, CA
Posts: 22,984
Bikes: old ones
Mentioned: 304 Post(s)
Tagged: 0 Thread(s)
Quoted: 26413 Post(s)
Liked 10,379 Times
in
7,207 Posts
.
...the part I'm missing in this is why you are taking them apart ? What are you trying to accomplish ? I have rarely needed to disassemble a bicycle brake caliper, and I've worked on some that were pretty filthy. It's a mistake to take them apart just to clean them.
...the part I'm missing in this is why you are taking them apart ? What are you trying to accomplish ? I have rarely needed to disassemble a bicycle brake caliper, and I've worked on some that were pretty filthy. It's a mistake to take them apart just to clean them.
__________________
Likes For 3alarmer:
08-17-22, 02:30 PM
#5
I'm good to go!
Join Date: Jul 2017
Location: Mississippi
Posts: 14,986
Bikes: Tarmac Disc Comp Di2 - 2020
Mentioned: 51 Post(s)
Tagged: 0 Thread(s)
Quoted: 6193 Post(s)
Liked 4,808 Times
in
3,316 Posts
It's a mistake to take them apart just to clean
 08-17-22, 04:10 PM
#6
Senior Member

Join Date: Aug 2015
Posts: 3,297
Mentioned: 39 Post(s)
Tagged: 0 Thread(s)
Quoted: 1142 Post(s)
Liked 1,739 Times
in
960 Posts
Pull the set screw from the mounting arm. The nut with the two flats locks to the mounting arm. The mounting arm is threaded to the center bolt with a washer between the two. You may need to get a better grip on the little arm to break free. If there is no set screw the arm and the are just friction locked so the center/pivot bolt has no bind in the pivoting.

08-17-22, 06:36 PM
#7
Friendship is Magic
Join Date: Nov 2010
Location: Sacramento, CA
Posts: 22,984
Bikes: old ones
Mentioned: 304 Post(s)
Tagged: 0 Thread(s)
Quoted: 26413 Post(s)
Liked 10,379 Times
in
7,207 Posts
...the ones I've had are already pretty well polished from the original manufacturer. If you really needed to gild the lily, the visible surfaces on the exterior are all accessible without disassembly. So yeah, I still don't get it. A couple of cycles in an ultrasonic cleaner, with the brake shoes removed, a little dry lube with ptfe in the pivots, and new shoes if needed, and they come out looking pretty spiffy.
__________________
Likes For 3alarmer:
08-18-22, 02:03 AM
#8
Newbie
Thread Starter
Join Date: Aug 2022
Location: Switzerland, Zurich
Posts: 3
Bikes: Full Campagnolo Record built by Jaap Huissoon
Mentioned: 0 Post(s)
Tagged: 0 Thread(s)
Quoted: 1 Post(s)
Likes: 0
Liked 0 Times
in
0 Posts
While yeah they are polished pretty well from the manufacturer, but the thing is im trying to polish them to a mirror finish, will it improve my riding no, but thats not the point. These Parts come anodized from the factory meaning to polish them you have to get that initial anodization off using either Chemicals or just abrading them away. Using things like oven cleaner makes it pretty easy and quick but i don't want the little ball bearings for which you cant buy any replacement to be ruined(as they are plastic) and if i would go the long route of sanding through the anodization i feel like i would fill those moving pivot points with tons of small aluminium particles which would work as abrasives. So thats why im trying so hard to get the nut off. Also im kind of a perfectionist when it comes to my bike in a way that i just love working on it understanding every part and wanting it to be perfect, in the same way like someone who restores junk old timers.
08-18-22, 02:18 AM
#9
Newbie
Thread Starter
Join Date: Aug 2022
Location: Switzerland, Zurich
Posts: 3
Bikes: Full Campagnolo Record built by Jaap Huissoon
Mentioned: 0 Post(s)
Tagged: 0 Thread(s)
Quoted: 1 Post(s)
Likes: 0
Liked 0 Times
in
0 Posts
Hello Andy.
here i put the images on another sharing service so you too could see them as i think they could make things more clear.
postimg.cc /gallery /WJxQ56m
...............^......... ^ remove these spaces
To answer your questions about heat, ive put it over my stove until it was difficult to hold it with my bare hand ergo, the heat traveled through the whole part. Also the thing is that im scared of stripping of the screw(not the nut) and then id be f**ed. After posting this I decided to try to take my other brake apart to see if anything was different and the only thing i could find was that there seemed to be some kind of "fabric" sticking out of the threads. Maybe some kind of lock hemp idk?
In my view it is a vintage part since it is almost 30 years old and always listed as a vintage part but maybe since im still young things seem much older to me.
Anyway i hope my answers could help out a little and clarify things.
Airchair
08-18-22, 10:42 AM
#10
I'm good to go!
Join Date: Jul 2017
Location: Mississippi
Posts: 14,986
Bikes: Tarmac Disc Comp Di2 - 2020
Mentioned: 51 Post(s)
Tagged: 0 Thread(s)
Quoted: 6193 Post(s)
Liked 4,808 Times
in
3,316 Posts
Till you get 10 posts and a day or whatever it takes, you can also upload pics to the Galleryhere on BF.

https://ibb.co/vZ985kG
https://ibb.co/ws1b93X
https://ibb.co/d6nwygQ
https://ibb.co/r035cpG

https://ibb.co/C1SFspH

https://ibb.co/vZ985kG
https://ibb.co/ws1b93X
https://ibb.co/d6nwygQ
https://ibb.co/r035cpG
https://ibb.co/C1SFspH
08-18-22, 06:37 PM
#12
Friendship is Magic
Join Date: Nov 2010
Location: Sacramento, CA
Posts: 22,984
Bikes: old ones
Mentioned: 304 Post(s)
Tagged: 0 Thread(s)
Quoted: 26413 Post(s)
Liked 10,379 Times
in
7,207 Posts
While yeah they are polished pretty well from the manufacturer, but the thing is im trying to polish them to a mirror finish, will it improve my riding no, but thats not the point. These Parts come anodized from the factory meaning to polish them you have to get that initial anodization off using either Chemicals or just abrading them away. Using things like oven cleaner makes it pretty easy and quick but i don't want the little ball bearings for which you cant buy any replacement to be ruined(as they are plastic) and if i would go the long route of sanding through the anodization i feel like i would fill those moving pivot points with tons of small aluminium particles which would work as abrasives. So thats why im trying so hard to get the nut off. Also im kind of a perfectionist when it comes to my bike in a way that i just love working on it understanding every part and wanting it to be perfect, in the same way like someone who restores junk old timers.
...thanks for your reply. I'm not going to sit here and type out some argument, but anodizing got put on there for some pretty good reasons. And once you strip it off and polish your calipers, they will immediately begin to form the aluminum oxide coating that will eventually defeat your effort at a mirror surface, without regular maintenance. Best wishes with your project. I hope it comes out like a chrome Paramount.
I know that there are people on this forum who insist on removing the factory lubricant on a new chain, so they can get it "properly lubed". I am not one of these people.

__________________
