


Suntour GT rear derailleur: how to assemble?
 04-09-21, 08:01 AM
#1

Senior Member
Thread Starter
Join Date: Apr 2007
Location: Ottawa, Canada
Posts: 777
Bikes: Raleigh Classic 15, 84; Miyata 912, 85; Miyata Ridge Runner SE, 85; Miyata 610, 86; Miyata 100M, 86; Miyata Valley Runner, 88; Miyata Triple Cross, 89; GT Karakoram, 90; Miyata Elevation 300, 91; Marinoni Touring, 95; Long Haul Trucker, 2013
Mentioned: 9 Post(s)
Tagged: 0 Thread(s)
Quoted: 159 Post(s)
Liked 133 Times
in
80 Posts
Suntour GT rear derailleur: how to assemble?
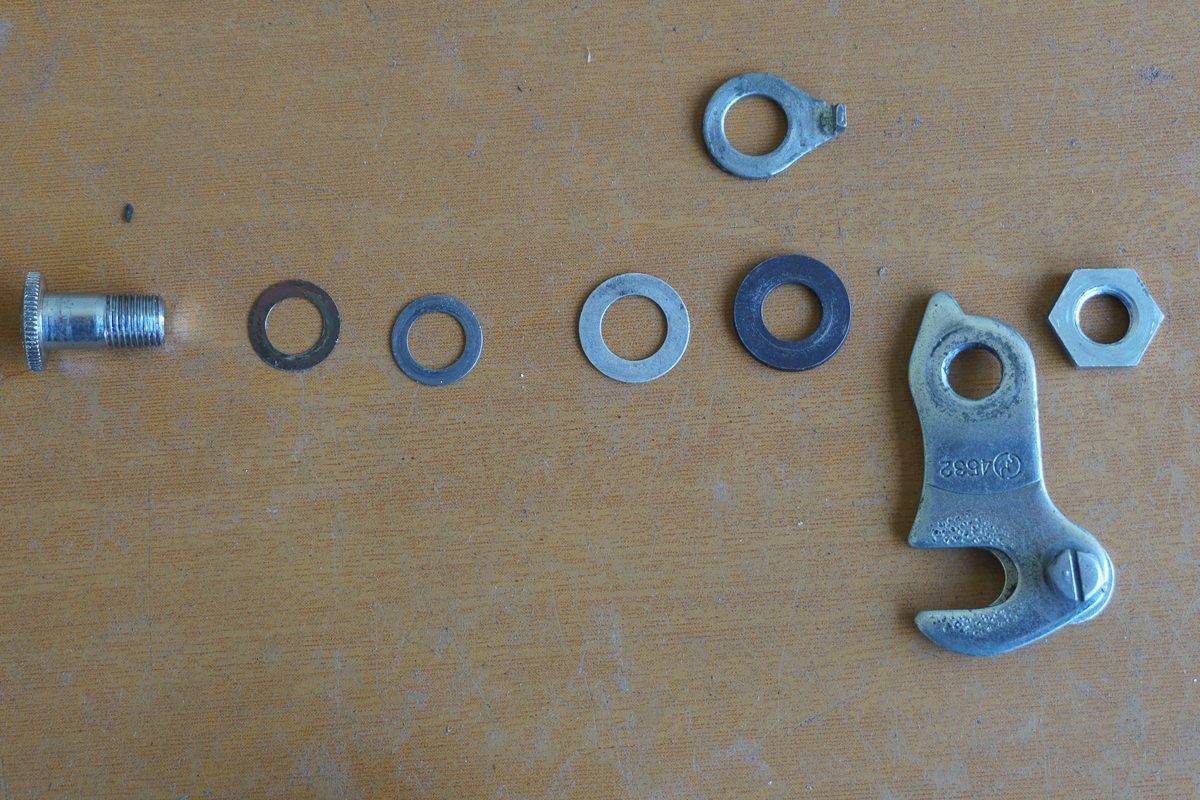
I'm trying to assemble this Raleigh branded Suntour GT, but I'm missing some understanding, and, maybe, some part. I picked it up at my co-op a couple of years ago, and it may not have all the original fittings. The claw didn't come with it.
I don't understand how to tighten it onto the claw and still allow it to pivot. I've never assembled a derailleur with a claw and a jam nut. I'm not clear what the jam nut is for, since integrated hangers don't seem to need one.
I've included a picture of the fittings placed in the order I've tried for assembly:
pivot bolt, then 2 thin washers, then derailleur body, then thin washer, thicker washer, then pivot bolt threaded into claw, then jam nut. It also had the tabbed washer you see above the thicker washer, but I don't understand what that's for, or where it goes. If I include it there's not that much thread left for the jam nut.
When I pulled this out of my parts bin, I thought this would be a no brainer, but I forgot who I was dealing with.
 04-09-21, 01:28 PM
#2
Senior Member
Join Date: Feb 2020
Posts: 2,820
Mentioned: 49 Post(s)
Tagged: 0 Thread(s)
Quoted: 1106 Post(s)
Likes: 0
Liked 1,327 Times
in
783 Posts
That tabbed washer is a wheel-axle-retaining gizmo, usually seen on front wheels; the dropout has a little rectangular hole above the axle slot, into which the tab fits, the washer section is placed on the axle inside the nut. If your wheel is loose it (is supposed to) stay(s) in.
I discard them, my nuts are tight.
(It's not part of your derailleur, it came from somewhere else.)
I discard them, my nuts are tight.
(It's not part of your derailleur, it came from somewhere else.)
04-09-21, 01:34 PM
#3
Senior Member
Thread Starter
Join Date: Apr 2007
Location: Ottawa, Canada
Posts: 777
Bikes: Raleigh Classic 15, 84; Miyata 912, 85; Miyata Ridge Runner SE, 85; Miyata 610, 86; Miyata 100M, 86; Miyata Valley Runner, 88; Miyata Triple Cross, 89; GT Karakoram, 90; Miyata Elevation 300, 91; Marinoni Touring, 95; Long Haul Trucker, 2013
Mentioned: 9 Post(s)
Tagged: 0 Thread(s)
Quoted: 159 Post(s)
Liked 133 Times
in
80 Posts
04-09-21, 01:36 PM
#4
Senior Member
Join Date: Feb 2020
Posts: 2,820
Mentioned: 49 Post(s)
Tagged: 0 Thread(s)
Quoted: 1106 Post(s)
Likes: 0
Liked 1,327 Times
in
783 Posts
(Some rear mechs have a shouldered pivot bolt and shims to get the same result.)
04-09-21, 01:55 PM
#5
Senior Member
Thread Starter
Join Date: Apr 2007
Location: Ottawa, Canada
Posts: 777
Bikes: Raleigh Classic 15, 84; Miyata 912, 85; Miyata Ridge Runner SE, 85; Miyata 610, 86; Miyata 100M, 86; Miyata Valley Runner, 88; Miyata Triple Cross, 89; GT Karakoram, 90; Miyata Elevation 300, 91; Marinoni Touring, 95; Long Haul Trucker, 2013
Mentioned: 9 Post(s)
Tagged: 0 Thread(s)
Quoted: 159 Post(s)
Liked 133 Times
in
80 Posts
Thanks for that...that's what I imagined, but I can't seem to figure out how to keep the adjustment when I tighten down the jam nut.
I installed the derailleur and claw on the frame, adjusted the pivot bolt, and tried to hold the pivot bolt in place with a hex wrench while tightening the jam nut, but things still ended up too tight.
I installed the derailleur and claw on the frame, adjusted the pivot bolt, and tried to hold the pivot bolt in place with a hex wrench while tightening the jam nut, but things still ended up too tight.
04-09-21, 02:45 PM
#6
Senior Member
I thought the slant-parallelogram ders didn't need to pivot.
04-09-21, 02:57 PM
#7
Senior Member
Thread Starter
Join Date: Apr 2007
Location: Ottawa, Canada
Posts: 777
Bikes: Raleigh Classic 15, 84; Miyata 912, 85; Miyata Ridge Runner SE, 85; Miyata 610, 86; Miyata 100M, 86; Miyata Valley Runner, 88; Miyata Triple Cross, 89; GT Karakoram, 90; Miyata Elevation 300, 91; Marinoni Touring, 95; Long Haul Trucker, 2013
Mentioned: 9 Post(s)
Tagged: 0 Thread(s)
Quoted: 159 Post(s)
Liked 133 Times
in
80 Posts
04-09-21, 03:11 PM
#8
Senior Member
04-09-21, 03:17 PM
#9
Senior Member
Thread Starter
Join Date: Apr 2007
Location: Ottawa, Canada
Posts: 777
Bikes: Raleigh Classic 15, 84; Miyata 912, 85; Miyata Ridge Runner SE, 85; Miyata 610, 86; Miyata 100M, 86; Miyata Valley Runner, 88; Miyata Triple Cross, 89; GT Karakoram, 90; Miyata Elevation 300, 91; Marinoni Touring, 95; Long Haul Trucker, 2013
Mentioned: 9 Post(s)
Tagged: 0 Thread(s)
Quoted: 159 Post(s)
Liked 133 Times
in
80 Posts
04-09-21, 03:20 PM
#10
Senior Member
Join Date: Feb 2020
Posts: 2,820
Mentioned: 49 Post(s)
Tagged: 0 Thread(s)
Quoted: 1106 Post(s)
Likes: 0
Liked 1,327 Times
in
783 Posts
Thanks for that...that's what I imagined, but I can't seem to figure out how to keep the adjustment when I tighten down the jam nut.
I installed the derailleur and claw on the frame, adjusted the pivot bolt, and tried to hold the pivot bolt in place with a hex wrench while tightening the jam nut, but things still ended up too tight.
I installed the derailleur and claw on the frame, adjusted the pivot bolt, and tried to hold the pivot bolt in place with a hex wrench while tightening the jam nut, but things still ended up too tight.
Locknuts work because there is clearance - physical space - between the threads of a bolt and the threads of a nut. A nut by itself (usually) has enough clearance that it is loose; it will turn, and it will also move forwards and backwards along the bolt WITHOUT turning, taking up first the clearance on one side of the thread valleys, then on the other. Locknuts work by forcing the main nut against one side of the valleys, while the locknut gets forced against the other side of the valleys. You get them tight and they stay wherever they wind up being wedged against each other..
Adjusting a pair of locknuts to a particular position along a threaded shaft is a bit of an art. You must start with the main nut a little too loose, so when the jam nut forces it a little further along the shaft it winds up in the correct location. One out of maybe twenty or thirty times I'll be lucky and get it just right the first time - but normally it is lock and check and unlock and tweak and lock and check again until is *is* just right.
04-09-21, 03:30 PM
#11
Senior Member
Thread Starter
Join Date: Apr 2007
Location: Ottawa, Canada
Posts: 777
Bikes: Raleigh Classic 15, 84; Miyata 912, 85; Miyata Ridge Runner SE, 85; Miyata 610, 86; Miyata 100M, 86; Miyata Valley Runner, 88; Miyata Triple Cross, 89; GT Karakoram, 90; Miyata Elevation 300, 91; Marinoni Touring, 95; Long Haul Trucker, 2013
Mentioned: 9 Post(s)
Tagged: 0 Thread(s)
Quoted: 159 Post(s)
Liked 133 Times
in
80 Posts
Thanks, oneclick. Sounds good—Trial and error, that's right up my alley (especially the error!) Just nice to know the procedure isn't in error.
04-09-21, 03:31 PM
#12
Senior Member
is being refused as it is not an https but in http form.
04-09-21, 03:50 PM
#13
Senior Member
Thread Starter
Join Date: Apr 2007
Location: Ottawa, Canada
Posts: 777
Bikes: Raleigh Classic 15, 84; Miyata 912, 85; Miyata Ridge Runner SE, 85; Miyata 610, 86; Miyata 100M, 86; Miyata Valley Runner, 88; Miyata Triple Cross, 89; GT Karakoram, 90; Miyata Elevation 300, 91; Marinoni Touring, 95; Long Haul Trucker, 2013
Mentioned: 9 Post(s)
Tagged: 0 Thread(s)
Quoted: 159 Post(s)
Liked 133 Times
in
80 Posts
Thanks for clearing that up Big Block.
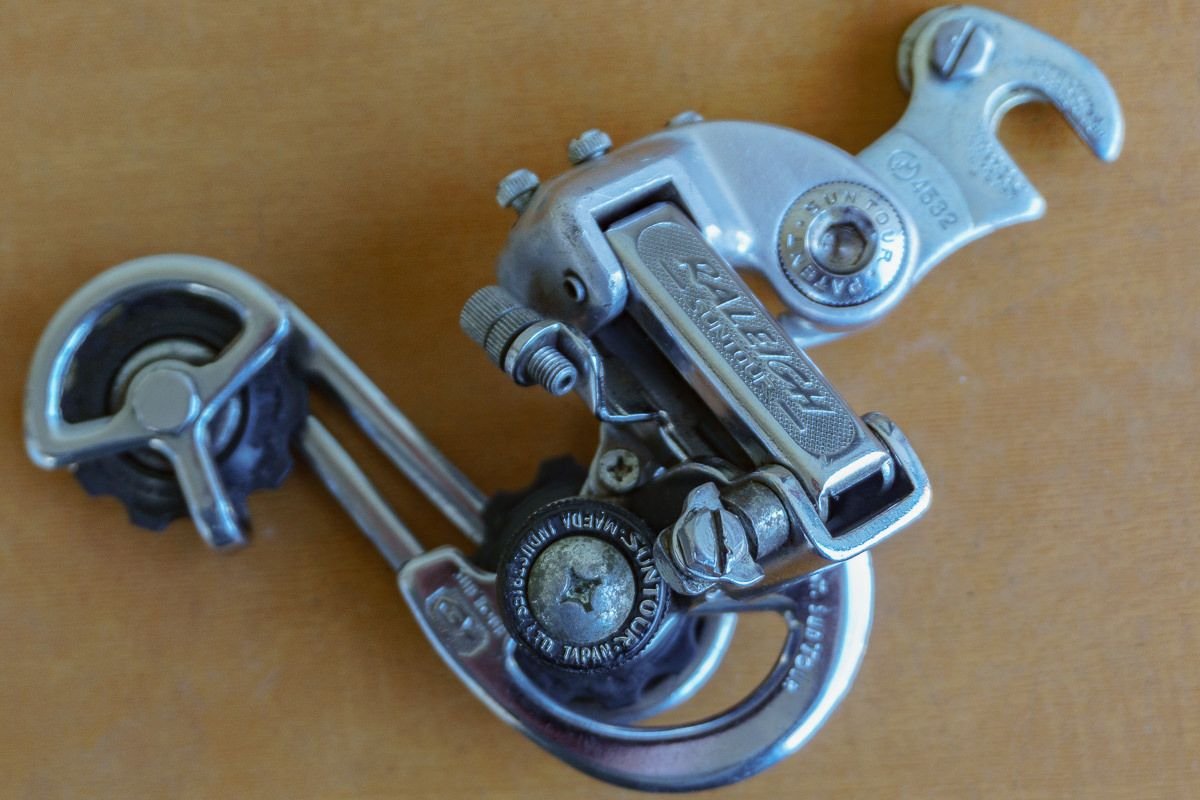
That page one doesn't exactly match my mech—there doesn't seem to be a recess for the pivot bolt, and I'm pretty sure the very thin washers on mine are original, but they don't appear in that diagram.
Still, it does give the general idea.
That page one doesn't exactly match my mech—there doesn't seem to be a recess for the pivot bolt, and I'm pretty sure the very thin washers on mine are original, but they don't appear in that diagram.
Still, it does give the general idea.
04-10-21, 03:16 AM
#14
Senior Member
Join Date: Feb 2020
Posts: 2,820
Mentioned: 49 Post(s)
Tagged: 0 Thread(s)
Quoted: 1106 Post(s)
Likes: 0
Liked 1,327 Times
in
783 Posts
Thanks for clearing that up Big Block.
That page one doesn't exactly match my mech�there doesn't seem to be a recess for the pivot bolt, and I'm pretty sure the very thin washers on mine are original, but they don't appear in that diagram.
Still, it does give the general idea.
That page one doesn't exactly match my mech�there doesn't seem to be a recess for the pivot bolt, and I'm pretty sure the very thin washers on mine are original, but they don't appear in that diagram.
Still, it does give the general idea.
Likes For oneclick:
04-10-21, 06:58 AM
#15
Senior Member
These only pivot to make it easier to get the wheel out, so if you can't get it on there where it pivots freely it won't affect operation at all.
Likes For PatTheSlat:
04-10-21, 08:03 AM
#16
Senior Member
Thread Starter
Join Date: Apr 2007
Location: Ottawa, Canada
Posts: 777
Bikes: Raleigh Classic 15, 84; Miyata 912, 85; Miyata Ridge Runner SE, 85; Miyata 610, 86; Miyata 100M, 86; Miyata Valley Runner, 88; Miyata Triple Cross, 89; GT Karakoram, 90; Miyata Elevation 300, 91; Marinoni Touring, 95; Long Haul Trucker, 2013
Mentioned: 9 Post(s)
Tagged: 0 Thread(s)
Quoted: 159 Post(s)
Liked 133 Times
in
80 Posts
I finally got it adjusted—shuffled around the shims, and worked a bit more carefully. Thanks PatTheSlat: good to know the adjustment isn't too critical.
