


Pannier seams are unravelling. Suggestions for repairing?
 08-01-22, 01:19 PM
#1
Junior Member
Thread Starter
Pannier seams are unravelling. Suggestions for repairing?
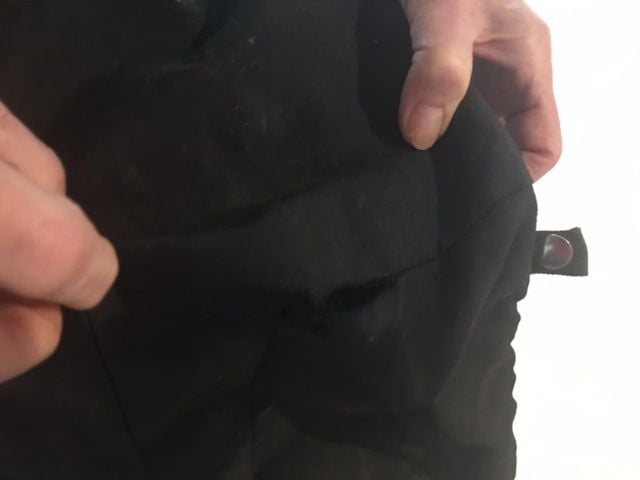
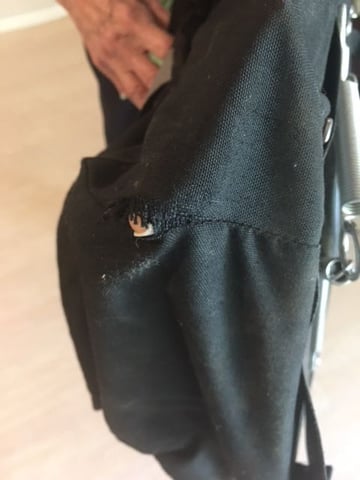
My favorite panniers, decades old, are starting to unravel at the seams (see attached pictures). Does anyone have a suggestion for repairing them? I really want to keep using them because they are short and consequently easy to use on an under the seat rack on my recumbent bike.
 08-01-22, 04:41 PM
#3
Senior Member
Join Date: Aug 2010
Location: Madison, WI
Posts: 11,203
Bikes: 1961 Ideor, 1966 Perfekt 3 Speed AB Hub, 1994 Bridgestone MB-6, 2006 Airnimal Joey, 2009 Thorn Sherpa, 2013 Thorn Nomad MkII, 2015 VO Pass Hunter, 2017 Lynskey Backroad, 2017 Raleigh Gran Prix, 1980s Bianchi Mixte on a trainer. Others are now gone.
Mentioned: 48 Post(s)
Tagged: 0 Thread(s)
Quoted: 3459 Post(s)
Liked 1,465 Times
in
1,143 Posts
Do what M Rose said above, then after you do that apply some Seam Grip on the material where you sewed it on the inside, that should prevent future fraying of the edge of the fabric at your new seam. Let the Seam Grip dry for several days before use. The Seam Grip has a lot of volatiles in it, I always use it outdoors instead of inside.
https://www.rei.com/product/603034/g...ip-seam-sealer
https://www.rei.com/product/603034/g...ip-seam-sealer
 08-01-22, 11:11 PM
#4
Senior Member
It seems the fabric is going instead of the seams. That's going to be a tough repair even with rehemming. Adding a strengthening patch could work on top of above suggestions, but with such damage I'm guessing it's only a matter of time until the rest of the pannier goes.
08-03-22, 06:41 AM
#5
Senior Member
Find a shoe repair place, they'll most likely have a good repair option.
They have the super strong sewing machines, materials, glue and the know-how attitude to improvise a good repair, much better and stronger than what you probably would do.
Worth a visit in any case.
They have the super strong sewing machines, materials, glue and the know-how attitude to improvise a good repair, much better and stronger than what you probably would do.
Worth a visit in any case.
Likes For djb:
08-03-22, 07:14 AM
#6
Senior Member
Join Date: Apr 2021
Posts: 4,083
Mentioned: 6 Post(s)
Tagged: 0 Thread(s)
Quoted: 2333 Post(s)
Liked 2,097 Times
in
1,314 Posts
I had a cheap set start to do that on a tour, I got out my Chouinard Expedition Sewing Kit, superglue, and duck tape.
Alternatively, one could buy recumbent specific bags
https://www.radicaldesign.com/recumbent-bags
Alternatively, one could buy recumbent specific bags
https://www.radicaldesign.com/recumbent-bags
08-03-22, 05:30 PM
#7
Senior Member
Join Date: Mar 2009
Location: Oregon
Posts: 6,489
Mentioned: 31 Post(s)
Tagged: 0 Thread(s)
Quoted: 1182 Post(s)
Liked 833 Times
in
435 Posts
Before you do anything you might want to remove the stiffening material, and some o the hardware if you can. This will make sewing easier. If your panniers are made with nylon material you might also want to "heat seal" the frayed edges with a lighter. This will melt the leading edge together and help reduce future fraying. Run the lighter along the material fast enough to melt just the leading edge. Do it before sewing, and after sewing.
08-04-22, 08:48 AM
#8
Junior Member
Join Date: Oct 2008
Posts: 78
Mentioned: 0 Post(s)
Tagged: 0 Thread(s)
Quoted: 1 Post(s)
Likes: 0
Liked 1 Time
in
1 Post
When the material starts deteriorating like that you've got to reinforce part of the panel. I would break the stitches until ~2 inches away from the tear, sew on a triangular patch of cordura to the edge of the panel, then use a locked stitch with strong nylon thread to close it up.
08-05-22, 08:44 AM
#9
Senior Member
Join Date: Jan 2007
Location: Eastern VA
Posts: 1,724
Bikes: 2022 Fuel EX 8, 2021 Domane SL6, Black Beta (Nashbar frame), 2004 Trek 1000C for the trainer
Mentioned: 1 Post(s)
Tagged: 0 Thread(s)
Quoted: 270 Post(s)
Liked 447 Times
in
266 Posts
After sewing I�d add some iron on patches on the inside to reinforce the fabric. I just had to do that for a motorcycle tank bag made from a cordura fabric.
