


1972 Fuji The Finest
 03-28-22, 09:37 AM
#1

Full Member
Thread Starter

Join Date: Apr 2019
Location: Denver Metro, CO
Posts: 392
Bikes: 1972 Fuji The Finest | 1990 Bianchi Giro | 1999 LeMond Buenos Aires
Mentioned: 5 Post(s)
Tagged: 0 Thread(s)
Quoted: 151 Post(s)
Liked 303 Times
in
134 Posts
1972 Fuji The Finest
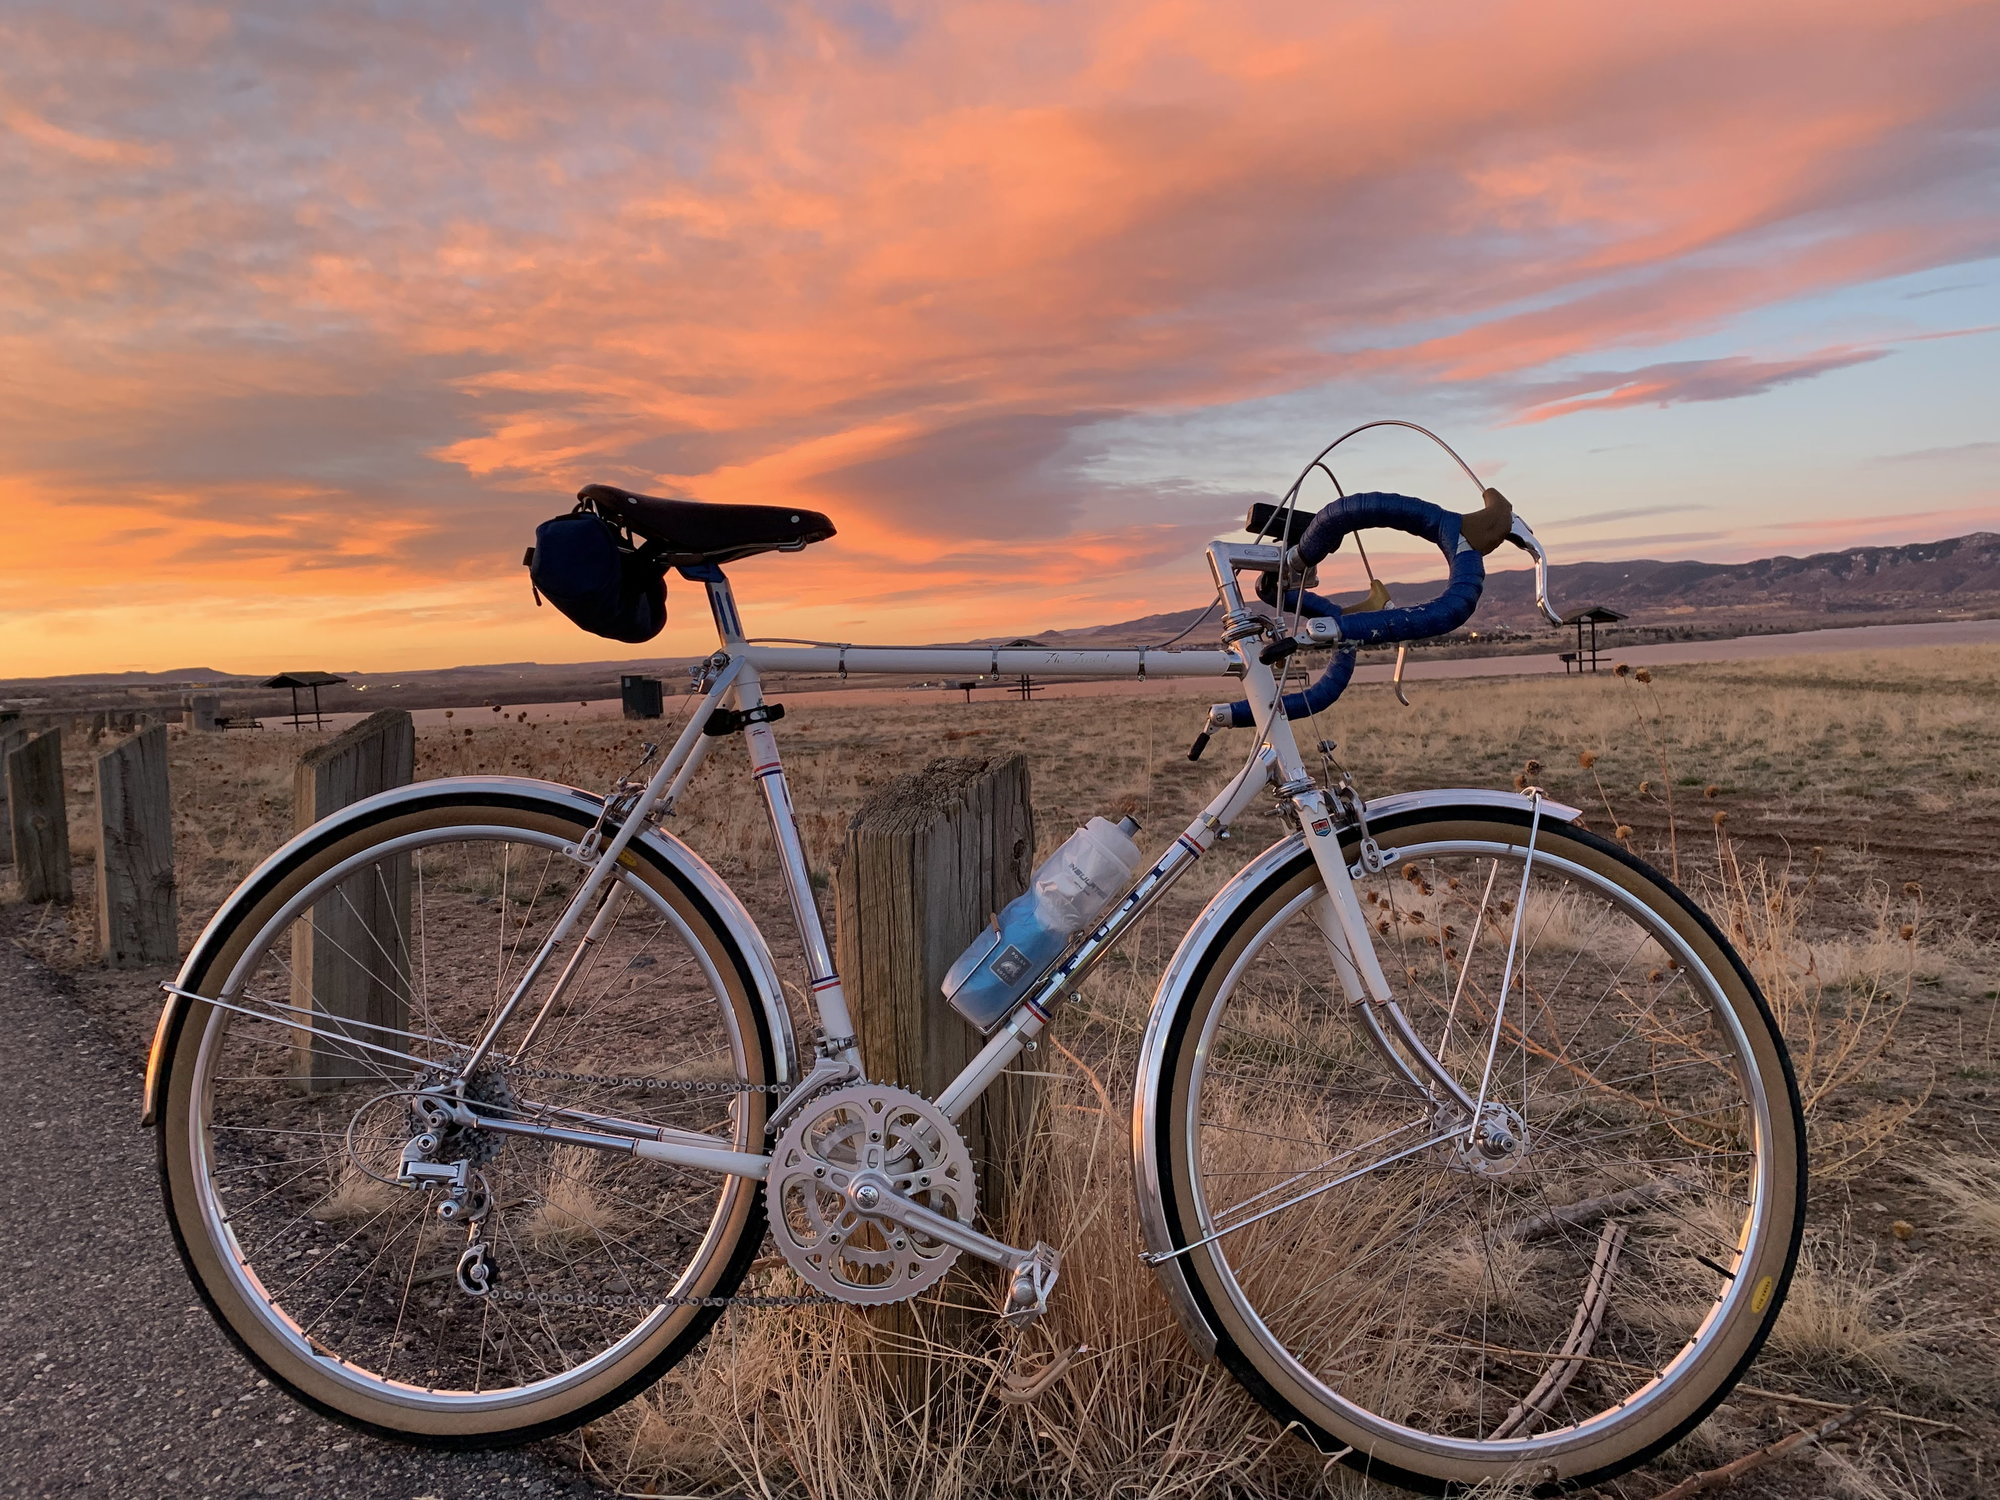
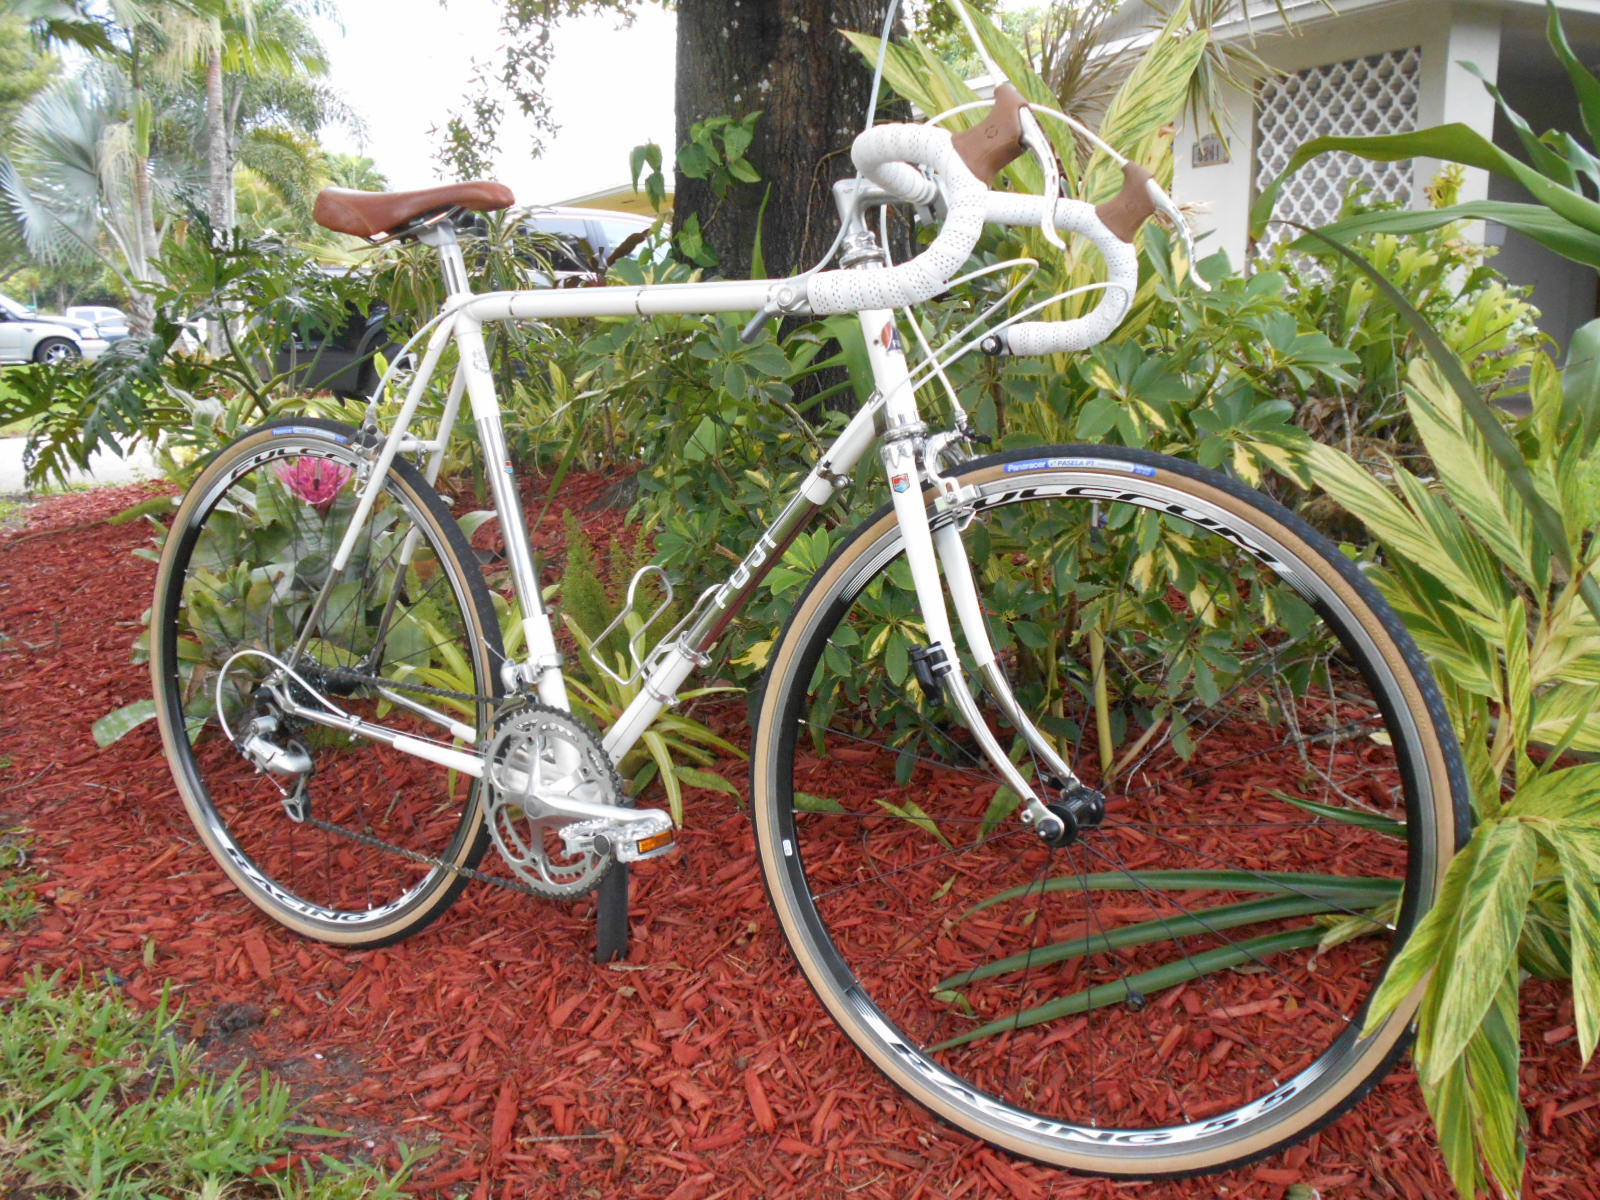
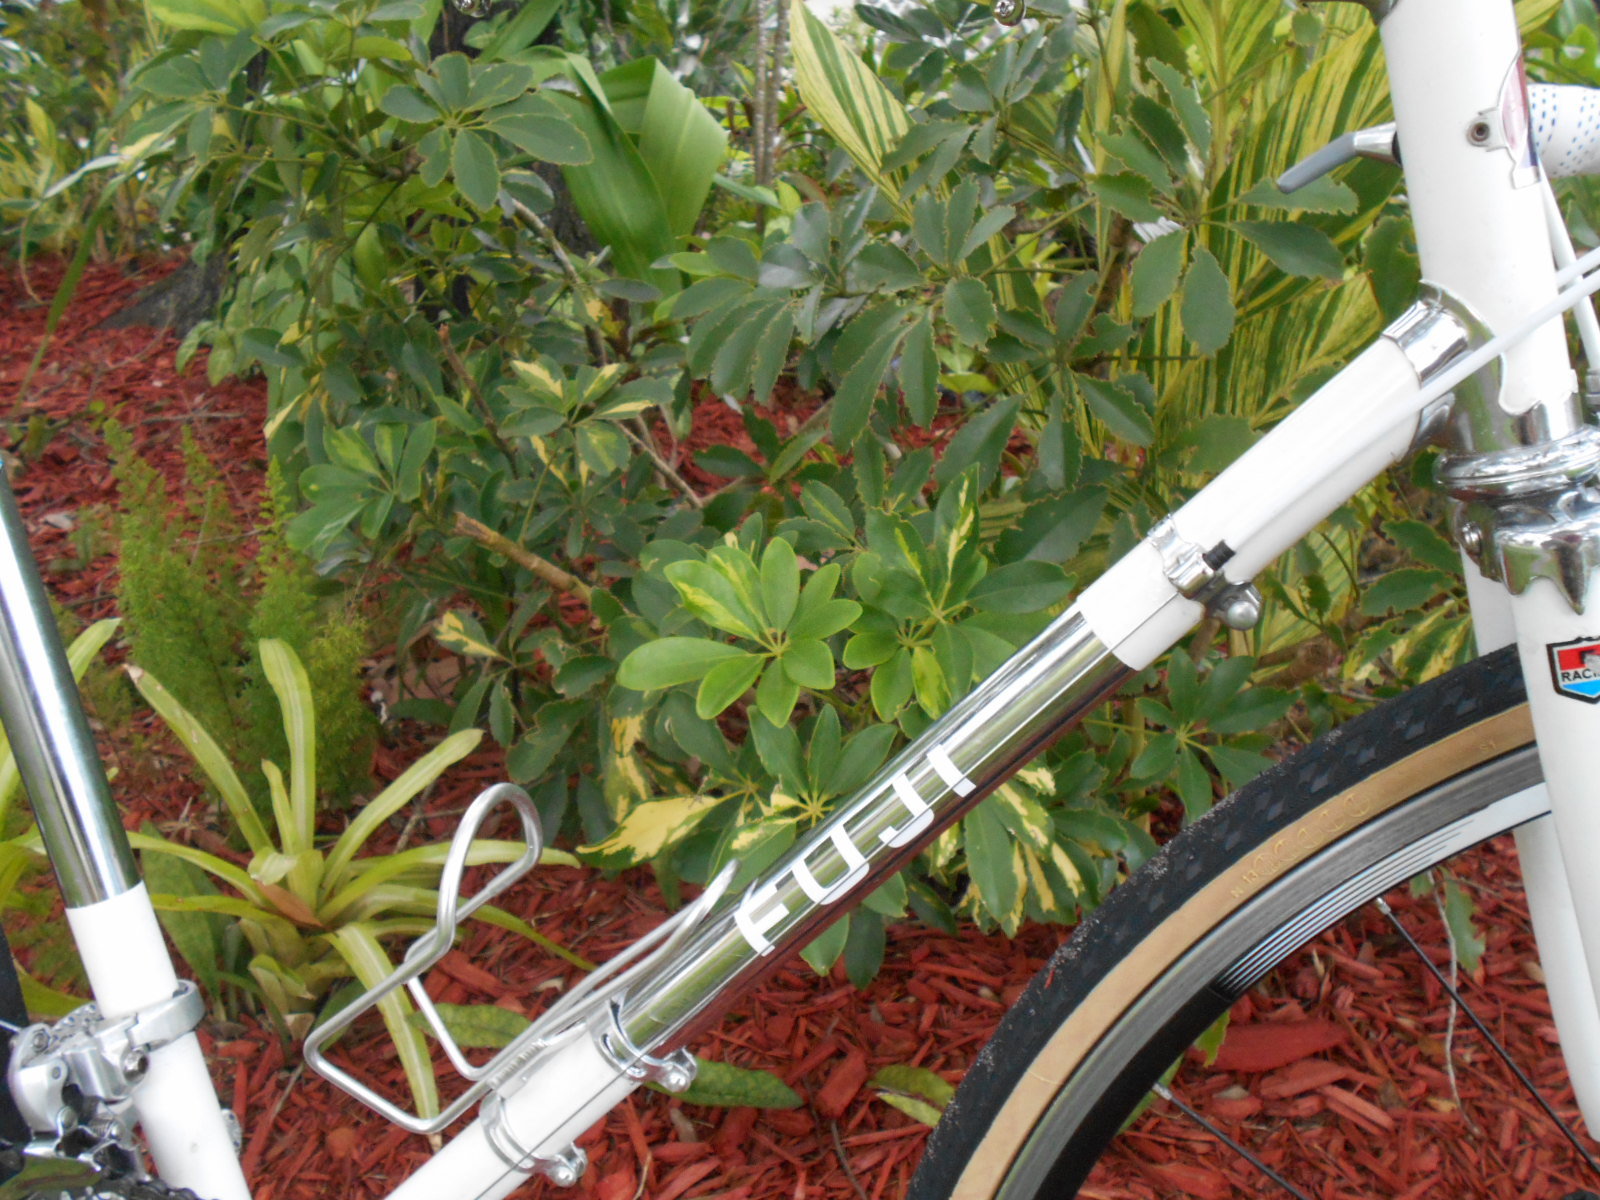
My version of a build thread. I'm not too verbose, and I don't take a ton of pictures. Some of the events were chronicled in other threads, links within the text. Here's how it sits today:
I saw @bikemig offer this Fuji in a Sales thread and messaged him about it. A while later once the OP passed on it, we came to an agreement and he shipped it my way. It had a stuck stem which was the first step to remedy, which had it's own thread (https://m.bikeforums.net/showthread.php?p=22116023).
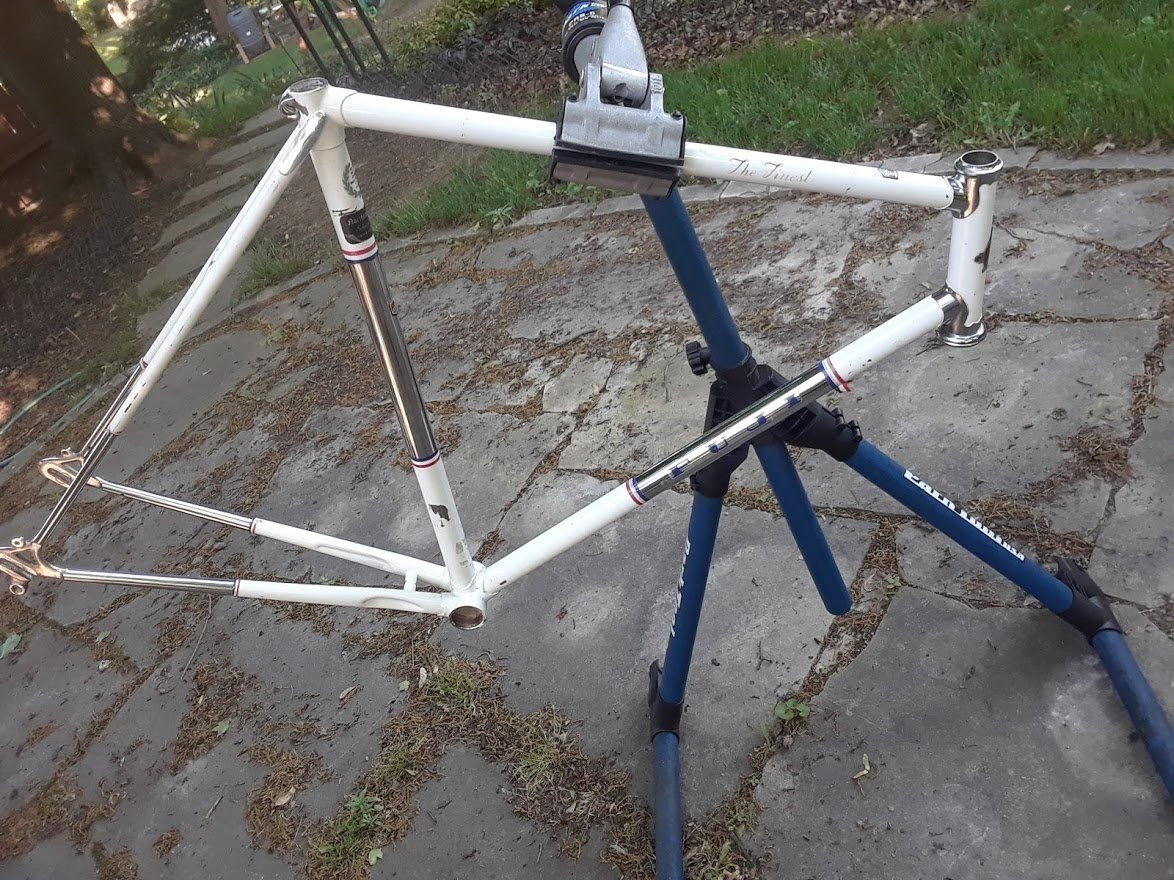
original frame picture from bikemig
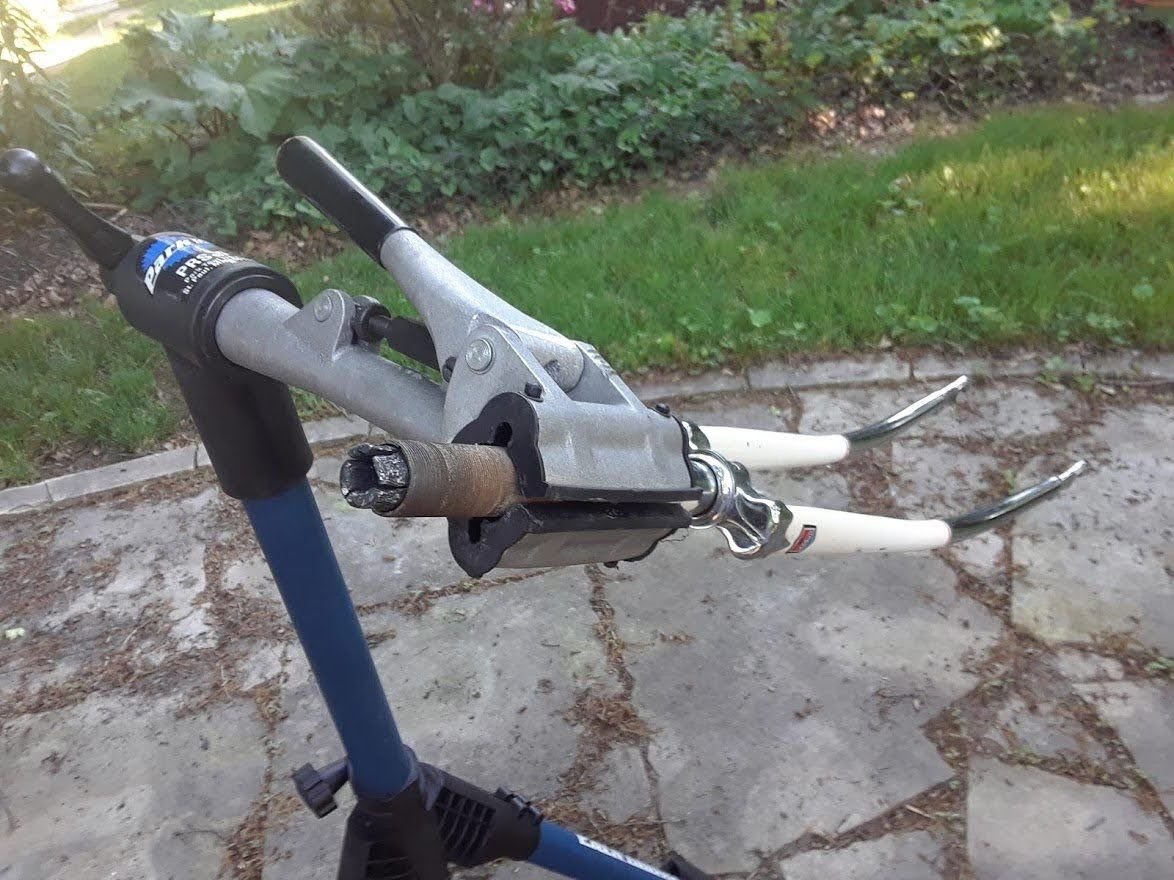
Fork with stuck stem (photo also from bikemig)
The next step was dealing with some internal rust. This was fully disclosed, just needed to clean it up. I used Evaporust, and soaked one side, then the other, then the fork. In reading a recent CR thread, next time I may make sure I fully submerge with Evaporust as the bit of light corrosion that occurs above the fluid surface may be problematic overall (I experienced no real issue with this and it wiped right off).
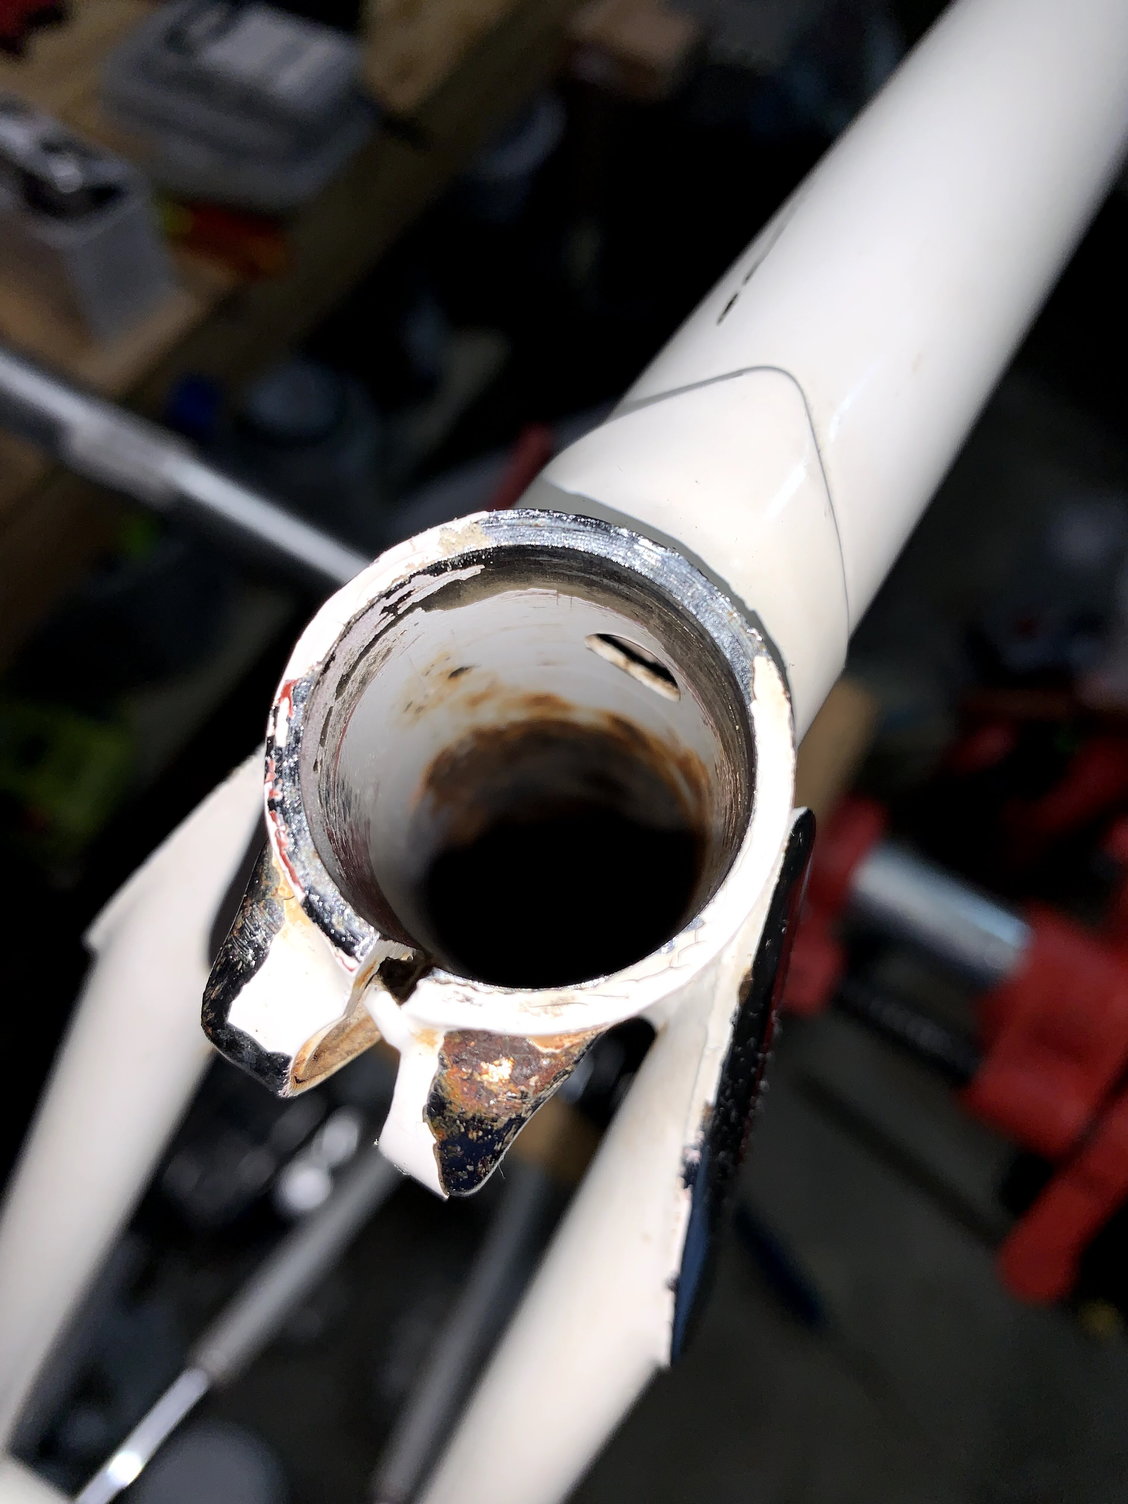
Bit of rust in the seat tube

Checking the frame/box fit
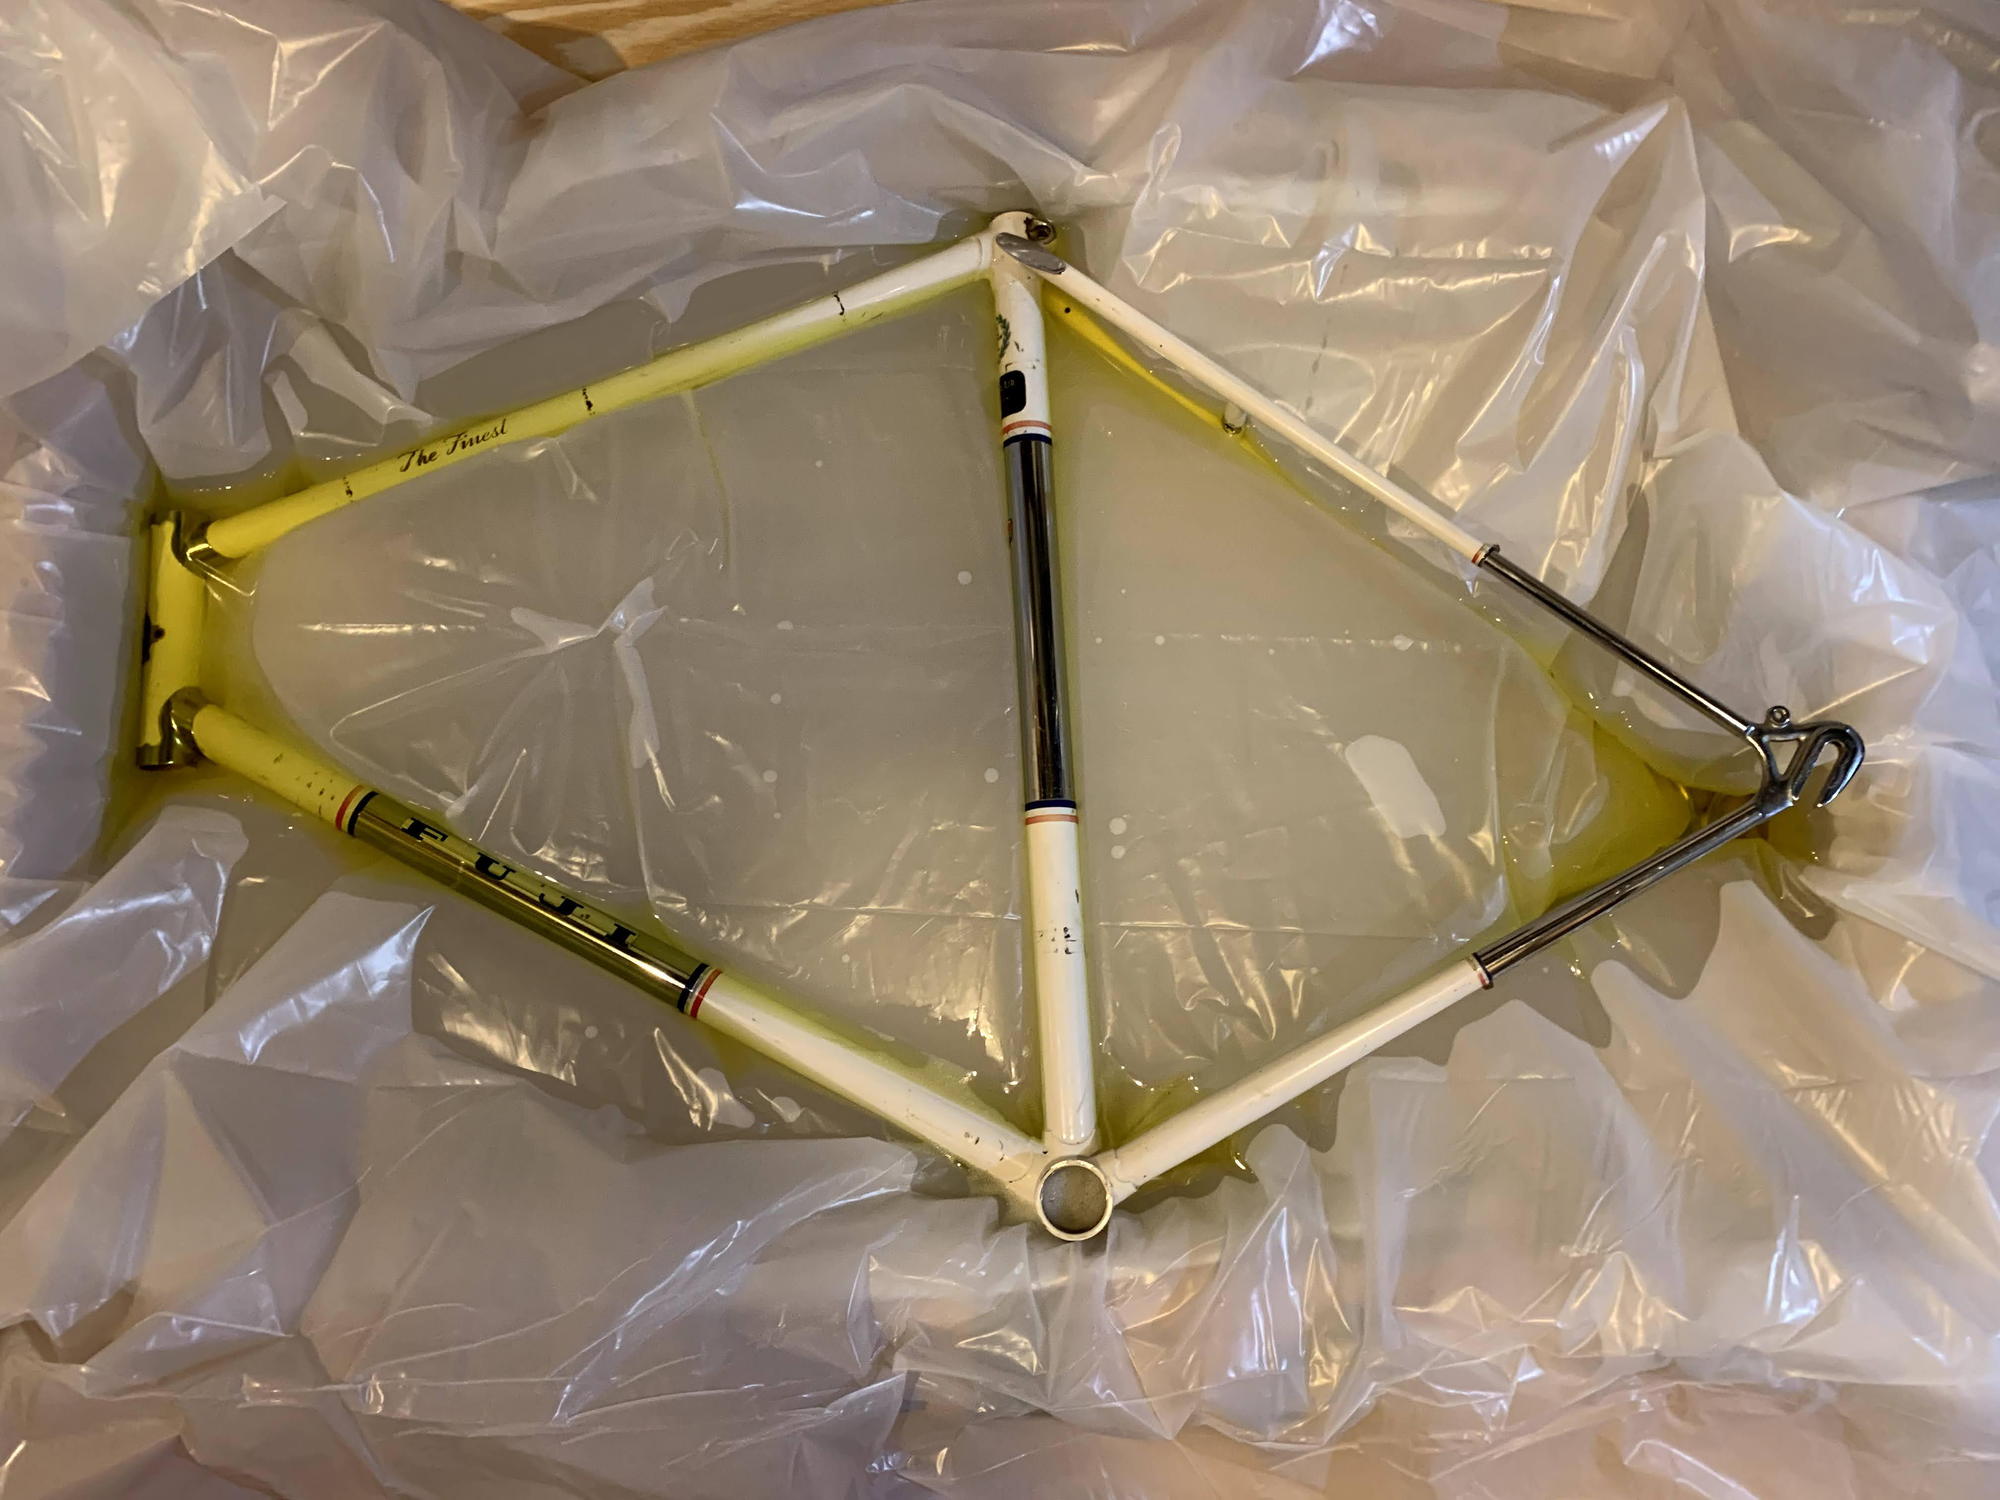
Taking a bath (plastic layer 1, water, plastic layer 2, frame and Evaporust)
Then it was time for some cleanup. Used Meguiar's Scratch-X on the paint and Simichrome on the chrome. Went well, no big issues. A coat of wax over everything after cleanup. During build-up I accidently removed the bike shop sticker, was under the clamp area and frame must've rotated in the clamp.
Next was aligning the fork. When a wheel was clamped it was fairly even, but the faces didn't align. I emailed @gugie to try and figure out shipping to him, and he encouraged me to use a bit of muscle and go for it. That was the bump I needed, once I put some effort into it, aligned up pretty well. Rear alignment seemed good enough from my string test and threaded rods.
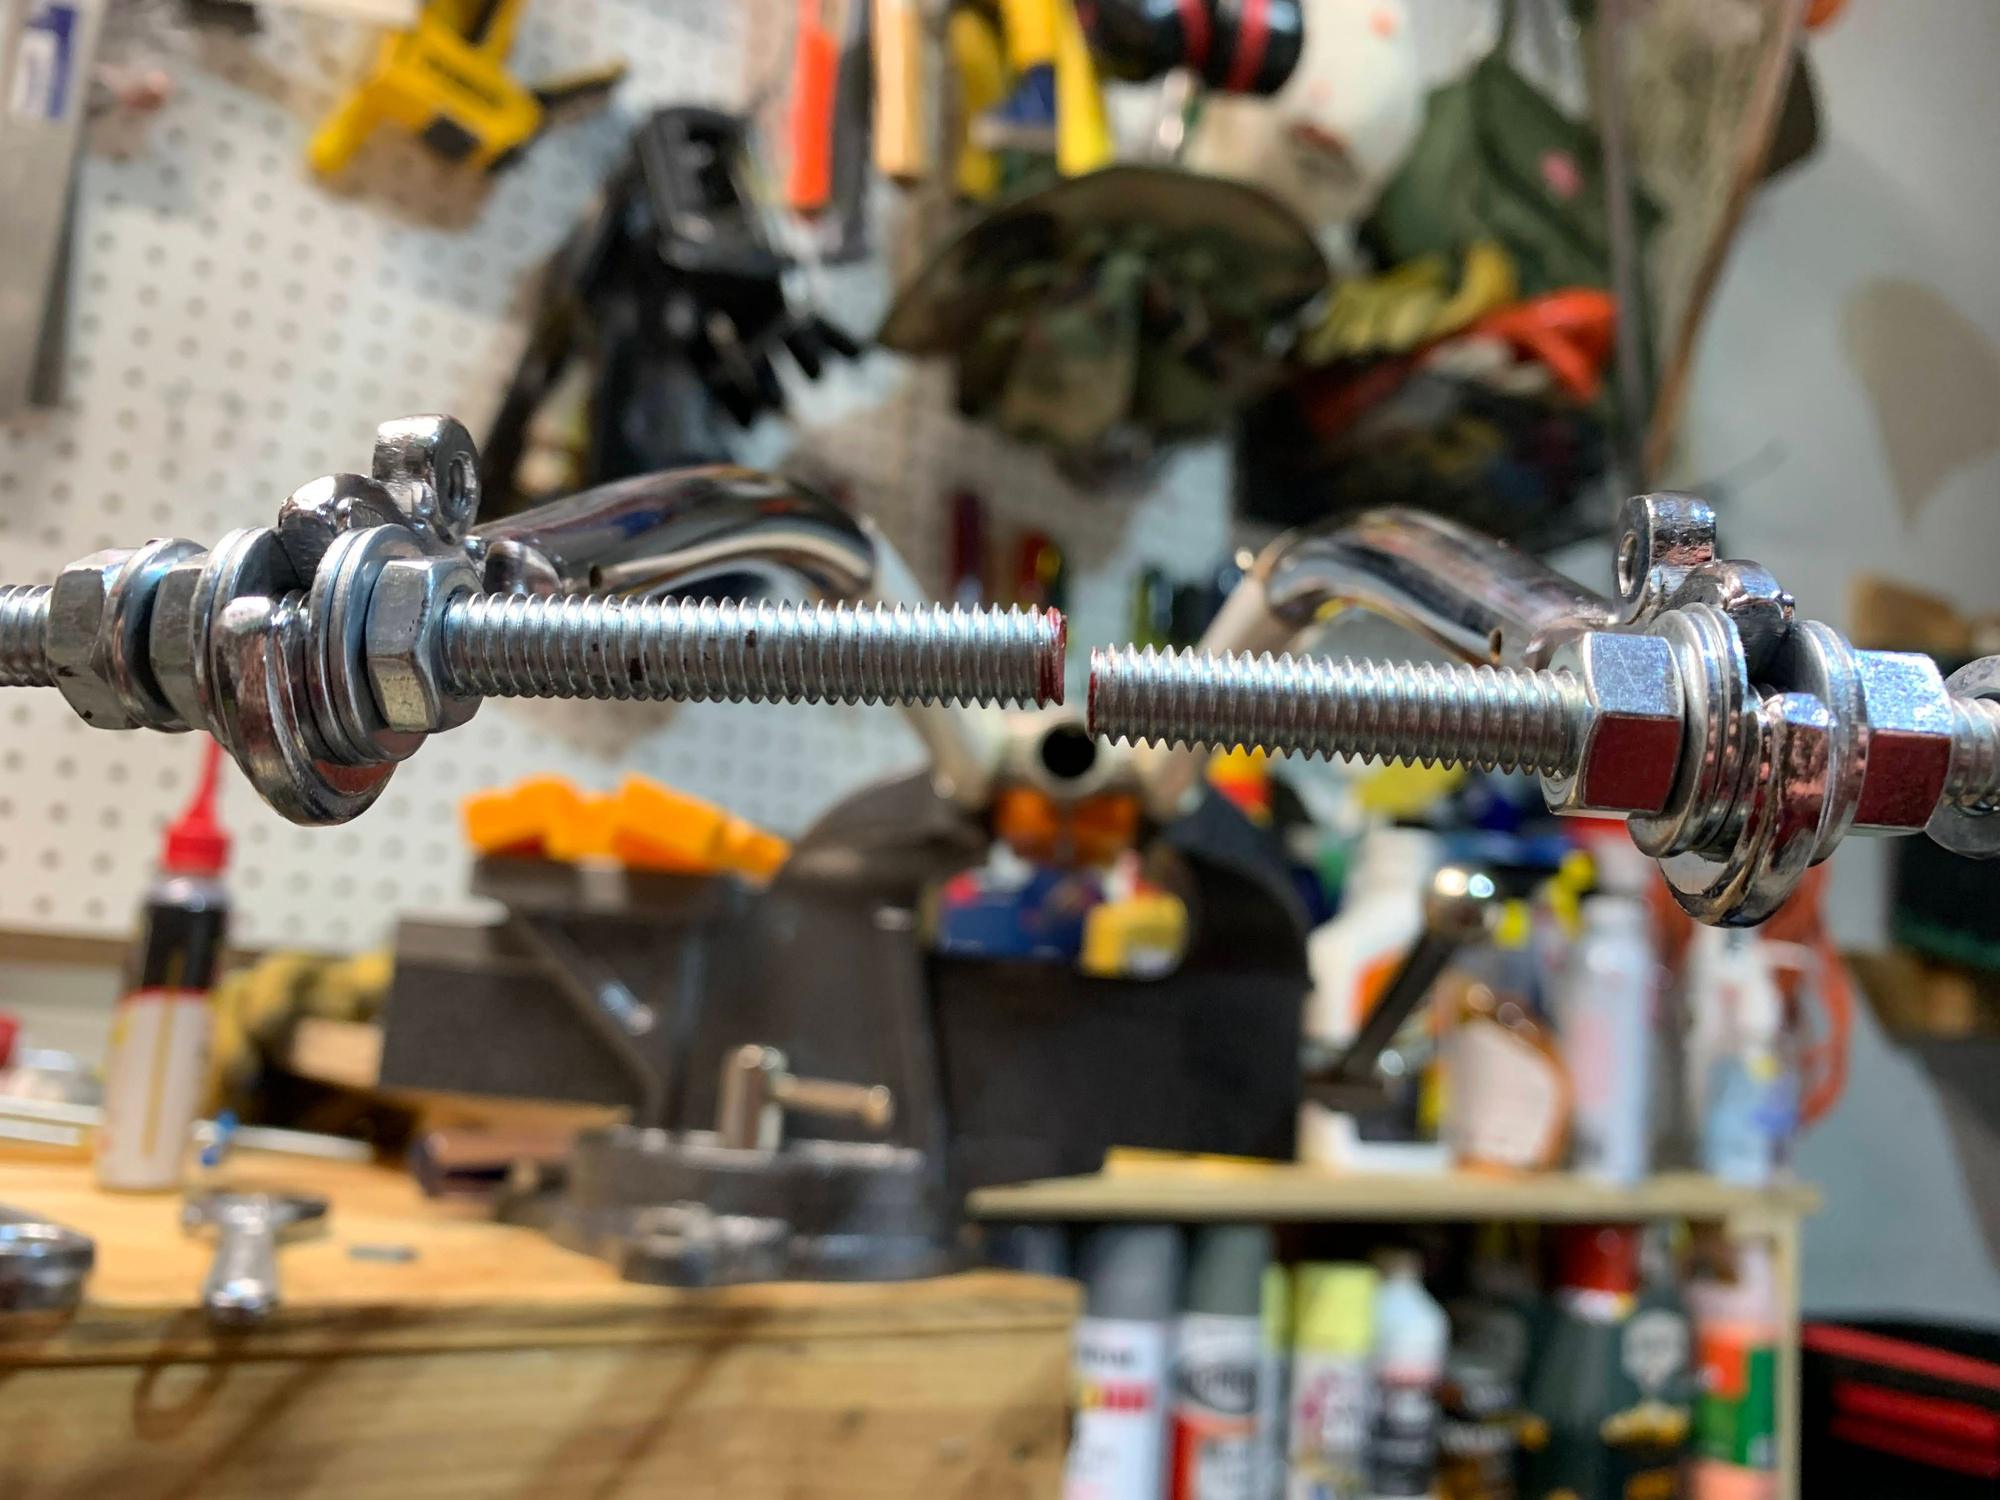
Checking dropout alignment
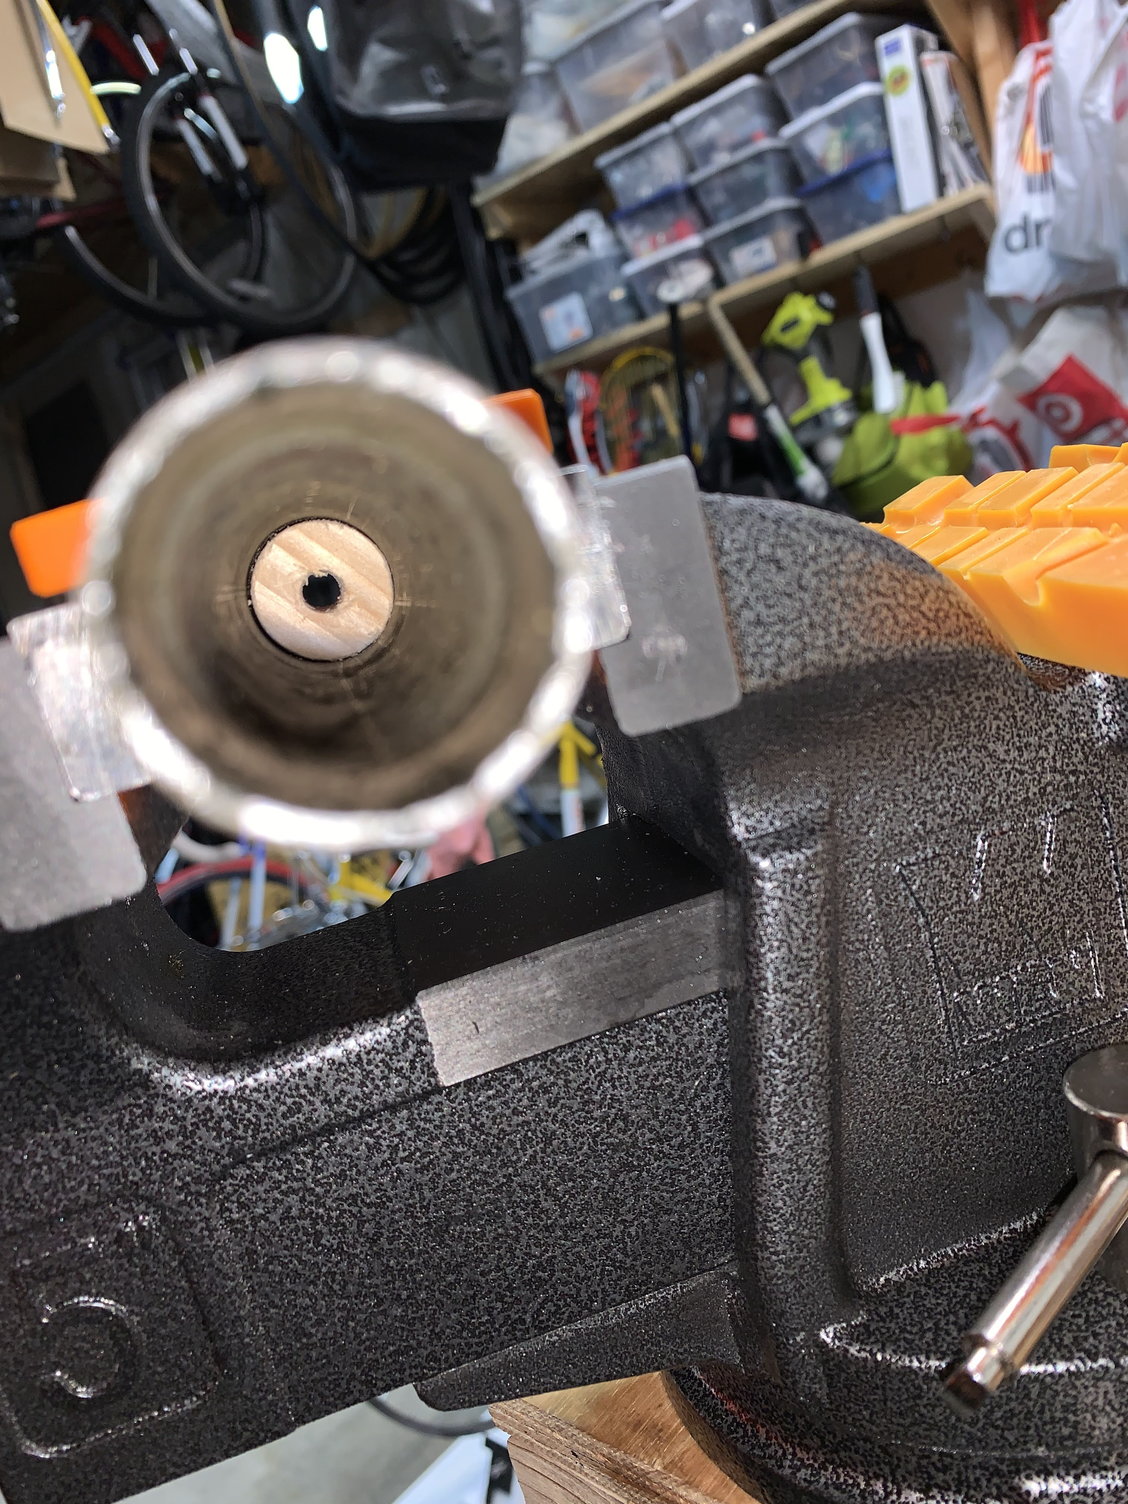
Holesaw cut plug for eyeballing fork center/ side to side alignment (using a wheel with a valve hole sighted to hub center)
After that it was mainly smooth sailing except for snapping a bolt and removing the remnant (https://www.bikeforums.net/classic-v...lt-advice.html)
That's probably enough for the first post.
I saw @bikemig offer this Fuji in a Sales thread and messaged him about it. A while later once the OP passed on it, we came to an agreement and he shipped it my way. It had a stuck stem which was the first step to remedy, which had it's own thread (https://m.bikeforums.net/showthread.php?p=22116023).
original frame picture from bikemig
Fork with stuck stem (photo also from bikemig)
The next step was dealing with some internal rust. This was fully disclosed, just needed to clean it up. I used Evaporust, and soaked one side, then the other, then the fork. In reading a recent CR thread, next time I may make sure I fully submerge with Evaporust as the bit of light corrosion that occurs above the fluid surface may be problematic overall (I experienced no real issue with this and it wiped right off).
Bit of rust in the seat tube
Checking the frame/box fit
Taking a bath (plastic layer 1, water, plastic layer 2, frame and Evaporust)
Then it was time for some cleanup. Used Meguiar's Scratch-X on the paint and Simichrome on the chrome. Went well, no big issues. A coat of wax over everything after cleanup. During build-up I accidently removed the bike shop sticker, was under the clamp area and frame must've rotated in the clamp.
Next was aligning the fork. When a wheel was clamped it was fairly even, but the faces didn't align. I emailed @gugie to try and figure out shipping to him, and he encouraged me to use a bit of muscle and go for it. That was the bump I needed, once I put some effort into it, aligned up pretty well. Rear alignment seemed good enough from my string test and threaded rods.
Checking dropout alignment
Holesaw cut plug for eyeballing fork center/ side to side alignment (using a wheel with a valve hole sighted to hub center)
After that it was mainly smooth sailing except for snapping a bolt and removing the remnant (https://www.bikeforums.net/classic-v...lt-advice.html)
That's probably enough for the first post.
 03-28-22, 09:48 AM
#2
Senior Member

Join Date: Apr 2012
Location: Middle Earth (aka IA)
Posts: 20,435
Bikes: A bunch of old bikes and a few new ones
Mentioned: 178 Post(s)
Tagged: 0 Thread(s)
Quoted: 5888 Post(s)
Liked 3,471 Times
in
2,079 Posts
This came out sweet; great build. I never got around to building it as soon after I picked up this bike, I found an early 70s Fuji Finest in blue that was in fine shape and bought it. So this frame sat around. I'm glad it found the right home.
How do you like the ride? I have found mine to be an excellent long distance machine.
How do you like the ride? I have found mine to be an excellent long distance machine.
Likes For bikemig:
03-28-22, 10:05 AM
#3
Full Member
Thread Starter
Join Date: Apr 2019
Location: Denver Metro, CO
Posts: 392
Bikes: 1972 Fuji The Finest | 1990 Bianchi Giro | 1999 LeMond Buenos Aires
Mentioned: 5 Post(s)
Tagged: 0 Thread(s)
Quoted: 151 Post(s)
Liked 303 Times
in
134 Posts
Wheels
For the wheels, once I decided on 650B, I went with Grand Bois Papillon Rims, 36h. They look good with the build I think, but are not vintage of course. The hubs are Sunshine Pro-Am, courtesy of @Mad Honk. Spokes are Sapim Race, Nipples Sapim Poly-Ax, and I did some nipple washers, mostly to check how they build as I'll want to use them on the next build I plan coming up (higher dish). I soaked the washers in motor oil, greased the spokes with anti-seize. Built up to tension easy. Tiny bit of side to side bulge on both rims at the seam, balanced as I saw it between lateral trueness and tension. Radial seemed good.

Likes For AJI125:
03-28-22, 10:19 AM
#4
Bike Butcher of Portland

Join Date: Jul 2014
Location: Portland, OR
Posts: 11,634
Bikes: It's complicated.
Mentioned: 1299 Post(s)
Tagged: 0 Thread(s)
Quoted: 4678 Post(s)
Liked 5,795 Times
in
2,281 Posts
QUOTE=AJI125;22453440]My version of a build thread. I'm not too verbose, and I don't take a ton of pictures. Some of the events were chronicled in other threads, links within the text. Here's how it sits today:
[/QUOTE]
Nice build, and the fenderlines came out perfect!
[/QUOTE]
Nice build, and the fenderlines came out perfect!
__________________
If someone tells you that you have enough bicycles and you don't need any more, stop talking to them. You don't need that kind of negativity in your life.
If someone tells you that you have enough bicycles and you don't need any more, stop talking to them. You don't need that kind of negativity in your life.
Last edited by gugie; 03-28-22 at 10:33 AM.
 03-28-22, 10:28 AM
#5
Full Member
Thread Starter
Join Date: Apr 2019
Location: Denver Metro, CO
Posts: 392
Bikes: 1972 Fuji The Finest | 1990 Bianchi Giro | 1999 LeMond Buenos Aires
Mentioned: 5 Post(s)
Tagged: 0 Thread(s)
Quoted: 151 Post(s)
Liked 303 Times
in
134 Posts
Build
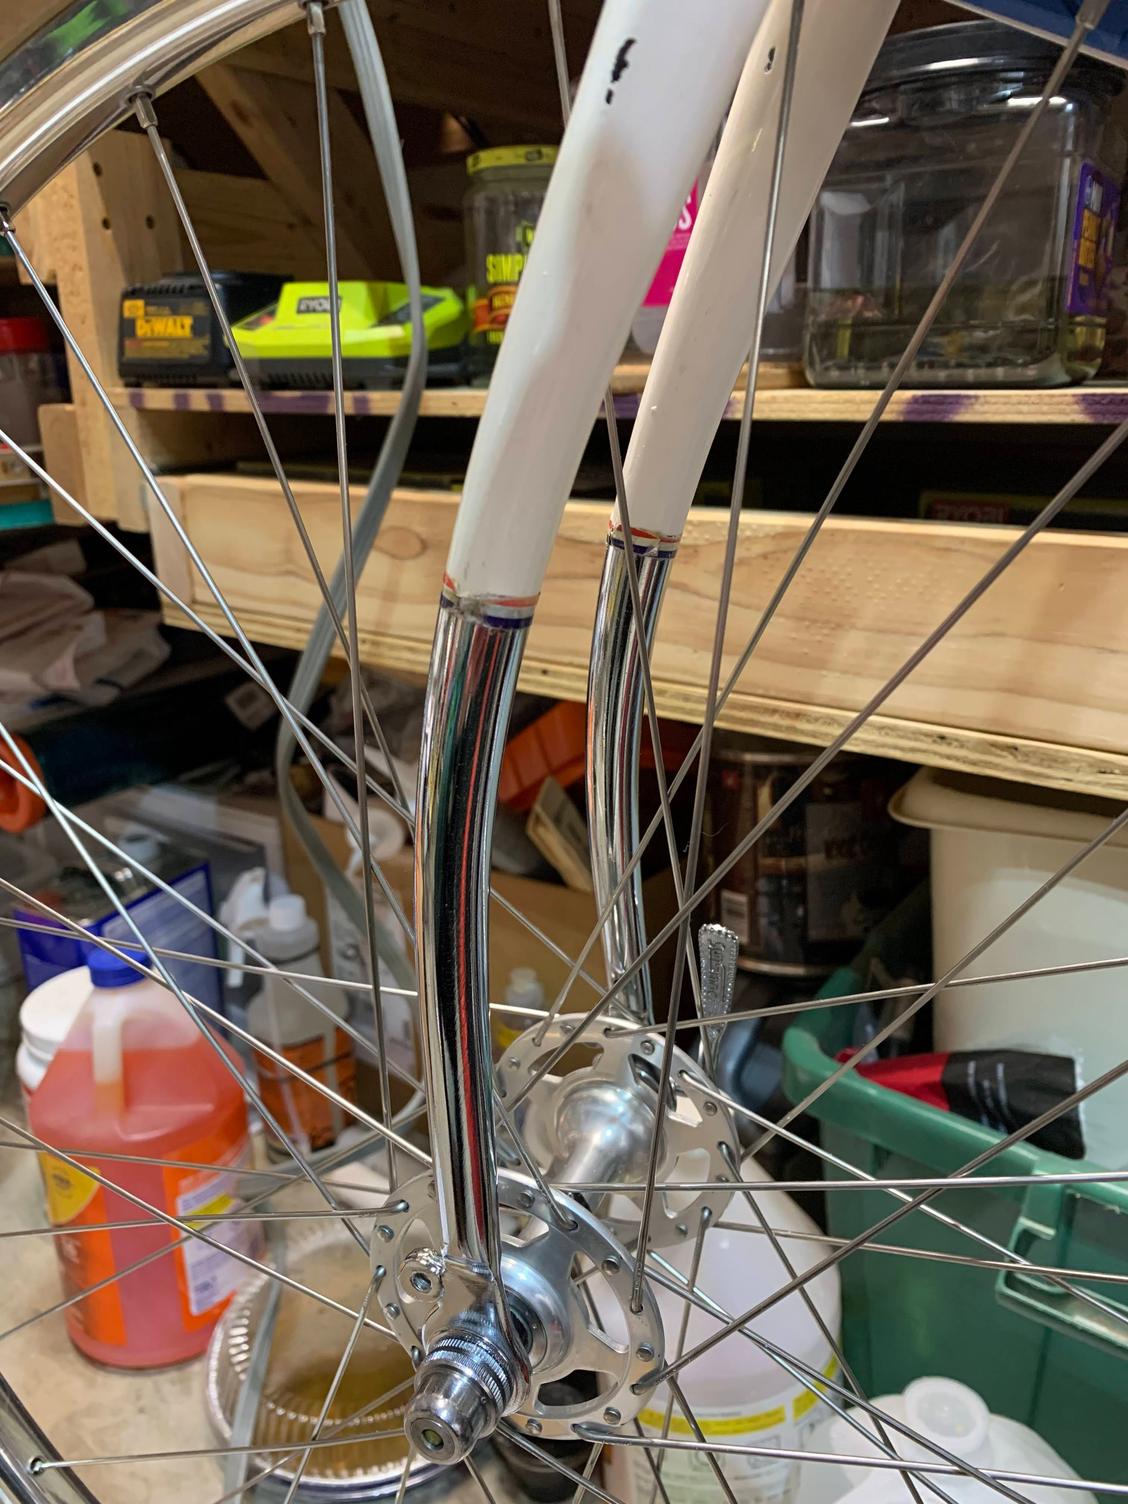
On to the overall build details. I wanted to go with 1970s style (better if parts were available in 1972) if not fully confirmed (some date codes are early 80s). Final bar tape will go on when I get a couple more rides in and confirm the setup works for me.
Here's a test ride photo (before the bottle cage was added):

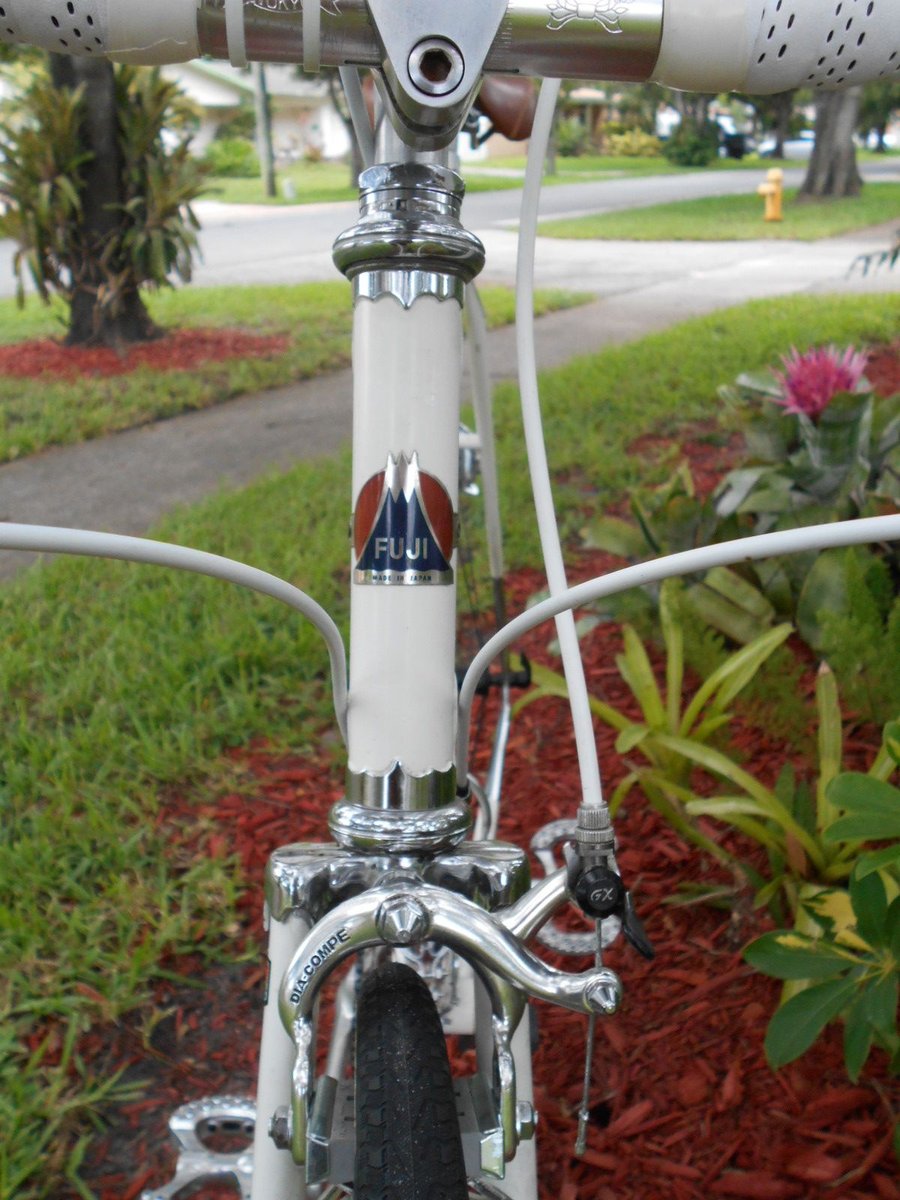
Headset: Don't actually know! Whatever bikemig sent, I'll try to remember to check. Nice and smooth operation.
Cockpit: Gran Compe stem and SR Randnner
Brakes: Dia Compe 750 with BDop drop pads (rear needs it, front might be OK without but liked the matching sets)
Brake Levers: Dia Compe with quick release (162C I think)
Cables: Velo-Orange retro stainless wound (https://velo-orange.com/collections/...ided-kit-brake)
Seatpost: SR Laprade 26.6
Saddle: Fujita Belt
Crankset: Sugino Mighty Tour (53/49/36 right now)
Pedals: MKS Unique Royal with MKS half clips (currently half clips too small for my size 12s, going to hunt for some larger)
Bottom Bracket: Sugino Mighty Tour
Freewheel: Suntour Ultra 6: 13-15-18-21-25-30
Front Derailleur: Suntour SL
Rear Derailleur: Suntour VGT Luxe
Shifters: Suntour bar-end
Wheels (as above)
Tires: Grand Bois Hetre EL (650x42b) - measure at 40mm new at 40psig
Fenders: Velo Orange Zeppelin (https://velo-orange.com/products/vo-...n-fenders-650b) with extra front stay due to no rack mounted, dimpled a bit at chainstays and at fork crown
Bottle cage: Zefal classic, with Velo Orange clamps (https://velo-orange.com/products/bottle-cage-clamp) - super loose holding the bottle on the first ride, so we'll see how that lasts
Half-step chart (for @mountaindave )
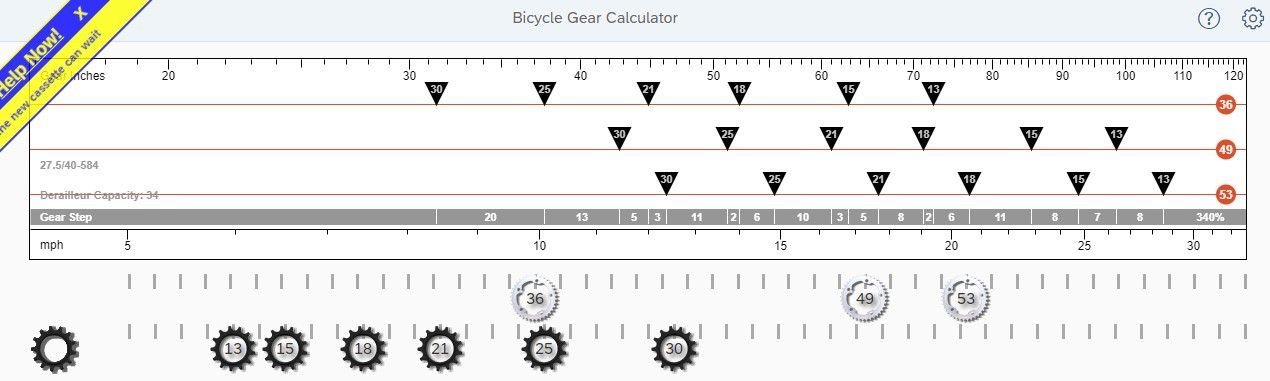
Bicycle Gear Calculator
Here's a test ride photo (before the bottle cage was added):
Headset: Don't actually know! Whatever bikemig sent, I'll try to remember to check. Nice and smooth operation.
Cockpit: Gran Compe stem and SR Randnner
Brakes: Dia Compe 750 with BDop drop pads (rear needs it, front might be OK without but liked the matching sets)
Brake Levers: Dia Compe with quick release (162C I think)
Cables: Velo-Orange retro stainless wound (https://velo-orange.com/collections/...ided-kit-brake)
Seatpost: SR Laprade 26.6
Saddle: Fujita Belt
Crankset: Sugino Mighty Tour (53/49/36 right now)
Pedals: MKS Unique Royal with MKS half clips (currently half clips too small for my size 12s, going to hunt for some larger)
Bottom Bracket: Sugino Mighty Tour
Freewheel: Suntour Ultra 6: 13-15-18-21-25-30
Front Derailleur: Suntour SL
Rear Derailleur: Suntour VGT Luxe
Shifters: Suntour bar-end
Wheels (as above)
Tires: Grand Bois Hetre EL (650x42b) - measure at 40mm new at 40psig
Fenders: Velo Orange Zeppelin (https://velo-orange.com/products/vo-...n-fenders-650b) with extra front stay due to no rack mounted, dimpled a bit at chainstays and at fork crown
Bottle cage: Zefal classic, with Velo Orange clamps (https://velo-orange.com/products/bottle-cage-clamp) - super loose holding the bottle on the first ride, so we'll see how that lasts
Half-step chart (for @mountaindave )
Bicycle Gear Calculator
Last edited by AJI125; 03-28-22 at 10:53 AM.
Likes For AJI125:
03-28-22, 10:33 AM
#6
Full Member
Thread Starter
Join Date: Apr 2019
Location: Denver Metro, CO
Posts: 392
Bikes: 1972 Fuji The Finest | 1990 Bianchi Giro | 1999 LeMond Buenos Aires
Mentioned: 5 Post(s)
Tagged: 0 Thread(s)
Quoted: 151 Post(s)
Liked 303 Times
in
134 Posts
This came out sweet; great build. I never got around to building it as soon after I picked up this bike, I found an early 70s Fuji Finest in blue that was in fine shape and bought it. So this frame sat around. I'm glad it found the right home.
How do you like the ride? I have found mine to be an excellent long distance machine.
How do you like the ride? I have found mine to be an excellent long distance machine.
Still figuring out fit (with the short top tube and short stem): if I love the cockpit or not, and I realized today I need to tilt the saddle slightly up. Downside of the old bars are the hoods are too narrow for my current rando bag (which doesn't match anyways so something else to buy!). But currently focusing on a rackless bike. Gearing will also be a work in progress, picked up a 110/74 Takagi AR-T as well if I decide to get a bit lower for the mountains, and have several 5s and U6 freewheels to mix and match as needed.
Likes For AJI125:
03-28-22, 10:42 AM
#7
Senior Member

Join Date: Sep 2005
Location: Oakland, CA
Posts: 3,265
Bikes: '82 Univega Competizione, '72 Motobecane Grand Record, '83 Mercian KOM Touring, '85 Univega Alpina Uno, '76 Eisentraut Limited
Mentioned: 57 Post(s)
Tagged: 0 Thread(s)
Quoted: 1088 Post(s)
Liked 1,205 Times
in
701 Posts
Love the ride so far (thanks again for sending it my way)! Didn't hammer today so not sure on "planing". But nice and smooth with the Hetres.
Still figuring out fit (with the short top tube and short stem): if I love the cockpit or not, and I realized today I need to tilt the saddle slightly up. Downside of the old bars are the hoods are too narrow for my current rando bag (which doesn't match anyways so something else to buy!). But currently focusing on a rackless bike. Gearing will also be a work in progress, picked up a 110/74 Takagi AR-T as well if I decide to get a bit lower for the mountains, and have several 5s and U6 freewheels to mix and match as needed.
Still figuring out fit (with the short top tube and short stem): if I love the cockpit or not, and I realized today I need to tilt the saddle slightly up. Downside of the old bars are the hoods are too narrow for my current rando bag (which doesn't match anyways so something else to buy!). But currently focusing on a rackless bike. Gearing will also be a work in progress, picked up a 110/74 Takagi AR-T as well if I decide to get a bit lower for the mountains, and have several 5s and U6 freewheels to mix and match as needed.
03-28-22, 11:03 AM
#8
Full Member
Thread Starter
Join Date: Apr 2019
Location: Denver Metro, CO
Posts: 392
Bikes: 1972 Fuji The Finest | 1990 Bianchi Giro | 1999 LeMond Buenos Aires
Mentioned: 5 Post(s)
Tagged: 0 Thread(s)
Quoted: 151 Post(s)
Liked 303 Times
in
134 Posts
Thanks! This place provides plenty of inspiration (https://www.bikeforums.net/classic-v...ne-awards.html) - it took some time but I tried to be patient, and I should've already mentioned @southpawboston for his amazing guide on fenders which was a tab on my phone browser for maybe a month or two? (https://somervillebikes.wordpress.co...er-arc-radius/). Your Peugeot specifically inspired the placement of the extra front fender stay, wasn't sure where the heck to put it.
03-28-22, 11:11 AM
#9
Bike Butcher of Portland
Join Date: Jul 2014
Location: Portland, OR
Posts: 11,634
Bikes: It's complicated.
Mentioned: 1299 Post(s)
Tagged: 0 Thread(s)
Quoted: 4678 Post(s)
Liked 5,795 Times
in
2,281 Posts
I'm impressed that you've formed the fenders for a nice, even gap all the way around, front and back without the stays connected (per @southpawboston's excellent instructions, as you note.) I note that you only have one set of dropout eyelets for the fender, you'll need to stack the R-clips. A small spacer between them should work fine, the top fender stays will need to clear the bottom tip of the fork. Not an issue, I've done it that way a couple of times before. You could go without the front stay, but it'll rattle a bit. Your solution is much more robust.
Now all you need is a handlebar bag and rack!
__________________
If someone tells you that you have enough bicycles and you don't need any more, stop talking to them. You don't need that kind of negativity in your life.
If someone tells you that you have enough bicycles and you don't need any more, stop talking to them. You don't need that kind of negativity in your life.
03-28-22, 12:10 PM
#10
Full Member
Thread Starter
Join Date: Apr 2019
Location: Denver Metro, CO
Posts: 392
Bikes: 1972 Fuji The Finest | 1990 Bianchi Giro | 1999 LeMond Buenos Aires
Mentioned: 5 Post(s)
Tagged: 0 Thread(s)
Quoted: 151 Post(s)
Liked 303 Times
in
134 Posts
How short is the top tube? I like a shorter top tube and wonder if I should be on the lookout for one of these. I had a Campania Professional a while ago that shares several characteristics with the Fuji, and I loved the way it rode, but its top tube was on the long side. Reach was ultimately an issue, so I sold it. This is a great build, by the way.
Seat Tube: 58 cm ctt (have my saddle set right around 75 cm for reference)
Top Tube: 54-54.5 cm c/c
Head Tube: 15.8 cm
The stem I'm running on this is around 8.5 cm, I generally run a 10-11 cm stem with a 56-57 cm top tube, and the reach on the bars is a little more than I usually use. So add it all up, mix it together, and you get a bit more compact position by 2-3 cm. We'll see how it does over time. May drop the stem a little also from where it is which would stretch it out slightly.
03-28-22, 12:37 PM
#11
Full Member
Thread Starter
Join Date: Apr 2019
Location: Denver Metro, CO
Posts: 392
Bikes: 1972 Fuji The Finest | 1990 Bianchi Giro | 1999 LeMond Buenos Aires
Mentioned: 5 Post(s)
Tagged: 0 Thread(s)
Quoted: 151 Post(s)
Liked 303 Times
in
134 Posts
I'm impressed that you've formed the fenders for a nice, even gap all the way around, front and back without the stays connected (per @southpawboston's excellent instructions, as you note.) I note that you only have one set of dropout eyelets for the fender, you'll need to stack the R-clips. A small spacer between them should work fine, the top fender stays will need to clear the bottom tip of the fork. Not an issue, I've done it that way a couple of times before. You could go without the front stay, but it'll rattle a bit. Your solution is much more robust.
Now all you need is a handlebar bag and rack!
Now all you need is a handlebar bag and rack!
At the risk of outing my lazy stay filing (removing sharp edges only), here's the spacer and R clips for the front. I decided to turn the outer clip inward to keep the stay from bowing out any further. You can't quite see in this shot but they push against one another just slightly. Was on the fence about it, may need to keep an eye on it and just swap around if it seems problematic. In fact I even wanted to have the front stay be the inside connection for aesthetic purposes, but it hit the fork blade (as you can probably tell it would from the picture, turning the R clip down doesn't work due to axle/QR interference), necessitating it be placed on the outboard side.

Likes For AJI125:
03-28-22, 12:43 PM
#12
Senior Member
Join Date: Sep 2005
Location: Oakland, CA
Posts: 3,265
Bikes: '82 Univega Competizione, '72 Motobecane Grand Record, '83 Mercian KOM Touring, '85 Univega Alpina Uno, '76 Eisentraut Limited
Mentioned: 57 Post(s)
Tagged: 0 Thread(s)
Quoted: 1088 Post(s)
Liked 1,205 Times
in
701 Posts
Just took some quick measurements (love working from home):
Seat Tube: 58 cm ctt (have my saddle set right around 75 cm for reference)
Top Tube: 54-54.5 cm c/c
Head Tube: 15.8 cm
The stem I'm running on this is around 8.5 cm, I generally run a 10-11 cm stem with a 56-57 cm top tube, and the reach on the bars is a little more than I usually use. So add it all up, mix it together, and you get a bit more compact position by 2-3 cm. We'll see how it does over time. May drop the stem a little also from where it is which would stretch it out slightly.
Likes For noobinsf:
03-29-22, 03:09 AM
#13
Senior Member
Join Date: May 2016
Location: Plantation, Fl.
Posts: 60
Bikes: Lotsa
Mentioned: 3 Post(s)
Tagged: 0 Thread(s)
Quoted: 19 Post(s)
Likes: 0
Liked 19 Times
in
8 Posts
My '72 Finest
This one is mine. I have owned it for about 10 years. The FUJI lettering on the down tube is not original. This bike rides like a big old 1960's Cadillac.

Likes For as50x20:
03-29-22, 04:41 AM
#14
Junior Member
Awesome bike. I have been searching for a blue 70's Fuji finest for years with no luck. Congratulations on a great find and build!
Likes For Warbird21:
03-29-22, 07:47 AM
#16
Senior Member

Join Date: Apr 2006
Location: Washington County, Vermont, USA
Posts: 3,778
Bikes: 1966 Dawes Double Blue, 1976 Raleigh Gran Sport, 1975 Raleigh Sprite 27, 1980 Univega Viva Sport, 1971 Gitane Tour de France, 1984 Lotus Classique, 1976 Motobecane Grand Record
Mentioned: 77 Post(s)
Tagged: 0 Thread(s)
Quoted: 765 Post(s)
Liked 660 Times
in
351 Posts
There's nothing new under the sun, so I probably didn't really invent the flotation method of soaking a frame in a small amount of Evaporust. But I still feel a warm glow whenever someone uses it.
__________________
www.redclovercomponents.com
"Progress might have been all right once, but it has gone on too long."
--Ogden Nash
www.redclovercomponents.com
"Progress might have been all right once, but it has gone on too long."
--Ogden Nash
Likes For jonwvara:
03-29-22, 06:14 PM
#17
Full Member
Thread Starter
Join Date: Apr 2019
Location: Denver Metro, CO
Posts: 392
Bikes: 1972 Fuji The Finest | 1990 Bianchi Giro | 1999 LeMond Buenos Aires
Mentioned: 5 Post(s)
Tagged: 0 Thread(s)
Quoted: 151 Post(s)
Liked 303 Times
in
134 Posts
Might well be your post I saw here a couple years back on this method! I did my Trek tube by tube then, using a small 2x4 frame, but decided to graduate to the big leagues full frame for this one!
03-31-22, 09:06 PM
#18
Junior Member
Incredible build of a Finest. Thanks for sharing the process. Great component selection� the Sunshine Pro-Am high flange hubs didn�t go unnoticed. Wow. The combination of the VGT Luxe � Mighty Tour triple looks perfect.
