


Bottom Bracket stuck in 80s Miele overhaul
 09-17-22, 10:20 AM
#1
Newbie
Thread Starter

Join Date: Sep 2022
Location: Montreal, QC
Posts: 6
Bikes: 2005 Guru Strada, 2014 Cervelo P3, Hardtail CCM Aluminum commuter bike (loaned to my nephew)
Mentioned: 0 Post(s)
Tagged: 0 Thread(s)
Quoted: 12 Post(s)
Liked 0 Times
in
0 Posts
Bottom Bracket stuck in 80s Miele overhaul
Hi all,
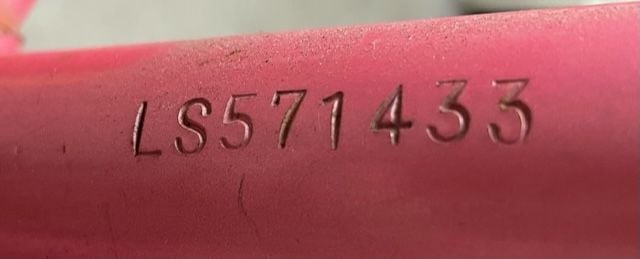
I'm doing an overhaul of my brother's pink 80s Miele bike, serial LS571433, and I'm trying to get the bottom bracket loose. It has square tapered bolts, it's threaded, and the size of the wrench I need is around 35mm (or 1 and 3/8 inch), which doesn't seem to be common. Not sure if the thread is English (clockwise to loosen on the right/drive side) or Italian (counterclockwise to loosen on right/drive side).
Any input is appreciated. I have pictures, but unable to post them since I'm new here.
Thanks in advance!
Simon
 09-17-22, 10:30 AM
#2
Senior Member
Join Date: Jan 2007
Location: Ontario
Posts: 2,648
Mentioned: 16 Post(s)
Tagged: 0 Thread(s)
Quoted: 478 Post(s)
Liked 634 Times
in
336 Posts
Usually I leave the drive side (fixed) cup alone as they are usually very tight, and you can do a decent job cleaning out the bottom bracket without removing it.
I assume you had no trouble on the non-drive side as that cup usually has a lock ring and is adjustable so easy enough to unscrew to service the bottom bracket.
I assume you had no trouble on the non-drive side as that cup usually has a lock ring and is adjustable so easy enough to unscrew to service the bottom bracket.
Likes For markk900:
09-17-22, 10:34 AM
#3
Newbie
Thread Starter
Join Date: Sep 2022
Location: Montreal, QC
Posts: 6
Bikes: 2005 Guru Strada, 2014 Cervelo P3, Hardtail CCM Aluminum commuter bike (loaned to my nephew)
Mentioned: 0 Post(s)
Tagged: 0 Thread(s)
Quoted: 12 Post(s)
Liked 0 Times
in
0 Posts
It's not a cup. Non drive side was removed, but it's just a flat ring, oversized compared to the shell, with a few notches. Happy to send pictures in a direct message or email.
09-17-22, 11:27 AM
#4
Senior Member
Join Date: Oct 2015
Location: PDX
Posts: 13,034
Bikes: Merz x 5 + Specialized Merz Allez x 2, Strawberry/Newlands/DiNucci/Ti x3, Gordon, Fuso/Moulton x2, Bornstein, Paisley,1958-74 Paramounts x3, 3rensho, 74 Moto TC, 73-78 Raleigh Pro's x5, Marinoni x2, 1960 Cinelli SC, 1980 Bianchi SC, PX-10 X 2
Mentioned: 267 Post(s)
Tagged: 0 Thread(s)
Quoted: 4510 Post(s)
Liked 6,377 Times
in
3,667 Posts
Here we go again.
I always remove the entire BB, period.
You must/need to use the proper tools.
Yes, some of the pics are transposed.


I always remove the entire BB, period.
You must/need to use the proper tools.
Yes, some of the pics are transposed.
Last edited by merziac; 09-17-22 at 11:31 AM.
Likes For merziac:
09-17-22, 11:39 AM
#5
Senior Member
Join Date: Nov 2004
Posts: 23,223
Mentioned: 654 Post(s)
Tagged: 1 Thread(s)
Quoted: 4722 Post(s)
Likes: 0
Liked 3,036 Times
in
1,874 Posts
Based on the serial number it is a 1986 model, manufactured in Japan during December 1985. So, it should be English threaded and the fixed cup should be a left hand thread.
Likes For T-Mar:
09-17-22, 11:43 AM
#6
Newbie
Thread Starter
Join Date: Sep 2022
Location: Montreal, QC
Posts: 6
Bikes: 2005 Guru Strada, 2014 Cervelo P3, Hardtail CCM Aluminum commuter bike (loaned to my nephew)
Mentioned: 0 Post(s)
Tagged: 0 Thread(s)
Quoted: 12 Post(s)
Liked 0 Times
in
0 Posts
That's very helpful merziac and T-Mar ! Most BB tools like you are showing are 36mm, and mine seems to be 34.92mm or 1 3/8 inch, is it a 35mm? Other threads seem to say that this tool is hard to get nowadays, thus my challenge. I'll happily post a picture once I'm allowed to! I just didn't realize I needed to post 10x times before being allowed to do so!
09-17-22, 11:53 AM
#7
Senior Member
Join Date: Oct 2015
Location: PDX
Posts: 13,034
Bikes: Merz x 5 + Specialized Merz Allez x 2, Strawberry/Newlands/DiNucci/Ti x3, Gordon, Fuso/Moulton x2, Bornstein, Paisley,1958-74 Paramounts x3, 3rensho, 74 Moto TC, 73-78 Raleigh Pro's x5, Marinoni x2, 1960 Cinelli SC, 1980 Bianchi SC, PX-10 X 2
Mentioned: 267 Post(s)
Tagged: 0 Thread(s)
Quoted: 4510 Post(s)
Liked 6,377 Times
in
3,667 Posts
That's very helpful merziac and T-Mar ! Most BB tools like you are showing are 36mm, and mine seems to be 34.92mm or 1 3/8 inch, is it a 35mm? Other threads seem to say that this tool is hard to get nowadays, thus my challenge. I'll happily post a picture once I'm allowed to! I just didn't realize I needed to post 10x times before being allowed to do so!
Those are the wrenches that have been and are used for decades.
There are many methods that are used but this one has never failed me.
09-17-22, 11:58 AM
#8
Newbie
Thread Starter
Join Date: Sep 2022
Location: Montreal, QC
Posts: 6
Bikes: 2005 Guru Strada, 2014 Cervelo P3, Hardtail CCM Aluminum commuter bike (loaned to my nephew)
Mentioned: 0 Post(s)
Tagged: 0 Thread(s)
Quoted: 12 Post(s)
Liked 0 Times
in
0 Posts
I used my avatar in lieu of a picture! I did try to secure my crescent wrench before applying some force, but I'll try the setup with a wood board and some clamps, it's a good idea. Now I just need to find the 35mm BB wrench, and apply some force... but clockwise this time! Also my liquid wrench might have taken effect after 3-4 days! T-Mar Where did you find the info about the serial number? I'm curious about the model name as well.
09-17-22, 12:02 PM
#9
Senior Member
Join Date: Oct 2015
Location: PDX
Posts: 13,034
Bikes: Merz x 5 + Specialized Merz Allez x 2, Strawberry/Newlands/DiNucci/Ti x3, Gordon, Fuso/Moulton x2, Bornstein, Paisley,1958-74 Paramounts x3, 3rensho, 74 Moto TC, 73-78 Raleigh Pro's x5, Marinoni x2, 1960 Cinelli SC, 1980 Bianchi SC, PX-10 X 2
Mentioned: 267 Post(s)
Tagged: 0 Thread(s)
Quoted: 4510 Post(s)
Liked 6,377 Times
in
3,667 Posts
I used my avatar in lieu of a picture! I did try to secure my crescent wrench before applying some force, but I'll try the setup with a wood board and some clamps, it's a good idea. Now I just need to find the 35mm BB wrench, and apply some force... but clockwise this time! Also my liquid wrench might have taken effect after 3-4 days! T-Mar Where did you find the info about the serial number? I'm curious about the model name as well.
 09-17-22, 12:06 PM
#10
Senior Member
Join Date: Oct 2015
Location: PDX
Posts: 13,034
Bikes: Merz x 5 + Specialized Merz Allez x 2, Strawberry/Newlands/DiNucci/Ti x3, Gordon, Fuso/Moulton x2, Bornstein, Paisley,1958-74 Paramounts x3, 3rensho, 74 Moto TC, 73-78 Raleigh Pro's x5, Marinoni x2, 1960 Cinelli SC, 1980 Bianchi SC, PX-10 X 2
Mentioned: 267 Post(s)
Tagged: 0 Thread(s)
Quoted: 4510 Post(s)
Liked 6,377 Times
in
3,667 Posts
I used my avatar in lieu of a picture! I did try to secure my crescent wrench before applying some force, but I'll try the setup with a wood board and some clamps, it's a good idea. Now I just need to find the 35mm BB wrench, and apply some force... but clockwise this time! Also my liquid wrench might have taken effect after 3-4 days! T-Mar Where did you find the info about the serial number? I'm curious about the model name as well.
09-17-22, 12:11 PM
#11
Newbie
Thread Starter
Join Date: Sep 2022
Location: Montreal, QC
Posts: 6
Bikes: 2005 Guru Strada, 2014 Cervelo P3, Hardtail CCM Aluminum commuter bike (loaned to my nephew)
Mentioned: 0 Post(s)
Tagged: 0 Thread(s)
Quoted: 12 Post(s)
Liked 0 Times
in
0 Posts
pin holes: no. Flats: yes, and it's just shy of 35mm between those flat spots, and the HCW-4 park tool is 36mm, so that's why I'm concerned it will be loose. I don't mind buying the right tool, I might just need some trial & error to confirm it's the right size.
09-17-22, 12:20 PM
#12

Senior Member

Join Date: May 2010
Location: Bastrop Texas
Posts: 4,471
Bikes: Univega, Peu P6, Peu PR-10, Ted Williams, Peu UO-8, Peu UO-18 Mixte, Peu Dolomites
Mentioned: 13 Post(s)
Tagged: 0 Thread(s)
Quoted: 960 Post(s)
Liked 1,626 Times
in
1,044 Posts
Great question and good post. There is a lot of youtubes on this type of removal as you know.
I think your question is more of having the right size wrench for the job. When trying out bottom bracket wrenches its a toss up on finding the wrench that fits. Even my Park bottom bracket specific wrench was sloppy in its use. I ended up getting a cheap undersize ChiCom wrench and then used a grinder to get it sized for a tight fit. It was a fun project and involved re-tempering the wrench, but really; it was not worth the time just to have another wrench hanging on my board. Even if it was the right size. I don't do that many bottom brackets.
Yes... We do end up going for that large Adjustable (Cresent) wrench more then we would like to admit.
Welcome to the forum... You are going to fit right in... eh...
__________________
 No matter where you're at... There you are... Δf:=f(1/2)-f(-1/2)
No matter where you're at... There you are... Δf:=f(1/2)-f(-1/2)
09-17-22, 12:22 PM
#13
Senior Member
Join Date: Oct 2015
Location: PDX
Posts: 13,034
Bikes: Merz x 5 + Specialized Merz Allez x 2, Strawberry/Newlands/DiNucci/Ti x3, Gordon, Fuso/Moulton x2, Bornstein, Paisley,1958-74 Paramounts x3, 3rensho, 74 Moto TC, 73-78 Raleigh Pro's x5, Marinoni x2, 1960 Cinelli SC, 1980 Bianchi SC, PX-10 X 2
Mentioned: 267 Post(s)
Tagged: 0 Thread(s)
Quoted: 4510 Post(s)
Liked 6,377 Times
in
3,667 Posts
I just compared a Sugino, Campy and Park on a fixed cup, they are all pretty sloppy, always are IME.

Likes For merziac:
09-17-22, 12:32 PM
#14

Senior Member
Join Date: Jun 2006
Posts: 20,305
Mentioned: 130 Post(s)
Tagged: 0 Thread(s)
Quoted: 3464 Post(s)
Liked 2,828 Times
in
1,995 Posts
That's very helpful merziac and T-Mar ! Most BB tools like you are showing are 36mm, and mine seems to be 34.92mm or 1 3/8 inch, is it a 35mm? Other threads seem to say that this tool is hard to get nowadays, thus my challenge. I'll happily post a picture once I'm allowed to! I just didn't realize I needed to post 10x times before being allowed to do so!
used almost exclusively in Japan.
35mm is French threading.
bottom bracket "flats" are off from time to time.
there is a pro VAR tool with interchangeable sized engagements.
the methods shown should work.
some Kroil would not hurt. With drive side of bike down for a day or two.
Last edited by repechage; 09-17-22 at 12:36 PM.
09-17-22, 12:35 PM
#15
Friendship is Magic

Join Date: Nov 2010
Location: Sacramento, CA
Posts: 22,984
Bikes: old ones
Mentioned: 304 Post(s)
Tagged: 0 Thread(s)
Quoted: 26400 Post(s)
Liked 10,373 Times
in
7,202 Posts
.
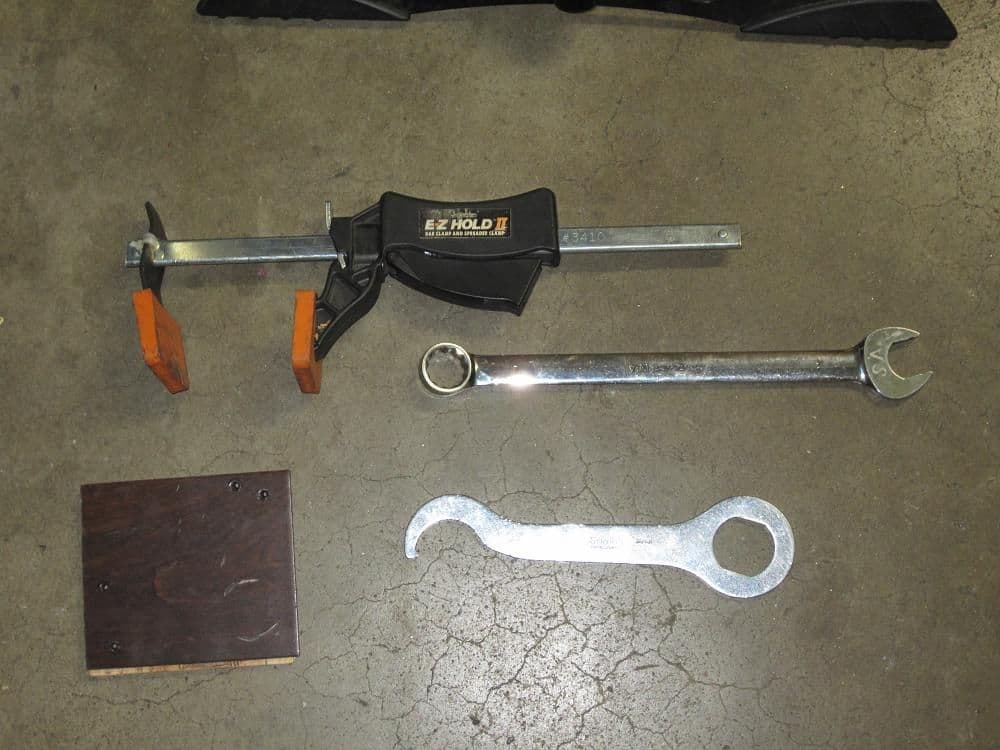
...most fixed cups that have been in place for a long time will not come off with an adjustable wrench. There's a specialized tool for removing (and reinstalling) stubborn fixed cups, that looks like this:

But in general , merziac and I disagree on the need to remove a fixed cup every time you service a bottom bracket.I'm not alone in thinking that when one is really stuck in there (they often are hard to remove), it's better to clean it in place, and maybe use fresh bearings and grease in reassembly.
There is one other way you can use a long bolt that goes all the way through the BB shell with some large fender washers on each side, to hold your wrench on the cup flats. But that usually won't work with an adjustable wrench either. What happens is that your adjustable wrench jumps off the flats repeatedly, and eventually damages the flats on the cup to the point that nobody can remove it, without the special tool pictured.
...most fixed cups that have been in place for a long time will not come off with an adjustable wrench. There's a specialized tool for removing (and reinstalling) stubborn fixed cups, that looks like this:
But in general , merziac and I disagree on the need to remove a fixed cup every time you service a bottom bracket.I'm not alone in thinking that when one is really stuck in there (they often are hard to remove), it's better to clean it in place, and maybe use fresh bearings and grease in reassembly.
There is one other way you can use a long bolt that goes all the way through the BB shell with some large fender washers on each side, to hold your wrench on the cup flats. But that usually won't work with an adjustable wrench either. What happens is that your adjustable wrench jumps off the flats repeatedly, and eventually damages the flats on the cup to the point that nobody can remove it, without the special tool pictured.
__________________
09-17-22, 01:50 PM
#16
Edumacator
Join Date: Jan 2018
Location: Goose Creek, SC
Posts: 6,789
Bikes: '87 Crestdale, '87 Basso Gap, '92 Rossin Performance EL-OS, 1990 VanTuyl, 1980s Losa, 1985 Trek 670, 1982 AD SLE, 1987 PX10, etc...
Mentioned: 59 Post(s)
Tagged: 0 Thread(s)
Quoted: 2436 Post(s)
Liked 3,118 Times
in
1,962 Posts
Does it have a brand name? That might help solve why it is 35mm.
kroil is a good penetrant to let soak in a few times, but leverage and removal of wrench sloppiness is the key.
We all have different opinions on whether or not to remove if it is staying in, but if you choose to remove the key is penetrant.
If you have a coop near you, it might pay to see if they have a fixed cup remover.

 09-17-22, 01:58 PM
#18
Senior Member
Join Date: Oct 2015
Location: PDX
Posts: 13,034
Bikes: Merz x 5 + Specialized Merz Allez x 2, Strawberry/Newlands/DiNucci/Ti x3, Gordon, Fuso/Moulton x2, Bornstein, Paisley,1958-74 Paramounts x3, 3rensho, 74 Moto TC, 73-78 Raleigh Pro's x5, Marinoni x2, 1960 Cinelli SC, 1980 Bianchi SC, PX-10 X 2
Mentioned: 267 Post(s)
Tagged: 0 Thread(s)
Quoted: 4510 Post(s)
Liked 6,377 Times
in
3,667 Posts
 09-18-22, 05:55 AM
#19
Bianchi Goddess

Join Date: Apr 2009
Location: Shady Pines Retirement Fort Wayne, In
Posts: 27,858
Bikes: Too many to list here check my signature.
Mentioned: 192 Post(s)
Tagged: 2 Thread(s)
Quoted: 2930 Post(s)
Liked 2,923 Times
in
1,491 Posts

__________________
�One morning you wake up, the girl is gone, the bikes are gone, all that's left behind is a pair of old tires and a tube of tubular glue, all squeezed out"
Sugar "Kane" Kowalczyk
�One morning you wake up, the girl is gone, the bikes are gone, all that's left behind is a pair of old tires and a tube of tubular glue, all squeezed out"
Sugar "Kane" Kowalczyk
09-18-22, 06:05 AM
#20
Bianchi Goddess
Join Date: Apr 2009
Location: Shady Pines Retirement Fort Wayne, In
Posts: 27,858
Bikes: Too many to list here check my signature.
Mentioned: 192 Post(s)
Tagged: 2 Thread(s)
Quoted: 2930 Post(s)
Liked 2,923 Times
in
1,491 Posts
I used my avatar in lieu of a picture! I did try to secure my crescent wrench before applying some force, but I'll try the setup with a wood board and some clamps, it's a good idea. Now I just need to find the 35mm BB wrench, and apply some force... but clockwise this time! Also my liquid wrench might have taken effect after 3-4 days! T-Mar Where did you find the info about the serial number? I'm curious about the model name as well.
I know I�m jumping in late to the party here but�.. you might want to take this to you local shop or co-op and ask them to loosen it for you. Then after you get the BB overhauled go back and asked to have it tightened. It might cost you a few bucks but, they have the right tool and knowledge. Then you can see how your bike collecting and repairing is going and do you really need these specialized tools.
cool color.
T-Mar worked for the Wright Brothers and has a huge wealth of knowledge and it seems one of his hobbies is collecting and cataloging serials to create a database on many brands. Since lots of mid level bikes are/were built in Japan, and Taiwan they are basically built by like 6 companies so there are familiar formats.
if you to send me some pics I�ll post them for you. BianchiGirll@yahoo.com
__________________
�One morning you wake up, the girl is gone, the bikes are gone, all that's left behind is a pair of old tires and a tube of tubular glue, all squeezed out"
Sugar "Kane" Kowalczyk
�One morning you wake up, the girl is gone, the bikes are gone, all that's left behind is a pair of old tires and a tube of tubular glue, all squeezed out"
Sugar "Kane" Kowalczyk
09-18-22, 06:57 AM
#21
Old fart

Join Date: Nov 2004
Location: Appleton WI
Posts: 24,782
Bikes: Several, mostly not name brands.
Mentioned: 153 Post(s)
Tagged: 0 Thread(s)
Quoted: 3587 Post(s)
Liked 3,398 Times
in
1,932 Posts
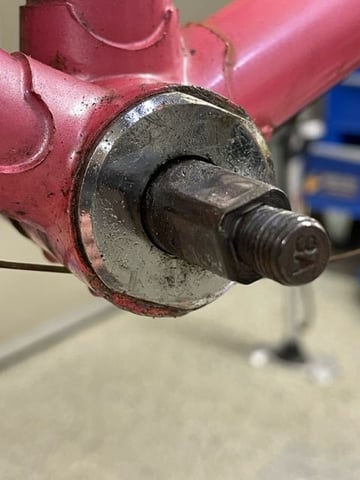
Flats and no pin tool holes on the non-drive side suggests that the fixed cup was installed on the wrong side, which, in turn, suggests either French or Italian thread. What does the drive-side cup look like? Are there any markings on either cup?
The Park tool should work, provided you can secure it against the cup, as suggested by others above. Otherwise, the Sheldon Brown method should also work. And failing that, find a shop with the VAR #30 fixed cup tool, which has a double-sided jaw with 35.2mm on one side and 36.2mm on the other.
and it's just shy of 35mm between those flat spots, and the HCW-4 park tool is 36mm, so that's why I'm concerned it will be loose. I don't mind buying the right tool, I might just need some trial & error to confirm it's the right size.
09-18-22, 07:12 AM
#22
Bianchi Goddess
Join Date: Apr 2009
Location: Shady Pines Retirement Fort Wayne, In
Posts: 27,858
Bikes: Too many to list here check my signature.
Mentioned: 192 Post(s)
Tagged: 2 Thread(s)
Quoted: 2930 Post(s)
Liked 2,923 Times
in
1,491 Posts
Great news!!
Hi Bianchi Girll,
Thanks for offering to post pictures.
I was going to post this, but it hasn�t been 24 hours and I already did my 5 posts, so I need to wait a bit more to post again.
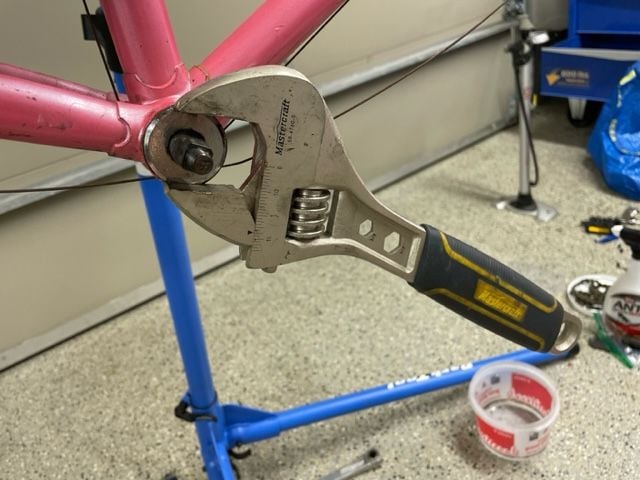
Good news: the clamp setup worked, after making some holes in the 5/8� plywood to account for the square tapered ends sticking out. My massive crescent wrench was perfect� once I was applying force clockwise! 4 days after applying liquid wrench probably helped as well. I had a harder time installing the tyres yesterday after that! Replacement BB is a Shimano BB-UN300 68x118MM, for which I have the proper BBT-32 park took to install. Now I need new bolts since my old BB had the threads attached to it and only needed nuts to secure the crank arms.
Here�s are some of the pictures.
I can�t seem to save and post the OP�s plywood and clamp method for removing the cup.

Thanks for offering to post pictures.
I was going to post this, but it hasn�t been 24 hours and I already did my 5 posts, so I need to wait a bit more to post again.
Good news: the clamp setup worked, after making some holes in the 5/8� plywood to account for the square tapered ends sticking out. My massive crescent wrench was perfect� once I was applying force clockwise! 4 days after applying liquid wrench probably helped as well. I had a harder time installing the tyres yesterday after that! Replacement BB is a Shimano BB-UN300 68x118MM, for which I have the proper BBT-32 park took to install. Now I need new bolts since my old BB had the threads attached to it and only needed nuts to secure the crank arms.
Here�s are some of the pictures.
I can�t seem to save and post the OP�s plywood and clamp method for removing the cup.
__________________
�One morning you wake up, the girl is gone, the bikes are gone, all that's left behind is a pair of old tires and a tube of tubular glue, all squeezed out"
Sugar "Kane" Kowalczyk
�One morning you wake up, the girl is gone, the bikes are gone, all that's left behind is a pair of old tires and a tube of tubular glue, all squeezed out"
Sugar "Kane" Kowalczyk
09-18-22, 11:55 AM
#23
Senior Member
Join Date: Oct 2015
Location: PDX
Posts: 13,034
Bikes: Merz x 5 + Specialized Merz Allez x 2, Strawberry/Newlands/DiNucci/Ti x3, Gordon, Fuso/Moulton x2, Bornstein, Paisley,1958-74 Paramounts x3, 3rensho, 74 Moto TC, 73-78 Raleigh Pro's x5, Marinoni x2, 1960 Cinelli SC, 1980 Bianchi SC, PX-10 X 2
Mentioned: 267 Post(s)
Tagged: 0 Thread(s)
Quoted: 4510 Post(s)
Liked 6,377 Times
in
3,667 Posts
FWIW the “proper tools” would be a Stien or similar Fixed Cup tool and a fixed cup wrench with a permanently attached extension handle. Using this negates the the complicated clamp setup. You should always loosen the fixed cup first, or at least leave the BB in until it is loose.
Also the Stien tool, had the OP even had or been able to obtain one would likely have been useless here for the spindle being nutted and and barring a complicated jamb nut setup.
I'm glad the OP was able to get it done which was my goal and is the beauty of this setup, many/most have the parts and pieces for this on hand or readily available without chasing down obscure and expensive to obtain tools that only make sense to obsessed enthusiasts like ourselves.
I never use a fit all for this as many do but the OP handled that as well so all good.
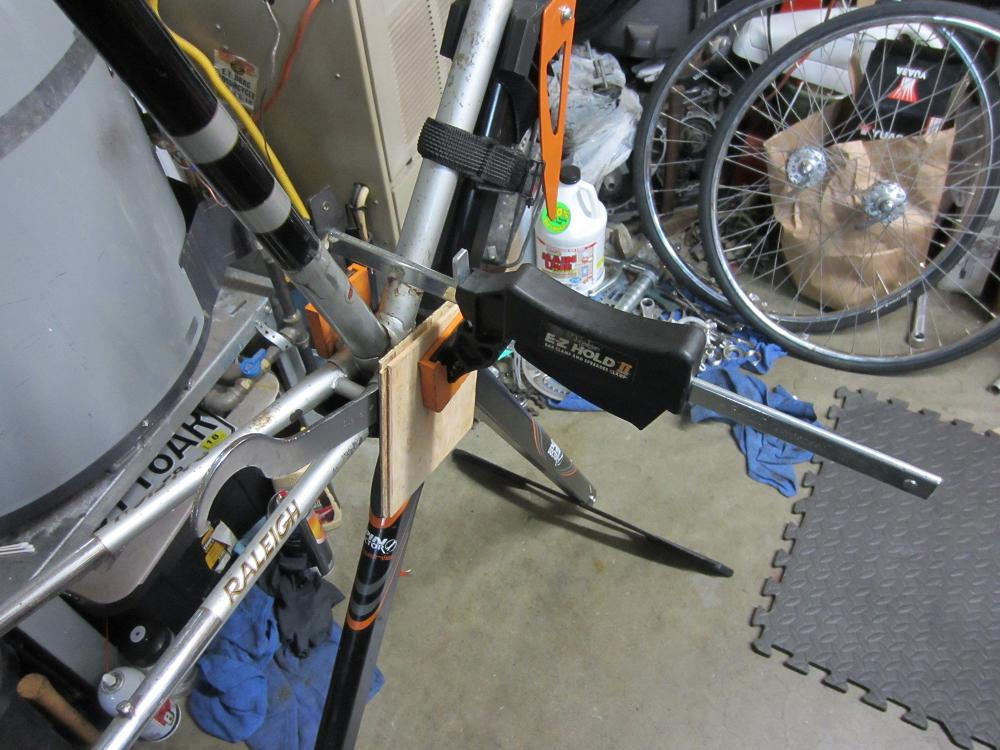
The permanent handle tool can often get in the way and be a hindrance, my setup in the pic was mostly for illustration although I do it that way sometimes when the cup is not too tight. When they are too tight I use a cheater of increasing length until it relents. They allow for an angle that doesn't threaten the frame while being able to really lean in.

Also, my "entire BB" statement was in regard to removing the fixed cup for proper service including full inspection of bearing surfaces, cup and BB shell threads as well as properly torquing upon reassembly.
I'm not concerned with when the cup is removed although I usually take it last, so long as it comes out every time when I don't know the last time it was taken out.
Last edited by merziac; 09-18-22 at 12:11 PM.
Likes For merziac:
09-18-22, 12:01 PM
#24
Senior Member
Join Date: Oct 2015
Location: PDX
Posts: 13,034
Bikes: Merz x 5 + Specialized Merz Allez x 2, Strawberry/Newlands/DiNucci/Ti x3, Gordon, Fuso/Moulton x2, Bornstein, Paisley,1958-74 Paramounts x3, 3rensho, 74 Moto TC, 73-78 Raleigh Pro's x5, Marinoni x2, 1960 Cinelli SC, 1980 Bianchi SC, PX-10 X 2
Mentioned: 267 Post(s)
Tagged: 0 Thread(s)
Quoted: 4510 Post(s)
Liked 6,377 Times
in
3,667 Posts
 Well done, bravo.
09-18-22, 02:27 PM
Well done, bravo.
09-18-22, 02:27 PM
#25
Senior Member
Join Date: Apr 2007
Location: Thunder Bay, Ontario, Canada - burrrrr!
Posts: 11,674
Bikes: 1958 Rabeneick 120D, 1968 Legnano Gran Premio, 196? Torpado Professional, 2000 Marinoni Piuma
Mentioned: 210 Post(s)
Tagged: 0 Thread(s)
Quoted: 1372 Post(s)
Likes: 0
Liked 1,751 Times
in
938 Posts
I am not sure what your BB looks like but I have run into a few stuck BBs before. The following set-up rarely fails me when dealing with the situation...
I use a 15 or 16 inch adjustable wrench, snugly fitted to the flats on the offending cup. I then ensure that the wrench cannot slip off of the flats. To prevent the possibility of a slip, I jury rig a clamp to prevent it...

Usually, with both bottom bracket cups installed (no bearings), I run a 5/8" through the cup holes, which is used to prevent the 16" wrench from slipping off of the drive side BB flats. I use WD40 ahead of time with the hope that it just might help a bit (don't get too excited but it cannot hurt). Then, ensuring the the wrench is SNUGLY adjusted to the best fit possible to the flats, rotate this way and then the other way, until you feel movement. Once you do feel movement, you are almost home free.
As mentioned, it is rare that this procedure does not work for me. It allows considerable (needed) torque with minimal risk of the wrench slipping off and/or banged up knuckles (bloody pain in the butt when this happens).
Good luck if you decide to give it a try.
I use a 15 or 16 inch adjustable wrench, snugly fitted to the flats on the offending cup. I then ensure that the wrench cannot slip off of the flats. To prevent the possibility of a slip, I jury rig a clamp to prevent it...
Usually, with both bottom bracket cups installed (no bearings), I run a 5/8" through the cup holes, which is used to prevent the 16" wrench from slipping off of the drive side BB flats. I use WD40 ahead of time with the hope that it just might help a bit (don't get too excited but it cannot hurt). Then, ensuring the the wrench is SNUGLY adjusted to the best fit possible to the flats, rotate this way and then the other way, until you feel movement. Once you do feel movement, you are almost home free.
As mentioned, it is rare that this procedure does not work for me. It allows considerable (needed) torque with minimal risk of the wrench slipping off and/or banged up knuckles (bloody pain in the butt when this happens).
Good luck if you decide to give it a try.
__________________
"98% of the bikes I buy are projects".
"98% of the bikes I buy are projects".