


16 speed Brompton with shimano nexus 8
 03-04-21, 09:31 PM
#76

Senior Member
Join Date: Sep 2005
Location: Michigan
Posts: 3,706
Bikes: Trek 730 (quad), 720 & 830, Bike Friday NWT, Brompton M36R & M6R, Dahon HAT060 & HT060, ...
Mentioned: 10 Post(s)
Tagged: 0 Thread(s)
Quoted: 840 Post(s)
Liked 336 Times
in
251 Posts
In my memory, the plastic cylinders provide no structural support of any sort, just shield the interior from dirt getting in. I.e., if you extend the pulley axles so far that a gap develops, the risk will be of letting dirt in. Indeed you can presumably remedy it by elongating the cylinders in some fashion. In my arrangement, I had to modify the protective caps on the tensioner wheels from the other side, after elongating the axles. Incidentally, Bikegang sells extended axles with such caps, but their caps are too soft and fall out and get lost over short time.
 03-05-21, 05:38 AM
#77
Senior Member
Join Date: Aug 2011
Location: Paris, France
Posts: 2,497
Mentioned: 9 Post(s)
Tagged: 0 Thread(s)
Quoted: 573 Post(s)
Liked 118 Times
in
99 Posts
He bought it second hand from someone who had it done. At some point, he no longer liked the way the chain tensioner had been modified, so went ahead and 3D-printed two spacers.
I guess it was cold set since AonaB doesn't mention a factory-made 135mm triangle like those from Kinetics or available on Chinese sites these days.
It looks like a simple spacer with the same diameter throughout is OK, but if I also go the 3D route, I might as well make one with a 1mm difference between the two halves so that there's no additional play between the idler pulley and the axle it rotates around.
Last edited by Winfried; 03-05-21 at 05:43 AM.
 03-05-21, 06:14 AM
#78
Senior Member
Join Date: Aug 2011
Location: Paris, France
Posts: 2,497
Mentioned: 9 Post(s)
Tagged: 0 Thread(s)
Quoted: 573 Post(s)
Liked 118 Times
in
99 Posts
Also, considering the tiny difference in diameters between the SA axle (10mm) and the Shimano (3/8" = 9.525mm), I wonder if using the SA nut + lock washers is really an issue.

03-05-21, 08:08 AM
#80
Schwinnasaur

I did not see that the Aussie used the metal sleeves. Perhaps because his jockeys do not slide or need to since does not shift it off the cog.
03-05-21, 12:12 PM
#81
Senior Member
Join Date: Aug 2011
Location: Paris, France
Posts: 2,497
Mentioned: 9 Post(s)
Tagged: 0 Thread(s)
Quoted: 573 Post(s)
Liked 118 Times
in
99 Posts
One among others:
https://www.aliexpress.com/item/4000922614652.html
I emailed Aceoffix and Twtopse to suggest they offer a 135mm steel triangle as a more affordable alternative to their titanium version� but am not holding my breath. Too bad, because I'm sure enough Brompton users would be interested in a better transmission.
From what I understood, the original metal spacers were installed by the previous owner, and can be seen in this picture.
https://www.aliexpress.com/item/4000922614652.html
I emailed Aceoffix and Twtopse to suggest they offer a 135mm steel triangle as a more affordable alternative to their titanium version� but am not holding my breath. Too bad, because I'm sure enough Brompton users would be interested in a better transmission.
03-05-21, 02:16 PM
#82
Senior Member
Join Date: Sep 2005
Location: Michigan
Posts: 3,706
Bikes: Trek 730 (quad), 720 & 830, Bike Friday NWT, Brompton M36R & M6R, Dahon HAT060 & HT060, ...
Mentioned: 10 Post(s)
Tagged: 0 Thread(s)
Quoted: 840 Post(s)
Liked 336 Times
in
251 Posts
As I have different male and female threads in the vicinity that match or just minimally mismatch and I tried to couple those that mismatched just a bit, my advise is of not going for it with the wheel axle. It is about safety and cost. If it does not fully hold, you can strip the thread when hitting a bump. If you have to force the nut, you will be weakening the threads while tightening the nut and you may end up with a stuck nut that you can only remove while ruining the threads for good. The cost and trouble replacing the wheel is out of proportion to the trouble in finding the proper nut.
03-06-21, 10:09 AM
#83
Senior Member
Join Date: Aug 2011
Location: Paris, France
Posts: 2,497
Mentioned: 9 Post(s)
Tagged: 0 Thread(s)
Quoted: 573 Post(s)
Liked 118 Times
in
99 Posts
Yes, I'll play it safe, and find some ~3mm tall, OD 15mm wide, ID 3/8" nut so it fits both the Nexus axle and the Brompton chain tensioner.
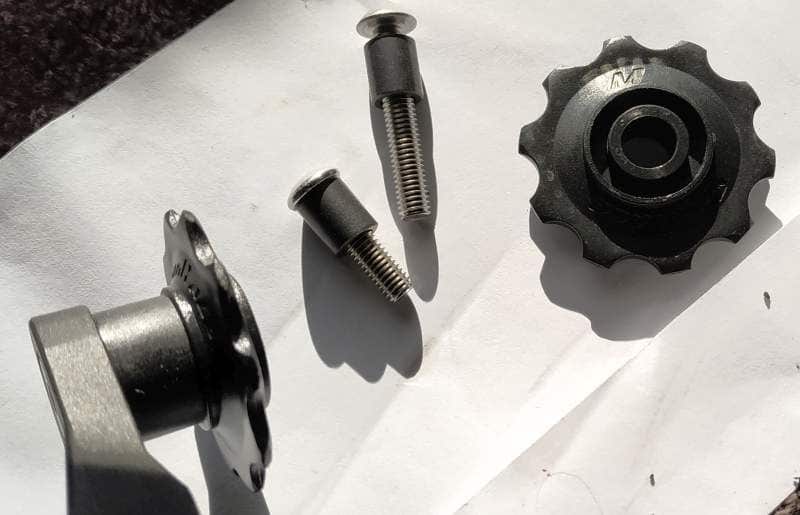
The ID of the part where the idlers rest on fhe 2/6 chain tensioner above is 15mm. Hopefully, a 3D-printed cylinder like AonaB did will be tough enough to withstand the force from the tensioner spring even with the leverage of this add-on, and not break while touring.

The ID of the part where the idlers rest on fhe 2/6 chain tensioner above is 15mm. Hopefully, a 3D-printed cylinder like AonaB did will be tough enough to withstand the force from the tensioner spring even with the leverage of this add-on, and not break while touring.
Last edited by Winfried; 03-06-21 at 10:18 AM.
03-09-21, 12:26 PM
#85
Senior Member
Join Date: Aug 2011
Location: Paris, France
Posts: 2,497
Mentioned: 9 Post(s)
Tagged: 0 Thread(s)
Quoted: 573 Post(s)
Liked 118 Times
in
99 Posts
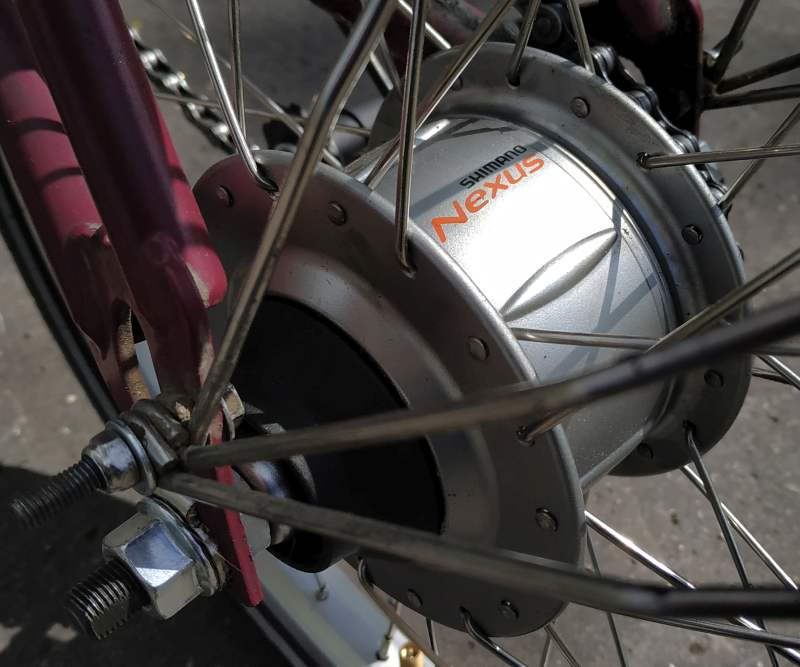
Removing the 7,3mm nut that holds the dust cap reduces the OLD from 132 to ~124mm, which means the Brompton frame only needs to be widened to 124-122=12mm (6mm on each side.) The dust cap will be held in place by the frame and the outter nut, as show in this post above.
But this means that the hub is moved slightly to the left (ie. non-drive side), so I must build a dished wheel, ie. the spokes are of a different length left/right.
To order the right spoke lengths, am I correct in understanding I should somehow measure and correct the Left Flange Offset (original: 29.3 mm) and Right Flange Offset (original: 24.5 mm) settings?

https://www.kstoerz.com/freespoke/hub/168
But this means that the hub is moved slightly to the left (ie. non-drive side), so I must build a dished wheel, ie. the spokes are of a different length left/right.
To order the right spoke lengths, am I correct in understanding I should somehow measure and correct the Left Flange Offset (original: 29.3 mm) and Right Flange Offset (original: 24.5 mm) settings?
https://www.kstoerz.com/freespoke/hub/168
05-07-21, 10:31 AM
#86
Senior Member
Join Date: Aug 2011
Location: Paris, France
Posts: 2,497
Mentioned: 9 Post(s)
Tagged: 0 Thread(s)
Quoted: 573 Post(s)
Liked 118 Times
in
99 Posts
Turned out to be a lot easier than I had read on the Net.
It only took ~20mn to a seasoned frame maker to cold set the frame with a metal bar as lever, and could probably do it faster with experience. He didn't even have to remove/replace the thick, left side nut to gain a few mms, and cold set it at 133m (Nexus 8 = 132,5mm). That saved me filing down the axle to increase the flats, and dish the wheel to match.
As for for the 2/6 speed chain tensioner + 1/3 speed jockey wheels combo, don't bother with filling the "chimneys" with a 3D-printed cylinder or a small wood rod: Just put a 18+mm washer on top of them so the jockey wheels rest OK. If you need to move the wheels inward — I didn't —, just insert washers.
Silence, single shifter, no more derailleur stuck with mud on the bigger cog, same gear inches than Brompton's six-speed transmission (307 vs. 302%) with smaller increases between gears (Brompton, Nexus)… and all that for an extra400g 700g.
Recommended upgrade.
It only took ~20mn to a seasoned frame maker to cold set the frame with a metal bar as lever, and could probably do it faster with experience. He didn't even have to remove/replace the thick, left side nut to gain a few mms, and cold set it at 133m (Nexus 8 = 132,5mm). That saved me filing down the axle to increase the flats, and dish the wheel to match.
As for for the 2/6 speed chain tensioner + 1/3 speed jockey wheels combo, don't bother with filling the "chimneys" with a 3D-printed cylinder or a small wood rod: Just put a 18+mm washer on top of them so the jockey wheels rest OK. If you need to move the wheels inward — I didn't —, just insert washers.
Silence, single shifter, no more derailleur stuck with mud on the bigger cog, same gear inches than Brompton's six-speed transmission (307 vs. 302%) with smaller increases between gears (Brompton, Nexus)… and all that for an extra
Recommended upgrade.
Last edited by Winfried; 05-11-21 at 02:44 AM.
Likes For Winfried:
05-08-21, 02:47 AM
#88
Senior Member
Join Date: Aug 2011
Location: Paris, France
Posts: 2,497
Mentioned: 9 Post(s)
Tagged: 0 Thread(s)
Quoted: 573 Post(s)
Liked 118 Times
in
99 Posts
With the 26/46T double crankset I was using with the BWR, and now with the smallest cog from Shimano (16T), it's too low (1.09 - 5.90m), so I'll replace it with a 34/50T (1.42 - 6.42m).
If I had to widen the triangle myself, I would be more cautious:
1. From the center of the bike, measure the angle each end of the horizontal bars make with the center of the bike, as the right-side tube is slighly more bent than the left-side because the latter is a bit further out from the center (folding requirement)
2. Bend two metal rods accordingly and use them as jigs, as an easy was to check we reached our targets
3. Use two clamps to hold the triangle in place: One on the horizontal tubes just before they're bent at the end, and one to hold the diagonal tubes just before the dropouts: We only want to increase the curvature of the horizontal tubes, nothing else
4. Use a regular bike hub + nuts to check you reached the required ~133mm and that the dropouts are parallel.
Considering the very small overall increase in weight and the much better user experience… it's a shame Brompton doesn't even offer the Nexus 8 as an option. Considering the parts it'd save (single shifter, no derailleur) and the massive number of N8 Shimano sells, it probably wouldn't be more expensive, or barely.
Last edited by Winfried; 05-08-21 at 03:42 AM.
05-08-21, 04:59 PM
#89
Senior Member
Join Date: Sep 2005
Location: Michigan
Posts: 3,706
Bikes: Trek 730 (quad), 720 & 830, Bike Friday NWT, Brompton M36R & M6R, Dahon HAT060 & HT060, ...
Mentioned: 10 Post(s)
Tagged: 0 Thread(s)
Quoted: 840 Post(s)
Liked 336 Times
in
251 Posts
Is the conversion to Alfine 11 going to be identical? Are there any reasons going for one hub or the other? I am just curious.
05-09-21, 09:17 AM
#90
Senior Member
Join Date: Aug 2011
Location: Paris, France
Posts: 2,497
Mentioned: 9 Post(s)
Tagged: 0 Thread(s)
Quoted: 573 Post(s)
Liked 118 Times
in
99 Posts
The Alfine has a 135mm OLD, so you just need to widen the triangle 2mm more. It's been done.
An Alfine 11 offers a 409% development, which is less than what I have with a double chainring, but it might be enough depending on where you ride.
Note that the pulley arm on the Alfine cassette joint is above while the Nexus CJ is below. No reason to think it'd be an issue. At worst, it can be pointed backward.
Being oil-lubricated while the Alfine/Nexus 8 are grease-lubricated, the Alfine 11 is a bit more efficient. I'll probably open the Nexus, clean up the original grease, and feed it with Phil Wood Tenacious Oil.
Last edited by Winfried; 05-09-21 at 09:25 AM.
Likes For Winfried:
05-09-21, 10:11 AM
#91
Senior Member
Join Date: Aug 2011
Location: Paris, France
Posts: 2,497
Mentioned: 9 Post(s)
Tagged: 0 Thread(s)
Quoted: 573 Post(s)
Liked 118 Times
in
99 Posts
Like I said, If I were bold enough and do it myself, I would use two clamps, to make sure the 1) diagonal tubes and 2) the horizontal tubes (before the curvatures) don't move.
Then, I would measure the angle each horizontal tube makes currently (the right tube is a bit more bent) and compute how far each should be bent outward for the OLD to reach 135mm.
That's why using a long metal plate as lever to bend each tube independently is a better way than using a fork spreading tool because the latter might mess the ratio with the rim no longer being centered.
05-09-21, 10:31 AM
#92
Senior Member
Join Date: Sep 2005
Location: Michigan
Posts: 3,706
Bikes: Trek 730 (quad), 720 & 830, Bike Friday NWT, Brompton M36R & M6R, Dahon HAT060 & HT060, ...
Mentioned: 10 Post(s)
Tagged: 0 Thread(s)
Quoted: 840 Post(s)
Liked 336 Times
in
251 Posts
That's why using a long metal plate as lever to bend each tube independently is a better way than using a fork spreading tool because the latter might mess the ratio with the rim no longer being centered.
05-09-21, 10:53 AM
#93
Senior Member
Join Date: Aug 2011
Location: Paris, France
Posts: 2,497
Mentioned: 9 Post(s)
Tagged: 0 Thread(s)
Quoted: 573 Post(s)
Liked 118 Times
in
99 Posts
Besides the tire wearing oddly, I guess it also impacts the way the bike rides.
The frame maker used a long, flat tube that looked like this.
Reminded me of M*A*S*H.

The frame maker used a long, flat tube that looked like this.
Reminded me of M*A*S*H.
Last edited by Winfried; 05-09-21 at 10:56 AM.
05-10-21, 04:32 AM
#94
Senior Member
Join Date: Aug 2011
Location: Paris, France
Posts: 2,497
Mentioned: 9 Post(s)
Tagged: 0 Thread(s)
Quoted: 573 Post(s)
Liked 118 Times
in
99 Posts
A simple and affordable way to partly save on those extra 700g — not 400g, as I mistakenly measured — added by switching to a Nexus 8, is to replace Marathon Plus tires with Continental Contact Urban tires, which are supposed to be just as puncture-proof but lighter (320g vs. 480g, ie. 160*2=320g saved ).

