


Aluminium seat post identification, for removal/replacement purposes.
 09-29-22, 12:48 PM
#1
Newbie
Thread Starter
Aluminium seat post identification, for removal/replacement purposes.
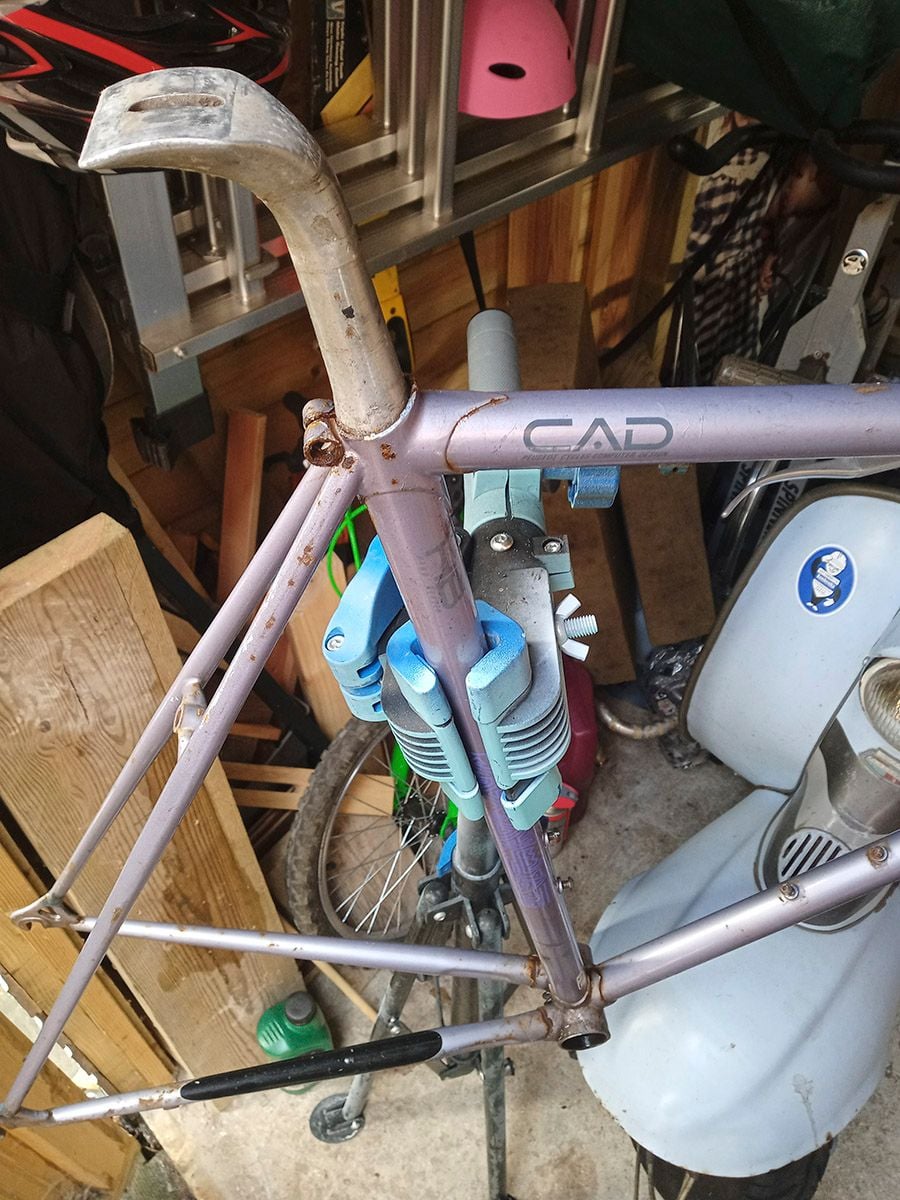
This seat post is stuck in my steel frame Peugeot Optimum road bike (no idea for how long, it was a recent Ebay purchase.
I love the elegant styling of the swans neck design & would love to remove it in one (healthy) piece.
I've begun the penetrant dowsing method & have all the time in the world for it to drink in...there's no rush.
There's roughly 3 inches of straight post above frame level - does anyone know how much more may be in the frame?
Also, is it a recognised post & therefore easily tracked down to replace? I don't see any visible markings for i.d.
 09-29-22, 02:03 PM
#2
Senior Member

Join Date: Aug 2005
Location: Las Vegas, NV
Posts: 932
Bikes: '04 LeMond Buenos Aires, '82 Bianchi Nuova Racing, De Rosa SLX, Bridgestone MB-1, Guerciotti TSX, Torpado Aelle, LeMond Tourmalet 853, Bridgestone Radac
Mentioned: 1 Post(s)
Tagged: 0 Thread(s)
Quoted: 101 Post(s)
Liked 46 Times
in
36 Posts
In the days of level top tube frames seat posts were very short compared to today. It's likely only 180mm long.
Likes For Eric S.:
09-29-22, 02:16 PM
#3
Senior Member

Join Date: Sep 2010
Location: Roswell, GA
Posts: 8,319
Bikes: '93 Trek 750, '92 Schwinn Crisscross, '93 Mongoose Alta
Mentioned: 30 Post(s)
Tagged: 0 Thread(s)
Quoted: 1438 Post(s)
Liked 1,092 Times
in
723 Posts
Get some Kano Kroil, it is your best chance at a penetrant-only solution.
Likes For dsbrantjr:
09-29-22, 02:27 PM
#4
Senior Member
Join Date: Jun 2002
Location: Montreal, Quebec
Posts: 5,917
Mentioned: 16 Post(s)
Tagged: 0 Thread(s)
Quoted: 1813 Post(s)
Liked 1,691 Times
in
972 Posts
I get it. The top of that seat post has an elegant appearance. However, if is well and truly stuck you may have to sacrifice it in order to save the rest of this bike. Penetrating lubricants can help, but still some brute force may be required to free that seat post which might destroy the top of the seatpost. . I faced the same dilemma years ago freeing up a seat post on a GT LTS. I worked on it for over a year, finally having to cut the post off and cut from the inside diameter of the post . I saved the bike, sacrificed the post. Do you want a bike or a useless seat post?
09-29-22, 06:43 PM
#5

Mad bike riding scientist

Join Date: Nov 2004
Location: Denver, CO
Posts: 27,334
Bikes: Some silver ones, a red one, a black and orange one, and a few titanium ones
Mentioned: 152 Post(s)
Tagged: 1 Thread(s)
Quoted: 6192 Post(s)
Liked 4,190 Times
in
2,351 Posts
No clue on the seatpost, although it looks a bit like a long layback Velo Orange Grand Cru. However, I think you may want to reassess whether or not it’s even worth trying to remove the post. The frame is showing some very concerning rust. The rust on the seatstay isn’t anything to worry about but every joint on the frame that we can see in the picture is showing rust. Not a little rust but rust that completely encircles the lug/tube joint. That’s concerning.
__________________
Stuart Black
Plan Epsilon Around Lake Michigan in the era of Covid
Old School�When It Wasn�t Ancient bikepacking
Gold Fever Three days of dirt in Colorado
Pokin' around the Poconos A cold ride around Lake Erie
Dinosaurs in Colorado A mountain bike guide to the Purgatory Canyon dinosaur trackway
Solo Without Pie. The search for pie in the Midwest.
Picking the Scablands. Washington and Oregon, 2005. Pie and spiders on the Columbia River!
09-29-22, 07:03 PM
#6
Really Old Senior Member

You might be ale to get a rough idea by tapping the seat tube with a SMALL wrench or similar and listen to when the sound changes pitch/tone/different.
I'd give those rusty joints a workout with a wire brush to see IF you can tell how deep it goes.
I'd give those rusty joints a workout with a wire brush to see IF you can tell how deep it goes.

Likes For Bill Kapaun:
09-30-22, 09:48 AM
#7
Friendship is Magic

Join Date: Nov 2010
Location: Sacramento, CA
Posts: 22,982
Bikes: old ones
Mentioned: 304 Post(s)
Tagged: 0 Thread(s)
Quoted: 26370 Post(s)
Liked 10,340 Times
in
7,184 Posts
.
...just a couple of random thoughts. they may or may not help you.
1. the best penetrant, by far, is a 50/50 mix of acetone and automatic transmission fluid.
2. I have owned a couple of posts that were designed like that, and they did not work well. You can help them work better, by increasing the friction of the large flat surface on that curved top, but they tend to slip unless the bolt is tightened excessively. I just replaced mine with a different design.
3. when you struggle with trying to get it to break free, it helps a lot to install an old, junk steel saddle frame, or a crummy saddle you can sacrifice, into the post, Then you can pound and twist on the saddle frame, not the post clamp. If youi have access to a solid mounted bench vise, you can clamp the steel saddle frame in the vise, and twist the bike frame itself, to break it free of the post.
__________________
Likes For 3alarmer:
09-30-22, 10:51 AM
#8
Senior Member
Join Date: Feb 2012
Location: Golden, CO and Tucson, AZ
Posts: 2,835
Bikes: 2016 Fuji Tread, 1983 Trek 520
Mentioned: 13 Post(s)
Tagged: 0 Thread(s)
Quoted: 674 Post(s)
Liked 738 Times
in
429 Posts
If you plan on repainting, DOT3 brake fluid is also an excellent penetrant. But it will damage paint. I use it on auto suspension work with great results.
In any case, even with successful penetration, it's still going to take a lot of mechanical force. I hear aluminum swells when it oxidizes. The idea with a sacrificial saddle is a good one. Otherwise, an 18" or 24" pipe wrench on the post has worked for me. Be sure to use the front triangle for the opposing force.
Checking the oxidation at the BB shell before proceeding is a very good idea.
Likes For andrewclaus:
09-30-22, 11:09 AM
#9
Senior Member

Join Date: Jul 2005
Location: Boulder County, CO
Posts: 4,385
Bikes: '80 Masi Gran Criterium, '12 Trek Madone, early '60s Frejus track
Mentioned: 6 Post(s)
Tagged: 0 Thread(s)
Quoted: 512 Post(s)
Liked 444 Times
in
334 Posts
In any case, even with successful penetration, it's still going to take a lot of mechanical force. I hear aluminum swells when it oxidizes. The idea with a sacrificial saddle is a good one. Otherwise, an 18" or 24" pipe wrench on the post has worked for me. Be sure to use the front triangle for the opposing force.
Likes For oldbobcat:
Likes For andrewclaus:
09-30-22, 02:00 PM
#11
Friendship is Magic
Join Date: Nov 2010
Location: Sacramento, CA
Posts: 22,982
Bikes: old ones
Mentioned: 304 Post(s)
Tagged: 0 Thread(s)
Quoted: 26370 Post(s)
Liked 10,340 Times
in
7,184 Posts
A sacrificial saddle is unlikely to provide enough grip or leverage. I'd put that post in a bench vise, protected by wooden blocks, of course. Spray the inside with penetrant, let it soak for a few days, and then start with short, sharp twisting efforts on the frame. Resist the urge to use a hammer or cheater bar.
....this may be your opinion, but I can assure you that I've done this plenty of times, and in fact, keep an old leather saddle frame (minus the leather) hanging over on one corner of the tools pegboard for exactly this purpose. It works quite well, and you don't need any wooden blocks or other protections for the saddle frame, because it is not necessary to protect it. Why in the world would you think that grabbing a sacrificial saddle frame, attached to the post via the post's own clamp, and fixed on a bench vise, would have less "leverage" in using this method to twist the frame off the post ? It's the same operation. But by avoiding any clamping force directed from the vise to the post, it protects the post and clamp itself.
__________________
Likes For 3alarmer:
09-30-22, 07:31 PM
#12
Senior Member

Join Date: Mar 2014
Location: City of Angels
Posts: 4,867
Bikes: A few too many
Mentioned: 42 Post(s)
Tagged: 1 Thread(s)
Quoted: 1360 Post(s)
Liked 2,175 Times
in
1,180 Posts
I will add turn the bike upside down and put the penetrant into the BB shell and give it a long time to work...you might even see some of it flowing out around the "downturned" seat post.
Good Luck, Ben
Good Luck, Ben
__________________
"EVERY PERSON IS GUILTY OF ALL THE GOOD THEY DID NOT DO"
Voltaire
Voice recognition may sometimes create odd spelling and grammatical errors
"EVERY PERSON IS GUILTY OF ALL THE GOOD THEY DID NOT DO"
Voltaire
Voice recognition may sometimes create odd spelling and grammatical errors
09-30-22, 08:08 PM
#13
Friendship is Magic
Join Date: Nov 2010
Location: Sacramento, CA
Posts: 22,982
Bikes: old ones
Mentioned: 304 Post(s)
Tagged: 0 Thread(s)
Quoted: 26370 Post(s)
Liked 10,340 Times
in
7,184 Posts
.
...the other thing you can do is grab a MAPP gas torch, and use it to do several heating and cooling cycles, applying the heat to the aluminum post, to avoid smoking the paint on the frame. The expansion and contraction over several cycles will usually break the corrosive bond between the steel frame and the aluminum post, and it also helps your penetrant to wick in, if you apply it when the thing is hot. You should get it hot enough to smoke the oil, but not so hot that you damage the paint. If that makes sense ? It usually works, but sometimes posts can be pretty stuck in there.
Cool with something like Freeze Off.
__________________
Likes For 3alarmer:
Likes For grumpus:
10-01-22, 10:32 AM
#15
Newbie
Thread Starter
10-01-22, 10:34 AM
#16
Newbie
Thread Starter
10-01-22, 10:37 AM
#17
Newbie
Thread Starter
I get it. The top of that seat post has an elegant appearance. However, if is well and truly stuck you may have to sacrifice it in order to save the rest of this bike. Penetrating lubricants can help, but still some brute force may be required to free that seat post which might destroy the top of the seatpost. . I faced the same dilemma years ago freeing up a seat post on a GT LTS. I worked on it for over a year, finally having to cut the post off and cut from the inside diameter of the post . I saved the bike, sacrificed the post. Do you want a bike or a useless seat post?
 )....but I understand it's a process with many outcomes.
10-01-22, 10:38 AM
)....but I understand it's a process with many outcomes.
10-01-22, 10:38 AM
#18
Newbie
Thread Starter
No clue on the seatpost, although it looks a bit like a long layback Velo Orange Grand Cru. However, I think you may want to reassess whether or not it�s even worth trying to remove the post. The frame is showing some very concerning rust. The rust on the seatstay isn�t anything to worry about but every joint on the frame that we can see in the picture is showing rust. Not a little rust but rust that completely encircles the lug/tube joint. That�s concerning.
10-01-22, 10:43 AM
#20
Newbie
Thread Starter
10-01-22, 10:44 AM
#21
Newbie
Thread Starter
10-01-22, 10:58 AM
#23
Mad bike riding scientist
Join Date: Nov 2004
Location: Denver, CO
Posts: 27,334
Bikes: Some silver ones, a red one, a black and orange one, and a few titanium ones
Mentioned: 152 Post(s)
Tagged: 1 Thread(s)
Quoted: 6192 Post(s)
Liked 4,190 Times
in
2,351 Posts
On a new (or newer) bike, it might be superficial. But this bike is around 30 years old and has significant rust elsewhere, in addition to a frozen post. It has rust problems.
__________________
Stuart Black
Plan Epsilon Around Lake Michigan in the era of Covid
Old School�When It Wasn�t Ancient bikepacking
Gold Fever Three days of dirt in Colorado
Pokin' around the Poconos A cold ride around Lake Erie
Dinosaurs in Colorado A mountain bike guide to the Purgatory Canyon dinosaur trackway
Solo Without Pie. The search for pie in the Midwest.
Picking the Scablands. Washington and Oregon, 2005. Pie and spiders on the Columbia River!
10-01-22, 12:16 PM
#24

Senior Member

Join Date: Jul 2006
Location: San Jose (Willow Glen) Ca
Posts: 9,828
Bikes: Kirk Custom JK Special, '84 Team Miyata,(dura ace old school) 80?? SR Semi-Pro 600 Arabesque
Mentioned: 106 Post(s)
Tagged: 0 Thread(s)
Quoted: 2336 Post(s)
Liked 2,802 Times
in
1,531 Posts
other seat post removal approaches
I agree with doing a good rust check before investing time/effort on the seat post
some other seat post removal methods
ammonia soak, turn frame upside down an fill with as concentrated ammonia as you can find
thermal shock..... a product called freeze off combines penetrant and get super cold when applied...this is my go to for stuck things
from there it is destructive removal
lye soak to dissolve the seat post
cut top of seat post off and cut the seatpost out by cutting vertical strips out
__________________
Life is too short not to ride the best bike you have, as much as you can
(looking for Torpado Super light frame/fork or for Raleigh International frame fork 58cm)
Life is too short not to ride the best bike you have, as much as you can
(looking for Torpado Super light frame/fork or for Raleigh International frame fork 58cm)
10-01-22, 07:54 PM
#25
Senior Member
Join Date: Jul 2005
Location: Boulder County, CO
Posts: 4,385
Bikes: '80 Masi Gran Criterium, '12 Trek Madone, early '60s Frejus track
Mentioned: 6 Post(s)
Tagged: 0 Thread(s)
Quoted: 512 Post(s)
Liked 444 Times
in
334 Posts
....this may be your opinion, but I can assure you that I've done this plenty of times, and in fact, keep an old leather saddle frame (minus the leather) hanging over on one corner of the tools pegboard for exactly this purpose. It works quite well, and you don't need any wooden blocks or other protections for the saddle frame, because it is not necessary to protect it. Why in the world would you think that grabbing a sacrificial saddle frame, attached to the post via the post's own clamp, and fixed on a bench vise, would have less "leverage" in using this method to twist the frame off the post ? It's the same operation. But by avoiding any clamping force directed from the vise to the post, it protects the post and clamp itself.

