


Question regarding dropouts
 11-19-21, 03:14 PM
#1
Junior Member
Thread Starter
Question regarding dropouts
Hi
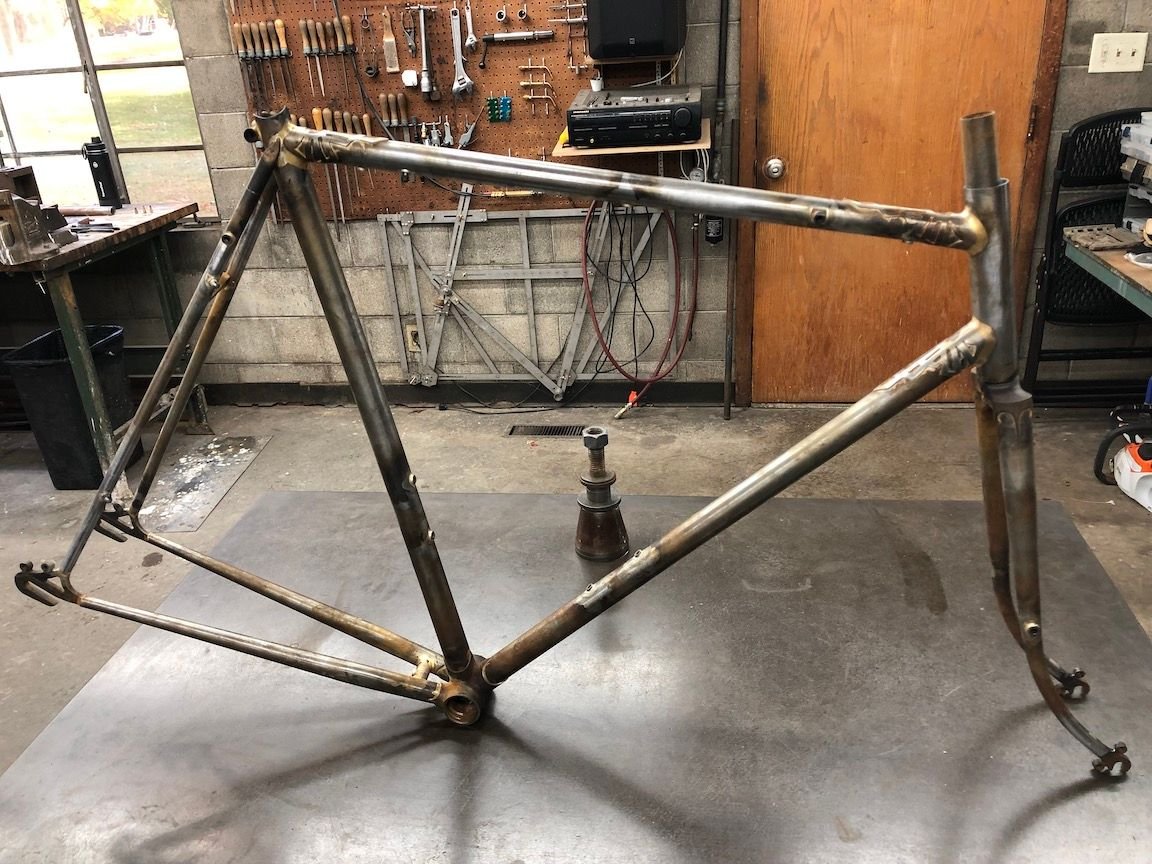
I am building my first frame. Learning as i go. Just finished my main triangle and about to start on the rear frame. Bought my tubes from Reynolds type 631. I am bending the top tube. So, i got these rear droputs (see picture). The are part # LS186 and seems to some with d. hanger. I don�t know how to get these integrated with the chainstays. Think about getting som new ones. Plan is to use a 28 inch wheel with 7 gear internal. Have anyone used these dropouts and can give me some pointers?
thanks
[img]blob:https://www.bikeforums.net/f7acf010-e6ad-4407-8971-49cdaf6f2815[/img]
 11-19-21, 04:49 PM
#2

framebuilder
If I was building a frame that was going to use a 7 sp internally geared hub, I'd use long slot horizontal dropouts. Ceeway in England has some nice ones (N65). I wouldn't use vertical dropouts like the ones in your picture for several reasons. 1st you will have to add a chain tensioner and there is no reason to do that if you are using horizontal dropouts. A 2nd, it is much more difficult (especially for a beginner) to get the chain stays the exact length so the rear wheel centers.
The way you attach your hooded vertical dropouts to chain stays is by mitering the end of the CS to match the radius of the hood and then fillet braze them together with brass (we say brass but really it is bronze). With this kind of dropout, it requires more careful positioning when brazing. Another reason not to use them if you don't have good fixturing.
The way you attach your hooded vertical dropouts to chain stays is by mitering the end of the CS to match the radius of the hood and then fillet braze them together with brass (we say brass but really it is bronze). With this kind of dropout, it requires more careful positioning when brazing. Another reason not to use them if you don't have good fixturing.
11-19-21, 05:16 PM
#3
Junior Member
Thread Starter
If I was building a frame that was going to use a 7 sp internally geared hub, I'd use long slot horizontal dropouts. Ceeway in England has some nice ones (N65). I wouldn't use vertical dropouts like the ones in your picture for several reasons. 1st you will have to add a chain tensioner and there is no reason to do that if you are using horizontal dropouts. A 2nd, it is much more difficult (especially for a beginner) to get the chain stays the exact length so the rear wheel centers.
The way you attach your hooded vertical dropouts to chain stays is by mitering the end of the CS to match the radius of the hood and then fillet braze them together with brass (we say brass but really it is bronze). With this kind of dropout, it requires more careful positioning when brazing. Another reason not to use them if you don't have good fixturing.
The way you attach your hooded vertical dropouts to chain stays is by mitering the end of the CS to match the radius of the hood and then fillet braze them together with brass (we say brass but really it is bronze). With this kind of dropout, it requires more careful positioning when brazing. Another reason not to use them if you don't have good fixturing.
11-19-21, 07:54 PM
#4
Senior Member
Spot on, Doug. The first frame I built the chain stays were 2mm shorter on the drive side than the non drive side. Although everything measured the same before brazing, they did not end the same after brazing! Thank goodness I used horizontal drop outs.
11-20-21, 03:05 AM
#5
Senior Member
Join Date: Dec 2019
Posts: 955
Mentioned: 3 Post(s)
Tagged: 0 Thread(s)
Quoted: 321 Post(s)
Liked 263 Times
in
212 Posts
What Doug said was spot on, but I would add that you can also TIG weld these dropouts on and in fact they are the best design to use for a TIG frame (they're sometimes even called "TIG dropouts" rather than "hooded dropouts").
I'm not sure bending the top-tube is a good idea as this Reynolds tube will be butted which means it will be very thin in the middle section. I think you're better to get some plain-gauge CrMo tube from somewhere (about 0.8 or 0.9mm wall), quite a bit longer than you need, and then curve it with a roller bender. It needs to be long because with a roller bender you can only bend so close to the ends of the tube.
Good luck with the build!
11-20-21, 12:25 PM
#6
Junior Member
Thread Starter
Rear axle question
Hi.
I have a follow up question and that is regarding the rear axle. I have made a frame JIG and a dummy axle. The width of the dummy is 137mm. Is that a standard that i can use? I measured the ID on my dropouts and it is 10mm. I thought that 12mm was standard. Just want to get things correct so that i can get wheels at a resonable cost in the end.
thanks
11-20-21, 02:32 PM
#7
Senior Member
Join Date: Feb 2012
Location: Rochester, NY
Posts: 18,073
Bikes: Stewart S&S coupled sport tourer, Stewart Sunday light, Stewart Commuting, Stewart Touring, Co Motion Tandem, Stewart 3-Spd, Stewart Track, Fuji Finest, Mongoose Tomac ATB, GT Bravado ATB, JCP Folder, Stewart 650B ATB
Mentioned: 0 Post(s)
Tagged: 0 Thread(s)
Quoted: 4201 Post(s)
Liked 3,856 Times
in
2,305 Posts
Hi.
I have a follow up question and that is regarding the rear axle. I have made a frame JIG and a dummy axle. The width of the dummy is 137mm. Is that a standard that i can use? I measured the ID on my dropouts and it is 10mm. I thought that 12mm was standard. Just want to get things correct so that i can get wheels at a resonable cost in the end.
thanks
I have a follow up question and that is regarding the rear axle. I have made a frame JIG and a dummy axle. The width of the dummy is 137mm. Is that a standard that i can use? I measured the ID on my dropouts and it is 10mm. I thought that 12mm was standard. Just want to get things correct so that i can get wheels at a resonable cost in the end.
thanks
Often when making a frame the rear drop width closes up a bit. Hence the 137mm slightly wider then the goal's 135mm.
What type of axle and QR will your hub have? If it's 10mm ended and common QR skewer (as the imaged drop outs would be correct for) then the 12mm reference is not a spec that matters. The 12mm might be the axle's diameter elsewhere. Don't confuse a QR axle with a through axle (which does have a 12mm spec).
Certainly these days the 10mm and QR skewered hubbed wheels will cost less then a 12mm (or 15mm for that matter) through axled wheel will. Seeing that the 1mm axle has been is use for about 100 years I doubt the replacement wheel industry will continue to offer these for years to come. Andy
__________________
AndrewRStewart
AndrewRStewart
11-20-21, 04:49 PM
#8
framebuilder
Hi.
I have a follow up question and that is regarding the rear axle. I have made a frame JIG and a dummy axle. The width of the dummy is 137mm. Is that a standard that i can use? I measured the ID on my dropouts and it is 10mm. I thought that 12mm was standard. Just want to get things correct so that i can get wheels at a resonable cost in the end. thanks
I have a follow up question and that is regarding the rear axle. I have made a frame JIG and a dummy axle. The width of the dummy is 137mm. Is that a standard that i can use? I measured the ID on my dropouts and it is 10mm. I thought that 12mm was standard. Just want to get things correct so that i can get wheels at a resonable cost in the end. thanks
Most frame builders use a "true" or "builder's wheel" to check that a wheel centers during the building process. This is a good reason to get your rear wheel before you begin building the frame. I never trust my expensive fixturing to get that just right.
Like Andy said, brazing the chain stays to the BB wheel usually closes in the space between the dropouts by at least a couple of mms.
Is this frame you are making going to be a city type of bike with upright handlebars?
11-20-21, 06:05 PM
#9


Randomhead
Join Date: Aug 2008
Location: Happy Valley, Pennsylvania
Posts: 24,395
Mentioned: 0 Post(s)
Tagged: 0 Thread(s)
Quoted: 4 Post(s)
Liked 3,696 Times
in
2,517 Posts
Paragon changed from the Anvil way of doing things, now their dummy axles are true width.
But the older ones had a couple of mm extra
But the older ones had a couple of mm extra
11-21-21, 02:31 AM
#10
Senior Member
Join Date: Dec 2019
Posts: 955
Mentioned: 3 Post(s)
Tagged: 0 Thread(s)
Quoted: 321 Post(s)
Liked 263 Times
in
212 Posts
Then after fully welding on the dropouts I extend the dummy axle by a few mm (it's just a threaded rod and some locknuts) when putting in bridge tubes.
What type of axle and QR will your hub have? If it's 10mm ended and common QR skewer (as the imaged drop outs would be correct for) then the 12mm reference is not a spec that matters. The 12mm might be the axle's diameter elsewhere. Don't confuse a QR axle with a through axle (which does have a 12mm spec).
Certainly these days the 10mm and QR skewered hubbed wheels will cost less then a 12mm (or 15mm for that matter) through axled wheel will. Seeing that the 1mm axle has been is use for about 100 years I doubt the replacement wheel industry will continue to offer these for years to come. Andy
Certainly these days the 10mm and QR skewered hubbed wheels will cost less then a 12mm (or 15mm for that matter) through axled wheel will. Seeing that the 1mm axle has been is use for about 100 years I doubt the replacement wheel industry will continue to offer these for years to come. Andy
11-21-21, 02:47 AM
#11
Junior Member
Thread Starter
You mentioned using a 7sp internally geared hub? The ones made by Shimano have an axle width between nuts as 130mm. The axle diameter is 10mm. This has been the standard forever. Their 8 speed model is 132mm. Some other brands have a width of 135. Before you make your frame, you should decide on what hub you are going to use. IGH need a non-turn washer to keep the hub from rotating. These non-turn washers are designed for dropouts with 10 mm of slot width.
Most frame builders use a "true" or "builder's wheel" to check that a wheel centers during the building process. This is a good reason to get your rear wheel before you begin building the frame. I never trust my expensive fixturing to get that just right.
Like Andy said, brazing the chain stays to the BB wheel usually closes in the space between the dropouts by at least a couple of mms.
Is this frame you are making going to be a city type of bike with upright handlebars?
So, next step for the project is to find suitable wheels. A ton to choose from and a bit confusing for an amature but i�ll manage. I do aim for a 28 or 29 inch size and 2.1-2.5 width. I have enough space.
11-21-21, 06:33 AM
#12
Senior Member
Join Date: Jan 2013
Location: South Jersey
Posts: 2,266
Mentioned: 18 Post(s)
Tagged: 0 Thread(s)
Quoted: 714 Post(s)
Liked 800 Times
in
475 Posts
They still have the +2mm versions of the QR dummy axles. They are listed as just 120,130 and 135, but they have the extra 2mm of length. The ones without the extra length are listed as "exact".
11-21-21, 06:53 AM
#13
Randomhead
Join Date: Aug 2008
Location: Happy Valley, Pennsylvania
Posts: 24,395
Mentioned: 0 Post(s)
Tagged: 0 Thread(s)
Quoted: 4 Post(s)
Liked 3,696 Times
in
2,517 Posts
They have the extra long dummy axles in a few sizes. My interpretation is those are going to go away as they sell.
11-21-21, 09:14 AM
#14
Senior Member
Join Date: Feb 2012
Location: Rochester, NY
Posts: 18,073
Bikes: Stewart S&S coupled sport tourer, Stewart Sunday light, Stewart Commuting, Stewart Touring, Co Motion Tandem, Stewart 3-Spd, Stewart Track, Fuji Finest, Mongoose Tomac ATB, GT Bravado ATB, JCP Folder, Stewart 650B ATB
Mentioned: 0 Post(s)
Tagged: 0 Thread(s)
Quoted: 4201 Post(s)
Liked 3,856 Times
in
2,305 Posts
"Then after fully welding on the dropouts I extend the dummy axle by a few mm (it's just a threaded rod and some locknuts) when putting in bridge tubes." guy153
Not sure I agree with this process. We know that when bridges are attached the rear end will want to close up so why not plan of this from the beginning. When you spread the rear end with your all thread but don't cold set it so I believe you induce more stress at the bridge. Now there will be compressive forces acting on the stays inner sides at the bridge as well as the stays taking on a bow due to the heat being focused for longer on the insides. I recently repaired a Soma (the current version of this decades old brand) steel frame whose seat stay had cracked right at the bridge. I could tell that the bridge had been too long as the stays had a distortion at the ends of the bridge, the bridge had "indented" the stay. Andy
Not sure I agree with this process. We know that when bridges are attached the rear end will want to close up so why not plan of this from the beginning. When you spread the rear end with your all thread but don't cold set it so I believe you induce more stress at the bridge. Now there will be compressive forces acting on the stays inner sides at the bridge as well as the stays taking on a bow due to the heat being focused for longer on the insides. I recently repaired a Soma (the current version of this decades old brand) steel frame whose seat stay had cracked right at the bridge. I could tell that the bridge had been too long as the stays had a distortion at the ends of the bridge, the bridge had "indented" the stay. Andy
__________________
AndrewRStewart
AndrewRStewart
11-21-21, 09:23 AM
#15
framebuilder
To all, thank you very much for all input/help. Much appreciated. Doug, yep - city bike (Electric) actually with crank engine and old school handlebars. The inspiration for the design is the schwinn bikes. My battery will be hidden inside the �tank�.
So, next step for the project is to find suitable wheels. A ton to choose from and a bit confusing for an amature but i�ll manage. I do aim for a 28 or 29 inch size and 2.1-2.5 width. I have enough space.
So, next step for the project is to find suitable wheels. A ton to choose from and a bit confusing for an amature but i�ll manage. I do aim for a 28 or 29 inch size and 2.1-2.5 width. I have enough space.
We build these bicycles on a college campus near Kyiv. The parts that aren't tubes are laser cut in Ukraine. Building them there serves several purposes including spending as much money as we raise in a country that is economically depressed. And those that have taken one of my framebuilding classes (I taught my 1st one in 1976) can practice what they have learned to refine their skills.

Yuri looking over a finished group of transportation bicycles we made in that little red shop
My last student made a city bike that will use upright handlebars and an IGH. He is an artist so added some art deco flourishes. He used those dropouts I mentioned in a prior post. His tire choice is a lot narrower than yours.
Here is a picture of the frame Kuba made to use with a IGH. His construction method was a combination of silver and bronze in a half bilaminate style.

These are the dropouts he got from Ceeway in the UK. They are #506 in their online catalog
Likes For Doug Fattic:
11-21-21, 12:11 PM
#16
Senior Member
Join Date: Dec 2019
Posts: 955
Mentioned: 3 Post(s)
Tagged: 0 Thread(s)
Quoted: 321 Post(s)
Liked 263 Times
in
212 Posts
"Then after fully welding on the dropouts I extend the dummy axle by a few mm (it's just a threaded rod and some locknuts) when putting in bridge tubes." guy153
Not sure I agree with this process. We know that when bridges are attached the rear end will want to close up so why not plan of this from the beginning. When you spread the rear end with your all thread but don't cold set it so I believe you induce more stress at the bridge. Now there will be compressive forces acting on the stays inner sides at the bridge as well as the stays taking on a bow due to the heat being focused for longer on the insides. I recently repaired a Soma (the current version of this decades old brand) steel frame whose seat stay had cracked right at the bridge. I could tell that the bridge had been too long as the stays had a distortion at the ends of the bridge, the bridge had "indented" the stay. Andy
Not sure I agree with this process. We know that when bridges are attached the rear end will want to close up so why not plan of this from the beginning. When you spread the rear end with your all thread but don't cold set it so I believe you induce more stress at the bridge. Now there will be compressive forces acting on the stays inner sides at the bridge as well as the stays taking on a bow due to the heat being focused for longer on the insides. I recently repaired a Soma (the current version of this decades old brand) steel frame whose seat stay had cracked right at the bridge. I could tell that the bridge had been too long as the stays had a distortion at the ends of the bridge, the bridge had "indented" the stay. Andy
But if you make the rear spacing slightly too wide to start with then at the end of it all the bridge tube is now pulling it elastically back into the right place. So you have some residual stress, with a bit of tension at the ends of the bridge tube.
Yes if you overdo it then the bridge tube will be pushing the stays too wide and you will actually have to bend them back, and the joints at the ends of the bridge tube will have some residual compression. But this should actually reduce fatigue.
The aim is to get it just right. I don't think the residual stresses make too much difference and may not have contributed to the failure on the Soma-- it could have been something else like a defect in the weld. My main reason for doing it like this is to preserve the dropout alignment.
11-21-21, 12:14 PM
#17
Junior Member
Thread Starter
I had to study the design of city transportation kind of bicycles because of our charity bicycle project in Ukraine. Holland was a great place to start. The essential factors are more laid back angles (around 70�/71�) and longer top tubes (around 58 cm effective length). This is because a person's butt goes back more when sitting more upright. And hands coming back towards you with M shaped handlebars (north road style) requires extending the stem further out. Don't make the mistake of copying the design of a road bike that uses drop handlebars.
We build these bicycles on a college campus near Kyiv. The parts that aren't tubes are laser cut in Ukraine. Building them there serves several purposes including spending as much money as we raise in a country that is economically depressed. And those that have taken one of my framebuilding classes (I taught my 1st one in 1976) can practice what they have learned to refine their skills.
Yuri looking over a finished group of transportation bicycles we made in that little red shop
My last student made a city bike that will use upright handlebars and an IGH. He is an artist so added some art deco flourishes. He used those dropouts I mentioned in a prior post. His tire choice is a lot narrower than yours.
Here is a picture of the frame Kuba made to use with a IGH. His construction method was a combination of silver and bronze in a half bilaminate style.
These are the dropouts he got from Ceeway in the UK. They are #506 in their online catalog
My ST angle is 72.5 and HT angle is 71. Effective TT length is 58.6cm. DT about the same. A bit longer. BB to rear axle is 45.9cm.
11-21-21, 02:09 PM
#18
framebuilder
If you were to make 2 identical bicycles with north road handlebars, except one with a 72.5 ST angle and the other with a 71�, it would quickly become obvious to you which is the superior design. You wouldn't go 100 meters before wishing you saddle could go further back on the model with the steeper angle. The student that made the frame in my pictures based his design on the position he found most comfortable on a fitting bike. With a 25mm setback seat post, he found that a 70� seat angle worked well for him. if you were to put your chosen handlebars and saddle on a fitting bike you would discover the same thing too. Not necessarily that 70� is perfect but that it would be at least 71� and maybe less.
And now a word about handlebar shapes. The typical MTB bar is designed for riding fast downhill trying to avoid injury and death. It is a more forward position. Swept back handlebars are designed to ride comfortably at a walking effort so one doesn't arrive at their destination all sweaty and gasping for air. I found this shape to be more comfortable for a city cruiser. Again I assumed the Dutch (that ride everywhere on their bicycles) know what works best for the kind of riding they do.
Likes For Doug Fattic:
11-21-21, 03:58 PM
#19
Junior Member
Thread Starter
Those dimensions are solid except for the seat tube angle. If you are going to use North Road handlebars (the shape of a handlebar on old English 3 speeds or Chicago era Schwinns), a 72.5� ST angle won't work well. If you are going to use MTB style of handlebars with maybe a 6� bend, your bicycle position is more forward and a steeper seat tube angle is okay. The problem is that a person sits more upright with north road handlebars and what is happening is that their body is being pivoted backward. This means the saddle has to also be placed rearward. The Dutch - who ride this kind of bicycle with north road handlebars all the time - have even slacker angles than 71�. I studied their frame designs when I was designing our Ukraine bikes to see what they have successfully done.
If you were to make 2 identical bicycles with north road handlebars, except one with a 72.5 ST angle and the other with a 71�, it would quickly become obvious to you which is the superior design. You wouldn't go 100 meters before wishing you saddle could go further back on the model with the steeper angle. The student that made the frame in my pictures based his design on the position he found most comfortable on a fitting bike. With a 25mm setback seat post, he found that a 70� seat angle worked well for him. if you were to put your chosen handlebars and saddle on a fitting bike you would discover the same thing too. Not necessarily that 70� is perfect but that it would be at least 71� and maybe less.
And now a word about handlebar shapes. The typical MTB bar is designed for riding fast downhill trying to avoid injury and death. It is a more forward position. Swept back handlebars are designed to ride comfortably at a walking effort so one doesn't arrive at their destination all sweaty and gasping for air. I found this shape to be more comfortable for a city cruiser. Again I assumed the Dutch (that ride everywhere on their bicycles) know what works best for the kind of riding they do.
Leif
