


Trailer experimentation - from kid trailer to sectional adjustable length frame
 08-31-21, 06:42 PM
#1
Senior Member
Thread Starter
Join Date: Apr 2013
Posts: 1,173
Bikes: Surly Disk Trucker, 2014 w/Brooks Flyer Special saddle, Tubus racks - Duo front/Logo Evo rear, 2019 Dahon Mariner D8, Both bikes share Ortlieb Packer Plus series panniers, Garmin Edge 1000
Mentioned: 2 Post(s)
Tagged: 0 Thread(s)
Quoted: 405 Post(s)
Liked 115 Times
in
99 Posts
Trailer experimentation - from kid trailer to sectional adjustable length frame
All,
In another thread (link below) I have been compiling some ideas on making my own trailer from the ground up. That project is on hold for a bit. I got a kid trailer given to me so I have been experimenting with it. I think that is a really good thing because it gives me something to use and adjust, change, etc so I can refine some things before I tackle the custom trailer build entirely.
Previous thread for reference <- link
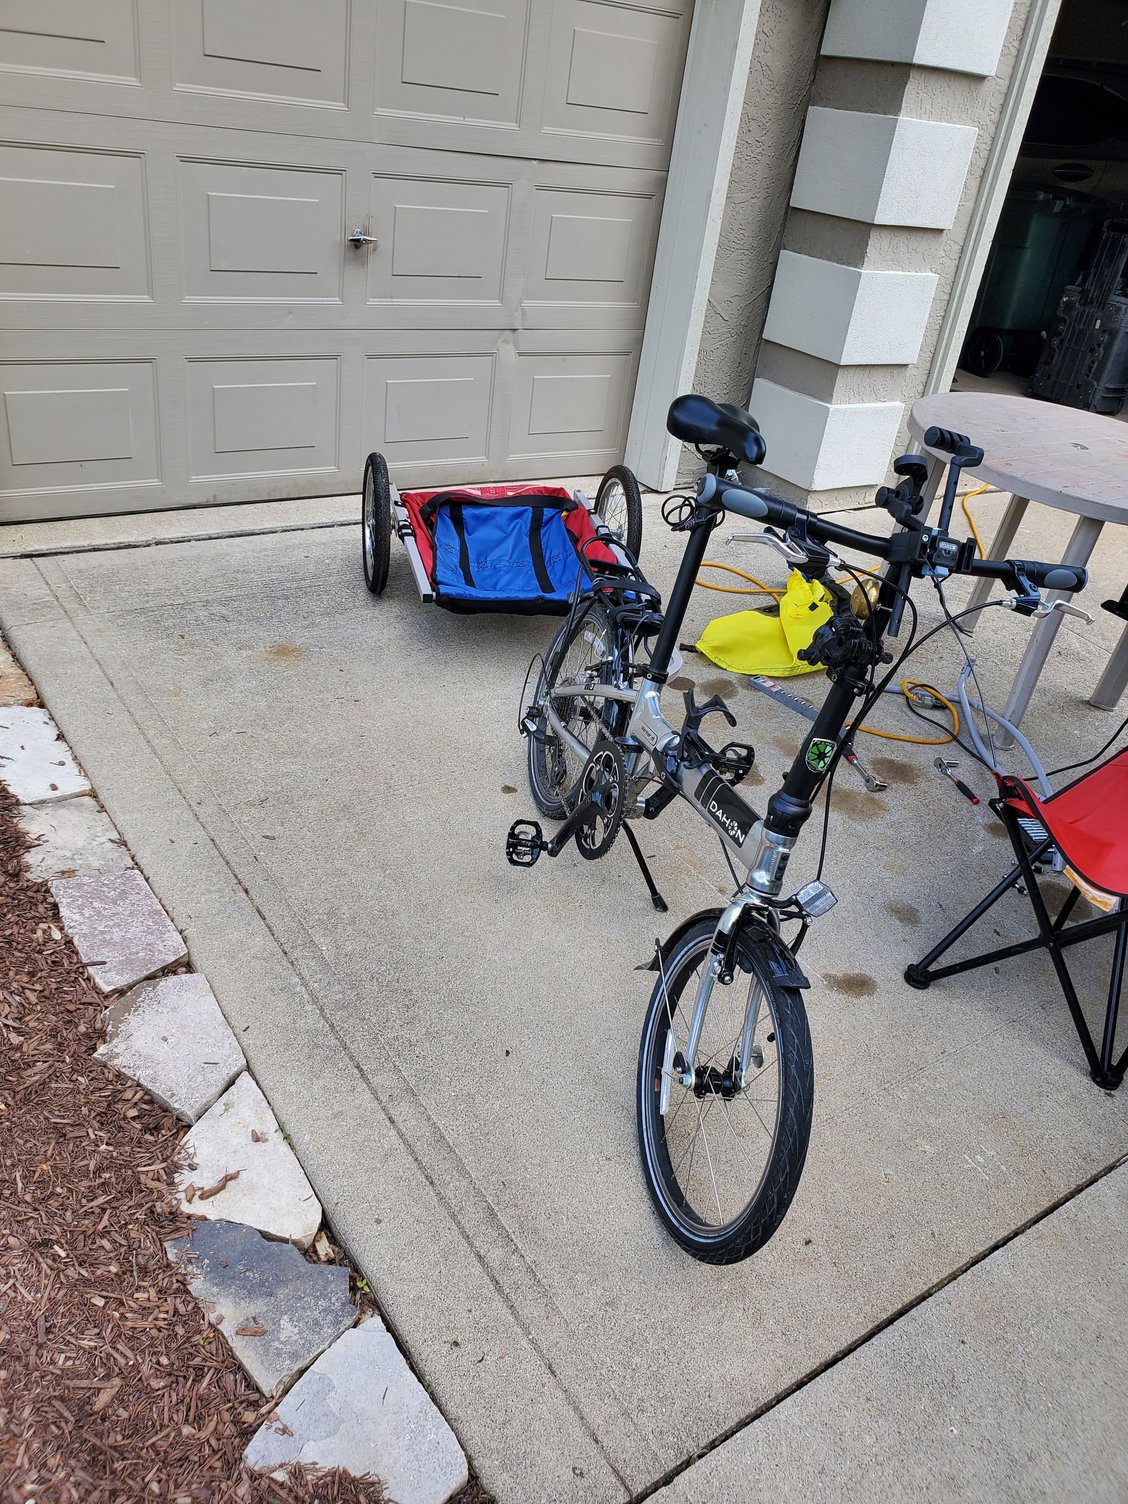
This is how I started using the kid trailer. I took the upper canopy support off and made it more of a "fabric flat bed" style.
To expand on the idea and give some background for the below metamorphosis -
I have been a Ham radio operator for 20 years and have acquired a set of surplus military tent poles for holding up various antennas. I forget how many I have, but I can string enough of them together to get 60-70 feet of mast. They have 44.5" of usable length (then a coupler - a reduced section so they can be stacked).
We got a roof rack for an SUV we have in the family and I took it on a trip a few months ago. I needed a way to put large totes on the rack so I mulled over the idea for a bit. The rack bars are a fixed distance apart and they are too wide for straddling with a tote. So I got the idea to use the mast pipes as "rails" to support the totes. It worked really well.
So that is the root of the idea of the mast pipes for the bike trailer idea. They have been successfully used as rack rails on an SUV for a cross-country trip so they will surely work for a bike trailer frame.
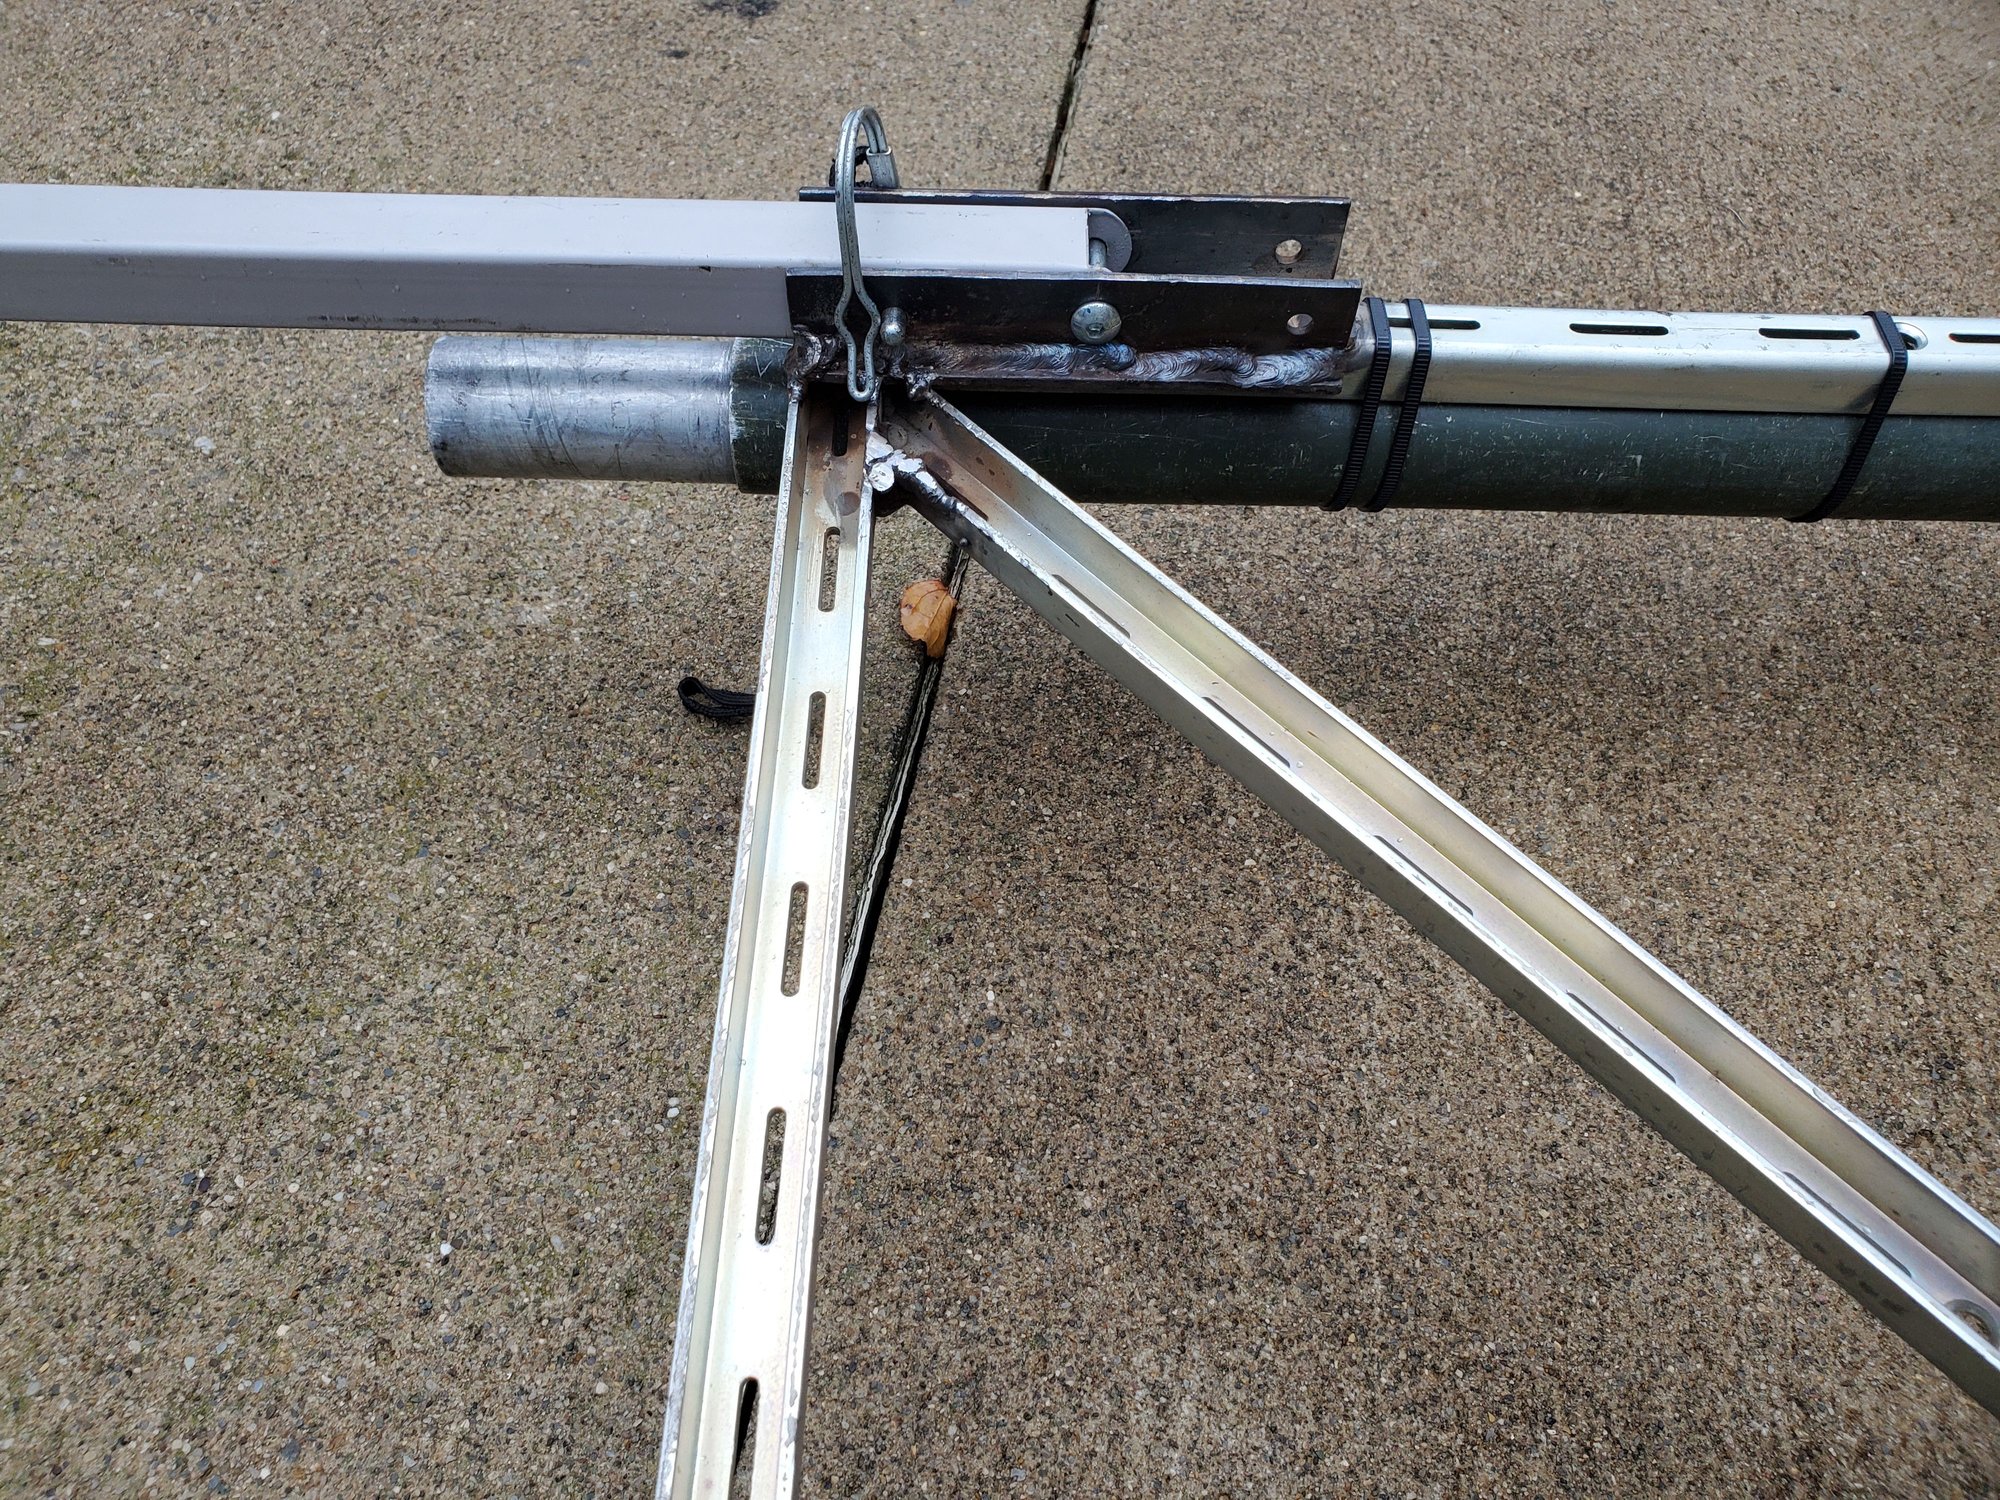
Now on to what to make the cross members out of. I have some commercial shelving rails that I salvaged about 10-15 years ago. They have just been sitting around. I have gravitated towards them for various small projects over the years. Oddly enough, they have never been implemented as shelves, although I have all the parts with the hangers and shelves to go with them. So I decided to make use of them.
The shelf rails are essentially small U channel - about 3/4" square.
The nice thing about U channel and round pipe is the open end of the U will "latch on to" the pipe when held together under tension - the open end of the U self-centers and aligns to the round pipe.
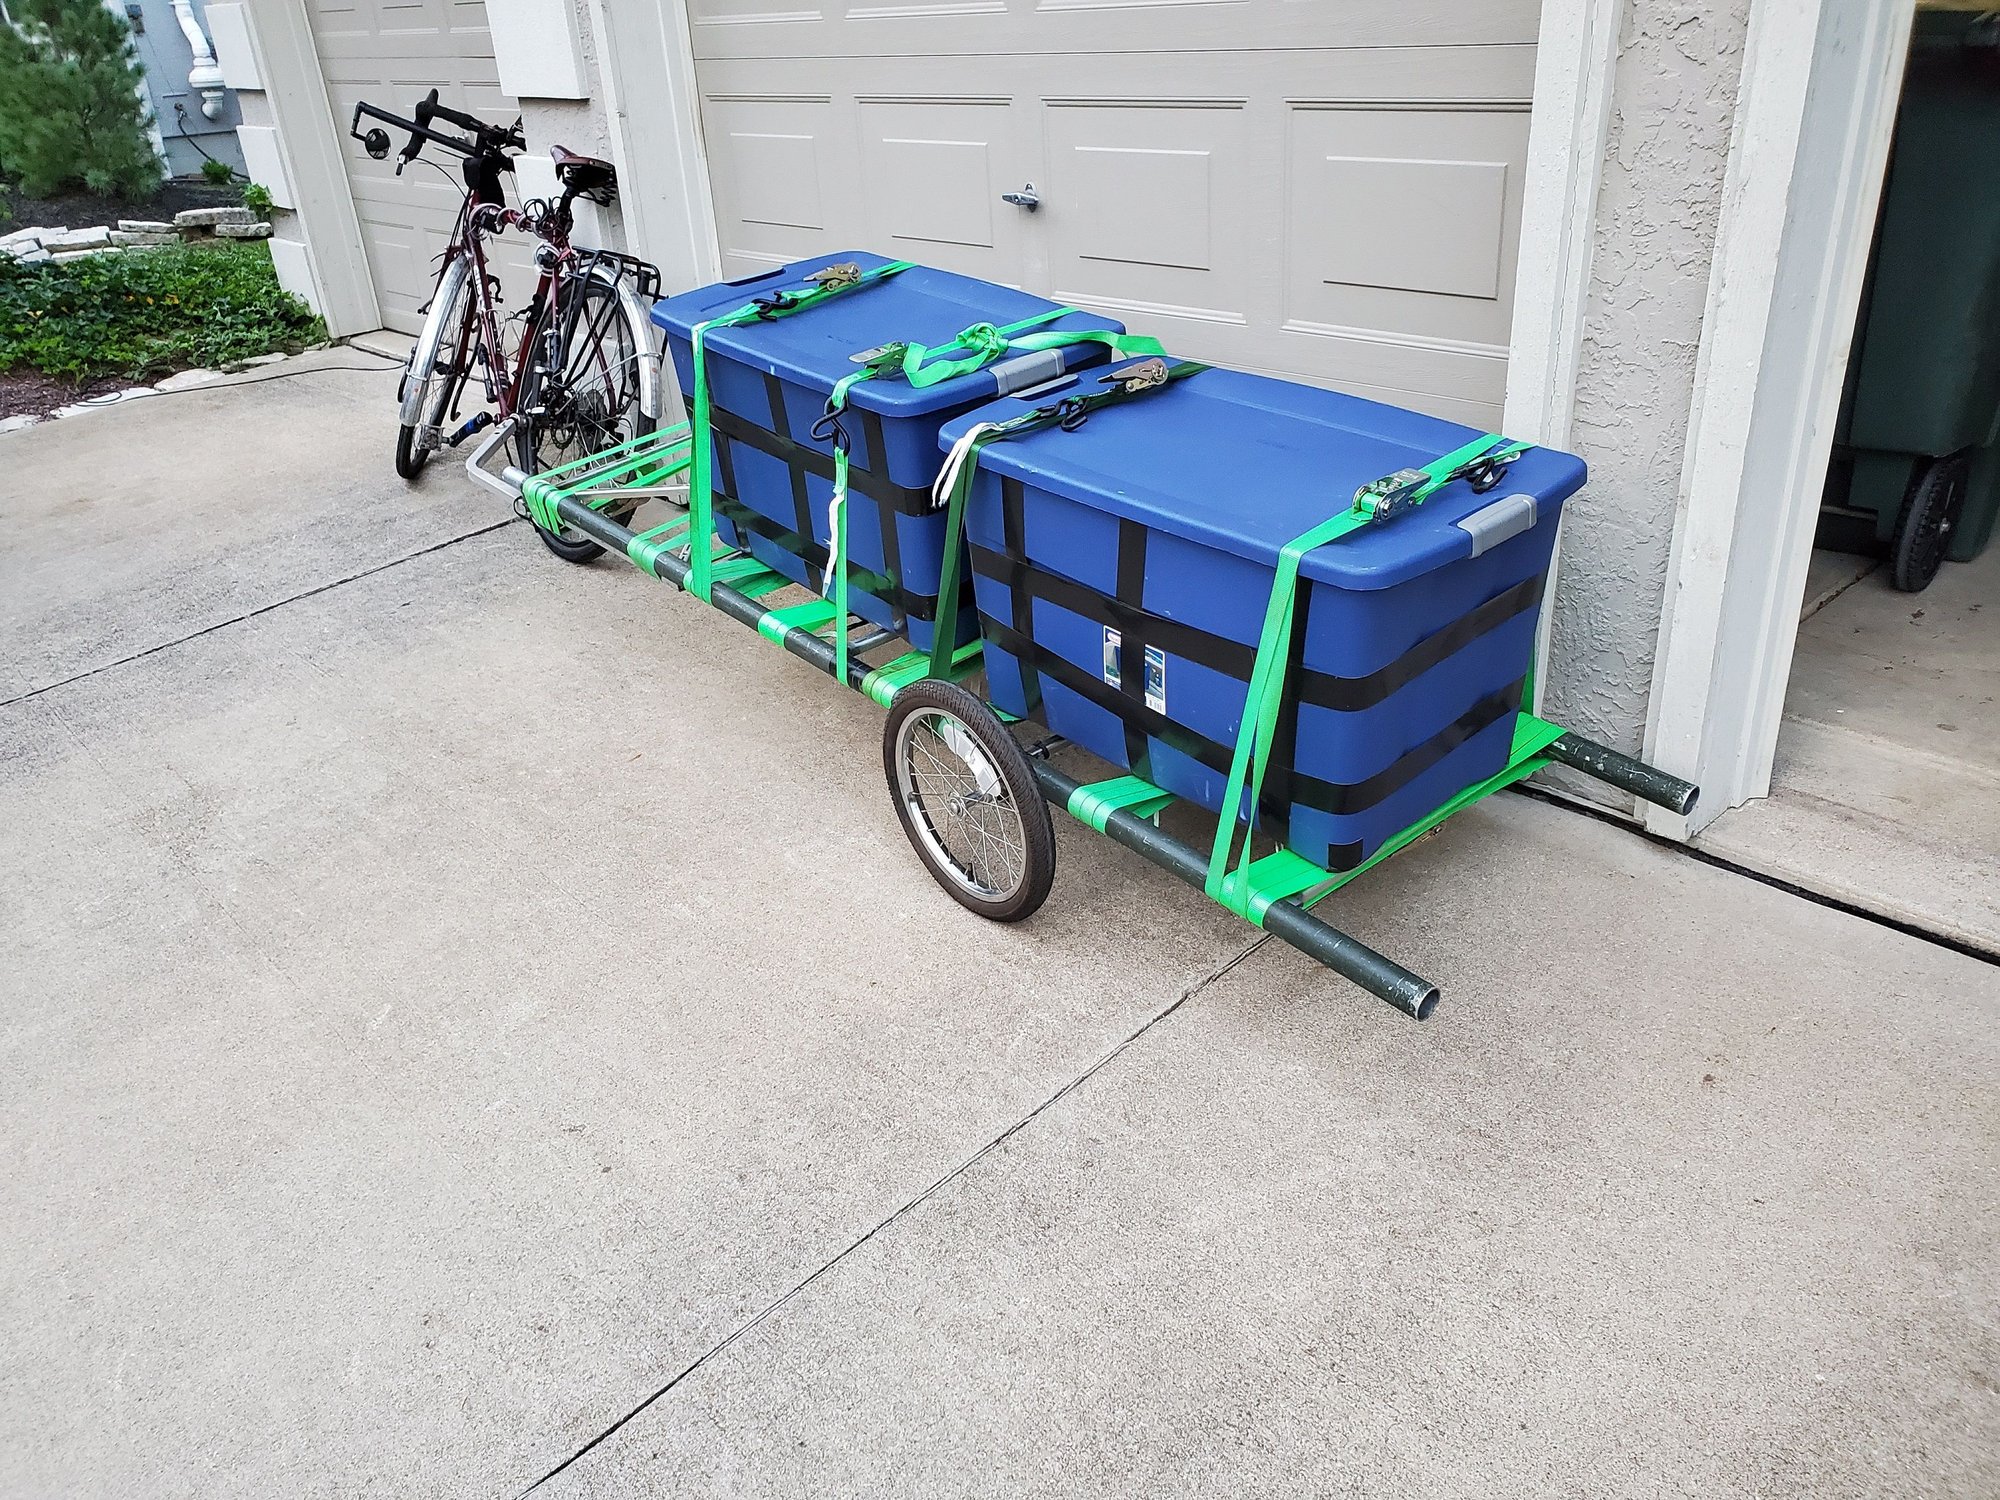
So here is what I came up with:

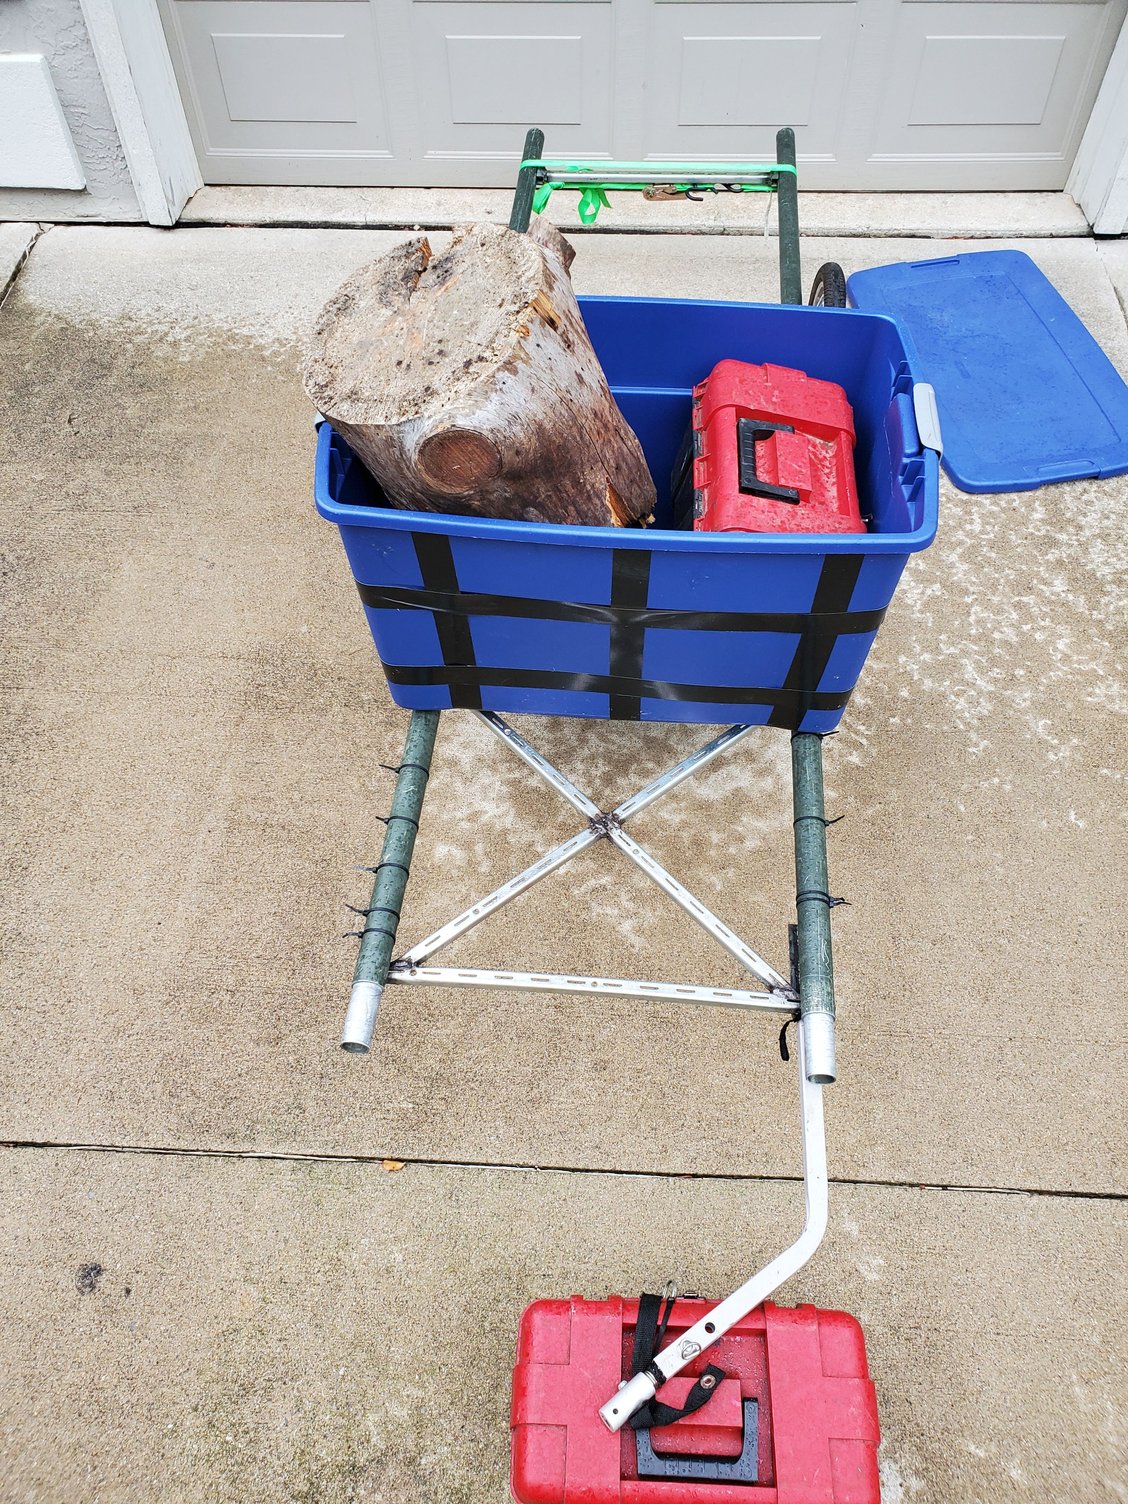
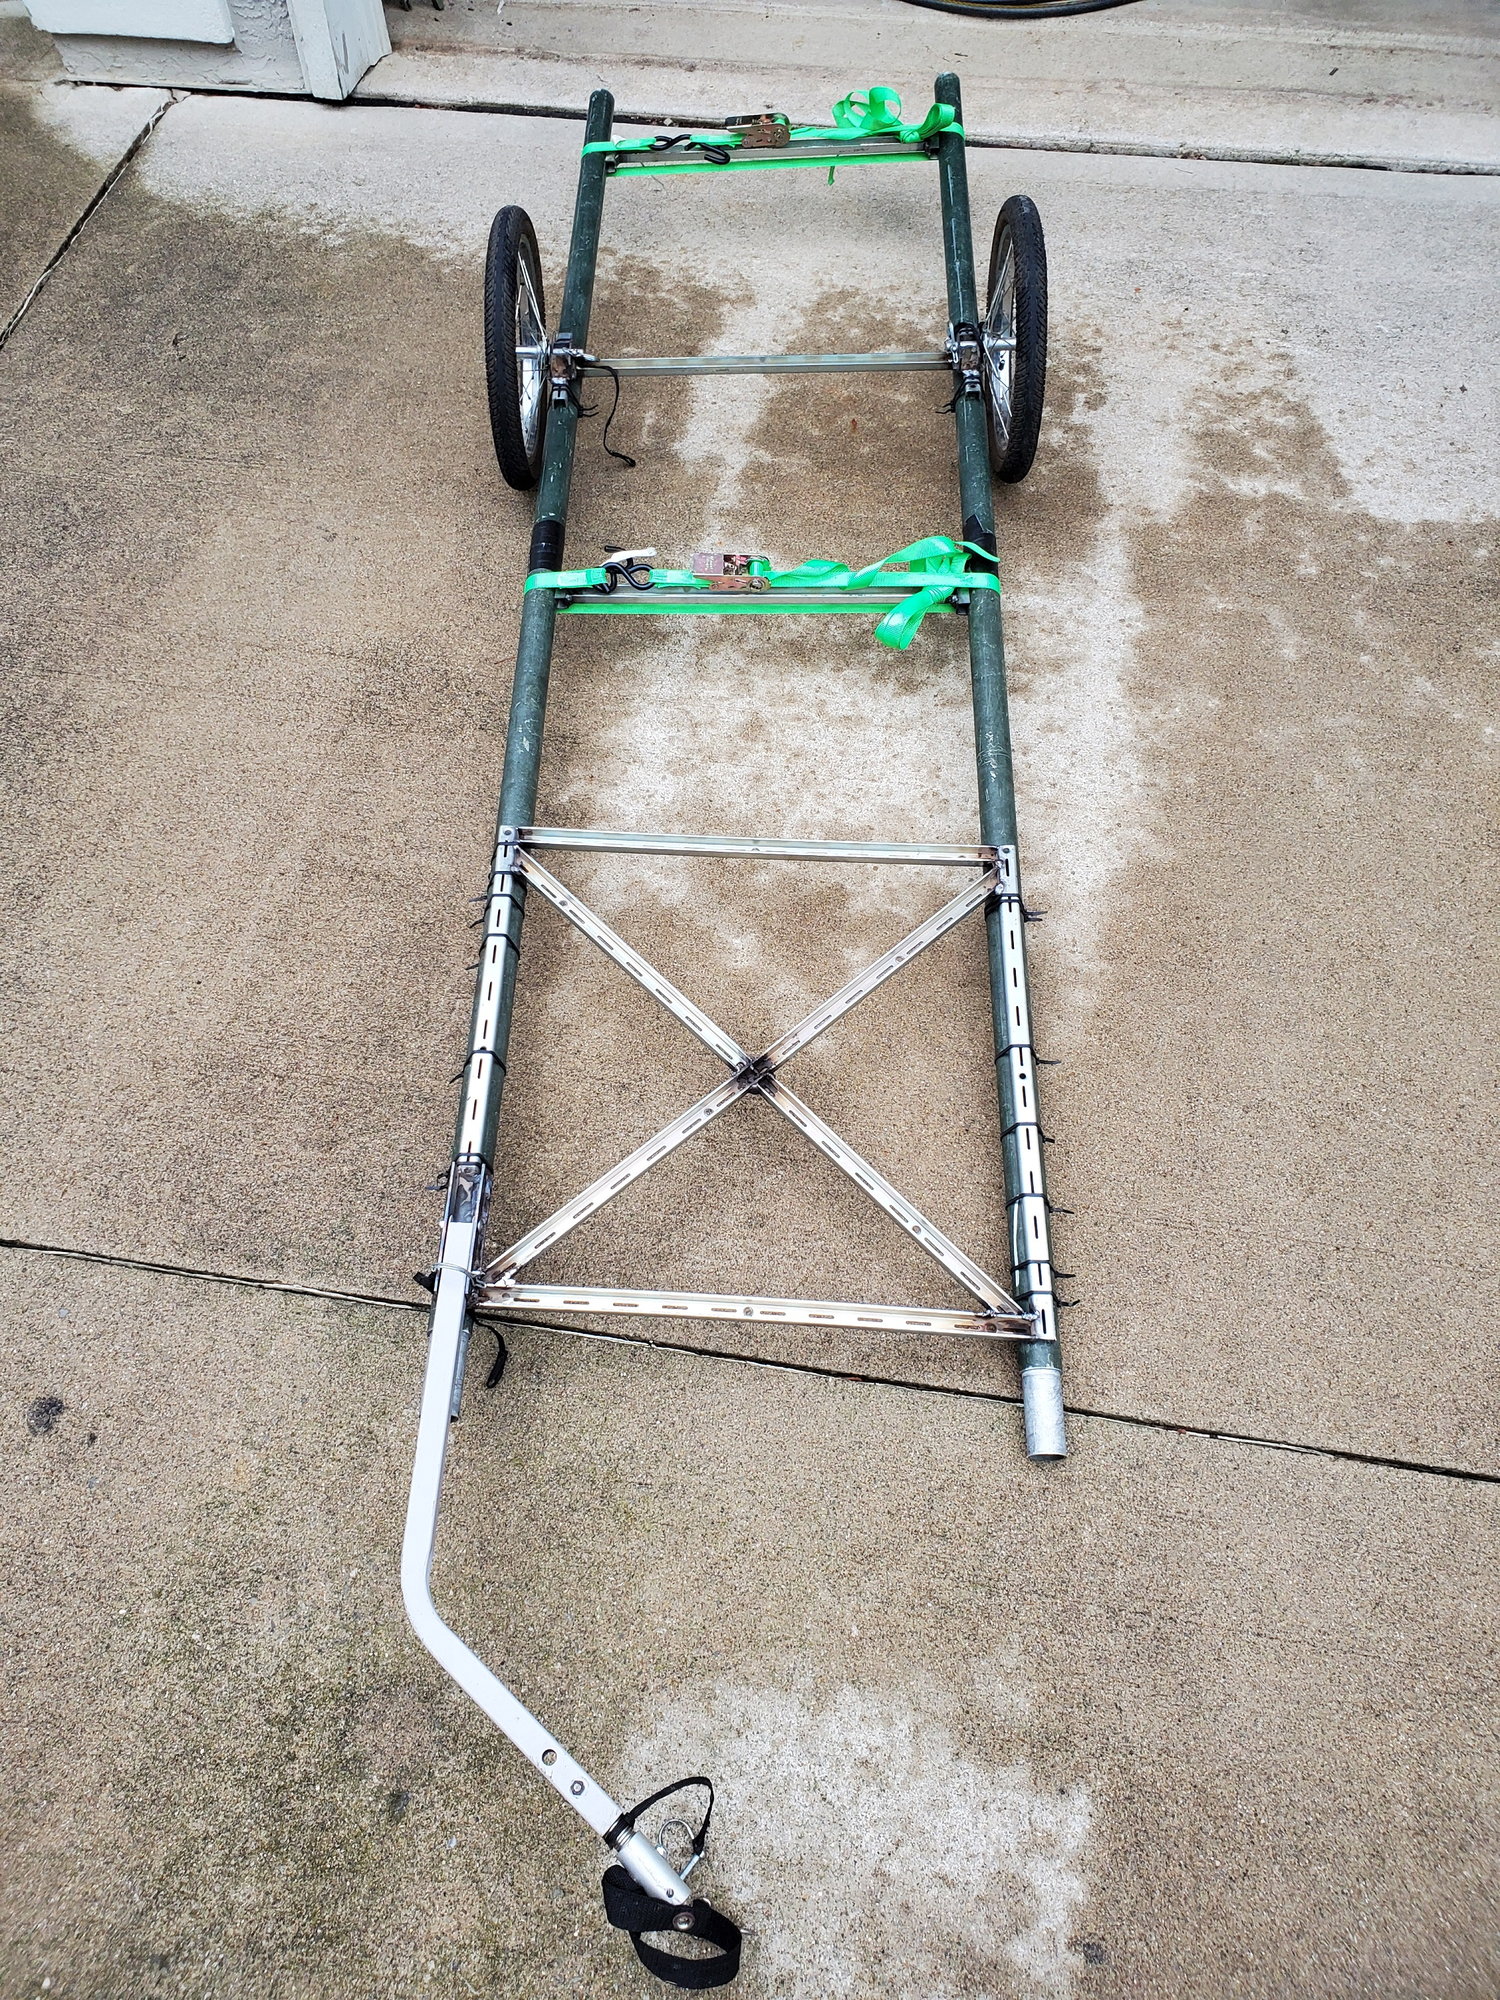
If you are looking at it and cocking your head sideways, scratching your head, and saying "gee, that looks awfully crooked to me" - you would be correct.
Have you ever seen an empty flat bed semi trailer? Have you noticed how it looks like a hill? Then have you compared that to a heavily loaded flat bed in that the heavily loaded flat bed is flat?
Here is the same trailer with around 100lbs:

My concern at the moment is that the hitch attaches on the left side of the trailer. With the pipe frame there isn't much to restrain against torquing the frame under load so I had to come up with a way to counter the torquing. I can accept the opposite side of the hitch being "high", but if I don't do anything and set it up flat unloaded then the opposite end as the hitch will hang too low. That will be a problem for ground clearance. So this way, with the front X frame pre-torquing the trailer frame I am ahead of the ground clearance game.
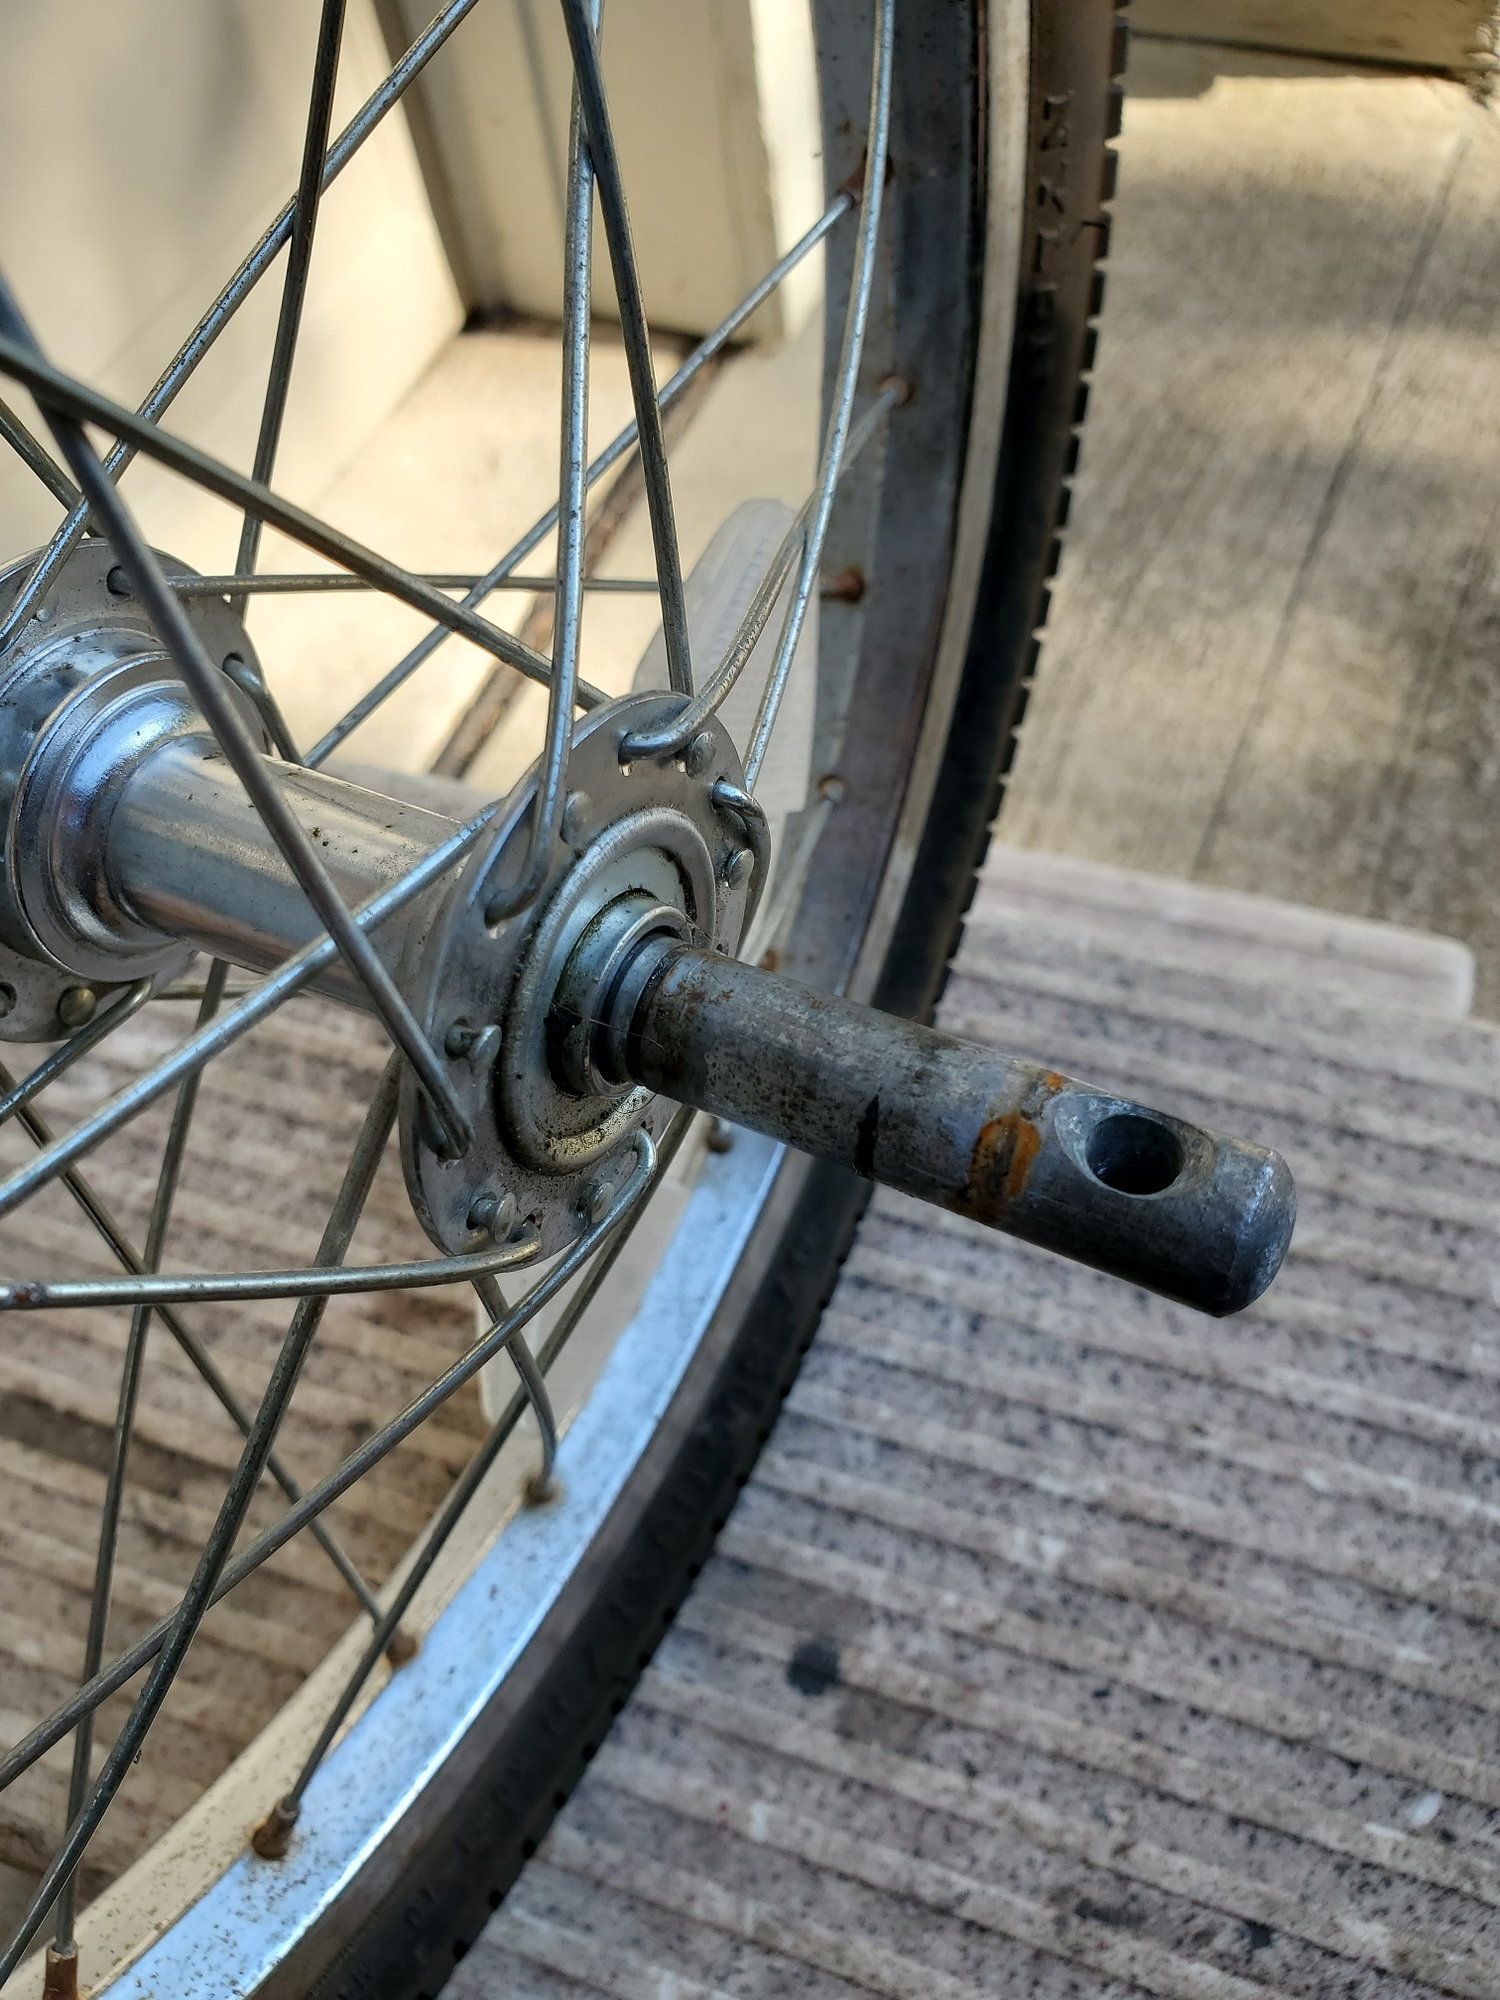
Here are some detail pictures:
The brackets the axle stubs go in to were set up so the tops of the tires, when resting normally on the ground, are slightly further apart than the bottom of the tires touching the ground. The idea here is that when loaded they will straighten out.

Max'ed out the file size. I will add more in the next post.
In another thread (link below) I have been compiling some ideas on making my own trailer from the ground up. That project is on hold for a bit. I got a kid trailer given to me so I have been experimenting with it. I think that is a really good thing because it gives me something to use and adjust, change, etc so I can refine some things before I tackle the custom trailer build entirely.
Previous thread for reference <- link
This is how I started using the kid trailer. I took the upper canopy support off and made it more of a "fabric flat bed" style.
To expand on the idea and give some background for the below metamorphosis -
I have been a Ham radio operator for 20 years and have acquired a set of surplus military tent poles for holding up various antennas. I forget how many I have, but I can string enough of them together to get 60-70 feet of mast. They have 44.5" of usable length (then a coupler - a reduced section so they can be stacked).
We got a roof rack for an SUV we have in the family and I took it on a trip a few months ago. I needed a way to put large totes on the rack so I mulled over the idea for a bit. The rack bars are a fixed distance apart and they are too wide for straddling with a tote. So I got the idea to use the mast pipes as "rails" to support the totes. It worked really well.
So that is the root of the idea of the mast pipes for the bike trailer idea. They have been successfully used as rack rails on an SUV for a cross-country trip so they will surely work for a bike trailer frame.
Now on to what to make the cross members out of. I have some commercial shelving rails that I salvaged about 10-15 years ago. They have just been sitting around. I have gravitated towards them for various small projects over the years. Oddly enough, they have never been implemented as shelves, although I have all the parts with the hangers and shelves to go with them. So I decided to make use of them.
The shelf rails are essentially small U channel - about 3/4" square.
The nice thing about U channel and round pipe is the open end of the U will "latch on to" the pipe when held together under tension - the open end of the U self-centers and aligns to the round pipe.
So here is what I came up with:
If you are looking at it and cocking your head sideways, scratching your head, and saying "gee, that looks awfully crooked to me" - you would be correct.
Have you ever seen an empty flat bed semi trailer? Have you noticed how it looks like a hill? Then have you compared that to a heavily loaded flat bed in that the heavily loaded flat bed is flat?
Here is the same trailer with around 100lbs:
My concern at the moment is that the hitch attaches on the left side of the trailer. With the pipe frame there isn't much to restrain against torquing the frame under load so I had to come up with a way to counter the torquing. I can accept the opposite side of the hitch being "high", but if I don't do anything and set it up flat unloaded then the opposite end as the hitch will hang too low. That will be a problem for ground clearance. So this way, with the front X frame pre-torquing the trailer frame I am ahead of the ground clearance game.
Here are some detail pictures:
The brackets the axle stubs go in to were set up so the tops of the tires, when resting normally on the ground, are slightly further apart than the bottom of the tires touching the ground. The idea here is that when loaded they will straighten out.
Max'ed out the file size. I will add more in the next post.
 08-31-21, 06:52 PM
#2
Senior Member
Thread Starter
Join Date: Apr 2013
Posts: 1,173
Bikes: Surly Disk Trucker, 2014 w/Brooks Flyer Special saddle, Tubus racks - Duo front/Logo Evo rear, 2019 Dahon Mariner D8, Both bikes share Ortlieb Packer Plus series panniers, Garmin Edge 1000
Mentioned: 2 Post(s)
Tagged: 0 Thread(s)
Quoted: 405 Post(s)
Liked 115 Times
in
99 Posts
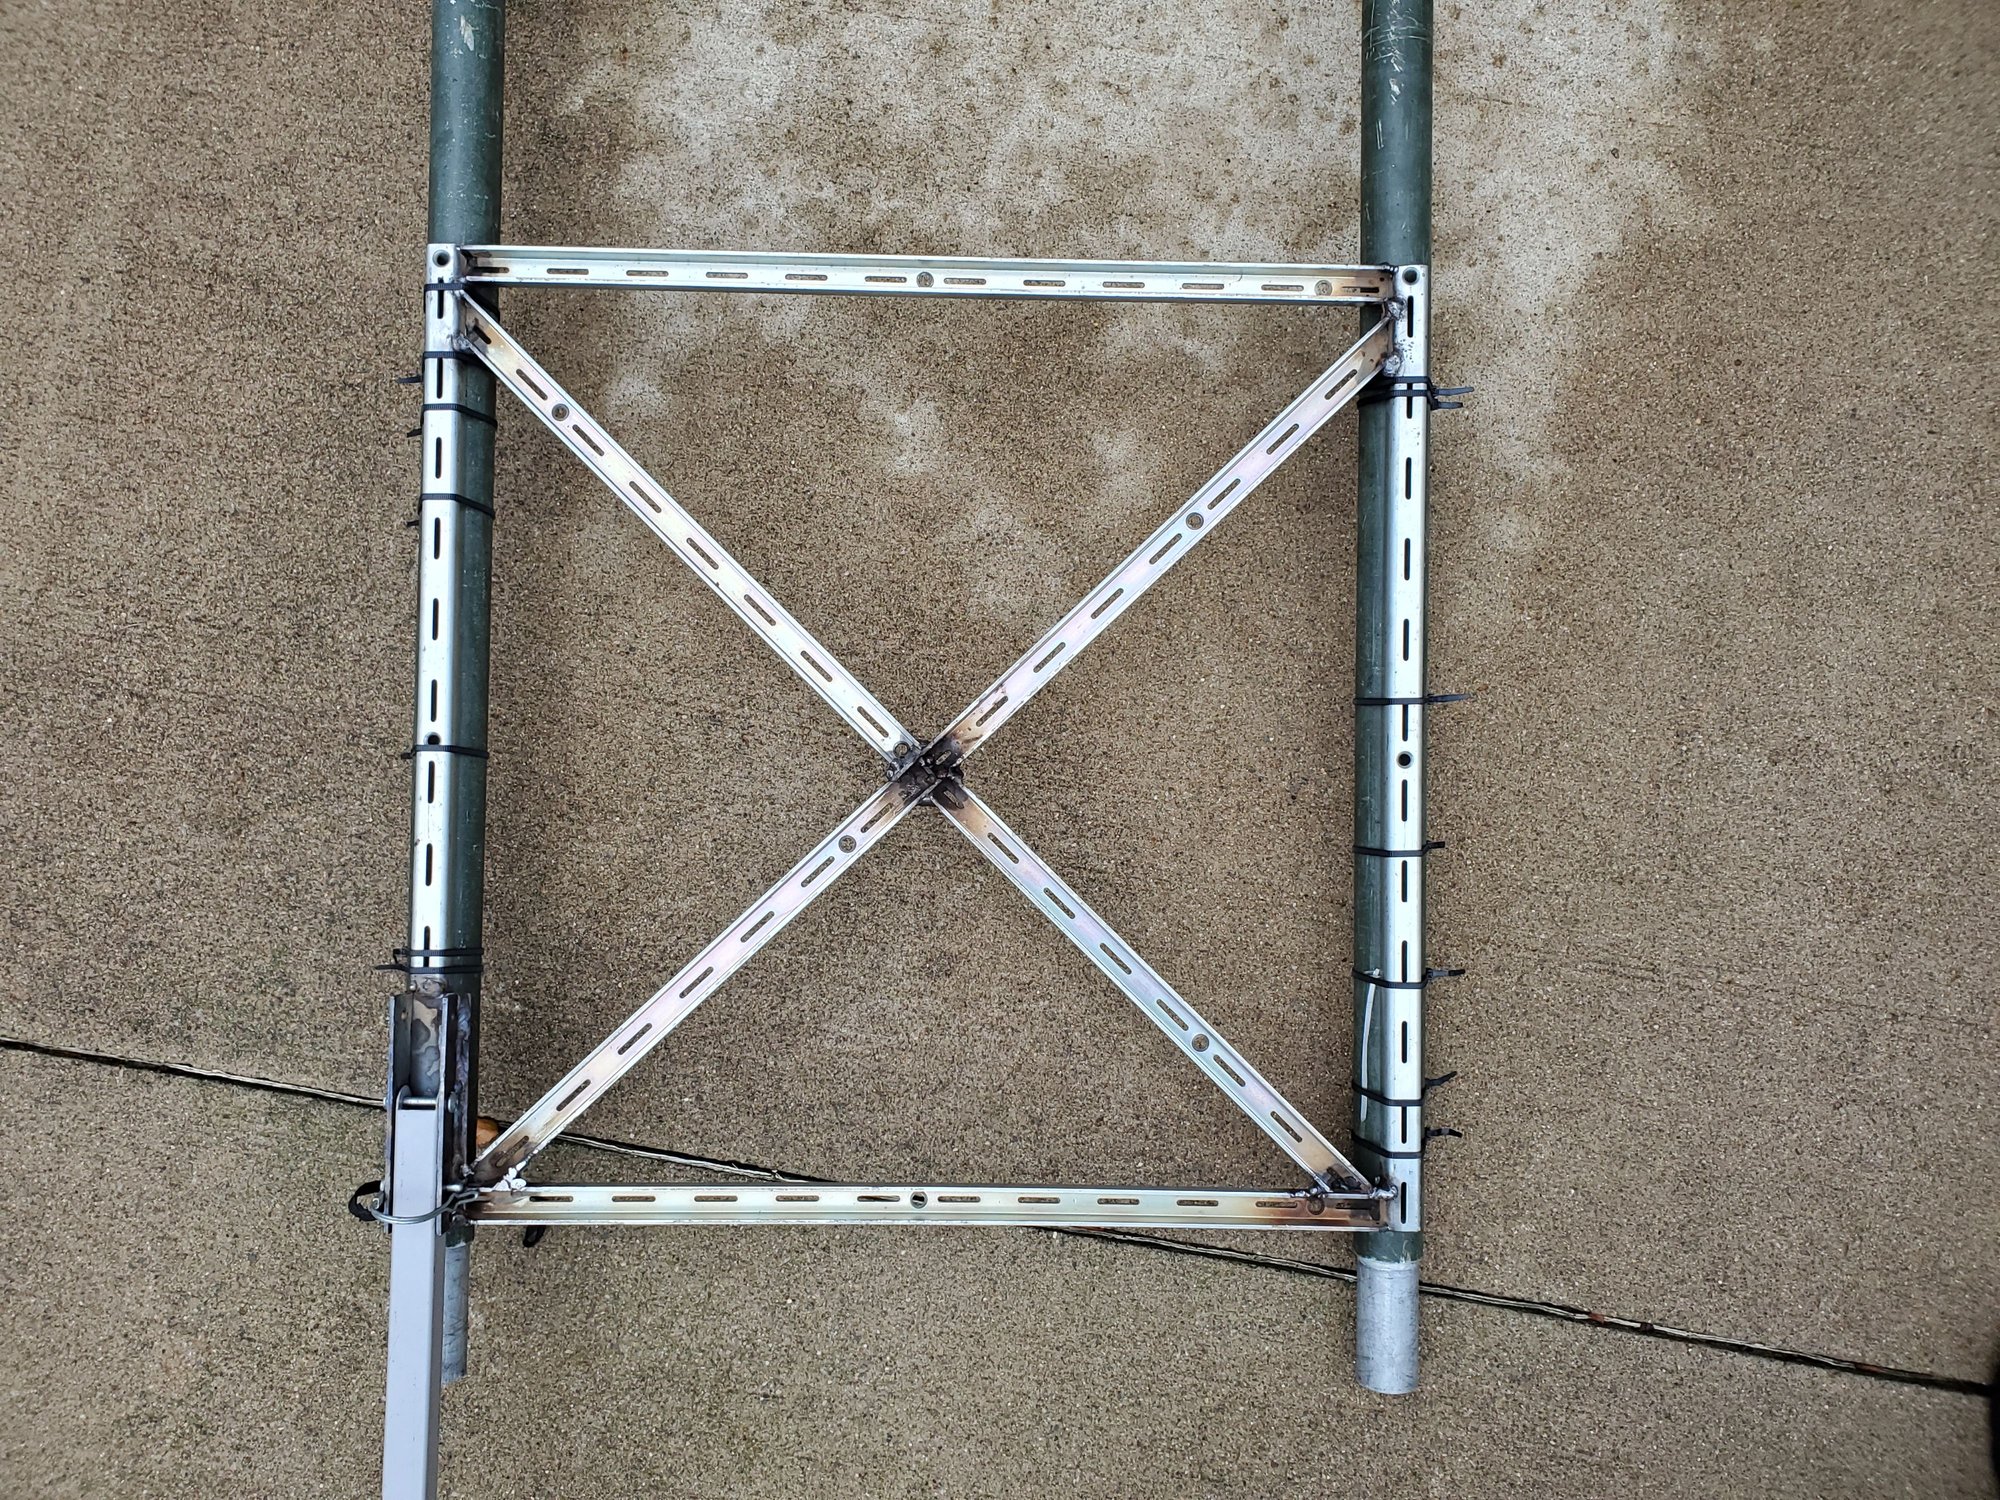
Under side of the front X. Again, this was fabricated intentionally twisted. A triangle is the strongest geometric shape. When using it in fabrication with multiple triangles it can not only withstand forces against the plane of the triangles, it can restrain from any forces - including torsion - against the assembly. So by fabricating with a pre-set twist it is the key to leveling the loaded trailer.
Tensioned cross bar detail

Hitch detail
Whole underside
Tensioned cross bar detail
Hitch detail
Whole underside
08-31-21, 07:00 PM
#3
Senior Member
Thread Starter
Join Date: Apr 2013
Posts: 1,173
Bikes: Surly Disk Trucker, 2014 w/Brooks Flyer Special saddle, Tubus racks - Duo front/Logo Evo rear, 2019 Dahon Mariner D8, Both bikes share Ortlieb Packer Plus series panniers, Garmin Edge 1000
Mentioned: 2 Post(s)
Tagged: 0 Thread(s)
Quoted: 405 Post(s)
Liked 115 Times
in
99 Posts
Yes, the pipes are zip tied for the time being.
I do have an idea to utilize U bolts instead.
The stand-alone cross bars are held in with the tension of ratchet straps. I am contemplating the U bolt idea for those also. Another idea is to weave a cord "platform" of sorts with 550 cord. The tension of the "platform" should be enough to hold the cross bars. I could also use 550 cord loops with "truckers hitches" (loops along the cord to add mechanical advantage for tensioning) to set the cross bars so they aren't an issue no matter what the platform does.
The bad part about U bolts is they add weight. So do the ratchet straps. Though, I think it is a really good idea to have ratchet straps for a multitude of purposes, if I can reduce them and substitute 550 cord that will save weight.
So the long and short of this trailer idea is it gives me a platform (no pun intended) to experiment with.
The downside to harvesting the parts from the kid trailer is they are weaker. The tires are 35psi max and I don't suppose the wheels/hubs/axle stubs are going to be very strong. I have used the kid trailer on some light day trips and so far they have held up. But with any real "touring load" they might be questionable. The tire pressure can be remedied with better tires. Whether it is worth it to put better tires on this wheel set I am not sure.
09-01-21, 10:32 PM
#4
Senior Member
Thread Starter
Join Date: Apr 2013
Posts: 1,173
Bikes: Surly Disk Trucker, 2014 w/Brooks Flyer Special saddle, Tubus racks - Duo front/Logo Evo rear, 2019 Dahon Mariner D8, Both bikes share Ortlieb Packer Plus series panniers, Garmin Edge 1000
Mentioned: 2 Post(s)
Tagged: 0 Thread(s)
Quoted: 405 Post(s)
Liked 115 Times
in
99 Posts
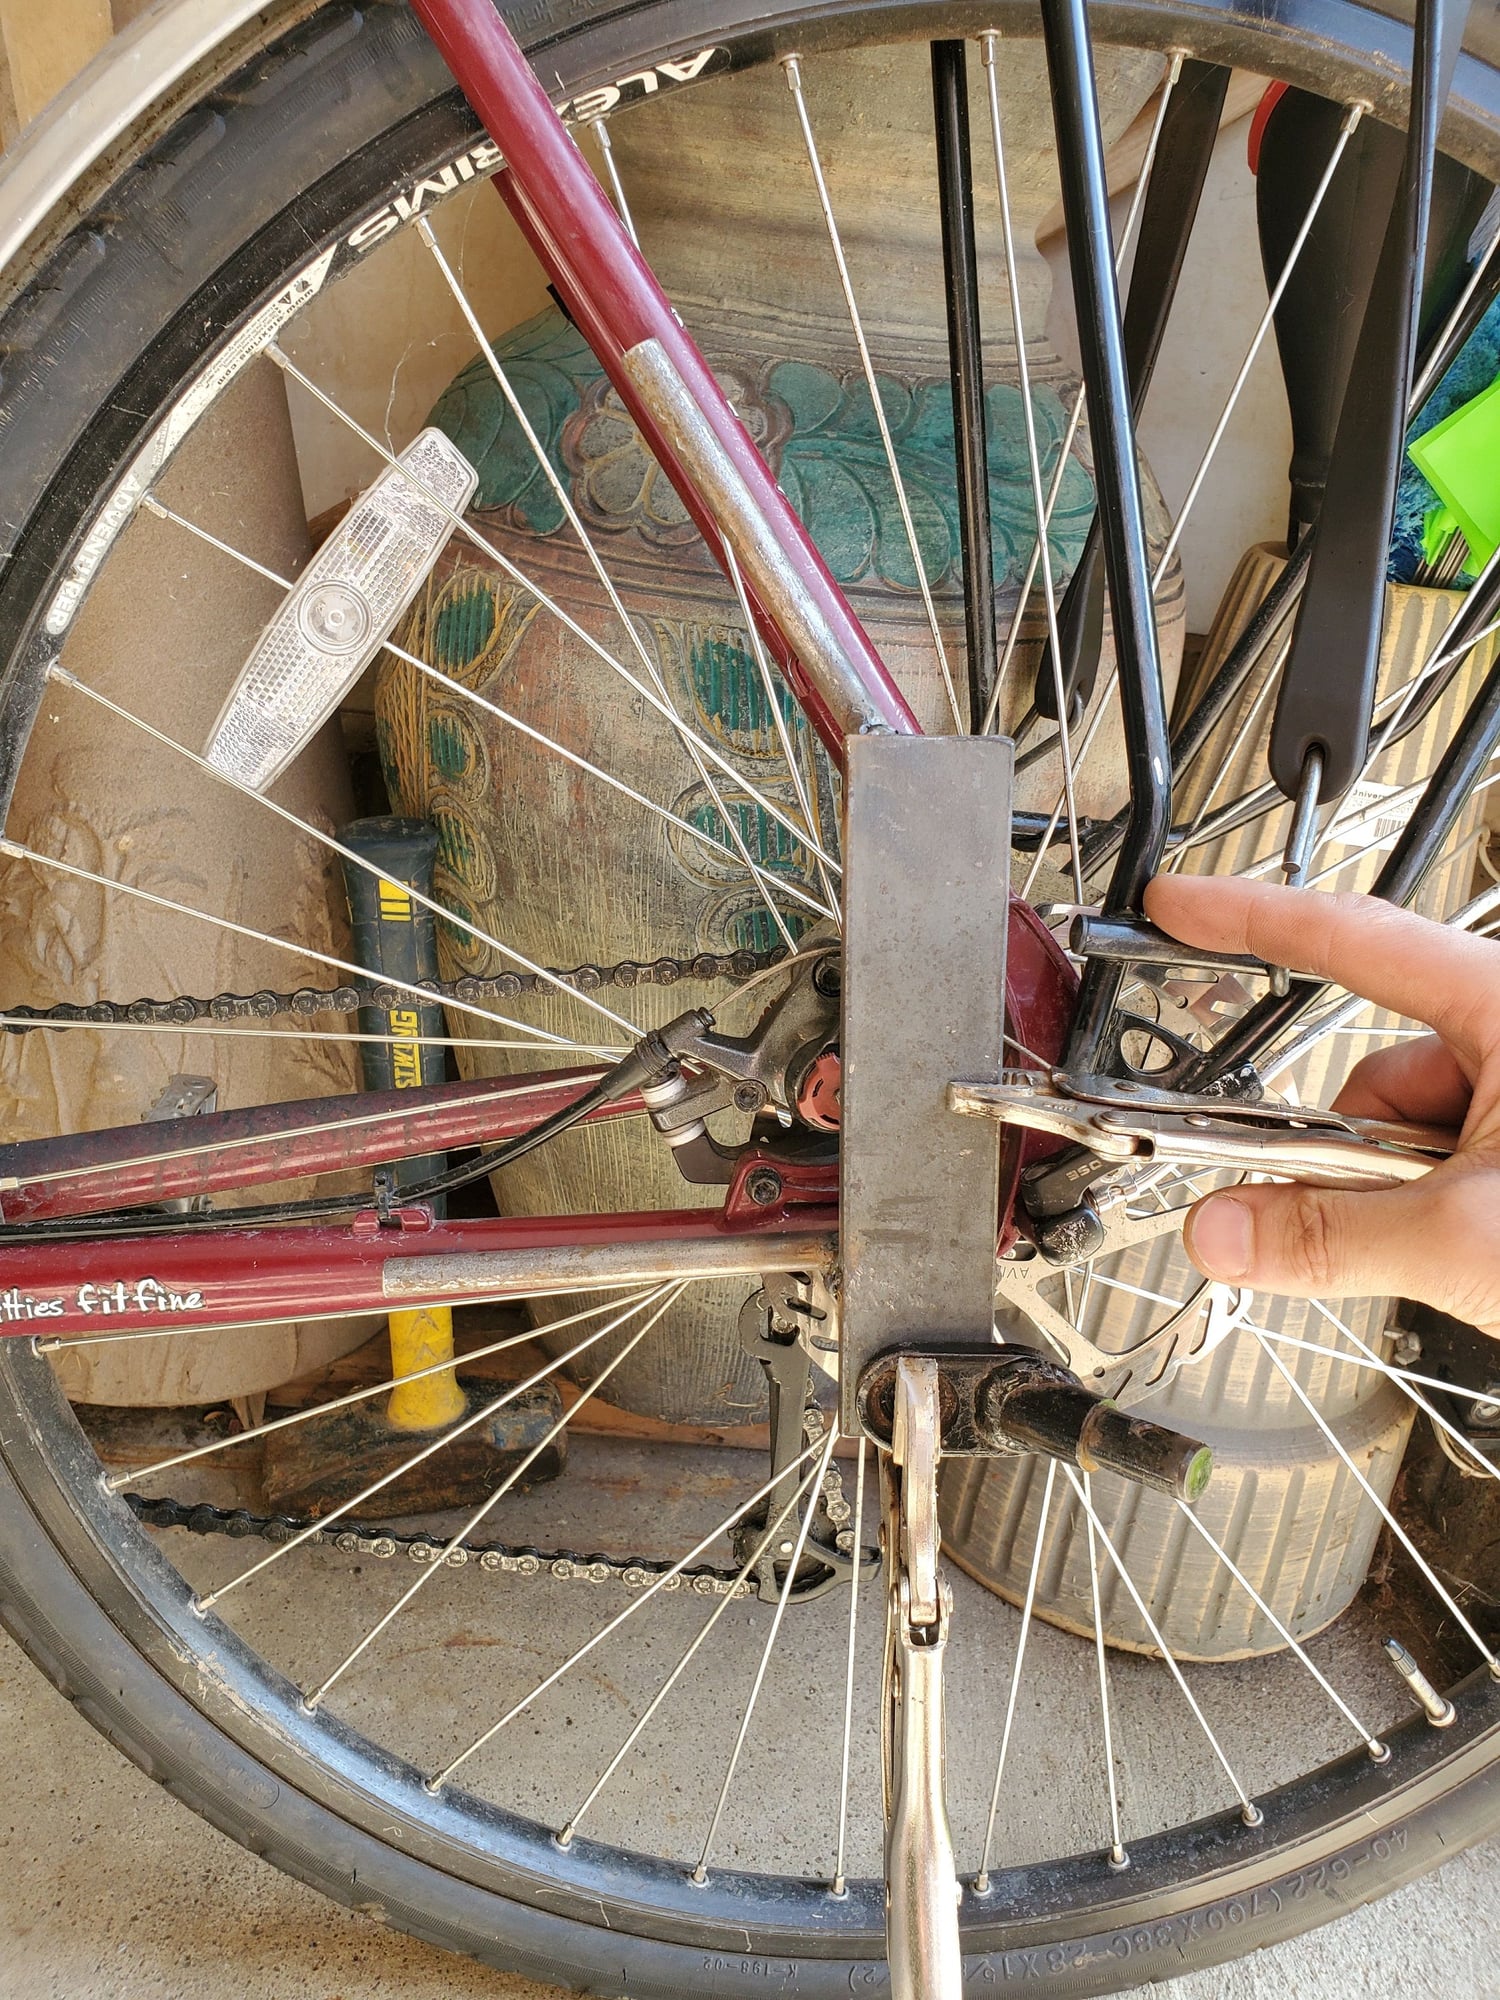
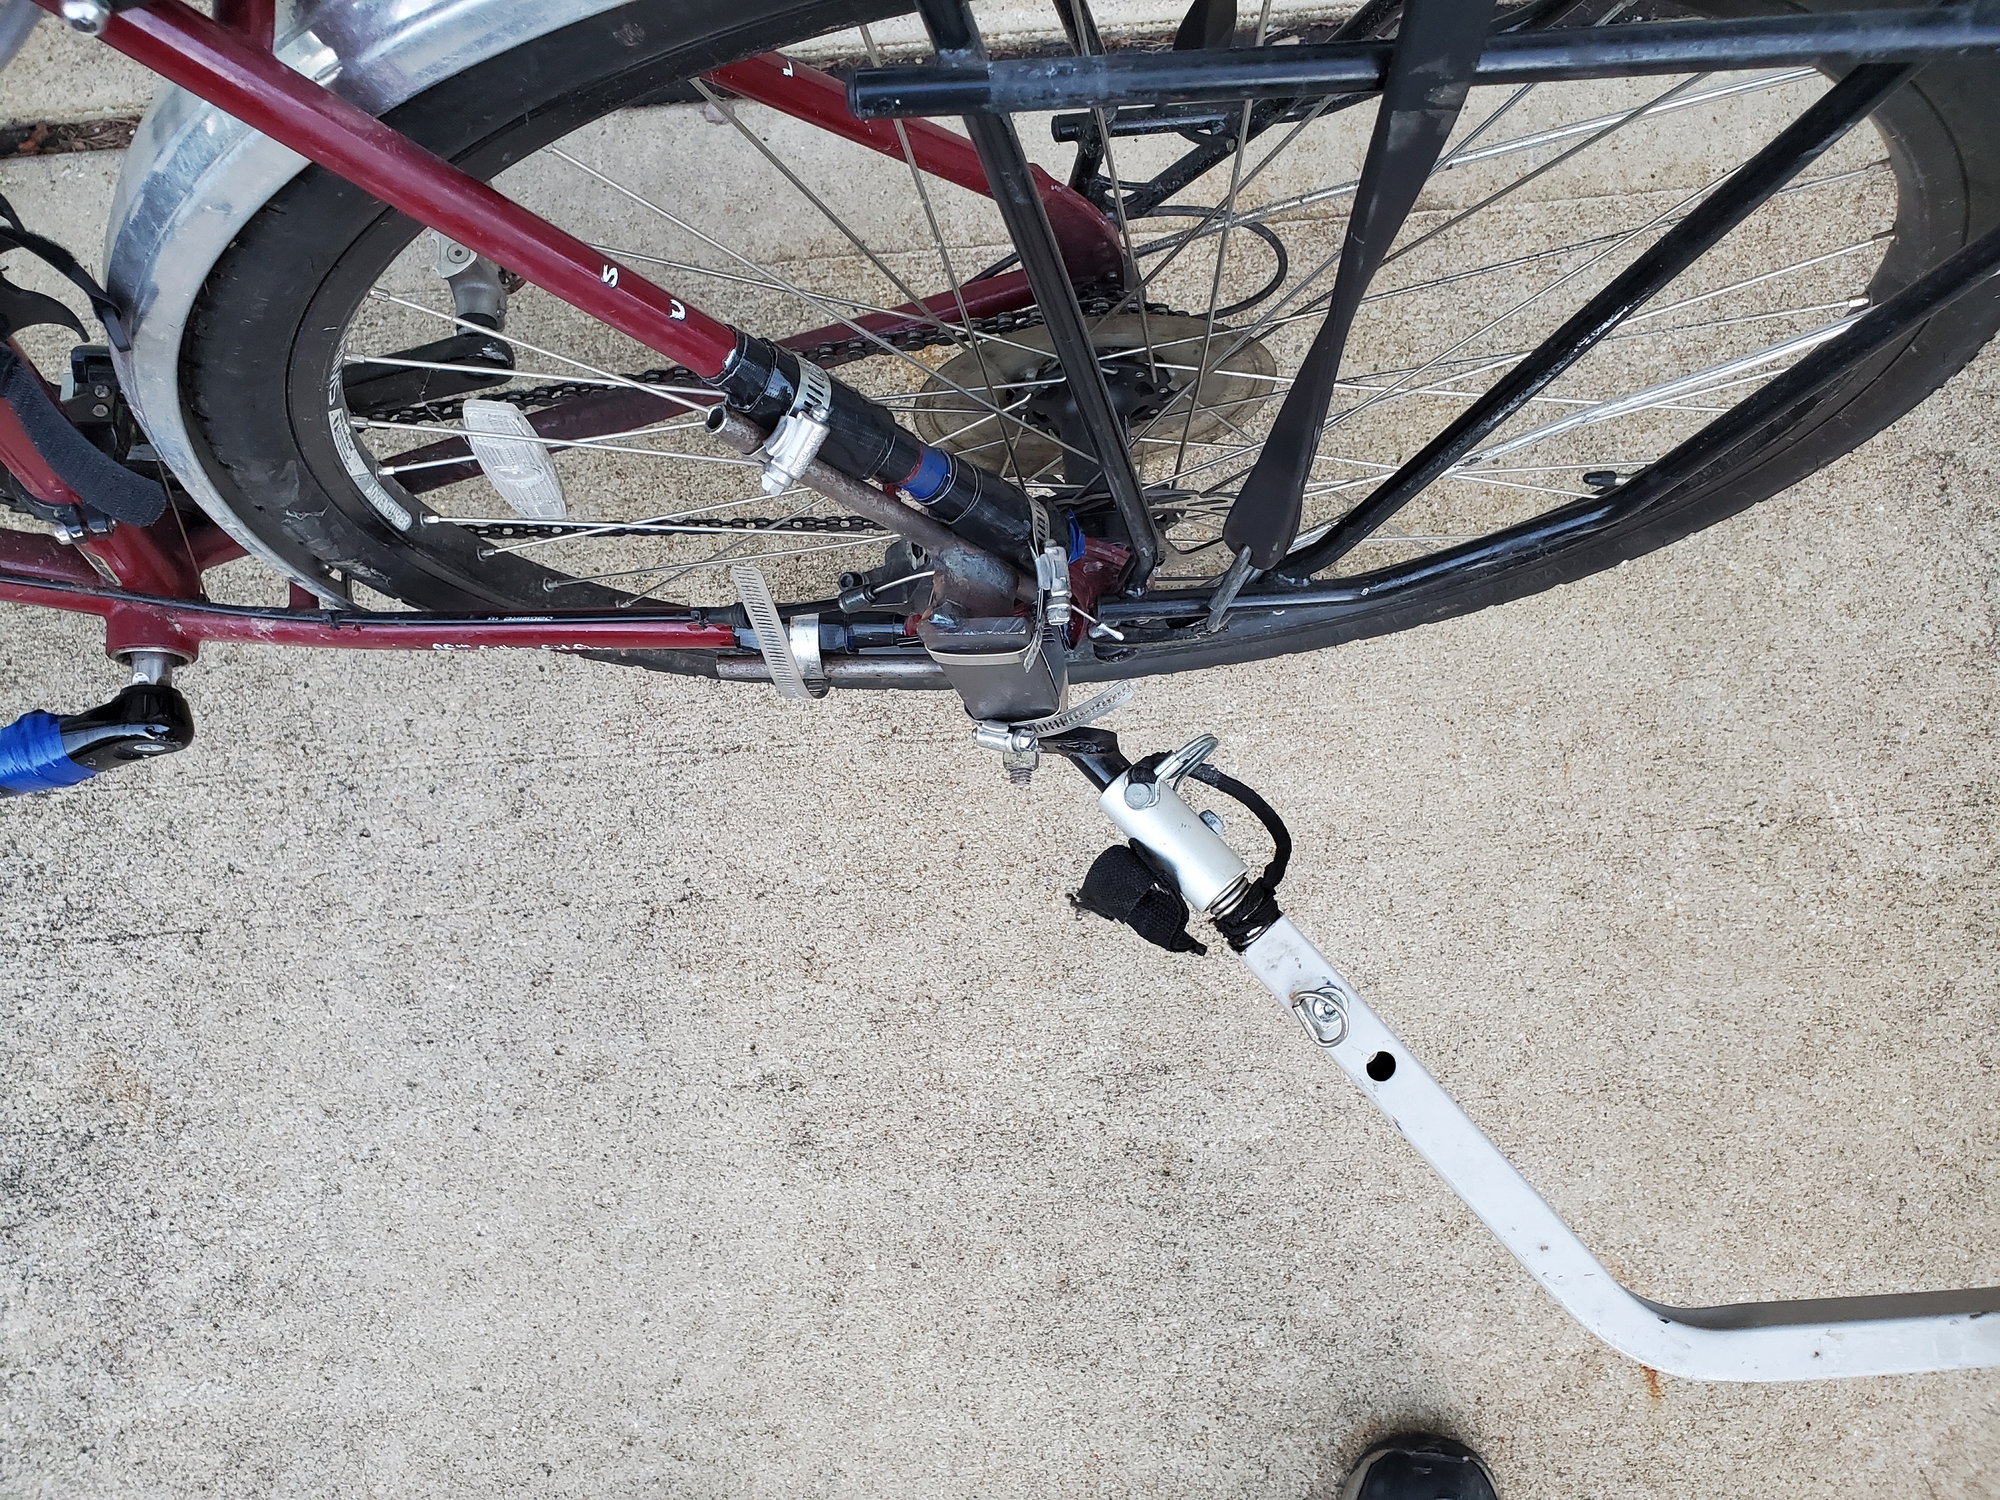
I went to do more load testing but decided to switch bikes from my folding Dahon to my Surly Disk Trucker. I found the bike side of the trailer hitch mount does not fit the Disk Trucker's drop out with the QR skewer as well as the rack and fender frames and bolts. So.... it turned in to another fabrication day making a hitch.
I modeled this partly after the standard/universal hitch that Bikes At Work makes - it spans the chain stay and seat stay on the non-drive side for its' structure, in place of attaching to the side of the axle on the drop out.
This came about from some steel stock I had. The small round pipe I got a few years ago with the intent on making my own custom front/rear racks on my Disk Trucker. At the time I got my panniers (full Ortleib 5 piece set) I decided to get commercial racks and use them for the mean time. However, I like the commercial racks well enough I'm scrapping my custom rack idea.
The hitch metal does weigh a lot. The flat stock is 1/4" x 1.5" - overkill, but I had it.

I think I will weld a couple beads above and below the hitch bracket, then grind a nice tight "notch" so the hitch bracket is secured better. That will keep it from rotating even more. I have never sensed it trying to rotate the times I've used the original trailer, but I might as well do it. At this stage of the game it would be really easy to do it.
I modeled this partly after the standard/universal hitch that Bikes At Work makes - it spans the chain stay and seat stay on the non-drive side for its' structure, in place of attaching to the side of the axle on the drop out.
This came about from some steel stock I had. The small round pipe I got a few years ago with the intent on making my own custom front/rear racks on my Disk Trucker. At the time I got my panniers (full Ortleib 5 piece set) I decided to get commercial racks and use them for the mean time. However, I like the commercial racks well enough I'm scrapping my custom rack idea.
The hitch metal does weigh a lot. The flat stock is 1/4" x 1.5" - overkill, but I had it.
I think I will weld a couple beads above and below the hitch bracket, then grind a nice tight "notch" so the hitch bracket is secured better. That will keep it from rotating even more. I have never sensed it trying to rotate the times I've used the original trailer, but I might as well do it. At this stage of the game it would be really easy to do it.
09-02-21, 07:44 PM
#5
Senior Member
Thread Starter
Join Date: Apr 2013
Posts: 1,173
Bikes: Surly Disk Trucker, 2014 w/Brooks Flyer Special saddle, Tubus racks - Duo front/Logo Evo rear, 2019 Dahon Mariner D8, Both bikes share Ortlieb Packer Plus series panniers, Garmin Edge 1000
Mentioned: 2 Post(s)
Tagged: 0 Thread(s)
Quoted: 405 Post(s)
Liked 115 Times
in
99 Posts
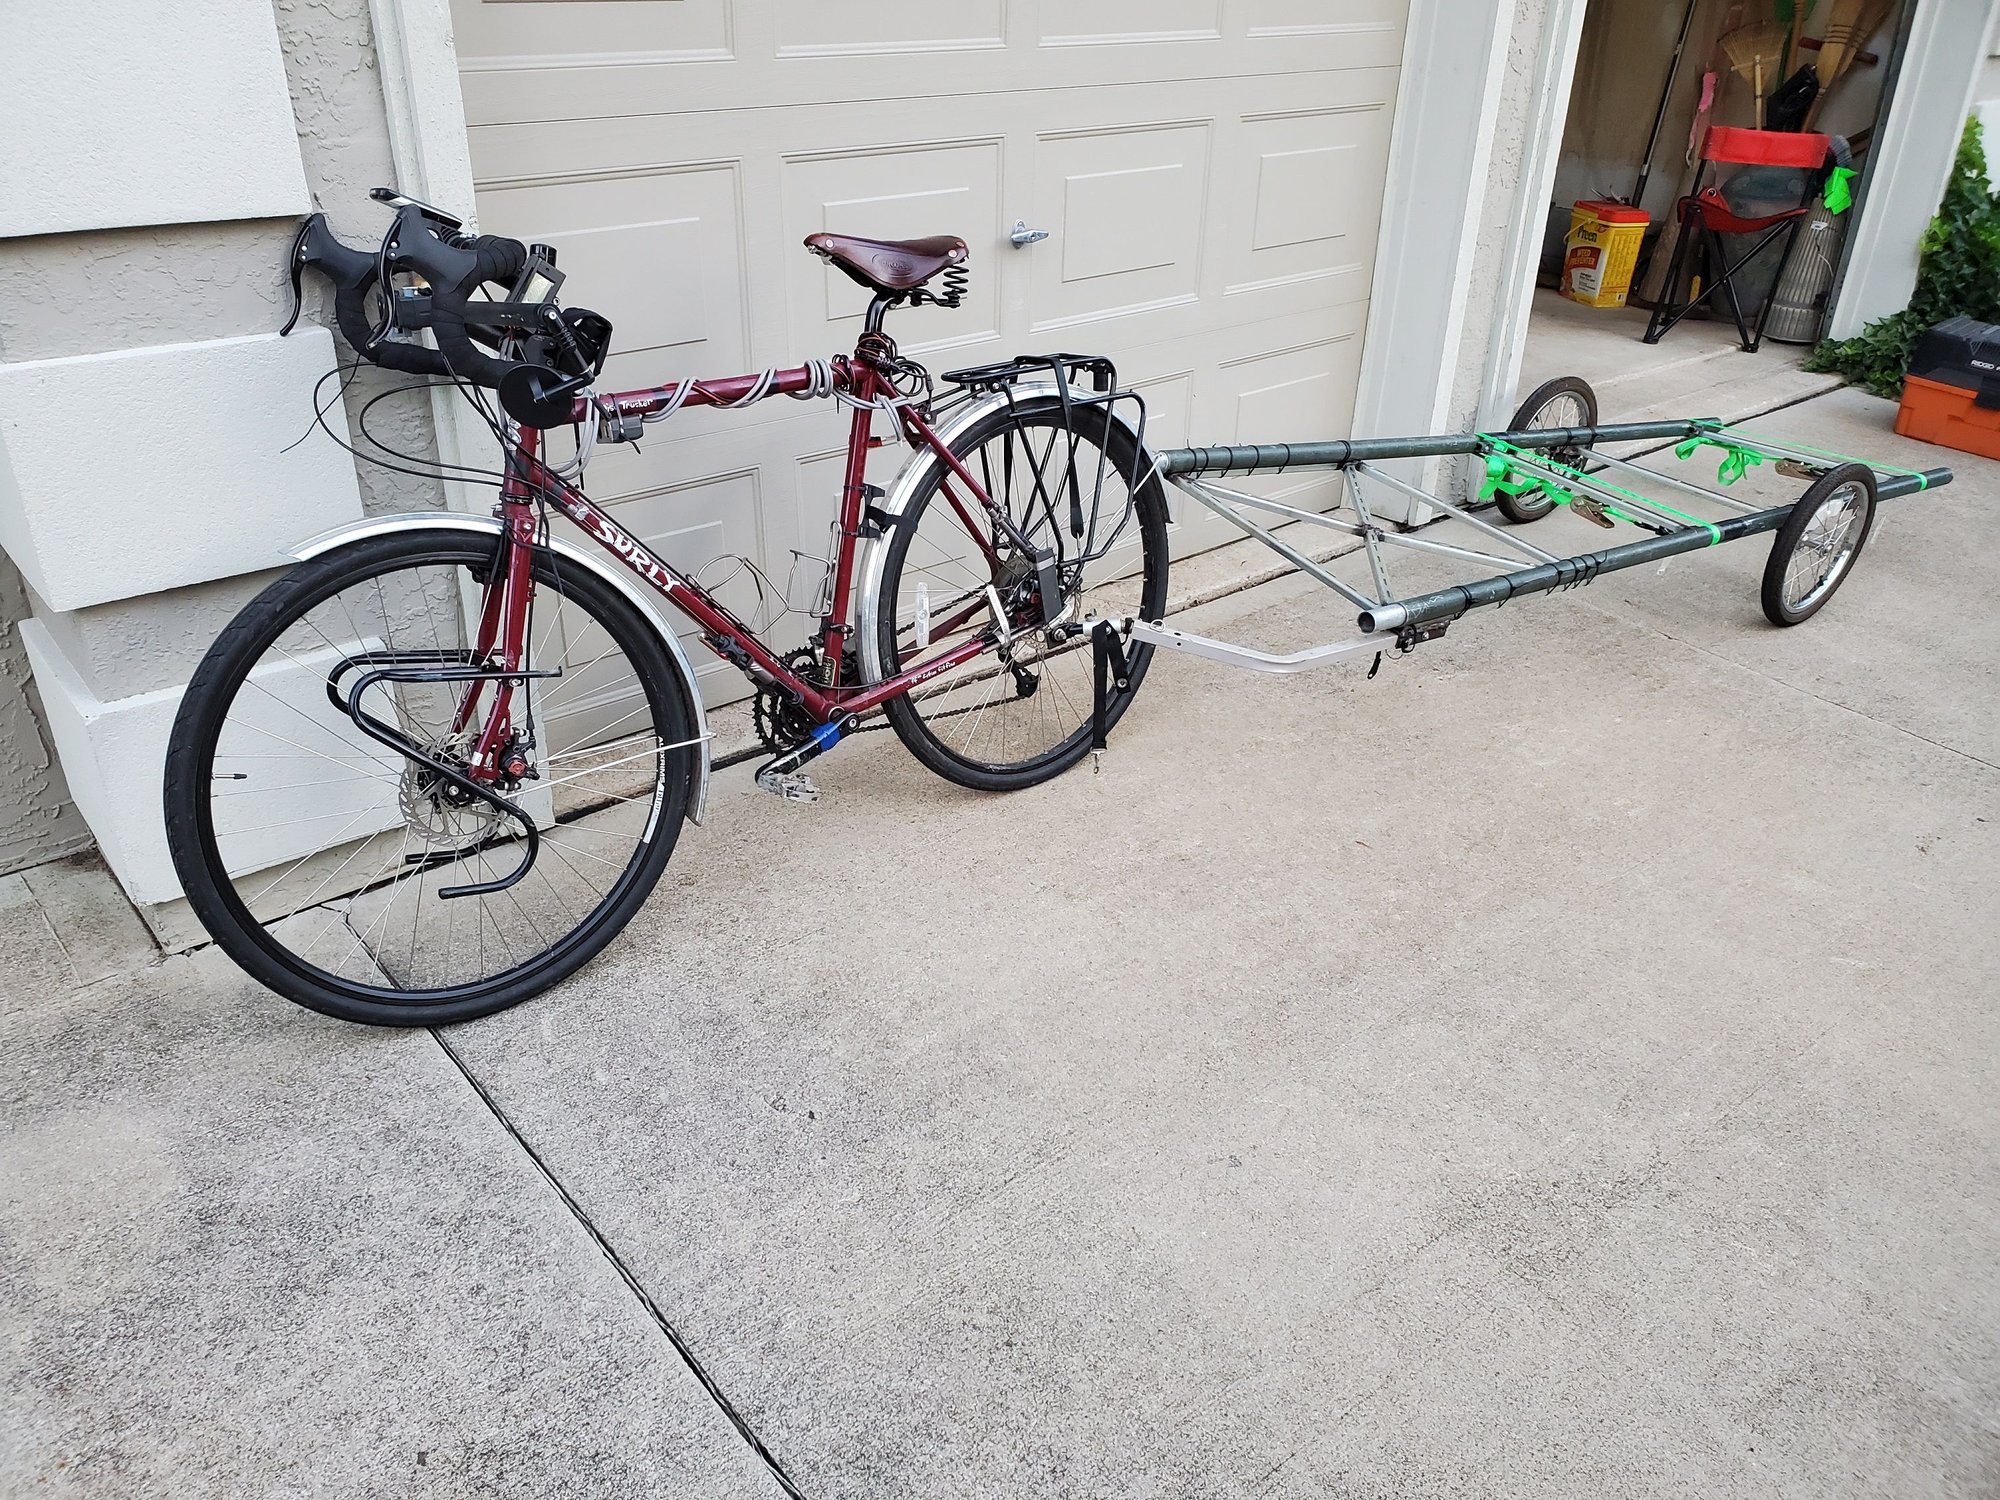
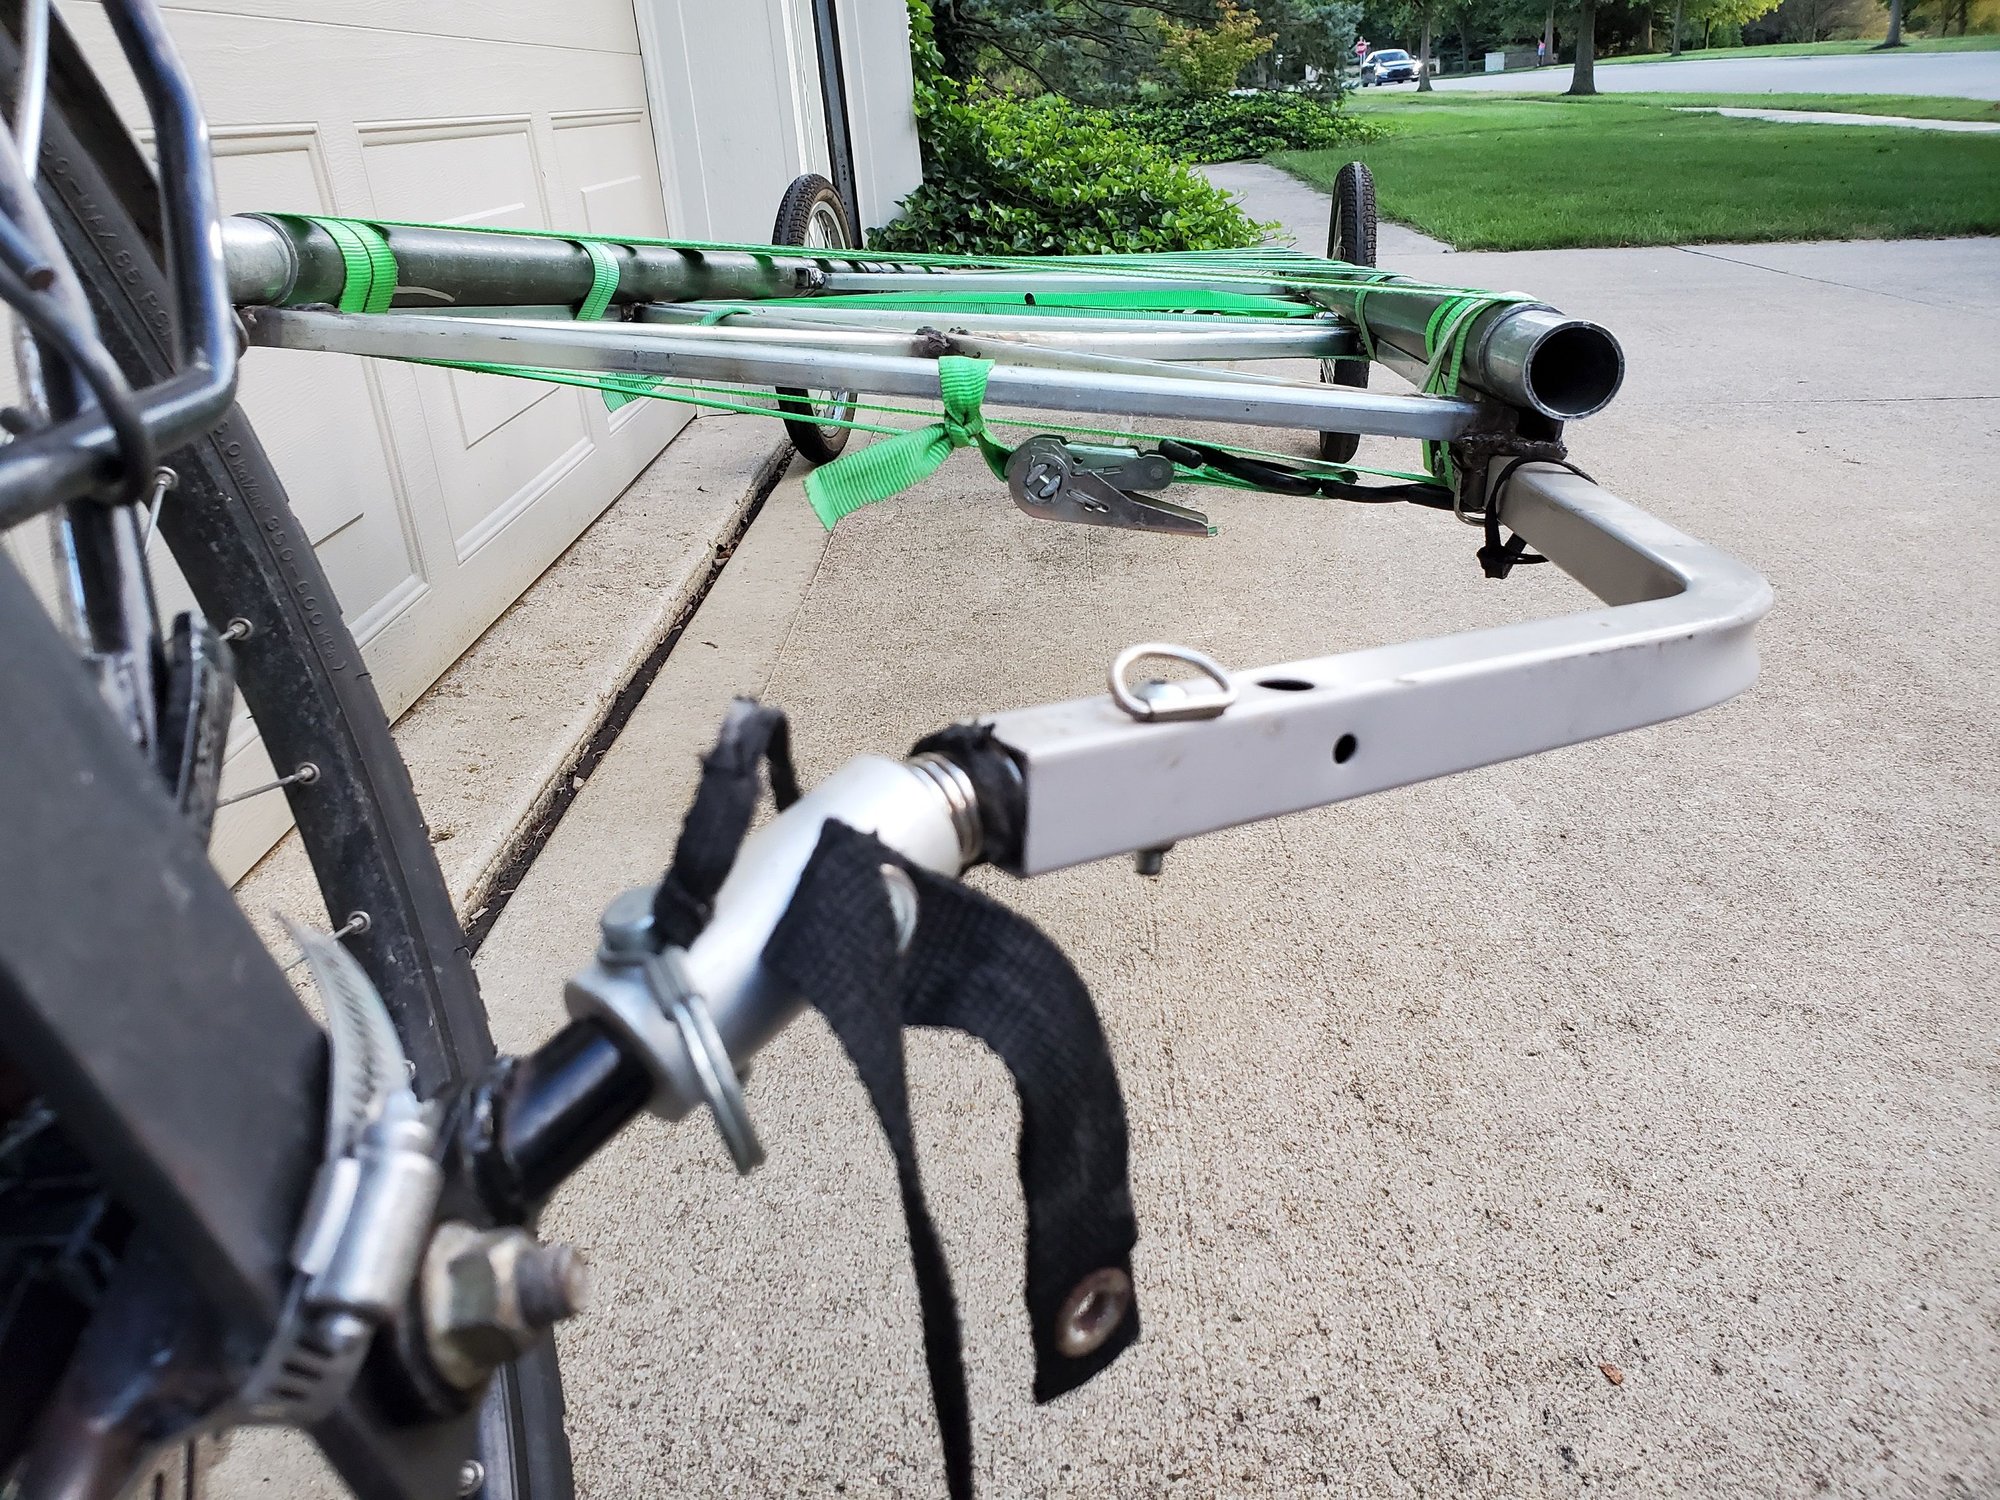
I did some multi-tasking today so I didn't get quite as far as I wanted, but I did get the hitch on the bike and got the trailer hooked to test fit it. I havent done any loading/rolling tests yet.
I protected the bike frame with a layer of electric tape sticky side out, then gorilla tape, then a metal strip, then more gorilla tape. My thought was the metal strip would take the abrasion. However, with the hose clamps around the back side of the stays (tire side/inside) I don't know that there is much merit to the metal strips - the hose clamps can wear through the tape over time and mess up the paint on the inside of the stays. We'll see.
Thinking about how I loaded the trailer the other day - I may take out some of the twist. I will put a block in the front of the hitch side and play with the angles and loads to see what happens. What I am thinking through is that I want to reduce the tongue weight on the bike and get more of the weight around the axle. The theory with a bumper pull trailer with a vehicle is that 10-15% of the trailer weight should be on the tongue. With a gooseneck/5th wheel style then that % goes up to about 25%. However, a bumper pull trailer behind a vehicle puts the pivot point behind the rear axle of the vehicle. On the bike set up - the axle mounted hitch pivot point is very close to the axle. So in theory that tongue weight percentage could approach the 25% of a gooseneck/5th wheel because the pivot point is not behind the axle.
My assumption is if I have too light of a tongue weight the "rotation" of the trailer (horizontal plane - hitch pushing the bike side to side as the trailer wheels articulate terrain) might be too much. By increasing the tongue weight (and moving the axle back further) I can reduce that "rotation". The more trailer and the more weight behind the trailer axle the more "rotation".
All stuff to play with. The good thing about having a long trailer is there is a lot of room to fit stuff and adjust loading.
Likes For KC8QVO:
09-02-21, 07:52 PM
#6
Senior Member
Thread Starter
Join Date: Apr 2013
Posts: 1,173
Bikes: Surly Disk Trucker, 2014 w/Brooks Flyer Special saddle, Tubus racks - Duo front/Logo Evo rear, 2019 Dahon Mariner D8, Both bikes share Ortlieb Packer Plus series panniers, Garmin Edge 1000
Mentioned: 2 Post(s)
Tagged: 0 Thread(s)
Quoted: 405 Post(s)
Liked 115 Times
in
99 Posts
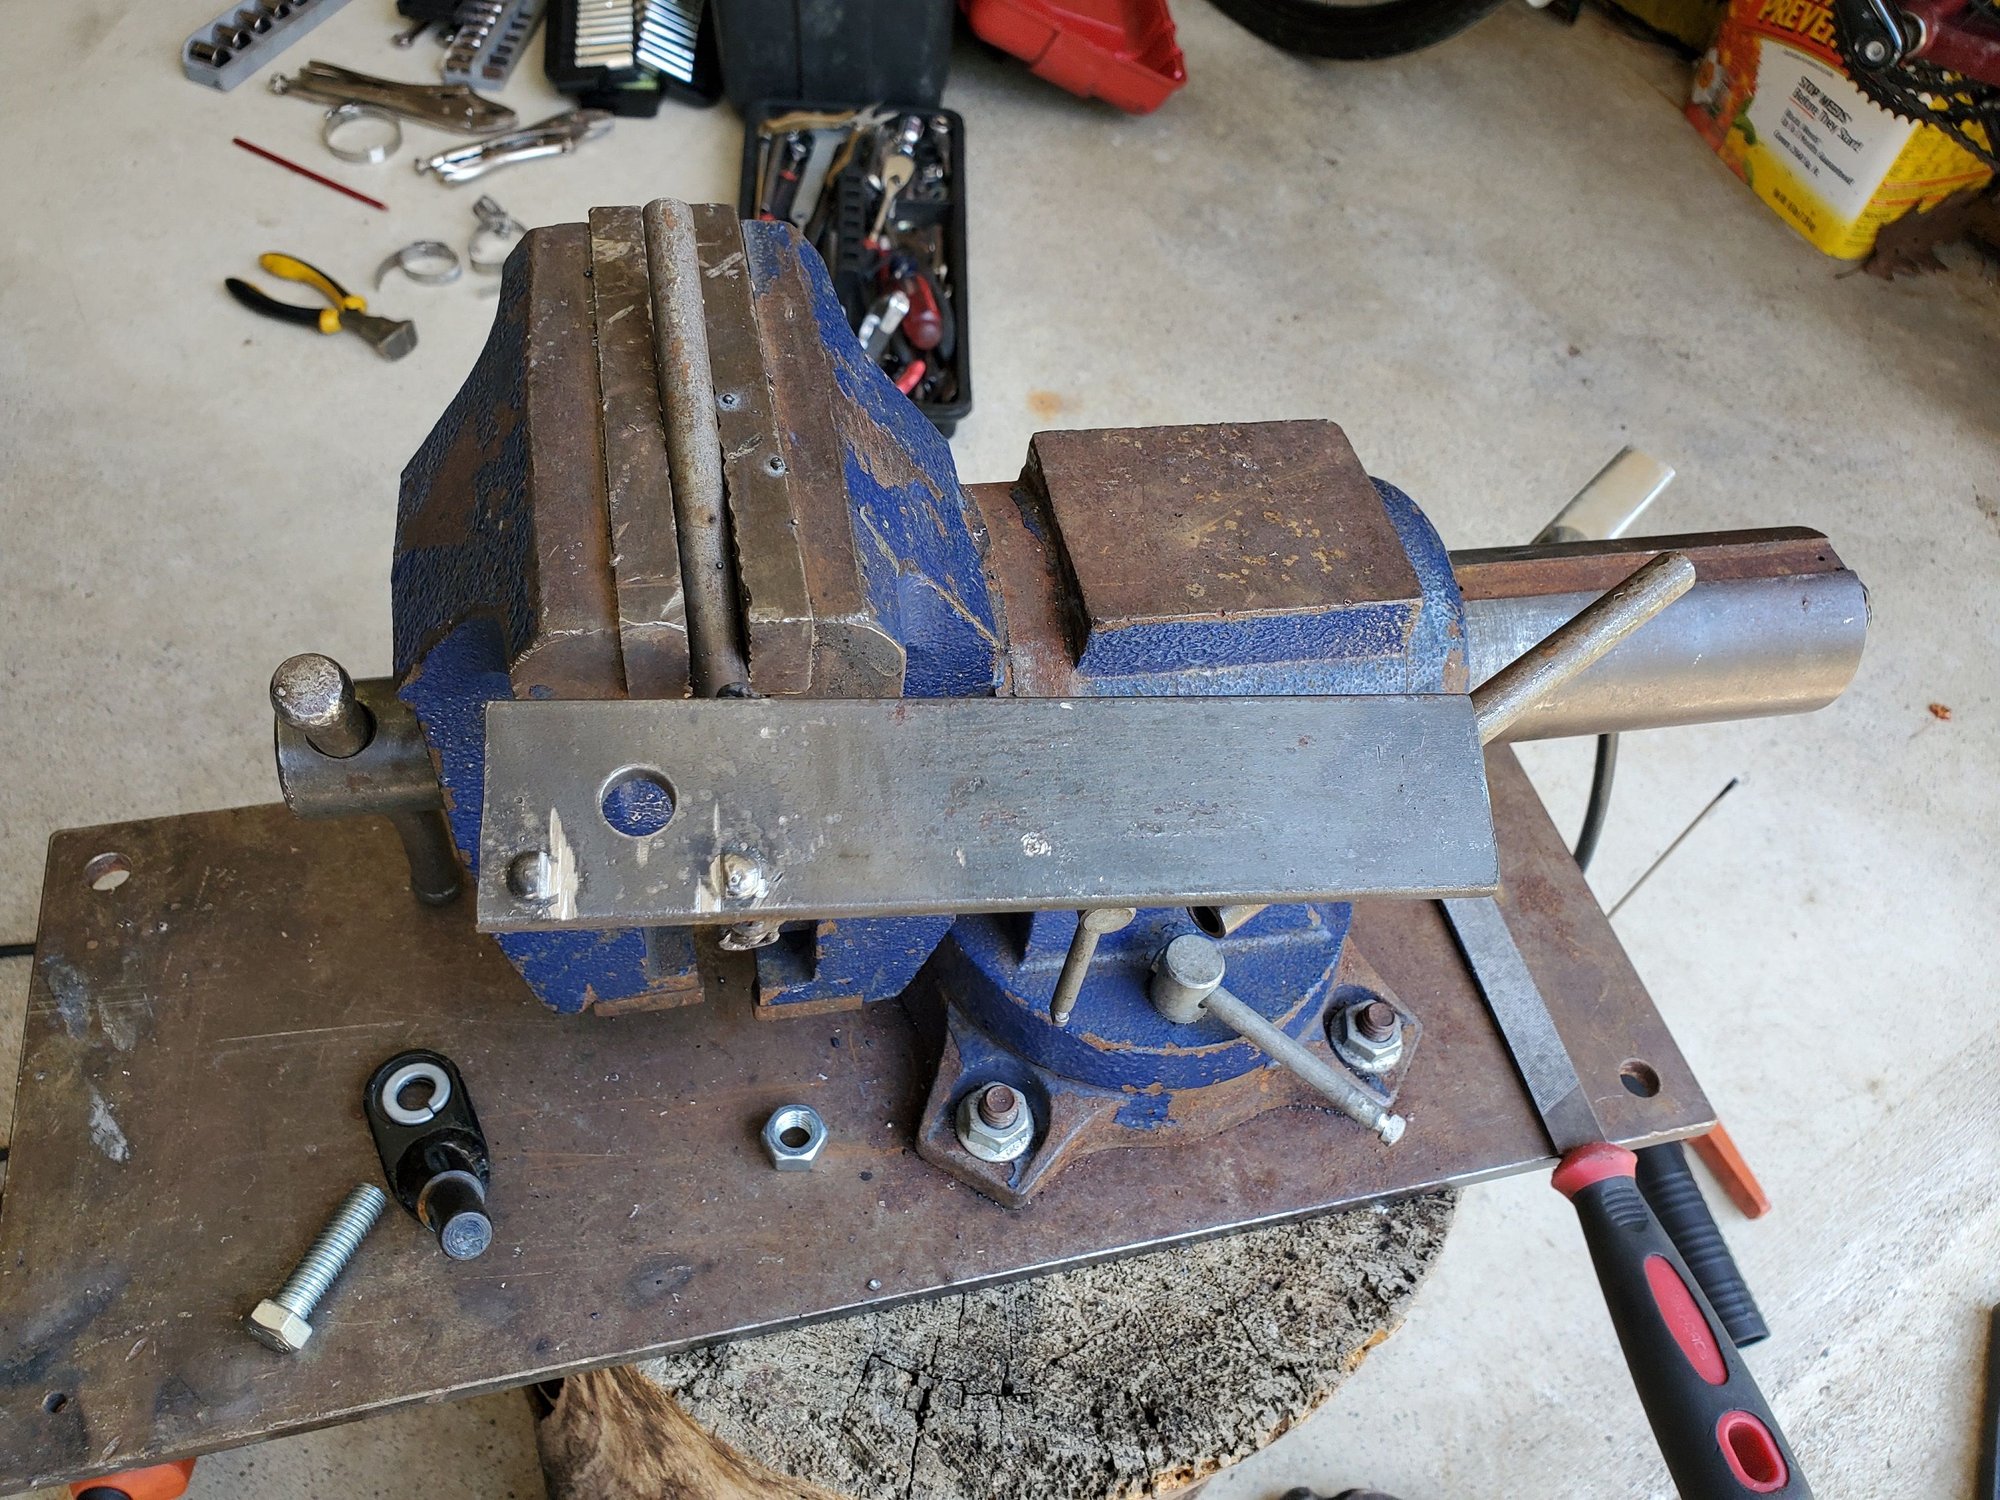
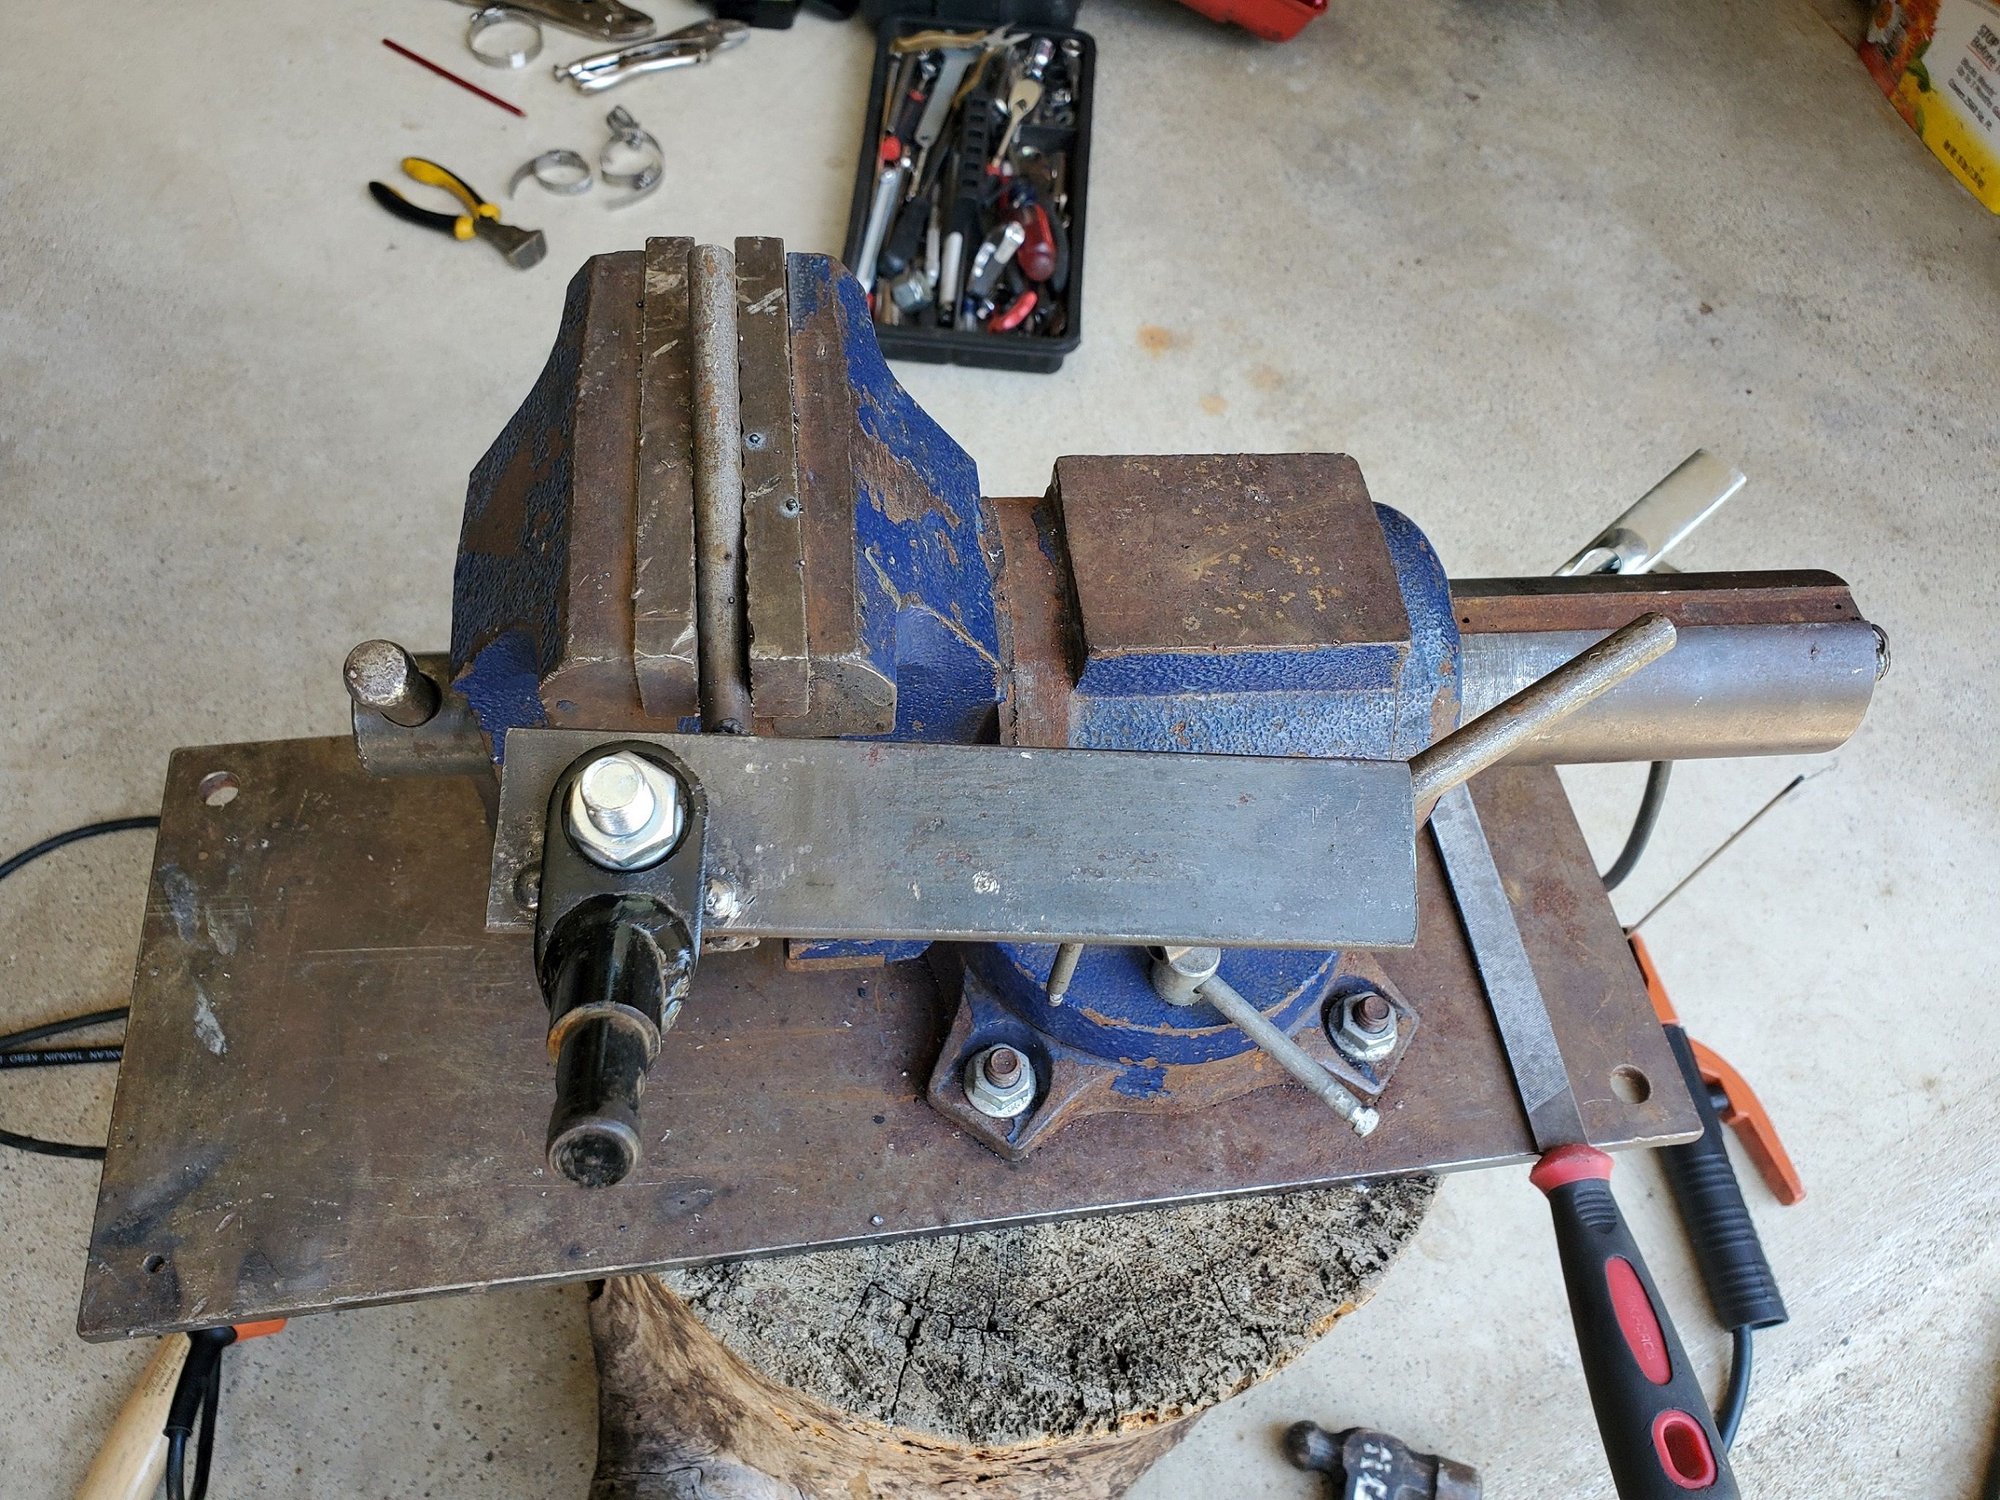
Here are a couple close-ups of the hitch bracket I made.
I did 2 heavy tack welds to make a "cradle" for the OEM hitch bracket. Once I got the on I ground the "cradle" to fit the OEM bracket snugly.
I did 2 heavy tack welds to make a "cradle" for the OEM hitch bracket. Once I got the on I ground the "cradle" to fit the OEM bracket snugly.
09-03-21, 08:34 PM
#7
Senior Member
Thread Starter
Join Date: Apr 2013
Posts: 1,173
Bikes: Surly Disk Trucker, 2014 w/Brooks Flyer Special saddle, Tubus racks - Duo front/Logo Evo rear, 2019 Dahon Mariner D8, Both bikes share Ortlieb Packer Plus series panniers, Garmin Edge 1000
Mentioned: 2 Post(s)
Tagged: 0 Thread(s)
Quoted: 405 Post(s)
Liked 115 Times
in
99 Posts
More work today.
I did some fine-tuning of the stub axle fitment. The alignment wasn't all that great and they were a bit loose. So I added more metal welding around the holes, then filed to fit. Things are a lot better now but I can't take out the cone and race looseness as the axle stub is not threaded to set the tension. That is a bad thing. I suppose I could easily swap out the axle for a conventional axle. However, at that point I'd rather build up a new wheel set. So I'll run these as-is and see what happens.
I also flattened out the front X brace frame. It was at 2.25" of twist (the end of the non-hitch side was 2.25" higher than the hitch side). I took 1" out by cutting some X members in a couple places. Then I welded the cut X members back together. Of course, when welding things move. So I ended up with closer to 1.75" of twist instead of 1.25". It is better than it was, though.
To test the flex of the twist I sat on one of the tubs and bounced a bit. I'm about 150 lbs so that was a good amount of weight to test with. I definitely had too much twist to start with.
Once I got things dialed in I added more ratchet straps for the time being. I have 3x straps wrapped 3 times around the frame as the supports for the tubs. The front X frame is held in with 2 straps with 3 wraps around the frames and 1 loop between side rails. That isn't how I want to keep it, but we'll see how it works for the time being.
I am going to do a short weekend trip this weekend so we'll see how things work out.
For weight I used a 6gal water jug, 2 tool boxes, and my tower climbing gear duffel. Load was close to 200lbs I estimate, plus maybe 40lbs for the trailer.
The 2 comments I have on how the trailer handled are:
1. The tongue weight on the left side of the bike feels really weird
2. The trailer load definitely pushes the bike around.
When I did my long tours last Fall I had all the gear on my bike in panniers and stuff lashed to the top of the rear rack and off the sides next to the panniers. When balanced well the bike rode fairly well given what all I was hauling, however with the gear not balanced well it rode horribly. Given that experience, I am hoping a similar load on a trailer is able to be dialed in. What I am not sure about is lightening up the tongue weight with the same trailer weight. I feel that more percentage of weight on the trailer axle will shove the bike around even more.
I did not sense any weakness in the hitch bar. That I am very thankful for. I figured I would notice some. However, the spring pivot point appears to be a bit weak. With the tongue weight the spring was stretched down. I am thinking a rigid hitch would be a better idea in the long run. My custom trailer idea would utilize a heim joint most likely.
All in all - things are a success. Nothing has broken, nothing needs to be re-worked (after the adjustment on the front X frame). We'll see how it holds up on my trip this weekend.
Likes For KC8QVO:
09-06-21, 08:35 AM
#8
Senior Member
Thread Starter
Join Date: Apr 2013
Posts: 1,173
Bikes: Surly Disk Trucker, 2014 w/Brooks Flyer Special saddle, Tubus racks - Duo front/Logo Evo rear, 2019 Dahon Mariner D8, Both bikes share Ortlieb Packer Plus series panniers, Garmin Edge 1000
Mentioned: 2 Post(s)
Tagged: 0 Thread(s)
Quoted: 405 Post(s)
Liked 115 Times
in
99 Posts
Here are a couple pictures from the weekend trip. I like riding out in the country, always have. This route, however, is new to me but I suspect it will be a frequent run from now on. There are only a few mild hills - nothing that I had to get off the bike to walk, even with the heavy load. I do have a 4th smaller chain ring to gear way down. It seems to me I sized up the ring from what I originally had on there (I bought 2, I forget what tooth counts, but they were 2 different sizes - smallest they had and one a couple teeth bigger - Mountain Tamer Triple is what it is - adapts a cassette gear to a crank).
The biggest complaint I have is the rolling resistance of the tires. So I will work on possibly changing that. I am tempted to build a 20" wheel set, but if I did for the time being I would want to keep the stub axle set up for the time being. I will have to see if I can find some stub axles that allow tensioning (IE - threaded axle, not fixed cones or pinned/clipped in cones like these axles).
Other than the rolling resistance, it handled fine. I did take off a noticeable amount of tongue weight from my test ride earlier. I could still feel the tongue weight on pulling the bike to the left (off balance) but it wasn't as much as before.
I think I will experiment with the axle placement. I have plenty of useable length left in the set of poles I have at the moment where I can shift the tubs back about 10". What I want to try to do is minimize the amount of weight behind the axle. There really isn't much now, but I want to trim that down as far as I can. The reason being I think that mass is where the side-to-side jerky-ness of the trailer comes from. It isn't terrible, but from a day-after-day long tour perspective that would get irritating pretty fast. If I can minimize it more all the better.
There are about 3-4 miles of MUP trail on this route. The trail crosses many roads. I went over some of those crossings with a good bit of speed to see how the trailer handled. I noticed it bounced. I saw the wheels flop a bit out of the corner of my eye trying to look back. I will inspect the brackets that the stub axles go in to. I did spend some time to tune the alignment and ensure there was a snug fit to the stub axles last week. At that point the only noticeable play was in the bearings (again - can't tension them without a threaded axle). So I am curious if the flopping of the wheels was just the bearing or if the brackets opened up some over the miles.

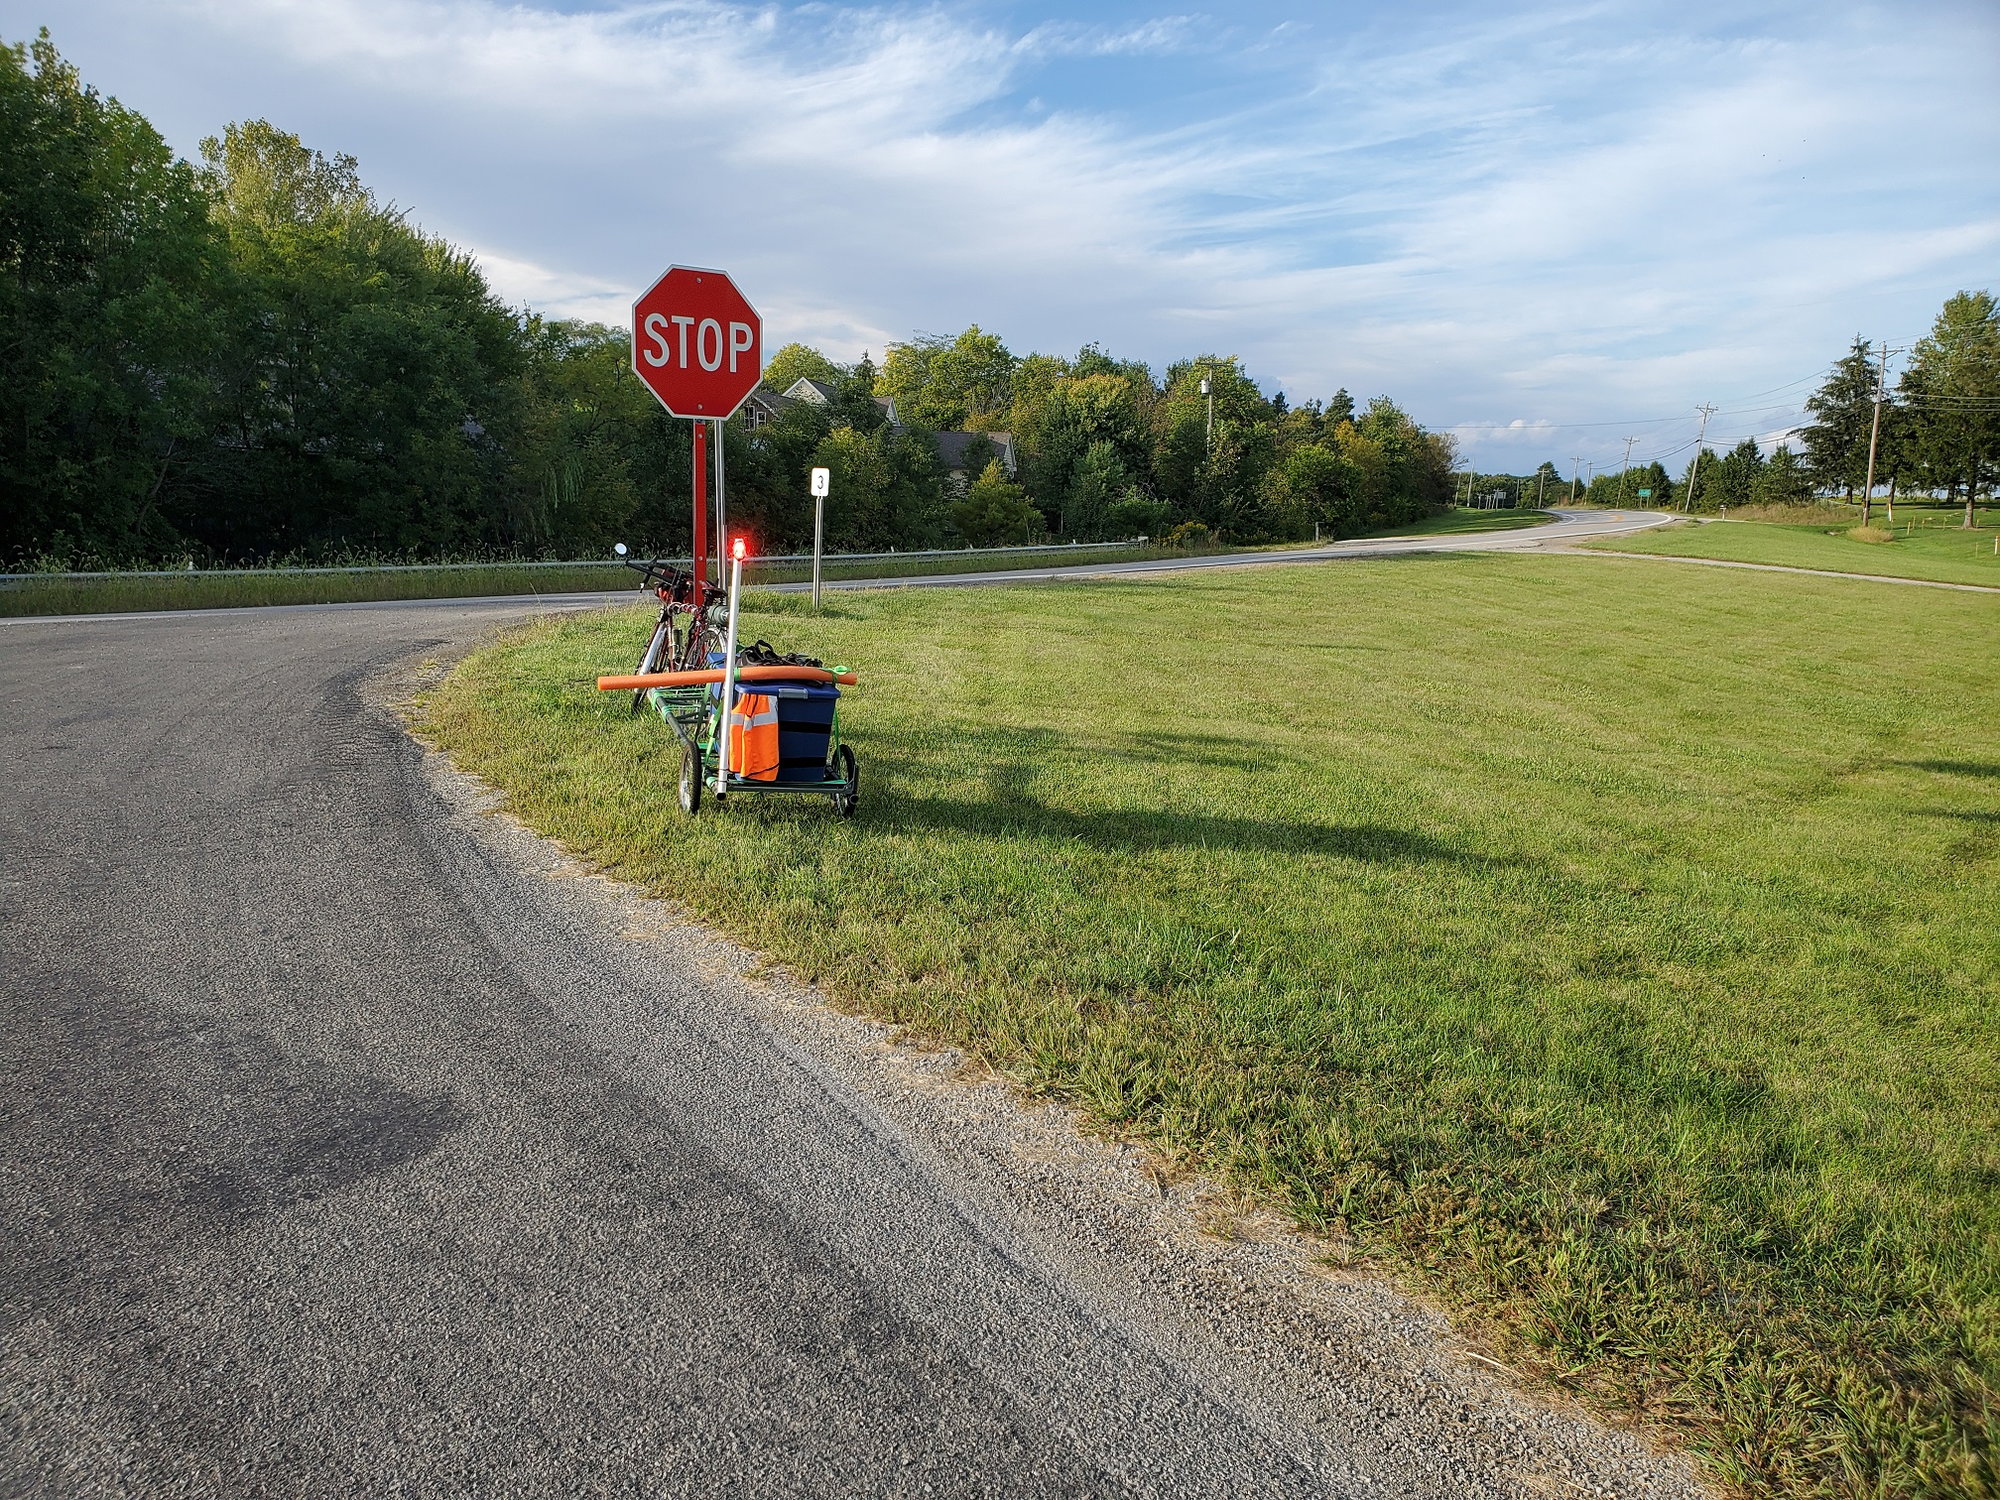
Note the high mounted blinky tail light. I really like doing that. I have a mast I put together to hold up a ham radio antenna and have used that for the light as well. Riding on the roads out in the country it helps enormously when cresting hills. The higher the light is the more warning distance to motorists coming up over the same hill. This pole is just a pole. As with the rest of the trailer frame and the "platforms" for the tubs - everything right now is ratchet strapped together. I need a better solution for the pole. The biggest issue, aside from the time it takes to get the strap woven right to do it, is I can't get in to the tub on-the-go. The pole strap is the first that has to come off. and I can't put it on until I get the 2 holding the tub down secured. Some kind of mount attached to the frame rail is in order. That brings up another aspect that needs addressed in a custom trailer design.

Here is a closer-up picture.

The biggest complaint I have is the rolling resistance of the tires. So I will work on possibly changing that. I am tempted to build a 20" wheel set, but if I did for the time being I would want to keep the stub axle set up for the time being. I will have to see if I can find some stub axles that allow tensioning (IE - threaded axle, not fixed cones or pinned/clipped in cones like these axles).
Other than the rolling resistance, it handled fine. I did take off a noticeable amount of tongue weight from my test ride earlier. I could still feel the tongue weight on pulling the bike to the left (off balance) but it wasn't as much as before.
I think I will experiment with the axle placement. I have plenty of useable length left in the set of poles I have at the moment where I can shift the tubs back about 10". What I want to try to do is minimize the amount of weight behind the axle. There really isn't much now, but I want to trim that down as far as I can. The reason being I think that mass is where the side-to-side jerky-ness of the trailer comes from. It isn't terrible, but from a day-after-day long tour perspective that would get irritating pretty fast. If I can minimize it more all the better.
There are about 3-4 miles of MUP trail on this route. The trail crosses many roads. I went over some of those crossings with a good bit of speed to see how the trailer handled. I noticed it bounced. I saw the wheels flop a bit out of the corner of my eye trying to look back. I will inspect the brackets that the stub axles go in to. I did spend some time to tune the alignment and ensure there was a snug fit to the stub axles last week. At that point the only noticeable play was in the bearings (again - can't tension them without a threaded axle). So I am curious if the flopping of the wheels was just the bearing or if the brackets opened up some over the miles.
Note the high mounted blinky tail light. I really like doing that. I have a mast I put together to hold up a ham radio antenna and have used that for the light as well. Riding on the roads out in the country it helps enormously when cresting hills. The higher the light is the more warning distance to motorists coming up over the same hill. This pole is just a pole. As with the rest of the trailer frame and the "platforms" for the tubs - everything right now is ratchet strapped together. I need a better solution for the pole. The biggest issue, aside from the time it takes to get the strap woven right to do it, is I can't get in to the tub on-the-go. The pole strap is the first that has to come off. and I can't put it on until I get the 2 holding the tub down secured. Some kind of mount attached to the frame rail is in order. That brings up another aspect that needs addressed in a custom trailer design.
Here is a closer-up picture.
Last edited by KC8QVO; 09-06-21 at 08:46 AM.
09-06-21, 04:14 PM
#9
Senior Member
Thread Starter
Join Date: Apr 2013
Posts: 1,173
Bikes: Surly Disk Trucker, 2014 w/Brooks Flyer Special saddle, Tubus racks - Duo front/Logo Evo rear, 2019 Dahon Mariner D8, Both bikes share Ortlieb Packer Plus series panniers, Garmin Edge 1000
Mentioned: 2 Post(s)
Tagged: 0 Thread(s)
Quoted: 405 Post(s)
Liked 115 Times
in
99 Posts
I checked out a couple things on the trailer this evening post-trip. I got rained on the last 1.5-2hrs of the 1st leg of my trip. I was hoping to not get the trailer wet as I did not get a chance to paint the parts I made. As soon as water touched the welded parts they got surface rust, of course. So now I'll have to scrub off the rust before I paint. I was going to cover everything with a coat of etching primer first so that should bite down through any light rust and in to the base metal.
I found no signs of excessive wear, no cracked welds, and no bent parts - including the stub axles. That I was really curious about - if the heavy load and bouncing over train tracks, MUP/road crossings, pot holes, and the like would have bent the axles. Nada. That gives me some more comfort in the load capacity of the wheel set.
However, I did find the hubs are sealed cartridge bearings - not cone/race hubs like I thought they were. I tried to take one apart and so far I have not had much luck. I will poke at them a bit more when I get a chance, carefully, and see if I can pop them apart without damaging them. The one wheel I had off has a pretty gritty feel to the rolling of the bearing so I'd like to get it open, degrease/clean everything, then pack with fresh grease. The grease that is around the inside (look at the axle stub) is black and very loose. So at least it appears decently well lubed, but the gritty'ness has me concerned - that will only lead to problems over time.
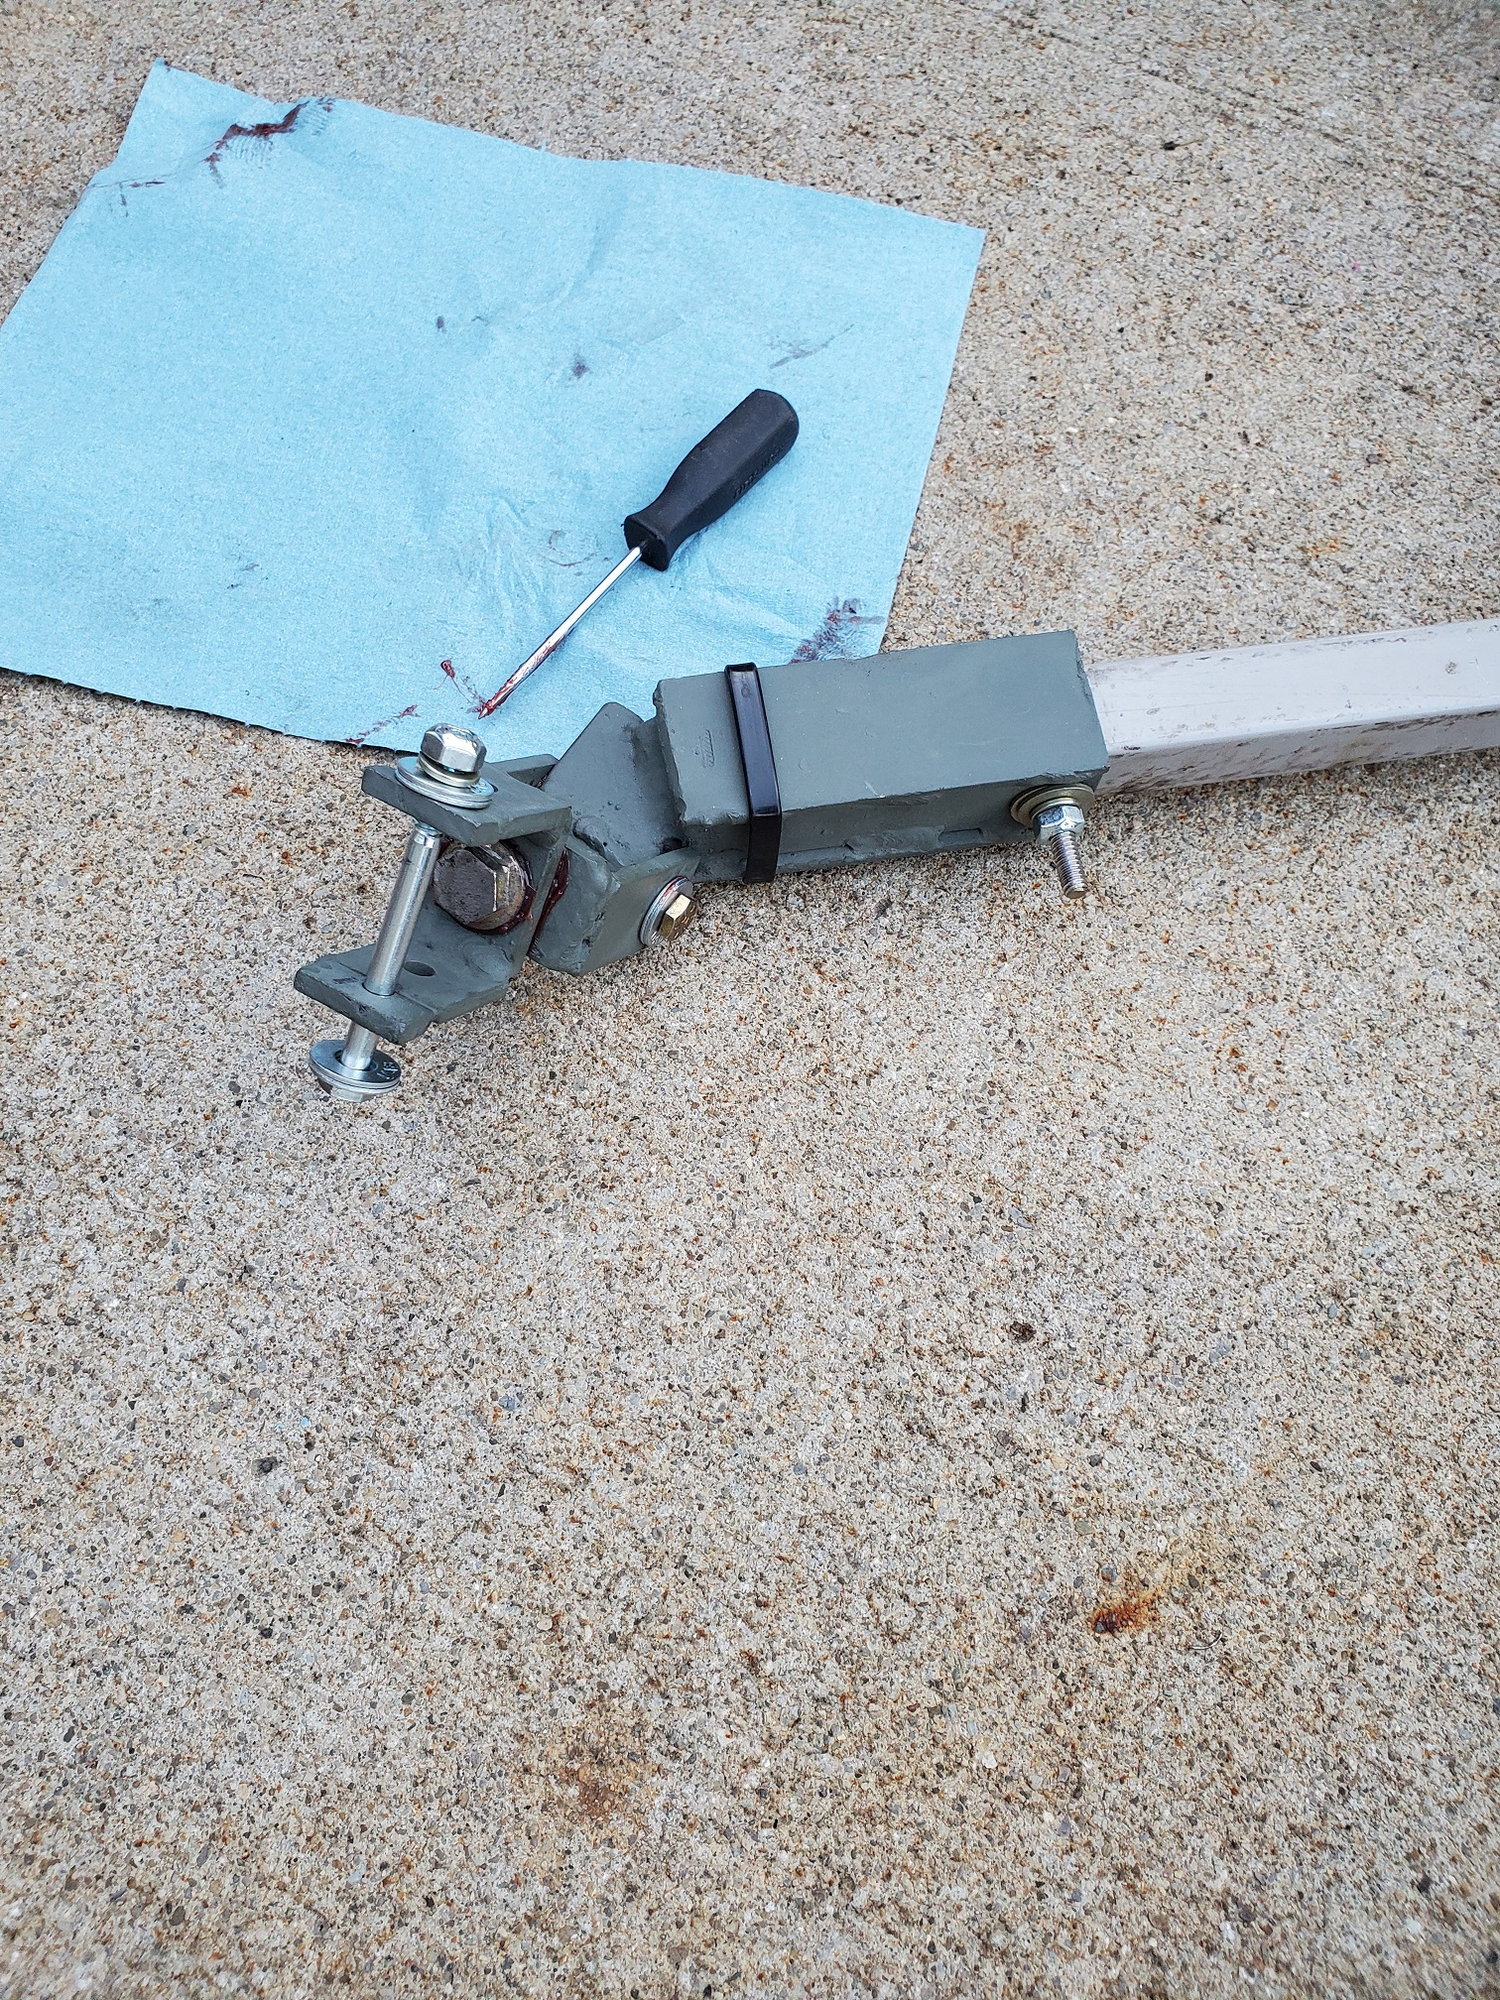
Although, if the bearings are a somewhat normal size cartridge then I might be able to find some higher quality, more durable bearings to press in. That would give me a lot more peace of mind. As for the axles - they are 1/2" so it might be possible to get a 1/2" grade 8 bolt to work as a spare axle. So long as the hub or rim don't split apart - a bolt and spare set of bearings could give me a way out if I ran in to trouble on a long trip.


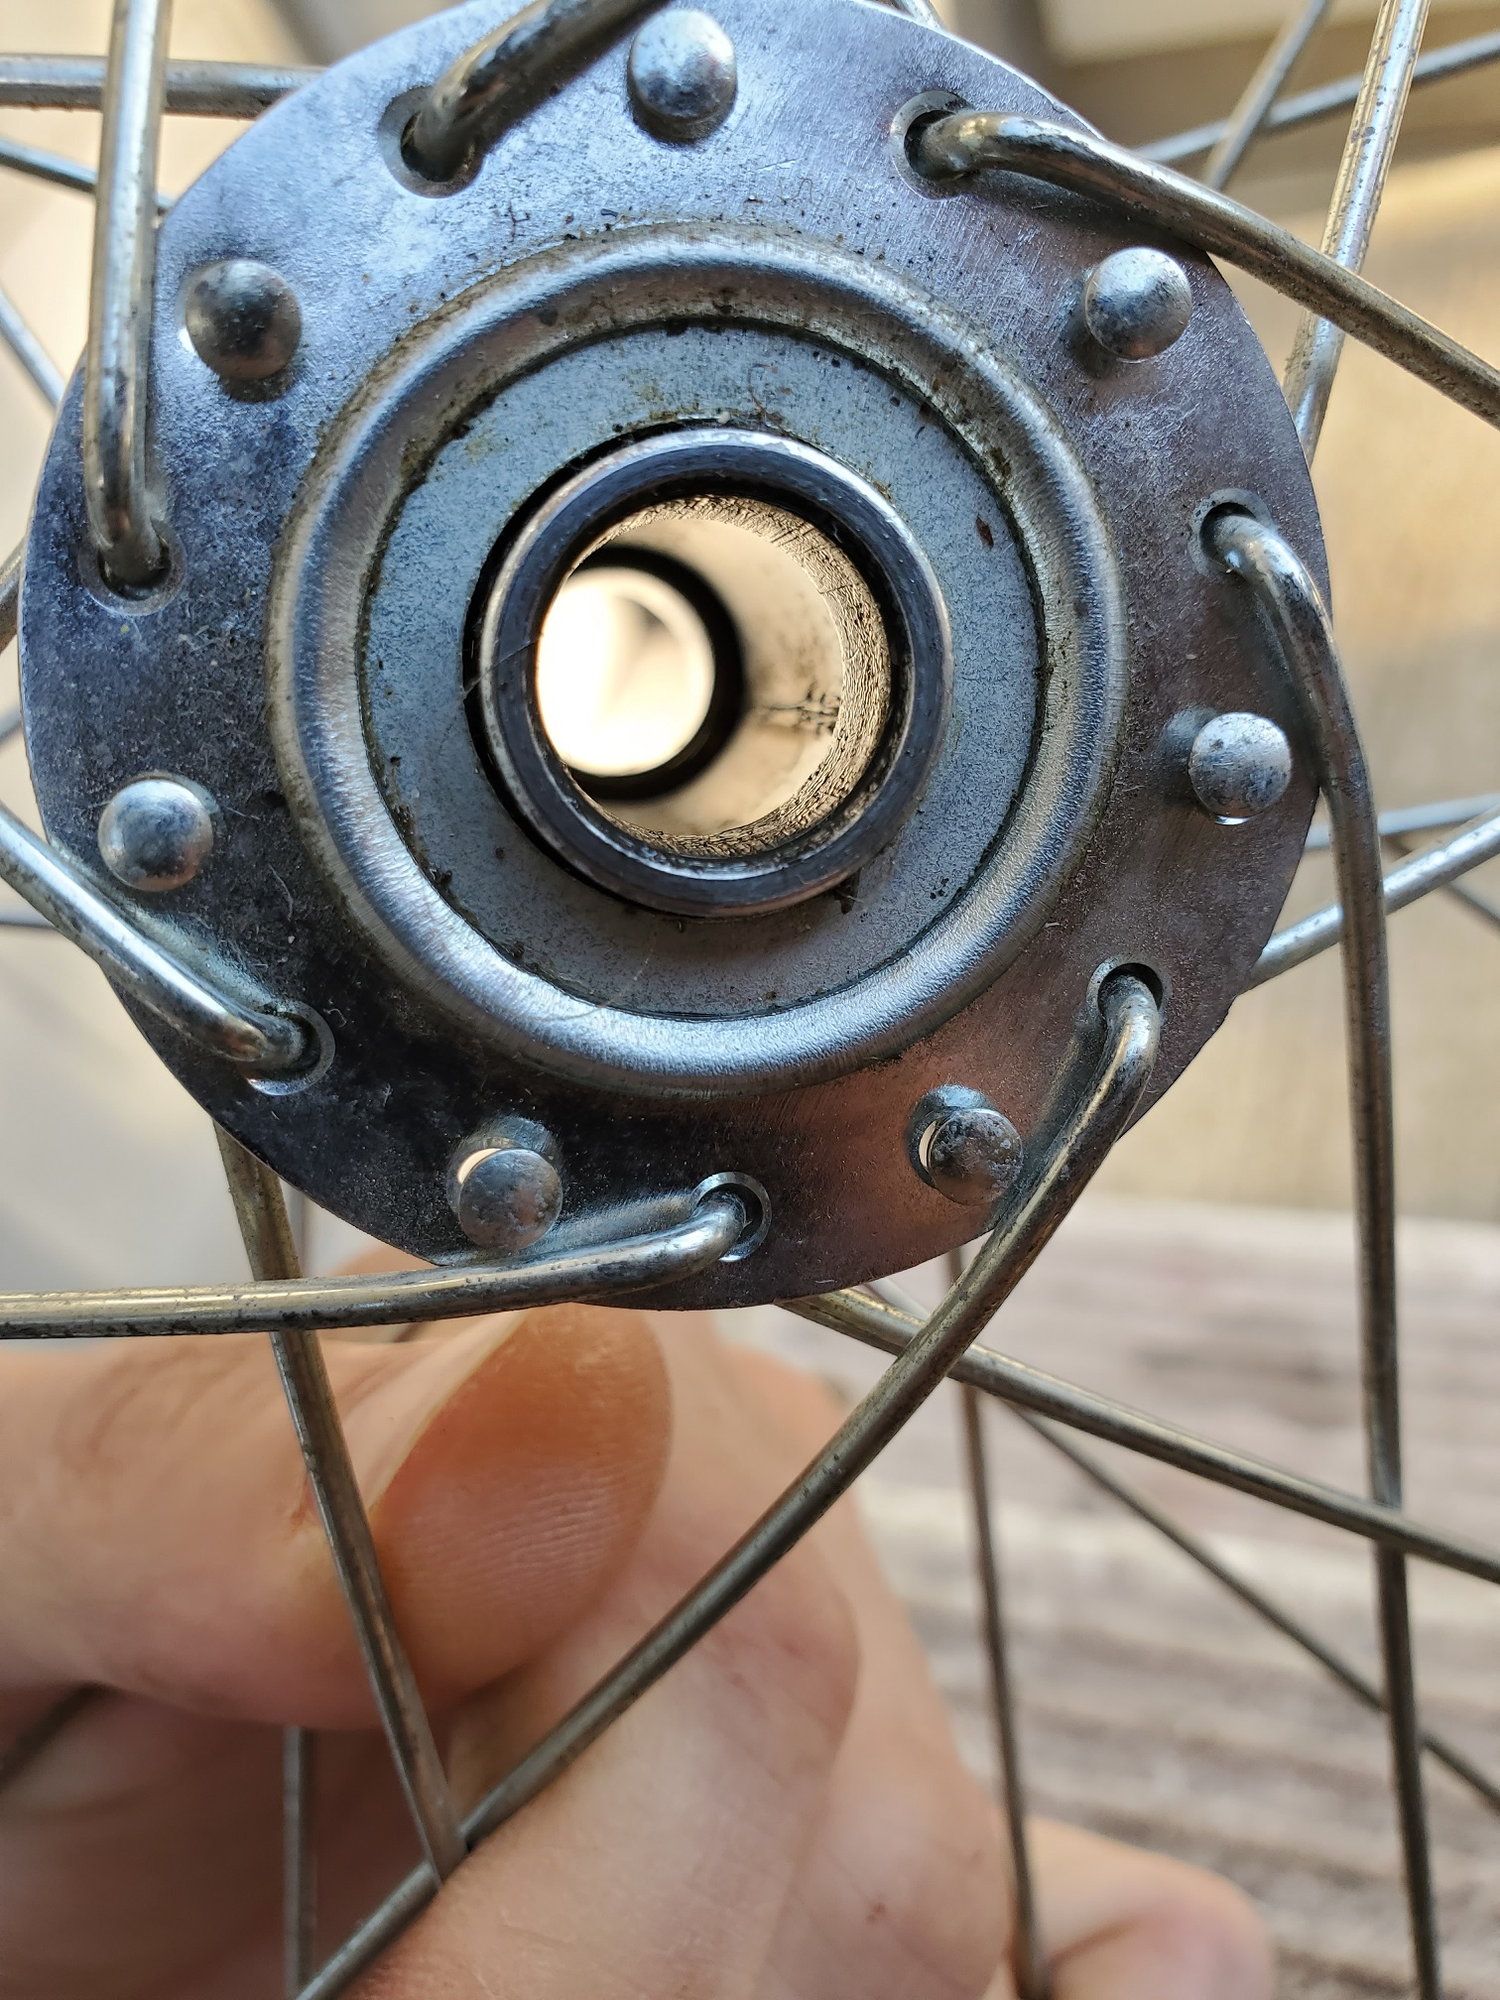
And a picture of the axle mounting bracket I made. You can see some of the surface rust from getting wet the other day.

I found no signs of excessive wear, no cracked welds, and no bent parts - including the stub axles. That I was really curious about - if the heavy load and bouncing over train tracks, MUP/road crossings, pot holes, and the like would have bent the axles. Nada. That gives me some more comfort in the load capacity of the wheel set.
However, I did find the hubs are sealed cartridge bearings - not cone/race hubs like I thought they were. I tried to take one apart and so far I have not had much luck. I will poke at them a bit more when I get a chance, carefully, and see if I can pop them apart without damaging them. The one wheel I had off has a pretty gritty feel to the rolling of the bearing so I'd like to get it open, degrease/clean everything, then pack with fresh grease. The grease that is around the inside (look at the axle stub) is black and very loose. So at least it appears decently well lubed, but the gritty'ness has me concerned - that will only lead to problems over time.
Although, if the bearings are a somewhat normal size cartridge then I might be able to find some higher quality, more durable bearings to press in. That would give me a lot more peace of mind. As for the axles - they are 1/2" so it might be possible to get a 1/2" grade 8 bolt to work as a spare axle. So long as the hub or rim don't split apart - a bolt and spare set of bearings could give me a way out if I ran in to trouble on a long trip.
And a picture of the axle mounting bracket I made. You can see some of the surface rust from getting wet the other day.
Likes For KC8QVO:
09-07-21, 09:10 PM
#10
Senior Member
Thread Starter
Join Date: Apr 2013
Posts: 1,173
Bikes: Surly Disk Trucker, 2014 w/Brooks Flyer Special saddle, Tubus racks - Duo front/Logo Evo rear, 2019 Dahon Mariner D8, Both bikes share Ortlieb Packer Plus series panniers, Garmin Edge 1000
Mentioned: 2 Post(s)
Tagged: 0 Thread(s)
Quoted: 405 Post(s)
Liked 115 Times
in
99 Posts
Todays work -
I made a bracket to mount vertical masts - one on each side. One thing that bothered me on my trip over the weekend was accessing the rear tub was a challenge and time consuming in that I needed to remove the light mast first.
The other thing is I have a mast that mounts to a bracket that sits on my rear rack that has been the host to my rear flashy light for a long time now, but it also a mast for a ham radio antenna. So I borrowed the same assembly theory for the mast mounts on the trailer - instead of one in the middle, though, I put one on each side.
The idea for the side mounts is I prefer the flashy light to be on the traffic side of the trailer - the left. I have an idea for another antenna mount and I'd rather have that on the non-traffic side. We'll see how things pan out as I go. Lots of options.
I did do something a little different on this bracket - I put diagonal supports in for extra support front to back and side to side. For the flashy light mast I don't think they would be needed, but they certainly strengthen things a lot.

I also experimented with a 3ord section in the tube rail frame. This pushes the usable frame rail length to a hair over 11'. I am not sure I'll ever need it this long, with 2 I still have close to 2' of frame length on top of the 2 tubs loaded up. That is likely all I'll need.
I made a bracket to mount vertical masts - one on each side. One thing that bothered me on my trip over the weekend was accessing the rear tub was a challenge and time consuming in that I needed to remove the light mast first.
The other thing is I have a mast that mounts to a bracket that sits on my rear rack that has been the host to my rear flashy light for a long time now, but it also a mast for a ham radio antenna. So I borrowed the same assembly theory for the mast mounts on the trailer - instead of one in the middle, though, I put one on each side.
The idea for the side mounts is I prefer the flashy light to be on the traffic side of the trailer - the left. I have an idea for another antenna mount and I'd rather have that on the non-traffic side. We'll see how things pan out as I go. Lots of options.
I did do something a little different on this bracket - I put diagonal supports in for extra support front to back and side to side. For the flashy light mast I don't think they would be needed, but they certainly strengthen things a lot.
I also experimented with a 3ord section in the tube rail frame. This pushes the usable frame rail length to a hair over 11'. I am not sure I'll ever need it this long, with 2 I still have close to 2' of frame length on top of the 2 tubs loaded up. That is likely all I'll need.
09-09-21, 09:10 AM
#11
Senior Member
Thread Starter
Join Date: Apr 2013
Posts: 1,173
Bikes: Surly Disk Trucker, 2014 w/Brooks Flyer Special saddle, Tubus racks - Duo front/Logo Evo rear, 2019 Dahon Mariner D8, Both bikes share Ortlieb Packer Plus series panniers, Garmin Edge 1000
Mentioned: 2 Post(s)
Tagged: 0 Thread(s)
Quoted: 405 Post(s)
Liked 115 Times
in
99 Posts
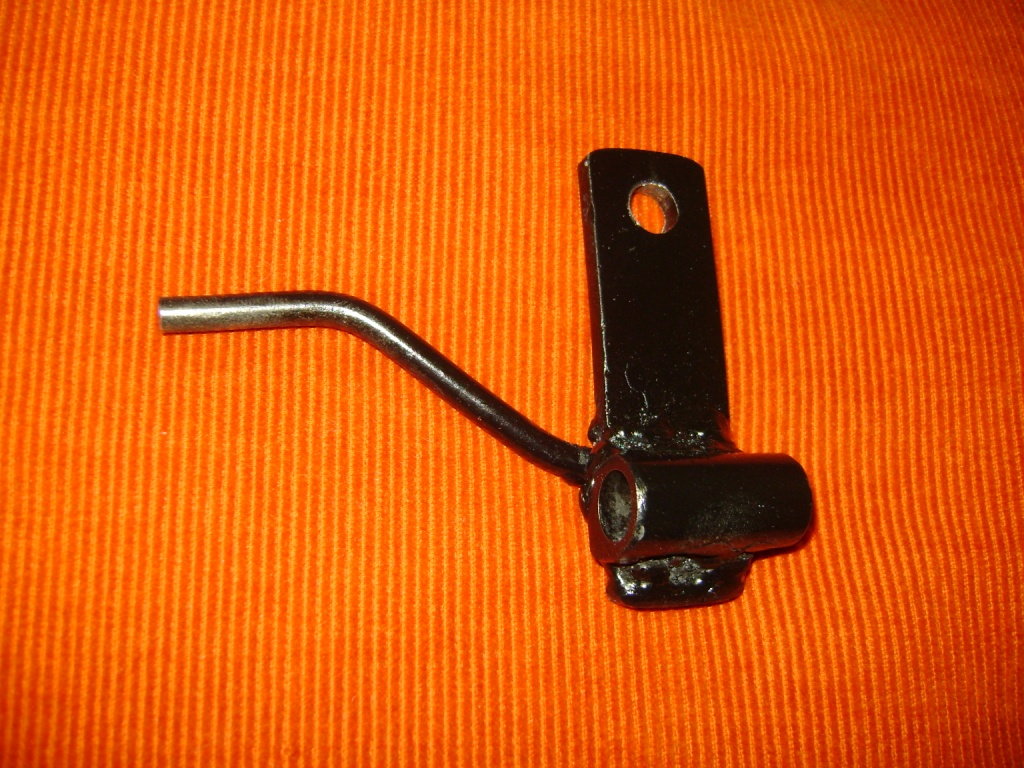
I got to thinking about the apparently weak springy hitch from the stock trailer. In my other thread the below hitch idea was posted in there. So I decided to make something similar.
At first I welded the tube on the bike side in the horizontal position. However, I got to thinking about it and felt that if I did that the pivot point - and thus the leverage the trailer tongue would have on the rear end of the bike - would be extended out further than it should be. So I decided to cut it off and weld it vertically instead.
I will post pictures later. I am going to work on the rest of the hitch today. Hopefully I will get a bit further with it.
My idea for the tongue hitch bar to couple to the pivot brackets is to make a square socket that the hitch tongue bar would fit inside of, like a receiver hitch and drawbar on a vehicle (1-1/4", 2", 2.5" etc square receiver hitches). The hitch tongue bar going inside would mean the coupler would be larger and thus stronger. The hitch tongue bar is pretty small thin wall tube and it would be a challenge making a square tube to go inside. The welds being on the outside will be a lot easier to work with, also.
With the vertical (rotational) pivot at the bike, the horizontal (rolling) pivot will be at the hitch bar. That might be a challenge to make, but I'll hammer through it. That is the blessing of custom fabrication - you can make what you need and make things work. Sometimes there are a million ways to accomplish the same thing.
Likes For KC8QVO:
09-09-21, 08:42 PM
#12
Senior Member
Thread Starter
Join Date: Apr 2013
Posts: 1,173
Bikes: Surly Disk Trucker, 2014 w/Brooks Flyer Special saddle, Tubus racks - Duo front/Logo Evo rear, 2019 Dahon Mariner D8, Both bikes share Ortlieb Packer Plus series panniers, Garmin Edge 1000
Mentioned: 2 Post(s)
Tagged: 0 Thread(s)
Quoted: 405 Post(s)
Liked 115 Times
in
99 Posts
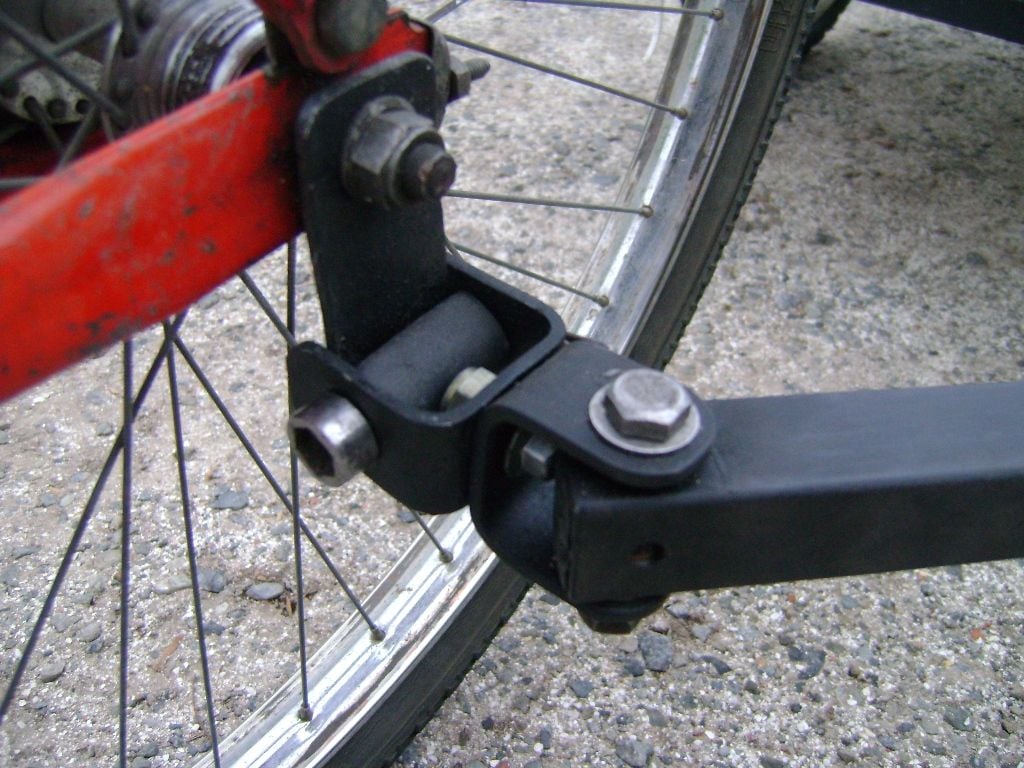
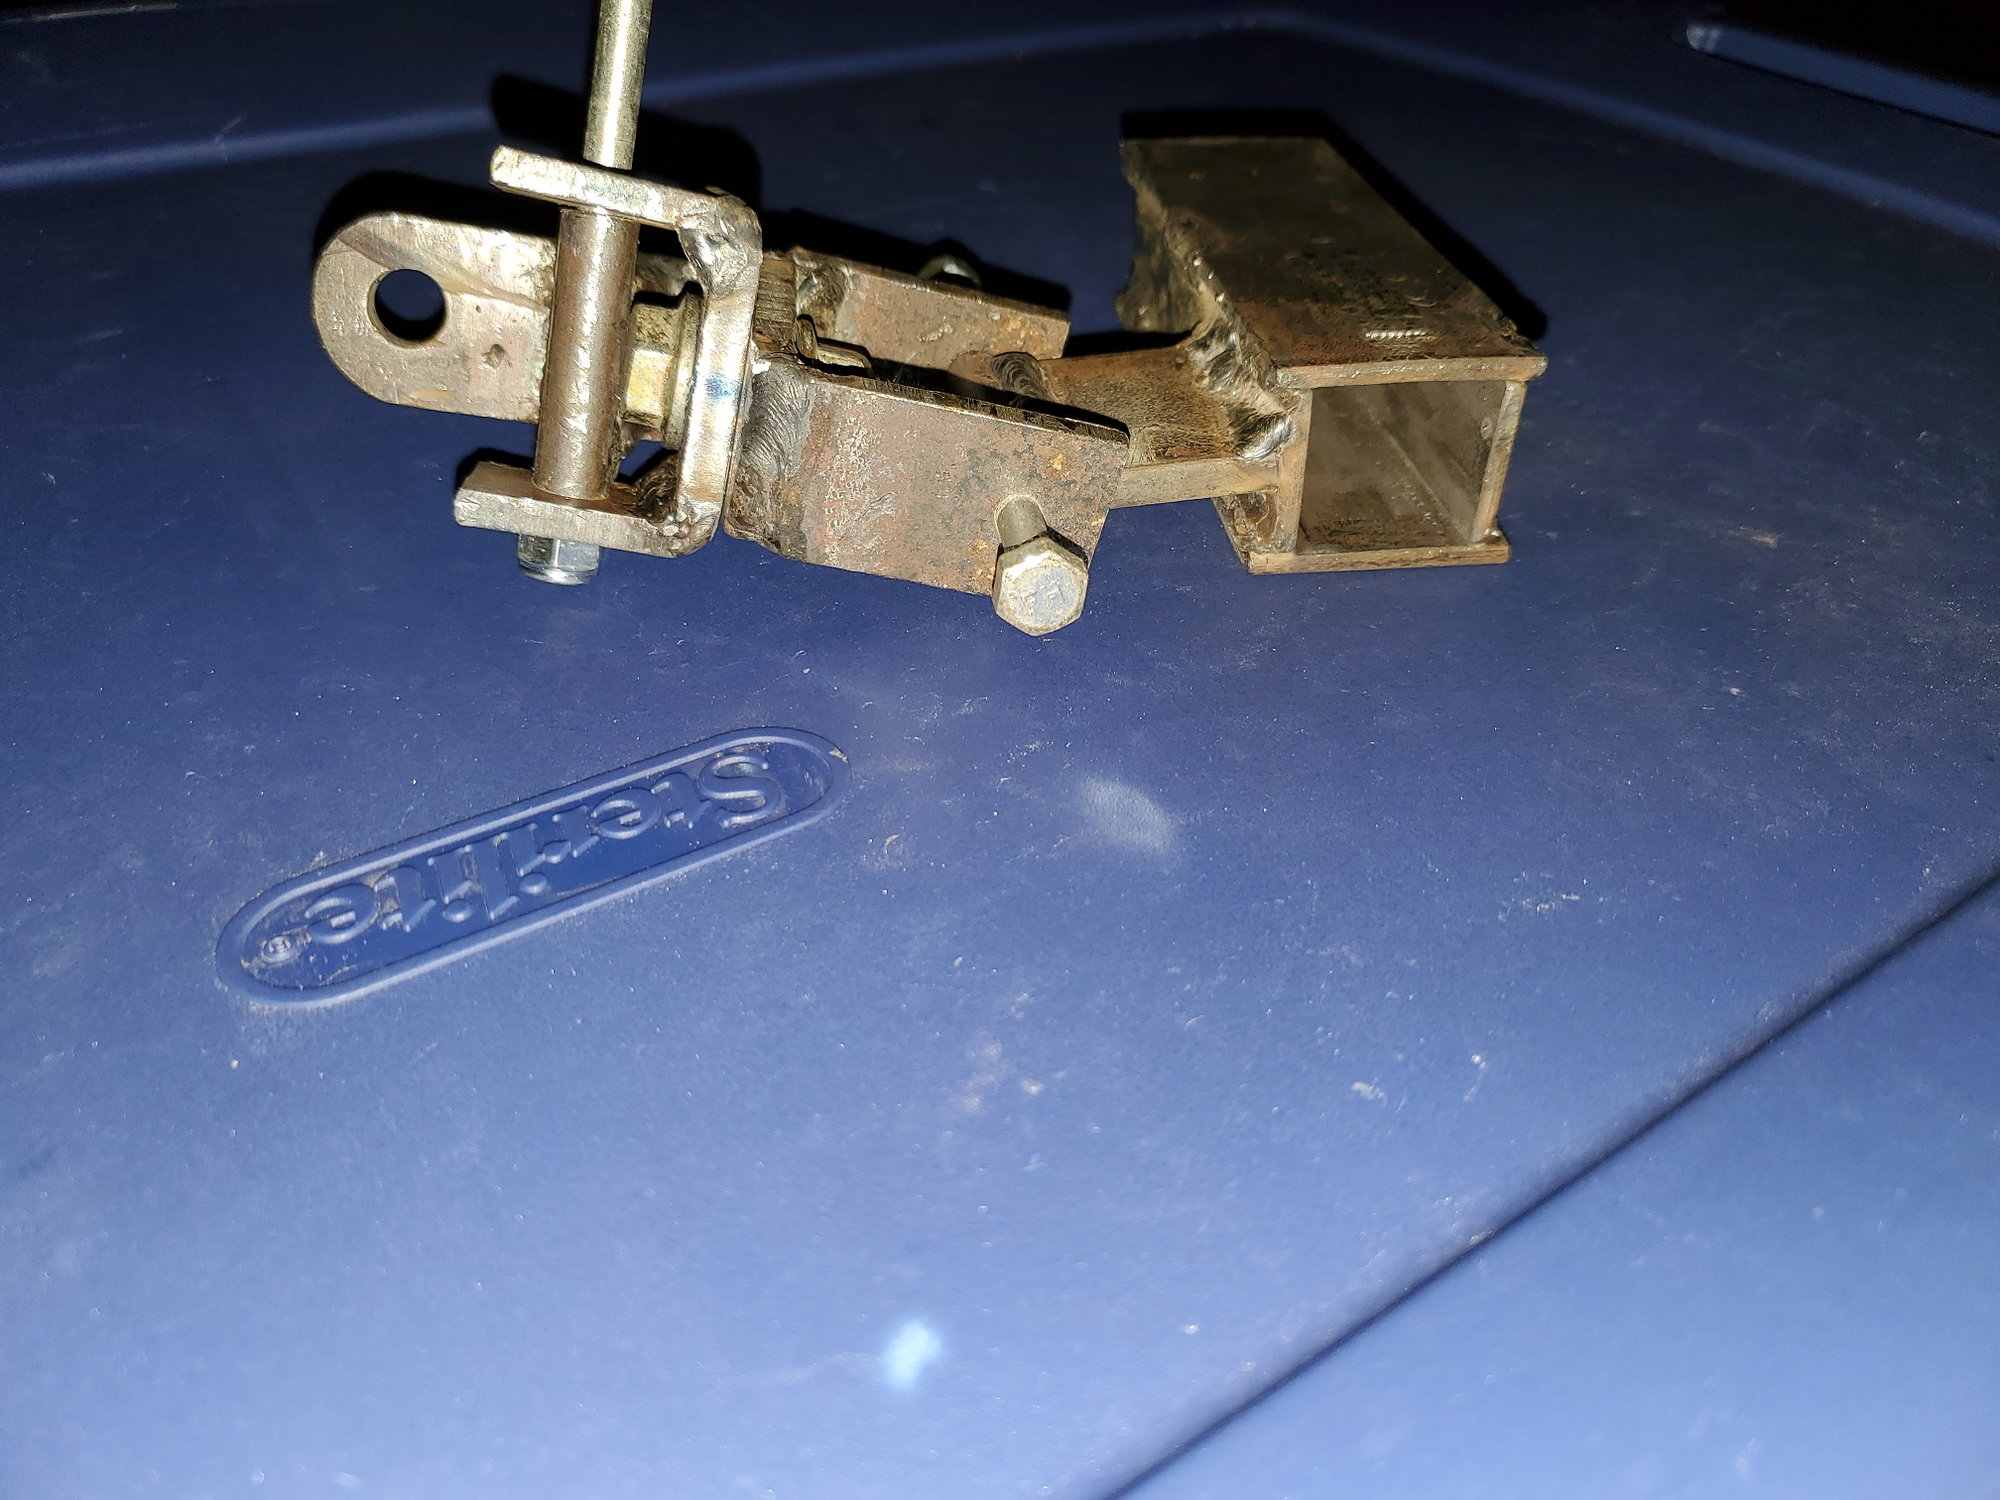
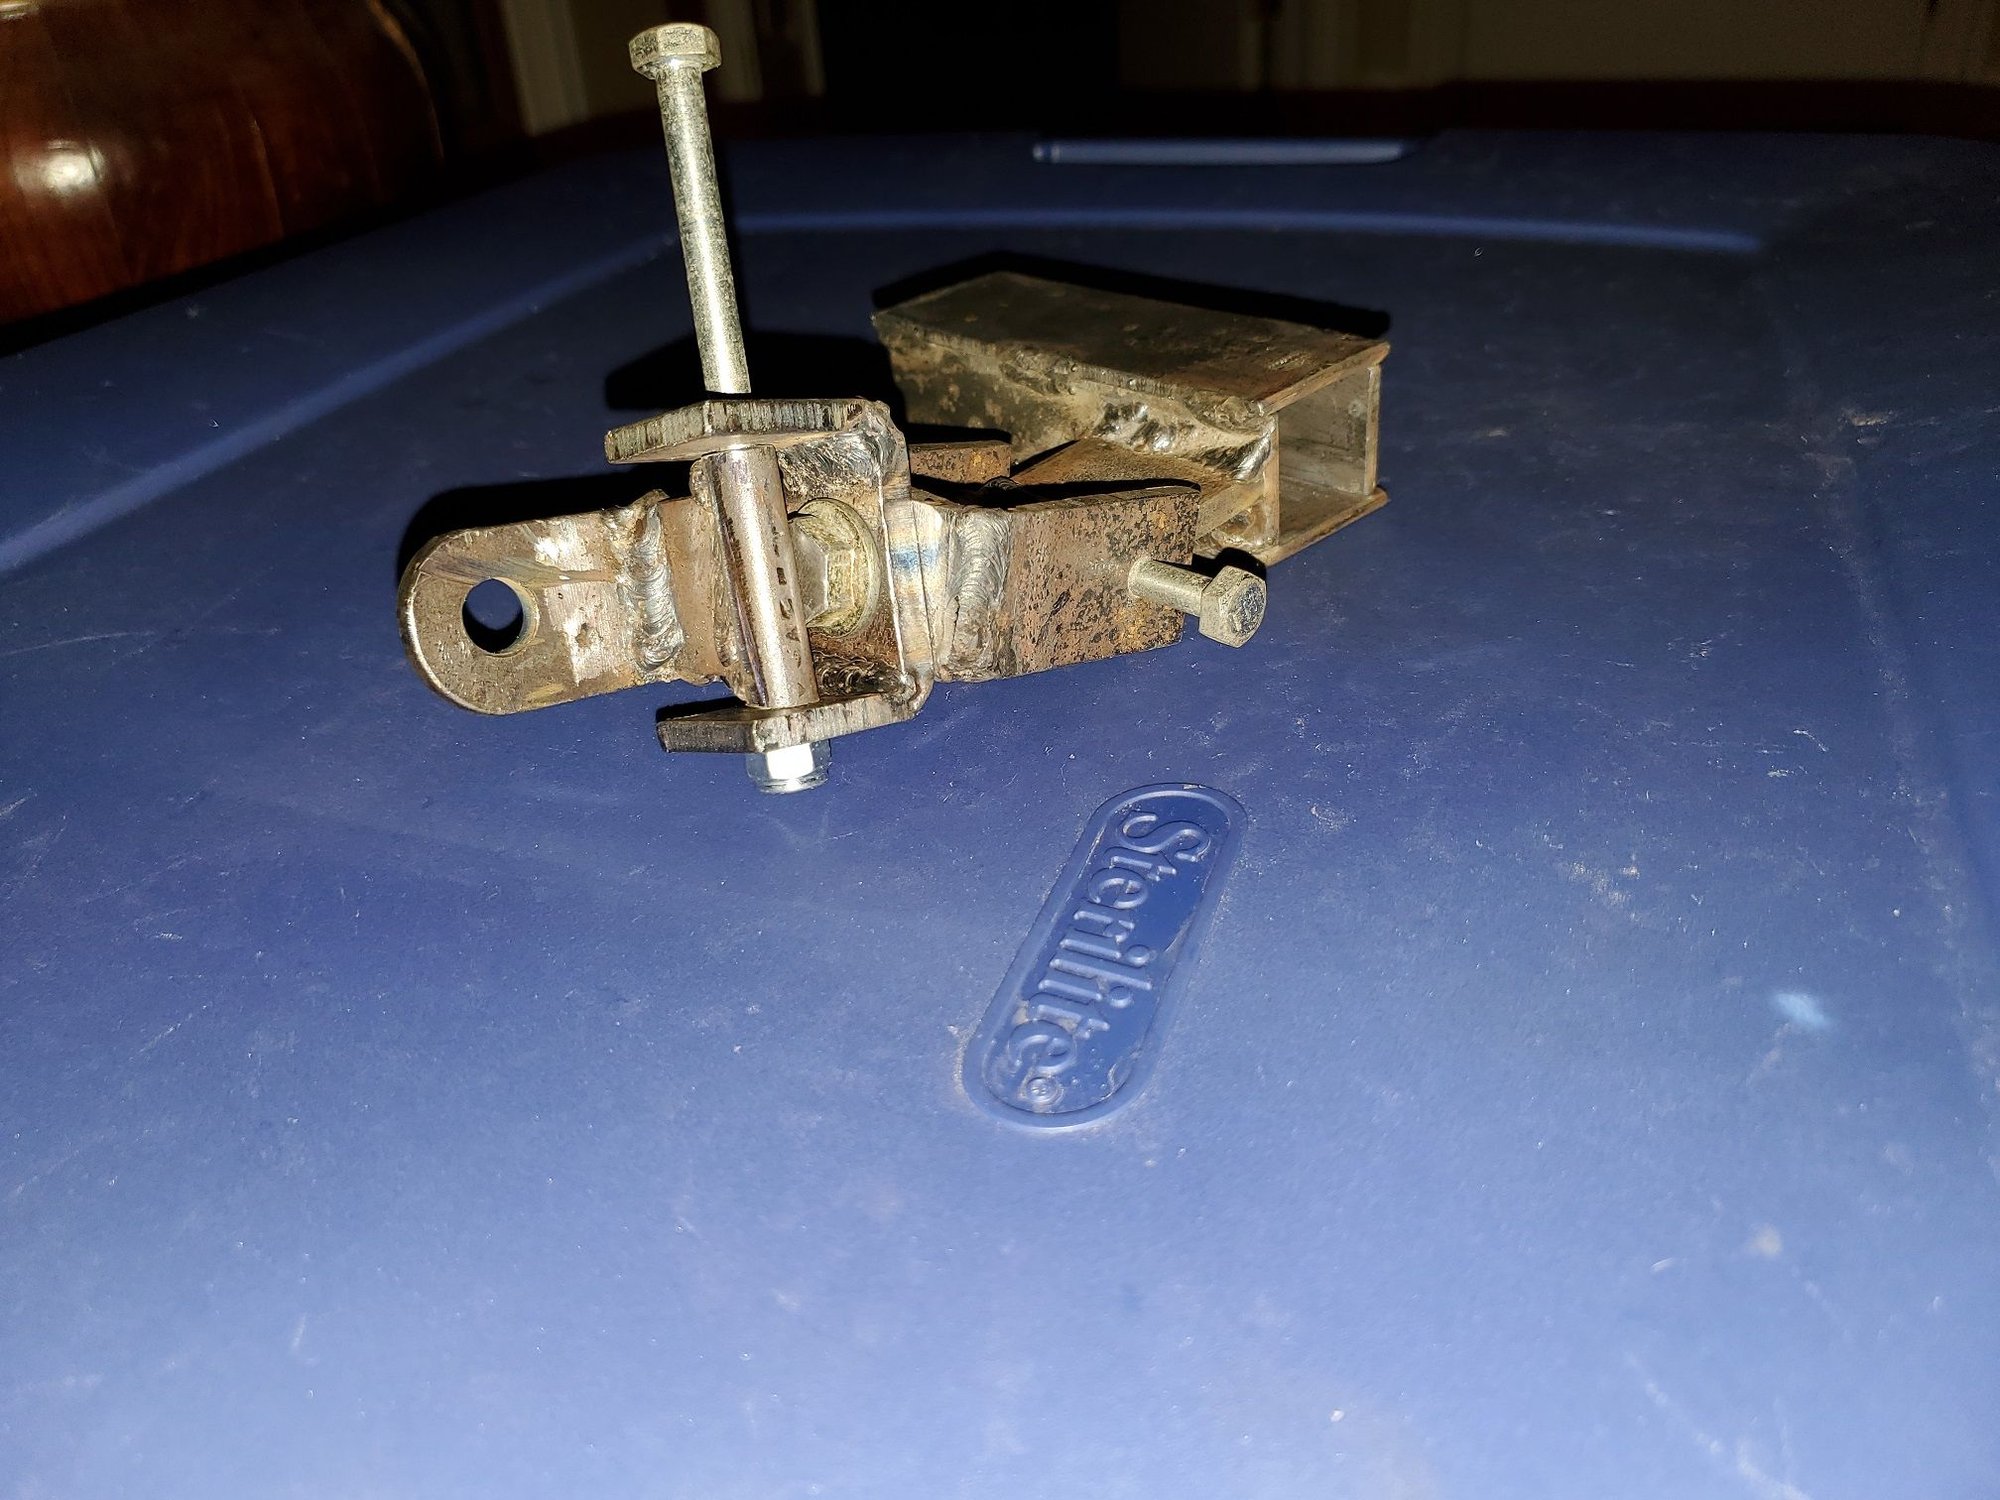
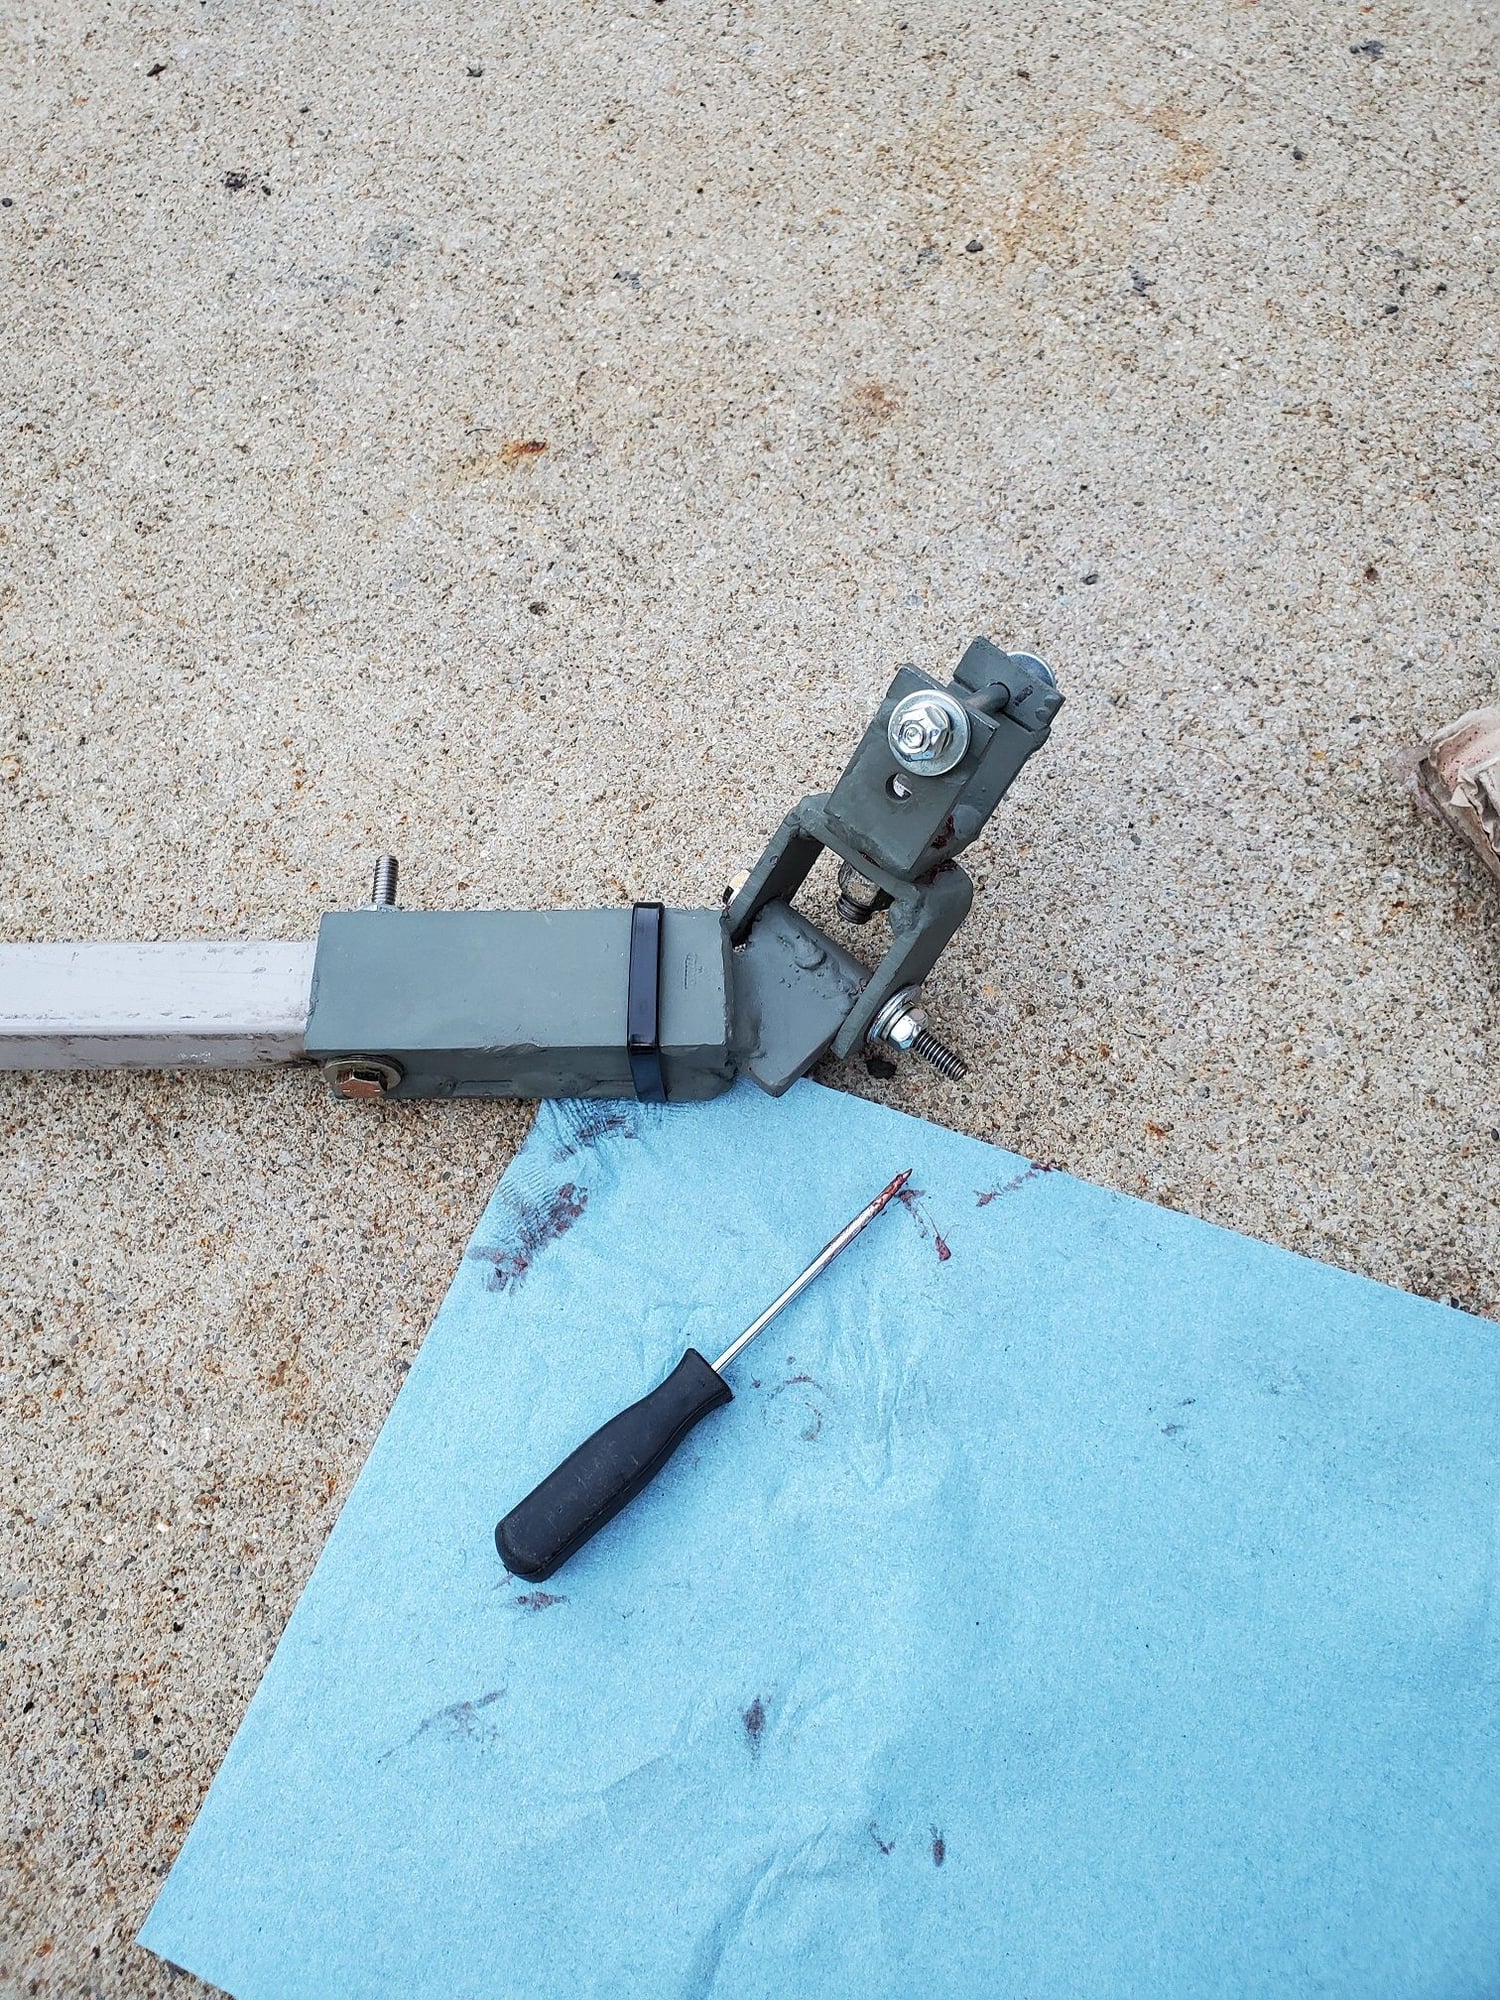
Heres the hitch pivot so far.
The bike bracket mounts to the bracket I made last week - same way the OEM bracket for the trailer mounts.
I do not think I like the side mount of the tongue bar coupler. On top of it, I ran out of daylight and screwed up the welds attaching the hitch pivot to the tongue bar sleeve. So the welds will need ground out anyway. I am thinking of mounting that pivot in-line with the hitch bar. I will eyeball it and see what I like. I might angle it so the pivot is perpendicular with the direction of travel. We'll see. A lot of it will come down to the tracking - centering up the trailer with the bike when going straight.
The bolts are just temporary. They are some long 1/4" bolts that I had. I will get some other ones when I get a chance.
Last edited by KC8QVO; 09-09-21 at 08:45 PM.
09-13-21, 09:28 PM
#13
Senior Member
Thread Starter
Join Date: Apr 2013
Posts: 1,173
Bikes: Surly Disk Trucker, 2014 w/Brooks Flyer Special saddle, Tubus racks - Duo front/Logo Evo rear, 2019 Dahon Mariner D8, Both bikes share Ortlieb Packer Plus series panniers, Garmin Edge 1000
Mentioned: 2 Post(s)
Tagged: 0 Thread(s)
Quoted: 405 Post(s)
Liked 115 Times
in
99 Posts
More work today on the hitch.
I had some other things going on today so I didn't get as much fabrication time as I could have. I will pick things back up tomorrow.
What I ended up doing is welding in a square to the "front" of the tongue bar sleeve and cutting a matching angle to the bracket the horizontal pivot is on (130deg angle) so the horizontal pivot is perpendicular to the trailer. That part I tack welded to test fit and it needs cut apart and moved - I can't get the horizontal pivot assembled - see pictures. That is the good thing with custom fabrication - I can play with part fitment and make it work. Yea, I could design it if I was careful with measurements and drafting everything but I am not going to that length on this project. Its just rough fabrication for now. When I get to my full custom trailer design at a later date then that will be "designed" - part of the reason I am working with the stuff I am here - to try some ideas and see what I want to change or do differently next time so I can add those changes in to that new design.
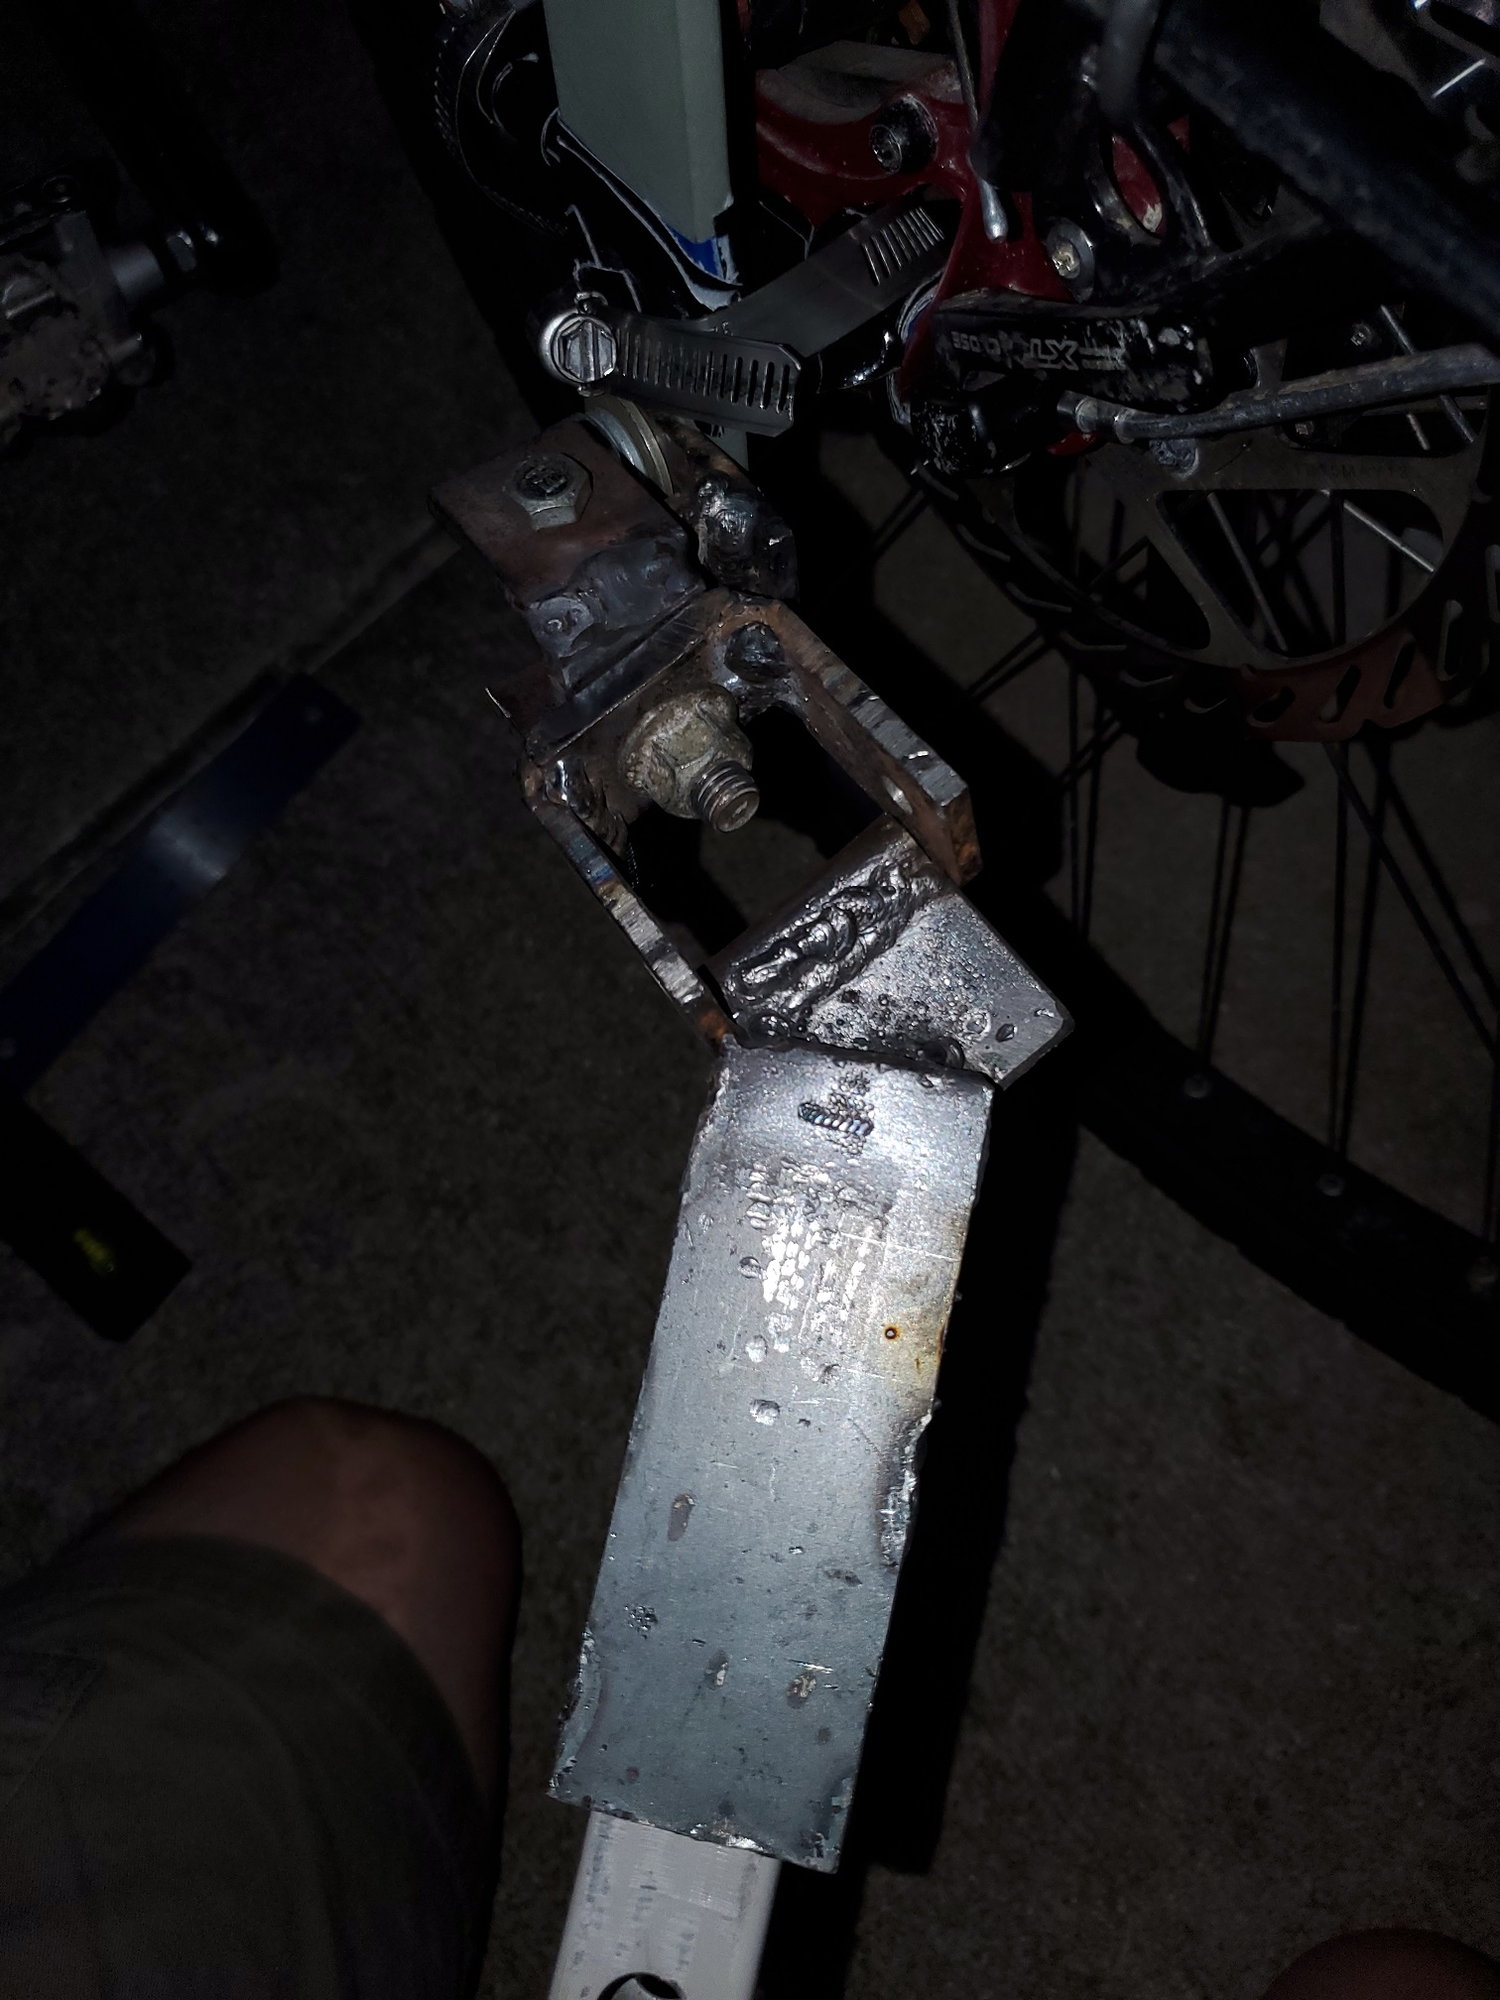
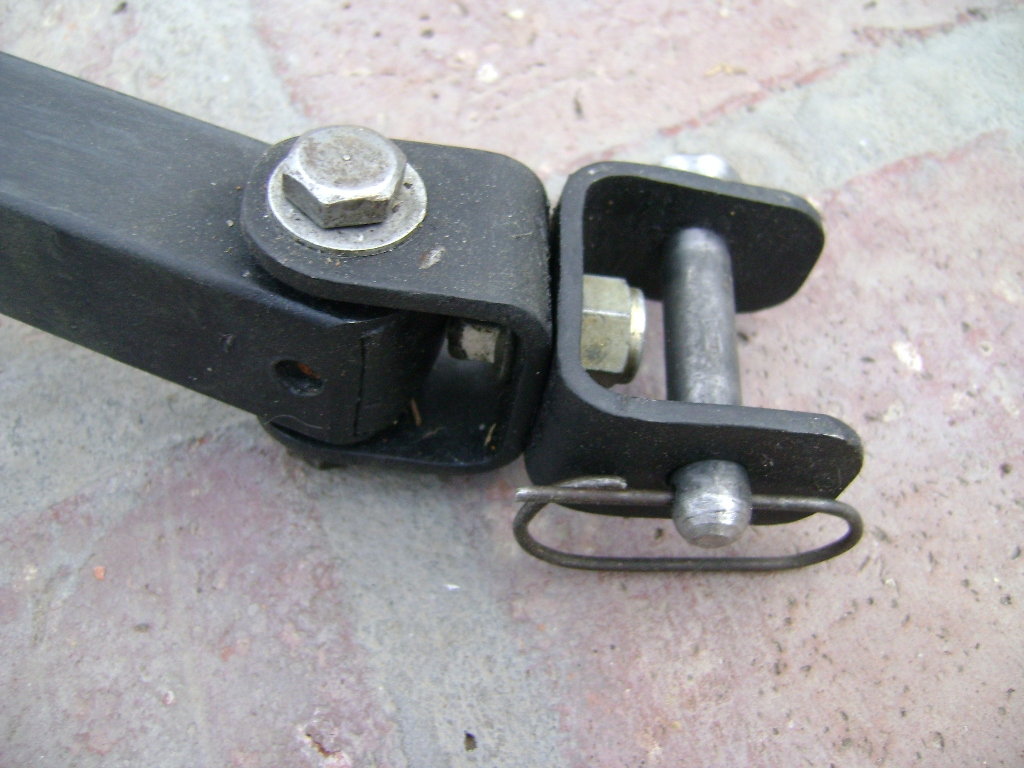
Here is the hitch pivot on the bike side only turned all the way to the "right" (how the pivot would move when turning to the right). You can see there is some part interference. That is easy to change - I can cut the protruding part down without loosing much. There is a lot of weld on both sides of that T joint so it is pretty stout.

I had some other things going on today so I didn't get as much fabrication time as I could have. I will pick things back up tomorrow.
What I ended up doing is welding in a square to the "front" of the tongue bar sleeve and cutting a matching angle to the bracket the horizontal pivot is on (130deg angle) so the horizontal pivot is perpendicular to the trailer. That part I tack welded to test fit and it needs cut apart and moved - I can't get the horizontal pivot assembled - see pictures. That is the good thing with custom fabrication - I can play with part fitment and make it work. Yea, I could design it if I was careful with measurements and drafting everything but I am not going to that length on this project. Its just rough fabrication for now. When I get to my full custom trailer design at a later date then that will be "designed" - part of the reason I am working with the stuff I am here - to try some ideas and see what I want to change or do differently next time so I can add those changes in to that new design.
Here is the hitch pivot on the bike side only turned all the way to the "right" (how the pivot would move when turning to the right). You can see there is some part interference. That is easy to change - I can cut the protruding part down without loosing much. There is a lot of weld on both sides of that T joint so it is pretty stout.
09-14-21, 10:15 PM
#14
Senior Member
Thread Starter
Join Date: Apr 2013
Posts: 1,173
Bikes: Surly Disk Trucker, 2014 w/Brooks Flyer Special saddle, Tubus racks - Duo front/Logo Evo rear, 2019 Dahon Mariner D8, Both bikes share Ortlieb Packer Plus series panniers, Garmin Edge 1000
Mentioned: 2 Post(s)
Tagged: 0 Thread(s)
Quoted: 405 Post(s)
Liked 115 Times
in
99 Posts
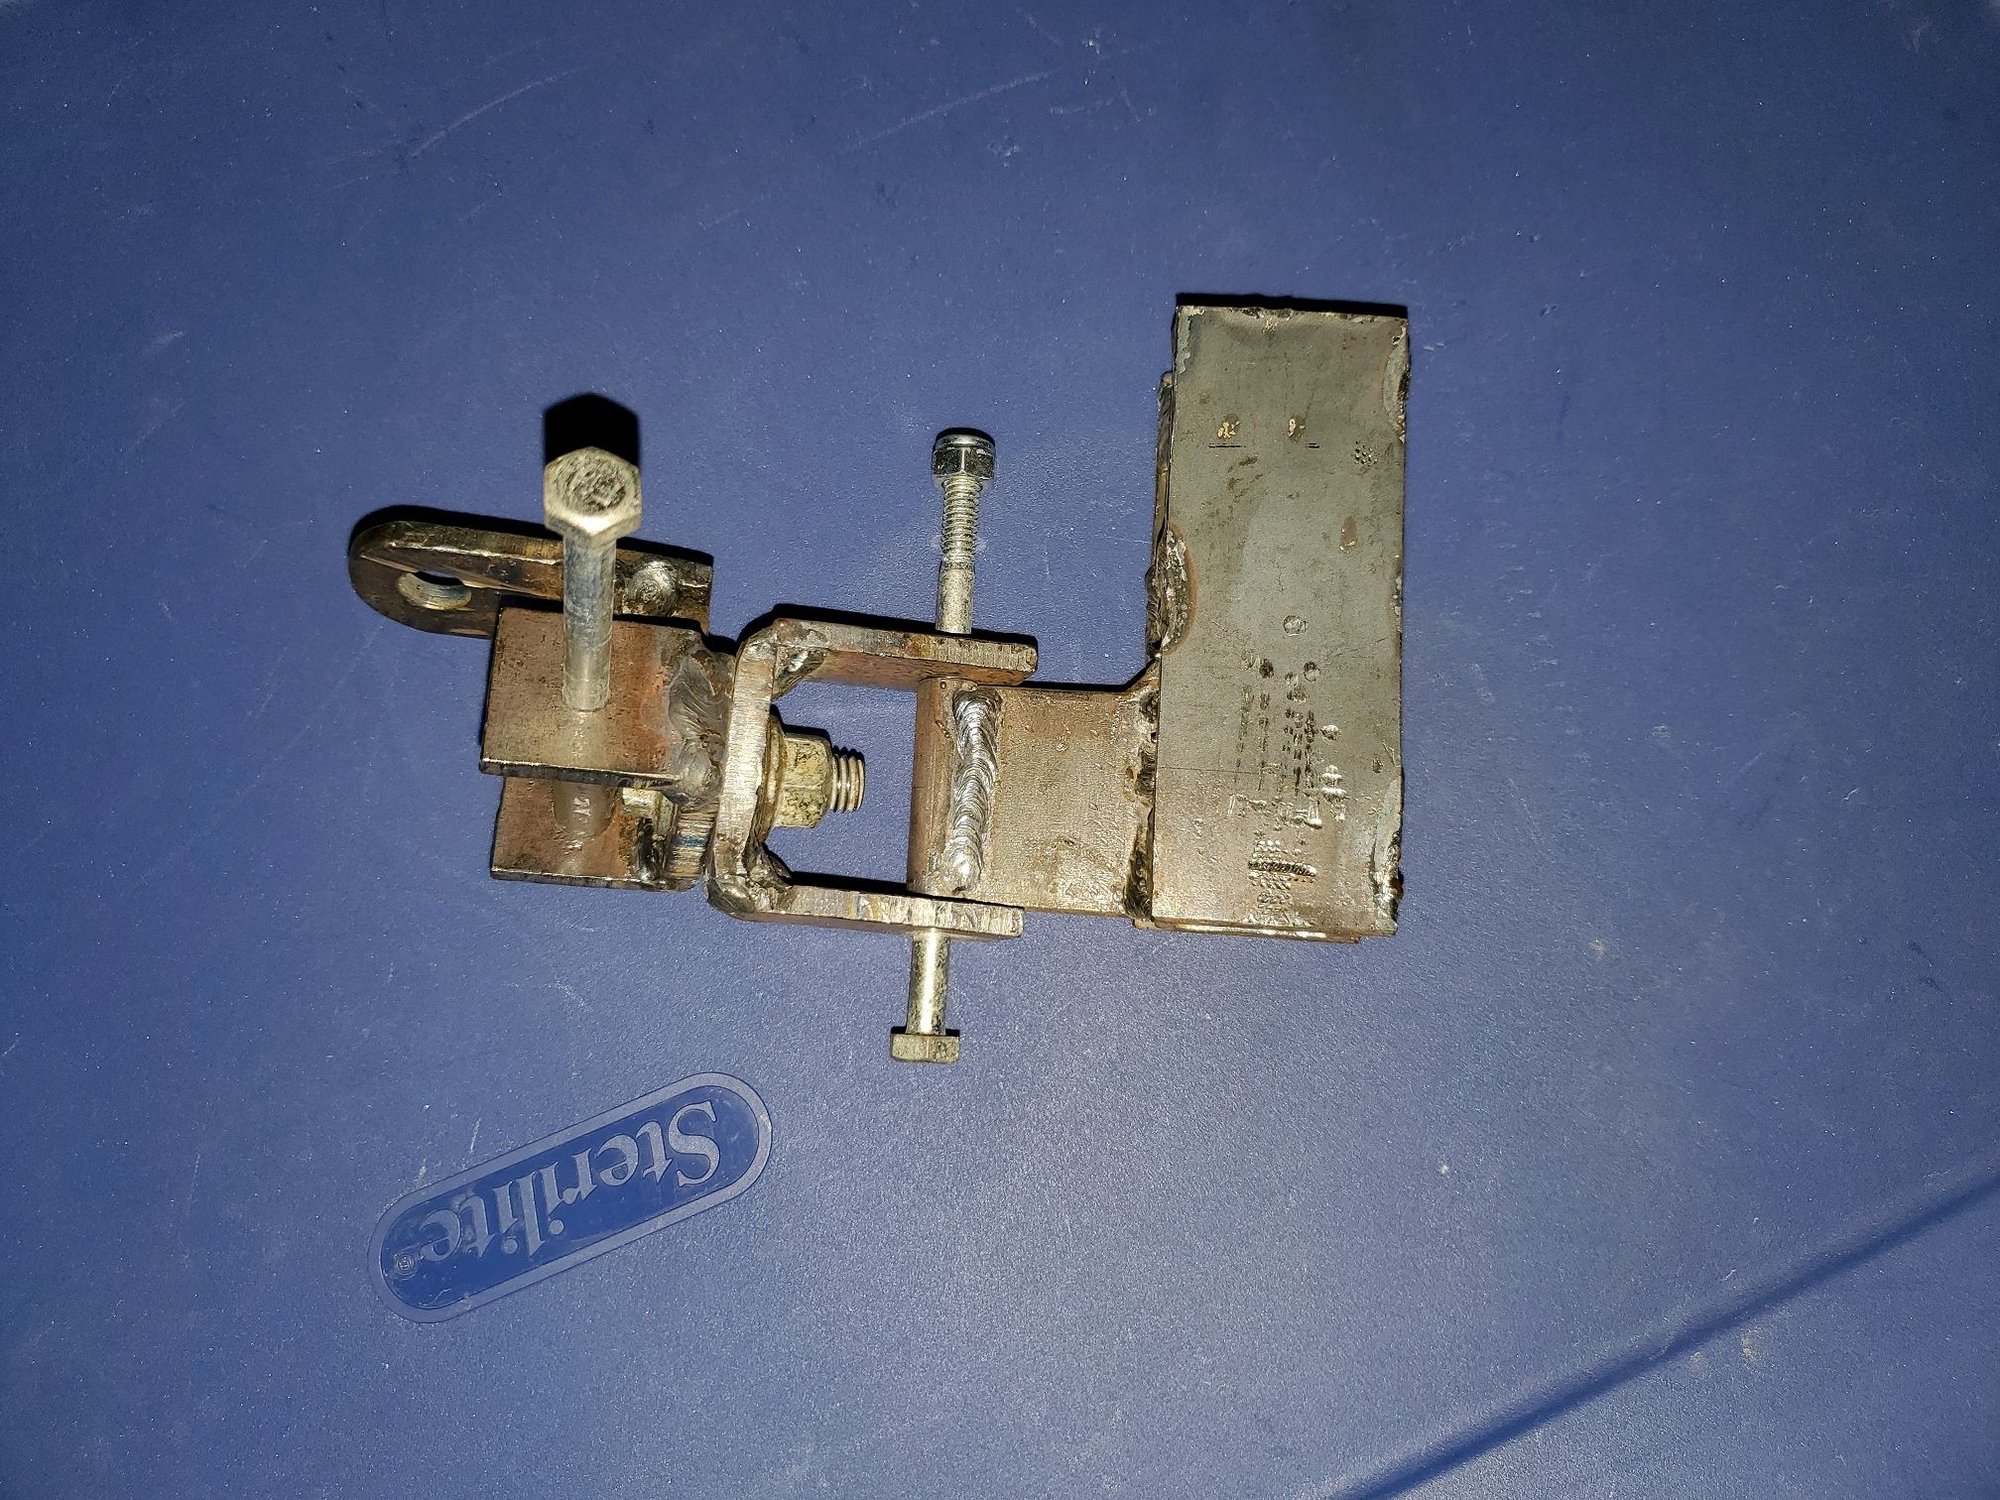
More work today. I got the hitch ironed out better. Somewhat.
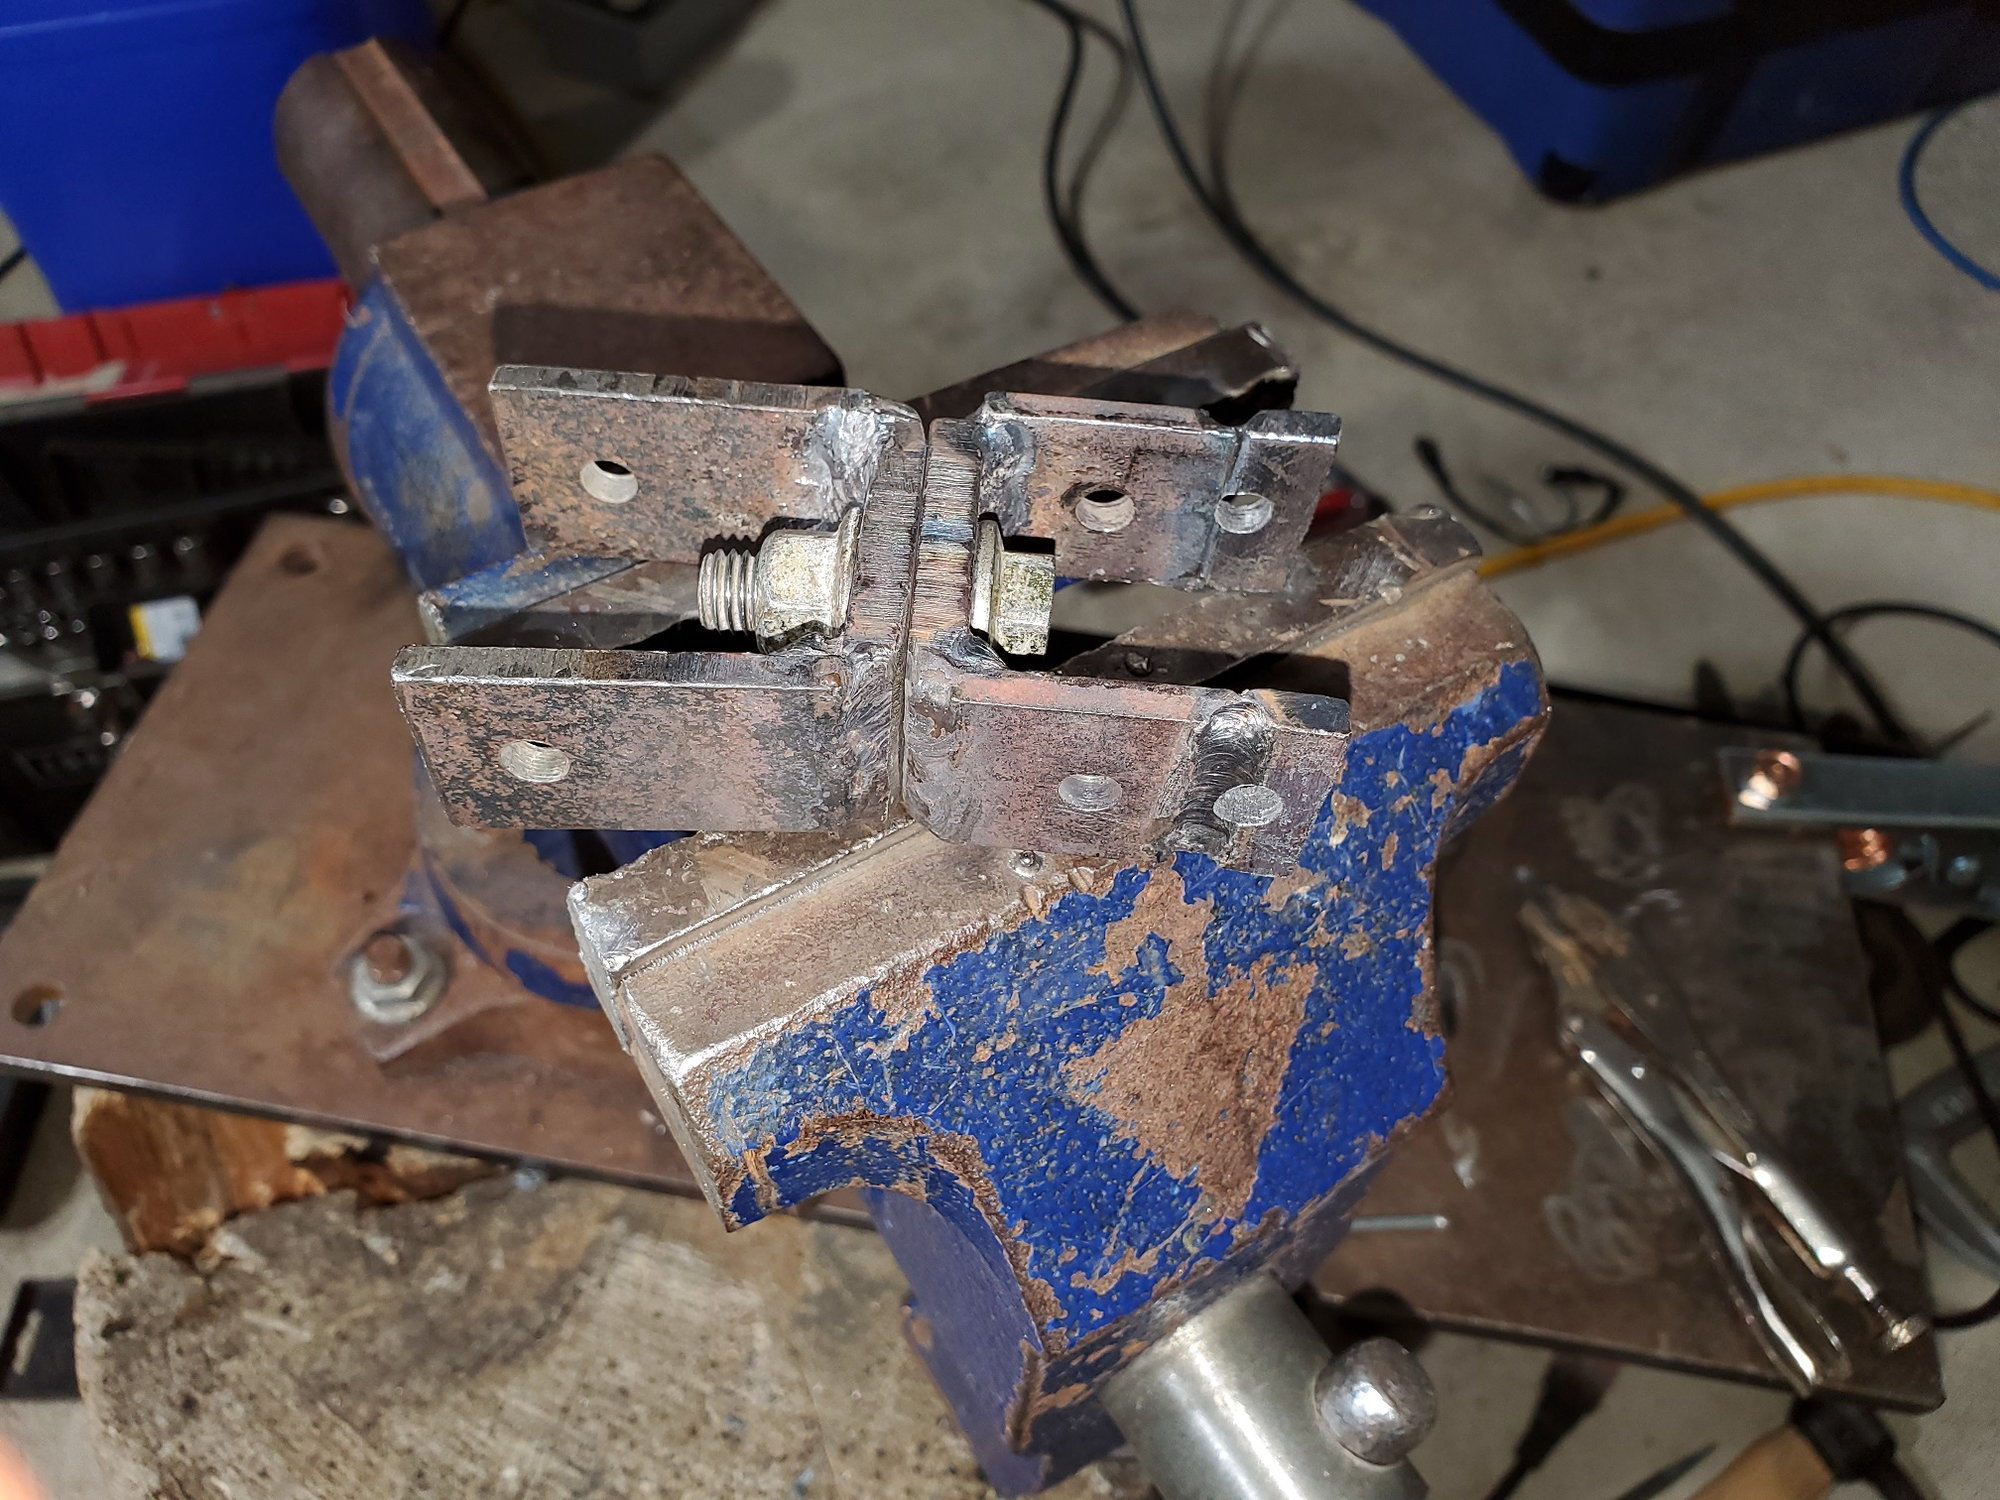
The limitation with the rotation to the right wasn't what I thought it was. I trimmed the bracket that mounts to the bike and there was still interference - with the rotational pivot bolt head against the yaw pivot sleeve (vertical, on the bike). So the only way to get enough movement was to extend the coupler that attached to the vertical/yaw pivot.
At this point I don't want to make a whole new bracket, so I just welded extension tabs to the one I had. I beveled the edges, clamped the parts to my vice base so they were held flat and there was plenty of heat wicking on the back side. I dialed up the amps about 10 extra from what I was running and got a nice bead. I didn't quite get the penetration I was after - the weld didn't get all the way through the back side against the vice base, but it still bit pretty well and I got a nice level fill on top. We'll see how the hitch works. If it is something I am going to keep for a while I may make some new brackets to clean things up, but thats a lot of work. Hence the extension tabs and 2nd round of holes... just trying to get something to work so I can use it for a bit and see how much of an improvement there is.
I got the sleeve ironed out on the tongue bar also. Getting the angle right on the horizontal/pitch pivot was a bit tricky. I wanted it perpendicular to the trailer. I used a slab on our concrete driveway to line things up. It was pretty square so I could lay the hitch bar on one side and the crack between slabs was 90deg from it so I could line up the pivot to the sleeve and tack weld it in place. It was a bit of a job, but I got it. It left a good gap on one end of the pivot base against the front of the sleeve. So I layered tack welds to build up that spot. It was about 5/32" of a gap on one end. Once I had 2 tacks in place to lock the angle in I used a 6011 rod (penetrating, low slag, fast freeze) to fill in one side some. My intent was to go to the other end and fill with 7018 - which has been my rod of choice for the whole project (aside from tacking - 6011). However, there was too much slag in the crack and I felt it was going to be hard to get a good root with just trying burning a 7018 rod in there. So I cleaned the whole crack with a cut off wheel and beveled the part. I didn't cut through the 6011 beads on the other end, but enough that I got things cleaned out pretty good and had room for the 7018 rod. It took 3 passes. The root pass was deep and I got some good metal down. 2nd pass I laid wider but was inconsistent and the bead was a bit lumpy on top. 3ord pass smoothed everything out. Of course, I cleaned the beads with each pass (using a pick to get slag out from hard to get to spots where chipping and brushing wouldn't get to).
On the original 6011 side I ran 2 beads of 7018 pretty hot to smooth out the weld and to get 7018 on that end. 7018 with mild steel produces an ideal ductile weld metal that is more resistant to vibration and rattling than most other common rods. People will argue that point about others like 6013, 6011, 6010, etc until they're blue in the face but 6010 and 6011 (both very very useful rods) don't stack up, and I've heard enough stories of 6013 being too brittle to never use it on anything but sheet metal that isn't structural. 7018 only for structural for me.
Welds facing up are the 6011 side I smoothed out with a couple hot passes of the 7018. It's probably overkill but I'd rather overkill it and not worry about it. Of all the joints in the hitch pivots the extension tabs on the other part are the weakest link.

I got all the parts painted. I did not get a picture, it was well after dark.
I am probably going to do another trip the next couple days so I will get things put back together and get some pictures of it as I do so, and as I roll. I am sure the metal hitch will be more stout than the rubber bar/spring of the OEM hitch.
The limitation with the rotation to the right wasn't what I thought it was. I trimmed the bracket that mounts to the bike and there was still interference - with the rotational pivot bolt head against the yaw pivot sleeve (vertical, on the bike). So the only way to get enough movement was to extend the coupler that attached to the vertical/yaw pivot.
At this point I don't want to make a whole new bracket, so I just welded extension tabs to the one I had. I beveled the edges, clamped the parts to my vice base so they were held flat and there was plenty of heat wicking on the back side. I dialed up the amps about 10 extra from what I was running and got a nice bead. I didn't quite get the penetration I was after - the weld didn't get all the way through the back side against the vice base, but it still bit pretty well and I got a nice level fill on top. We'll see how the hitch works. If it is something I am going to keep for a while I may make some new brackets to clean things up, but thats a lot of work. Hence the extension tabs and 2nd round of holes... just trying to get something to work so I can use it for a bit and see how much of an improvement there is.
I got the sleeve ironed out on the tongue bar also. Getting the angle right on the horizontal/pitch pivot was a bit tricky. I wanted it perpendicular to the trailer. I used a slab on our concrete driveway to line things up. It was pretty square so I could lay the hitch bar on one side and the crack between slabs was 90deg from it so I could line up the pivot to the sleeve and tack weld it in place. It was a bit of a job, but I got it. It left a good gap on one end of the pivot base against the front of the sleeve. So I layered tack welds to build up that spot. It was about 5/32" of a gap on one end. Once I had 2 tacks in place to lock the angle in I used a 6011 rod (penetrating, low slag, fast freeze) to fill in one side some. My intent was to go to the other end and fill with 7018 - which has been my rod of choice for the whole project (aside from tacking - 6011). However, there was too much slag in the crack and I felt it was going to be hard to get a good root with just trying burning a 7018 rod in there. So I cleaned the whole crack with a cut off wheel and beveled the part. I didn't cut through the 6011 beads on the other end, but enough that I got things cleaned out pretty good and had room for the 7018 rod. It took 3 passes. The root pass was deep and I got some good metal down. 2nd pass I laid wider but was inconsistent and the bead was a bit lumpy on top. 3ord pass smoothed everything out. Of course, I cleaned the beads with each pass (using a pick to get slag out from hard to get to spots where chipping and brushing wouldn't get to).
On the original 6011 side I ran 2 beads of 7018 pretty hot to smooth out the weld and to get 7018 on that end. 7018 with mild steel produces an ideal ductile weld metal that is more resistant to vibration and rattling than most other common rods. People will argue that point about others like 6013, 6011, 6010, etc until they're blue in the face but 6010 and 6011 (both very very useful rods) don't stack up, and I've heard enough stories of 6013 being too brittle to never use it on anything but sheet metal that isn't structural. 7018 only for structural for me.
Welds facing up are the 6011 side I smoothed out with a couple hot passes of the 7018. It's probably overkill but I'd rather overkill it and not worry about it. Of all the joints in the hitch pivots the extension tabs on the other part are the weakest link.
I got all the parts painted. I did not get a picture, it was well after dark.
I am probably going to do another trip the next couple days so I will get things put back together and get some pictures of it as I do so, and as I roll. I am sure the metal hitch will be more stout than the rubber bar/spring of the OEM hitch.
09-15-21, 09:07 PM
#15
Senior Member
Thread Starter
Join Date: Apr 2013
Posts: 1,173
Bikes: Surly Disk Trucker, 2014 w/Brooks Flyer Special saddle, Tubus racks - Duo front/Logo Evo rear, 2019 Dahon Mariner D8, Both bikes share Ortlieb Packer Plus series panniers, Garmin Edge 1000
Mentioned: 2 Post(s)
Tagged: 0 Thread(s)
Quoted: 405 Post(s)
Liked 115 Times
in
99 Posts
Well the new hitch works pretty good. There is a bit of play in it (loose tollerances), but it is a million times more sturdy than the rubber rod and spring thingy on the OEM set up.

The pole mount I made works OK. I need to tighten the zip ties holding it on because it rotates with the road vibration at the moment. Easy fix. Having the light up high while I can access the stuff on the trailer works really well.
Note the pool noodle. I like the extra space cars give me now . So far no one has honked at me, but several have sat behind me for a bit until they could pass - and when they did pass the pedal was to the floor. I presume that is them thanking me for being a courteous, safe cyclist (I couldn't tell if anyone told me I was number 1 too, ya know - with their middle finger). Its all good. I'll take the extra passing space.
The pole mount I made works OK. I need to tighten the zip ties holding it on because it rotates with the road vibration at the moment. Easy fix. Having the light up high while I can access the stuff on the trailer works really well.
Note the pool noodle. I like the extra space cars give me now
. So far no one has honked at me, but several have sat behind me for a bit until they could pass - and when they did pass the pedal was to the floor. I presume that is them thanking me for being a courteous, safe cyclist (I couldn't tell if anyone told me I was number 1 too, ya know - with their middle finger). Its all good. I'll take the extra passing space.
09-21-21, 04:08 PM
#16
Senior Member
Thread Starter
Join Date: Apr 2013
Posts: 1,173
Bikes: Surly Disk Trucker, 2014 w/Brooks Flyer Special saddle, Tubus racks - Duo front/Logo Evo rear, 2019 Dahon Mariner D8, Both bikes share Ortlieb Packer Plus series panniers, Garmin Edge 1000
Mentioned: 2 Post(s)
Tagged: 0 Thread(s)
Quoted: 405 Post(s)
Liked 115 Times
in
99 Posts
Last time I had the trailer out I experimented with the axle being much further back on the frame. The intent was to decrease the amount of mass behind the axle where that mass way in the back contributes to the side-to-side throw of the bike in front. With 2 tubs before that was something I noticed.
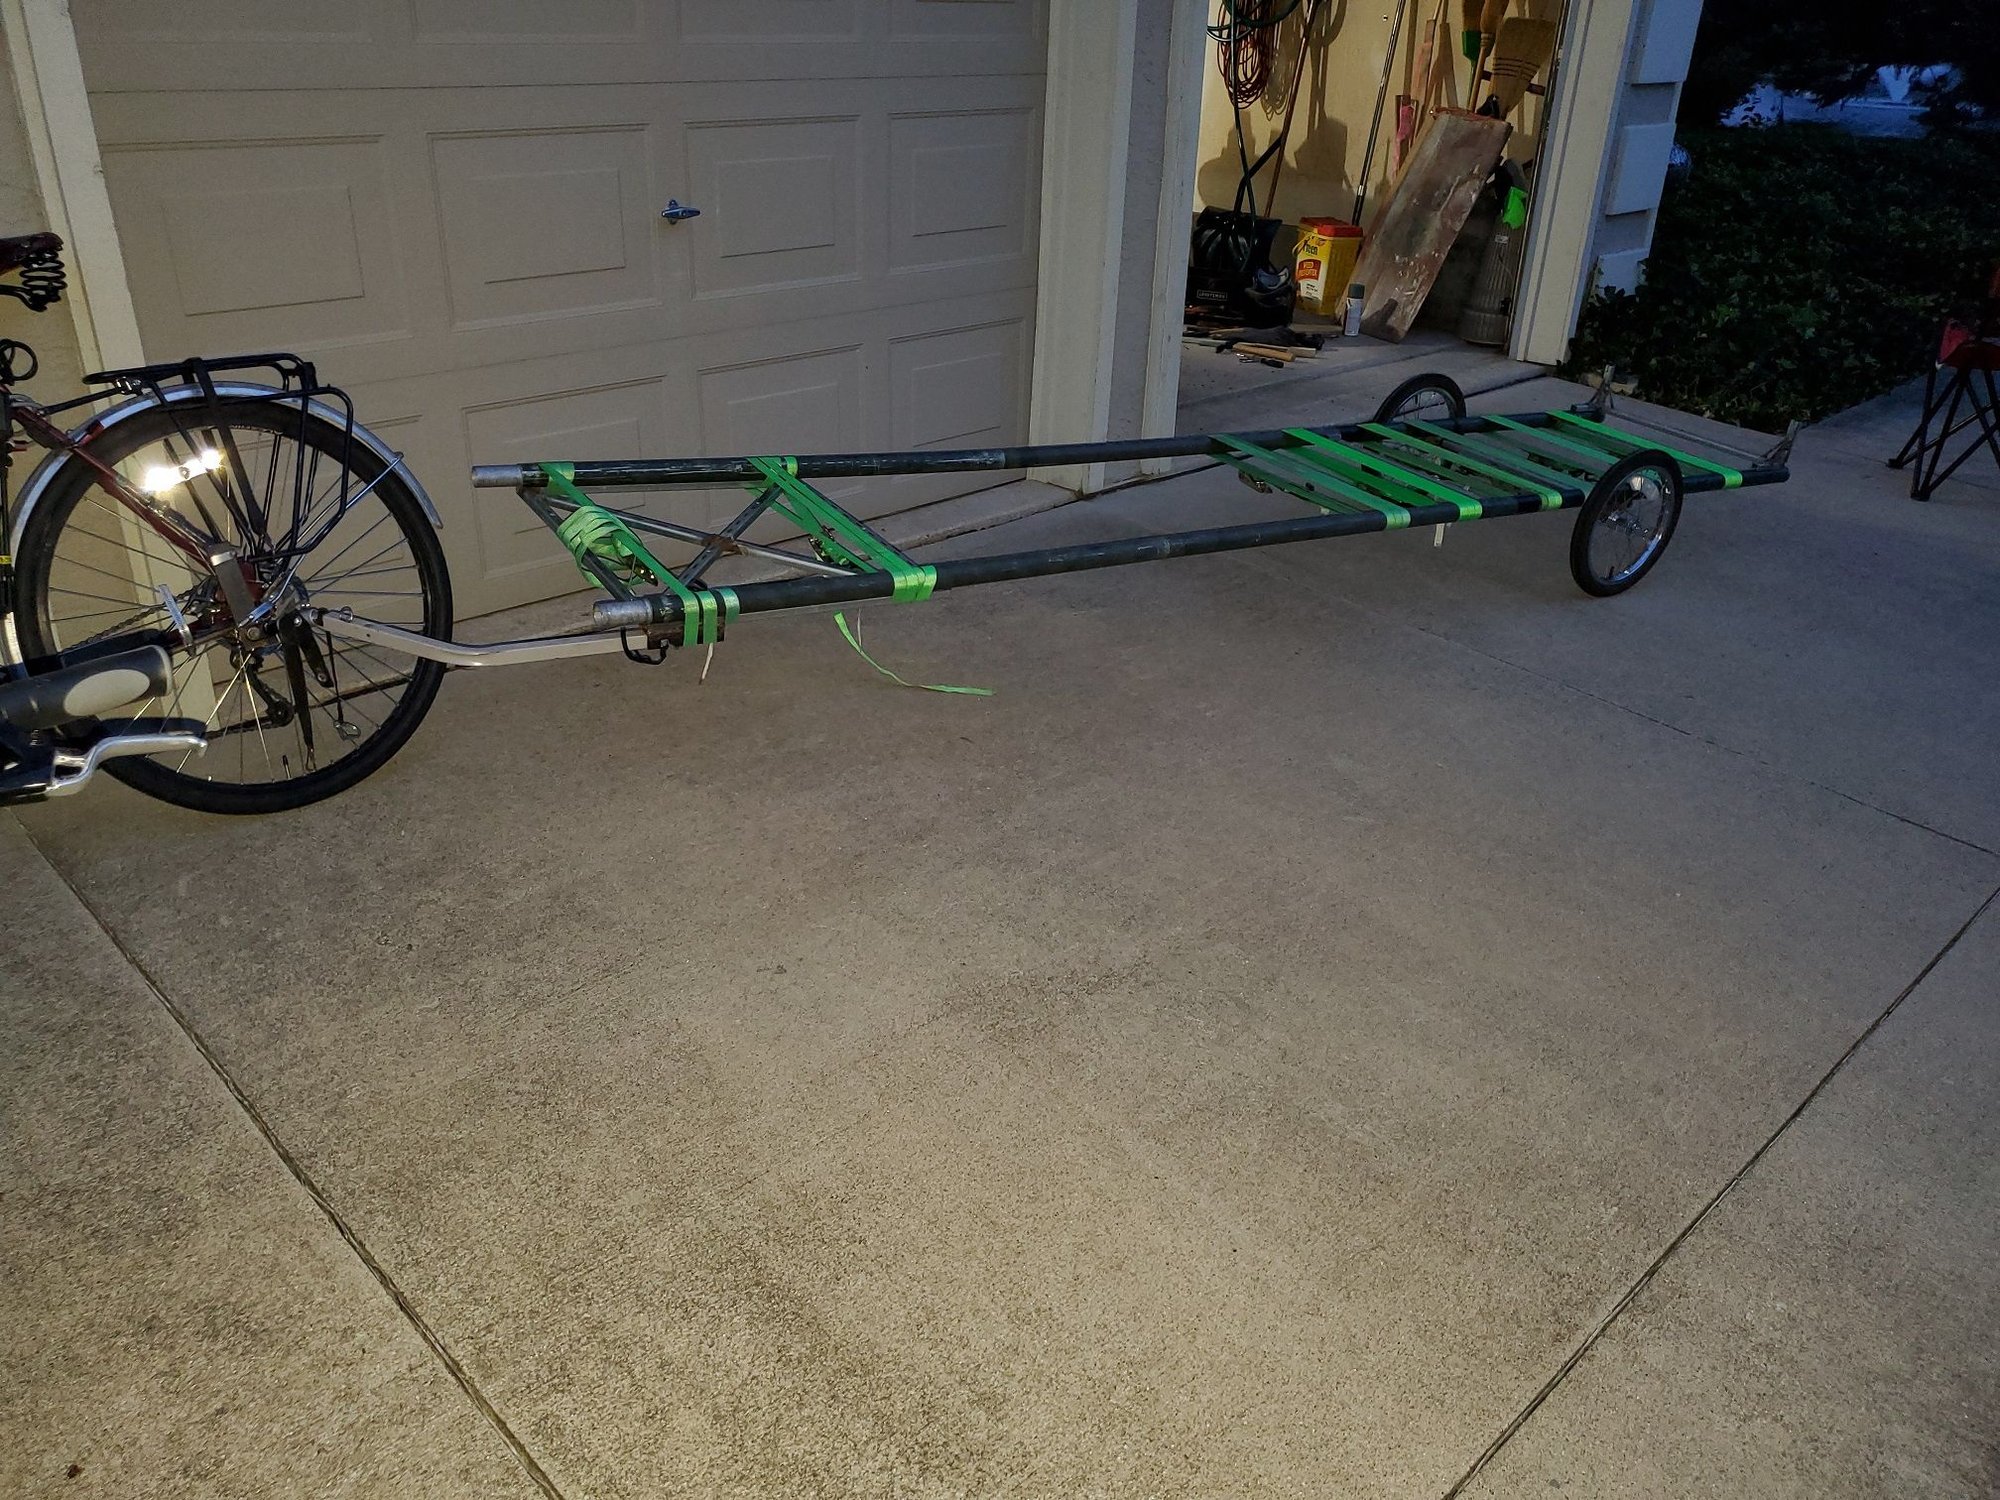
Here is the empty trailer with the rear axle position.

I found a bag of large zip ties. They are rated to 120lbs of "working load" - Im sure that is quite a bit more than the ones I used before. I am working on trying to replace some of the green straps with the zip ties.
The only structural places where straps might still be required (or my 550 cord idea earlier) is the spreader struts, where the straps are in the picture below.
Something that occurred to me about the zip ties, from a safety aspect, is if I snag something with a trailer wheel the zip ties might break and let the axle assembly break away as opposed to snag hard and throw me off the bike and/or break a trailer wheel.

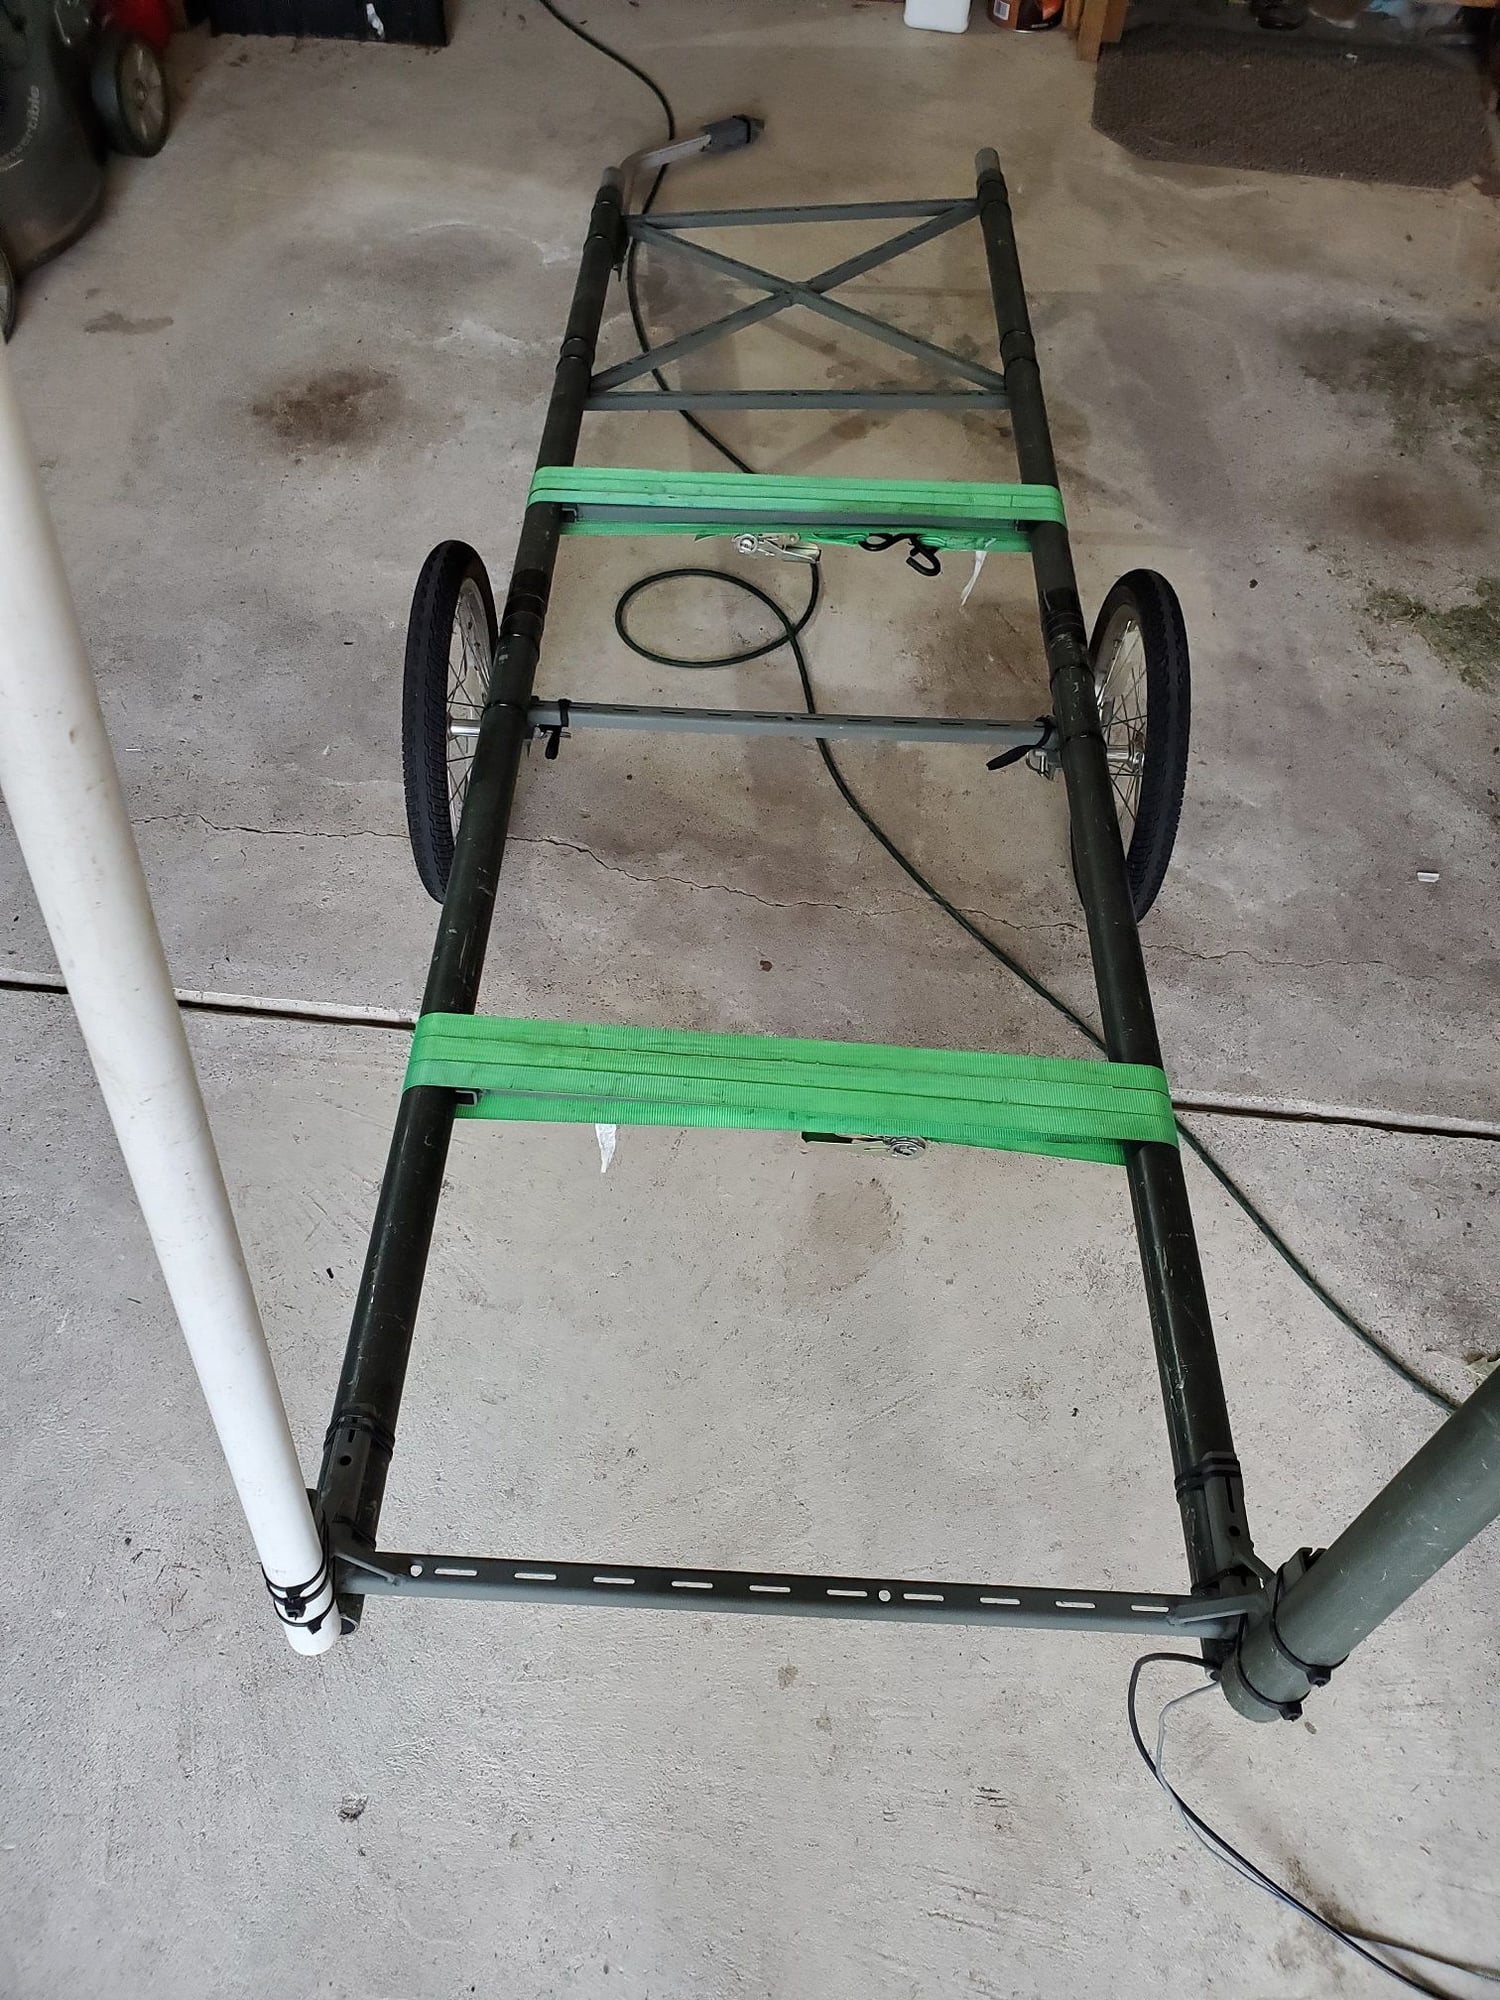
You can also see the rear bracket for the light pole etc in the back.
As far as weight distribution goes - with 1 tub I have plenty of space to adjust the weight distribution, obviously. However, with 2 tubs I am not sure. The axle might be too far forward. We'll see next time I get 2 tubs on there. My concern, again, is the mass behind the axle.
There are two important aspects of weight that I am finding:
1. Tongue weight - the weight the hitch has on the bike.
2. Weight behind the trailer axle
With respect to 1 - tongue weight - the heavier the tongue is the more the bike tends to lean to the side the hitch is on.
With respect to 2 - weight behind the trailer axle - the more weight the more side-to-side "throw" there is against the bike.
If the trailer is heavy and the object of the game is to reduce tongue weight - the obvious answer would be to shift weight back. That is - move some weight further and further behind the trailer axle so that weight is taken off the hitch. In theory, that makes sense. However, doing so goes against #2 above.
So how do you solve both 1 and 2?
Extend the trailer and/or hitch. That way you condense where the weight is along the wheelbase between the hitch and trailer axle. By having a longer "trailer" (trailer and/or hitch) - the leverage the bike has pulling it is increased. In reverse, that decreases the affect mass has on the side-to-side throw of the bike (#2 above). The question is where that equilibrium is.
Since I have a lot of usable trailer frame (quite a bit more than the length of 2 tubs) I have a lot of room to experiment. However, I might have shot myself in the foot on where I put the axle this round. We'll see how things go the next chance I get to use it.
Here is the empty trailer with the rear axle position.
I found a bag of large zip ties. They are rated to 120lbs of "working load" - Im sure that is quite a bit more than the ones I used before. I am working on trying to replace some of the green straps with the zip ties.
The only structural places where straps might still be required (or my 550 cord idea earlier) is the spreader struts, where the straps are in the picture below.
Something that occurred to me about the zip ties, from a safety aspect, is if I snag something with a trailer wheel the zip ties might break and let the axle assembly break away as opposed to snag hard and throw me off the bike and/or break a trailer wheel.
You can also see the rear bracket for the light pole etc in the back.
As far as weight distribution goes - with 1 tub I have plenty of space to adjust the weight distribution, obviously. However, with 2 tubs I am not sure. The axle might be too far forward. We'll see next time I get 2 tubs on there. My concern, again, is the mass behind the axle.
There are two important aspects of weight that I am finding:
1. Tongue weight - the weight the hitch has on the bike.
2. Weight behind the trailer axle
With respect to 1 - tongue weight - the heavier the tongue is the more the bike tends to lean to the side the hitch is on.
With respect to 2 - weight behind the trailer axle - the more weight the more side-to-side "throw" there is against the bike.
If the trailer is heavy and the object of the game is to reduce tongue weight - the obvious answer would be to shift weight back. That is - move some weight further and further behind the trailer axle so that weight is taken off the hitch. In theory, that makes sense. However, doing so goes against #2 above.
So how do you solve both 1 and 2?
Extend the trailer and/or hitch. That way you condense where the weight is along the wheelbase between the hitch and trailer axle. By having a longer "trailer" (trailer and/or hitch) - the leverage the bike has pulling it is increased. In reverse, that decreases the affect mass has on the side-to-side throw of the bike (#2 above). The question is where that equilibrium is.
Since I have a lot of usable trailer frame (quite a bit more than the length of 2 tubs) I have a lot of room to experiment. However, I might have shot myself in the foot on where I put the axle this round. We'll see how things go the next chance I get to use it.
09-21-21, 04:11 PM
#17
Senior Member
Thread Starter
Join Date: Apr 2013
Posts: 1,173
Bikes: Surly Disk Trucker, 2014 w/Brooks Flyer Special saddle, Tubus racks - Duo front/Logo Evo rear, 2019 Dahon Mariner D8, Both bikes share Ortlieb Packer Plus series panniers, Garmin Edge 1000
Mentioned: 2 Post(s)
Tagged: 0 Thread(s)
Quoted: 405 Post(s)
Liked 115 Times
in
99 Posts
Here are some detail pictures of dimensions.
The distance between frame rail centers is right about 24".
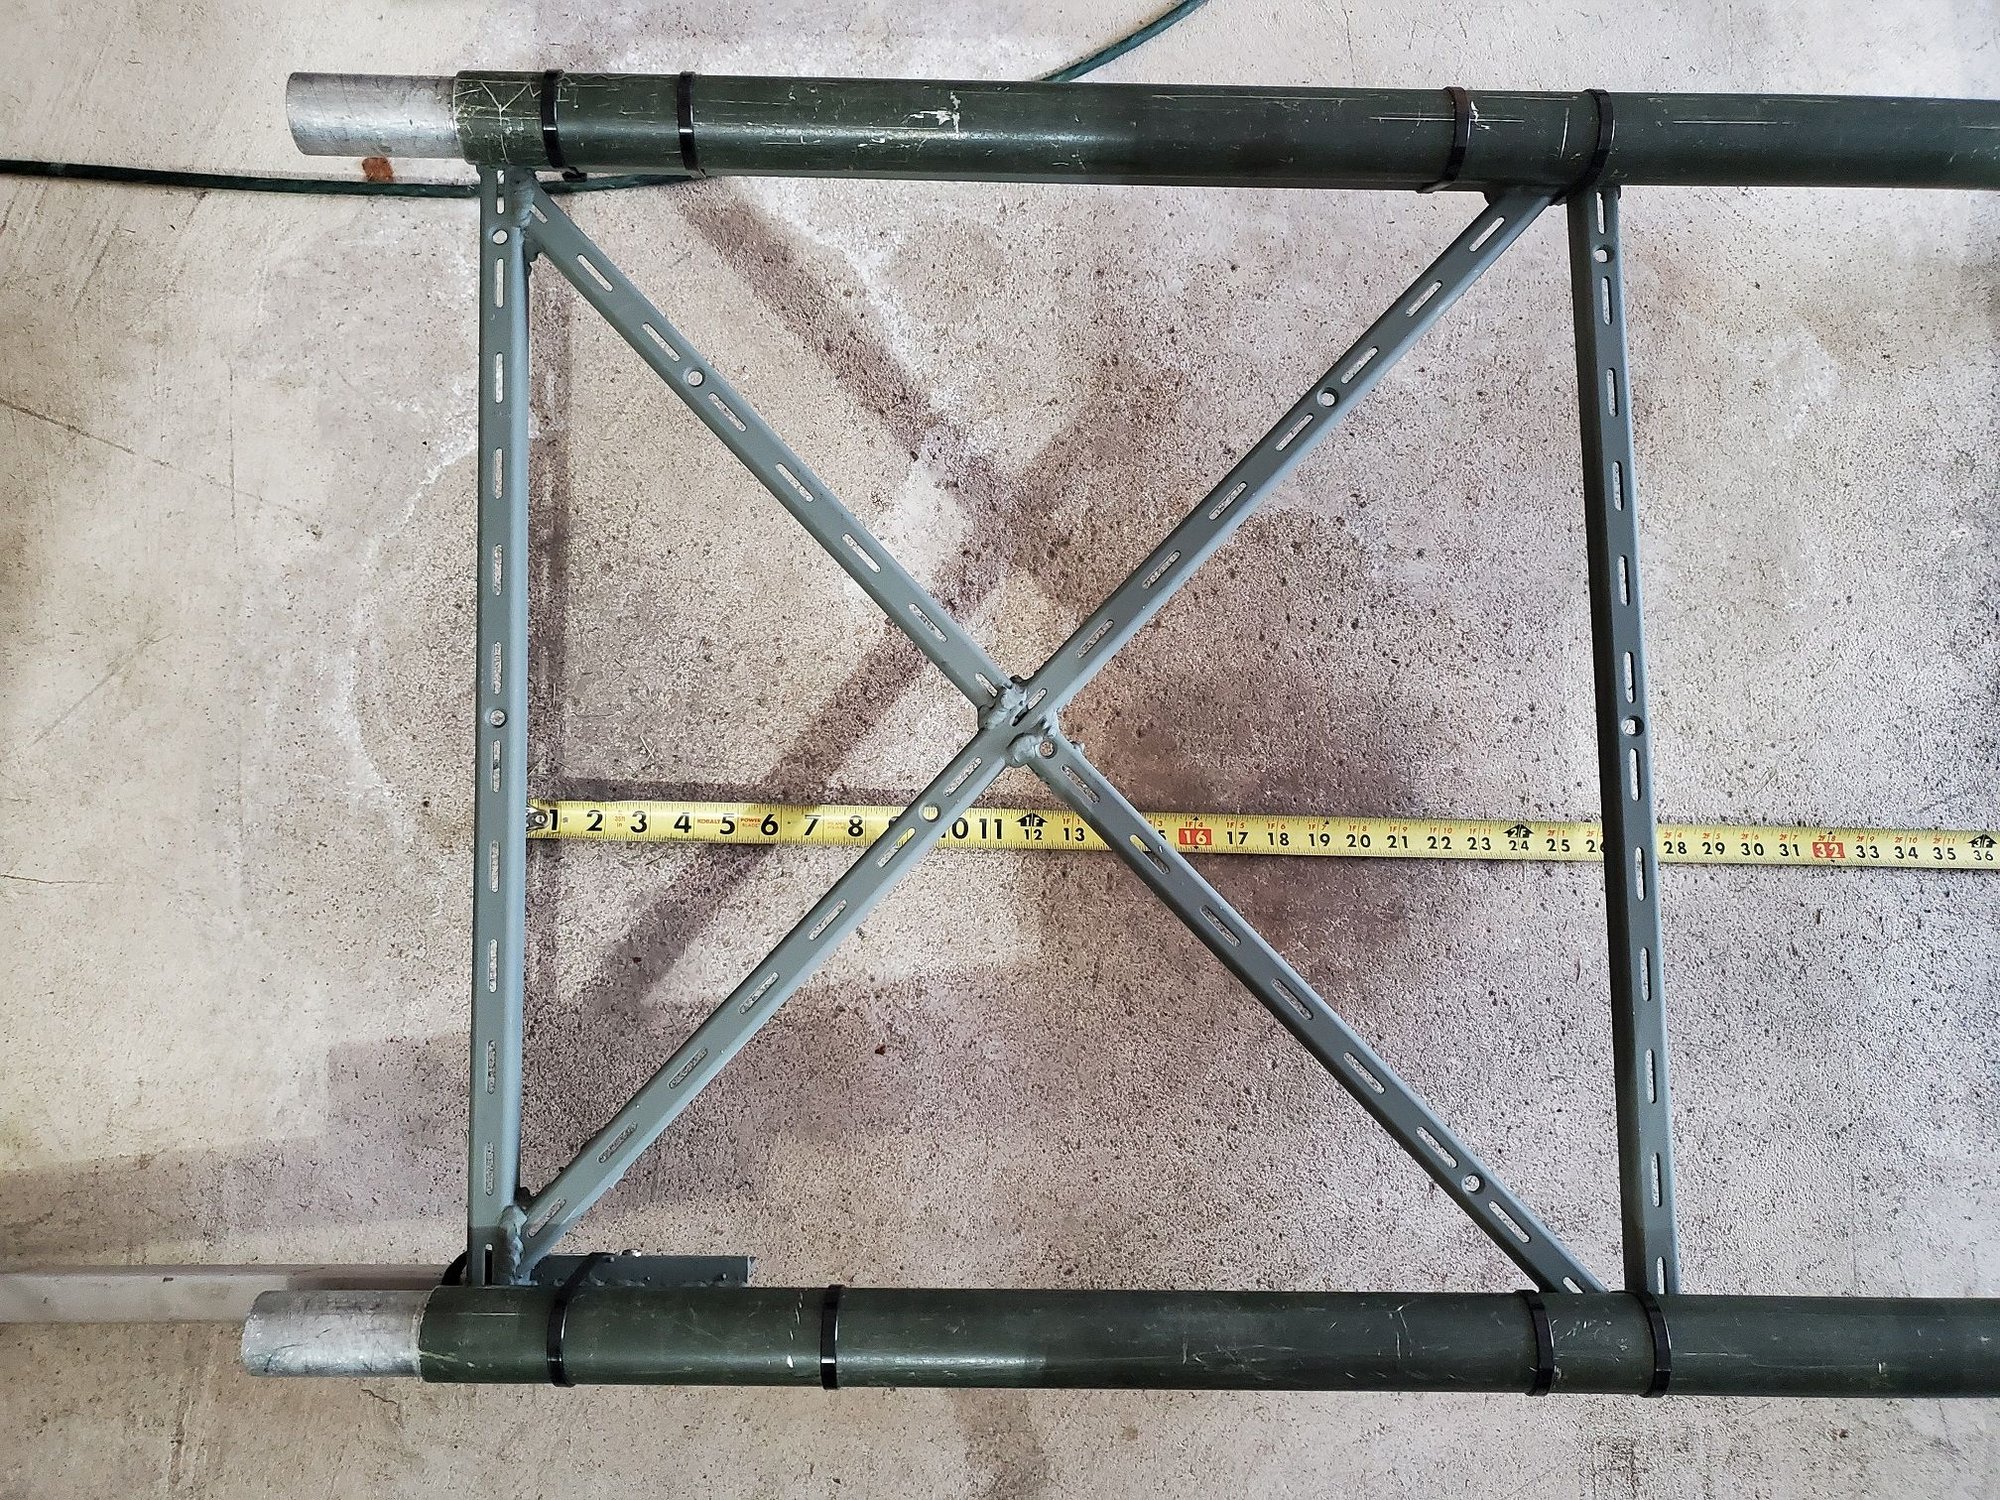

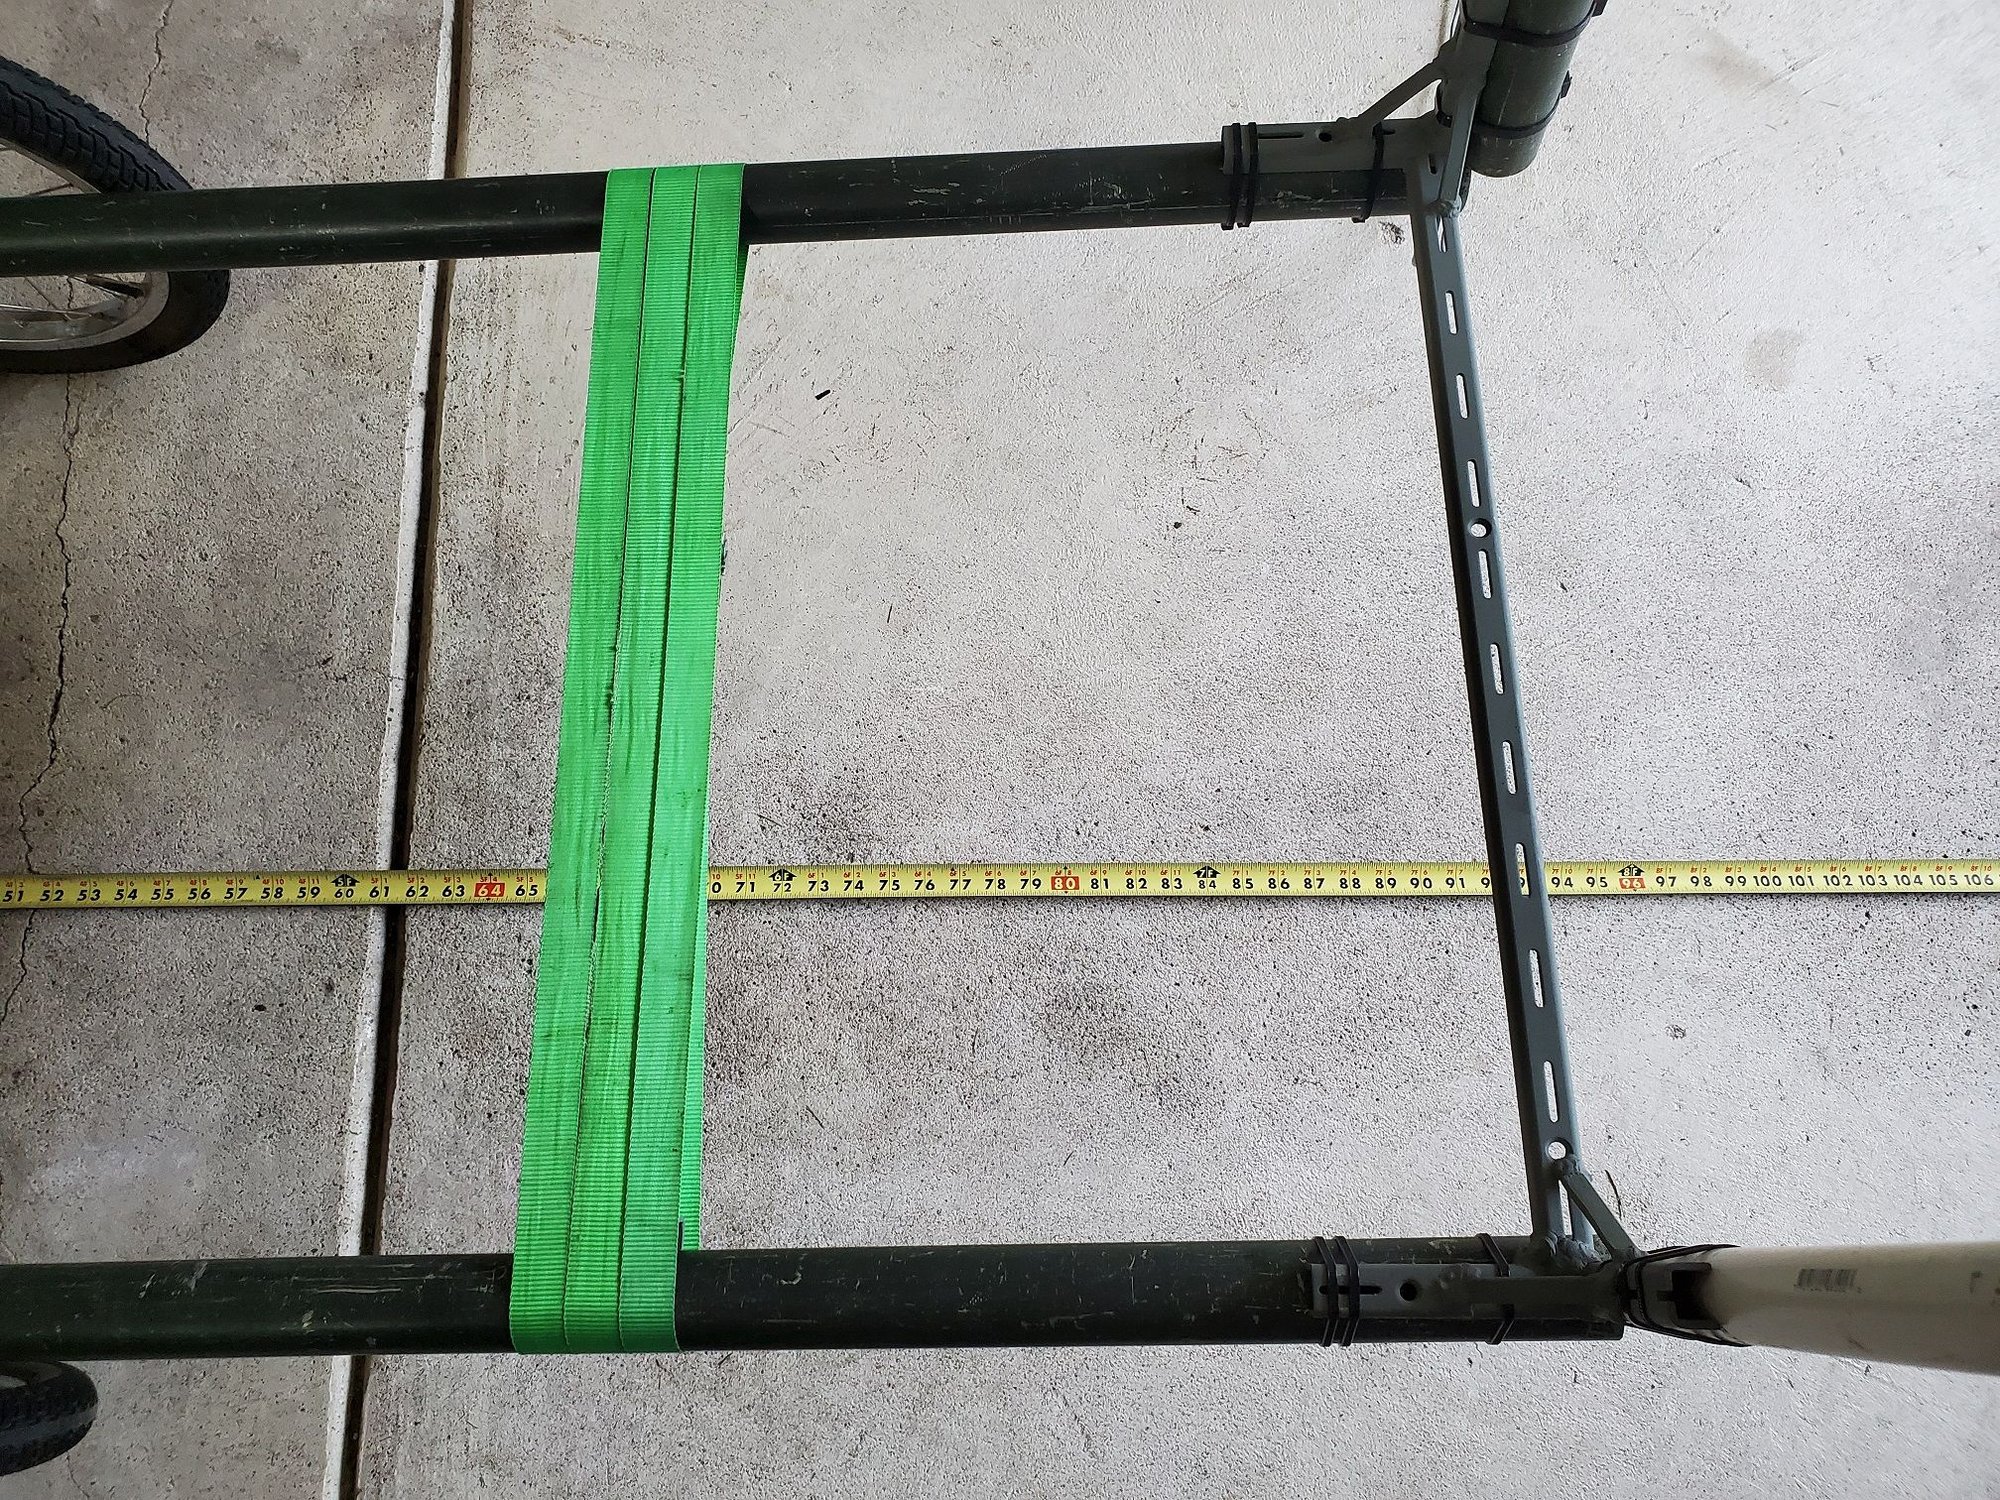

The distance between frame rail centers is right about 24".
09-25-21, 06:41 PM
#18
Newbie
Join Date: Sep 2021
Location: Halifax, Nova Scotia, Canada
Posts: 4
Bikes: 1980-some Cannondale ST400 touring bike
Mentioned: 0 Post(s)
Tagged: 0 Thread(s)
Quoted: 2 Post(s)
Likes: 0
Liked 0 Times
in
0 Posts
This thread is such a wild ride. I love the detailed documentation.
The twist intrigues me, but also makes me nervous because it relies on a specific load to flatten the frame. I know that Bikes At Work solves this by making a giant U-shaped hitch to connect at the middle between the two sides instead, which is reinforced by virtue of being a Big Hunka Metal. It might just be a non-issue for your purposes, though.
The twist intrigues me, but also makes me nervous because it relies on a specific load to flatten the frame. I know that Bikes At Work solves this by making a giant U-shaped hitch to connect at the middle between the two sides instead, which is reinforced by virtue of being a Big Hunka Metal. It might just be a non-issue for your purposes, though.
09-25-21, 11:21 PM
#19
Senior Member
Thread Starter
Join Date: Apr 2013
Posts: 1,173
Bikes: Surly Disk Trucker, 2014 w/Brooks Flyer Special saddle, Tubus racks - Duo front/Logo Evo rear, 2019 Dahon Mariner D8, Both bikes share Ortlieb Packer Plus series panniers, Garmin Edge 1000
Mentioned: 2 Post(s)
Tagged: 0 Thread(s)
Quoted: 405 Post(s)
Liked 115 Times
in
99 Posts
This thread is such a wild ride. I love the detailed documentation.
The twist intrigues me, but also makes me nervous because it relies on a specific load to flatten the frame. I know that Bikes At Work solves this by making a giant U-shaped hitch to connect at the middle between the two sides instead, which is reinforced by virtue of being a Big Hunka Metal. It might just be a non-issue for your purposes, though.
The twist intrigues me, but also makes me nervous because it relies on a specific load to flatten the frame. I know that Bikes At Work solves this by making a giant U-shaped hitch to connect at the middle between the two sides instead, which is reinforced by virtue of being a Big Hunka Metal. It might just be a non-issue for your purposes, though.
As to the "twist" and requiring a "specific" load to flatten it - you are partially correct. The part you are correct with is to get the frame "flat" then it requires a specific load - the combination of weight and location of where the weight is on the frame, as well as where the axle is.
However, as long as the trailer frame doesn't go below "level" I am fine. If it is high on the opposite side of the hitch that is fine by me. I just don't want it lower than level. If it is exactly "level" is a non-issue. There isn't I will set the trailer up with, load wise, that will require it to be "level", or that can't handle any frame twist.
The Bikes At Work hitch is an interesting idea. I have studied those trailers some. I am not a fan of the large tube hitch tongue bar they use. I do not like how it attaches to the trailer frame - with what appear to be U bolts. The tongue bar in the middle makes a lot of sense, though, as you point out - it would eliminate the frame twist issue.
Another idea I want to try is a seat post hitch. That will require material I don't have and I will need to make a new front x brace frame. That will have to wait for a later date.
I mentioned location of the axle relating to the twist as well. That is something else that I realize with the axle position I have. I have not moved it since the last post I discussed that. Looking at my pictures from where I had it at first I think I have it about 10" or so up from where it was when I did my first trip with it. That position might, ultimately, be the best. The reason being is when it was there I had plenty of room behind the 2nd tub for adjustment in load placement - as well as in front. That gives me the ability to still move things around for balance with 2 tubs. Balancing 1 tub is a piece of cake if 2 is able to be balanced.
Last edited by KC8QVO; 09-25-21 at 11:24 PM.
09-27-21, 06:29 PM
#20
Senior Member
Thread Starter
Join Date: Apr 2013
Posts: 1,173
Bikes: Surly Disk Trucker, 2014 w/Brooks Flyer Special saddle, Tubus racks - Duo front/Logo Evo rear, 2019 Dahon Mariner D8, Both bikes share Ortlieb Packer Plus series panniers, Garmin Edge 1000
Mentioned: 2 Post(s)
Tagged: 0 Thread(s)
Quoted: 405 Post(s)
Liked 115 Times
in
99 Posts
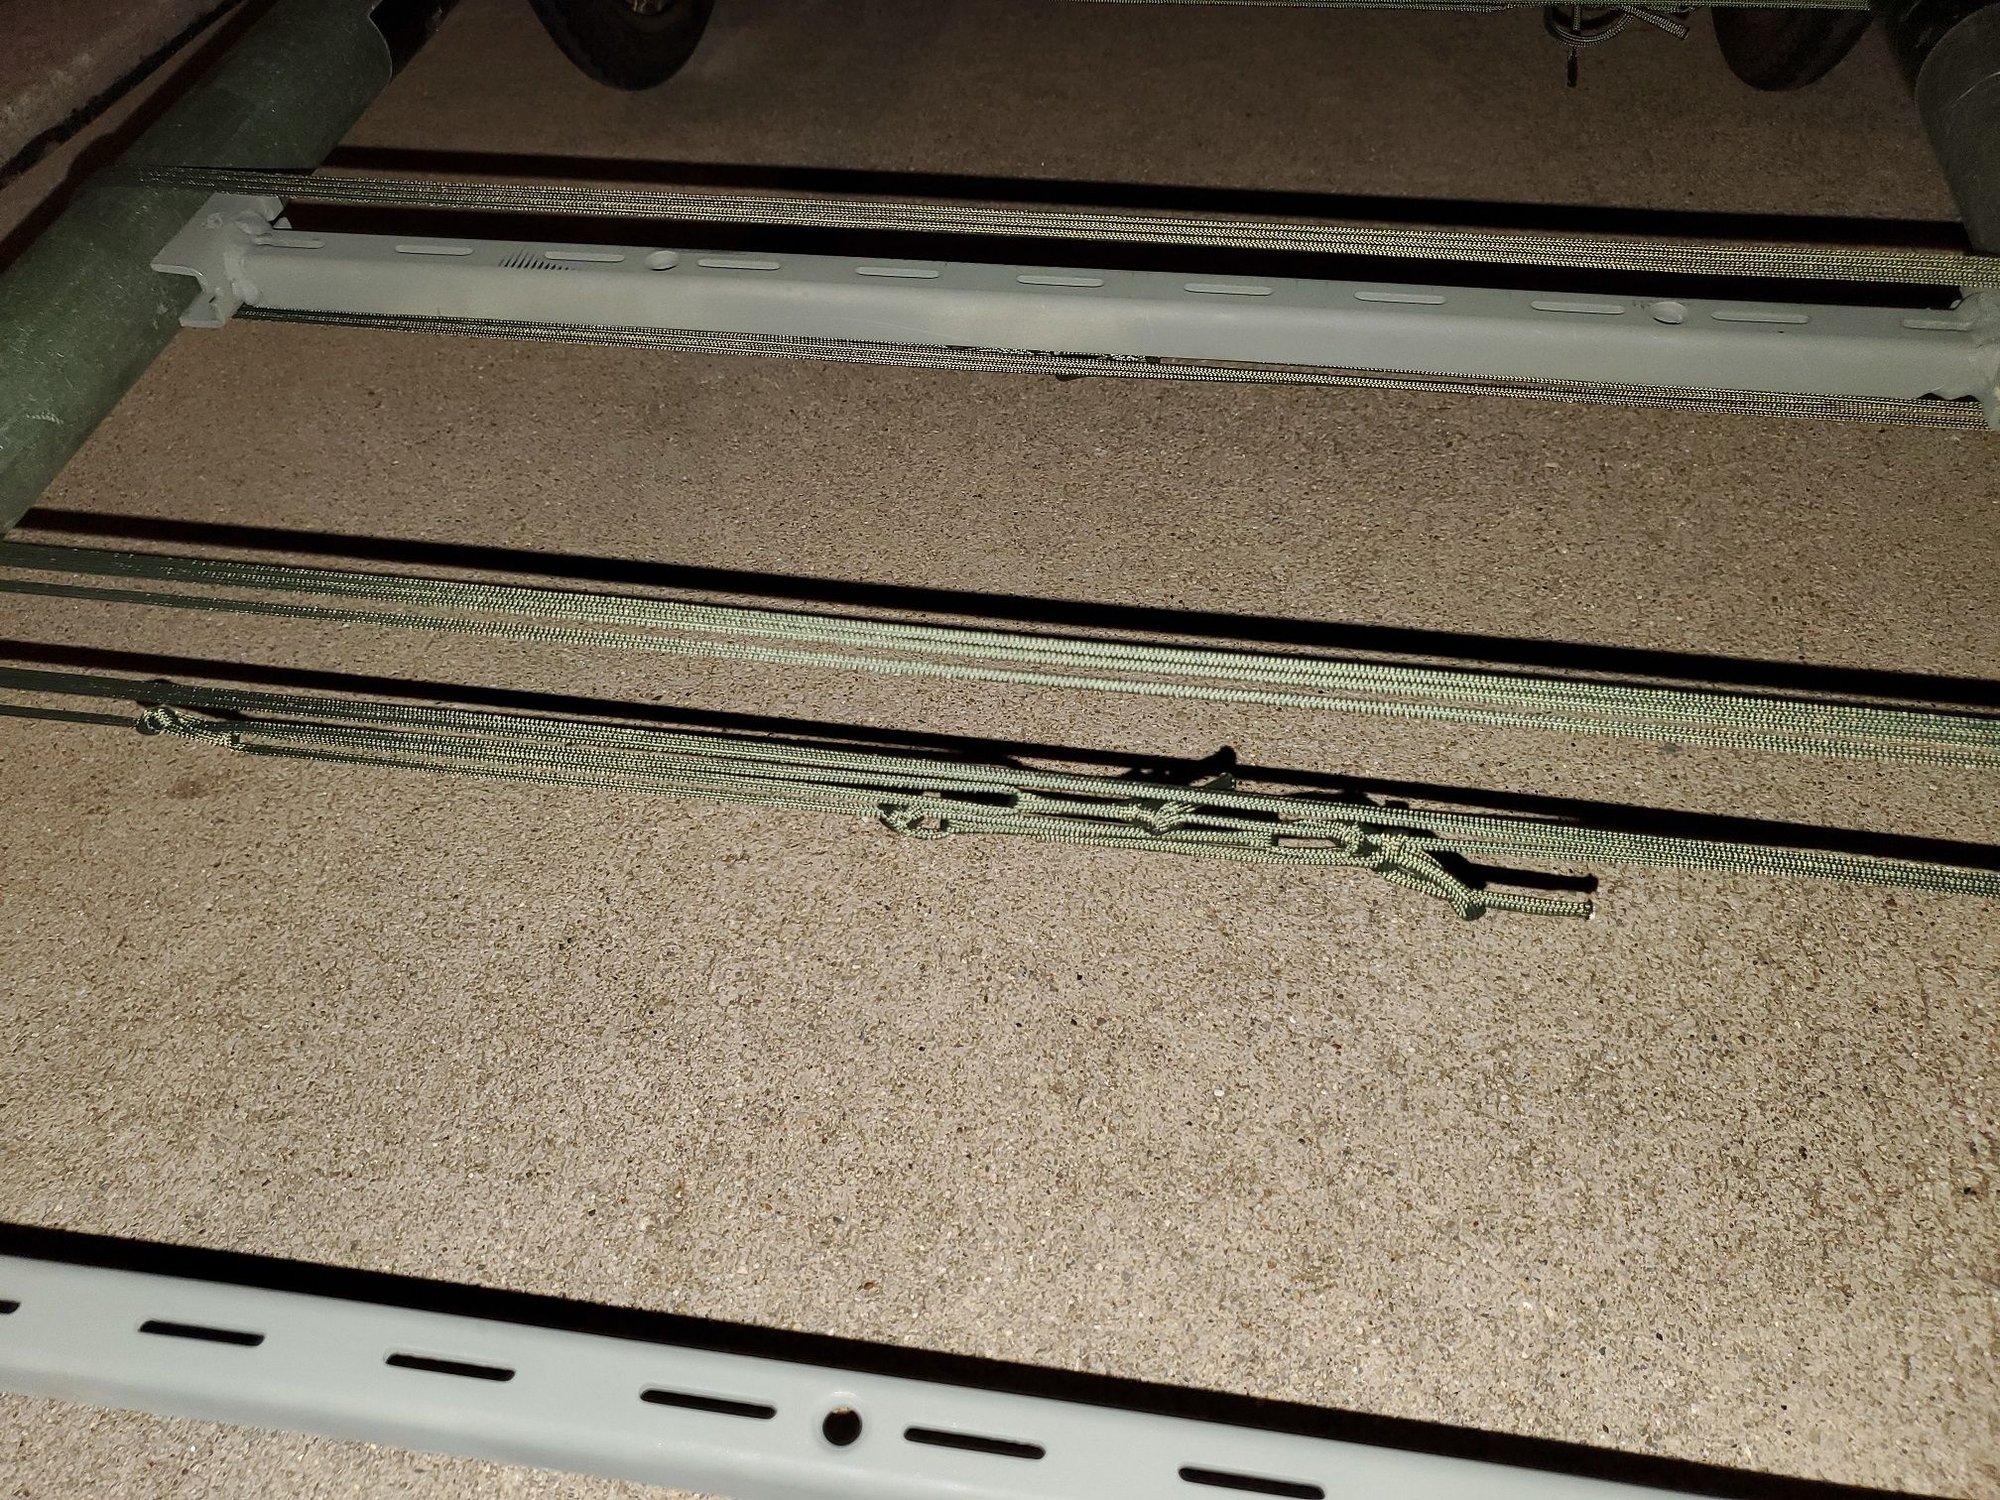
Tonight's work -
I did relocate the axle. The math behind it is as follows:
Each tub is 32" long (the top lid length, not the bottom - the tubs taper to the bottom, but the ruling dimension for stacking tubs front to back is the 32"). 1/2 of that length is 16". If the heaviest stuff is in the rear tub the starting dimension I came up with was to start with the axle centered on the tub - 16". Then I added 10" behind that for room to shift the load rearward along the trailer frame's usable length. That came to 26". So that is where I set the axle.
The axle position is no absolute, I can move it anywhere at another time. However, the math made sense to me and that parallels how I used the trailer the first trip with the 2 tubs. I don't recall what the exact number was where I set the axle in the beginning - it was just a wild guess. Looking at the pictures from before where the axle is now is close to where it was before. On that trip I had plenty of trailer behind the axle to move the load, if I needed to.
I do not know how the weight is going to ride just yet with a heavy load and 2 tubs. The metal hitch is new since the 1st heavy loaded trip so the stretching (causing most of the surging I think) of the old rubber rod hitch not being there is going to be a significant change in and of itself. With the ability to adjust where the load is I am pretty confident in the set up.


I also am trying my 550 cord webbing idea. I have a series of truckers hitches to amplify the tension. I think it is around 8:1 mechanical advantage. I can get the cord so tight it sounds like a guitar string when plucked. Pretty cool. We'll se how it works.
Aside from the 1st knot at the starting end, all the rest of them are bowline's = easy to take apart, even after tensioning. So if I have to adjust them later I can.
I did relocate the axle. The math behind it is as follows:
Each tub is 32" long (the top lid length, not the bottom - the tubs taper to the bottom, but the ruling dimension for stacking tubs front to back is the 32"). 1/2 of that length is 16". If the heaviest stuff is in the rear tub the starting dimension I came up with was to start with the axle centered on the tub - 16". Then I added 10" behind that for room to shift the load rearward along the trailer frame's usable length. That came to 26". So that is where I set the axle.
The axle position is no absolute, I can move it anywhere at another time. However, the math made sense to me and that parallels how I used the trailer the first trip with the 2 tubs. I don't recall what the exact number was where I set the axle in the beginning - it was just a wild guess. Looking at the pictures from before where the axle is now is close to where it was before. On that trip I had plenty of trailer behind the axle to move the load, if I needed to.
I do not know how the weight is going to ride just yet with a heavy load and 2 tubs. The metal hitch is new since the 1st heavy loaded trip so the stretching (causing most of the surging I think) of the old rubber rod hitch not being there is going to be a significant change in and of itself. With the ability to adjust where the load is I am pretty confident in the set up.
I also am trying my 550 cord webbing idea. I have a series of truckers hitches to amplify the tension. I think it is around 8:1 mechanical advantage. I can get the cord so tight it sounds like a guitar string when plucked. Pretty cool. We'll se how it works.
Aside from the 1st knot at the starting end, all the rest of them are bowline's = easy to take apart, even after tensioning. So if I have to adjust them later I can.
Likes For KC8QVO:
09-29-21, 06:45 PM
#21
Senior Member
Thread Starter
Join Date: Apr 2013
Posts: 1,173
Bikes: Surly Disk Trucker, 2014 w/Brooks Flyer Special saddle, Tubus racks - Duo front/Logo Evo rear, 2019 Dahon Mariner D8, Both bikes share Ortlieb Packer Plus series panniers, Garmin Edge 1000
Mentioned: 2 Post(s)
Tagged: 0 Thread(s)
Quoted: 405 Post(s)
Liked 115 Times
in
99 Posts
Today's work:
I got some proper bolts for the hitch pivot along with a good greasing. Grease is a thick heavy duty automotive grease. As for bolts - I was going to use grade 5's but they were more expensive than grade 8's and they did not have washers or nuts for gr5. So I used gr8's.
The nuts are metal lock nuts (the deformed ones, not nylocks). I don't think they are a very heavy grade. My guess is they are standard zinc. However, I am not using the bolts to hold compression. The bolts are being used as hinges in shear loading. The only tightening I did was to compress a split ring lock washer - no need to have them any tighter. The important thing is for the nuts to not vibrate loose - hence the lock nuts.
I am going to try a zinc bolt for the yaw pivot (bike side). I have a few of them - the original long one I had and I got some new ones that are shorter. Zinc bolts are a weaker bolt so the theory is it may be a shear bolt in a worst-case scenario. However, it would still take a heck of a hit. There are a set of 1/2" holes in the tongue bar on the trailer that I think were put there as intentional weakening of the bar. I am guessing that would give out before the zinc bolt would. But ya never know. Either way, I don't want to find out.
I am not sure what bolts I want to use yet - really long or the short ones I got today - for the yaw pivot. The reason is that if I put a nut on it I can't pull the bolt out like a pin real easy. I have to unscrew the nut - which likely requires tools. I can't use a wing nut because there is nothing to prevent it from vibrating off, or any non-locking nut for that matter. I did get some castle nuts with this in thought. The castle nuts would allow a pin through the nut and bolt to prevent the nut from turning against the bolt. The catch - there has to be a hole in the bolt to get a pin through which I would have to drill. If I go without a nut entirely that would eliminate all the hassle, but at the risk of working up and out. I couldn't tell if I had that issue with the long bolt so I'll try that next trip again and see what happens.
Last edited by KC8QVO; 09-29-21 at 06:56 PM.
09-30-21, 06:15 PM
#22
Senior Member
Thread Starter
Join Date: Apr 2013
Posts: 1,173
Bikes: Surly Disk Trucker, 2014 w/Brooks Flyer Special saddle, Tubus racks - Duo front/Logo Evo rear, 2019 Dahon Mariner D8, Both bikes share Ortlieb Packer Plus series panniers, Garmin Edge 1000
Mentioned: 2 Post(s)
Tagged: 0 Thread(s)
Quoted: 405 Post(s)
Liked 115 Times
in
99 Posts
Here are some pictures from my overnight trek.
The balance on the trailer works pretty good. I intentionally loaded the rear tub heavy. I had the trailer hooked up when I loaded it so I didn't get to feel the tongue weight before I rolled - I just took a guess at it. The handling wasn't bad but I did notice the bike seemed "light" when I was walking it through the yard to the driveway before I left.
What did stand out to me with the trailer handling and weight distribution was when I went through the road crossings on the MUP. The trailer and stuff seemed to bounce a lot - more than it should.
Before I hit the road (end of the MUP) I stopped and set up the pool noodle. I checked the trailer weight and realized how little tongue weight there was. There was nearly 0.
What also stood out to me is I found the trailer frame was bowed up. As in - the rear of the trailer (the heavy loaded tub) was bent down a bit. What I determined was the bow in the trailer frame acted like a trampoline - hence the bouncing I noticed on the crossings.
I took stuff out of the rear tub and shifted it to the front tub. I don't know what the tongue weight was, but it was a decent bit more. Although there were no MUP/road crossings the rest of the trek today the bumps in the road I did hit (and railroad track crossings) didn't seem to be as harsh as before. I definitely like the bit extra tongue weight. The bike doesn't lean too much towards the side of the hitch, but there is a bit more weight on the rear end. That helps significantly when walking the bike with the trailer in the grass on the side of the road - like when I stop and get back on the road.
The grease in the pivot points works great. I tightened the roll pivot bolt more than when I didn't have the lube. That is where most of the "looseness" is, The lube let me tighten it a bit more and, although there is a slight amount of play, there isn't any noise that bothers me on the road - no rattling.
I have sensed the tongue bar flexing at the bend. Watching the yaw pivot when rolling down the road seems to indicate the angle of the tongue bar changing quite a bit. That might be a concern - it could lead to metal fatigue. We'll see. That is easy enough to make a new one of, should it need to be remade.
09-30-21, 06:23 PM
#23
Senior Member
Thread Starter
Join Date: Apr 2013
Posts: 1,173
Bikes: Surly Disk Trucker, 2014 w/Brooks Flyer Special saddle, Tubus racks - Duo front/Logo Evo rear, 2019 Dahon Mariner D8, Both bikes share Ortlieb Packer Plus series panniers, Garmin Edge 1000
Mentioned: 2 Post(s)
Tagged: 0 Thread(s)
Quoted: 405 Post(s)
Liked 115 Times
in
99 Posts
More pictures. I think I am limited to 5 per post.
These pictures describe the location of the tubs along the trailer. This goes back to my "math" a few posts up with where I moved the axle to. I have the rear tub behind the "center point" of the axle (the axle being centered with the tub). I still have some room to move it back, but the way the weight worked out the locations were good where they were.
With the scenario I mentioned in the previous post of having too light of a hitch - I could have moved the tubs forward to alleviate that as opposed to moving stuff from one tub to the other. However, it was a lot easier to just transfer the stuff. On a tour where I had things organized in the tubs and may not want to move things between tubs then moving the tubs themselves forwards or backwards is certainly an option - it just takes more work to do so (which is why I didn't do it today). Moving the tubs would have helped out with the flexing of the frame, perhaps, more than just moving the stuff as it would have shifted the overall weight forwards - with the weight still concentrated more over the axle and maybe a bit behind.
Edit -
One more note is I am using 550 cord for the tie-downs also. I have a double acting truckers hitch (3:1 ratio I think) to tension each one. It works great. I have a bit of extra cord than I need so I can secure things on top or if I have to compress stuff inside I can. It is about as quick to work with as the ratchet straps earlier and is plenty of securment to keep things from bouncing off and moving around going down the road.
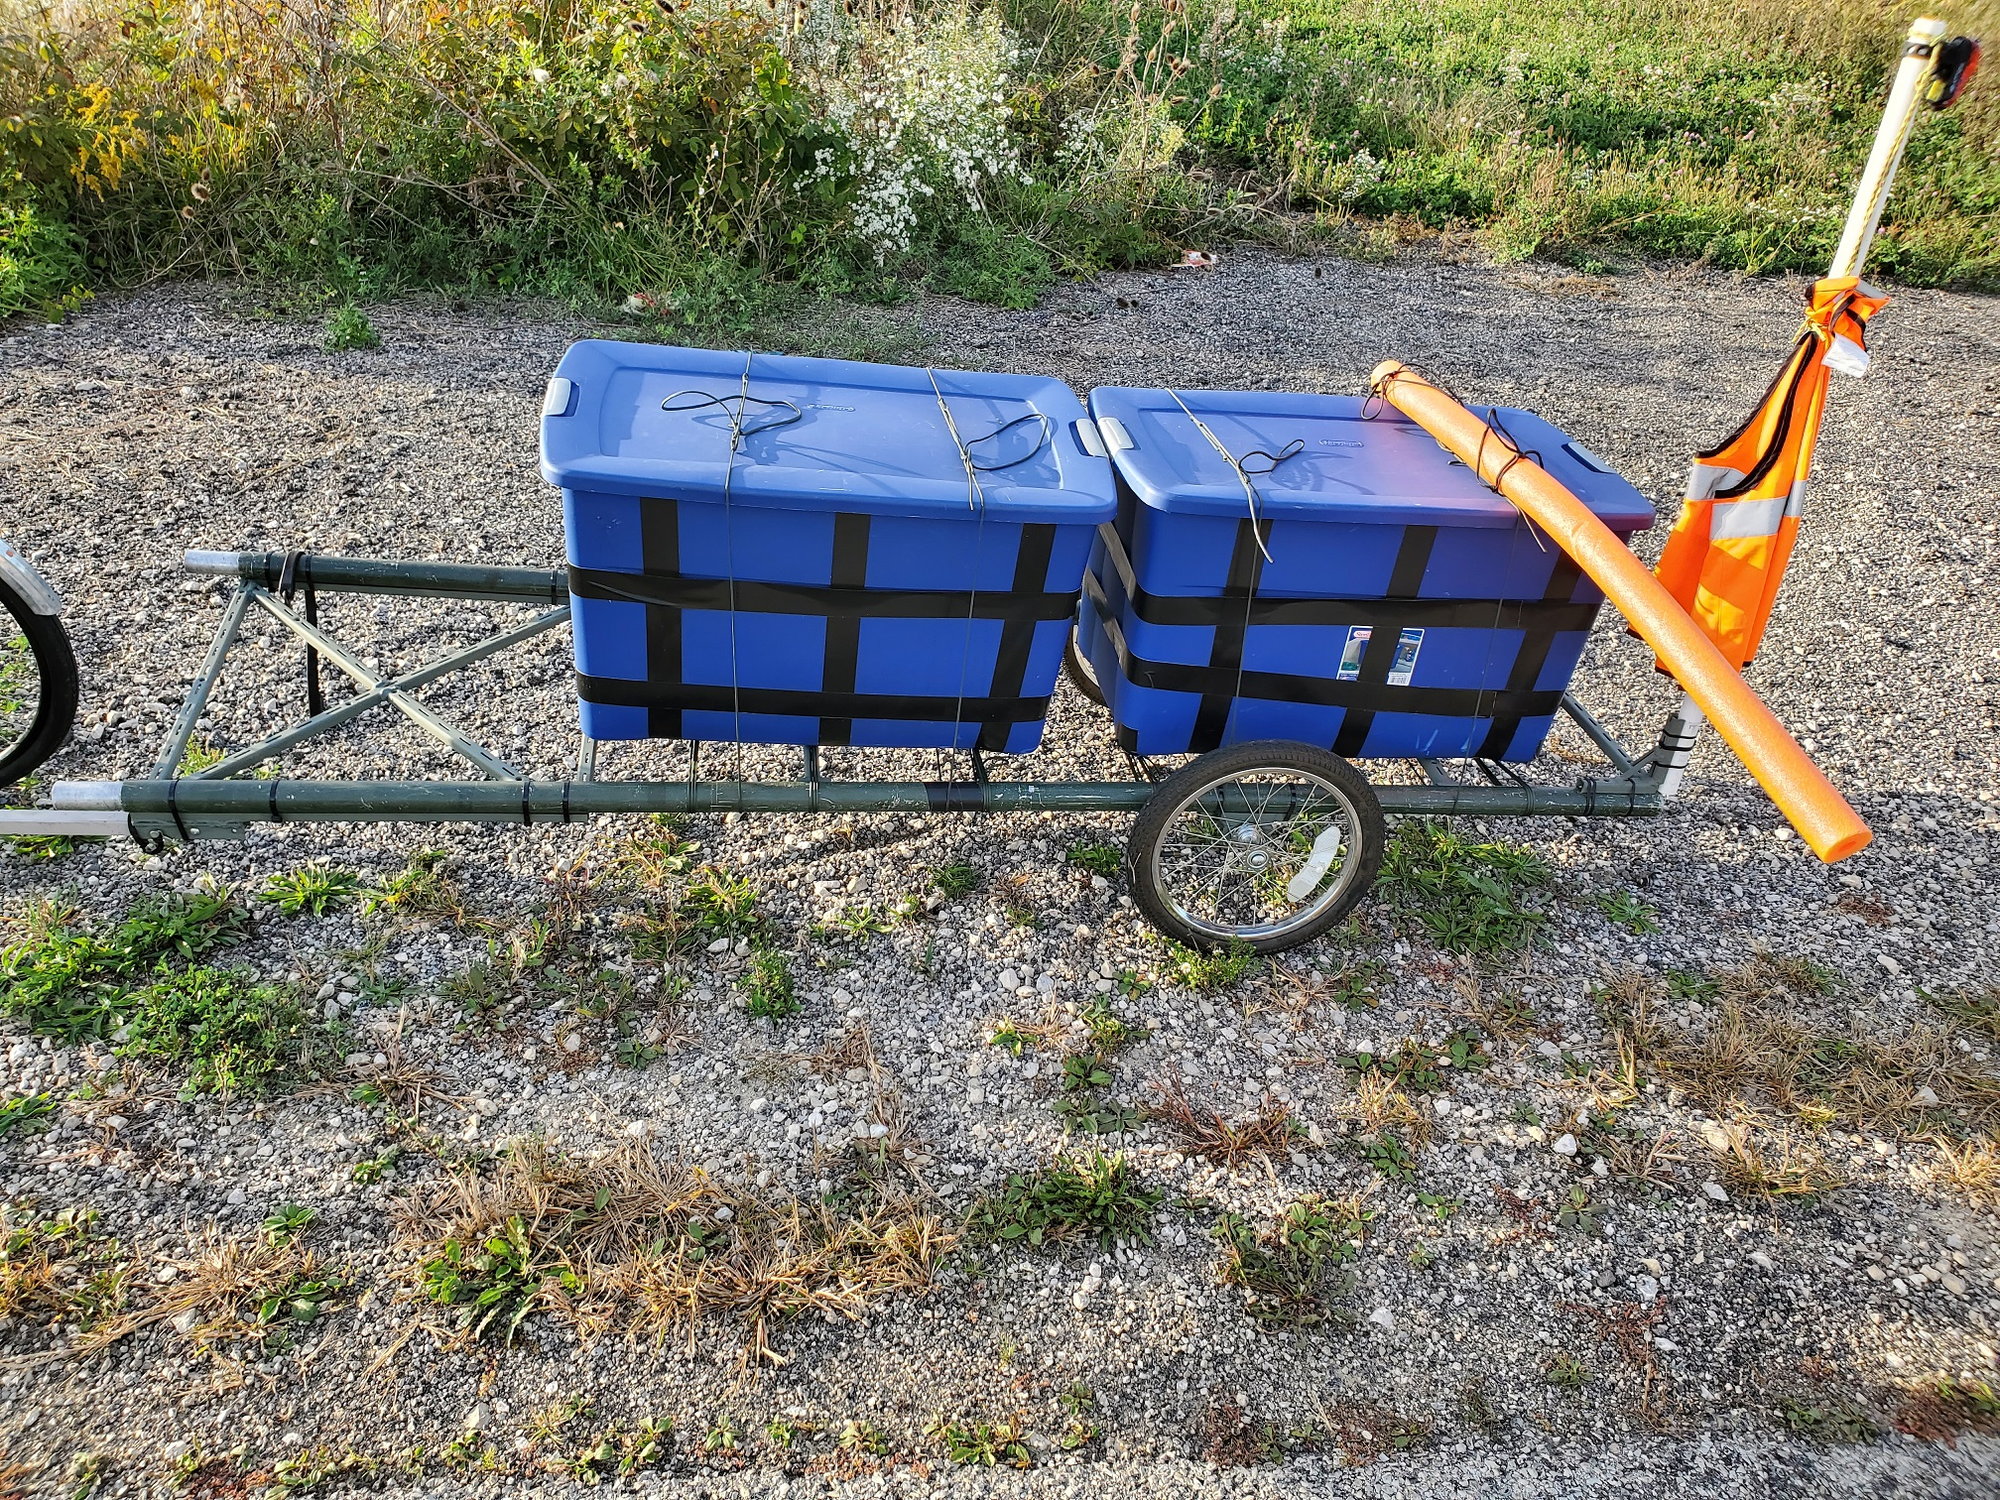
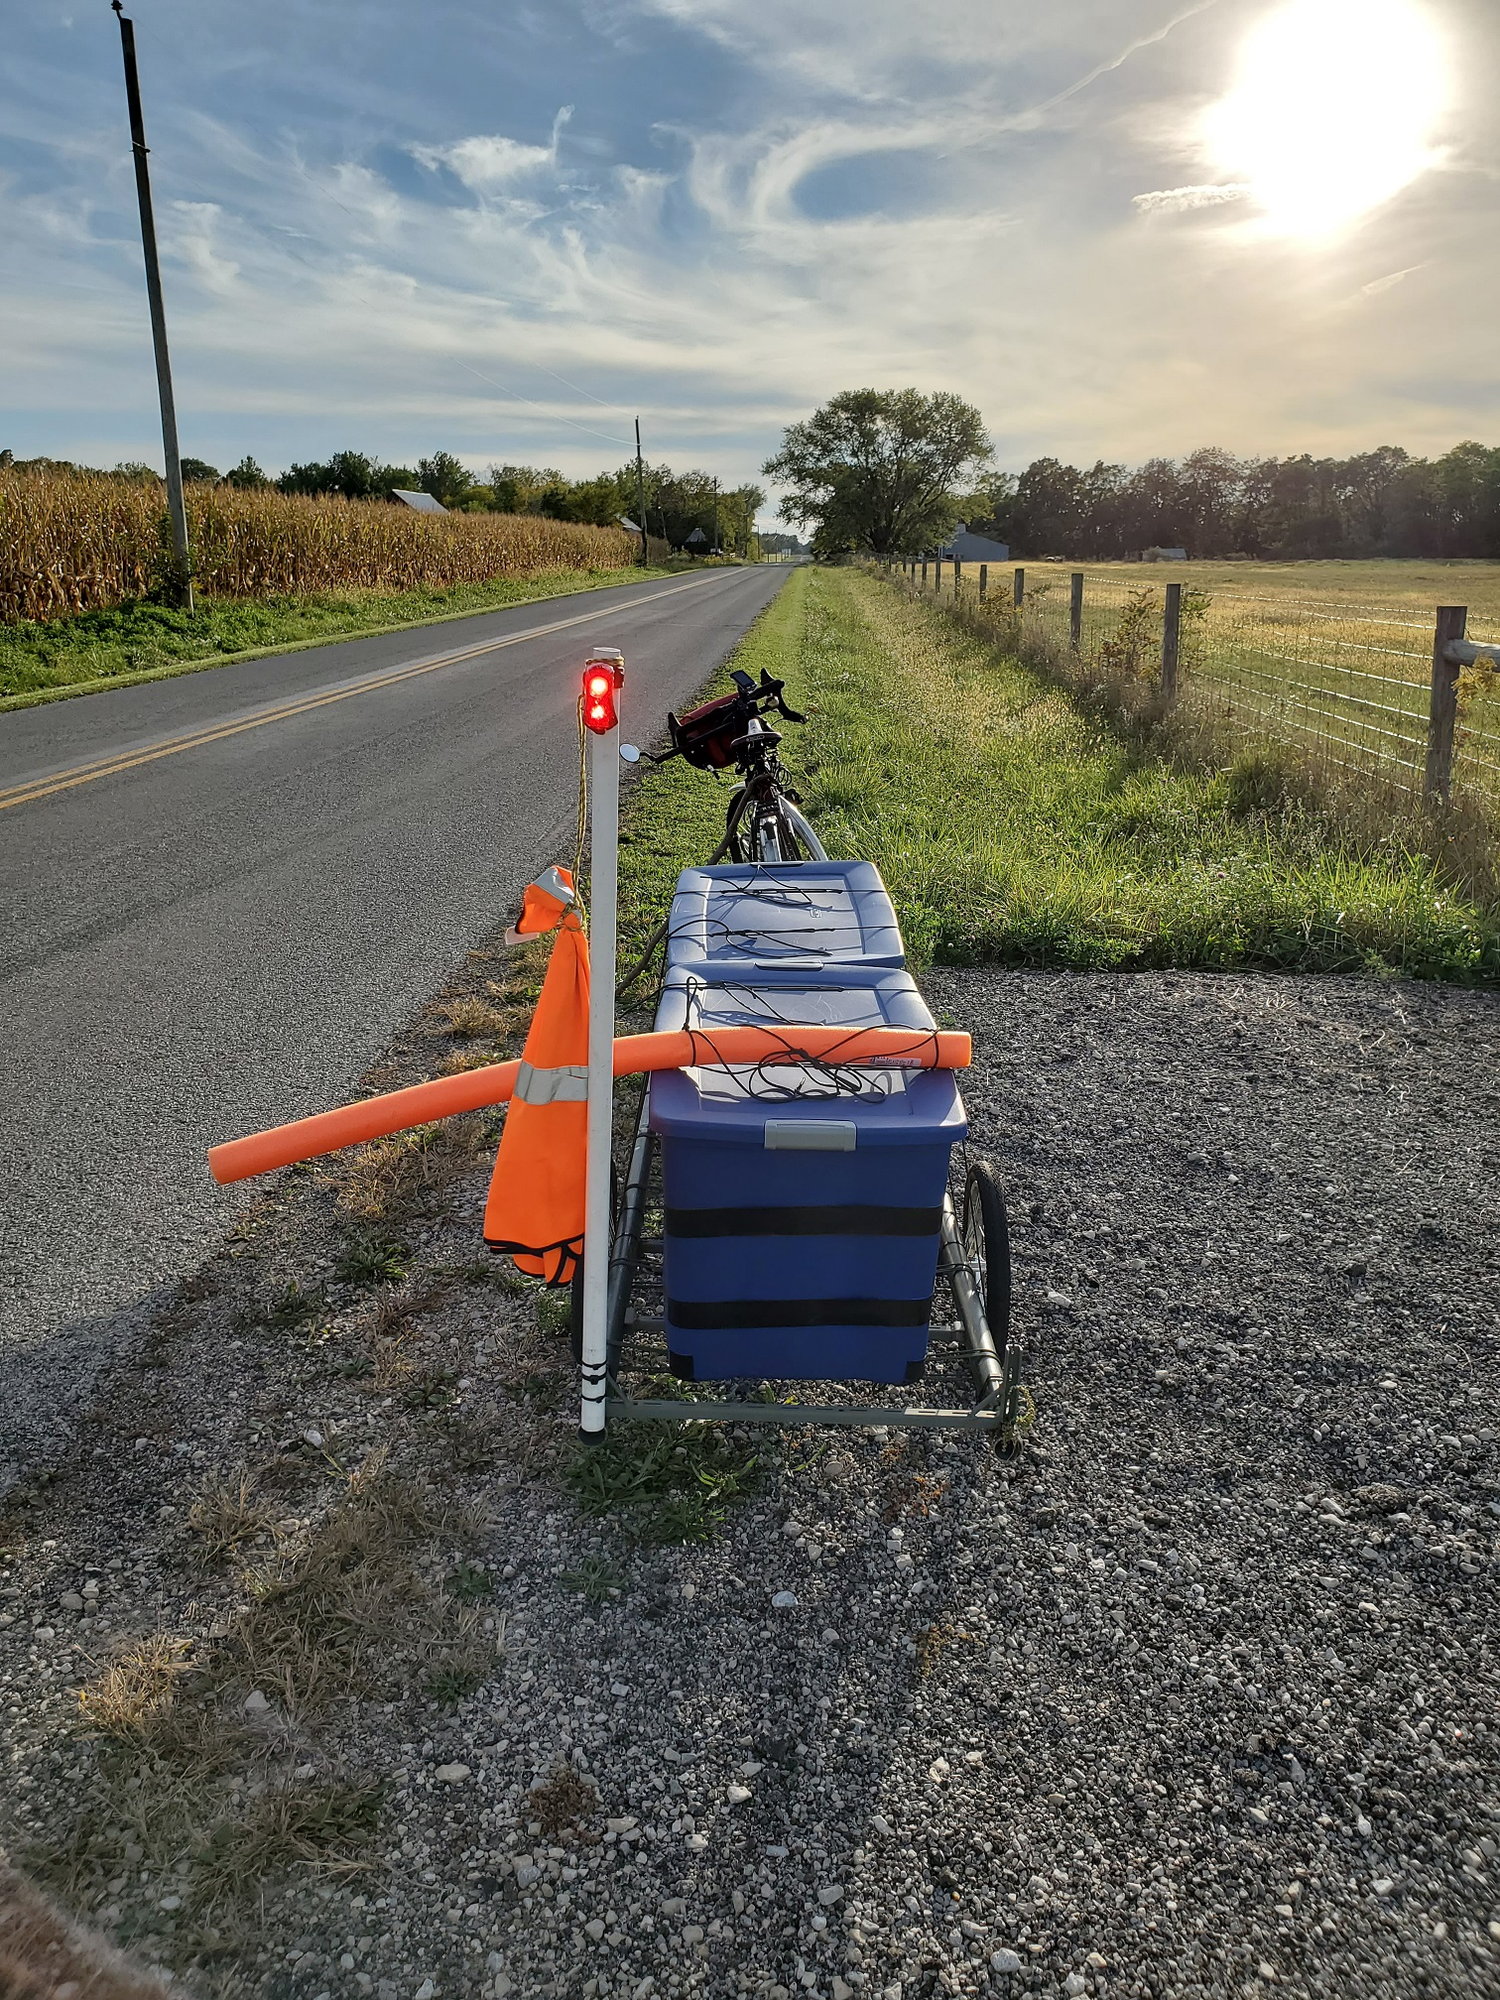
Last edited by KC8QVO; 09-30-21 at 06:32 PM.
Likes For KC8QVO:
10-05-21, 04:04 PM
#24
Senior Member
Thread Starter
Join Date: Apr 2013
Posts: 1,173
Bikes: Surly Disk Trucker, 2014 w/Brooks Flyer Special saddle, Tubus racks - Duo front/Logo Evo rear, 2019 Dahon Mariner D8, Both bikes share Ortlieb Packer Plus series panniers, Garmin Edge 1000
Mentioned: 2 Post(s)
Tagged: 0 Thread(s)
Quoted: 405 Post(s)
Liked 115 Times
in
99 Posts
Today's work:
I took the wheels off to inspect the bearings closer (I have another thread in the mechanics forum on bearings, I'll leave the details there - https://www.bikeforums.net/bicycle-m...-bearings.html). While I had the wheels off I inspected the brackets.
What I am sensing is that the wheels are getting looser and looser with each use. My assumption was that the holes in the brackets I made that hold the stub axles were deforming under load and stress. The brackets are made out of mild steel (A36) so as far as steels go it is "soft".
However, when I inspected them closely there was minimal distortion. There was some - you can see where the paint is worn in the higher-stressed areas - but very minimal wear.
So I held the axle rigid and rocked the wheel to see how much play there was in the bearings. Lots of play.
From what I am seeing is the bearings are getting looser and looser.
My intent with the bearing thread was addressing the low-quality bearings that I suspected - and with them getting looser and looser that just seals the deal on that.
On another subject - I gave the wheels a good round of spoke tensioning. If you look close at the hub you can see some of the spoke bases popping up from the hole in the hub = no tension on them. I did not get them banjo-string tight. That is a really bad idea. I just made them taught so they didn't feel so loose. The spokes on the other side of the hub did tighten up a good bit more, but they still aren't banjo string tight so that is a good thing. They are just taught.
Pictures are from last week. I didn't take any today - but the point is they show how loose some of the spokes were.
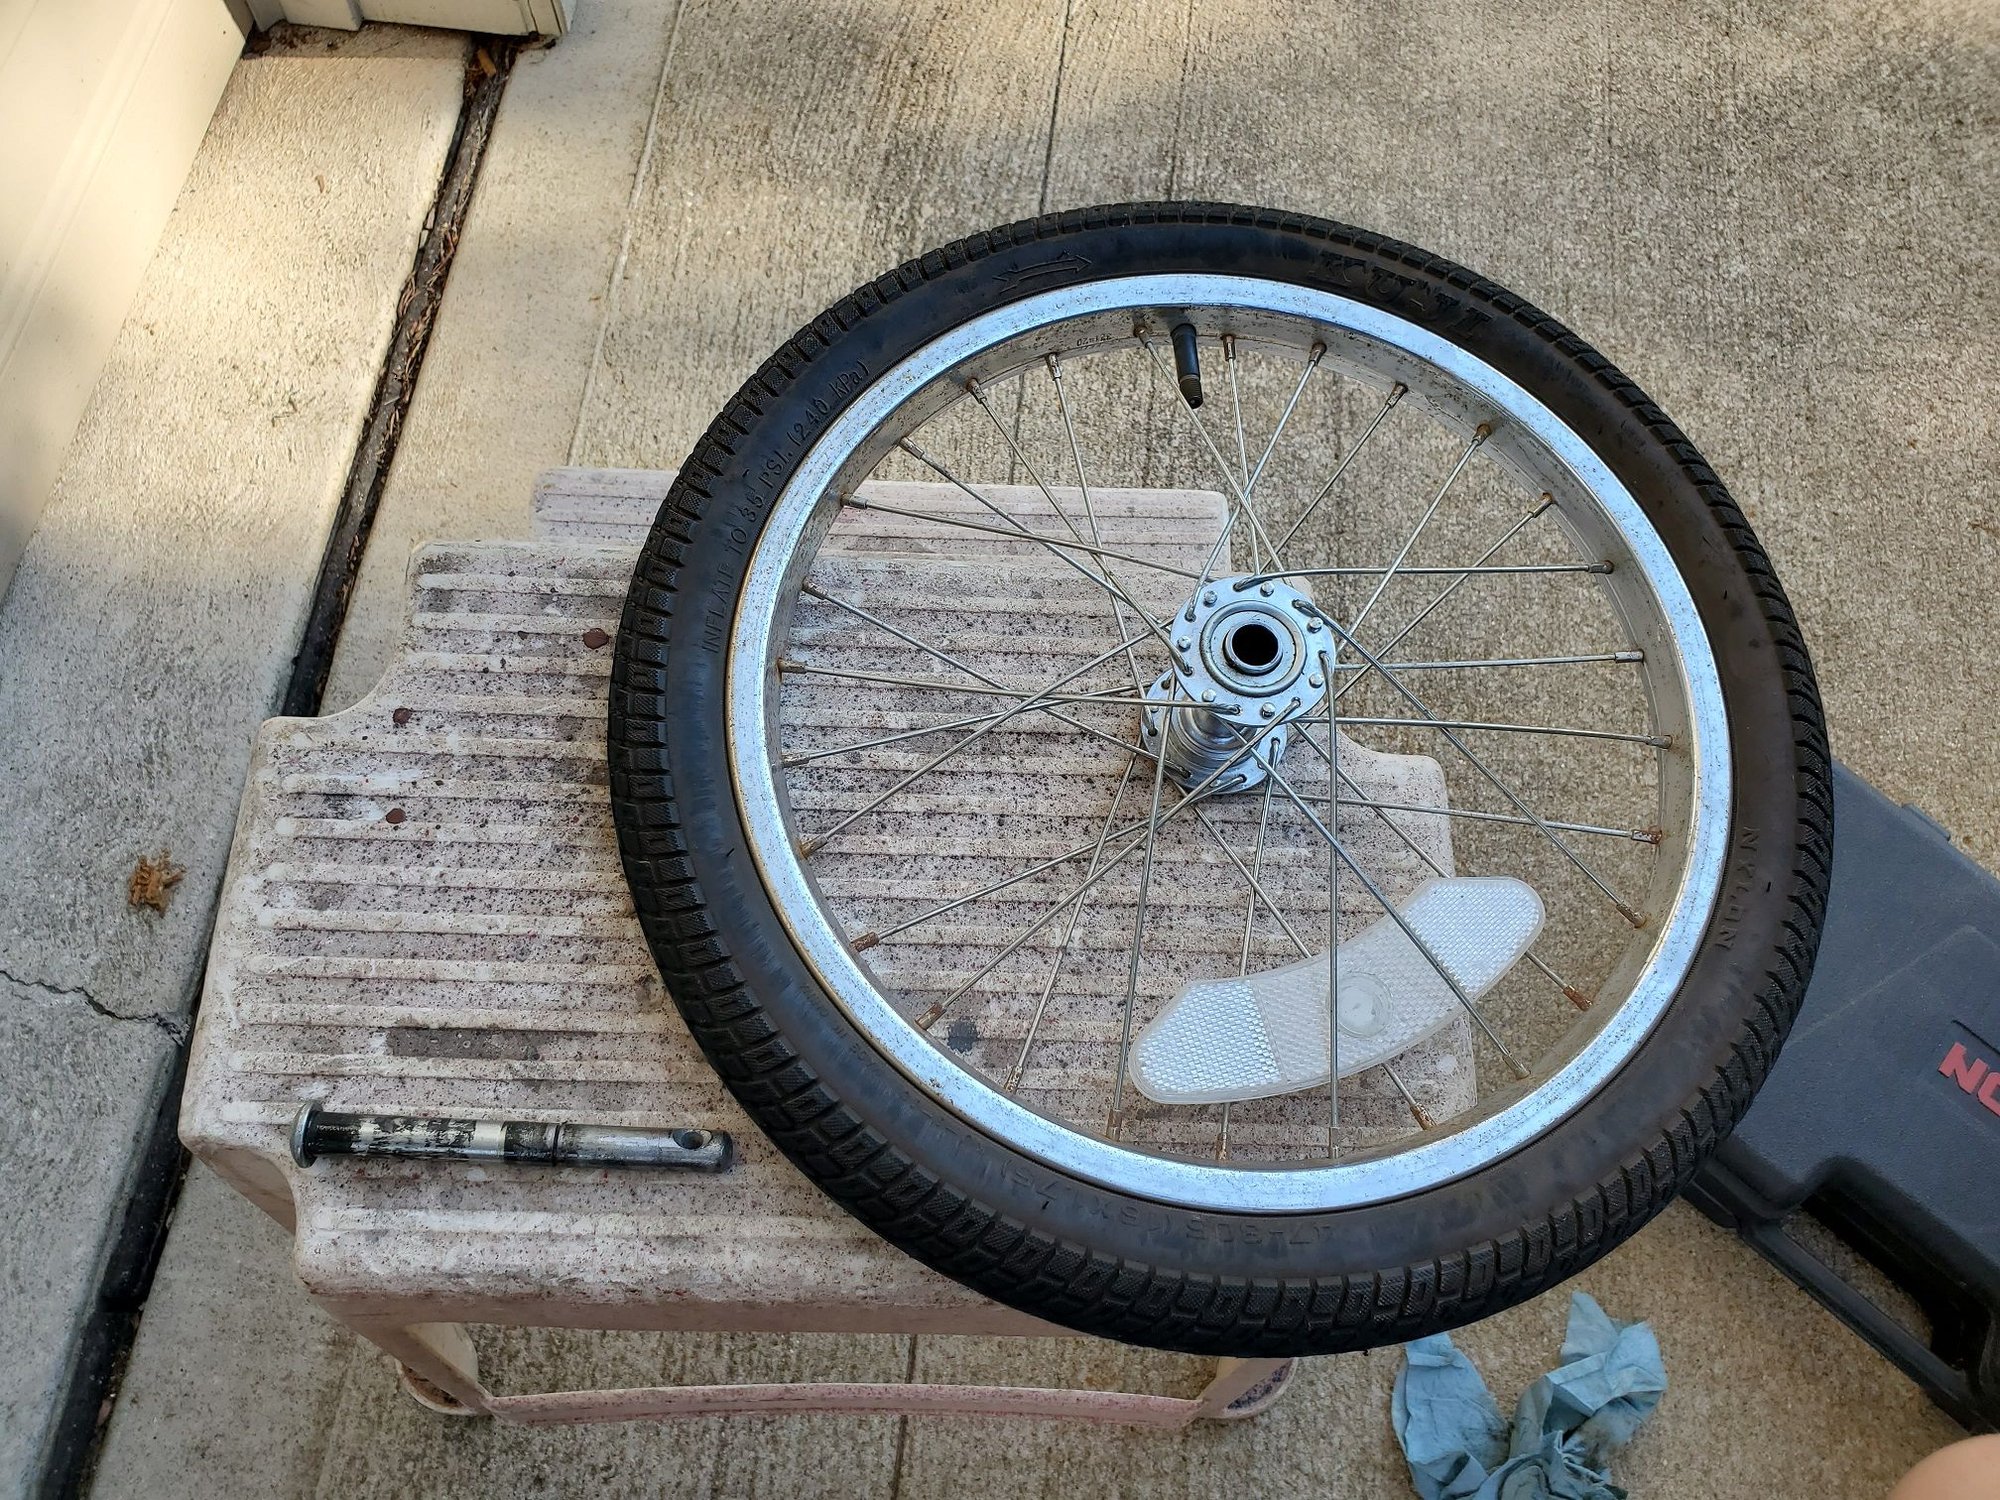
Likes For KC8QVO:
10-08-21, 09:01 AM
#25
Senior Member
Thread Starter
Join Date: Apr 2013
Posts: 1,173
Bikes: Surly Disk Trucker, 2014 w/Brooks Flyer Special saddle, Tubus racks - Duo front/Logo Evo rear, 2019 Dahon Mariner D8, Both bikes share Ortlieb Packer Plus series panniers, Garmin Edge 1000
Mentioned: 2 Post(s)
Tagged: 0 Thread(s)
Quoted: 405 Post(s)
Liked 115 Times
in
99 Posts
I made a slight change, not really with the "trailer", but the pool noodle traffic deflector.
I added a piece of PVC pipe. I believe it is 1/2" ID. It fits pretty snug inside the noodle. The purpose is to stiffen up the noodle. The pipe goes through all but the last foot or so. This way the noodle is a lot more rigid. The softer end is there in case a passing car snags it - the foam will simply flex out of the way. Since the whole thing is tied on to the top of the tub, also, it is very easy to rotate with much force. So there still isn't any risk of impact damaging much or throwing my balance.
The rigid noodle also gives me more visibility options - like hanging the orange vest. I was going to hang the orange vest further out, but realized it would blow around a lot more. If I do that I need a rod of some kind to hang from the bottom of the vest to keep it "down".
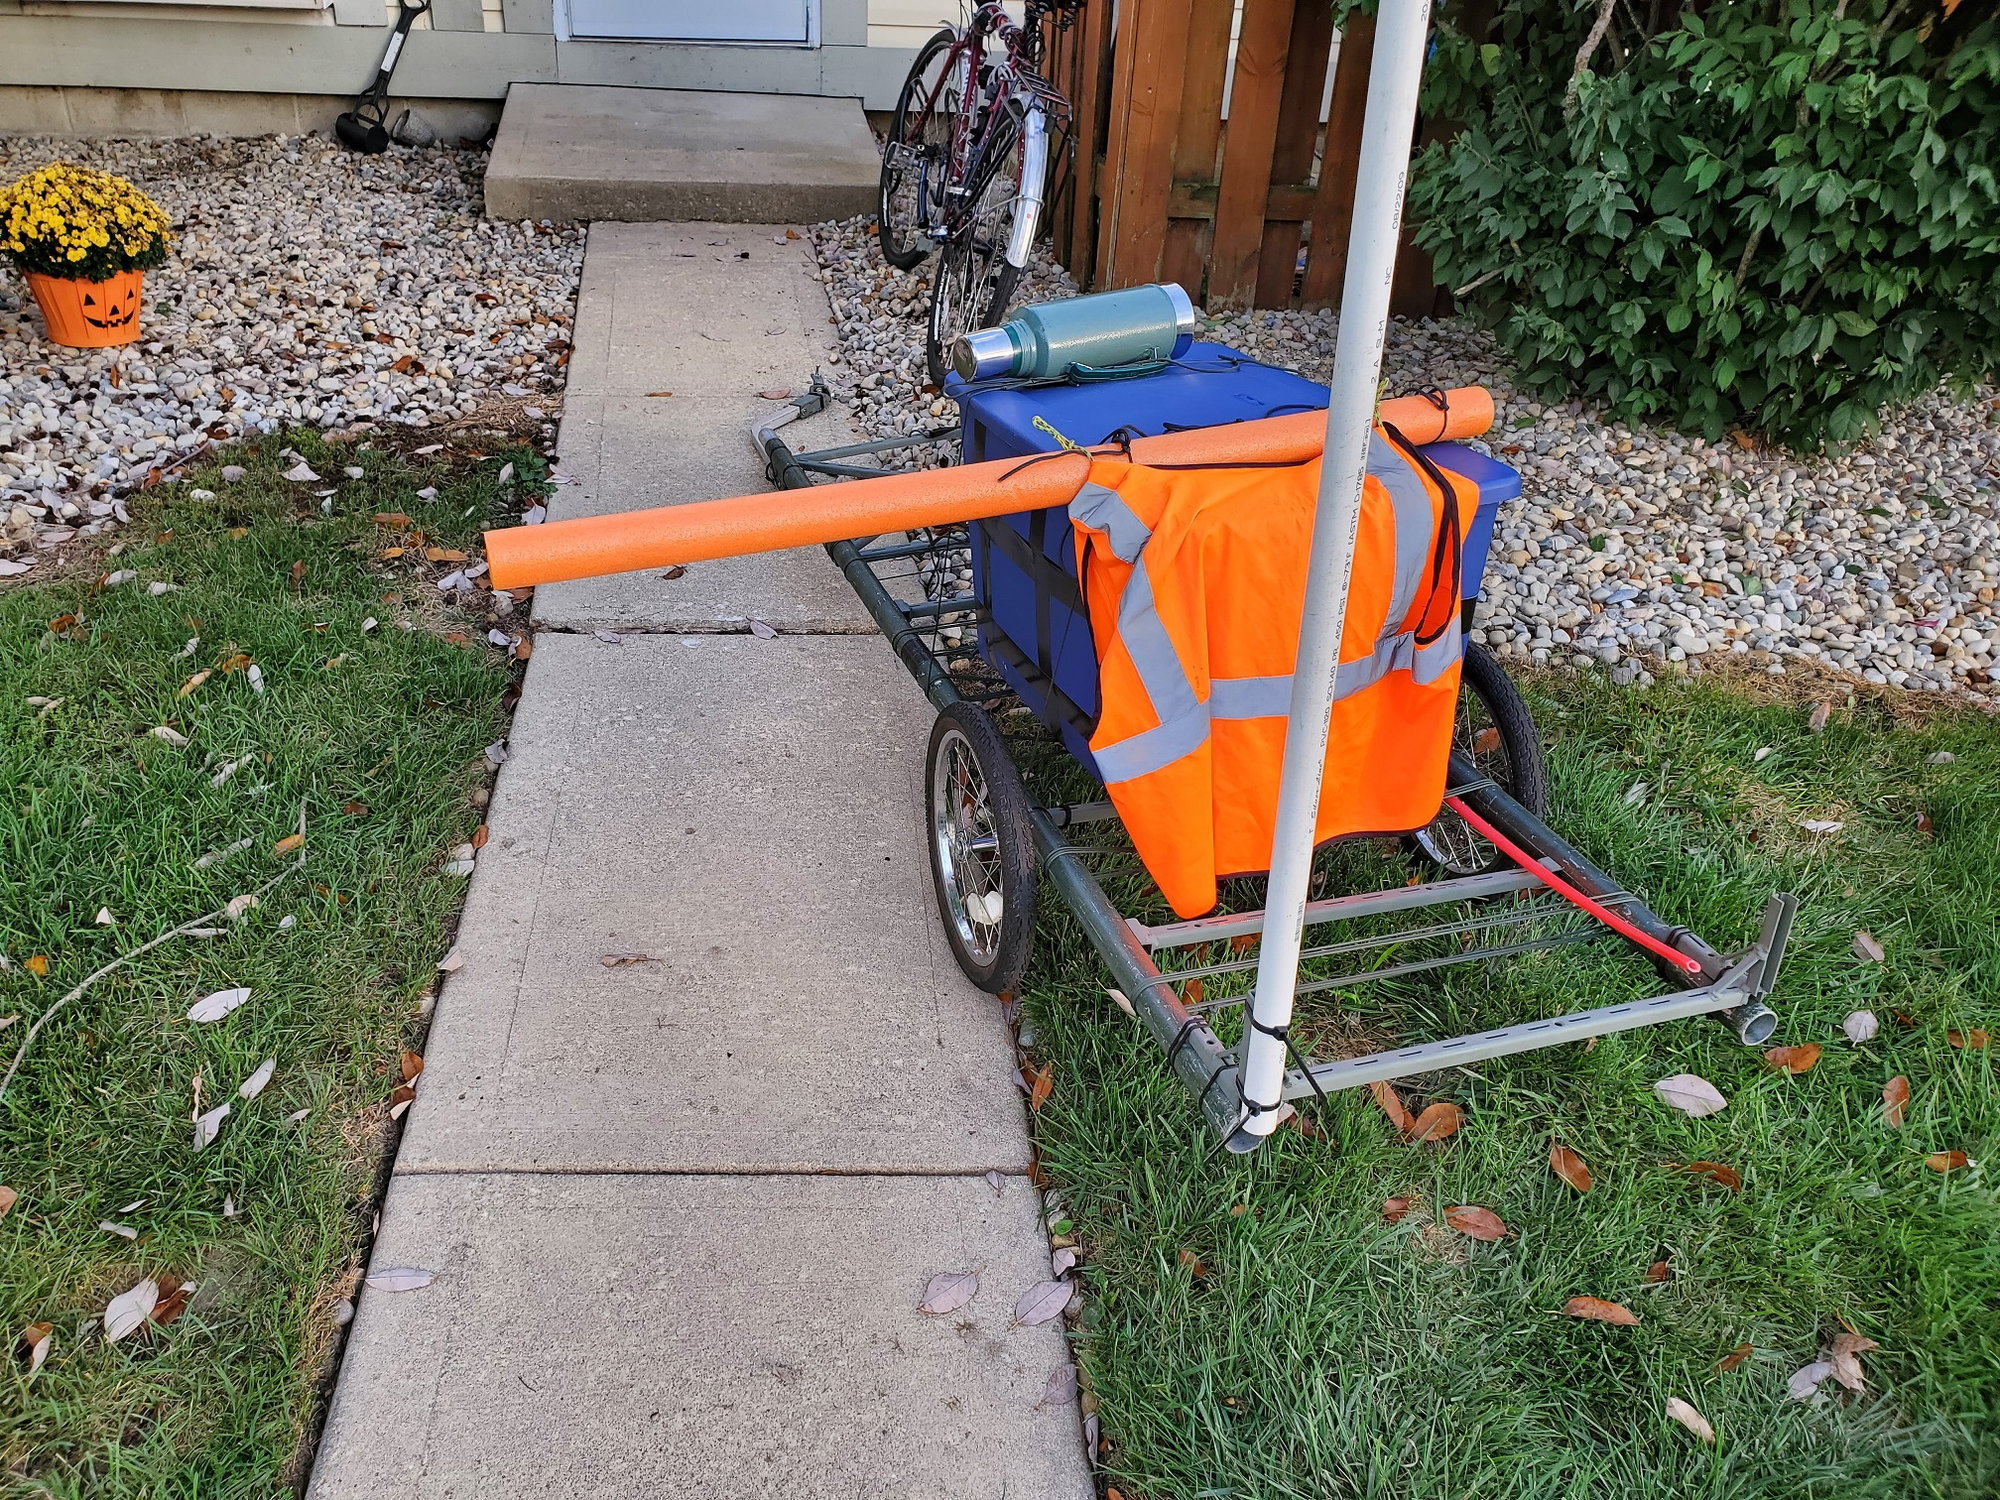

A couple other things to come -
I ordered an aluminum-backed SMV sign (Slow Moving Vehicle - the reflective orange and red triangle). I have looked at them in the past. There is a fabric one that people have mentioned here on the forums a few times. They are interesting - definitely lighter. There are also sticky-backed ones, like bumper stickers. There are also some that are plastic-backed instead of aluminum. I thought through the options and I decided I wanted a rigid one - it will give me more options on how to hang it, and won't blow around as easy and flex in the breeze. So it was between the aluminum and plastic. Aluminum won out because it won't crack up like plastic. We'll see how it works.
I also have new bearings coming. The ones that are on the wheels now are really cheap and seem like they are getting looser and looser. I am hoping the ones I ordered are decent and stay tighter. Depending on the quality of them, I plan on keeping some of the originals as spares in case something goes on a trek I have a way to replace them.
As mentioned earlier with the first heavy torture ride, the axle stubs themselves are holding up pretty good. I am happy to see I haven't had any issues with them. With as hard as they've been "hit" with MUP/road transition crossings, bridge joints, and pot holes - under load - if something was easy to break or bend it surely would have by now. The only concern I have, of metal parts, now is bearings. That will soon be rectified.
I added a piece of PVC pipe. I believe it is 1/2" ID. It fits pretty snug inside the noodle. The purpose is to stiffen up the noodle. The pipe goes through all but the last foot or so. This way the noodle is a lot more rigid. The softer end is there in case a passing car snags it - the foam will simply flex out of the way. Since the whole thing is tied on to the top of the tub, also, it is very easy to rotate with much force. So there still isn't any risk of impact damaging much or throwing my balance.
The rigid noodle also gives me more visibility options - like hanging the orange vest. I was going to hang the orange vest further out, but realized it would blow around a lot more. If I do that I need a rod of some kind to hang from the bottom of the vest to keep it "down".
A couple other things to come -
I ordered an aluminum-backed SMV sign (Slow Moving Vehicle - the reflective orange and red triangle). I have looked at them in the past. There is a fabric one that people have mentioned here on the forums a few times. They are interesting - definitely lighter. There are also sticky-backed ones, like bumper stickers. There are also some that are plastic-backed instead of aluminum. I thought through the options and I decided I wanted a rigid one - it will give me more options on how to hang it, and won't blow around as easy and flex in the breeze. So it was between the aluminum and plastic. Aluminum won out because it won't crack up like plastic. We'll see how it works.
I also have new bearings coming. The ones that are on the wheels now are really cheap and seem like they are getting looser and looser. I am hoping the ones I ordered are decent and stay tighter. Depending on the quality of them, I plan on keeping some of the originals as spares in case something goes on a trek I have a way to replace them.
As mentioned earlier with the first heavy torture ride, the axle stubs themselves are holding up pretty good. I am happy to see I haven't had any issues with them. With as hard as they've been "hit" with MUP/road transition crossings, bridge joints, and pot holes - under load - if something was easy to break or bend it surely would have by now. The only concern I have, of metal parts, now is bearings. That will soon be rectified.
Likes For KC8QVO:

