


Just another weekend...abusing a 1960's-ish Bianchi.
 06-06-23, 09:29 PM
#51

blahblahblah chrome moly

Join Date: Apr 2009
Location: Seattle
Posts: 1,987
Mentioned: 92 Post(s)
Tagged: 0 Thread(s)
Quoted: 1174 Post(s)
Liked 2,569 Times
in
1,073 Posts
Fantastic! One thing off the list.
Now for the 650B's and a 36 hole FW hub shell which should be elusive enough on its own. Wonder if I could make this even more difficult on myself and find a Sturmey FB hub shell. In 36h.
I'm unicorn hunting for no good reason. Again.
-Kurt
Now for the 650B's and a 36 hole FW hub shell which should be elusive enough on its own. Wonder if I could make this even more difficult on myself and find a Sturmey FB hub shell. In 36h.
I'm unicorn hunting for no good reason. Again.
-Kurt
Another helpful fact that you probably already knew: you can use an AW hub shell with your FW guts. The stamped-in name of the hub is the only difference. I might be able to come up with a 36h AW shell, let me know if you need me to look. My S-A stuff is a little buried at the mo, due to a home remodel project. I might have a surplus alloy shell too, LMK if that's interesting to you. A little less reliable since they crack at the spoke holes sometimes. Though the one on my errand bike, with brass washers at the spoke heads, has been reliable for 40+ years of low-mileage around-town use with a heavy rider.
Mark B in Seattle
 06-06-23, 10:05 PM
#52
www.theheadbadge.com
Thread Starter

Join Date: Sep 2005
Location: Southern Florida
Posts: 28,513
Bikes: https://www.theheadbadge.com
Mentioned: 124 Post(s)
Tagged: 0 Thread(s)
Quoted: 2422 Post(s)
Liked 4,393 Times
in
2,092 Posts
I've built a few 40h hubs to 36h rims. Bit of a PITA with the different spoke lengths, but once built, you'll never know. 100% as reliable as with a 36h hub. I seem to remember it's a little easier with 40 in the hub and 32 in the rim but I don't remember why. Fewer spoke lengths? Someone here knows...
Another helpful fact that you probably already knew: you can use an AW hub shell with your FW guts. The stamped-in name of the hub is the only difference. I might be able to come up with a 36h AW shell, let me know if you need me to look. My S-A stuff is a little buried at the mo, due to a home remodel project. I might have a surplus alloy shell too, LMK if that's interesting to you. A little less reliable since they crack at the spoke holes sometimes. Though the one on my errand bike, with brass washers at the spoke heads, has been reliable for 40+ years of low-mileage around-town use with a heavy rider.
Mark B in Seattle
A 36h AW shell - or AB - would be the sensible way out of it, but since I'm already jumping through some extra hoops to stick one more gear in there, I might as well have the correct shell that shows off the effort. I greatly appreciate the offer though.
What era alloy shell? Period or the 1980's? I found out that the latter - in its modern incarnation on the current SRF3 - doesn't have enough clearance at the integrated ball ring to fit the slightly larger FW internals. Found out this the hard way while coming up with the driveline for Blasptwenty.
-Kurt
__________________


06-07-23, 01:20 AM
#53
blahblahblah chrome moly
Join Date: Apr 2009
Location: Seattle
Posts: 1,987
Mentioned: 92 Post(s)
Tagged: 0 Thread(s)
Quoted: 1174 Post(s)
Liked 2,569 Times
in
1,073 Posts
Most of my S-A stuff is 1955 or older. I think a '57 SW might be my newest.
I just looked, I have two 36h alloy shells, both AW, a '52 and a '53. I also have a 36h ASC, alloy shell of course (the only way that hub was offered), but that hub is spoken for, pending payment.
And at least one 36h AW in steel, not so hard to find since they came on Schwinns
My only FW with alloy shell is on a bike I ride. Actually converted to an S-5, with a second shift lever and left-side bellcrank.
Ooh check it out, I have an FG, 4-sp Dynohub. Anyone know, can a Dynohub be used with drum brake guts? They sure look the same, except for the 4 little holes where the Dyno guts bolt in. For me though, it's worth more as a Dynohub. I might use it to power a bright tail light, on the bike that currently has a front Dyno powering the headlight. Those Dynos are wicked heavy though, not good for hillclimb time-trials!
Sorry, getting far afield from the original subject of this thread.
Mark B
Likes For bulgie:
06-07-23, 06:01 AM
#54
Freewheel Medic

Join Date: Oct 2005
Location: An Island on the Coast of GA!
Posts: 12,882
Bikes: Snazzy* Schwinns, Classy Cannondales & a Super Pro Aero Lotus (* Ed.)
Mentioned: 140 Post(s)
Tagged: 0 Thread(s)
Quoted: 1452 Post(s)
Liked 2,195 Times
in
962 Posts
Kurt, I also have some sort of SA hubs with brakes. I'm fairly certain the rear is a 3-speed. Let me take a look and I'll email you pictures and count the spoke holes. They are here with me at home, so no waiting.
__________________
Bob
Enjoying the GA coast all year long!
Thanks for visiting my website: www.freewheelspa.com
Bob
Enjoying the GA coast all year long!
Thanks for visiting my website: www.freewheelspa.com
Likes For pastorbobnlnh:
06-09-23, 05:46 PM
#55
The Huffmeister

Join Date: Jul 2008
Location: The Le Grande HQ
Posts: 2,735
Bikes: '79 Trek 938, '86 Jim Merz Allez SE, '90 Miyata 1000, '68 PX-10, '80 PXN-10, '73 Super Course, '87 Guerciotti, '83 Trek 600, '80 Huffy Le Grande
Mentioned: 45 Post(s)
Tagged: 0 Thread(s)
Quoted: 1225 Post(s)
Liked 3,543 Times
in
1,407 Posts
Okay, let's see this frame drilling happen!
__________________
There were 135 Confentes, but only one...Huffente!

There were 135 Confentes, but only one...Huffente!
Likes For AdventureManCO:
06-09-23, 07:54 PM
#56
www.theheadbadge.com
Thread Starter
Join Date: Sep 2005
Location: Southern Florida
Posts: 28,513
Bikes: https://www.theheadbadge.com
Mentioned: 124 Post(s)
Tagged: 0 Thread(s)
Quoted: 2422 Post(s)
Liked 4,393 Times
in
2,092 Posts
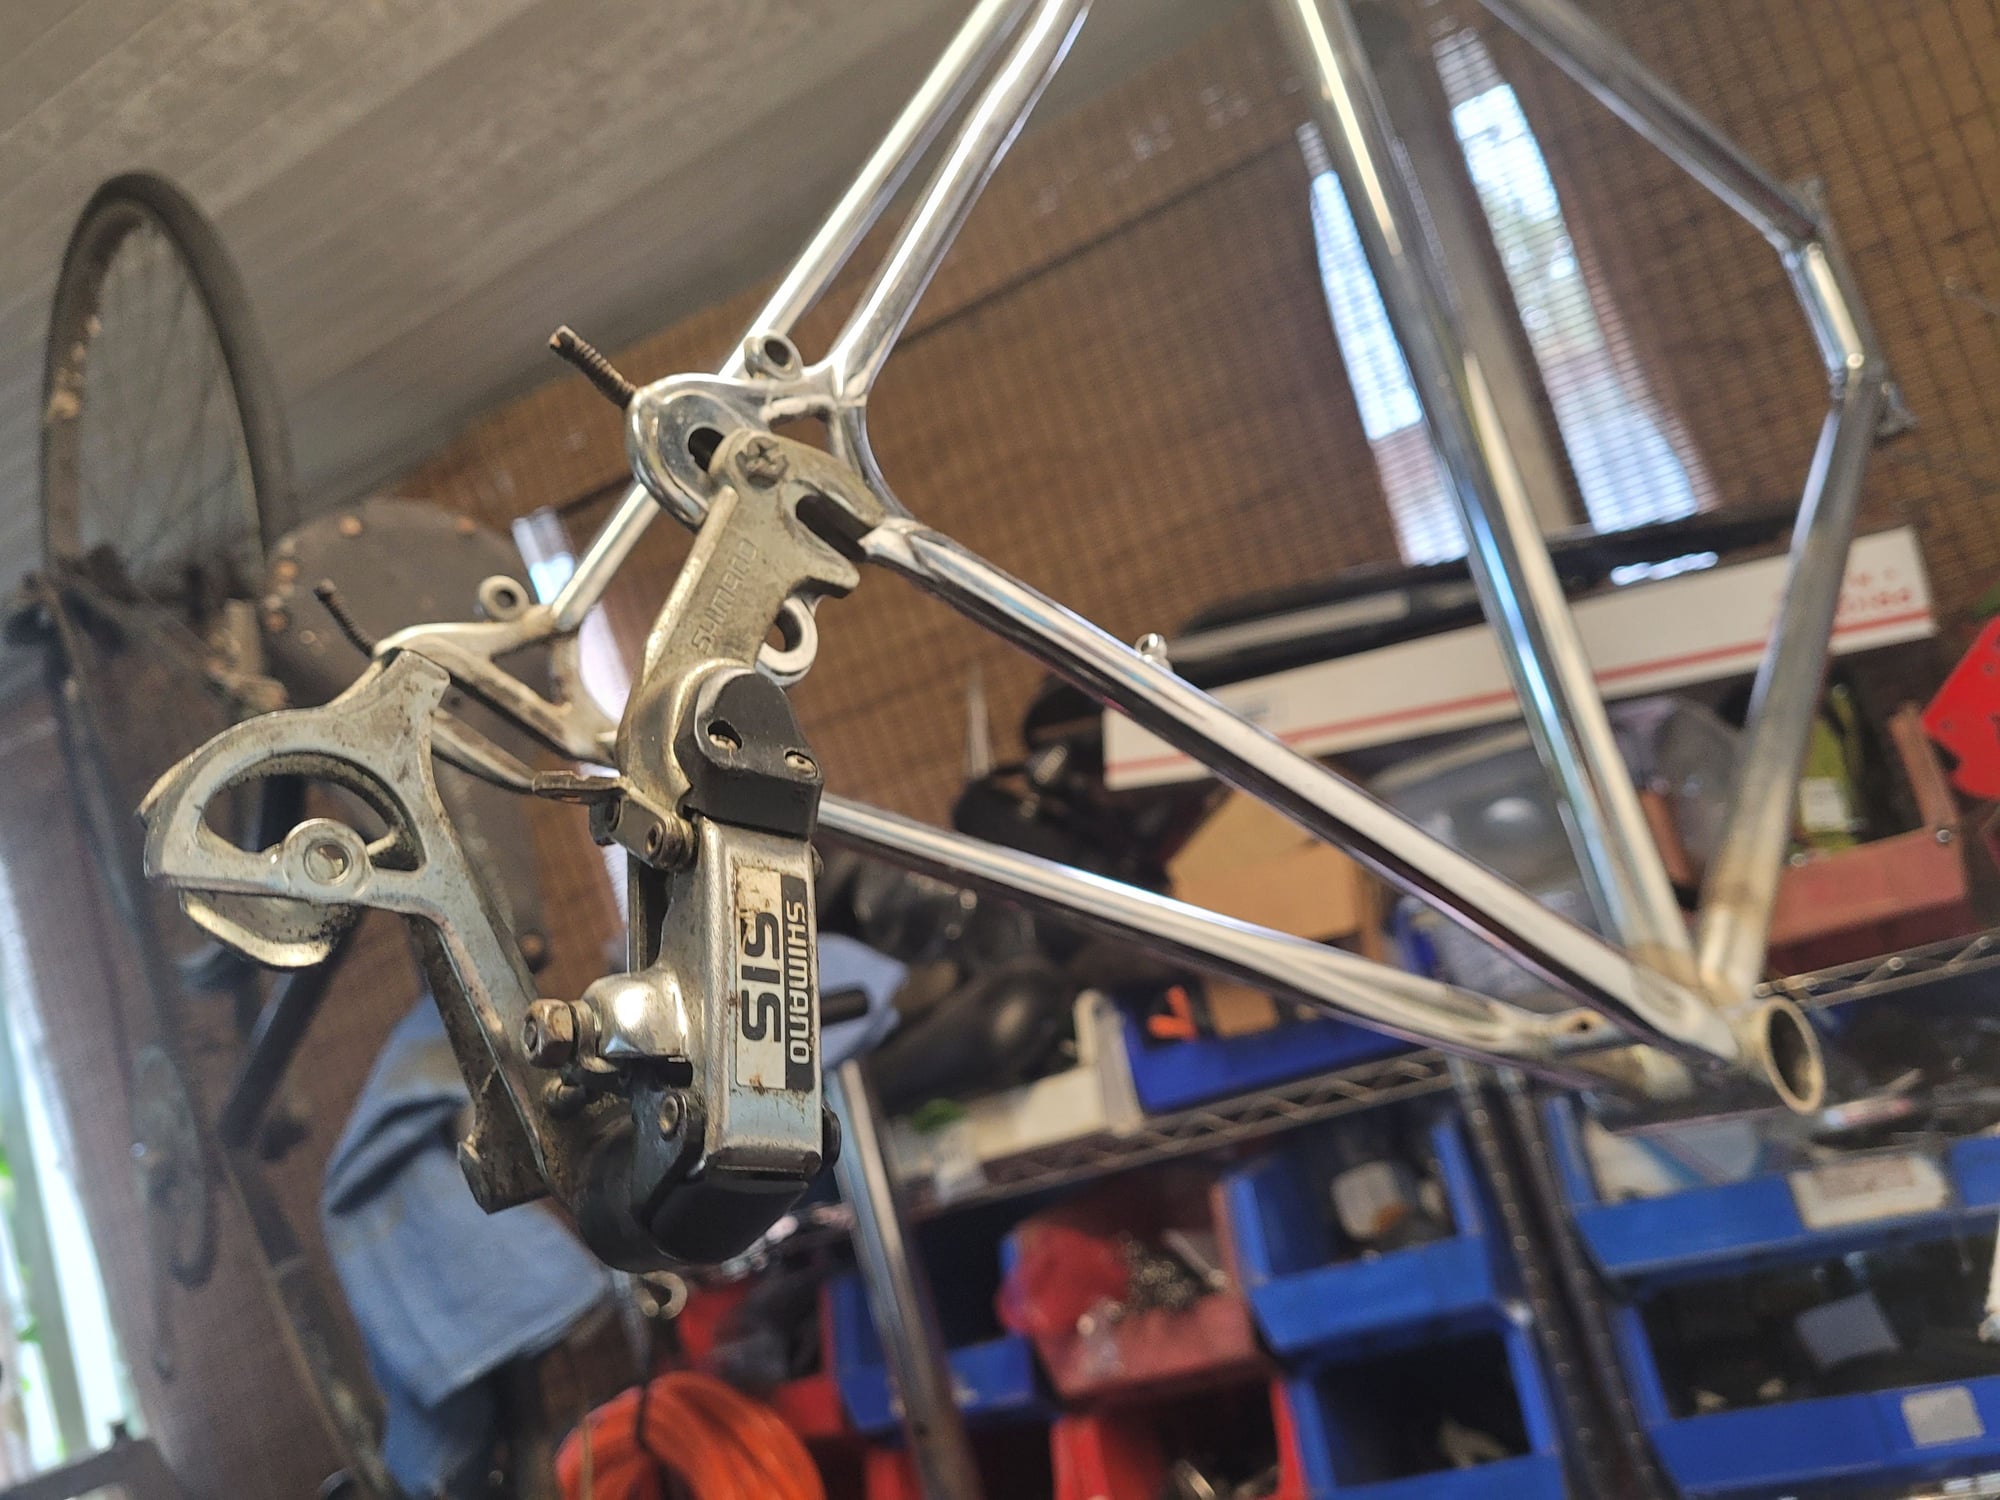
Ok, first to address the Huffyphant in the room:
I mentioned in Adventureman's epic thread the fact that I'd identified a crack in the Bianchi's downtube that I suspected might be a crack in the steel from straightening:

After mulling it over, I also thought that a way to save the frame from that crack would be to drill it out - thus relieving the stress riser - and creating a pass-through for internal lighting.
Given that there's not much to lose in this last-ditch effort to save a clapped-out Bianchi here, hey - why not? I can be the only person nuts enough to be making holes in a Specialissima in 2023. Huzzah, let's hear it for insanity.
But...undoubtedly to the dismay of my fellow Bike Butchers and Dr. Frahmensteens out there, I think we've found nothing more than a crack in the chrome. I shot 150psi worth of compressed air through the bottom bracket through the downtube and nothing at all could be felt. Mind, unlike many frames, the headtube is not drilled on this Bianchi to aid the release of expanding gases during brazing, so whatever I blew up the downtube would come right back out the BB or out the crack. Absolutely nothing is coming out of there.
If anything, we know it hasn't gone through. Maybe I'm wrong and it will open up someday. If it does, it does. So be it, it's a steel frame, after all. These things give fair warning as opposed to your garden variety Crapon Fibber or Crack-n-fails
Far afield is where this project will go, Mark, so please - divert away. Also, that's quite kind of you to offer the FG. I considered running an FG for a brief moment before you mentioned this, but - 1. I don't have a bike with Sturmey drums and 2. I'd rather not duplicate what I have on my '51 Raleigh Sports. Also, our resident Pastor of Disaster has come up with an offer too good to pass up:
Now, that begs the question whether the Bianchi fork is up to the task of a drum brake or not. This horror story of a mild-steel Raleigh fork tacoing from a modern Sturmey drum hub always sticks in my mind whenever I consider putting drum brakes on an old frameset, but I also wonder if it's just an outlier - or a function of using a 90mm brake over the more traditional 70mm:

The fact is that nearly identical forks were used on Raleigh Sports throughout the years with the smaller drums, including the less-beefy 1970's examples on 27"-wheeled Sports models sold in the Netherlands. There shouldn't be any reason the (probably Columbus) Specialissima fork can't support this.
Come to think of it, I ought to page our resident expert from the NL on this. JaccoW, are you free for some drum brake discussion?
-Kurt
I mentioned in Adventureman's epic thread the fact that I'd identified a crack in the Bianchi's downtube that I suspected might be a crack in the steel from straightening:
After mulling it over, I also thought that a way to save the frame from that crack would be to drill it out - thus relieving the stress riser - and creating a pass-through for internal lighting.
Given that there's not much to lose in this last-ditch effort to save a clapped-out Bianchi here, hey - why not? I can be the only person nuts enough to be making holes in a Specialissima in 2023. Huzzah, let's hear it for insanity.
But...undoubtedly to the dismay of my fellow Bike Butchers and Dr. Frahmensteens out there, I think we've found nothing more than a crack in the chrome. I shot 150psi worth of compressed air through the bottom bracket through the downtube and nothing at all could be felt. Mind, unlike many frames, the headtube is not drilled on this Bianchi to aid the release of expanding gases during brazing, so whatever I blew up the downtube would come right back out the BB or out the crack. Absolutely nothing is coming out of there.
If anything, we know it hasn't gone through. Maybe I'm wrong and it will open up someday. If it does, it does. So be it, it's a steel frame, after all. These things give fair warning as opposed to your garden variety Crapon Fibber or Crack-n-fails
Ooh check it out, I have an FG, 4-sp Dynohub. Anyone know, can a Dynohub be used with drum brake guts? They sure look the same, except for the 4 little holes where the Dyno guts bolt in. For me though, it's worth more as a Dynohub. I might use it to power a bright tail light, on the bike that currently has a front Dyno powering the headlight. Those Dynos are wicked heavy though, not good for hillclimb time-trials!
Sorry, getting far afield from the original subject of this thread.
Mark B
Sorry, getting far afield from the original subject of this thread.
Mark B
The fact is that nearly identical forks were used on Raleigh Sports throughout the years with the smaller drums, including the less-beefy 1970's examples on 27"-wheeled Sports models sold in the Netherlands. There shouldn't be any reason the (probably Columbus) Specialissima fork can't support this.
Come to think of it, I ought to page our resident expert from the NL on this. JaccoW, are you free for some drum brake discussion?
-Kurt
__________________
Likes For cudak888:
06-10-23, 06:08 AM
#57
Freewheel Medic
Join Date: Oct 2005
Location: An Island on the Coast of GA!
Posts: 12,882
Bikes: Snazzy* Schwinns, Classy Cannondales & a Super Pro Aero Lotus (* Ed.)
Mentioned: 140 Post(s)
Tagged: 0 Thread(s)
Quoted: 1452 Post(s)
Liked 2,195 Times
in
962 Posts
The SA drum brake hubs that I have are both 36H. The front has a sweet large flange opposite the drum.

Aren't those lovely holes?

Traditional SA charm and function.
Aren't those lovely holes?
Traditional SA charm and function.
__________________
Bob
Enjoying the GA coast all year long!
Thanks for visiting my website: www.freewheelspa.com
Bob
Enjoying the GA coast all year long!
Thanks for visiting my website: www.freewheelspa.com
Likes For pastorbobnlnh:
06-10-23, 06:57 AM
#58
The Huffmeister
Join Date: Jul 2008
Location: The Le Grande HQ
Posts: 2,735
Bikes: '79 Trek 938, '86 Jim Merz Allez SE, '90 Miyata 1000, '68 PX-10, '80 PXN-10, '73 Super Course, '87 Guerciotti, '83 Trek 600, '80 Huffy Le Grande
Mentioned: 45 Post(s)
Tagged: 0 Thread(s)
Quoted: 1225 Post(s)
Liked 3,543 Times
in
1,407 Posts
Shoot, I'm disappointed its just in the chrome...just kidding!
Although I would have liked seeing more carnage, I suppose that downtube has provided enough by itself. Great work.
Is this bike at the level of replacing the downtube if you ever had to? All that chrome...
Although I would have liked seeing more carnage, I suppose that downtube has provided enough by itself. Great work.
Is this bike at the level of replacing the downtube if you ever had to? All that chrome...
__________________
There were 135 Confentes, but only one...Huffente!
There were 135 Confentes, but only one...Huffente!
Likes For AdventureManCO:
06-13-23, 07:06 AM
#59
The Huffmeister
Join Date: Jul 2008
Location: The Le Grande HQ
Posts: 2,735
Bikes: '79 Trek 938, '86 Jim Merz Allez SE, '90 Miyata 1000, '68 PX-10, '80 PXN-10, '73 Super Course, '87 Guerciotti, '83 Trek 600, '80 Huffy Le Grande
Mentioned: 45 Post(s)
Tagged: 0 Thread(s)
Quoted: 1225 Post(s)
Liked 3,543 Times
in
1,407 Posts
The fact that the name 'Huffy' is living in your mind rent-free for a while brings warmth to my heart and a tear to my eye. Whether its the Moulton or the Le Grunge, I'm satisfied.
__________________
There were 135 Confentes, but only one...Huffente!
There were 135 Confentes, but only one...Huffente!
Likes For AdventureManCO:
06-13-23, 03:40 PM
#60
Senior Member
Join Date: Aug 2017
Location: Germany
Posts: 1,090
Bikes: 80s Alan Super Record, 79' Somec Special, 90s Rossin(?) Columbus Ego Triathlon, previously: Bianchi SBX Reparto Corse (stolen) and so on...
Mentioned: 16 Post(s)
Tagged: 0 Thread(s)
Quoted: 391 Post(s)
Liked 812 Times
in
602 Posts
Likes For Lattz:
06-15-23, 07:04 AM
#61
www.theheadbadge.com
Thread Starter
Join Date: Sep 2005
Location: Southern Florida
Posts: 28,513
Bikes: https://www.theheadbadge.com
Mentioned: 124 Post(s)
Tagged: 0 Thread(s)
Quoted: 2422 Post(s)
Liked 4,393 Times
in
2,092 Posts
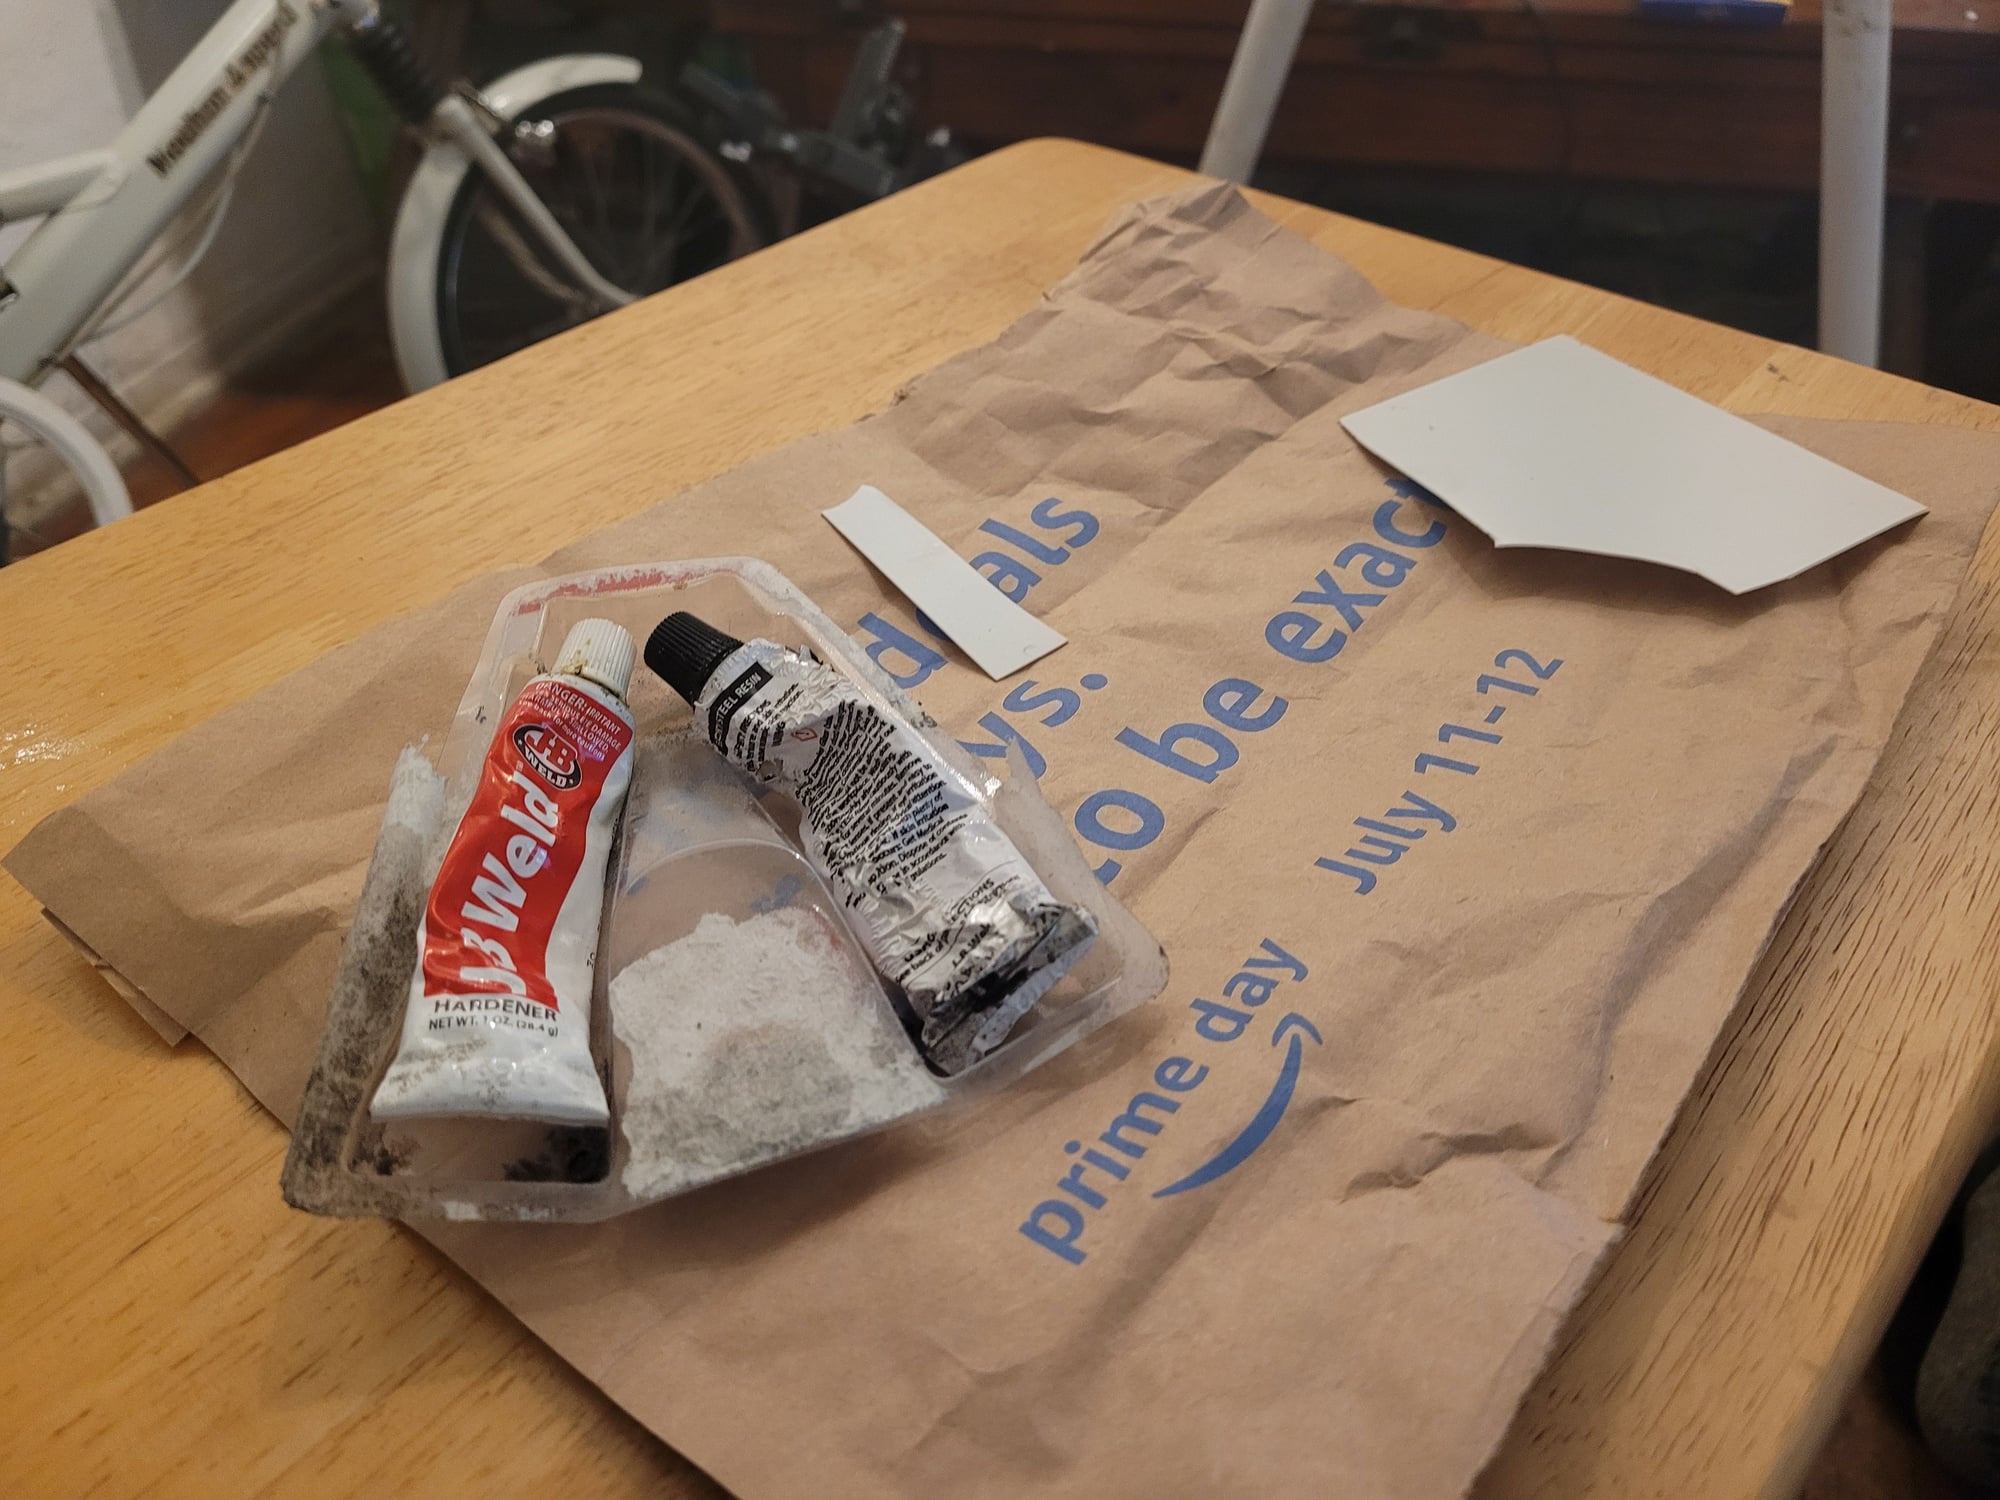
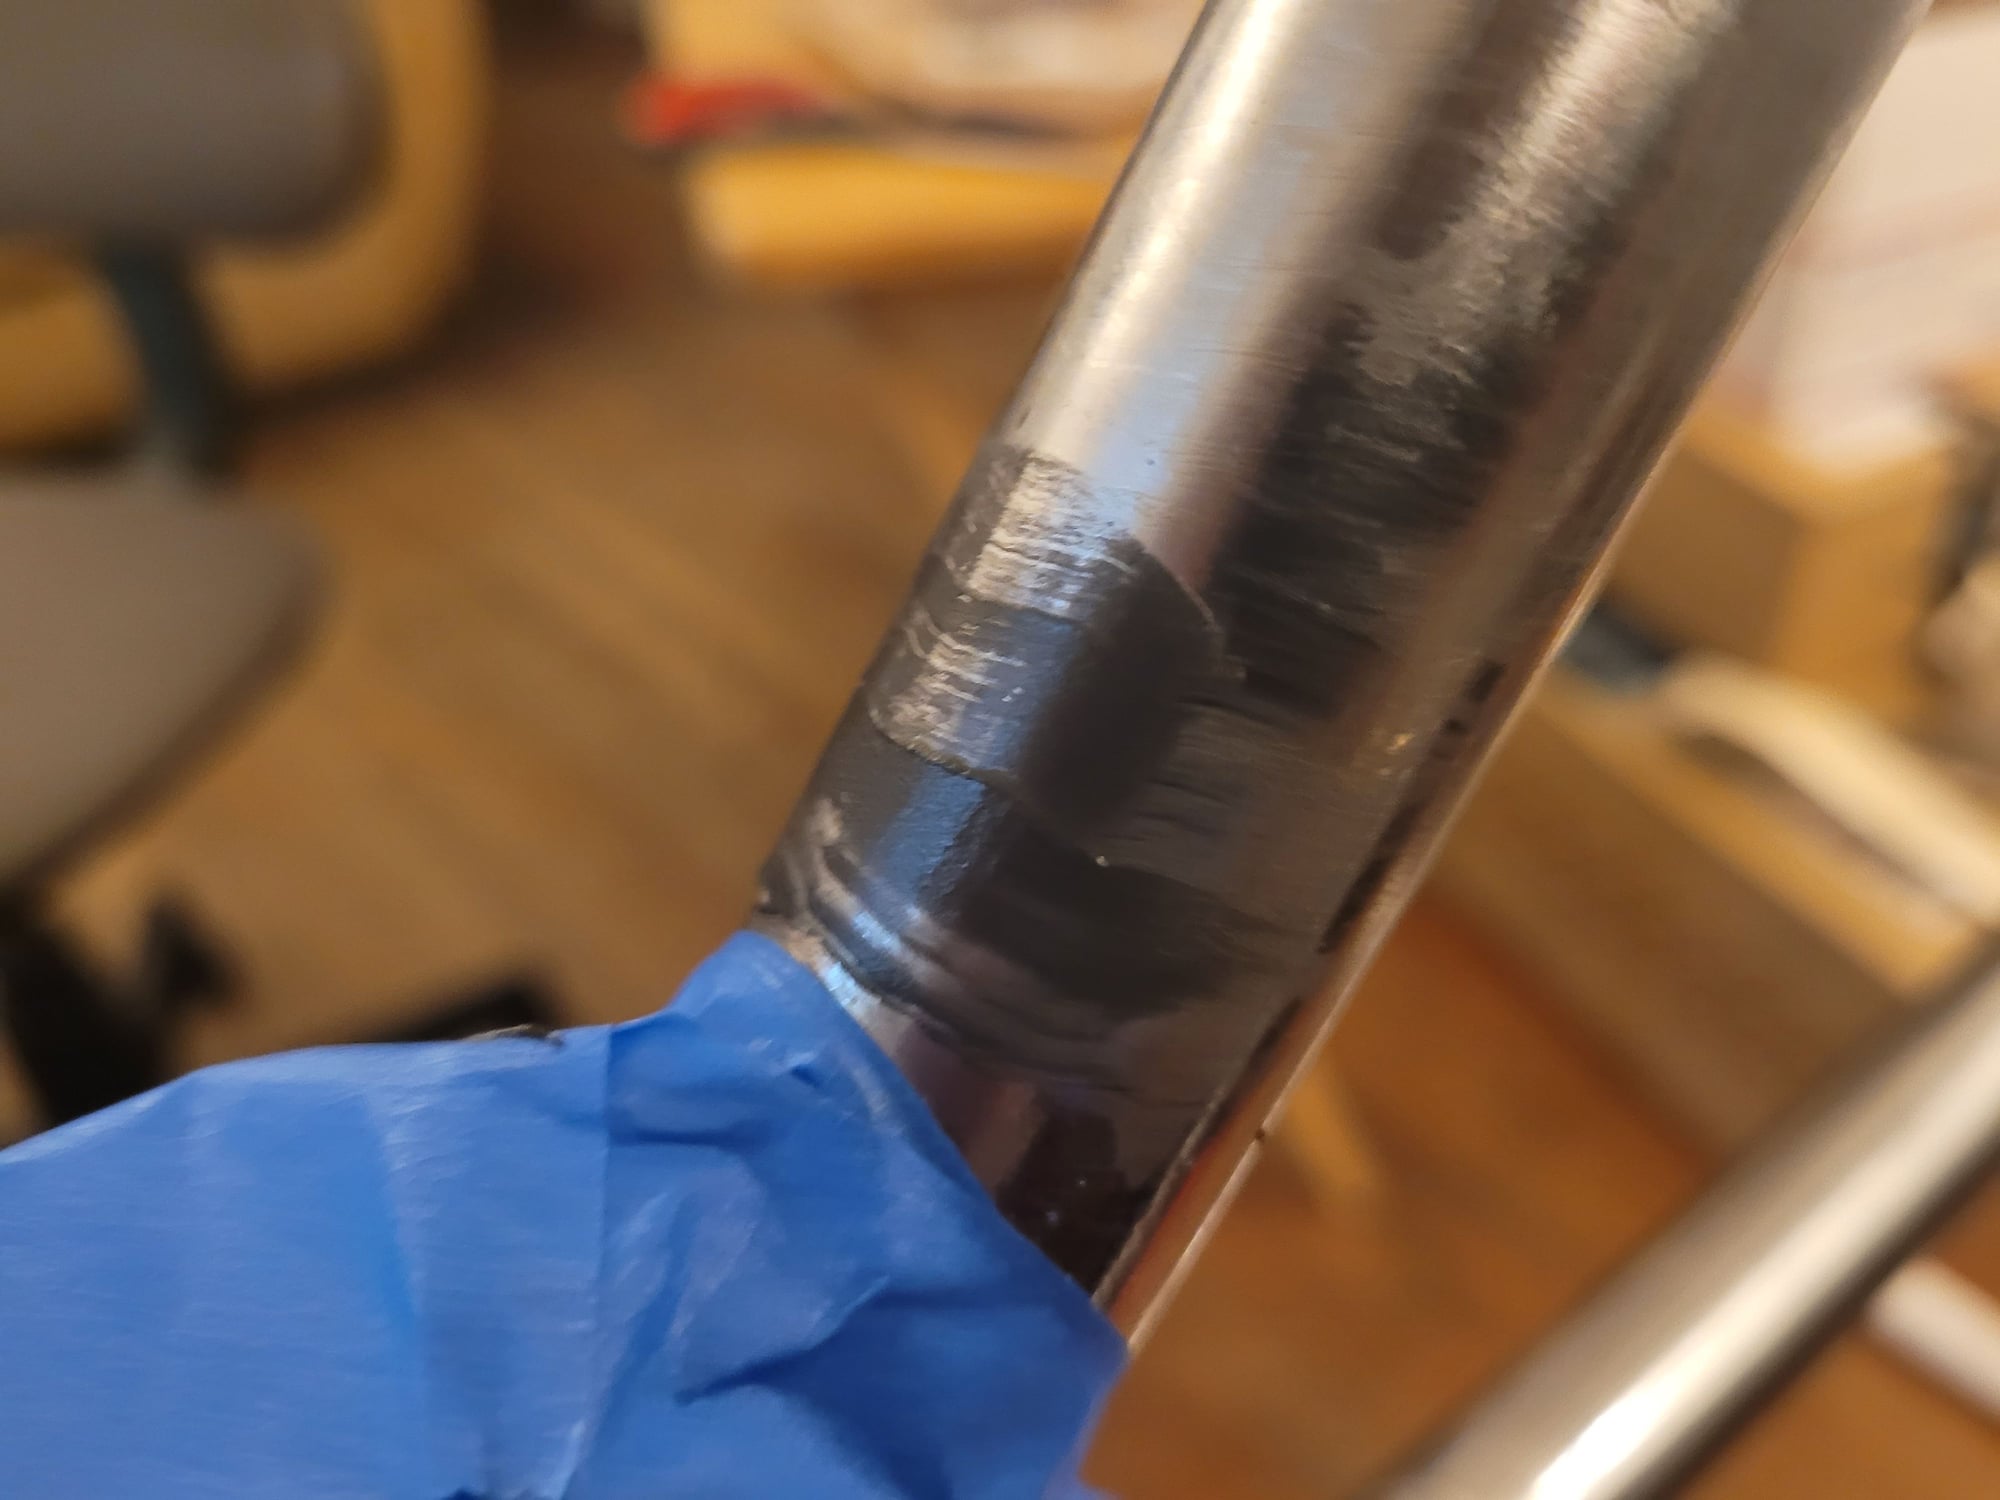
For any of you who've done something as silly as put filler over chrome, I just got my hands on a tube of this to skim the downtube area.
I'm a wee bit concerned about adhesion. What say those of you who've done bodywork - or ill-advised modifications to pitted automotive parts? Should I commit to removing the chrome just behind the lug?

Damn, I let that one out of the bag, didn't I?
Ah, but IGH has always been indexed.
-Kurt
I'm a wee bit concerned about adhesion. What say those of you who've done bodywork - or ill-advised modifications to pitted automotive parts? Should I commit to removing the chrome just behind the lug?
-Kurt
Likes For cudak888:
06-15-23, 08:37 AM
#62
Senior Member

Join Date: Aug 2015
Posts: 3,297
Mentioned: 39 Post(s)
Tagged: 0 Thread(s)
Quoted: 1142 Post(s)
Liked 1,739 Times
in
960 Posts
I think with that putty you need to have your primer down to adhere best.
I would have thought you would be using a 2-part filler epoxy if you want to do before priming
I would have thought you would be using a 2-part filler epoxy if you want to do before priming
Likes For Mr. 66:
06-15-23, 08:53 AM
#63
The Huffmeister
Join Date: Jul 2008
Location: The Le Grande HQ
Posts: 2,735
Bikes: '79 Trek 938, '86 Jim Merz Allez SE, '90 Miyata 1000, '68 PX-10, '80 PXN-10, '73 Super Course, '87 Guerciotti, '83 Trek 600, '80 Huffy Le Grande
Mentioned: 45 Post(s)
Tagged: 0 Thread(s)
Quoted: 1225 Post(s)
Liked 3,543 Times
in
1,407 Posts
Okay, so...question.
Before the goop gets slathered on, I know there was talk about getting some type of wheeled roller type of frame blocks that might be able to more specifically target that area. Although you have taken detailed pictures, there is truly no substitute for an in-person perspective, so you know best.
Do you think there is any chance, w/ the right tool, of getting that tiny little bulge left over, out? Especially if you had a tool, w/ a roller wheel, that can be focused right over the problem-area?
Also, I know there may be some concern over that area after the repair, as in, the future lifespan of that joint. I've heard of folks that have repaired front-end damaged bikes with the bulge down there, only to see it eventually fail prematurely on down the road. That area is getting paint, yes? Only the lug is chrome?
Here is a thought. Just thinking out loud. Let's say your able to get a roller that can concentrate its force over that dent. Then, you are able to get it flat. Of course, with the metal moving that much, there is concern about structural integrity. So, maybe you could take one of those fork crown 'inner tangs' and use it right below the bottom lug, over the now rolled out bulge, with it filed to be a perfect fit mated up to the bottom lug, and silver braze it in place, hopefully at a low enough temperature that you don't disturb the chrome on the lug. At that point, you've rolled the dent and reinforced it just a skosh. That's a lot more work, and some chrome removed under there, but maybe a more permanent solution, without worrying bout the bondo peeling off.
__________________
There were 135 Confentes, but only one...Huffente!
There were 135 Confentes, but only one...Huffente!
Likes For AdventureManCO:
06-16-23, 04:41 AM
#64
www.theheadbadge.com
Thread Starter
Join Date: Sep 2005
Location: Southern Florida
Posts: 28,513
Bikes: https://www.theheadbadge.com
Mentioned: 124 Post(s)
Tagged: 0 Thread(s)
Quoted: 2422 Post(s)
Liked 4,393 Times
in
2,092 Posts
Any recommendations for the latter? I'm not a paint and body fellow at all. The most I've read up on is 2K paint, and I know the two most important things: The base primer and clear have to be 2K for anything to hold up (if I so happen to shoot a 1K color coat between them) and that 2K is an isocyanate and dangerous AF without a full suit and air pumped in from another source (with a "YMMV, I know this is a religious subject" footnote).
Okay, so...question.
Before the goop gets slathered on, I know there was talk about getting some type of wheeled roller type of frame blocks that might be able to more specifically target that area. Although you have taken detailed pictures, there is truly no substitute for an in-person perspective, so you know best.
Do you think there is any chance, w/ the right tool, of getting that tiny little bulge left over, out? Especially if you had a tool, w/ a roller wheel, that can be focused right over the problem-area?
Also, I know there may be some concern over that area after the repair, as in, the future lifespan of that joint. I've heard of folks that have repaired front-end damaged bikes with the bulge down there, only to see it eventually fail prematurely on down the road. That area is getting paint, yes? Only the lug is chrome?
Here is a thought. Just thinking out loud. Let's say your able to get a roller that can concentrate its force over that dent. Then, you are able to get it flat. Of course, with the metal moving that much, there is concern about structural integrity. So, maybe you could take one of those fork crown 'inner tangs' and use it right below the bottom lug, over the now rolled out bulge, with it filed to be a perfect fit mated up to the bottom lug, and silver braze it in place, hopefully at a low enough temperature that you don't disturb the chrome on the lug. At that point, you've rolled the dent and reinforced it just a skosh. That's a lot more work, and some chrome removed under there, but maybe a more permanent solution, without worrying bout the bondo peeling off.
Before the goop gets slathered on, I know there was talk about getting some type of wheeled roller type of frame blocks that might be able to more specifically target that area. Although you have taken detailed pictures, there is truly no substitute for an in-person perspective, so you know best.
Do you think there is any chance, w/ the right tool, of getting that tiny little bulge left over, out? Especially if you had a tool, w/ a roller wheel, that can be focused right over the problem-area?
Also, I know there may be some concern over that area after the repair, as in, the future lifespan of that joint. I've heard of folks that have repaired front-end damaged bikes with the bulge down there, only to see it eventually fail prematurely on down the road. That area is getting paint, yes? Only the lug is chrome?
Here is a thought. Just thinking out loud. Let's say your able to get a roller that can concentrate its force over that dent. Then, you are able to get it flat. Of course, with the metal moving that much, there is concern about structural integrity. So, maybe you could take one of those fork crown 'inner tangs' and use it right below the bottom lug, over the now rolled out bulge, with it filed to be a perfect fit mated up to the bottom lug, and silver braze it in place, hopefully at a low enough temperature that you don't disturb the chrome on the lug. At that point, you've rolled the dent and reinforced it just a skosh. That's a lot more work, and some chrome removed under there, but maybe a more permanent solution, without worrying bout the bondo peeling off.
No silver brazing is going to get that tang on without destroying the lower headlug chrome. At that rate, I'd just cut the downtube out, die grind the steel, and have another downtube installed. That's no problem; it's rechroming the lower headlug that's the problem, e.g., not worth it.
I'm not concerned about the lifespan of the DT joint. If it fails at some point, it fails. It's steel, so I'll likely get a fair advance warning. Plus, it's survived at least part of its years being ridden after the crash with a basket strapped to the back and a whole lot of other "OMG, it's going to break" hobo transport modifications on it, so if it was going to fail, well, it already had a chance to do so.
-Kurt
__________________
06-16-23, 06:14 AM
#65
Senior Member
Join Date: Aug 2017
Location: Germany
Posts: 1,090
Bikes: 80s Alan Super Record, 79' Somec Special, 90s Rossin(?) Columbus Ego Triathlon, previously: Bianchi SBX Reparto Corse (stolen) and so on...
Mentioned: 16 Post(s)
Tagged: 0 Thread(s)
Quoted: 391 Post(s)
Liked 812 Times
in
602 Posts
With all honesty, why don't you just leave it alone unless you find the experimenting itself fun (I know thats also a factor sometimes, but I'm clumsy enough to end up with worse results than the starting point). It's not on the top or side, where it would always be an attention catcher. Sneeze some paint on it, decals if you wish and put it together.
If it rides good, you'll less and less think of it, but if you make any "improvements" toward the "it's not worth to do anything beyond this point" you'll end up with the "I shouldn't have done that".
BUT(t) even if worse happens, I know a bailout plan for you on Subito. CDM frame, perfect chrome, one fork tube is made by rotten tomato. I don't know what chrome jobs cost in the States these days in states where it is allowed at all, but here its really no cheapo.
If it rides good, you'll less and less think of it, but if you make any "improvements" toward the "it's not worth to do anything beyond this point" you'll end up with the "I shouldn't have done that".
BUT(t) even if worse happens, I know a bailout plan for you on Subito. CDM frame, perfect chrome, one fork tube is made by rotten tomato.
I don't know what chrome jobs cost in the States these days in states where it is allowed at all, but here its really no cheapo.
Last edited by Lattz; 06-16-23 at 01:25 PM.
06-16-23, 05:29 PM
#66
Senior Member
Join Date: Aug 2015
Posts: 3,297
Mentioned: 39 Post(s)
Tagged: 0 Thread(s)
Quoted: 1142 Post(s)
Liked 1,739 Times
in
960 Posts
Oh, don't worry, I've had my doubts, but wasn't 100% sure.
Any recommendations for the latter? I'm not a paint and body fellow at all. The most I've read up on is 2K paint, and I know the two most important things: The base primer and clear have to be 2K for anything to hold up (if I so happen to shoot a 1K color coat between them) and that 2K is an isocyanate and dangerous AF without a full suit and air pumped in from another source (with a "YMMV, I know this is a religious subject" footnote).
-Kurt
06-29-23, 08:34 PM
#67
The Huffmeister
Join Date: Jul 2008
Location: The Le Grande HQ
Posts: 2,735
Bikes: '79 Trek 938, '86 Jim Merz Allez SE, '90 Miyata 1000, '68 PX-10, '80 PXN-10, '73 Super Course, '87 Guerciotti, '83 Trek 600, '80 Huffy Le Grande
Mentioned: 45 Post(s)
Tagged: 0 Thread(s)
Quoted: 1225 Post(s)
Liked 3,543 Times
in
1,407 Posts
Forget all the new bikes you've been getting every day, we need updates on this one.
__________________
There were 135 Confentes, but only one...Huffente!
There were 135 Confentes, but only one...Huffente!
06-29-23, 09:57 PM
#68
www.theheadbadge.com
Thread Starter
Join Date: Sep 2005
Location: Southern Florida
Posts: 28,513
Bikes: https://www.theheadbadge.com
Mentioned: 124 Post(s)
Tagged: 0 Thread(s)
Quoted: 2422 Post(s)
Liked 4,393 Times
in
2,092 Posts
With all honesty, why don't you just leave it alone unless you find the experimenting itself fun (I know thats also a factor sometimes, but I'm clumsy enough to end up with worse results than the starting point). It's not on the top or side, where it would always be an attention catcher. Sneeze some paint on it, decals if you wish and put it together.
If it rides good, you'll less and less think of it, but if you make any "improvements" toward the "it's not worth to do anything beyond this point" you'll end up with the "I shouldn't have done that".
If it rides good, you'll less and less think of it, but if you make any "improvements" toward the "it's not worth to do anything beyond this point" you'll end up with the "I shouldn't have done that".
Not really, I know that NAPA, and others auto paint supply, will most likely have a 2part but that would like a pint or quart of product. It would be easy to use for sure. I thought about it when I did the repaint of the TI Raleigh but I went with the old standard of J&B Weld applied with a clean straight edge. On the Raleigh the spots were small I used a single edge reinforced razor blade. It smoothed out great one pass light biff sand, like one to 5 scrubs with 300 grit sandpaper, prime, another biff sand 600 grit.
At most, I might spray enamel and see about getting someone else to spray a 2K clear on top of that, but I'm still worried that this needs epoxy primer on it for anything to really stick.
-Kurt
__________________
06-29-23, 11:36 PM
#69
The Huffmeister
Join Date: Jul 2008
Location: The Le Grande HQ
Posts: 2,735
Bikes: '79 Trek 938, '86 Jim Merz Allez SE, '90 Miyata 1000, '68 PX-10, '80 PXN-10, '73 Super Course, '87 Guerciotti, '83 Trek 600, '80 Huffy Le Grande
Mentioned: 45 Post(s)
Tagged: 0 Thread(s)
Quoted: 1225 Post(s)
Liked 3,543 Times
in
1,407 Posts
Likes For AdventureManCO:
06-30-23, 09:09 AM
#70
Senior Member
Join Date: Aug 2015
Posts: 3,297
Mentioned: 39 Post(s)
Tagged: 0 Thread(s)
Quoted: 1142 Post(s)
Liked 1,739 Times
in
960 Posts
When I did the 2k paint I set up my paint booth I strategically placed an exhaust fan opposite of the bike to spray gun, used a voc respirator, and went with full cover clothing. I did not do the tyvex suit, that would have been ideal cover. The amount of exposure is a very short time per coat, walk away, come back after it dries, repeat as needed.
I'll try the 2k paints again, they worked out very well.
I'll try the 2k paints again, they worked out very well.
Likes For Mr. 66:
06-30-23, 09:49 AM
#71
www.theheadbadge.com
Thread Starter
Join Date: Sep 2005
Location: Southern Florida
Posts: 28,513
Bikes: https://www.theheadbadge.com
Mentioned: 124 Post(s)
Tagged: 0 Thread(s)
Quoted: 2422 Post(s)
Liked 4,393 Times
in
2,092 Posts
When I did the 2k paint I set up my paint booth I strategically placed an exhaust fan opposite of the bike to spray gun, used a voc respirator, and went with full cover clothing. I did not do the tyvex suit, that would have been ideal cover. The amount of exposure is a very short time per coat, walk away, come back after it dries, repeat as needed.
I'll try the 2k paints again, they worked out very well.
I'll try the 2k paints again, they worked out very well.
-Kurt
__________________
06-30-23, 04:09 PM
#72
www.theheadbadge.com
Thread Starter
Join Date: Sep 2005
Location: Southern Florida
Posts: 28,513
Bikes: https://www.theheadbadge.com
Mentioned: 124 Post(s)
Tagged: 0 Thread(s)
Quoted: 2422 Post(s)
Liked 4,393 Times
in
2,092 Posts

__________________
Likes For cudak888:
07-01-23, 08:43 AM
#73
Senior Member
Join Date: Aug 2015
Posts: 3,297
Mentioned: 39 Post(s)
Tagged: 0 Thread(s)
Quoted: 1142 Post(s)
Liked 1,739 Times
in
960 Posts
I don't remember, I used Spraymax 2k primer and flat black.
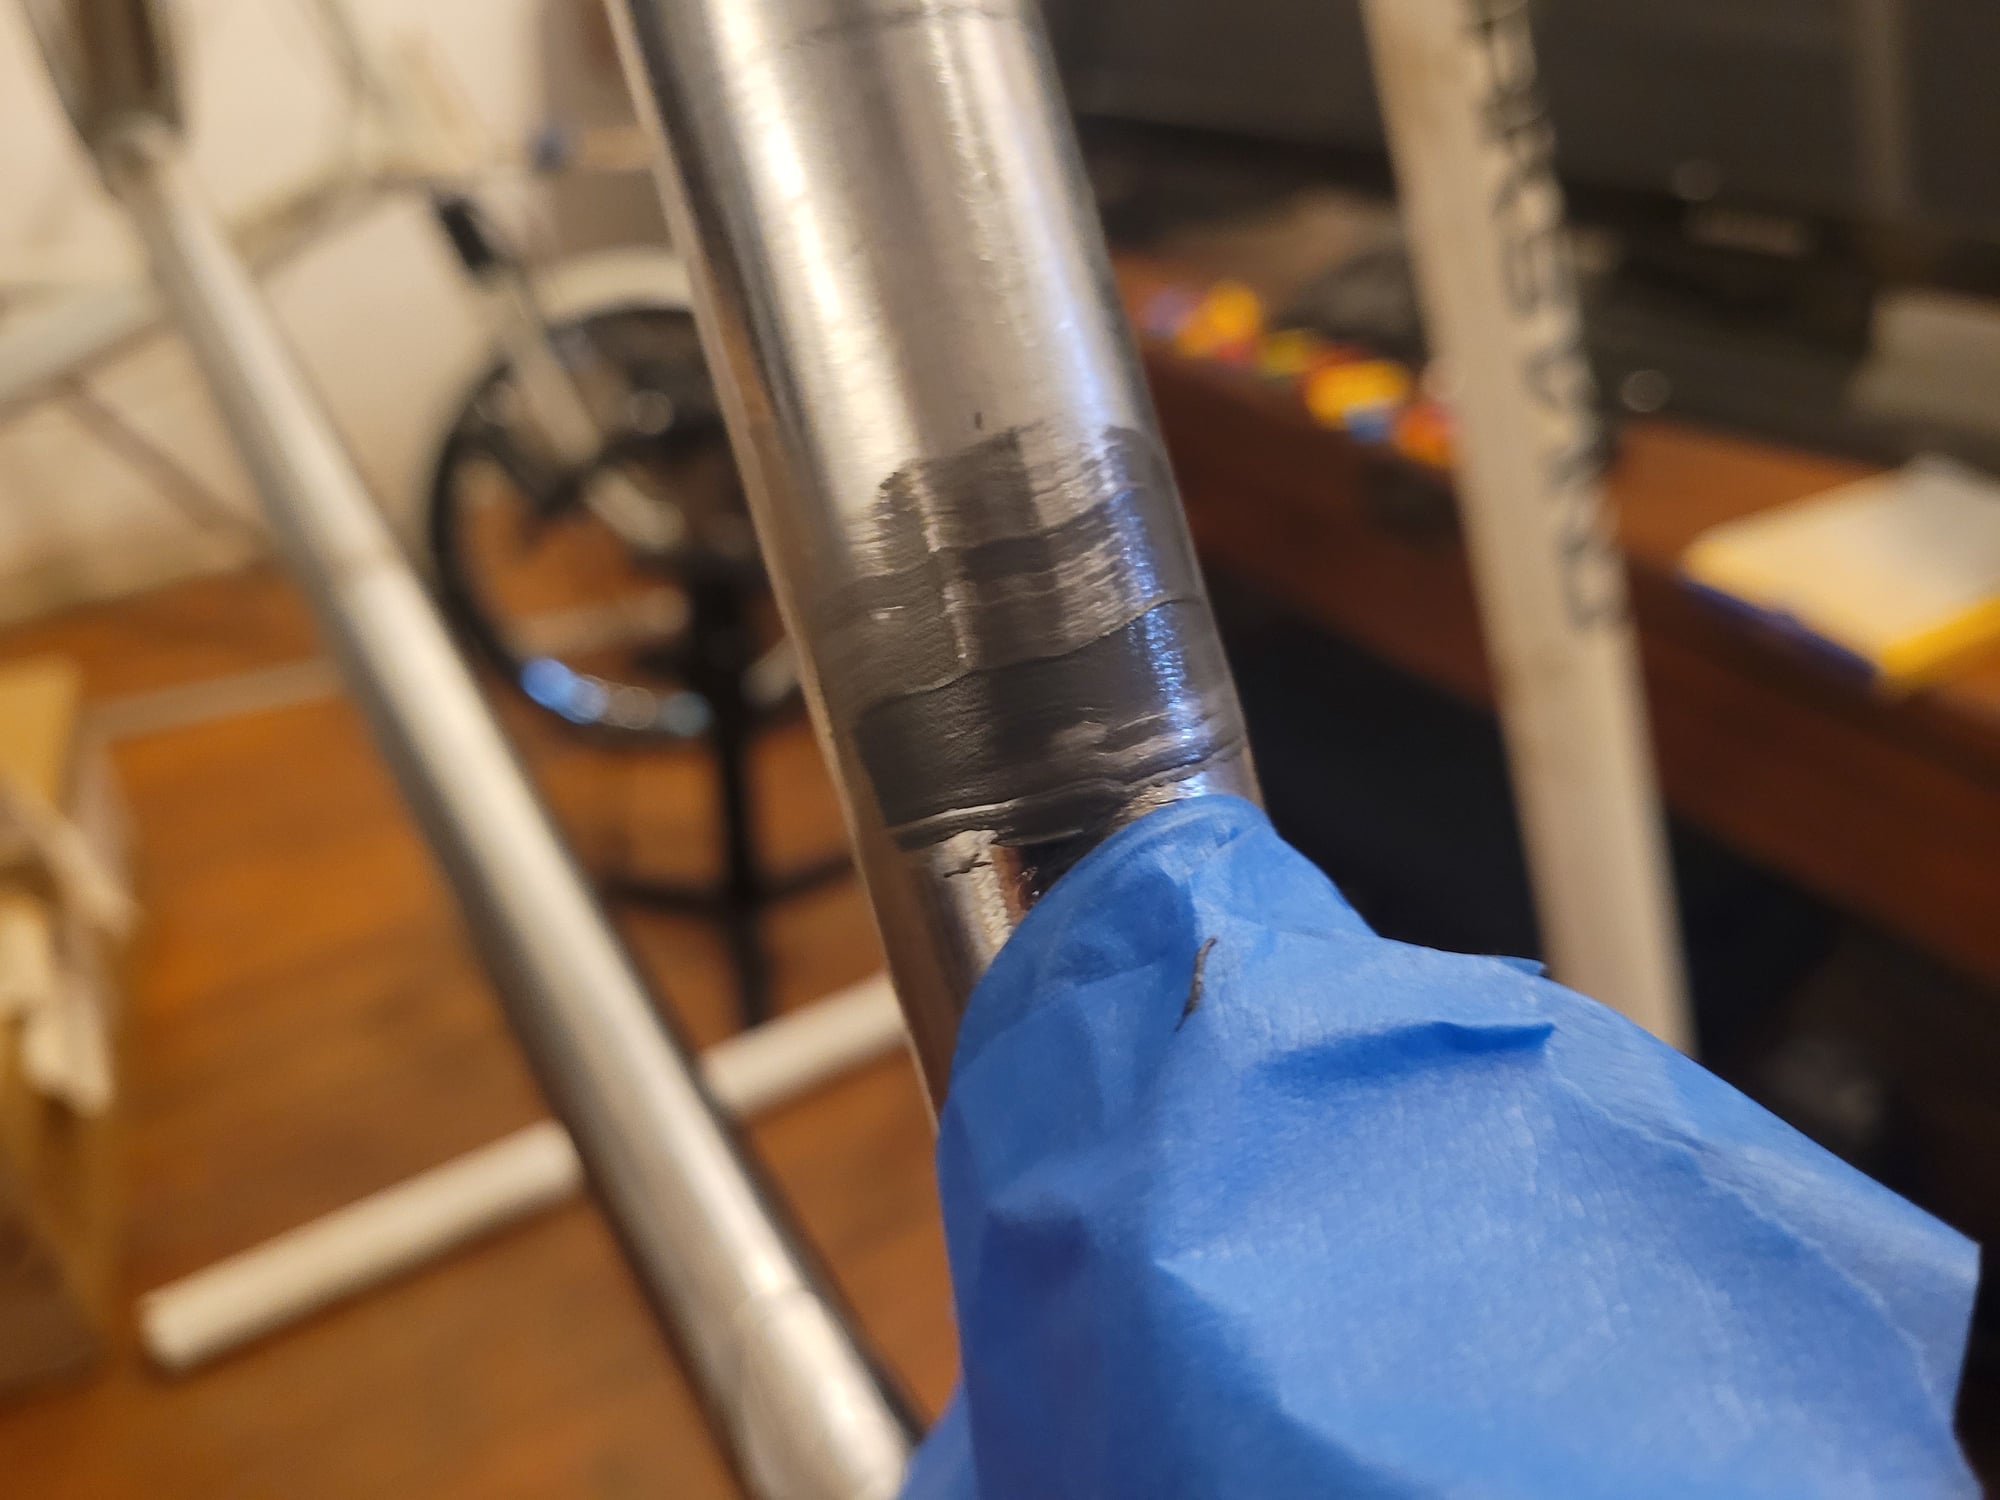
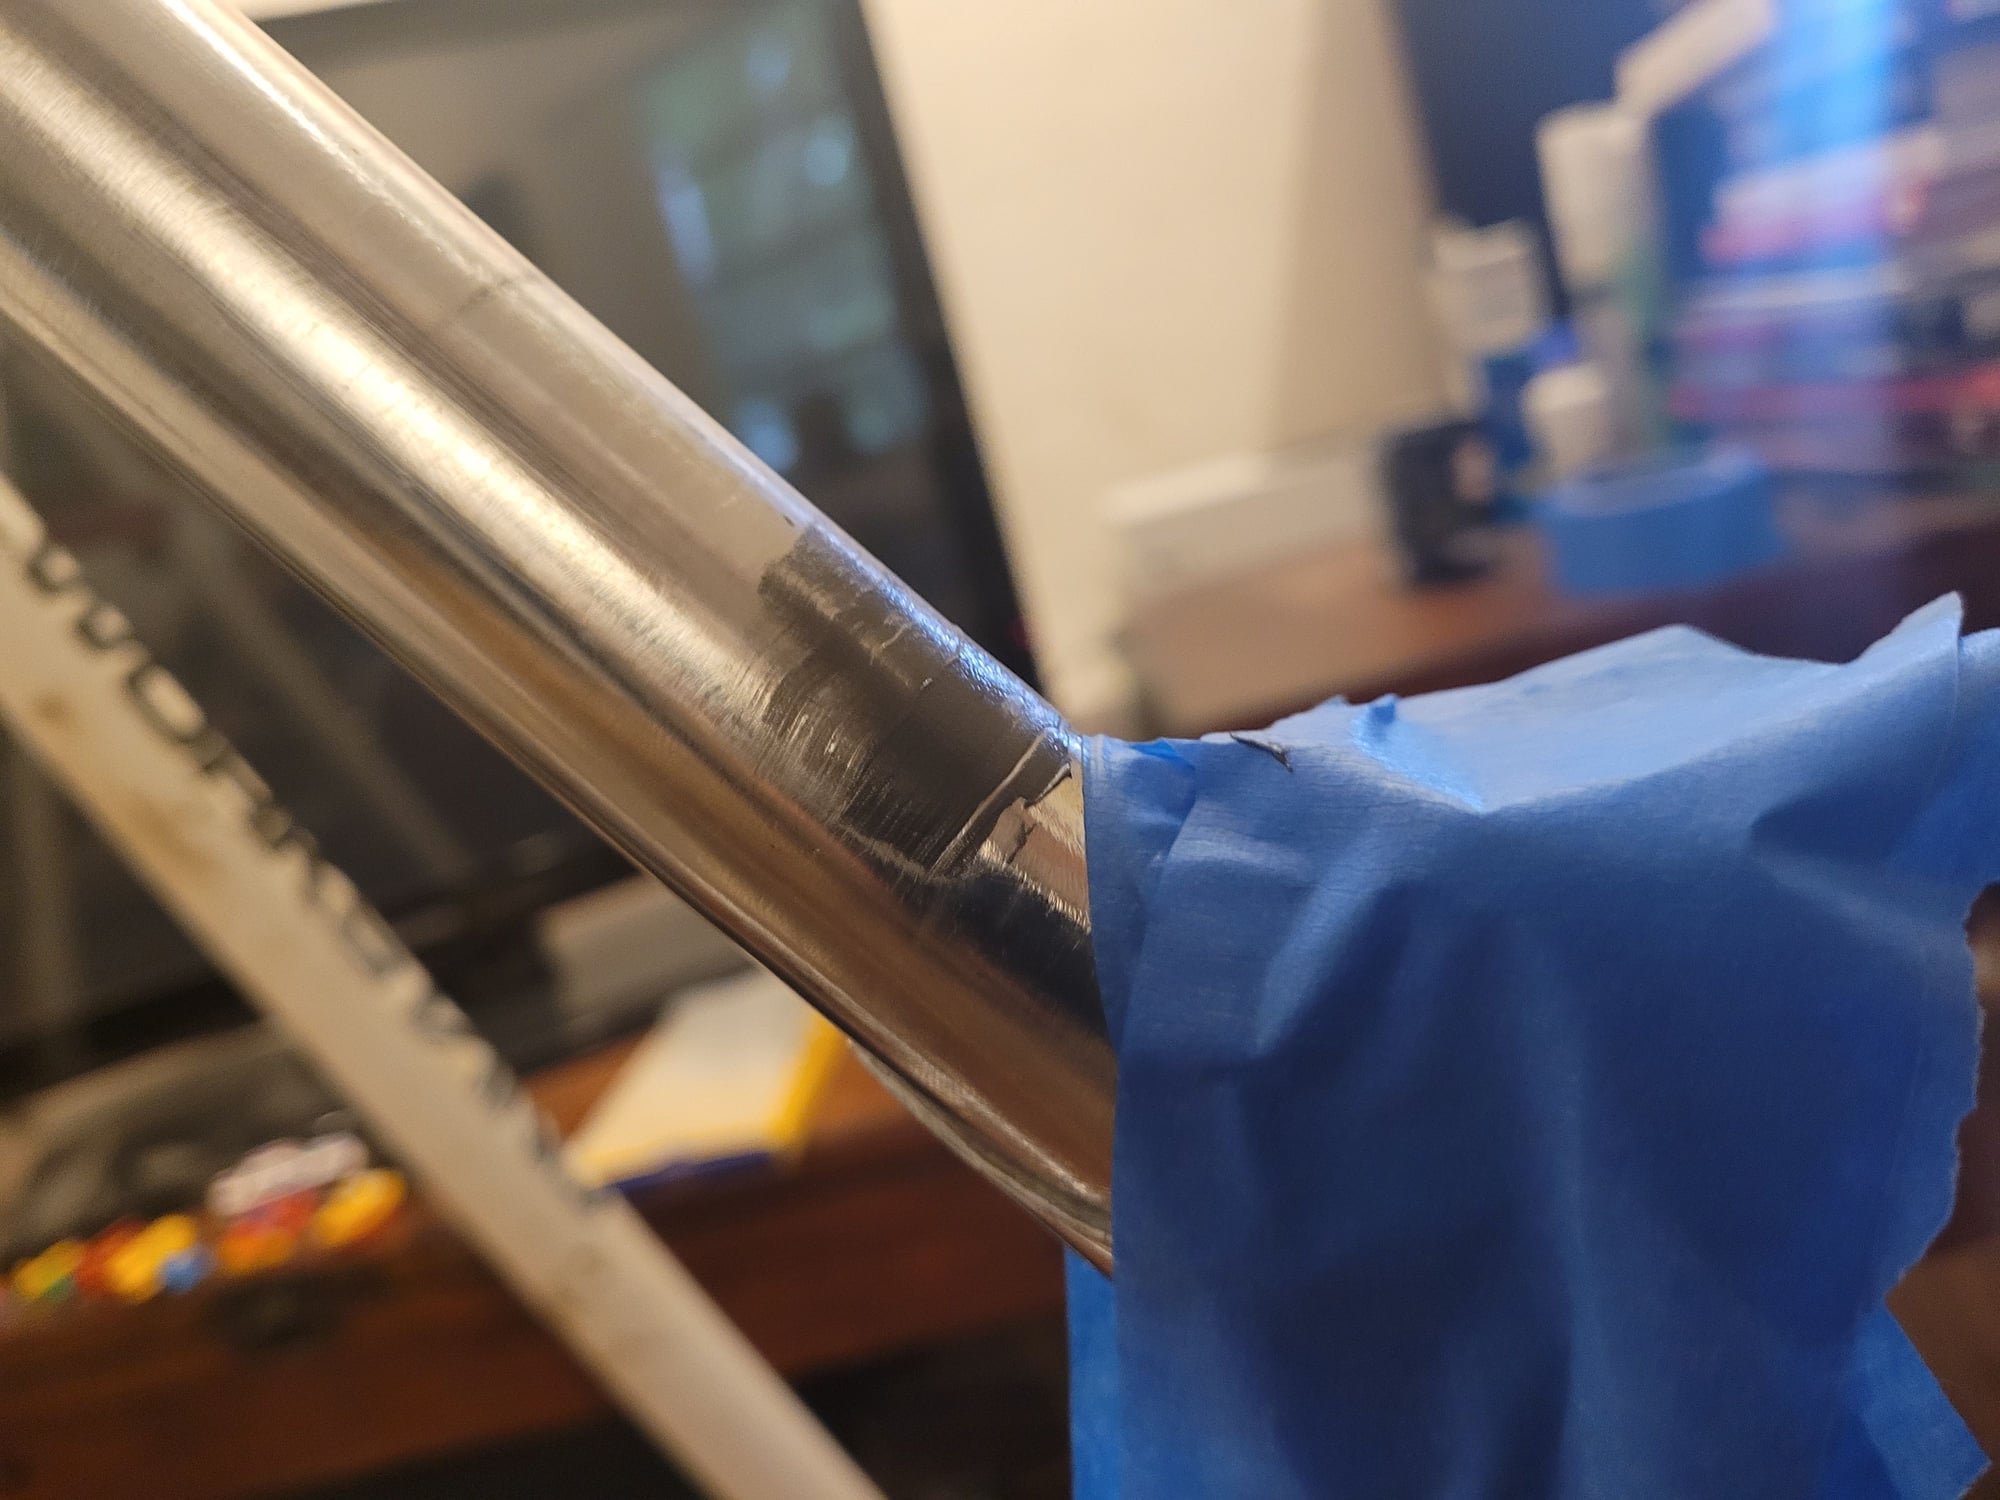
And as a side note, your epoxy fill looks a little rougher than I thought it would. Is that an old spackle knife used? You may need to do a couple of rounds of detail sand and repeat application or two, in order to get the right look.
And as a side note, your epoxy fill looks a little rougher than I thought it would. Is that an old spackle knife used? You may need to do a couple of rounds of detail sand and repeat application or two, in order to get the right look.
07-01-23, 09:14 AM
#74
The Huffmeister
Join Date: Jul 2008
Location: The Le Grande HQ
Posts: 2,735
Bikes: '79 Trek 938, '86 Jim Merz Allez SE, '90 Miyata 1000, '68 PX-10, '80 PXN-10, '73 Super Course, '87 Guerciotti, '83 Trek 600, '80 Huffy Le Grande
Mentioned: 45 Post(s)
Tagged: 0 Thread(s)
Quoted: 1225 Post(s)
Liked 3,543 Times
in
1,407 Posts
__________________
There were 135 Confentes, but only one...Huffente!
There were 135 Confentes, but only one...Huffente!
07-01-23, 09:58 AM
#75
www.theheadbadge.com
Thread Starter
Join Date: Sep 2005
Location: Southern Florida
Posts: 28,513
Bikes: https://www.theheadbadge.com
Mentioned: 124 Post(s)
Tagged: 0 Thread(s)
Quoted: 2422 Post(s)
Liked 4,393 Times
in
2,092 Posts
I don't remember, I used Spraymax 2k primer and flat black.
And as a side note, your epoxy fill looks a little rougher than I thought it would. Is that an old spackle knife used? You may need to do a couple of rounds of detail sand and repeat application or two, in order to get the right look.
And as a side note, your epoxy fill looks a little rougher than I thought it would. Is that an old spackle knife used? You may need to do a couple of rounds of detail sand and repeat application or two, in order to get the right look.
They're scrap styrene plastic pieces. I wasn't going for a smooth finish as much as I was going for high build. The intent is to overfill the area and sand it down; partially just to get a feel for how well the JB sticks in the first place.
The Bianchi sends its regards and hopes it can someday meet it's almighty peer.
-Kurt
__________________
Likes For cudak888: