


Quill Stems
 06-27-22, 10:13 PM
#1

Senior Member
Thread Starter
Join Date: Aug 2012
Location: Seattle
Posts: 507
Mentioned: 0 Post(s)
Tagged: 0 Thread(s)
Quoted: 103 Post(s)
Liked 144 Times
in
88 Posts
Quill Stems
I have a few older bikes that have configurations that i'm not that fond of and I'd like to replace the stem/bar combo. What better excuse to make a few quill stems. All told, I'll make 4. 1 will have a Paragon bar clamp. The others are made from raw stock.
I started by cutting/facing some 1.125" x 0.065" tube into 1.39" sections for the bar clamp. This picture shows the paragon clamp I had and my binder holder.


Four brazed bar clamps and 4 mitered extensions

Clamps brazed onto the extensions
Using my Alex Meade framebuilding tools to ensure the clamp is perpendicular to the quill miter.

Ready for to have some quills added. Mitered at 17* for standard road bike.
I will need to ream the bar clamp before brazing on the quills as the quill will not clear my lathe. I'll get that later this week. I may also slot the bar clamp. On my little mill, the steerer clamp/quill gets in the way. Just thought of that as I was looking at the pictures!
Thanks for following along.
I started by cutting/facing some 1.125" x 0.065" tube into 1.39" sections for the bar clamp. This picture shows the paragon clamp I had and my binder holder.
Four brazed bar clamps and 4 mitered extensions
Clamps brazed onto the extensions
Using my Alex Meade framebuilding tools to ensure the clamp is perpendicular to the quill miter.
Ready for to have some quills added. Mitered at 17* for standard road bike.
I will need to ream the bar clamp before brazing on the quills as the quill will not clear my lathe. I'll get that later this week. I may also slot the bar clamp. On my little mill, the steerer clamp/quill gets in the way. Just thought of that as I was looking at the pictures!
Thanks for following along.
__________________
https://www.flickr.com/photos/54319503@N05/
https://www.draper-cycles.com
https://www.flickr.com/photos/54319503@N05/
https://www.draper-cycles.com
Last edited by duanedr; 06-27-22 at 10:19 PM.


 06-28-22, 08:04 AM
#3
Senior Member
Join Date: Feb 2012
Location: Rochester, NY
Posts: 18,056
Bikes: Stewart S&S coupled sport tourer, Stewart Sunday light, Stewart Commuting, Stewart Touring, Co Motion Tandem, Stewart 3-Spd, Stewart Track, Fuji Finest, Mongoose Tomac ATB, GT Bravado ATB, JCP Folder, Stewart 650B ATB
Mentioned: 0 Post(s)
Tagged: 0 Thread(s)
Quoted: 4195 Post(s)
Liked 3,837 Times
in
2,295 Posts
Nice photo set. I've only done a few handfuls of stems (or of seat post things to support a HB bag off the bike's seat post) and have sort of a general design now I follow. Two bar clamp bolts and clamp is removeable like current stems have. I use M5 bolts and the binder barrels I had a machine shop make me (ask if interested as I have quite a few ). I ream the bar clamp ID with an adjustable hand reamer, walking up to the wanted ID. Slotting is done with a hack saw and the raw faces cleaned up on the belt sander. For the quill stems I have been using ready made ones (I forgot who made them, bought them from a couple of different sources over the years) as they have been slightly reduced in their OD to end up with a nice sliding fit with in a steerer (and allowing for paint thickness). I haven't tried to reduce the OD on my lathe, that's for when I run out of quill blanks).
One question that some have asked in the past is what tube diameters and wall thicknesses are good. I have used either 7/8" or 1" by .035" wall for the extensions. The quill blanks are about .049" wall. What are yours? Andy
). I ream the bar clamp ID with an adjustable hand reamer, walking up to the wanted ID. Slotting is done with a hack saw and the raw faces cleaned up on the belt sander. For the quill stems I have been using ready made ones (I forgot who made them, bought them from a couple of different sources over the years) as they have been slightly reduced in their OD to end up with a nice sliding fit with in a steerer (and allowing for paint thickness). I haven't tried to reduce the OD on my lathe, that's for when I run out of quill blanks). One question that some have asked in the past is what tube diameters and wall thicknesses are good. I have used either 7/8" or 1" by .035" wall for the extensions. The quill blanks are about .049" wall. What are yours? Andy
__________________
AndrewRStewart
AndrewRStewart
06-28-22, 08:59 AM
#4
Senior Member
Thread Starter
Join Date: Aug 2012
Location: Seattle
Posts: 507
Mentioned: 0 Post(s)
Tagged: 0 Thread(s)
Quoted: 103 Post(s)
Liked 144 Times
in
88 Posts
Nice photo set. I've only done a few handfuls of stems (or of seat post things to support a HB bag off the bike's seat post) and have sort of a general design now I follow. Two bar clamp bolts and clamp is removeable like current stems have. I use M5 bolts and the binder barrels I had a machine shop make me (ask if interested as I have quite a few). I ream the bar clamp ID with an adjustable hand reamer, walking up to the wanted ID. Slotting is done with a hack saw and the raw faces cleaned up on the belt sander. For the quill stems I have been using ready made ones (I forgot who made them, bought them from a couple of different sources over the years) as they have been slightly reduced in their OD to end up with a nice sliding fit with in a steerer (and allowing for paint thickness). I haven't tried to reduce the OD on my lathe, that's for when I run out of quill blanks).
One question that some have asked in the past is what tube diameters and wall thicknesses are good. I have used either 7/8" or 1" by .035" wall for the extensions. The quill blanks are about .049" wall. What are yours? Andy
). I ream the bar clamp ID with an adjustable hand reamer, walking up to the wanted ID. Slotting is done with a hack saw and the raw faces cleaned up on the belt sander. For the quill stems I have been using ready made ones (I forgot who made them, bought them from a couple of different sources over the years) as they have been slightly reduced in their OD to end up with a nice sliding fit with in a steerer (and allowing for paint thickness). I haven't tried to reduce the OD on my lathe, that's for when I run out of quill blanks).One question that some have asked in the past is what tube diameters and wall thicknesses are good. I have used either 7/8" or 1" by .035" wall for the extensions. The quill blanks are about .049" wall. What are yours? Andy
__________________
https://www.flickr.com/photos/54319503@N05/
https://www.draper-cycles.com
https://www.flickr.com/photos/54319503@N05/
https://www.draper-cycles.com
Likes For duanedr:
06-28-22, 03:53 PM
#5
Senior Member
Join Date: Dec 2019
Posts: 954
Mentioned: 3 Post(s)
Tagged: 0 Thread(s)
Quoted: 321 Post(s)
Liked 263 Times
in
212 Posts
Nice work! I'm going to link my conversion of a quill stem to threadless
https://www.bikeforums.net/framebuil...onversion.html
https://www.bikeforums.net/framebuil...onversion.html
07-18-22, 09:24 AM
#6
Senior Member
Thread Starter
Join Date: Aug 2012
Location: Seattle
Posts: 507
Mentioned: 0 Post(s)
Tagged: 0 Thread(s)
Quoted: 103 Post(s)
Liked 144 Times
in
88 Posts
Quick update
Two of the stems are complete aside from a little more fillet finishing.
I'm not super happy with how I cut the angle on the bottom of the quill to fit the wedge. It all ends up right but milling that 35* angle is troublesome on my small mill. Holding the part is challenging and then the end mill wants to snag because of the flex. Whenever I blame a problem on the size of the mill, I stop and internally recognize that the problem is generally stemming from my lack of machinist skills. But if I admit that, it's really hard to justify a bigger mill so...
The next two wedges will get cut with a hacksaw and then ground on the belt sander. I may make a 35* fixture to make sure the angle is right. I am worried that the quill is going to be too snug in the fork after I get paint on it.
For these two I turned top caps out of aluminum and brass. I may braze in a steel insert for the next ones.
Cutting the slot was done after adding the quill which is also troublesome so I will cut that before on the next two.
Framesets can turn into a bit of a death march for hobby builders. Stems are nice because they can be completed within a week or two.
 20220718_000811738_iOS by Duane Draper, on Flickr
Two of the stems are complete aside from a little more fillet finishing.
I'm not super happy with how I cut the angle on the bottom of the quill to fit the wedge. It all ends up right but milling that 35* angle is troublesome on my small mill. Holding the part is challenging and then the end mill wants to snag because of the flex. Whenever I blame a problem on the size of the mill, I stop and internally recognize that the problem is generally stemming from my lack of machinist skills. But if I admit that, it's really hard to justify a bigger mill so...
The next two wedges will get cut with a hacksaw and then ground on the belt sander. I may make a 35* fixture to make sure the angle is right. I am worried that the quill is going to be too snug in the fork after I get paint on it.
For these two I turned top caps out of aluminum and brass. I may braze in a steel insert for the next ones.
Cutting the slot was done after adding the quill which is also troublesome so I will cut that before on the next two.
Framesets can turn into a bit of a death march for hobby builders. Stems are nice because they can be completed within a week or two.
20220718_000811738_iOS by Duane Draper, on Flickr
__________________
https://www.flickr.com/photos/54319503@N05/
https://www.draper-cycles.com
https://www.flickr.com/photos/54319503@N05/
https://www.draper-cycles.com
Likes For duanedr:
07-18-22, 09:36 AM
#7


Randomhead
Join Date: Aug 2008
Location: Happy Valley, Pennsylvania
Posts: 24,387
Mentioned: 0 Post(s)
Tagged: 0 Thread(s)
Quoted: 4 Post(s)
Liked 3,687 Times
in
2,510 Posts
Those look great. I always thought that commercial wedges are overbuilt. I have a tool for un-denting seat tubes that has a wedge I made, and it has taken a lot of force. You can cut it out of the upright material and so the angle is guaranteed to be the same. I think that's how the constructeurs used to do it. I keep meaning to make stems, but i'm overthinking the fixturing. Only one I have made so far uses Llewellyn lugs
Once I get started with a frame I finish fairly quickly, but it might take years to get to that point if I haven't made that kind of bike before. And then, of course, the industry changes "standards" so there are fits and starts because of that. I understand why most established builders don't like to build racks, but at least the time involved isn't that much. And no changing standards. I understand that most of them don't like to make stems either.
Once I get started with a frame I finish fairly quickly, but it might take years to get to that point if I haven't made that kind of bike before. And then, of course, the industry changes "standards" so there are fits and starts because of that. I understand why most established builders don't like to build racks, but at least the time involved isn't that much. And no changing standards. I understand that most of them don't like to make stems either.
Likes For unterhausen:
07-18-22, 09:58 AM
#8
Senior Member

Join Date: Jun 2008
Location: Louisville, KY
Posts: 13,443
Mentioned: 33 Post(s)
Tagged: 0 Thread(s)
Quoted: 4225 Post(s)
Liked 2,945 Times
in
1,804 Posts
Cool.
07-18-22, 02:32 PM
#9
blahblahblah chrome moly

Join Date: Apr 2009
Location: Seattle
Posts: 1,985
Mentioned: 92 Post(s)
Tagged: 0 Thread(s)
Quoted: 1172 Post(s)
Liked 2,567 Times
in
1,072 Posts
I am worried that the quill is going to be too snug in the fork after I get paint on it.
Making the quill smaller now, after making the stem, is do-able on the lathe (small PITA) but you'll get a visible line where you stop, unless you transition with a shallow taper. Probably the best solution is plating instead of painting. Not cheap tho. I know a couple platers in the Seattle area I trust, or did trust some years ago anyway, hopefully still good. LMK if you want names.
Cutting the slot was done after adding the quill which is also troublesome so I will cut that before on the next two.
When I made stems for a living we used a slitting saw on the mill, but we had a dedicated setup for it. A horizontal mill is best for that. Without that setup, I'd just use the hacksaw / warding file.
One boss wanted me to use an abrasive cutoff blade, but I thought that was just nasty. I used to hate the smell so much I'd leave the room when anyone used one... "the princess and the pea"? YMMV. Weirdly, I don't seem to mind it as much anymore, and I use one in an angle grinder more often these days. Less of a princess maybe, or I've killed all the sense receptors in my nose?. The abrasive cut-off wheel method sure is fast! And it doesn't leave any hack marks to file out. Just don't go too far and zing the opposite side of the bar clamp. And watch out for the razor-sharp burrs it leaves, but I hope any metal-head knows not to "feel" for burrs with your precious fleshy bits.
Mark B
Likes For bulgie:
07-18-22, 06:08 PM
#10
Senior Member
Thread Starter
Join Date: Aug 2012
Location: Seattle
Posts: 507
Mentioned: 0 Post(s)
Tagged: 0 Thread(s)
Quoted: 103 Post(s)
Liked 144 Times
in
88 Posts
I completely agree. I like the wedge better than the Italian way of having the cone slip up into the quill. I don't know if that's "The Italian way" or what but I seem to see it more on Italian stems than others so I associate it to the Italians. The cone slipping up into the quill seems to create a smaller expanding section which requires greater force and increased likeliness of bulging the steerer - it seems to me.
These didn't use any fixturing other than the tube block to clamp the tube in the mill for mitering and my little binder boss holder thingy.
Mark, you hurt my feelings. I was thinking I wouldn't paint the lower half of the quill like the salsa ones! Hahaha
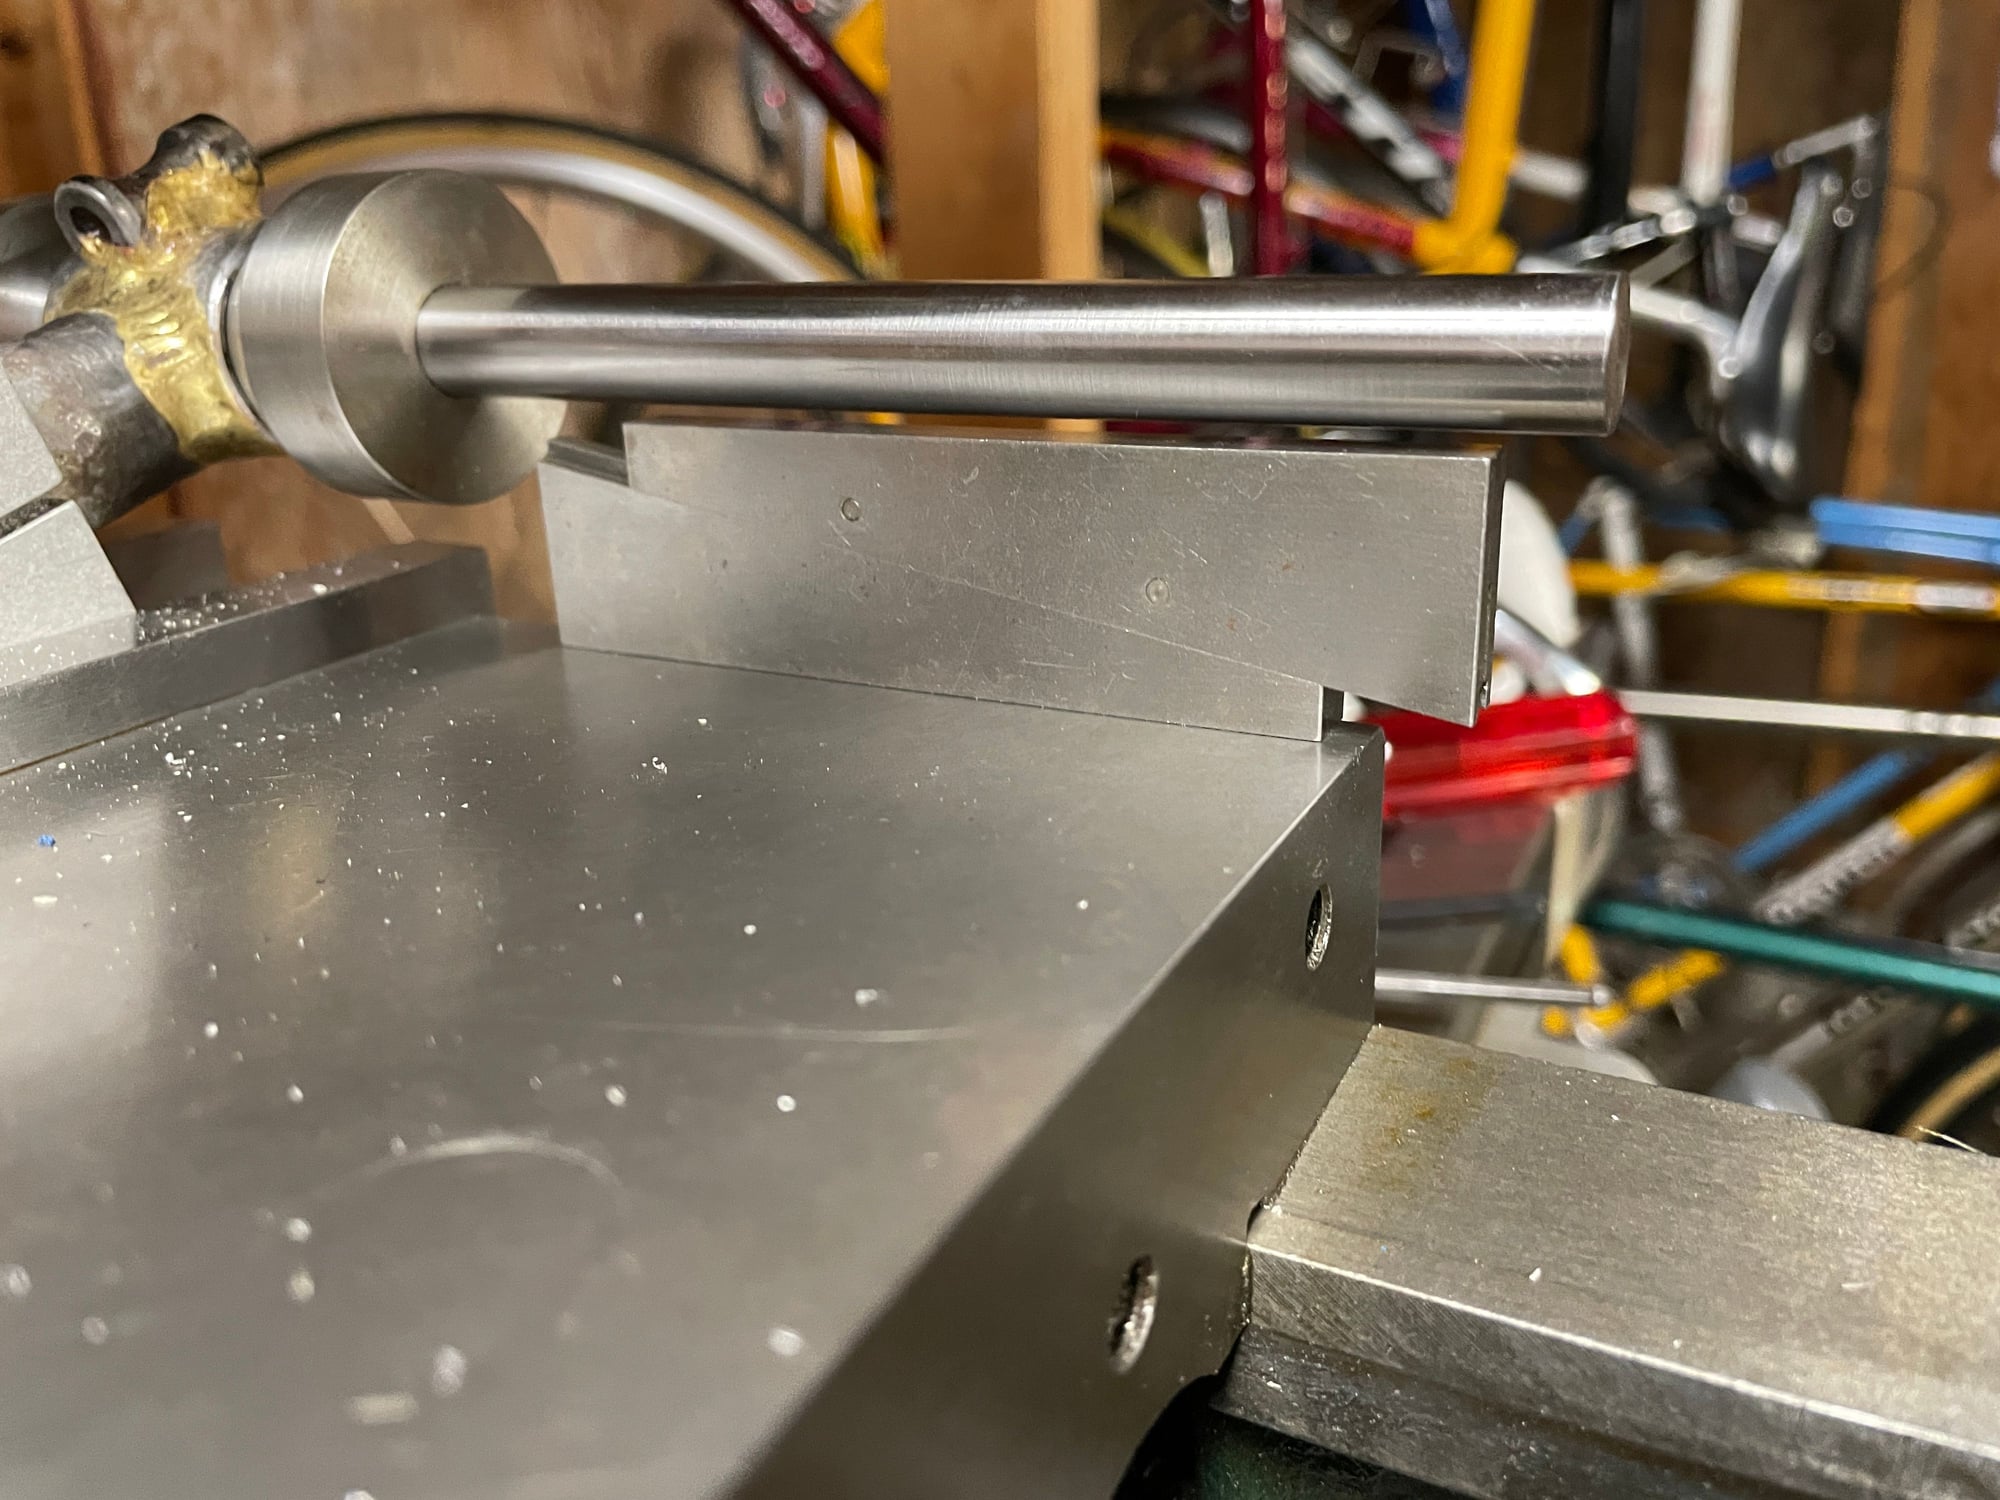
This is what I did for these. My precision is probably less precise that what you did! The quills are the same length as the width of my belt sander (6") so I made a little bar with bushing that sit inside the tube and i can press it against the belt as it slowly rotates. I was able to pretty quickly get it down 0.1mm for a slip fit but worry it's still going to be a bit snug. I have 2 more and will turn the quills down a bit for those before brazing on the extension.
These didn't use any fixturing other than the tube block to clamp the tube in the mill for mitering and my little binder boss holder thingy.
Originally Posted by bulgie
that masked the paint, but that's a cheezy solution
Originally Posted by bulgie
We had ours centerless-ground to a precise diameter
__________________
https://www.flickr.com/photos/54319503@N05/
https://www.draper-cycles.com
https://www.flickr.com/photos/54319503@N05/
https://www.draper-cycles.com
Last edited by duanedr; 07-18-22 at 06:11 PM.
07-18-22, 06:41 PM
#11
blahblahblah chrome moly
Join Date: Apr 2009
Location: Seattle
Posts: 1,985
Mentioned: 92 Post(s)
Tagged: 0 Thread(s)
Quoted: 1172 Post(s)
Liked 2,567 Times
in
1,072 Posts
 So sorry.
Your way and Salsa's is fine if you don't need to adjust it up/down. Even then, you can still raise it if you don't mind some unpainted quill showing (put a band of electrical tape over it?), or lower it by sanding some more paint off above the mask line. Or just jam it in and let the necessary amount of paint get scraped off...
But I know you don't need me to tell you that! Ignore me, and carry on. Nice lookin' stems BTW.
Mark B
07-19-22, 02:05 AM
#12
Senior Member
Thread Starter
Join Date: Aug 2012
Location: Seattle
Posts: 507
Mentioned: 0 Post(s)
Tagged: 0 Thread(s)
Quoted: 103 Post(s)
Liked 144 Times
in
88 Posts
HAHAHA I knew it was the easy way out . These stems, along with some other bits are going to be my first (well, 2nd technically) foray into proper painting. I have a few bikes that deserver nicer stems - and wider bars for my...uh...manly physique - so, ultimately, I need a few nice stems anyway. Making stuff is half the fun and I don't expect my first paint work to live up to a Columbine or Erickson so, I'll make more. I have the process dialed now at least!
__________________
https://www.flickr.com/photos/54319503@N05/
https://www.draper-cycles.com
https://www.flickr.com/photos/54319503@N05/
https://www.draper-cycles.com
07-19-22, 02:10 AM
#13
Senior Member
Join Date: Dec 2019
Posts: 954
Mentioned: 3 Post(s)
Tagged: 0 Thread(s)
Quoted: 321 Post(s)
Liked 263 Times
in
212 Posts
One boss wanted me to use an abrasive cutoff blade, but I thought that was just nasty. I used to hate the smell so much I'd leave the room when anyone used one... "the princess and the pea"? YMMV. Weirdly, I don't seem to mind it as much anymore, and I use one in an angle grinder more often these days. Less of a princess maybe, or I've killed all the sense receptors in my nose?. The abrasive cut-off wheel method sure is fast! And it doesn't leave any hack marks to file out. Just don't go too far and zing the opposite side of the bar clamp. And watch out for the razor-sharp burrs it leaves, but I hope any metal-head knows not to "feel" for burrs with your precious fleshy bits.
Mark B
07-19-22, 08:54 AM
#14
Senior Member
Thread Starter
Join Date: Aug 2012
Location: Seattle
Posts: 507
Mentioned: 0 Post(s)
Tagged: 0 Thread(s)
Quoted: 103 Post(s)
Liked 144 Times
in
88 Posts
Here I used a hack saw and then cleaned one up with a wheel - the slot is a bit wider on that one. I don't really like the wheel method because of the dust and noise of the air tool and the compressor. I usually use a slitting saw on my mill for any slotting.
__________________
https://www.flickr.com/photos/54319503@N05/
https://www.draper-cycles.com
https://www.flickr.com/photos/54319503@N05/
https://www.draper-cycles.com
Likes For duanedr:
