


Easy Home Made Freewheel Vise
 02-23-21, 09:18 PM
#1

Senior Member
Thread Starter

Easy Home Made Freewheel Vise
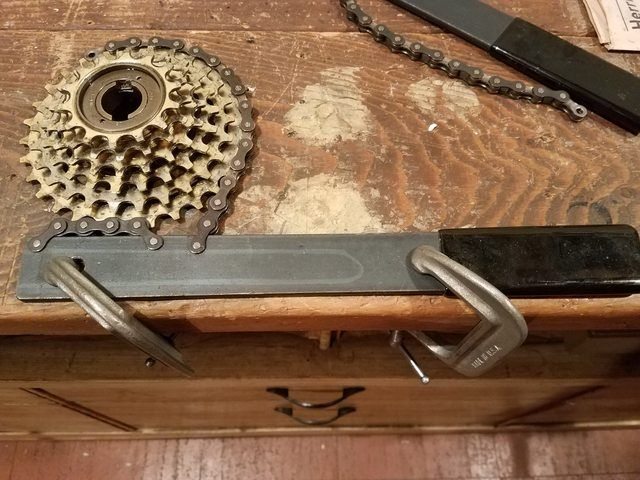
In the "Unlikely Tools" thread, I mentioned a home made freewheel vise I have in my workshop. Some folks asked for photos, so I thought I might as well create a stand-alone thread showing how it works and how to make one. You will need two chain whips, at least one of them being an SR-1 or SR-12 by Park Tools.
How to make it:
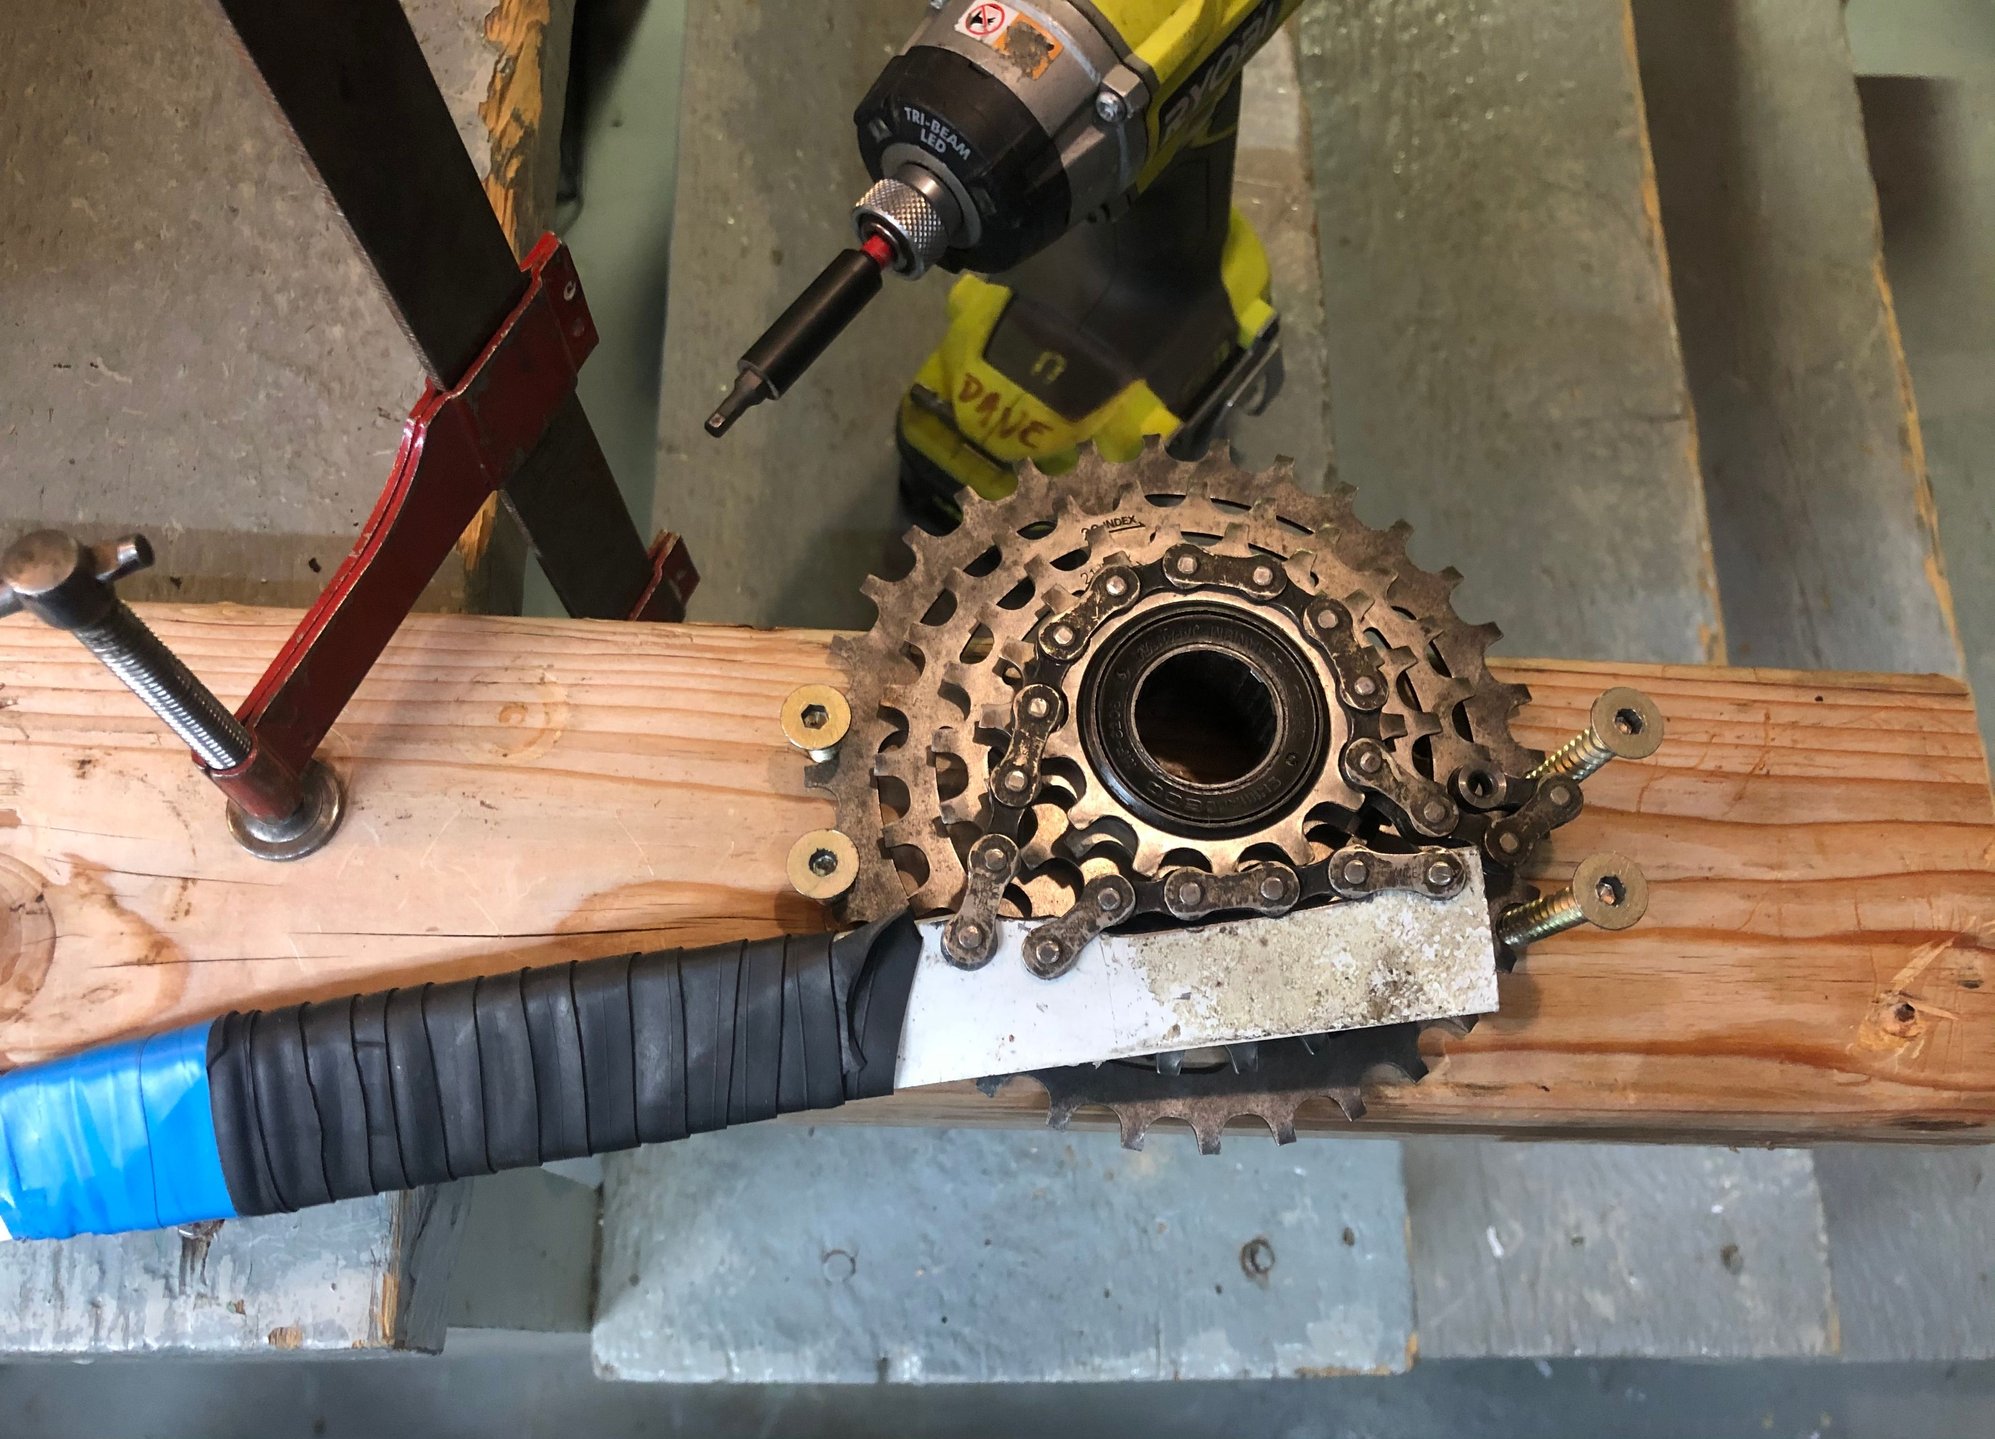
Step One: Drill two holes in your work table about 1 foot apart from each other
Step Two: Run a short bolt through the hole on the left, with a spacer on it. It's effectively a peg (see photo below):

How to use it to remove cogs from a freewheel:
Step One: Place the freewheel over the hole on the right
Step Two: Put the freewheel remover in
Step Three: Secure the freewheel to the table by running a front QR skewer through it. Note that I've added a couple of extra spacers to the take up the extra space on the skewer. If you have bolt that'll fit and is shorter, you don't need the extra spacers.

view from below:

Step Four: Secure the largest cog with the chain whip. You may need to loosen the bolt holding the freewheel to the table in order to get it on. Afterwards, tighten down the bolt or QR skewer. Slide the end of the chain whip, which has a hole in it, over the peg on the left.

Step Five: Use your second chain whip to remove the first cog on the freewheel. The lower chain whip will prevent the freewheel from moving, allowing you to put maximum force on the top cog.

How to use it to reassemble and tighten cogs on a freewheel:
Repeat steps 1-3 above.
Step Four: Secure the largest cog with the chain whip, in the opposite direction from the disassembly procedure.

Step Five: Tighten down cogs.

How to make it:
Step One: Drill two holes in your work table about 1 foot apart from each other
Step Two: Run a short bolt through the hole on the left, with a spacer on it. It's effectively a peg (see photo below):
How to use it to remove cogs from a freewheel:
Step One: Place the freewheel over the hole on the right
Step Two: Put the freewheel remover in
Step Three: Secure the freewheel to the table by running a front QR skewer through it. Note that I've added a couple of extra spacers to the take up the extra space on the skewer. If you have bolt that'll fit and is shorter, you don't need the extra spacers.
view from below:
Step Four: Secure the largest cog with the chain whip. You may need to loosen the bolt holding the freewheel to the table in order to get it on. Afterwards, tighten down the bolt or QR skewer. Slide the end of the chain whip, which has a hole in it, over the peg on the left.
Step Five: Use your second chain whip to remove the first cog on the freewheel. The lower chain whip will prevent the freewheel from moving, allowing you to put maximum force on the top cog.
How to use it to reassemble and tighten cogs on a freewheel:
Repeat steps 1-3 above.
Step Four: Secure the largest cog with the chain whip, in the opposite direction from the disassembly procedure.
Step Five: Tighten down cogs.
__________________
Check out www.djcatnap.com for articles on vintage Japanese & French bicycle restorations, components and history.
Check out www.djcatnap.com for articles on vintage Japanese & French bicycle restorations, components and history.

Likes For Catnap:
02-23-21, 10:04 PM
#2
Senior Member

Join Date: Aug 2009
Location: Berkeley, CA
Posts: 7,238
Bikes: '72 Cilo Pacer, '72 Gitane Gran Tourisme, '72 Peugeot PX10, '73 Speedwell Ti, '74 Peugeot UE-8, '75 Peugeot PR-10L, '80 Colnago Super, '85 De Rosa Pro, '86 Look Equipe 753, '86 Look KG86, '89 Parkpre Team, '90 Parkpre Team MTB, '90 Merlin
Mentioned: 87 Post(s)
Tagged: 0 Thread(s)
Quoted: 831 Post(s)
Liked 2,124 Times
in
554 Posts
Thanks, @Catnap. I'm one of the people who was curious about your DIY freewheel vice. I appreciate the write-up and photos. I may try a "portable" version I can mount to my workbench when needed. 
02-23-21, 10:07 PM
#3
WGB
Join Date: Jul 2017
Location: Niagara Region
Posts: 2,917
Bikes: Panasonic PT-4500
Mentioned: 46 Post(s)
Tagged: 0 Thread(s)
Quoted: 1799 Post(s)
Liked 2,334 Times
in
1,378 Posts
Thank you. I was looking at buying a freewheel vise. You just saved me some money. Looks simple and workable
Last edited by WGB; 02-23-21 at 10:12 PM.
02-23-21, 10:11 PM
#4
WGB
Join Date: Jul 2017
Location: Niagara Region
Posts: 2,917
Bikes: Panasonic PT-4500
Mentioned: 46 Post(s)
Tagged: 0 Thread(s)
Quoted: 1799 Post(s)
Liked 2,334 Times
in
1,378 Posts
Sorry duplicate!
02-23-21, 10:30 PM
#5
Senior Member

Join Date: Jun 2010
Location: Medford MA
Posts: 2,089
Bikes: Ron Cooper touring, 1959 Jack Taylor 650b ladyback touring tandem, Vitus 979, Joe Bell painted Claud Butler Dalesman, Colin Laing curved tube tandem, heavily-Dilberted 1982 Trek 6xx, Ren� Herse tandem
Mentioned: 80 Post(s)
Tagged: 0 Thread(s)
Quoted: 964 Post(s)
Liked 1,451 Times
in
723 Posts
You ever break a chain whip doing this? I've had some extra recalcitrant freewheels where the chain comes off the chain whip before I can get the little cog off. Been meaning to machine a wrench with the pins like the old Suntour freewheel vise, but haven't gotten around to it yet.
I bet the chain whip on the bench wouldn't be the one to break, since it's under less strain being on the big cog and having more leverage per chain tension.
I bet the chain whip on the bench wouldn't be the one to break, since it's under less strain being on the big cog and having more leverage per chain tension.
__________________
Owner & co-founder, Cycles Ren� Hubris. Unfortunately attaching questionable braze-ons to perfectly good frames since about 2015. With style.
Owner & co-founder, Cycles Ren� Hubris. Unfortunately attaching questionable braze-ons to perfectly good frames since about 2015. With style.
Likes For scarlson:
02-24-21, 09:02 AM
#6
Senior Member
Thread Starter
No, I've never had a chain whip break. I've even had to put a breaker pipe on the upper chain whip before, to unscrew really stuck cogs. the only tricky part in that scenario is making sure that the chain whip stays level with the cog while applying pressure, so as not to break any teeth or bend the cog.
__________________
Check out www.djcatnap.com for articles on vintage Japanese & French bicycle restorations, components and history.
Check out www.djcatnap.com for articles on vintage Japanese & French bicycle restorations, components and history.
02-24-21, 09:04 AM
#7
Senior Member

Join Date: May 2008
Location: Fredericksburg, Va
Posts: 9,579
Bikes: '65 Frejus TDF, '73 Bottecchia Giro d'Italia, '83 Colnago Superissimo, '84 Trek 610, '84 Trek 760, '88 Pinarello Veneto, '88 De Rosa Pro, '89 Pinarello Montello, '94 Burley Duet, 97 Specialized RockHopper, 2010 Langster, Tern Link D8
Mentioned: 73 Post(s)
Tagged: 0 Thread(s)
Quoted: 1607 Post(s)
Liked 2,216 Times
in
1,103 Posts
Other options shared here: DIY Tools for your bike work - Bike Forums
__________________
Bikes don't stand alone. They are two tired.
Bikes don't stand alone. They are two tired.
02-25-21, 04:29 PM
#8
Senior Member
Join Date: Nov 2013
Location: Big Apple
Posts: 1,428
Bikes: yes
Mentioned: 17 Post(s)
Tagged: 0 Thread(s)
Quoted: 512 Post(s)
Likes: 0
Liked 409 Times
in
176 Posts
I do something similar, although not as involved.
Clamp one whip down to the bench, position the freewheel, then mount the second whip and push. Easy peasy every time.

Clamp one whip down to the bench, position the freewheel, then mount the second whip and push. Easy peasy every time.
Likes For Vintage_Cyclist:
 02-26-21, 06:26 PM
#10
Senior Member

Nifty. Two thoughts:
1. It might be easier to use a bolt and wing nut rather than skewer.
2. You could clamp a piece of 2x4 to the edge of the bench to rest the top whip on to keep it from going out of plane.
1. It might be easier to use a bolt and wing nut rather than skewer.
2. You could clamp a piece of 2x4 to the edge of the bench to rest the top whip on to keep it from going out of plane.
02-26-21, 11:53 PM
#11
tantum vehi

Join Date: Jul 2008
Location: Flathead Valley, MT
Posts: 4,440
Bikes: More than I care to admit
Mentioned: 153 Post(s)
Tagged: 0 Thread(s)
Quoted: 1167 Post(s)
Liked 992 Times
in
491 Posts
This is an interesting way to skin a cat. I took a 2x4, put the freewheel on it, and screwed four wood screws around the largest sprocket to hold it in place. Clamped the 2x4 to something, then chain-whiped away. Or in my case, hammer a punch on the teeth of the smallest sprocket until it came loose because it�s toast anyway and broke my chain whip...
02-27-21, 05:51 AM
#12
Junior Member
Join Date: Jan 2021
Location: Long Island, New York
Posts: 11
Bikes: 1981 Colnago, 1984 Bob Jackson, 1985 Benotto
Mentioned: 0 Post(s)
Tagged: 0 Thread(s)
Quoted: 4 Post(s)
Likes: 0
Liked 1 Time
in
1 Post
Brilliant!
This is brilliant � and, given my freewheel vise has been misplaced for a while and I want to rebuild some Regina CXs now, very timely. Thanks!
02-27-21, 01:18 PM
#13
Senior Member
Thread Starter
Most do. There's always the possibility that there's some obscure freewheel out there that uses an alternate system, but generally this is how it's done. Some freewheels have all the cogs screwed on, while many others only have the first and sometimes also the second cogs screwed on, the rest of the cogs sliding on splines like a freehub.
Both of these are great suggestions. There's room for improvement in this system, interesting to see how others do it,
__________________
Check out www.djcatnap.com for articles on vintage Japanese & French bicycle restorations, components and history.
Check out www.djcatnap.com for articles on vintage Japanese & French bicycle restorations, components and history.
02-27-21, 01:51 PM
#15
Senior Member
Join Date: Oct 2017
Location: NJ
Posts: 626
Bikes: 68 SS, 72 Fuji Finest, 72 PX-10, 77 Pana Pro 7000, 84 Pinnarello Treviso NR, 84 Trek 520, 88 Project KOM, 90 Trek 750, 91 Trek 930
Mentioned: 11 Post(s)
Tagged: 0 Thread(s)
Quoted: 184 Post(s)
Liked 204 Times
in
142 Posts
Yes I did; and after bending one another time I gave up before breaking #2.
You ever break a chain whip doing this? I've had some extra recalcitrant freewheels where the chain comes off the chain whip before I can get the little cog off. Been meaning to machine a wrench with the pins like the old Suntour freewheel vise, but haven't gotten around to it yet.
I bet the chain whip on the bench wouldn't be the one to break, since it's under less strain being on the big cog and having more leverage per chain tension.
I bet the chain whip on the bench wouldn't be the one to break, since it's under less strain being on the big cog and having more leverage per chain tension.
__________________
Last new bike 1991
Last new bike 1991
03-01-21, 09:38 PM
#16
tantum vehi
Join Date: Jul 2008
Location: Flathead Valley, MT
Posts: 4,440
Bikes: More than I care to admit
Mentioned: 153 Post(s)
Tagged: 0 Thread(s)
Quoted: 1167 Post(s)
Liked 992 Times
in
491 Posts
Pics of my description above:
And yes, that�s a home made chain whip.
And yes, that�s a home made chain whip.
__________________
1970 Gitane TdF; 1973 Gitane TdF
1979 Trek 710; 1981 Trek 412; 1981 Trek 710
1984 Specialized Stumpjumper Sport; 1985 Specialized Allez SE; 1988 Specialized Sirrus; 1989 Specialized Rock Combo
1984 Ross Mt. Hood
1988 Centurion Ironman Expert
1991 Bridgestone RB-1
1992 Serotta Colorado TG
2015 Elephant NFE
1979 Trek 710; 1981 Trek 412; 1981 Trek 710
1984 Specialized Stumpjumper Sport; 1985 Specialized Allez SE; 1988 Specialized Sirrus; 1989 Specialized Rock Combo
1984 Ross Mt. Hood
1988 Centurion Ironman Expert
1991 Bridgestone RB-1
1992 Serotta Colorado TG
2015 Elephant NFE
