


1973 Colnago Super with slight bend
 12-23-20, 07:31 PM
#26

Senior Member
Join Date: May 2019
Location: Bloomington, IN
Posts: 2,949
Bikes: Paramount, Faggin, Ochsner, Ciocc, Basso
Mentioned: 117 Post(s)
Tagged: 0 Thread(s)
Quoted: 1303 Post(s)
Liked 1,910 Times
in
1,140 Posts
P123,
I would think that the solution that Andy K proposed would work. I have used those tools to straighten top tube and head tube alignment. They are different tools and do work, but they just repair the tubes to close to the original position. I would definitely try bending before replacing the tubes that are bent. Sometimes just bending them back works well. I have seen a bunch of race cars that have been bent back into place by using chains and come-alongs positioned between trees to bend them back into race-able condition. Smiles, MH
I would think that the solution that Andy K proposed would work. I have used those tools to straighten top tube and head tube alignment. They are different tools and do work, but they just repair the tubes to close to the original position. I would definitely try bending before replacing the tubes that are bent. Sometimes just bending them back works well. I have seen a bunch of race cars that have been bent back into place by using chains and come-alongs positioned between trees to bend them back into race-able condition. Smiles, MH
 12-24-20, 11:42 AM
#27

Senior Member
Join Date: Jun 2006
Posts: 20,305
Mentioned: 130 Post(s)
Tagged: 0 Thread(s)
Quoted: 3464 Post(s)
Liked 2,829 Times
in
1,995 Posts
For my time and money
I think the approach is remove the downtube,
see if the top tube can be brought into position
then if can be, finish the replacement of the tube. Fallback would be top and down tube replacement.
it may be possible to straighten it enough to make it a winter training bike but why spend the $ on paint when the tubes are known to have been bent?
worthy frame to start with.
I have a nice French bike that arrived damaged, most likely undisclosed. There is a ripple below the brazed on shifter bosses
it needs a tube. A 28.0 mm downtube... not going to be easy to locate. The frame sits.
I am sure I could ream out the bottom bracket shell - the downtube lug? A problem.
12-24-20, 12:30 PM
#28
Senior Member
Join Date: Dec 2019
Posts: 955
Mentioned: 3 Post(s)
Tagged: 0 Thread(s)
Quoted: 321 Post(s)
Liked 263 Times
in
212 Posts
For my time and money
I think the approach is remove the downtube,
see if the top tube can be brought into position
then if can be, finish the replacement of the tube. Fallback would be top and down tube replacement.
it may be possible to straighten it enough to make it a winter training bike but why spend the $ on paint when the tubes are known to have been bent?
worthy frame to start with.
I have a nice French bike that arrived damaged, most likely undisclosed. There is a ripple below the brazed on shifter bosses
it needs a tube. A 28.0 mm downtube... not going to be easy to locate. The frame sits.
I am sure I could ream out the bottom bracket shell - the downtube lug? A problem.
I think the approach is remove the downtube,
see if the top tube can be brought into position
then if can be, finish the replacement of the tube. Fallback would be top and down tube replacement.
it may be possible to straighten it enough to make it a winter training bike but why spend the $ on paint when the tubes are known to have been bent?
worthy frame to start with.
I have a nice French bike that arrived damaged, most likely undisclosed. There is a ripple below the brazed on shifter bosses
it needs a tube. A 28.0 mm downtube... not going to be easy to locate. The frame sits.
I am sure I could ream out the bottom bracket shell - the downtube lug? A problem.
I made a CF/steel hybrid this way (sanding the lugs so the CF tubes would be a good fit for gluing) and I've also used it for "reaming" head tubes when I didn't have the right size reamer.
12-24-20, 02:29 PM
#29
Senior Member
Join Date: Jun 2006
Posts: 20,305
Mentioned: 130 Post(s)
Tagged: 0 Thread(s)
Quoted: 3464 Post(s)
Liked 2,829 Times
in
1,995 Posts
Could maybe sand it out to 28.6 with a bit of of 80 grit emery tape wrapped around an aluminium cylinder with a slot in it mounted in a drill. Keep alternating between sanding and test fitting and by the time the battery is flat on the drill it should fit.
I made a CF/steel hybrid this way (sanding the lugs so the CF tubes would be a good fit for gluing) and I've also used it for "reaming" head tubes when I didn't have the right size reamer.
I made a CF/steel hybrid this way (sanding the lugs so the CF tubes would be a good fit for gluing) and I've also used it for "reaming" head tubes when I didn't have the right size reamer.
Likes For repechage:
12-24-20, 03:06 PM
#30
Senior Member
Join Date: Feb 2012
Location: Rochester, NY
Posts: 18,073
Bikes: Stewart S&S coupled sport tourer, Stewart Sunday light, Stewart Commuting, Stewart Touring, Co Motion Tandem, Stewart 3-Spd, Stewart Track, Fuji Finest, Mongoose Tomac ATB, GT Bravado ATB, JCP Folder, Stewart 650B ATB
Mentioned: 0 Post(s)
Tagged: 0 Thread(s)
Quoted: 4201 Post(s)
Liked 3,857 Times
in
2,305 Posts
One method of working around this access to the lug's full depth is to cut/grind away the HT wall, allowing the DT or TT to slide through the lug and into the open space inside the HT. Cut the replaced tube a slight bit long and after brazing it in place go back inside the HT and grind down the MM or two of replaced tube sticking into the HT's ID. Makes mitering the replacement tube much faster and the lug's ID clean up vastly easier. Andy
__________________
AndrewRStewart
AndrewRStewart
Likes For Andrew R Stewart:
12-24-20, 03:17 PM
#31
Senior Member
Join Date: Dec 2019
Posts: 955
Mentioned: 3 Post(s)
Tagged: 0 Thread(s)
Quoted: 321 Post(s)
Liked 263 Times
in
212 Posts
One method of working around this access to the lug's full depth is to cut/grind away the HT wall, allowing the DT or TT to slide through the lug and into the open space inside the HT. Cut the replaced tube a slight bit long and after brazing it in place go back inside the HT and grind down the MM or two of replaced tube sticking into the HT's ID. Makes mitering the replacement tube much faster and the lug's ID clean up vastly easier. Andy
Could just cut the HT out with a hole saw a bit like the way you made your lugs.
12-24-20, 06:30 PM
#32
Senior Member
Join Date: Jun 2006
Posts: 20,305
Mentioned: 130 Post(s)
Tagged: 0 Thread(s)
Quoted: 3464 Post(s)
Liked 2,829 Times
in
1,995 Posts
One method of working around this access to the lug's full depth is to cut/grind away the HT wall, allowing the DT or TT to slide through the lug and into the open space inside the HT. Cut the replaced tube a slight bit long and after brazing it in place go back inside the HT and grind down the MM or two of replaced tube sticking into the HT's ID. Makes mitering the replacement tube much faster and the lug's ID clean up vastly easier. Andy
Considering the lousey mitering that is done on frames that don't come apart, might be OK
I have also seen frames that cracked at the lug, the downtube never reached the head tube.
extending the downtube beyond so full braze is observed, is akin to keeping the head tube long and only cutting it off after brazing...
BUT, no builder I know of does an initial build as such, opening up a port for the downtube or top tube to extend beyond into the bore of the head tube.
12-24-20, 07:55 PM
#33
Senior Member
Join Date: Feb 2012
Location: Rochester, NY
Posts: 18,073
Bikes: Stewart S&S coupled sport tourer, Stewart Sunday light, Stewart Commuting, Stewart Touring, Co Motion Tandem, Stewart 3-Spd, Stewart Track, Fuji Finest, Mongoose Tomac ATB, GT Bravado ATB, JCP Folder, Stewart 650B ATB
Mentioned: 0 Post(s)
Tagged: 0 Thread(s)
Quoted: 4201 Post(s)
Liked 3,857 Times
in
2,305 Posts
There have been many thousands of bike made with as little human contact as possible that used a one piece HT and "lugs with no issues. (Trek and Fuji among other brands). The HT is made much like a pressed and welded lug is. A sheet of steel is formed, wrapped and welded to result in a single "lug" with two sockets and the full length of the HT. The TT and DT have no HT to butt against.
I'm not saying this is my first choice in a from scratch bike but for a repair/tube replacement it's a valid method just the same.
On the few tube replacements I have done that retained the ST and/or the HT I did use a hole saw to do the initial HT hole making. But followed up with a die grinder to do the final sizing and fit up. Andy
__________________
AndrewRStewart
AndrewRStewart
Likes For Andrew R Stewart:
12-24-20, 08:08 PM
#34
blahblahblah chrome moly

Join Date: Apr 2009
Location: Seattle
Posts: 1,987
Mentioned: 92 Post(s)
Tagged: 0 Thread(s)
Quoted: 1174 Post(s)
Liked 2,569 Times
in
1,073 Posts
Milling the frame on a milling machine is mostly only possible if replacing both the TT and DT, because if only one tube is being removed, the rest of the frame gets in the way. Milling just one tube can be possible but it requires a pretty small mill (and/or large frame) because the whole headstock of the mill plus the cutter itself has to fit inside the 'main triangle'. I have done it though (had a small enuf mill), worked great.
Some lugs don't grab a big enough handfull of head tube for full confidence with that large hole in the HT.
Example:
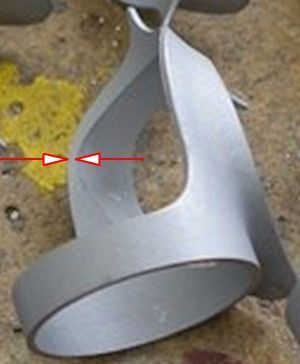
That's a real minimal bikini lug though; most have more meat there.
You could put back some of that strength, lost from piercing the HT, by capping the end of the DT with a piece of HT cut to match, brazed in and carved flush with the miter before inserting into the lug. I have not done this, just speculating. The thin line of brass holding the cap on can be decently strong especially if there's an inside fillet. Think of seatstay caps made of tubing, similar joint.
Mark B in Seattle
Likes For bulgie:
12-25-20, 11:06 AM
#35
Senior Member
Join Date: Feb 2012
Location: Rochester, NY
Posts: 18,073
Bikes: Stewart S&S coupled sport tourer, Stewart Sunday light, Stewart Commuting, Stewart Touring, Co Motion Tandem, Stewart 3-Spd, Stewart Track, Fuji Finest, Mongoose Tomac ATB, GT Bravado ATB, JCP Folder, Stewart 650B ATB
Mentioned: 0 Post(s)
Tagged: 0 Thread(s)
Quoted: 4201 Post(s)
Liked 3,857 Times
in
2,305 Posts
I think that the stresses that the portion of HT that is trapped within the TT or DT's circumference is pretty small. Some stretching or compression as the HT tries to twist. It would be interesting to do some tests to see which construction was "stronger". I do suspect that the one piece headtube/lug constructs that lower cost production bikes have used are of a lower strength steel then the usual 4130ish stuff we generally build with.
I don't remember who I heard this from but someone has posted (perhaps on the long gone Framebuilder's E List) that it was just as easy to replace the HT when doing a main tube replacement (TT or DT of course ) and that access to the remaining tube's ends easier, the head lugs were also replaced and thus not at risk of over reaming/grinding out as well as the shore lines being kept nice. I haven't done this myself though.
Happy Holiday. Andy
I don't remember who I heard this from but someone has posted (perhaps on the long gone Framebuilder's E List) that it was just as easy to replace the HT when doing a main tube replacement (TT or DT of course
) and that access to the remaining tube's ends easier, the head lugs were also replaced and thus not at risk of over reaming/grinding out as well as the shore lines being kept nice. I haven't done this myself though. Happy Holiday. Andy
__________________
AndrewRStewart
AndrewRStewart
12-25-20, 02:34 PM
#36


Randomhead
Join Date: Aug 2008
Location: Happy Valley, Pennsylvania
Posts: 24,396
Mentioned: 0 Post(s)
Tagged: 0 Thread(s)
Quoted: 4 Post(s)
Liked 3,696 Times
in
2,517 Posts
At some point it becomes the bike frame of Theseus
Not that I have done that many, but my experience with frame repairs has been bad so far. And then you own all the mistakes that the builder made. I guess replacing everything is best. I didn't find it was too hard to clean up the lugs, I think on a bike like this Colnago I would probably salvage the lugs. If I was doing a lot of repairs, I would set up a hearth with firebrick.
The head tube takes a lot of stress. The steerer bends, for example. Lots of head tube lugs have cracked. I have seen cracks from over-large vent holes in the head tube. Of course, some of that might be hole quality, don't really know. The repair that made me not want to do any more repairs had a crack all the way around the shoreline of the dt/ht lug. It might have been undercut, it's hard to tell on a finished bike. The crack was invisible from the outside.
