


Birdy thread
 07-24-22, 03:53 PM
#2026
Senior Member
Join Date: Feb 2017
Posts: 1,543
Mentioned: 4 Post(s)
Tagged: 0 Thread(s)
Quoted: 800 Post(s)
Likes: 0
Liked 247 Times
in
211 Posts
The spacer is placed to have the best chainline, i.e. to have the chain no too much deviated on the first and last cog.
The original 10s cassette has 9-10-11-13-15-18-21-24-28-32 so all cogs are smaller, the 3 bigger are each 4t smaller than on the XT 10s 11-36t cassette 11-13-15-17-19-21-24-28-32-36.
The cassette I have is 11s 9-11-13-15-17-19-21-24-27-30-34 and there is still space between cog and swing arm on every sprocket (but difficult to say for how many teeth more)..
A 11s is about 2.9mm wider than a 10s cassette which is I think what provides the space between chain and swing arm and avoid rubbing (the biggest 11s cog is about 2.9mm closer to the center of the wheel, the next ones a little less because the spacing between cogs is slightly smaller for 11s than for 10s).
And for the same reason, i.e. a 12s cassette being even wider than a 11s cassette, the 12s SRAM 10-36t 10-11-12-13-15-17-19-21-24-28-32-36 cassette should work without rubbing.
Last edited by Jipe; 07-24-22 at 03:59 PM.
 07-24-22, 03:58 PM
#2027
Senior Member

I don�t have any rubbing issues. I have the cassette mounted on an Ultegra 6800 hub, the crankset is a Dura Ace 7800. The chain line runs closer toward the inside, so I have enough clearance. Unfortunately, the chain rings on the crankset are so close to the rear swing arm that I can�t run a front derailleur.
07-24-22, 04:08 PM
#2028
Senior Member
Join Date: Feb 2017
Posts: 1,543
Mentioned: 4 Post(s)
Tagged: 0 Thread(s)
Quoted: 800 Post(s)
Likes: 0
Liked 247 Times
in
211 Posts
Your chain is closer to the inside because you have mounted a Dura-Ace crankset which is a road crankset and road crankset have a narrower chainline than MTB crankset.
The factory Birdy uses mainly MTB transmission components and has a MTB chanline.
The factory Birdy uses mainly MTB transmission components and has a MTB chanline.
07-25-22, 01:24 AM
#2029
Full Member
While folding my R&M Birdy Touring with rear rack, the rear wheel doesn�t swing under the bike but have to be moved by hand or leg. Is it normal or are hinge/rack bolts over tight?
07-25-22, 02:32 AM
#2030
Senior Member
Join Date: Feb 2017
Posts: 1,543
Mentioned: 4 Post(s)
Tagged: 0 Thread(s)
Quoted: 800 Post(s)
Likes: 0
Liked 247 Times
in
211 Posts
Its probably the rack bolts.
They have nylstop nuts, so you can tighten them a little bit less without risk.
One easy solution to reduce the chainline that you could try is to place the chainring on the inner position instead of the outer position (the spider of the Birdy crankset is foreseen to place two chanrings, one outer and one inner, the single chainring is factory installed at the place of the outer chainring, placing the chaining on the inner position may require to remove the plastic chainring protection)
Last edited by Jipe; 07-25-22 at 09:06 AM.
07-25-22, 11:04 AM
#2031
Full Member
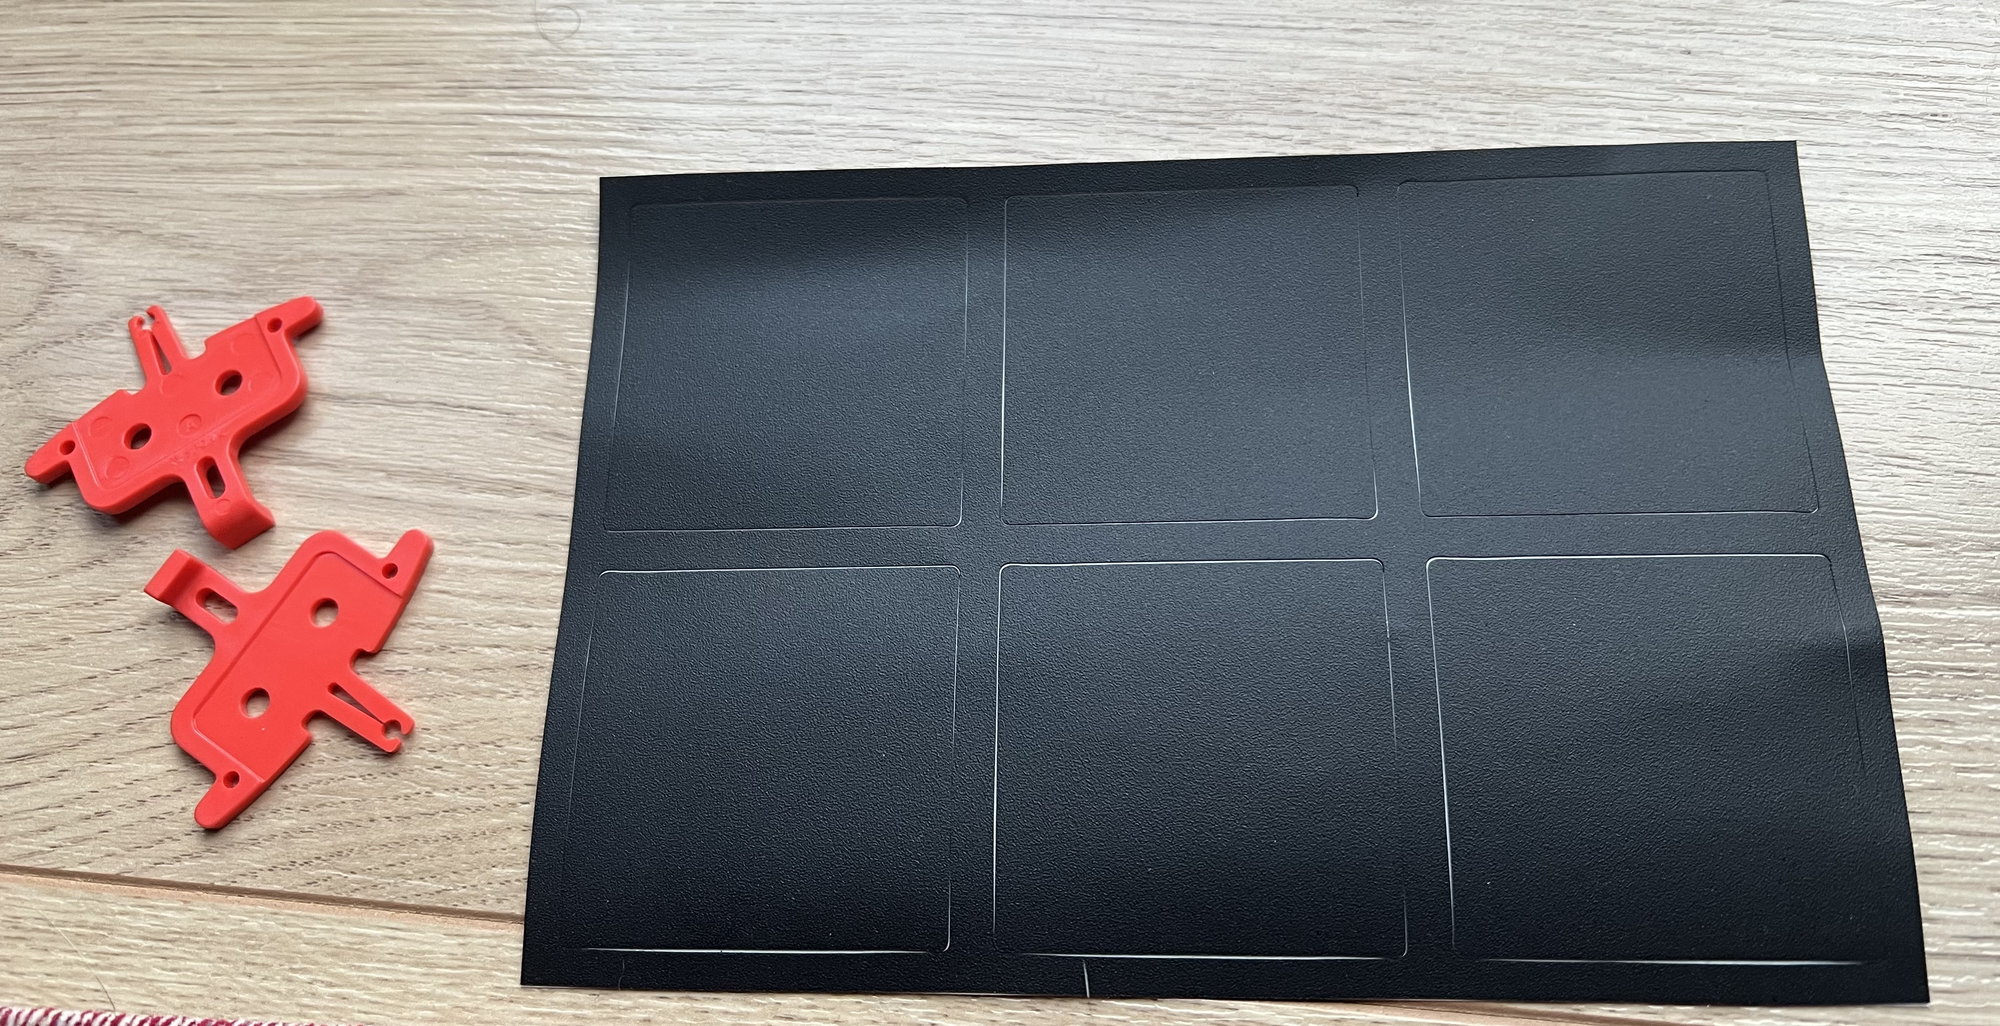
Along with user manual I received these black stickers matching my bicycle color and plasticky things. Any idea what these are for?
07-25-22, 04:09 PM
#2032
Senior Member
Join Date: Feb 2017
Posts: 1,543
Mentioned: 4 Post(s)
Tagged: 0 Thread(s)
Quoted: 800 Post(s)
Likes: 0
Liked 247 Times
in
211 Posts
The red thing are disc caliper spacers that should be introduced into the calipers between the plate when a wheel is removed to avoid accidentally push too far the pistons when there is no disc in between.
07-26-22, 01:21 AM
#2033
Full Member
Stickers are to be used as protection for the rear rack when installing a bag. The stickers should be placed in correspondence of the bag clamps.
07-26-22, 07:46 AM
#2035
Full Member
Update regarding cassette. 34t was still rubbing ever so slightly on 1 and 3rd gear. So I had to go lower to 32t which is now perfect. 11-32t 10s. Also removed spacer on crank hub so the chain line is slightly inside. Shifts fine, no issues so far.
After changing elastomer from mid to hard I noticed that mid elastomer was deformed so the rear fork was actually lower than it�s supposed to. I think this was one of the reason why 34 cassette was still rubbing. Add my 100kg weight to that mid stiffness deformed elastomer and you will have lower than average fork position which brings the chain closer to the rear fork. I believe lighter users with stiff suspension block may get away with 34 or 36t cogs. However extra weight needs to be factored in, so for anyone thinking of installing more than 32t cogs I�d recommend testing for chain rubbing with fully loaded rear rack (15kgs).
After changing elastomer from mid to hard I noticed that mid elastomer was deformed so the rear fork was actually lower than it�s supposed to. I think this was one of the reason why 34 cassette was still rubbing. Add my 100kg weight to that mid stiffness deformed elastomer and you will have lower than average fork position which brings the chain closer to the rear fork. I believe lighter users with stiff suspension block may get away with 34 or 36t cogs. However extra weight needs to be factored in, so for anyone thinking of installing more than 32t cogs I�d recommend testing for chain rubbing with fully loaded rear rack (15kgs).
Last edited by CEBEP; 07-26-22 at 10:22 AM.
07-26-22, 08:39 AM
#2036
Full Member
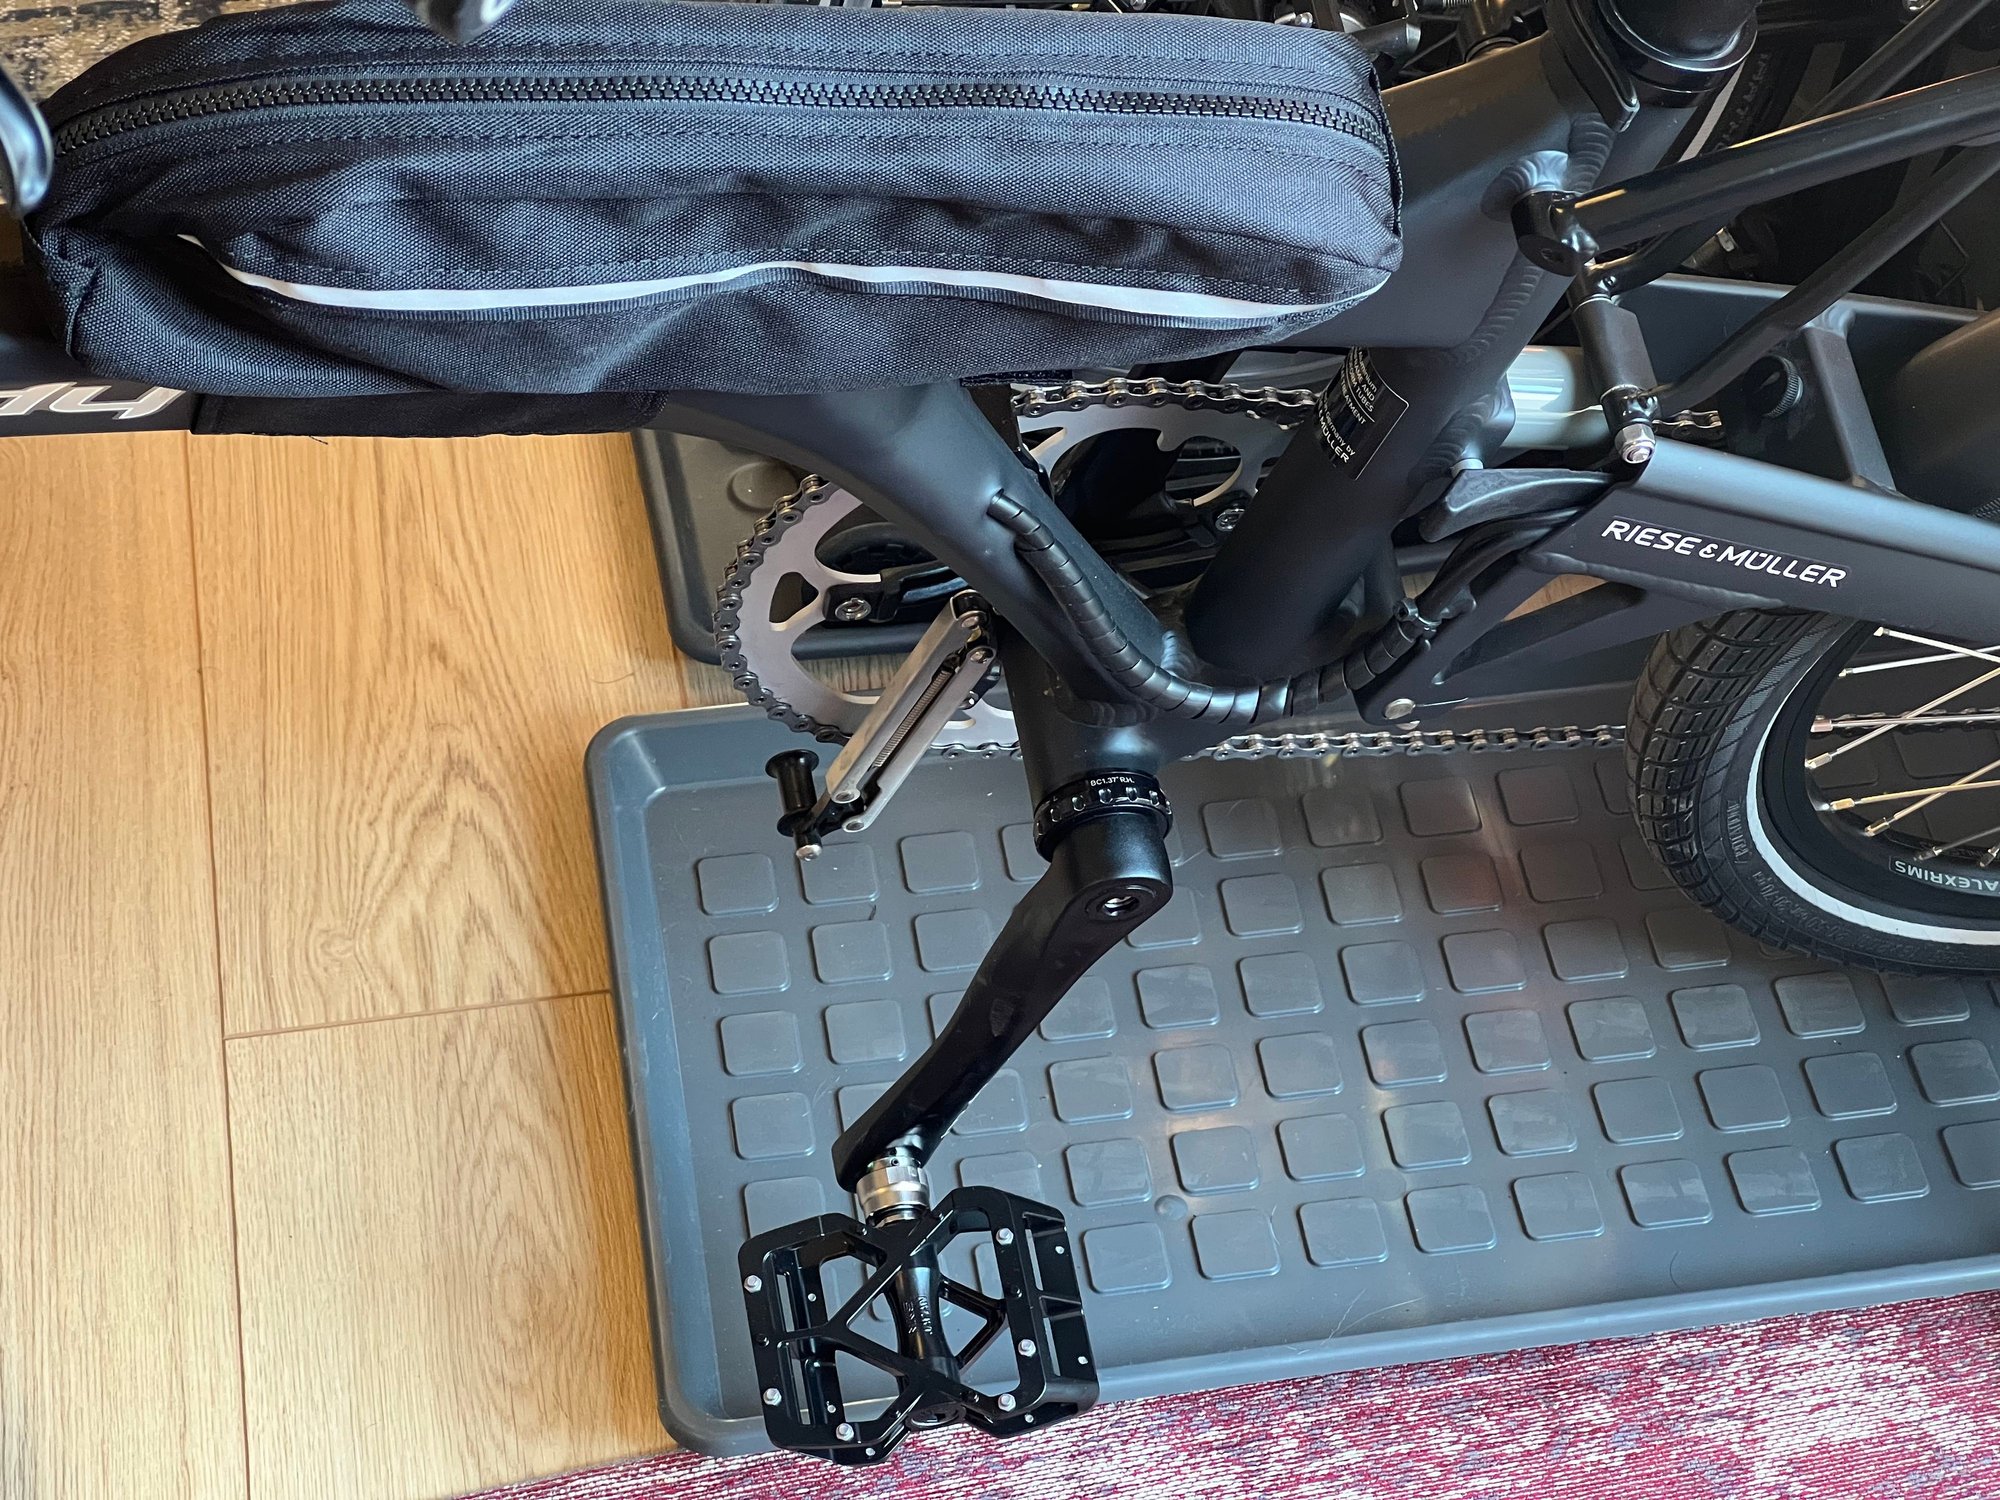
Received and installed few goodies today. R&M bag, my favorite MKS Allways Ezy Superior pedals and hard elastomer for rear suspension.
The bag is pretty amazing how well thought out it is. However I�m wondering what are these two velcros in the right zip pocket are for?

The bag is pretty amazing how well thought out it is. However I�m wondering what are these two velcros in the right zip pocket are for?
07-26-22, 10:25 AM
#2037
Full Member
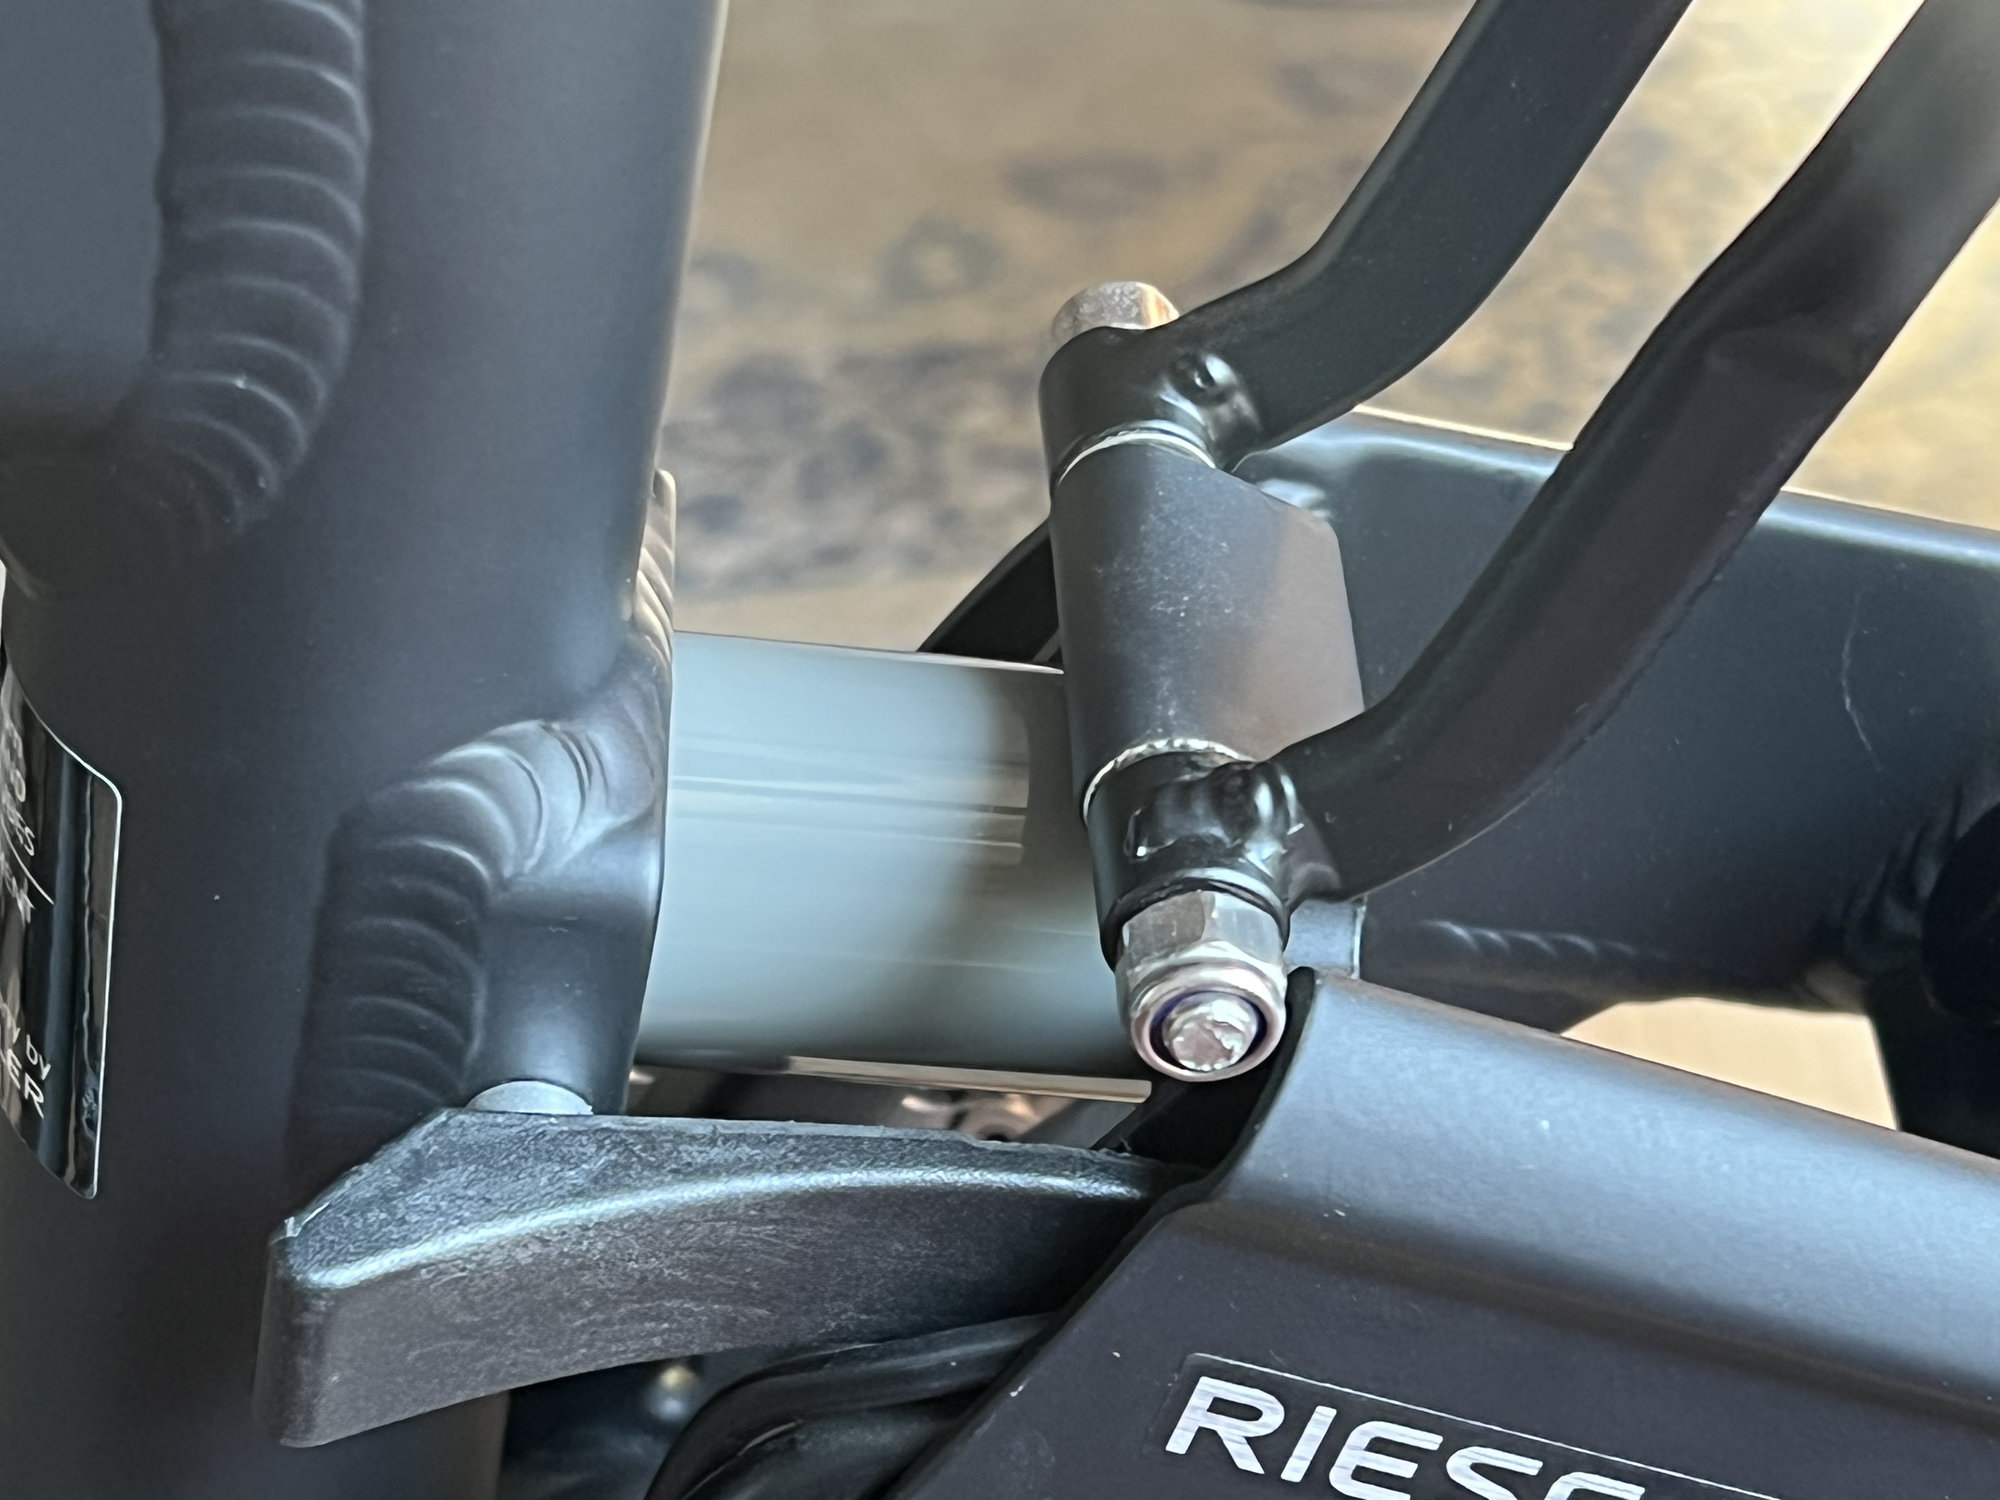
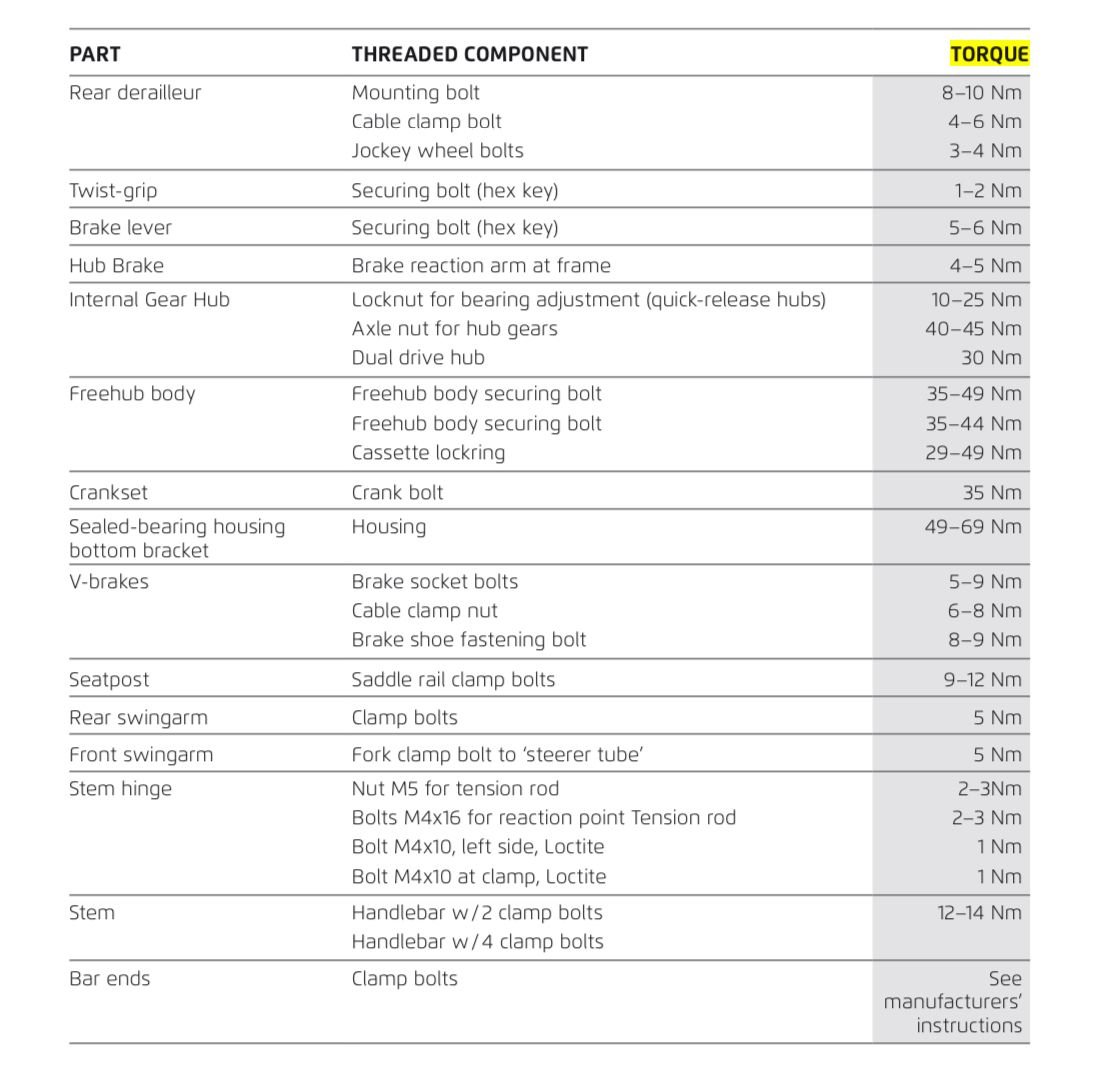
Sorry for posting so much today, still very excited with this bicycle. I want to check handlebar stem for correct torque tightness as handlebar was moved left and right relatively easy but I can�t understand how these 3 bolts are named in the user manual torque table. Could someone assist?

07-26-22, 03:53 PM
#2038
Senior Member
Join Date: Feb 2017
Posts: 1,543
Mentioned: 4 Post(s)
Tagged: 0 Thread(s)
Quoted: 800 Post(s)
Likes: 0
Liked 247 Times
in
211 Posts
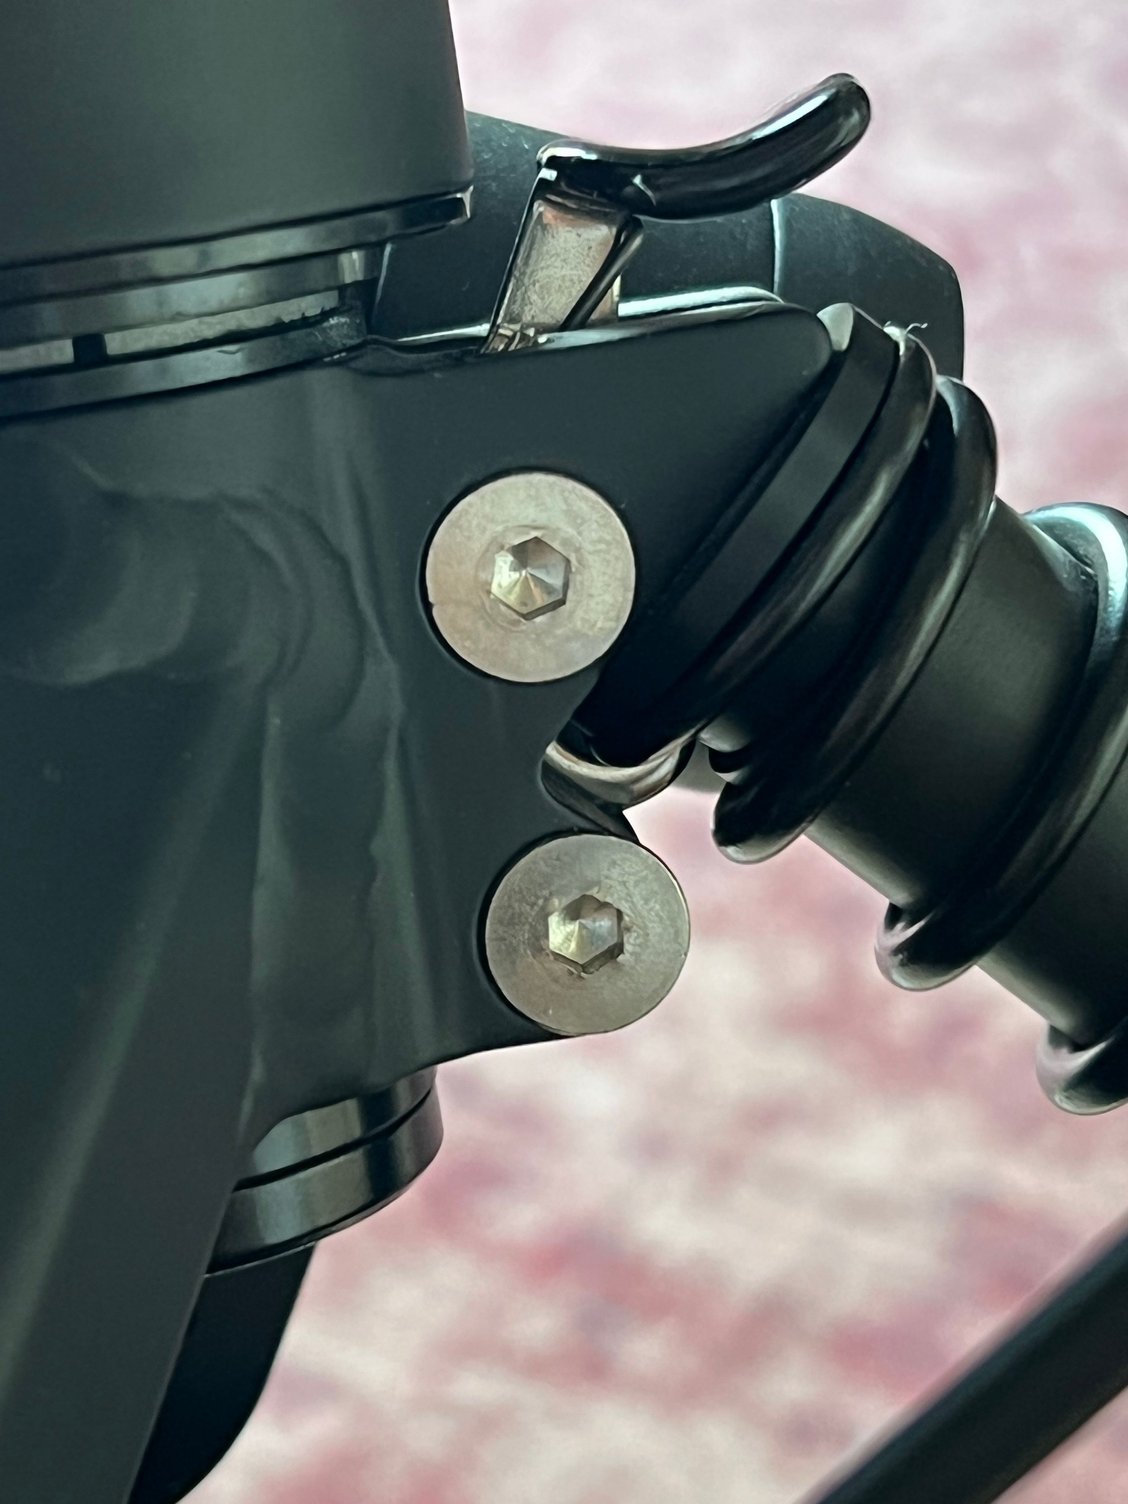
The Birdy stem mounting is an Ahead type of stem but inverted: the fork is like the stem of a regular Ahead, the stem is like the fork of a regular Ahead with a tube inserted in the fork, the fork being tightened around the stem tube. And has with any Ahead, there is a bold to adjust the bearing play which on the Birdy is between the fork legs that can be seen on the picture below (torx head bold):
The two bold on the picture below are for tightening the fork around the stem tube (they must be untightened before adjusting the bearing play with the bold above and then retightened).
The two bold on the picture below are for tightening the fork around the stem tube (they must be untightened before adjusting the bearing play with the bold above and then retightened).
07-27-22, 12:05 AM
#2040
Full Member
thank you very much Jipe!
This is the information about my front suspension and the rear suspension - a newer version released in early 2021.
This is the information about my front suspension and the rear suspension - a newer version released in early 2021.
Product page says it�s 75% more rigid than stock block. Which stock block I wonder, hard PU stock? Also if it�s PU based what�s the difference at all to the stock PU suspension block?
07-27-22, 12:05 AM
#2041
Senior Member
Join Date: Feb 2017
Posts: 1,543
Mentioned: 4 Post(s)
Tagged: 0 Thread(s)
Quoted: 800 Post(s)
Likes: 0
Liked 247 Times
in
211 Posts
For the bearing play adjustment bold, it must not be really tightened, it must be adjusted to have no play in the bearing.
For the two others, I don't know the torque value.
I didn't adjust the wheel stopper plug after switching from the factory mounted Marathon Racer to the Big Apple (what I did is removing one plastic washer between the fender and fork on the bolt at front of the fender to have more clearance between fender and tire). You just need to push the wheel harder to make it go over the wheel stopper plug.
07-27-22, 12:45 AM
#2042
Full Member
Thanks Jipe but it didn�t work for me. Stopper was so deep into the tire that I�m pretty sure it will cause tire damage if left like this for prolonged time. BYW how frequent do you check tire pressure on Big Apples? I�d assume they will loose air much slower than high pressure Brompton tires which I had to control weekly.
07-27-22, 02:42 AM
#2043
Senior Member
Join Date: Feb 2017
Posts: 1,543
Mentioned: 4 Post(s)
Tagged: 0 Thread(s)
Quoted: 800 Post(s)
Likes: 0
Liked 247 Times
in
211 Posts
As you an see, on a Birdy with front light, the stopper plug is mounted on the front light adapter plate. This one can be adjusted .
Maybe this plate is not placed the same on your bike as on my bike?
On Birdy without front light, the stopper plug is directly bolted in the fork and its possible to do so on a Birdy with front light by mounting it on the left side of the fork that has the same threaded hole than on the right side (hole which is used to mount the front light adapter plate).
07-27-22, 02:47 AM
#2044
Full Member
As you an see, on a Birdy with front light, the stopper plug is mounted on the front light adapter plate. This one can be adjusted .
Maybe this plate is not placed the same on your bike as on my bike?
On Birdy without front light, the stopper plug is directly bolted in the fork and its possible to do so on a Birdy with front light by mounting it on the left side of the fork that has the same threaded hole than on the right side (hole which is used to mount the front light adapter plate).
Maybe this plate is not placed the same on your bike as on my bike?
On Birdy without front light, the stopper plug is directly bolted in the fork and its possible to do so on a Birdy with front light by mounting it on the left side of the fork that has the same threaded hole than on the right side (hole which is used to mount the front light adapter plate).

But I can�t see how it can be adjusted in depth, so I simply removed the plastic stopper which is secured with a screw. Light adaptor remains there. Also I don�t see how this stopper it can be mounted on the fork as it�s designed to be mounted on a bracket with screw on the other side.
07-27-22, 02:55 AM
#2045
Senior Member
Join Date: Feb 2017
Posts: 1,543
Mentioned: 4 Post(s)
Tagged: 0 Thread(s)
Quoted: 800 Post(s)
Likes: 0
Liked 247 Times
in
211 Posts
The front light adapter plate position can be adjusted what also changes the position of the stopper plug, maybe changing the position of the plate would help ?
On the Birdy without front light, the plug is different and can be adjusted (at least the one I have mounted on my Ti Birdy, but this bike is different from a Birdy III, so I am never sure that it will be the same on a Birdy III).
Now what you could do to mount the stopper plug on the right side in the fork threaded hole is to put in the thread of the stopper plug a short threaded rod with one or two nuts and use the nut/nuts to adjust the length of the stopper lug.
Last edited by Jipe; 07-27-22 at 03:09 AM.
07-27-22, 03:22 AM
#2046
Full Member
I don�t think moving light bracket will change depth pf the plastic stopper as it remains parallel to the fork. I�m planning to ordered these and use one on one side or maybe two. These are specifically designed as wheel stoppers.

07-27-22, 04:08 AM
#2047
Senior Member
Join Date: Feb 2017
Posts: 1,543
Mentioned: 4 Post(s)
Tagged: 0 Thread(s)
Quoted: 800 Post(s)
Likes: 0
Liked 247 Times
in
211 Posts
This is exactly what suggested you to make with the current stopper plug and a piece of threaded rod+a nut !
A stopper on one side is enough.
You have seen the picture of my Birdy/fork, it has Big Apple and it works.
The R&M Birdy Rohloff come from factory with the same front light assembly and Big Apple and it of course works, below a picture of such a Birdy Rohloff:

.
A stopper on one side is enough.
You have seen the picture of my Birdy/fork, it has Big Apple and it works.
The R&M Birdy Rohloff come from factory with the same front light assembly and Big Apple and it of course works, below a picture of such a Birdy Rohloff:
.
07-27-22, 04:15 AM
#2048
Full Member
I don�t have a piece of threaded rod and if I can order one I don�t have the tools to cut it to length. I understand how it maybe done but I guess I�ll need to see if I can do it.
07-27-22, 06:07 AM
#2049
Senior Member
Join Date: Feb 2017
Posts: 1,543
Mentioned: 4 Post(s)
Tagged: 0 Thread(s)
Quoted: 800 Post(s)
Likes: 0
Liked 247 Times
in
211 Posts
Did you try to mount your chanring at the inner position what reduces the chainline and might allow you to remount a 11-36t cassette ?
07-27-22, 06:22 AM
#2050
Full Member

CEBEP, I thought your chain rubbing problem was with the original, medium elastomer? Could the new harder elastomer allow 34-36t?
If not, it might be possible to raise the swingarm just enough by inserting a shim of a hard material between the elastomer and the swingarm. This must be done with great care and in small millimeter increments, and it may void the warranty. But done carefully it could allow you to use the 36t.