


Which bottom bracket tool - 1987 Peugeot)
 07-15-21, 07:39 AM
#1
Full Member
Thread Starter
Which bottom bracket tool - 1987 Peugeot)
Hi all,
I picked up an old - what I'm pretty sure is - 1987 Peugeot Orient Express. Going to completely strip it and rebuild. I've never dealt with BB's before but I'm trying to teach myself. I was wondering if anyone knew which BB this had and which tool I'd need to take it off. I'm heading to the bike shop today to buy the crank arm remover and need to also pick up the BB tool but figured I'd throw this out there to see if anyone knew which it might be so I didn't have to make multiple trips to the bike shop. I've read that after around 1984 these should have British/English threading and this bike was made in Japan. Here's pics I have so far, just removing the crank bolts.
Back story: I saw these bikes and really liked the style and read they were decent bikes for their day. Thought it'd be cool to convert one to a gravel bike. This one was in pretty rough shape but I picked it up for $10. Going to try all the rust removal etc. I know it's probably not worth the money in the long run to add all new parts but the biggest part of this journey is me learning how to do everything and experimenting/getting comfortable working on bikes and building from the ground up. I'm taking a lot of pics of the process and will be adding a thread about it.
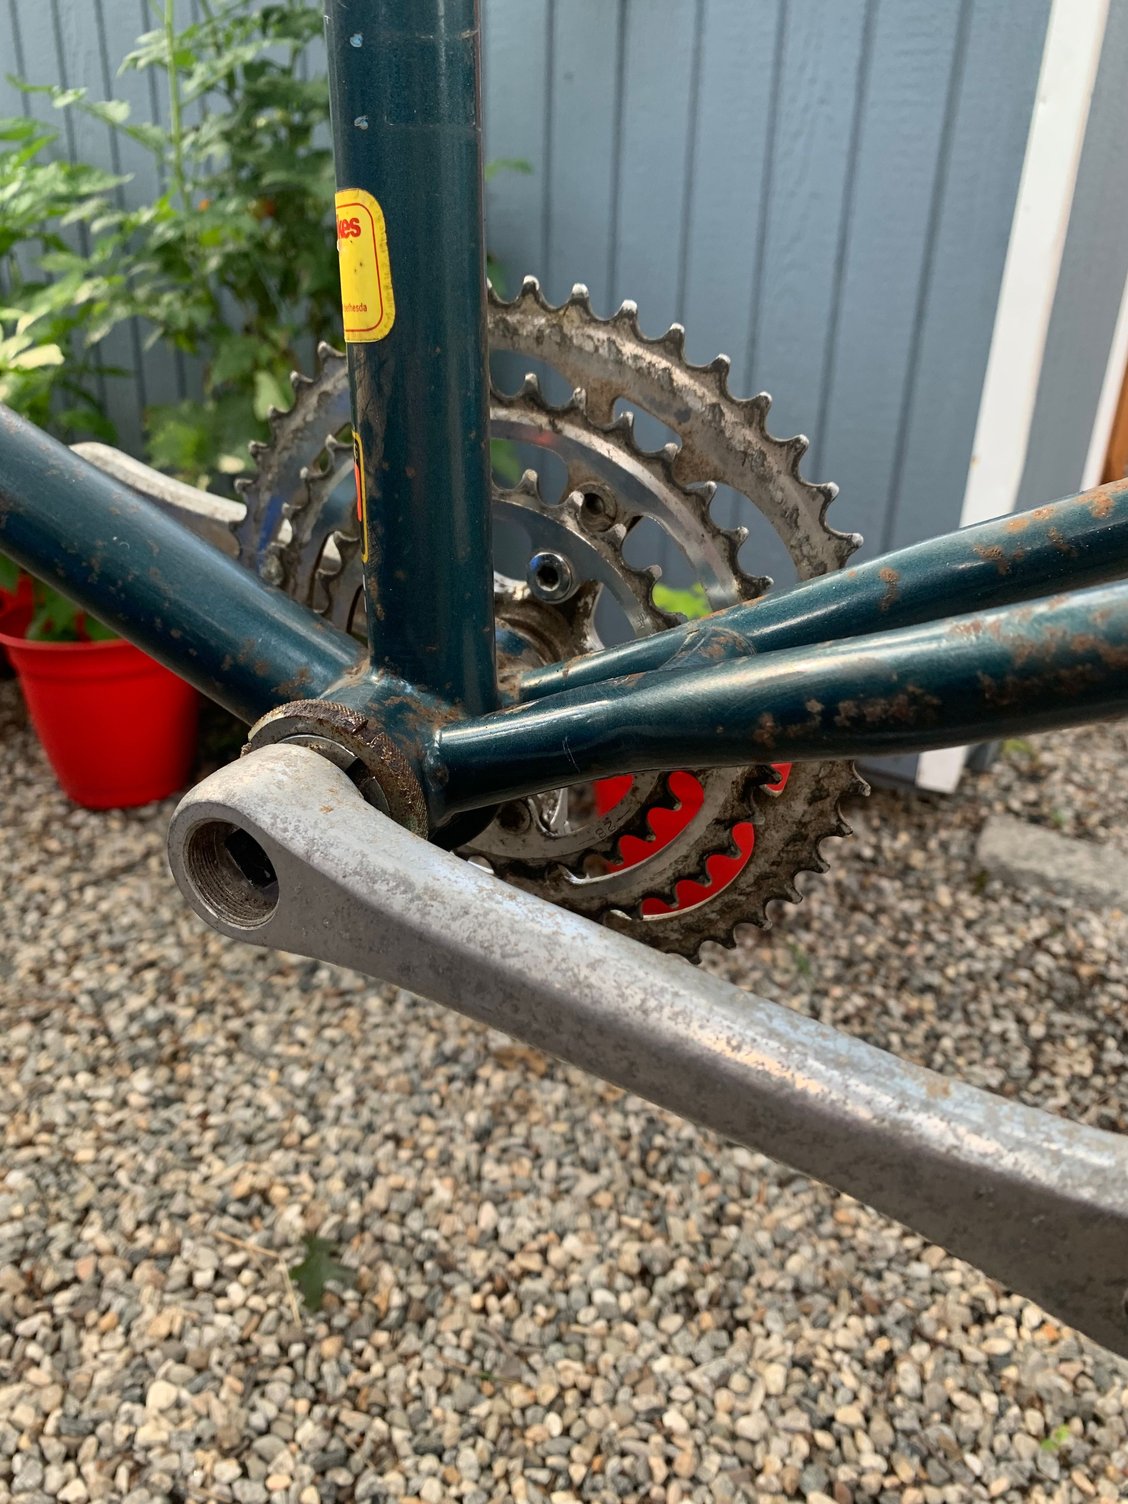
 07-15-21, 09:57 AM
#2
Really Old Senior Member

For the NDS it looks like maybe a B & C.
Can't tell DS.
Can't tell DS.
07-15-21, 11:07 AM
#3

Old fart

Join Date: Nov 2004
Location: Appleton WI
Posts: 24,774
Bikes: Several, mostly not name brands.
Mentioned: 153 Post(s)
Tagged: 0 Thread(s)
Quoted: 3580 Post(s)
Liked 3,393 Times
in
1,927 Posts
The Sakae Ringyo crank arms can be removed with a standard 22mm crank tool. A hook spanner like the Hozan C-205 will remove the lockring from the adjustable cup, and the Park HCW-11 will allow you to remove and adjust the cup. Don't bother removing the fixed cup unless you need to replace the entire bottom bracket. Just clean in out in situ and repack with fresh balls and grease.

Likes For JohnDThompson:
07-15-21, 11:15 AM
#4
Full Member
Thread Starter
Thanks all, I'll look into these. I know my bike shop has the crank tool, might have to order the other ones.
The BB sounds pretty gritty in spinning it. One step of this process is soaking the frame in oxalic acid to remove the rust so I just assumed I should completely remove the BB for this process. I already did the fork and it made quite a bit of difference.
The BB sounds pretty gritty in spinning it. One step of this process is soaking the frame in oxalic acid to remove the rust so I just assumed I should completely remove the BB for this process. I already did the fork and it made quite a bit of difference.
07-15-21, 02:52 PM
#5
Senior Member

Join Date: Feb 2017
Location: Northern Shenandoah Valley
Posts: 4,138
Bikes: More bikes than riders
Mentioned: 36 Post(s)
Tagged: 0 Thread(s)
Quoted: 1443 Post(s)
Liked 759 Times
in
568 Posts
You'll likely see two wrench flats on the fixed cup that you can use during removal. But the late '80s, I'm pretty sure Peugeot had moved to the British threading, which is left-hand threads on the drive/fixed cup side. That is, you'll turn it to the right to loosen it.
If the BB is gritty enough that you want to service it, you may consider replacing it with a cartridge style. If the BB shell is indeed British threaded, this'll really open up your options here. If it's French or Swiss threaded, then you may need to stick with cleaning up the original parts.
If the BB is gritty enough that you want to service it, you may consider replacing it with a cartridge style. If the BB shell is indeed British threaded, this'll really open up your options here. If it's French or Swiss threaded, then you may need to stick with cleaning up the original parts.
07-15-21, 08:01 PM
#6
Junior Member
Join Date: Sep 2011
Location: San Juan, PR
Posts: 159
Bikes: 1980's Royce Union "fixed wheel", 1995 Trek 370, 406 -wheeled " shopper/minivelo"for running errands, SS Raleigh M60
Mentioned: 0 Post(s)
Tagged: 0 Thread(s)
Quoted: 43 Post(s)
Liked 58 Times
in
46 Posts
If you plan on doing bottom bracket maintenance occasionally/only on your bike (and you have the tools or know someone who has them and/or time), you can make a lock ring pliers and a "Sheldon Brown fixed cup tool" easily and cheaply. I've had my set for 5 years now, and have worked pretty well on my bikes (albeit none's a classic or something valuable/rare!). Here's my set, and the link for the Sheldon's bottom bracket tool.
https://www.sheldonbrown.com/tooltips/bbcups.html
For the adjustable cup, you could try an adjustable pin spanner wrench.
https://www.sheldonbrown.com/tooltips/bbcups.html
For the adjustable cup, you could try an adjustable pin spanner wrench.
Likes For Juan el Boricua:
07-15-21, 08:08 PM
#7

Super Moderator

Join Date: Jul 2004
Location: Ffld Cnty Connecticut
Posts: 21,843
Bikes: Old Steelies I made, Old Cannondales
Mentioned: 12 Post(s)
Tagged: 0 Thread(s)
Quoted: 1173 Post(s)
Liked 927 Times
in
612 Posts
You need a puller to remove the cranks. Be sure to thread all the way in first.
__________________
Bikes: Old steel race bikes, old Cannondale race bikes, less old Cannondale race bike, crappy old mtn bike.
FYI: https://www.bikeforums.net/forum-sugg...ad-please.html
Bikes: Old steel race bikes, old Cannondale race bikes, less old Cannondale race bike, crappy old mtn bike.
FYI: https://www.bikeforums.net/forum-sugg...ad-please.html
07-16-21, 09:31 AM
#8
Senior Member
Join Date: May 2004
Location: Southern California
Posts: 2,191
Mentioned: 1 Post(s)
Tagged: 0 Thread(s)
Quoted: 114 Post(s)
Liked 119 Times
in
92 Posts
Years ago, I didn't look closely and left the washer in place. When I tried to remove the crankarm with the crank puller, I learned a valuable lesson that I will never forget.
07-16-21, 12:02 PM
#9
Bikes are okay, I guess.

Join Date: Jan 2015
Location: Richmond, Virginia
Posts: 6,938
Bikes: Waterford Paramount Touring, Giant CFM-2, Raleigh Sports 3-speeds in M23 & L23, Schwinn Cimarron oddball build, Marin Palisades Trail dropbar conversion, Nishiki Cresta GT
Mentioned: 69 Post(s)
Tagged: 0 Thread(s)
Quoted: 2647 Post(s)
Liked 2,446 Times
in
1,557 Posts
Big Wheel Bikes in D.C. and environs. What a place!
07-20-21, 12:37 PM
#10
Full Member
Thread Starter
Thanks again all. I bought the Park Tools CWP-7 but still can't seem to get the cranks off. Definitely no washer in there but as soon as tighten it down it just stops. I've tried holding the large part that screws into the threads and just turning the inner part that pushes against the BB to no avail - both sides. Any tips? I read someone say heat it up with a torch to loosen it up. Might invest in a 3-jaw puller as well. These things are not budging at all. Also pretty positive I'm using the correct (smaller) side for these square tapered cranks.
07-20-21, 01:08 PM
#11
Senior Member
Join Date: May 2004
Location: Southern California
Posts: 2,191
Mentioned: 1 Post(s)
Tagged: 0 Thread(s)
Quoted: 114 Post(s)
Liked 119 Times
in
92 Posts
Thanks again all. I bought the Park Tools CWP-7 but still can't seem to get the cranks off. Definitely no washer in there but as soon as tighten it down it just stops. I've tried holding the large part that screws into the threads and just turning the inner part that pushes against the BB to no avail - both sides. Any tips? I read someone say heat it up with a torch to loosen it up. Might invest in a 3-jaw puller as well. These things are not budging at all. Also pretty positive I'm using the correct (smaller) side for these square tapered cranks.
Last edited by MudPie; 07-20-21 at 01:21 PM.
07-20-21, 01:15 PM
#12
Senior Member
Join Date: May 2004
Location: Southern California
Posts: 2,191
Mentioned: 1 Post(s)
Tagged: 0 Thread(s)
Quoted: 114 Post(s)
Liked 119 Times
in
92 Posts
This is a pretty good video and instructions from Park Tool. Note, he talks about wrench position and mechanical advantage.
https://www.parktool.com/blog/repair...on-three-piece
https://www.parktool.com/blog/repair...on-three-piece
07-20-21, 01:20 PM
#13
Full Member
Thread Starter
For the square taper spindle, yes, the smaller diameter tip is the correct size. You just might need more leverage to pull the crank arm off. Do you have an adjustable wrench that is about as long as the crank arm? Often, the position of the wrench and nearest crank arm helps. For example, I ow the instruction say to screw the fixed part of the puller for the entire depth of the crank arm threads. In the past, I've cheated a bit, and backed the fixed part a quarter turn or so (never more than a full revolution), in order to position the adjustable wrench is an advantageous position. It's often easier to squeeze your hands together, while holding the adjustable wrench and crankarm is a scissor action. Or if you position the adjustable wrench and the crank arm at 90 degrees, that gives you good leverage. Once you break the joint loose, like a 1/4 turn, the arms usually slides right off with little to no force. It's just the initial 1/4 turn that is often very hard.
I might have to take it to my local co-op to see if we can do it there. I have a bike stand but it's not the beefiest thing and not super sturdy.
07-20-21, 02:01 PM
#14
Senior Member
Join Date: May 2004
Location: Southern California
Posts: 2,191
Mentioned: 1 Post(s)
Tagged: 0 Thread(s)
Quoted: 114 Post(s)
Liked 119 Times
in
92 Posts
yeah, i've tried backing off the fixed part and definitely done the scissor trick. And I've tried a regular 15mm wrench and the larger adjustable. It just seems like once the smaller tip screws in where it's touching it just completely stops - no give at all. I checked both sides multiple times thinking there must be a washer in there to be that unforgiving but nothing.
I might have to take it to my local co-op to see if we can do it there. I have a bike stand but it's not the beefiest thing and not super sturdy.
I might have to take it to my local co-op to see if we can do it there. I have a bike stand but it's not the beefiest thing and not super sturdy.
07-20-21, 07:14 PM
#15
Senior Member
Join Date: Oct 2017
Location: Chapel Hill NC
Posts: 1,683
Bikes: 2000 Litespeed Vortex Chorus 10, 1995 DeBernardi Cromor S/S
Mentioned: 4 Post(s)
Tagged: 0 Thread(s)
Quoted: 645 Post(s)
Liked 797 Times
in
446 Posts
Thanks again all. I bought the Park Tools CWP-7 but still can't seem to get the cranks off. Definitely no washer in there but as soon as tighten it down it just stops. I've tried holding the large part that screws into the threads and just turning the inner part that pushes against the BB to no avail - both sides. Any tips? I read someone say heat it up with a torch to loosen it up. Might invest in a 3-jaw puller as well. These things are not budging at all. Also pretty positive I'm using the correct (smaller) side for these square tapered cranks.
If you�re going to try a gear puller, try a two-jaw one - easier to find a couple of spots than three, but I think with adequate leverage a regular crank puller will do the job
Last edited by Litespud; 07-20-21 at 07:19 PM.
Likes For Litespud:


