


SunTour 2 prong Freewheel removal woes!
 07-30-22, 08:21 AM
#1
Newbie
Thread Starter
SunTour 2 prong Freewheel removal woes!
I'm having a pain of a job trying to free a not-very-free freewheel.
Sadly, being new here I can't yet post the detailed photo I've taken of it.
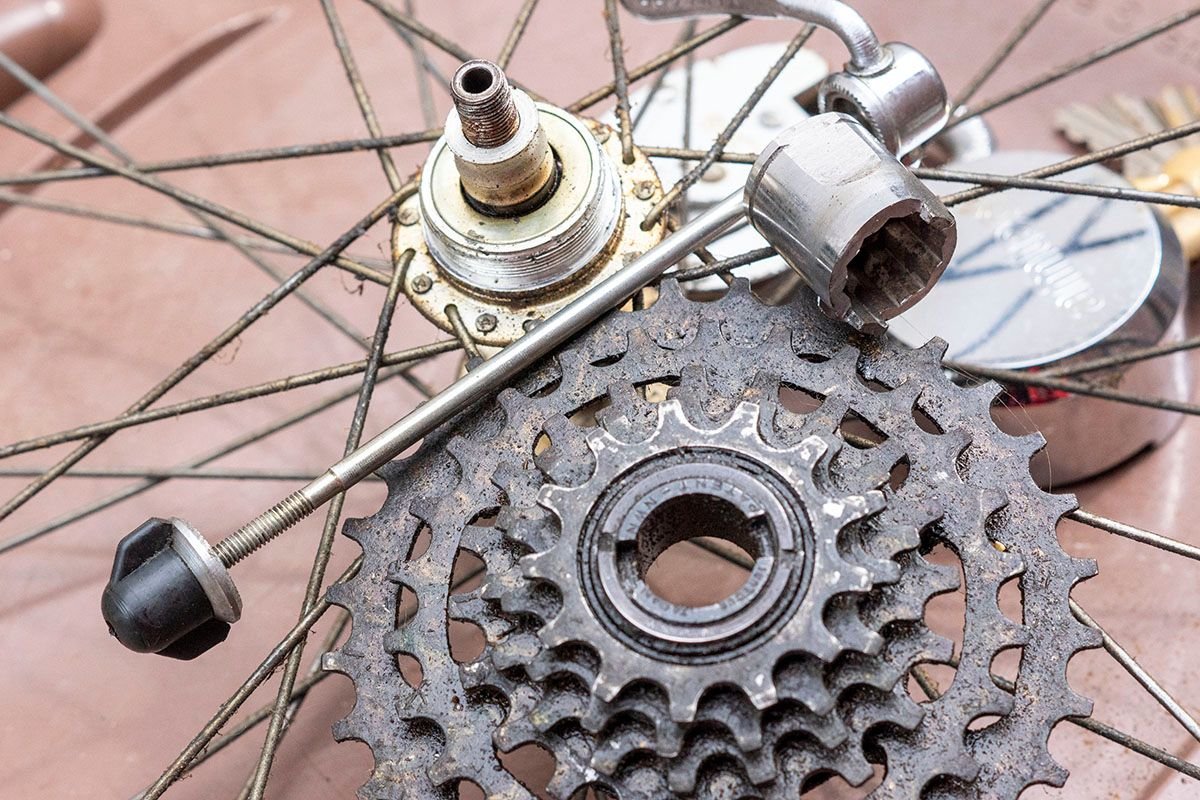
Within the centre of the top cog, but outside the centre hole occupied by the axle, are two locking rings - the outer thinner ring has "MAEDA INDUSTRIES LTD" and "<<<------UNSCREW" stamped into it....it's 2 small grooves seem bevelled towards the outside.
The inner, thicker ring has "SunTour Japan VF (possibly VE)" and "Patent - NWN" stamped into it & the 2 slots for removal are 7mm long.
I've "made" a 2 prong tool from a socket but the whole thing just seems too tight (turning anti-clockwise).
I've also tried driving the smaller, outer slots round with hammer/punch, but again, no joy.
Does one lock the other?
Do both need freeing?
Is this one of those where I could simply turn off the top cog with a couple of chain whips?
I intend to keep/service the whole thing, so destruction is really a very last option.
Thanks for any advice given - I can't find an image or video on the internet for this particular assembly.
Sadly, being new here I can't yet post the detailed photo I've taken of it.
Within the centre of the top cog, but outside the centre hole occupied by the axle, are two locking rings - the outer thinner ring has "MAEDA INDUSTRIES LTD" and "<<<------UNSCREW" stamped into it....it's 2 small grooves seem bevelled towards the outside.
The inner, thicker ring has "SunTour Japan VF (possibly VE)" and "Patent - NWN" stamped into it & the 2 slots for removal are 7mm long.
I've "made" a 2 prong tool from a socket but the whole thing just seems too tight (turning anti-clockwise).
I've also tried driving the smaller, outer slots round with hammer/punch, but again, no joy.
Does one lock the other?
Do both need freeing?
Is this one of those where I could simply turn off the top cog with a couple of chain whips?
I intend to keep/service the whole thing, so destruction is really a very last option.
Thanks for any advice given - I can't find an image or video on the internet for this particular assembly.
 07-30-22, 08:56 AM
#2
Senior Member

Join Date: Aug 2015
Posts: 3,282
Mentioned: 39 Post(s)
Tagged: 0 Thread(s)
Quoted: 1134 Post(s)
Liked 1,726 Times
in
950 Posts
It can take some effort, the last Suntour freewheel I removed I needed the tool clamped to the body and a long cheater to extend the wrench.
 07-30-22, 09:00 AM
#3

Full Member
I usually put the freewheel tool in a vise, set the wheel with freewheel down and unscrew. As Mr. 66 mentioned they can be on there pretty darn tight. Take your time and I noted that you "made" a 2 prong tool. You need to make sure this tool is right and not sloppy so that it slips off the freewheel. Good luck.
Likes For Steelman54:
07-30-22, 09:29 AM
#4
I am potato.

Join Date: Jun 2015
Location: Pacific Northwest
Posts: 3,104
Bikes: Only precision built, custom high performance elitist machines of the highest caliber. 🍆
Mentioned: 28 Post(s)
Tagged: 0 Thread(s)
Quoted: 1782 Post(s)
Liked 1,621 Times
in
927 Posts
...And install the axle nut to hold the tool in place.
__________________
I shouldn't have to "make myself more visible;" Drivers should just stop running people over.
Car dependency is a tax.
I shouldn't have to "make myself more visible;" Drivers should just stop running people over.
Car dependency is a tax.
07-30-22, 10:09 AM
#5
Friendship is Magic

Join Date: Nov 2010
Location: Sacramento, CA
Posts: 22,983
Bikes: old ones
Mentioned: 304 Post(s)
Tagged: 0 Thread(s)
Quoted: 26381 Post(s)
Liked 10,357 Times
in
7,194 Posts
.
...these are difficult to remove when they've been in place a long time...which is mot of them. This applies even using the correct, purpose built tool for removal. I cannot imagine trying to remove one using a homemade tool ground from a socket. What usually happens is that the wheel and freewheel assembly slips off the tool prongs, and this leads to damaging the either the tool prongs themselves, rounding the flats and corners, or damage to the removal slots themselves.
I presume that the "outer ring" you mention is the one that holds the freewheel cog mounting base to the freewheel body itself. You don't take that apart to remove the freewheel, and if you do, it is left hand threaded, not right hand like the mounting threads themselves that attach to the hub threads. What will happen if you do that is that all the little pawls, bearings, and springs will drop out, when you lift off the cogs. They will drop on the floor and hide under your workbench.
But if the slots for removal of the entire freewheel assembly are damaged enough, you'll never get it off except through destructive removal. Which is accomplished by doing exactly that, as described above, then using a bench vise to clamp the freewheel body, while you twist the wheel to remove the hub threads from the freewheel. There has to be at least one Youtube video that shows you what I mean, under "destructive removal of freewheel". That way, you at least save the hub and wheel assembly.
My first step in your situation would be to find and borrow or buy the genuine two prong removal tool for Suntour. And mix up a batch of 50/50 ATF and acetone, using it for a penetrating oil at the interface between the freewheel body and the hub threads. Many of these freewheels were origanlly mounted without using grease or anti-seize. So there's been some corrosive binding over the years of steel freewheel body to aluminum alloy hub threads. Sometimes they just cannot be salvaged.
__________________
Likes For 3alarmer:
07-30-22, 10:12 AM
#6
Friendship is Magic
Join Date: Nov 2010
Location: Sacramento, CA
Posts: 22,983
Bikes: old ones
Mentioned: 304 Post(s)
Tagged: 0 Thread(s)
Quoted: 26381 Post(s)
Liked 10,357 Times
in
7,194 Posts

__________________
Likes For 3alarmer:
07-30-22, 10:26 AM
#7
Full Member
Join Date: Sep 2007
Location: seoul korea
Posts: 460
Bikes: 3Rensho SuperRecord Export, Bridgestones MB1 RB1 XO2, Colnago Super, Medici GranTurismo, Schwinn Paramount, Olmo Competition, Raleigh Portage, Miyata 1000, Stumpjumper, Lotus Competition, Nishiki Maxima, Panasonic DX6000, Zeus Criterium
Mentioned: 2 Post(s)
Tagged: 0 Thread(s)
Quoted: 30 Post(s)
Likes: 0
Liked 80 Times
in
34 Posts
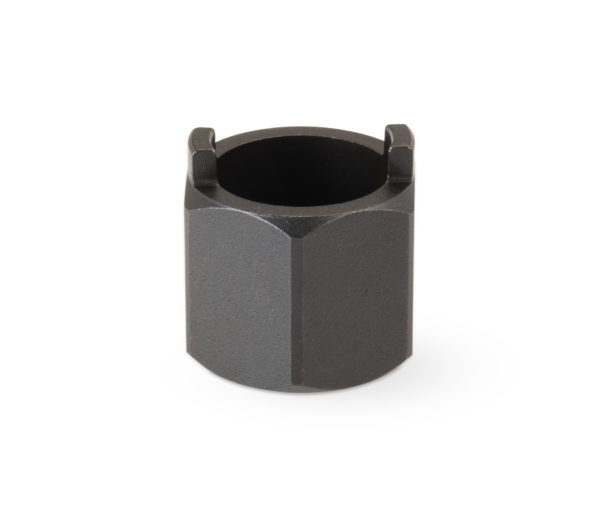
just in case you've damaged the two notches beyond using the suntour two prong removal tool :
 07-30-22, 10:38 AM
#9
Senior Member
Join Date: Oct 2014
Location: Portland, OR
Posts: 12,890
Bikes: (2) ti TiCycles, 2007 w/ triple and 2011 fixed, 1979 Peter Mooney, ~1983 Trek 420 now fixed and ~1973 Raleigh Carlton Competition gravel grinder
Mentioned: 129 Post(s)
Tagged: 0 Thread(s)
Quoted: 4789 Post(s)
Liked 3,915 Times
in
2,546 Posts
I usually put the freewheel tool in a vise, set the wheel with freewheel down and unscrew. As Mr. 66 mentioned they can be on there pretty darn tight. Take your time and I noted that you "made" a 2 prong tool. You need to make sure this tool is right and not sloppy so that it slips off the freewheel. Good luck.
Edit: base2 mentions using the hub nut to secure the remover. If quick release, use it. (For both, remember to back them off as you unscrew the FW. When using this much force, forgetting the obvious happens, And man, is it hard to unscrew that FW against that restraining nut/QR!)
Bench vises - I bought my first house to have a place to bolt one to. In years of apartment life, I did just fine with everything else but living 3000 miles from my dad's vise just didn't work. Bought the house n September. By December, a 5" vise was bolted to a 1/2" 100# steel plate on the workbench. Straightened some frames with it. Next house - bought 4x4s, flooring plywood and 1/2" ply for the table. Vise bolted to it. In the first few weeks after move-in.
And what I didn't know back then - no bench vise? Do you have a local bike coop? They've got one for sure. (The remover also.)
Last edited by 79pmooney; 07-30-22 at 10:47 AM.
07-30-22, 11:11 AM
#10
Really Old Senior Member

 07-30-22, 12:55 PM
#11
Newbie
Thread Starter
I live in the UK - the parktool FR2 is approx USD 21 here inc shipping - I only paid USD 35 for the bike in question - the wheels were kaput, so I paid USD 25 for an old Weinmann pair which this freewheel's attached to.
With new tyres, tubes, cables, brake shoes already bought the bike is now worth far less than the sum of it's parts & I'm trying to keep costs down.
I have a good friend who's very useful with power tools, so we're giving it a go.
With new tyres, tubes, cables, brake shoes already bought the bike is now worth far less than the sum of it's parts & I'm trying to keep costs down.
I have a good friend who's very useful with power tools, so we're giving it a go.
07-30-22, 02:42 PM
#12
Senior Member
Join Date: Oct 2014
Location: Portland, OR
Posts: 12,890
Bikes: (2) ti TiCycles, 2007 w/ triple and 2011 fixed, 1979 Peter Mooney, ~1983 Trek 420 now fixed and ~1973 Raleigh Carlton Competition gravel grinder
Mentioned: 129 Post(s)
Tagged: 0 Thread(s)
Quoted: 4789 Post(s)
Liked 3,915 Times
in
2,546 Posts
The danger is that if your tool fails, it may take the FW with it. Then you are reduced to the FW destroying methods of removal and I presume you'd have to buy a new one.
Likes For 79pmooney:
07-30-22, 03:05 PM
#13

Senior Member

Join Date: Jan 2005
Location: Baltimore, MD
Posts: 5,361
Mentioned: 15 Post(s)
Tagged: 0 Thread(s)
Quoted: 2479 Post(s)
Liked 2,947 Times
in
1,673 Posts
As noted in an earlier post, but repeated here for emphasis:
The crucial factor for using 2-prong Suntour removers with stubborn freewheels (i.e., almost all of them by now) is that the tool must be clamped to the freewheel as firmly as possible. That means fixing the tool against the freewheel with an axle nut or a quick-release skewer. Important: use about as much force as you use to secure the wheel in the dropouts.
Once you've secured the removal tool in place, then turn it just far enough to break the freewheel free of the hub. A few degrees of rotation will do it. Once the freewheel has moved, loosen the axle nut or QR skewer a little and then turn the tool a bit more. You will then be able to run the freewheel the rest of the way off the hub.
Skeptical? I once saw a mechanic who was working for me ruin two Suntour freewheel pullers, one right after the other, damaging the slots in the freewheel in the process. I stopped him from grabbing the last puller we had in the shop and secured the tool as decribed above. Even though the freewheel slots were deformed, I had the freewheel off in 20 seconds.
Likes For Trakhak:
07-30-22, 04:13 PM
#14
Senior Member
Join Date: Feb 2012
Location: Rochester, NY
Posts: 18,053
Bikes: Stewart S&S coupled sport tourer, Stewart Sunday light, Stewart Commuting, Stewart Touring, Co Motion Tandem, Stewart 3-Spd, Stewart Track, Fuji Finest, Mongoose Tomac ATB, GT Bravado ATB, JCP Folder, Stewart 650B ATB
Mentioned: 0 Post(s)
Tagged: 0 Thread(s)
Quoted: 4194 Post(s)
Liked 3,837 Times
in
2,295 Posts
Sounds resourceful, but I've never heard of anybody doing that successfully. It's difficult enough to remove these 2-prong freewheels. The Park FR-2 is only $12 (plus tax, unless you're lucky enough to live in NH, DE, MT, AK, or OR).
https://www.ebay.com/itm/19478047132...YAAOSwBIJh9XLO
https://www.ebay.com/itm/19478047132...YAAOSwBIJh9XLO
It is VERY important to have the remover's dogs (those tabs) fit and be held i the FW really well. Always secure the tool against the FW with the QR or axle nut. Only crack loose the initial tightness bond and stop. Loosen/remove the Q or nut and continue removing the FW. Andy
__________________
AndrewRStewart
AndrewRStewart
Likes For Andrew R Stewart:
07-31-22, 03:29 PM
#15
Newbie
Thread Starter
My pal is well on the way to completing the impromptu tool - I've seen a photo & the machining of the open end of the socket to produce 2 square & very strong looking prongs looks superb.
I'll let you all know how we get on with the job!
I'll let you all know how we get on with the job!
07-31-22, 05:08 PM
#16
Old fart

Join Date: Nov 2004
Location: Appleton WI
Posts: 24,776
Bikes: Several, mostly not name brands.
Mentioned: 153 Post(s)
Tagged: 0 Thread(s)
Quoted: 3582 Post(s)
Liked 3,394 Times
in
1,928 Posts
Unless the tool is hardened steel, I'm skeptical that it will work. Since you're already fabricating it, go ahead and try. The tool is more likely to fail than it is to damage the hardened steel freewheel body. But maybe I'm wrong. If it does fail, either buy the proper tool or find a bike shop with the proper tool to remove it for you.
08-01-22, 01:13 AM
#17
Newbie
Thread Starter
OK - you fellas have more experience & knowledge than me (and, probably more expendable income!)...I promise if this goes wrong, and the freewheel survives, I'll admit so on here & get the correct tool. 
08-01-22, 01:33 AM
#18
Senior Member
Join Date: May 2005
Location: SFBay
Posts: 2,334
Bikes: n, I would like n+1
Mentioned: 0 Post(s)
Tagged: 0 Thread(s)
Quoted: 127 Post(s)
Likes: 0
Liked 133 Times
in
108 Posts
All that said, I managed to remove one in a pinch with a DIY mild steel tool last year, so sometimes you get lucky.
08-01-22, 09:05 AM
#19
Thrifty Bill

Join Date: Jan 2008
Location: Mountains of Western NC
Posts: 23,523
Bikes: 86 Katakura Silk, 87 Prologue X2, 88 Cimarron LE, 1975 Sekai 4000 Professional, 73 Paramount, plus more
Mentioned: 96 Post(s)
Tagged: 0 Thread(s)
Quoted: 1236 Post(s)
Liked 964 Times
in
628 Posts
I live in the UK - the parktool FR2 is approx USD 21 here inc shipping - I only paid USD 35 for the bike in question - the wheels were kaput, so I paid USD 25 for an old Weinmann pair which this freewheel's attached to.
With new tyres, tubes, cables, brake shoes already bought the bike is now worth far less than the sum of it's parts & I'm trying to keep costs down.
I have a good friend who's very useful with power tools, so we're giving it a go.
With new tyres, tubes, cables, brake shoes already bought the bike is now worth far less than the sum of it's parts & I'm trying to keep costs down.
I have a good friend who's very useful with power tools, so we're giving it a go.
Another "trick" to finding tools at a lower cost is to search bicycle tool lots. I have bought a single "lot" of tools, where one tool was worth the price of the entire lot. Have to look closely. I've bought lots where I sold just a couple of tools out of the lot that exceeded the price of the entire purchase. At that point, the remaining tools were cheaper than "free". I do NOT look for tool sets, I look for a random pile of tools someone is selling.
Sure enough, I just bought a lot of tools off ebay. 6 tools for the price of 2. Not a deal of the century, but not too bad either.
Last edited by wrk101; 08-01-22 at 10:25 AM.
Likes For wrk101:
08-07-22, 11:21 AM
#20
Newbie
Thread Starter
Well chaps, I'm thrilled but equally relieved to report success in the shed - my pal's diy socket/2 prong adapter worked a treat (held perfectly in the vise in the flatted sides my pal made) & the freewheel is off and cleaned - relatively painlessly too.
I believe it's a 6 speed SunTour Winner - can anyone put a year of issue on this?


I believe it's a 6 speed SunTour Winner - can anyone put a year of issue on this?
Likes For wellerchap:
08-07-22, 01:51 PM
#21
se�or miembro

Join Date: Dec 2018
Location: Pac NW
Posts: 6,597
Bikes: '70s - '80s Campagnolo
Mentioned: 92 Post(s)
Tagged: 0 Thread(s)
Quoted: 3862 Post(s)
Liked 6,450 Times
in
3,190 Posts
Likes For SurferRosa:
08-07-22, 04:11 PM
#22
Newbie
Thread Starter
Likes For wellerchap:


