


Clunker
 09-17-21, 07:54 AM
#26
Senior Member
Thread Starter
Took the frame out of the stand and weighed it this morning. 6.4lb before filing (not that that will take much weight off). Not 'lightweight', but much lighter than the donor frame at ~10lbs.
Also put it back in the jig to check the alignment and it fit almost perfectly. The HT post had to be moved back ~2mm to fit. But, the HT angle is still good (measured at 70.8deg from 71 as laid out). BB post and rear dropouts were perfect. The dropouts closed up maybe 1mm.
Also put it back in the jig to check the alignment and it fit almost perfectly. The HT post had to be moved back ~2mm to fit. But, the HT angle is still good (measured at 70.8deg from 71 as laid out). BB post and rear dropouts were perfect. The dropouts closed up maybe 1mm.
 09-25-21, 04:40 PM
#27
Senior Member
Thread Starter
Filing fillets today. Rough cut is mostly done. Still need some work around the seat tube gusset. It's a tough junction to get into.


Likes For shelgame:
09-27-21, 05:16 PM
#28
Senior Member
Thread Starter
Been looking for handlebars for this bike without much luck finding what I really want. They're out there - just out of stock right now.
I do have ~6' of 7/8 0.035w 4130. I think Might try to make my own bullmoose bars. Anyone else ever build a set? Trying to think about how to jig it up...

I do have ~6' of 7/8 0.035w 4130. I think Might try to make my own bullmoose bars. Anyone else ever build a set? Trying to think about how to jig it up...
Likes For shelgame:
09-28-21, 02:17 AM
#29
Senior Member
Join Date: Dec 2019
Posts: 956
Mentioned: 3 Post(s)
Tagged: 0 Thread(s)
Quoted: 321 Post(s)
Liked 263 Times
in
212 Posts
Good idea! Have never made a whole handlebar but did make, or rather convert, this stem.
The main thing with fixturing is you want your handlebar to be level. Because it's quite long any small errors will be magnified.
I put the handlebar into the stem and just perched it on the table with a few magnets and things while getting a couple of tacks on. With the bar in place it's easy to see and measure the gaps right at the ends. If necessary it can be bent a small amount between tacking and welding, although I didn't need to do that.
With your design I would attach the v shaped bit first, just completely flat on the table, and then add the bit that goes over the steerer last since now you can check for level across the whole length.
https://www.bikeforums.net/framebuil...onversion.html
Likes For guy153:
09-28-21, 05:36 AM
#30
Senior Member
Thread Starter
Here's what I came up with.
Need to make a bending jig to bend the bar. I really wanted a double-bend, but as guy153 mentioned, it's tough to keep the whole bar straight; much less to get both bends in-plane and keep it flat. So, I went with a single bend for simplicity.
Still not 100% sure how I'm going to jig this up, but I have an idea. I want to finish up the fillets on the frame this week. Then maybe I can get to this bar this weekend.
Likes For shelgame:
09-28-21, 08:30 AM
#31


Randomhead
Join Date: Aug 2008
Location: Happy Valley, Pennsylvania
Posts: 24,396
Mentioned: 0 Post(s)
Tagged: 0 Thread(s)
Quoted: 4 Post(s)
Liked 3,696 Times
in
2,517 Posts
It seems like you could build your handlebars combining that design with the luv handles design https://www.cyclemonkey.com/blog/mor...dle-handlebars
Center piece straight and the swept back pieces are separate.
Center piece straight and the swept back pieces are separate.
09-28-21, 10:07 AM
#32
Senior Member
Join Date: Dec 2019
Posts: 956
Mentioned: 3 Post(s)
Tagged: 0 Thread(s)
Quoted: 321 Post(s)
Liked 263 Times
in
212 Posts
It seems like you could build your handlebars combining that design with the luv handles design https://www.cyclemonkey.com/blog/mor...dle-handlebars
Center piece straight and the swept back pieces are separate.
Center piece straight and the swept back pieces are separate.
09-28-21, 11:30 AM
#33
Senior Member
Thread Starter
It seems like you could build your handlebars combining that design with the luv handles design https://www.cyclemonkey.com/blog/mor...dle-handlebars
Center piece straight and the swept back pieces are separate.
Center piece straight and the swept back pieces are separate.
But, I've kind of sold myself on the bullmoose.
09-28-21, 12:03 PM
#34
Randomhead
Join Date: Aug 2008
Location: Happy Valley, Pennsylvania
Posts: 24,396
Mentioned: 0 Post(s)
Tagged: 0 Thread(s)
Quoted: 4 Post(s)
Liked 3,696 Times
in
2,517 Posts
What I meant was you could make a 3 piece bullmoose bar. Okay, 6 piece if you include the stem.
10-02-21, 12:53 PM
#35
Senior Member
Thread Starter
Handlebar bender fail!
I made this jig up (based on dsaul's post in this thread) to bend the bar for the bullmoose, and it won't do it. I just pulled it off the bench. Might try again with more stout mounting. 7/8" x 0.035 4130 is pretty tough stuff.

I made this jig up (based on dsaul's post in this thread) to bend the bar for the bullmoose, and it won't do it. I just pulled it off the bench. Might try again with more stout mounting. 7/8" x 0.035 4130 is pretty tough stuff.
Last edited by shelgame; 10-03-21 at 05:46 AM.
10-02-21, 11:22 PM
#36
Live not by lies.
Join Date: Nov 2020
Posts: 1,306
Bikes: BigBox bikes.
Mentioned: 3 Post(s)
Tagged: 0 Thread(s)
Quoted: 860 Post(s)
Liked 784 Times
in
582 Posts
I made a big arch by tacking the piece to my layout scribe on a fab table. Tack bend with heat. Repeat over and over.
I made all the countertop supports in the dorms at CSUF 11 years ago. I worked off the drawings the sub gave me. Later the general came back with a template where they wanted me to open up a part of the angle iron for the sink pan. The template was plywood and I worked a cutting torch right next to it. A lot of smoke and I had a water squirt fire extinguisher next to me� but the plywood didn�t catch fire.
Hopefully those ideas help.
Likes For SkinGriz:
10-03-21, 08:27 AM
#37
Senior Member
Thread Starter
I�ve made similar bends in ironwork by gradually heating the piece. Handrails for stairs.
I made a big arch by tacking the piece to my layout scribe on a fab table. Tack bend with heat. Repeat over and over.
I made all the countertop supports in the dorms at CSUF 11 years ago. I worked off the drawings the sub gave me. Later the general came back with a template where they wanted me to open up a part of the angle iron for the sink pan. The template was plywood and I worked a cutting torch right next to it. A lot of smoke and I had a water squirt fire extinguisher next to me� but the plywood didn�t catch fire.
Hopefully those ideas help.
If this was 0.049" wall mild steel, it would not be as much a concern to heat.
I'm going to mount this thing better (IE, bigger bolts); and try to set it up so that I'm pushing down to bend rather than up. See if I can't get the bar bent.
10-03-21, 09:06 AM
#38
Senior Member
Join Date: Dec 2019
Posts: 956
Mentioned: 3 Post(s)
Tagged: 0 Thread(s)
Quoted: 321 Post(s)
Liked 263 Times
in
212 Posts
Even if it isn't heat-treated you're still probably losing some cold working. If it is heat-treated though it might not be a good idea to try to bend it cold. Might be preferable to heat it.
But I think heating it would probably be OK especially as the bend is inboard of those two triangulation links in your design. A last resort option maybe.
But I think heating it would probably be OK especially as the bend is inboard of those two triangulation links in your design. A last resort option maybe.
Likes For guy153:
10-03-21, 12:50 PM
#39
Senior Member
Thread Starter
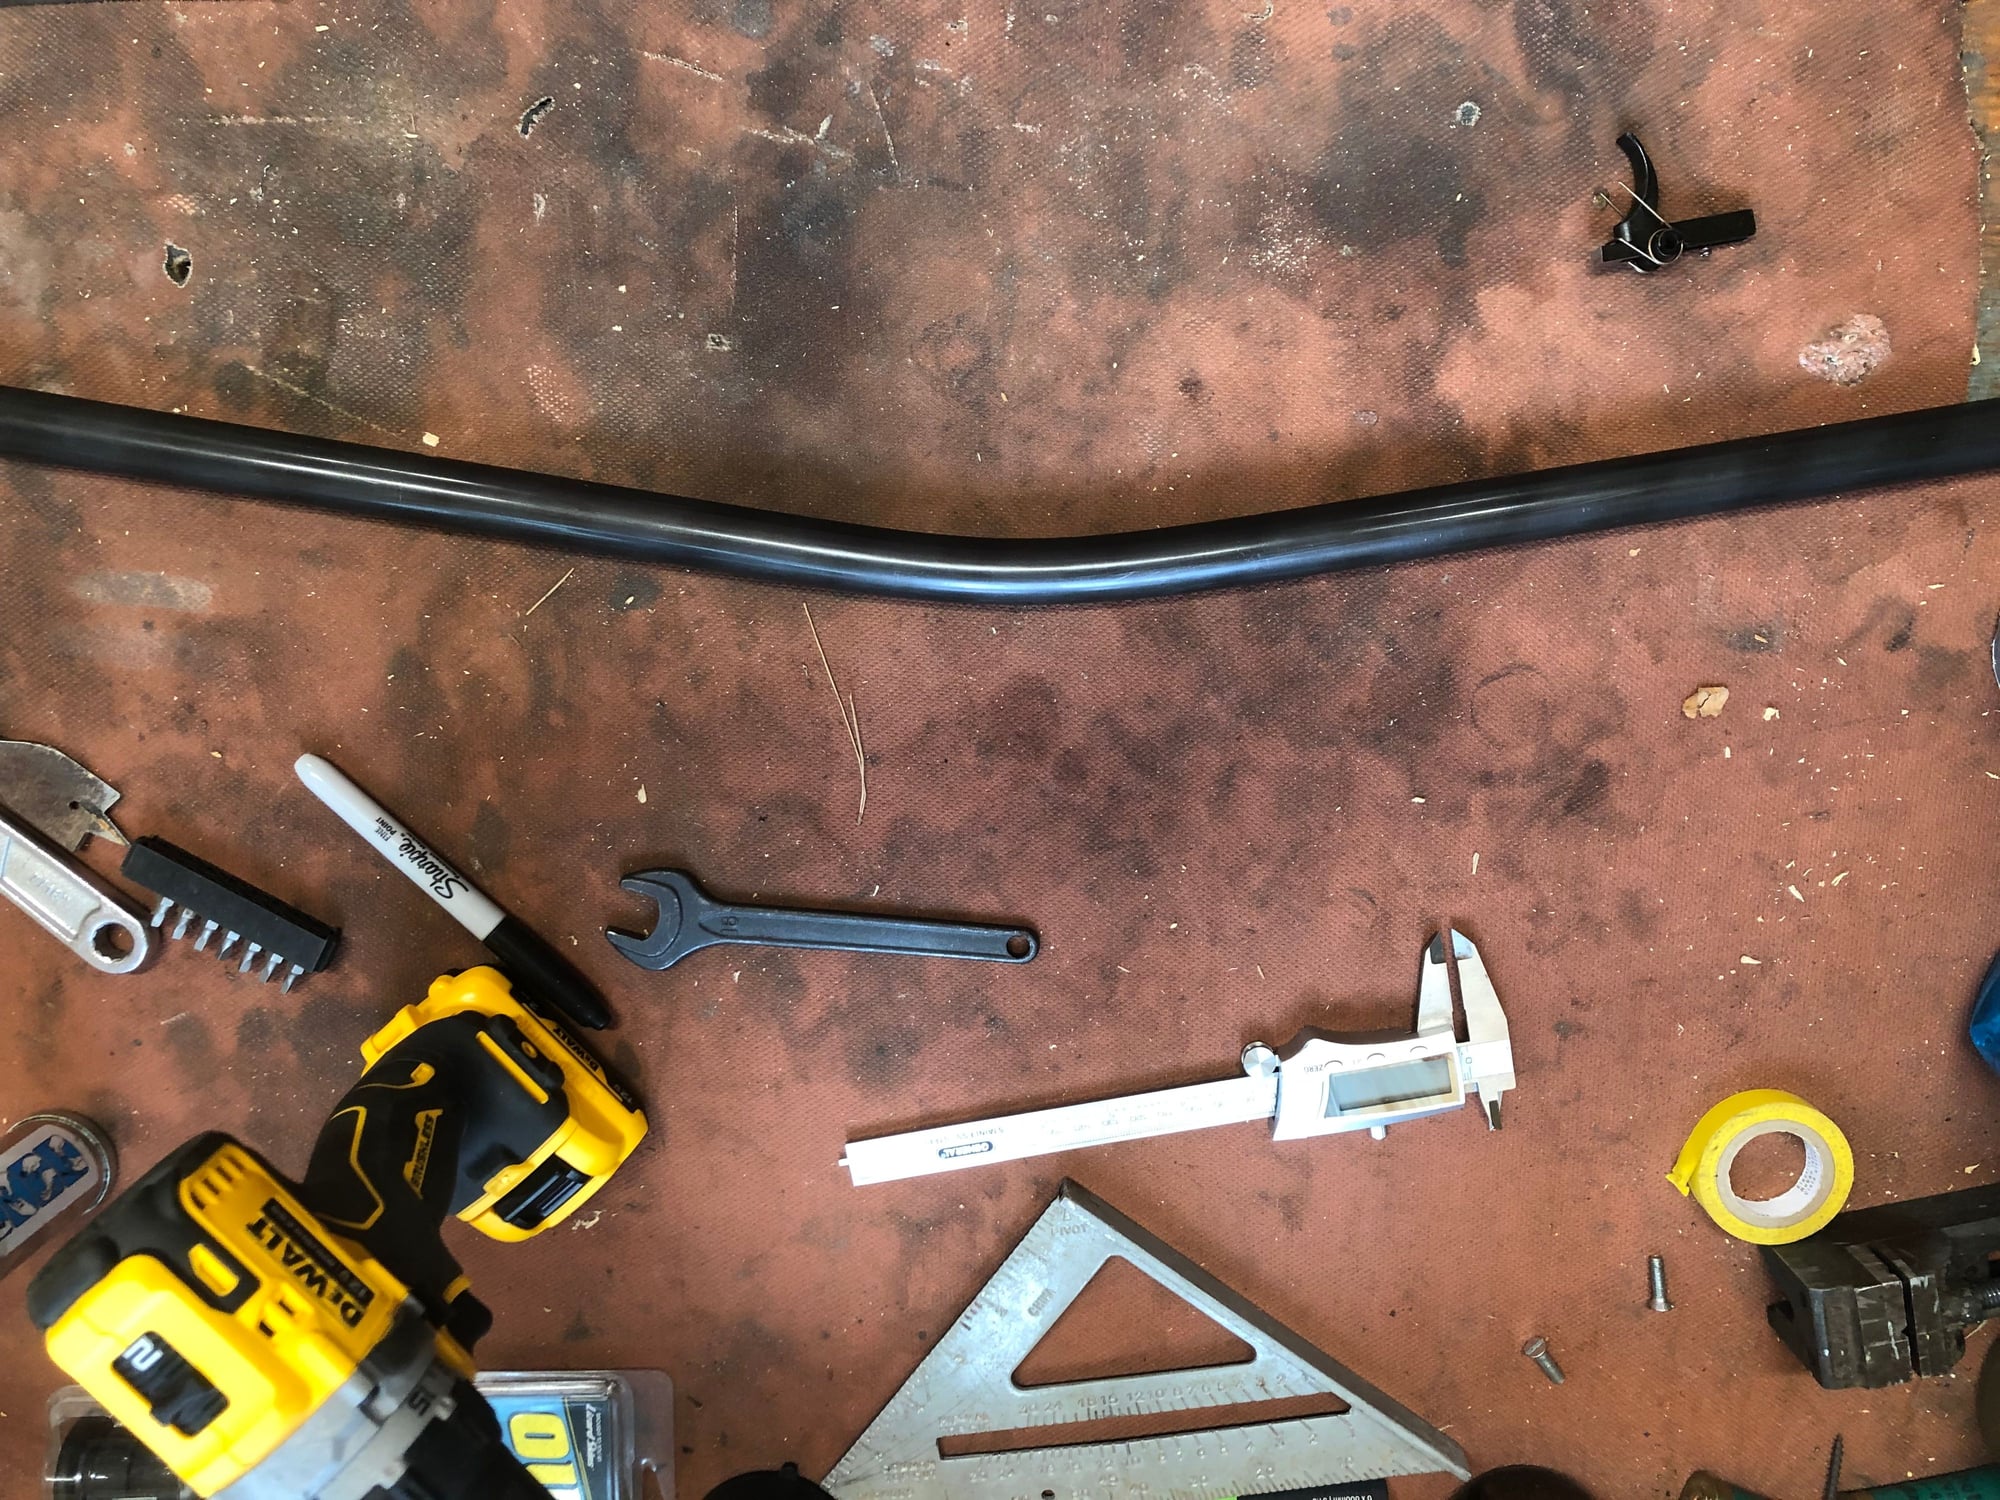
I gave up on the breaker arm and just tried to muscle it over. That worked! It's not quite the 20deg sweepback I wanted. More like 15. But, I think it'll work. Pics after I start cutting and jigging...
Likes For shelgame:


Likes For shelgame:
10-11-21, 08:50 AM
#41
Newbie
This is a super cool build! Thanks for sharing! I had a feeling the holes in the front of the headtube were for internal routing...
10-14-21, 02:19 PM
#42
Full Member
Join Date: Aug 2014
Location: ETX/ SNH
Posts: 225
Bikes: 2011 Handsome/ Twin Six Speedy Devil, 2006 Soma Groove, 1991 Haro Impulse Comp, 1987 KHS Montana Pro, 1986 Ross Mount Hood, 1986 Mongoose ATB, 1985 Shogun Prairie Breaker I, 1973 World Voyageur, 1941 Schwinn DX "Klunker"
Mentioned: 3 Post(s)
Tagged: 0 Thread(s)
Quoted: 83 Post(s)
Liked 96 Times
in
45 Posts
Glad I found this thread. I also want to make a clunker frame similar to my DX that I have posted on this forum but with modern tubing and components. I too want to build a bullmoose bar first. This is my first foray in brazing other than rack mounts and brake bosses so I thought the bar would be good practice. Below is the apparatus I designed to bend the tube. Two pieces of 1x6 pine screwed together with a 7/8 channel routed down the middle of the curve. I used a 26 in wheel rim as my template for the curve but wish I would have gone a tad bigger. For the two blocks on the ends I drilled a 7/8 hole in a piece of treated pine then cut it in half. Screwed it all to the garage door of my workshop. I greased everything good and operated the jack. Worked like a charm. The tubing is .058 7/8in 4130.

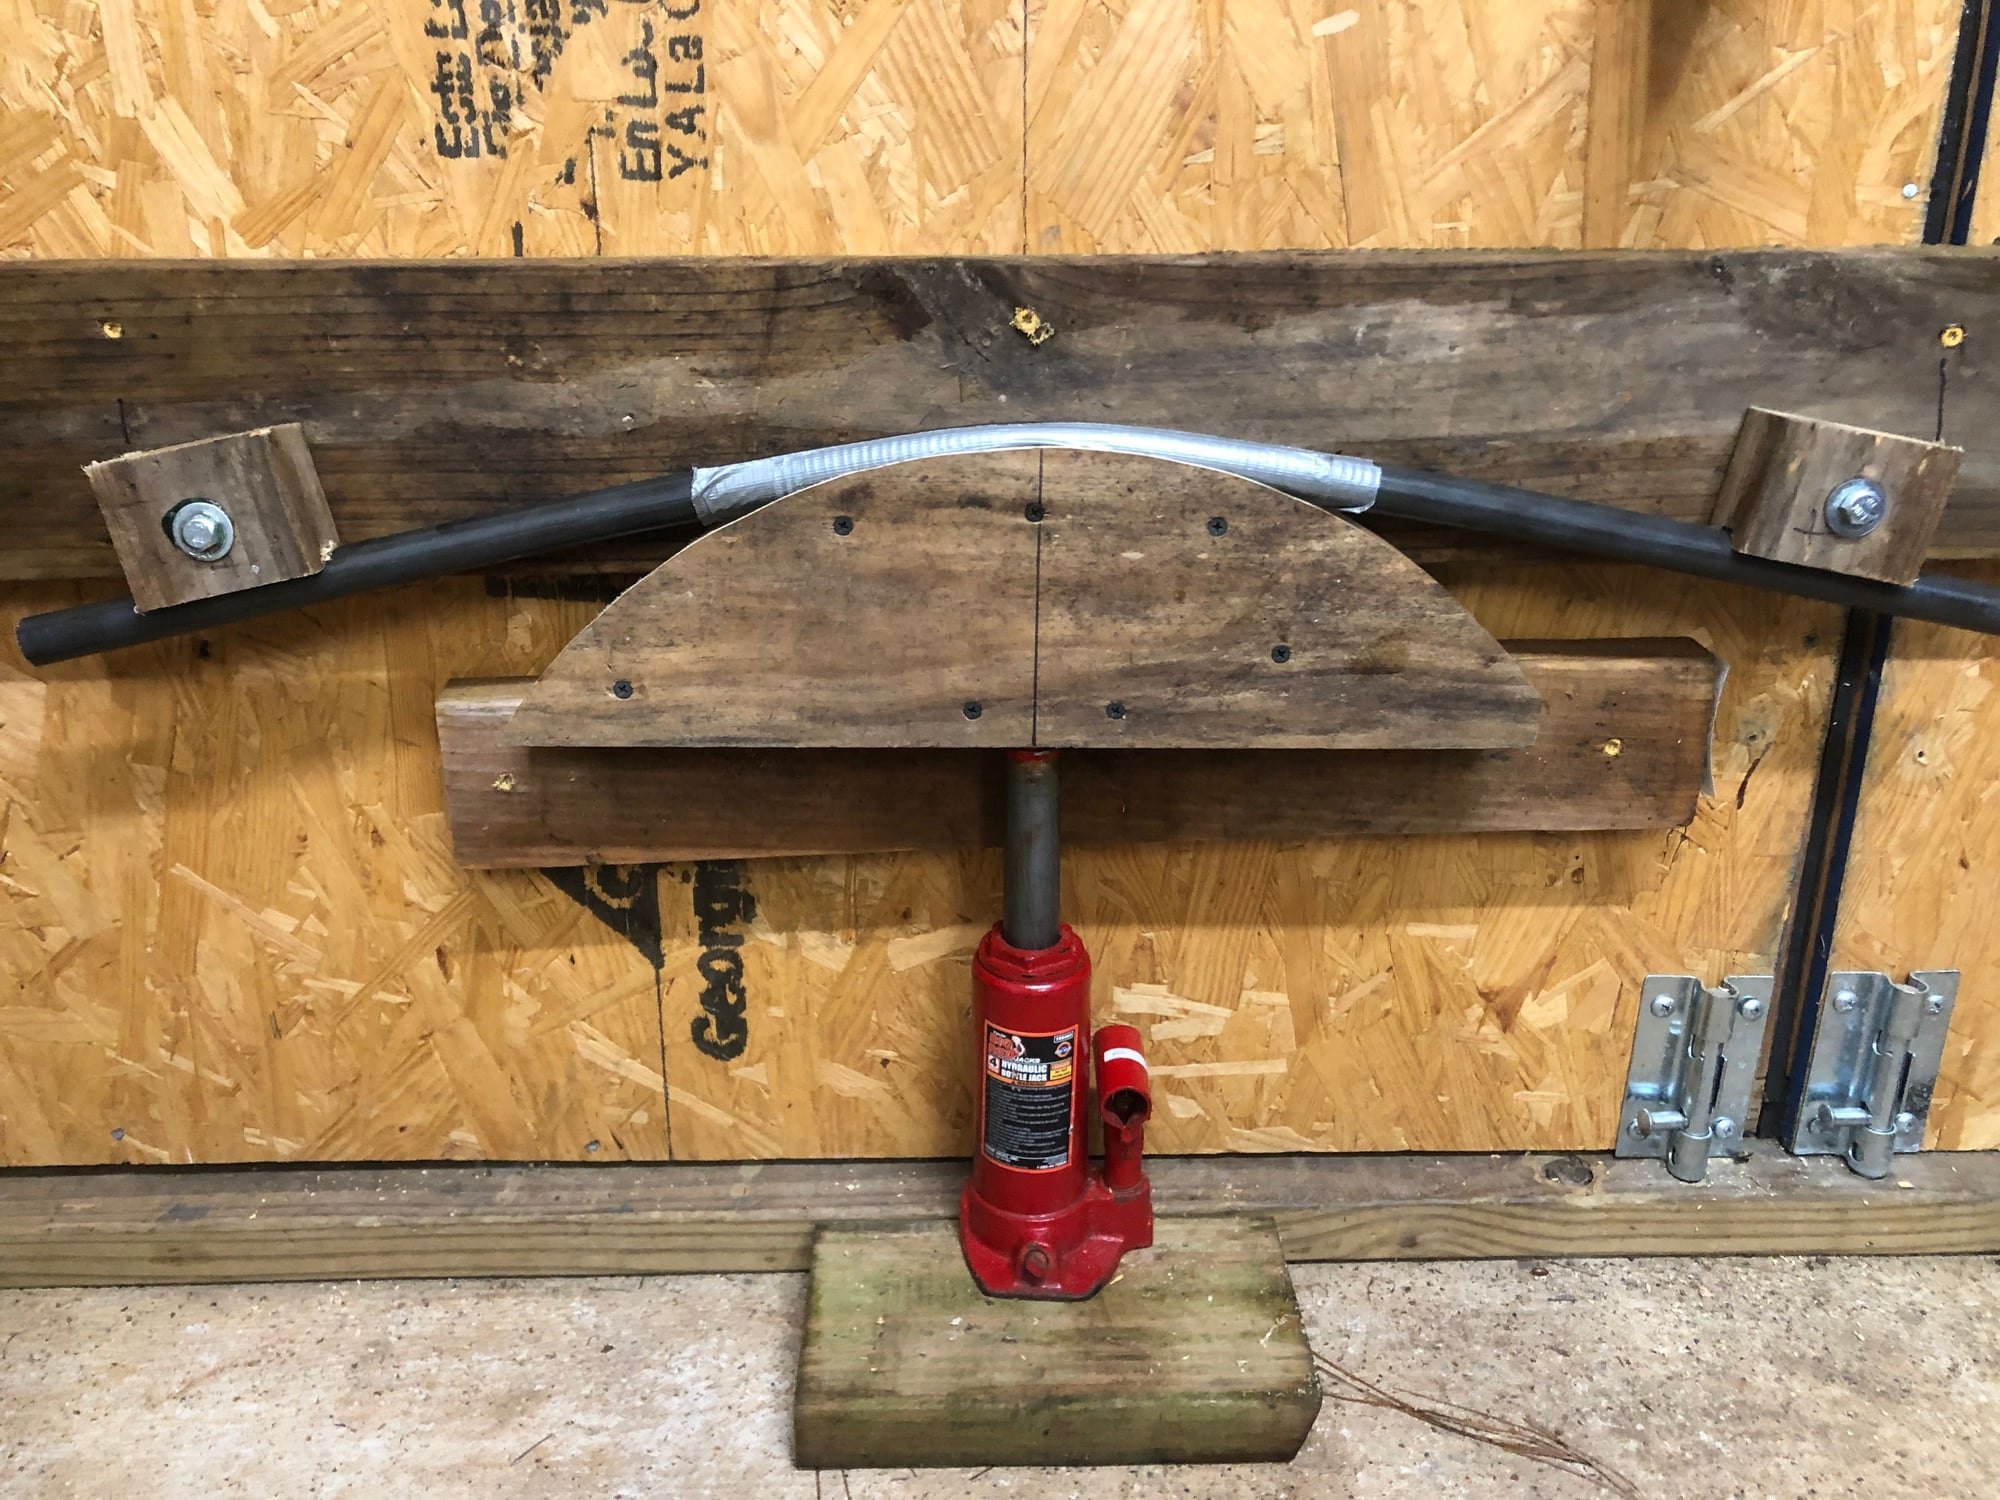
Last edited by MrK.; 10-14-21 at 04:07 PM.
Likes For MrK.:
11-07-21, 04:51 PM
#43
Senior Member
Thread Starter
Changed my mind about the handlebar. I found these:

Bike is almost all assembled. Waiting for a derailleur cable (should be here tomorrow). Then I'll post the 'done' pics...
Bike is almost all assembled. Waiting for a derailleur cable (should be here tomorrow). Then I'll post the 'done' pics...


 11-12-21, 12:49 PM
#48
Senior Member
Thread Starter
I only had enough time to ride it up and down the block a bit yesterday morning. Then it got cold and rainy. But, it felt good for that tenth of a mile, lol. Hopefully we get better weather again before winter hits in full...
The handlebars feel really nice at the grips. The barends I put on are actually too far out for me. I'll most likely be taking those off.
The handlebars feel really nice at the grips. The barends I put on are actually too far out for me. I'll most likely be taking those off.
