


Finishing a replaced steer tube in a frame restoration
 06-15-21, 01:53 PM
#1

Senior Member
Thread Starter

Join Date: Apr 2005
Location: Ann Arbor, MI
Posts: 16,874
Bikes: 1980 Masi, 1984 Mondonico, 1984 Trek 610, 1980 Woodrup Giro, 2005 Mondonico Futura Leggera ELOS, 1967 PX10E, 1971 Peugeot UO-8
Mentioned: 49 Post(s)
Tagged: 0 Thread(s)
Quoted: 1856 Post(s)
Liked 664 Times
in
506 Posts
Finishing a replaced steer tube in a frame restoration
Some of you may know I’m still working on restoring a hair of Witcomb bicycles owned by friends of ours, bought in the early 1970s at the Witcomb dealer in East Haddon, CT. These are the low-cost product line. The frames were built and the bikes assembled in a factory in Ireland. On disassembly the steer tube separated itself from the fork crown. The plan was always to send them out for paint, so the painter, also a frame builder, rebrazed anything sketchy, replacing both steer tubes. It looks like both are new tubes. I see several problems, but some of them might not matter.
1. The crown race seats have been painted with the final paint. I want to clean it off so I can measure the diameters, assess roundness , and see if the original races are suitable. I can do all that, I have emery cloth and the ability to do some knurling if necessary. I don’t think there’s anything I’m missing on this point, but I’m looking for input.
2. The end of one of the steerers is just cut straight off with no chamfer. It is hard to start a relatively new 24tpi part on it. In “Designing and Building your own Frameset,” Dick Talbot recommends to chamfer it with a mill file. At least on vintage hubs, nuts and such thread easily if this is done. Would you recommend it, or is it a bad idea?
 06-16-21, 07:41 AM
#2

Senior Member
Join Date: Feb 2020
Posts: 2,817
Mentioned: 49 Post(s)
Tagged: 0 Thread(s)
Quoted: 1106 Post(s)
Likes: 0
Liked 1,326 Times
in
782 Posts
Scrape the paint off with a small blade, finish with emery.
And go right ahead and take a file to the thread end on the steerer.
And go right ahead and take a file to the thread end on the steerer.
Likes For oneclick:
06-16-21, 07:45 AM
#3
www.theheadbadge.com

Join Date: Sep 2005
Location: Southern Florida
Posts: 28,513
Bikes: https://www.theheadbadge.com
Mentioned: 124 Post(s)
Tagged: 0 Thread(s)
Quoted: 2422 Post(s)
Liked 4,390 Times
in
2,092 Posts
Ask the framebuilder if they have a crown race facer. If so, have them face the paint off the mating surfaces for a perfect seat for the crown race.
-Kurt
-Kurt
__________________


Likes For cudak888:
06-28-21, 04:06 PM
#4
Senior Member
Thread Starter
Join Date: Apr 2005
Location: Ann Arbor, MI
Posts: 16,874
Bikes: 1980 Masi, 1984 Mondonico, 1984 Trek 610, 1980 Woodrup Giro, 2005 Mondonico Futura Leggera ELOS, 1967 PX10E, 1971 Peugeot UO-8
Mentioned: 49 Post(s)
Tagged: 0 Thread(s)
Quoted: 1856 Post(s)
Liked 664 Times
in
506 Posts
06-28-21, 04:08 PM
#5
Senior Member
Thread Starter
Join Date: Apr 2005
Location: Ann Arbor, MI
Posts: 16,874
Bikes: 1980 Masi, 1984 Mondonico, 1984 Trek 610, 1980 Woodrup Giro, 2005 Mondonico Futura Leggera ELOS, 1967 PX10E, 1971 Peugeot UO-8
Mentioned: 49 Post(s)
Tagged: 0 Thread(s)
Quoted: 1856 Post(s)
Liked 664 Times
in
506 Posts
I've got the paint off of the sides of the crown race seats. I used emery cloth on one of them and used my old Xacto knife to carve back the paint on the other. The diameters are both around 27.1 mm, so these are French crown races. Neither one has perfect races, but if I can't find a pair of new or near new French races in perfect condition I'll just install what I have. So I think I have the side of the seats sorted out.
I'm not sure about the actual crown race seat. I think the crown race is supposed to rest on a ground or flattenned "platform" which is attached to or cut into the atual structureal fork crown, at least this is what I think is going on. It's a little hard to be sure - most books on bike mechanics are about selecting, installing, tuning, evaluating, and replacing parts, not the base requirements for frame setup and preparation. The race needs to be pressed until it seats on its surface, but I'm not sure a flat surface has actually been made on the fork crown.
Probably the repaint did not result in removing any steel from the fork crown so whatever the crown race was seated on originally is most likely still there. Is it supposed to be painted steel or bare steel?
Last edited by Road Fan; 06-28-21 at 06:25 PM.
06-28-21, 04:20 PM
#6
Senior Member
Join Date: Oct 2014
Location: Portland, OR
Posts: 12,902
Bikes: (2) ti TiCycles, 2007 w/ triple and 2011 fixed, 1979 Peter Mooney, ~1983 Trek 420 now fixed and ~1973 Raleigh Carlton Competition gravel grinder
Mentioned: 129 Post(s)
Tagged: 0 Thread(s)
Quoted: 4802 Post(s)
Liked 3,923 Times
in
2,552 Posts
...
2. The end of one of the steerers is just cut straight off with no chamfer. It is hard to start a relatively new 24tpi part on it. In “Designing and Building your own Frameset,” Dick Talbot recommends to chamfer it with a mill file. At least on vintage hubs, nuts and such thread easily if this is done. Would you recommend it, or is it a bad idea?
2. The end of one of the steerers is just cut straight off with no chamfer. It is hard to start a relatively new 24tpi part on it. In “Designing and Building your own Frameset,” Dick Talbot recommends to chamfer it with a mill file. At least on vintage hubs, nuts and such thread easily if this is done. Would you recommend it, or is it a bad idea?
Ben Jeffries
06-29-21, 01:22 PM
#7
Senior Member
Thread Starter
Join Date: Apr 2005
Location: Ann Arbor, MI
Posts: 16,874
Bikes: 1980 Masi, 1984 Mondonico, 1984 Trek 610, 1980 Woodrup Giro, 2005 Mondonico Futura Leggera ELOS, 1967 PX10E, 1971 Peugeot UO-8
Mentioned: 49 Post(s)
Tagged: 0 Thread(s)
Quoted: 1856 Post(s)
Liked 664 Times
in
506 Posts
Thanks a lot for that, Ben! I'm not very familiar with the Paterek book, but I read Talbot cover to cover a few times. I was towrd the end of my BS Eng at the time, and I thought, what a great idea for a Masters' project!
His stability criterion drove me crazy - in those days I was into reading the math behind everything!
His stability criterion drove me crazy - in those days I was into reading the math behind everything!
06-29-21, 02:56 PM
#8
Senior Member
Join Date: Jun 2006
Posts: 20,305
Mentioned: 130 Post(s)
Tagged: 0 Thread(s)
Quoted: 3464 Post(s)
Liked 2,828 Times
in
1,995 Posts
I've got the paint off of the sides of the crown race seats. I used emery cloth on one of them and used my old Xacto knife to carve back the paint on the other. The diameters are both around 27.1 mm, so these are French crown races. Neither one has perfect races, but if I can't find a pair of new or near new French races in perfect condition I'll just install what I have. So I think I have the side of the seats sorted out.
I'm not sure about the actual crown race seat. I think the crown race is supposed to rest on a ground or flattenned "platform" which is attached to or cut into the atual structureal fork crown, at least this is what I think is going on. It's a little hard to be sure - most books on bike mechanics are about selecting, installing, tuning, evaluating, and replacing parts, not the base requirements for frame setup and preparation. The race needs to be pressed until it seats on its surface, but I'm not sure a flat surface has actually been made on the fork crown.
Probably the repaint did not result in removing any steel from the fork crown so whatever the crown race was seated on originally is most likely still there. Is it supposed to be painted steel or bare steel?
I'm not sure about the actual crown race seat. I think the crown race is supposed to rest on a ground or flattenned "platform" which is attached to or cut into the atual structureal fork crown, at least this is what I think is going on. It's a little hard to be sure - most books on bike mechanics are about selecting, installing, tuning, evaluating, and replacing parts, not the base requirements for frame setup and preparation. The race needs to be pressed until it seats on its surface, but I'm not sure a flat surface has actually been made on the fork crown.
Probably the repaint did not result in removing any steel from the fork crown so whatever the crown race was seated on originally is most likely still there. Is it supposed to be painted steel or bare steel?
put some light lube on it and use the typical slide hammer style race installer.
done.
use loose ball bearings and if you have notchy steering, mark then rotate the cups 60 to 90 degrees opposing directions to help avoid any indentations.
06-29-21, 03:13 PM
#9
Senior Member
Thread Starter
Join Date: Apr 2005
Location: Ann Arbor, MI
Posts: 16,874
Bikes: 1980 Masi, 1984 Mondonico, 1984 Trek 610, 1980 Woodrup Giro, 2005 Mondonico Futura Leggera ELOS, 1967 PX10E, 1971 Peugeot UO-8
Mentioned: 49 Post(s)
Tagged: 0 Thread(s)
Quoted: 1856 Post(s)
Liked 664 Times
in
506 Posts
What aggravates me with a headset is when the fork binds at a certain point in its turn and is loose, shaky, and clunks over bumps at 180 degrees away from this point. Brinelling is not my concern here, and I'm pretty darn sure these bikes are not gonna have indexing.
I don't care how the Irish (they weren't French) original builders felt about it. And I've ridden enough old steel with surprisingly good steering that I don't in the first place believe I should make something crappy just because somebody believes (or seems to) that it can only be made crappy because of some goofy reasoning that is lost in history. I have these bicycles in front of me and they need to get put together so they work decently. I'm not building these for historical restoration. I'm building them so my friends can continue good riding on their very sentimental bikes.
Anyway, I normally use a 3# hammer and a steel drift to install these. With lube.
Last edited by Road Fan; 06-30-21 at 08:59 PM.
06-29-21, 03:55 PM
#10
Senior Member
Join Date: Jun 2006
Posts: 20,305
Mentioned: 130 Post(s)
Tagged: 0 Thread(s)
Quoted: 3464 Post(s)
Liked 2,828 Times
in
1,995 Posts
Get a proper press.
06-29-21, 05:47 PM
#11
Phyllo-buster

Join Date: Jan 2010
Location: Nova Scotia
Posts: 8,846
Bikes: roadsters, club bikes, fixed and classic
Mentioned: 133 Post(s)
Tagged: 0 Thread(s)
Quoted: 2297 Post(s)
Liked 2,054 Times
in
1,254 Posts
Maybe remove the crown race and go at the seat with a narrow flat file to avoid paint damage. Lube with grease and tap it down.
06-29-21, 11:49 PM
#12
www.theheadbadge.com
Join Date: Sep 2005
Location: Southern Florida
Posts: 28,513
Bikes: https://www.theheadbadge.com
Mentioned: 124 Post(s)
Tagged: 0 Thread(s)
Quoted: 2422 Post(s)
Liked 4,390 Times
in
2,092 Posts
The following assumes proper facing:
Take a wrecked frame with standard-dimension tubing. Cut the 1-1/8" downtube out. Provided you have a 1" steerer tube, you've just made yourself a crown race hammer.
-Kurt
Take a wrecked frame with standard-dimension tubing. Cut the 1-1/8" downtube out. Provided you have a 1" steerer tube, you've just made yourself a crown race hammer.
-Kurt
__________________
06-30-21, 12:19 AM
#13
verktyg

Join Date: Jul 2006
Location: SF Bay Area
Posts: 4,030
Bikes: Current favorites: 1988 Peugeot Birraritz, 1984 Gitane Super Corsa, 1980s DeRosa, 1981 Bianchi Campione Del Mondo, 1992 Paramount OS, 1988 Colnago Technos, 1985 RalieghUSA SBDU Team Pro
Mentioned: 207 Post(s)
Tagged: 0 Thread(s)
Quoted: 1036 Post(s)
Liked 1,238 Times
in
654 Posts
Refacing The Fork Crown Race
Road Fan NON! NON! NON!
"Hammersmithing" doesn't fix the problem!
Any frame builder or painter worth their salt SHOULD have faced off the crown race with a proper facing tool !!!

Unless you have headsets with 27mm crown races that are in good condition, I'd recommend refacing the crowns to fit the much more common 26.4mm size crown races.
The head tube should have been refaced TOO!
Note: I've replaced the head tube reamer with a properly sized brass bushing so as not to cut the bore oversize when refacing.
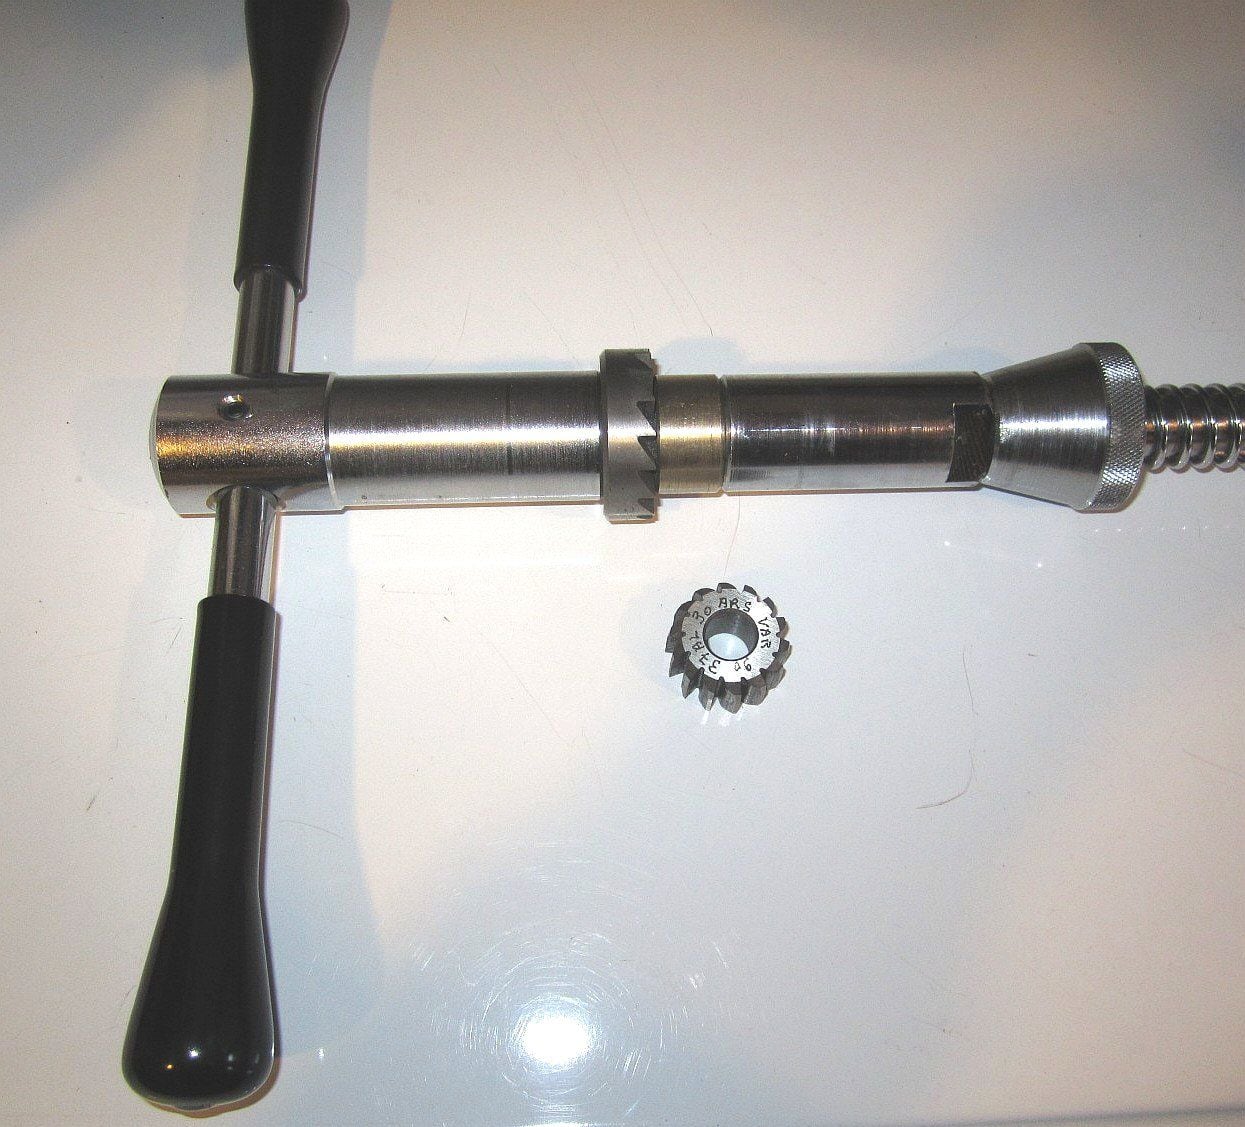
Anytime I'm working on or installing a headset, I reface the crown race and top and bottom of the head tube. Especially with alloy cups.
It's a 10 to 20 minute job and well worth the effort to have a fork that rotates smoothly side to side. It makes a difference in handling too!
As others have mentioned, use grade 25 alloy steel loose ball bearings and rotate the cups slightly if there are any indentations. It works!
verktyg
"Hammersmithing" doesn't fix the problem!
Any frame builder or painter worth their salt SHOULD have faced off the crown race with a proper facing tool !!!
Unless you have headsets with 27mm crown races that are in good condition, I'd recommend refacing the crowns to fit the much more common 26.4mm size crown races.
The head tube should have been refaced TOO!
Note: I've replaced the head tube reamer with a properly sized brass bushing so as not to cut the bore oversize when refacing.
Anytime I'm working on or installing a headset, I reface the crown race and top and bottom of the head tube. Especially with alloy cups.
It's a 10 to 20 minute job and well worth the effort to have a fork that rotates smoothly side to side. It makes a difference in handling too!
As others have mentioned, use grade 25 alloy steel loose ball bearings and rotate the cups slightly if there are any indentations. It works!
verktyg
__________________
Don't believe everything you think! History is written by those who weren't there....
Chas. ;-)
Don't believe everything you think! History is written by those who weren't there....
Chas. ;-)
06-30-21, 05:09 AM
#14
framebuilder
Total sidetrack to this thread. Dick Talbot. I hope he is well and enjoying life. 45 years ago we were NEBC clubmates. I still have a pair of Campy steel quilled pedals he sold me that started their second life on my Peter Mooney in 1979. (I roughly doubled the 19,000 miles Dick put on them. They are still going strong; just neglected because my pedal choices have changed. Peter Mooney was also a fellow clubmate.)
Ben Jeffries
Ben Jeffries
Last edited by Doug Fattic; 06-30-21 at 05:12 AM.
06-30-21, 11:29 AM
#15
Senior Member
Join Date: Oct 2014
Location: Portland, OR
Posts: 12,902
Bikes: (2) ti TiCycles, 2007 w/ triple and 2011 fixed, 1979 Peter Mooney, ~1983 Trek 420 now fixed and ~1973 Raleigh Carlton Competition gravel grinder
Mentioned: 129 Post(s)
Tagged: 0 Thread(s)
Quoted: 4802 Post(s)
Liked 3,923 Times
in
2,552 Posts
Thanks a lot for that, Ben! I'm not very familiar with the Paterek book, but I read Talbot cover to cover a few times. I was towrd the end of my BS Eng at the time, and I thought, what a great idea for a Masters' project!
His stability criterion drove me crazy - in those days I was into reading the math behind everything!
His stability criterion drove me crazy - in those days I was into reading the math behind everything!
So Dick Talbot is a real person? I figured that was a pen name or a pseudonym. His book has long outlived any usefulness as a source for good frame building information. In fact it contains some really poor information. He did a reasonable job explaining how to build a front triangle and a fork but failed completely in describing how to make a rear triangle. There is no hope a rear wheel will end up where it belongs using his method. As I understand it, Dick researched how to make a frame from other American builders. He then designed some wood home made fixtures that were his interpretation of what he saw to make a frame himself. The book is printed documentation of the process he used to make his very 1st frame. It resembles a master's thesis. Obviously if he had made another 10 frames he could have refined his process a lot. And of course an experienced frame builder would avoid Talbot's rookie mistakes. The Paterek Manual is decent although I do things differently. In fact almost all custom builders do things a bit differently from each other.
06-30-21, 12:56 PM
#16
Senior Member
Thread Starter
Join Date: Apr 2005
Location: Ann Arbor, MI
Posts: 16,874
Bikes: 1980 Masi, 1984 Mondonico, 1984 Trek 610, 1980 Woodrup Giro, 2005 Mondonico Futura Leggera ELOS, 1967 PX10E, 1971 Peugeot UO-8
Mentioned: 49 Post(s)
Tagged: 0 Thread(s)
Quoted: 1856 Post(s)
Liked 664 Times
in
506 Posts
Road Fan NON! NON! NON!
"Hammersmithing" doesn't fix the problem!
Any frame builder or painter worth their salt SHOULD have faced off the crown race with a proper facing tool !!!
Unless you have headsets with 27mm crown races that are in good condition, I'd recommend refacing the crowns to fit the much more common 26.4mm size crown races.
The head tube should have been refaced TOO!
Note: I've replaced the head tube reamer with a properly sized brass bushing so as not to cut the bore oversize when refacing.
Anytime I'm working on or installing a headset, I reface the crown race and top and bottom of the head tube. Especially with alloy cups.
It's a 10 to 20 minute job and well worth the effort to have a fork that rotates smoothly side to side. It makes a difference in handling too!
As others have mentioned, use grade 25 alloy steel loose ball bearings and rotate the cups slightly if there are any indentations. It works!
verktyg
I think you are making assumptions, certainly about what I plan to do with the hammer. Using a large hammer does not mean I will use it's full force. Hammersmithing, whatever the HELL that means to you ... I just don't know.
Why am I bothering with you guys?
06-30-21, 01:06 PM
#17
www.theheadbadge.com
Join Date: Sep 2005
Location: Southern Florida
Posts: 28,513
Bikes: https://www.theheadbadge.com
Mentioned: 124 Post(s)
Tagged: 0 Thread(s)
Quoted: 2422 Post(s)
Liked 4,390 Times
in
2,092 Posts
HEY VERKTIG!!! CHILL THE F... OUT!!!!! What gives you the right and reputation to speak to me that way?
I think you are making assumptions, certainly about what I plan to do with the hammer. Using a large hammer does not mean I will use it's full force. Hammersmithing, whatever the HELL that means to you ... I just don't know.
Why am I bothering with you guys?
I think you are making assumptions, certainly about what I plan to do with the hammer. Using a large hammer does not mean I will use it's full force. Hammersmithing, whatever the HELL that means to you ... I just don't know.
Why am I bothering with you guys?
He's also right that the painter should have sorted this out, especially since said painter is also a framebuilder. That combo of skills is almost an obligation to properly face and chase one's end product.
Take it easy - he's just trying to save you from a lot of frustration of trying to do the job any other much more laborious and less effective way. He's also trying to save you possible tears if the paint cracks, which I've seen on countless fresh builds (which nobody will own up to either when it does happen).
-Kurt
__________________
Last edited by cudak888; 06-30-21 at 01:11 PM.
06-30-21, 04:23 PM
#18
Senior Member
Join Date: Oct 2005
Location: Upper Left, USA
Posts: 1,915
Mentioned: 50 Post(s)
Tagged: 0 Thread(s)
Quoted: 634 Post(s)
Liked 444 Times
in
298 Posts
You asked about finishing a repaired fork and that was exactly what verktyg was giving you. His method is the best way to avoid the dreaded binding; prepping a frame and fork prior to installing a headset. It's needed especially after paint! You need to make sure all the flat surfaces in the fork/frame/headset stack are parallel. A hammer and drift is fine, a press is better. Maybe you were upset by verktyg's turn of words or his exclamation points, but he makes great points and in my opinion didn't even use any strong language, especially compared to most on the internet!
06-30-21, 08:53 PM
#19
Senior Member
Thread Starter
Join Date: Apr 2005
Location: Ann Arbor, MI
Posts: 16,874
Bikes: 1980 Masi, 1984 Mondonico, 1984 Trek 610, 1980 Woodrup Giro, 2005 Mondonico Futura Leggera ELOS, 1967 PX10E, 1971 Peugeot UO-8
Mentioned: 49 Post(s)
Tagged: 0 Thread(s)
Quoted: 1856 Post(s)
Liked 664 Times
in
506 Posts
Actually I am not trolling. When using this hammer technique you can detect very well when the race is seated and hence when common sense says that no more force is necessary. If the surfaces are all prepared correctly, the HS won't bind. I've installed headsets or parts 30 or 40 times over my history as bike hobbyist and if the seat and the head faces are finished correctly, the steering ends up smooth. It's been better to put my mind around how to do this than to go buy a $60 setter and a rather more expensive mill (at least the one example I could find!). I've bought a mill that can face the head tubes and I think it will align bore the head tube. This time around I actually looked again for tools, since I have four frames to reassemble. I'm not worried about destroying the existing crown race seats on the two Witcombs, I don't intend to use nearly that much force (the hammer only falls by gravity, and I don't raise it very high to limit the striking force), this time or any of the other times. I use hammers kind of delicately.
The frame builder actually said he milled the crown seats, but they don't look as good as I have seen in the past, hence my source of anxiety. Also, he painted them so I had to carve away the paint so I could verify the measurement. I have to reassemble (build) the bicycle, but I was not able to guide the frame builder and review his steps, and he is quite experienced so micro-managing should not have been necessary.
The other times I've built a bike from a frame and parts, I've handled the face/chase/align steps with very reasonable help from the good LBS's in town. But our best shops have closed, or key guys are no longer available. Ann Arbor once had a great local frame builder, with at least two more well-known experts within 100 miles.
I've also today had another experienced guy whom I respect rail at me for, why should you worry about how well the HS will turn if the bike was made in a slapdash French plant in the first place? Didn't need to hear that, either. Answer is, I'm not supporting any not-too-careful European factory guys who built these back in 1970 or so. I'm supporting my friend, who owns these bikes.
cudak888 , Yes, I've gotten past being upset with the painter/builder - some of the problem is with the bike owner as well. He asked be to be in charge and dismantle/remantle, and direct the builder, but when he wanted to know the status he went to the builder not to me, and then would not pass on what the builder told him or what he told the builder. Finally two frames surprised me by arriving at my house - no mutual agreement they are in fact prepared, nor a list of what the builder actually did.
So overall I'm trying to see my own way through this part of the build and deal with the new parts of the problem. I need to verify the face alignments before installing parts. I'm still not convinced I should not buy a pair of short-stack Tange steel headsets and be done with it. Tomorrow I'm going to agaijn canvas the remaining LBSs and this time record who has a good capability in frame preparation. In some of them there is still a person whose capabilities I respect.
06-30-21, 09:43 PM
#20
www.theheadbadge.com
Join Date: Sep 2005
Location: Southern Florida
Posts: 28,513
Bikes: https://www.theheadbadge.com
Mentioned: 124 Post(s)
Tagged: 0 Thread(s)
Quoted: 2422 Post(s)
Liked 4,390 Times
in
2,092 Posts
Still, I love my piece of rusty Reynolds 531 that I use to bang them in with. Fits and works perfectly, every time

cudak888 , Yes, I've gotten past being upset with the painter/builder - some of the problem is with the bike owner as well. He asked be to be in charge and dismantle/remantle, and direct the builder, but when he wanted to know the status he went to the builder not to me, and then would not pass on what the builder told him or what he told the builder. Finally two frames surprised me by arriving at my house - no mutual agreement they are in fact prepared, nor a list of what the builder actually did.
So overall I'm trying to see my own way through this part of the build and deal with the new parts of the problem. I need to verify the face alignments before installing parts. I'm still not convinced I should not buy a pair of short-stack Tange steel headsets and be done with it. Tomorrow I'm going to agaijn canvas the remaining LBSs and this time record who has a good capability in frame preparation. In some of them there is still a person whose capabilities I respect.
So overall I'm trying to see my own way through this part of the build and deal with the new parts of the problem. I need to verify the face alignments before installing parts. I'm still not convinced I should not buy a pair of short-stack Tange steel headsets and be done with it. Tomorrow I'm going to agaijn canvas the remaining LBSs and this time record who has a good capability in frame preparation. In some of them there is still a person whose capabilities I respect.
-Kurt
__________________
07-01-21, 07:57 AM
#21
Senior Member
Thread Starter
Join Date: Apr 2005
Location: Ann Arbor, MI
Posts: 16,874
Bikes: 1980 Masi, 1984 Mondonico, 1984 Trek 610, 1980 Woodrup Giro, 2005 Mondonico Futura Leggera ELOS, 1967 PX10E, 1971 Peugeot UO-8
Mentioned: 49 Post(s)
Tagged: 0 Thread(s)
Quoted: 1856 Post(s)
Liked 664 Times
in
506 Posts
Absolutely true. Though some may freak at the idea of a hammer taken to a crown race, it's completely possible to do it correctly without damage, given a careful eye, steady hand, and a properly faced fork with the correct race diameter on it, which is the key to making any crown race seat easy.
Still, I love my piece of rusty Reynolds 531 that I use to bang them in with. Fits and works perfectly, every time
A bad situation, undoubtedly. All the more reason to tread carefully though and get it done right within a reasonable budget. Just remember that idiots quickly become finger-pointers when they pfluck up, because refusing to own up to their stupidity is how they protect themselves.
-Kurt
As I think I said (this thread has a lot of me rambling in it), today I'm going to re-canvas the LBS's and see where I think these frame prep actions can get good attention. I'm also going to ask about availability of used serviceable frame prep tools. Head tube/BB end mills are not too $$ but I already have one from Bicycle Research To be equipped myself I would want a crown race seat milling/cutting tool, a head tube reamer with guides for alignment, and a crown race driver. I already have a headset cup press. Do the Patarek or Ballantine bike repair books give good guidance on performing frame prep?
Other questions: (more to follow)
>Based on inspection of my forks, is it acceptable to cut the seats down to 26.4 mm diameter? I worry that reducing the thickness by 0.3 mm could weaken the fork top connection from crown to steer tube.
Last edited by Road Fan; 07-01-21 at 09:26 AM.
07-01-21, 09:53 AM
#22
Senior Member
Join Date: Jun 2006
Posts: 20,305
Mentioned: 130 Post(s)
Tagged: 0 Thread(s)
Quoted: 3464 Post(s)
Liked 2,828 Times
in
1,995 Posts
The mental anguish expressed in this thread is totally out of perspective and proportion.
07-05-21, 07:23 AM
#23
Senior Member
Thread Starter
Join Date: Apr 2005
Location: Ann Arbor, MI
Posts: 16,874
Bikes: 1980 Masi, 1984 Mondonico, 1984 Trek 610, 1980 Woodrup Giro, 2005 Mondonico Futura Leggera ELOS, 1967 PX10E, 1971 Peugeot UO-8
Mentioned: 49 Post(s)
Tagged: 0 Thread(s)
Quoted: 1856 Post(s)
Liked 664 Times
in
506 Posts
The core problem has not been to find parts, it's been to get frame prep done competently. I've been talking to several "local" shops, one is emerging as having experience, tooling, and to be serious about crazy projects. I was actually told by a few that we service the mainstream. My task with these bikes is to make them work as sound bicycles frame to mechanisms, not to make them into vintage classic handbuilt showpieces.
You seem unwilling to tolerate the thought process related to sorting out the most appropriate solutions, beyond telling someone what to do. Sorry, this is the Internet. Deal with it.
07-05-21, 08:55 AM
#24
Senior Member
Join Date: Jun 2006
Posts: 20,305
Mentioned: 130 Post(s)
Tagged: 0 Thread(s)
Quoted: 3464 Post(s)
Liked 2,828 Times
in
1,995 Posts
You made my point.
07-05-21, 08:59 AM
#25
www.theheadbadge.com
Join Date: Sep 2005
Location: Southern Florida
Posts: 28,513
Bikes: https://www.theheadbadge.com
Mentioned: 124 Post(s)
Tagged: 0 Thread(s)
Quoted: 2422 Post(s)
Liked 4,390 Times
in
2,092 Posts
FFS.
Why are all of the good threads on C&V starting to turn into soiled toilet paper as of late?
-Kurt
Why are all of the good threads on C&V starting to turn into soiled toilet paper as of late?
-Kurt
__________________
