


Shimano 600?
 06-10-20, 02:28 AM
#1
Junior Member
Thread Starter
Shimano 600?
just bought a 1987 panasonic dx-5000 for $50. might have overpaid. needs a lot of work. can anyone tell me what size hub wrenches i need ? what tools do i need to get into the bottom bracket ? my searchs here showed a self removal feature on the cranks ? new to me. headset has a set up i have not seen before.
thks, mark d
thks, mark d
 06-10-20, 04:38 AM
#2
Senior Member
Join Date: Jun 2002
Location: Montreal, Quebec
Posts: 5,921
Mentioned: 16 Post(s)
Tagged: 0 Thread(s)
Quoted: 1815 Post(s)
Liked 1,693 Times
in
974 Posts
Original specs for the bike:
https://www.panasonicbikemuseum.info/87-dx-5000/
However, a bike of that age could have had parts wear out and be replaced with different components. The tools needed will depend on what is actually on the bike. Pictures would help once you have enough posts to be able to upload them
https://www.panasonicbikemuseum.info/87-dx-5000/
However, a bike of that age could have had parts wear out and be replaced with different components. The tools needed will depend on what is actually on the bike. Pictures would help once you have enough posts to be able to upload them
 06-10-20, 05:01 AM
#3
Junior Member
Thread Starter
hey alcjphil,
thks for the reply. that was a great link but it did not have the info on wrench sizes i will need for bottom bracket and hubs. it was interesting to see the original equiptment list. that is in fact what i have except in the cases where the components are missing i.e. front derailluer and shift levers
thks for the reply. that was a great link but it did not have the info on wrench sizes i will need for bottom bracket and hubs. it was interesting to see the original equiptment list. that is in fact what i have except in the cases where the components are missing i.e. front derailluer and shift levers
06-10-20, 05:59 AM
#4
Senior Member
hey alcjphil,
thks for the reply. that was a great link but it did not have the info on wrench sizes i will need for bottom bracket and hubs. it was interesting to see the original equiptment list. that is in fact what i have except in the cases where the components are missing i.e. front derailluer and shift levers
thks for the reply. that was a great link but it did not have the info on wrench sizes i will need for bottom bracket and hubs. it was interesting to see the original equiptment list. that is in fact what i have except in the cases where the components are missing i.e. front derailluer and shift levers
For shimano 600 hubs, a standard set of cone wrenches...13,14,15,16,17mm ..should give you all you need for the front and rear hubs.
06-10-20, 06:15 AM
#5
Blamester
For the bottom bracket, what tools you need will depend on the type. I suspect in 1987 you would have still had a 3 piece adjustable cup and cone BB, but am not sure about that. If you still have that, you need a combination of a lockring and pin spanners to remove the adjustable cup (NDS) and then either a fixed cup tool or just a big adjustable wrench to remove the fixed cup (Should have wrench flats on two sides) on the drive side. If the BB is a more modern cartridge type and its Shimano, you need a Shimano splined BB tool. In either case, the right side cup is reverse threaded so turn clockwise to remove. And be warned, if you are dealing with the cup and cone type, the fixed cup might be on there really tight.
For shimano 600 hubs, a standard set of cone wrenches...13,14,15,16,17mm ..should give you all you need for the front and rear hubs.
For shimano 600 hubs, a standard set of cone wrenches...13,14,15,16,17mm ..should give you all you need for the front and rear hubs.
Adjustable wrench. Cassette and chain tools. Screwdrivers.
That's a start and maybe enough but maybe not. Depends on the condition of the fasteners.
Likes For blamester:
06-10-20, 06:36 AM
#6
Senior Member

Join Date: Sep 2010
Location: Roswell, GA
Posts: 8,319
Bikes: '93 Trek 750, '92 Schwinn Crisscross, '93 Mongoose Alta
Mentioned: 30 Post(s)
Tagged: 0 Thread(s)
Quoted: 1438 Post(s)
Liked 1,092 Times
in
723 Posts
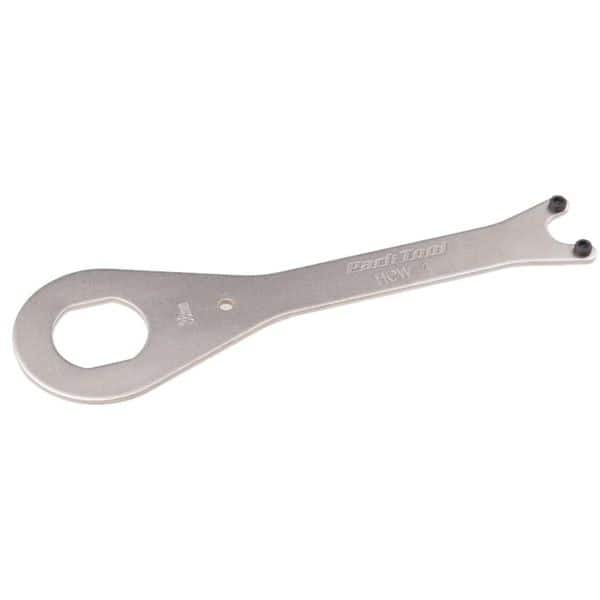
This tool is sooo much better than an adjustable wrench for the 2-flat type of fixed BB cup, if that is what you have: https://www.parktool.com/product/cra...t-wrench-hcw-4
Likes For dsbrantjr:
06-10-20, 06:41 AM
#7
Senior Member
Join Date: Aug 2005
Location: Pittsburgh, PA
Posts: 33,656
Bikes: '96 Litespeed Catalyst, '05 Litespeed Firenze, '06 Litespeed Tuscany, '20 Surly Midnight Special, All are 3x10. It is hilly around here!
Mentioned: 39 Post(s)
Tagged: 0 Thread(s)
Quoted: 2026 Post(s)
Likes: 0
Liked 1,095 Times
in
741 Posts
If it still has the OEM Shimano hubs you will need a 17 mm wrench for the lock nuts but it needn't be a cone wrench as any open end or box end will work. For the cones themselves, IIRC, you will need a 13 mm cone wrench for the front hub and a 15 mm cone wrench for the rear hub.
For the crank, it is most likely a standard square taper and I don't think Shimano was providing self-extracting bolts then. Assuming it's "standard" you will need a either a large flat screwdriver, a small pin spanner or a 5 or 6 mm hex key to remove the dust caps, a 14 mm thin wall socket to remove the fixing bolts and a square taper crank puller like the Park CCP-22 or CWP-7. Further assuming the OEM bottom bracke is still there, DOS gave a good summary of what you will need.
For the crank, it is most likely a standard square taper and I don't think Shimano was providing self-extracting bolts then. Assuming it's "standard" you will need a either a large flat screwdriver, a small pin spanner or a 5 or 6 mm hex key to remove the dust caps, a 14 mm thin wall socket to remove the fixing bolts and a square taper crank puller like the Park CCP-22 or CWP-7. Further assuming the OEM bottom bracke is still there, DOS gave a good summary of what you will need.
Likes For HillRider:
06-10-20, 02:29 PM
#8
Senior Member
Join Date: Jun 2014
Location: Ontario, Canada
Posts: 4,624
Bikes: iele Latina, Miele Suprema, Miele Uno LS, Miele Miele Beta, MMTB, Bianchi Model Unknown, Fiori Venezia, Fiori Napoli, VeloSport Adamas AX
Mentioned: 16 Post(s)
Tagged: 0 Thread(s)
Quoted: 1324 Post(s)
Liked 927 Times
in
640 Posts
Okay I found an image of a 1987 Panasonic DX-5000.
If the parts are all original on your bike you need a 6mm hex key to take off the crankarms. You'll most likely need a length of strong hollow tube (a piece of gas pipe works) to fit over the hex key to get enough torque.
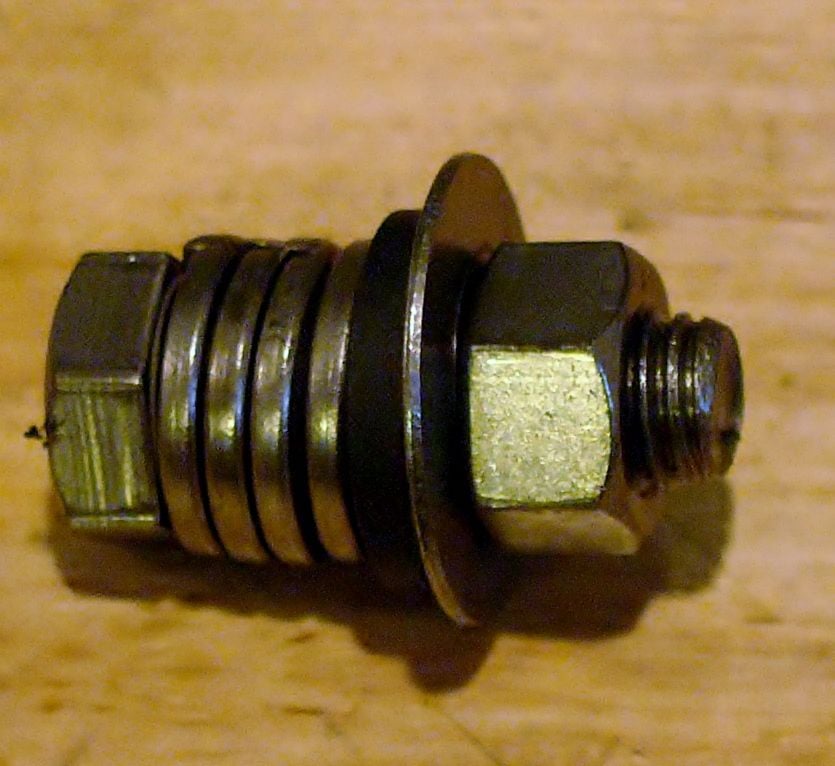
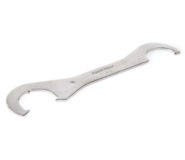
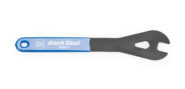
The non-drive side cup (left side of the bike) is a unit that utilizes a pin spanner and a lockring tool to take apart, reassemble or adjust.
Here are the two tools you need to service the bottom bracket. Note, you do NOT need to remove the right side fixed cup unless it's badly pitted or you are replacing the bottom bracket assembly.
In a pinch a large pair of adjustable lock-ring pliers will work to loosen and tighten the lockring. the proper tools make it a lot easier though.
The adjustable cup tool. Needed to unscrew the adjustable cup and to stop the cup from turning when tightening the lockring after assembly.
The lockring tool.

Cheers
Edit; Most likely the front wheel needs 13mm cone wrenches and the rear wheel needs 15mm cone wrenches and a 17mm wrench (can be a regular wrench or adjustable wrench) to loosen and tighten the locknuts.
If the parts are all original on your bike you need a 6mm hex key to take off the crankarms. You'll most likely need a length of strong hollow tube (a piece of gas pipe works) to fit over the hex key to get enough torque.
The non-drive side cup (left side of the bike) is a unit that utilizes a pin spanner and a lockring tool to take apart, reassemble or adjust.
Here are the two tools you need to service the bottom bracket. Note, you do NOT need to remove the right side fixed cup unless it's badly pitted or you are replacing the bottom bracket assembly.
In a pinch a large pair of adjustable lock-ring pliers will work to loosen and tighten the lockring. the proper tools make it a lot easier though.
The adjustable cup tool. Needed to unscrew the adjustable cup and to stop the cup from turning when tightening the lockring after assembly.
The lockring tool.
Cheers
Edit; Most likely the front wheel needs 13mm cone wrenches and the rear wheel needs 15mm cone wrenches and a 17mm wrench (can be a regular wrench or adjustable wrench) to loosen and tighten the locknuts.
Last edited by Miele Man; 06-10-20 at 02:32 PM. Reason: Added comment about cone wrenches
06-10-20, 05:20 PM
#9
Junior Member
Thread Starter
thank you very much to all for your responses. i am on my ship now so can not check type of bb but i'm gonna assume it is old style. so where i stand now is....
bb
1. 6mm hex key
2. cheater bar
3. 14 mm thin wall socket
4. crank puller
5. adjustable cup tool
6. lock ring tool
hubs
1. 13mm cone wrench
2. 15mm cone wrench
3. 17mm wrench
what grease do you guys like ?
again thks to all for your help
mark
bb
1. 6mm hex key
2. cheater bar
3. 14 mm thin wall socket
4. crank puller
5. adjustable cup tool
6. lock ring tool
hubs
1. 13mm cone wrench
2. 15mm cone wrench
3. 17mm wrench
what grease do you guys like ?
again thks to all for your help
mark
06-10-20, 05:27 PM
#10
Really Old Senior Member

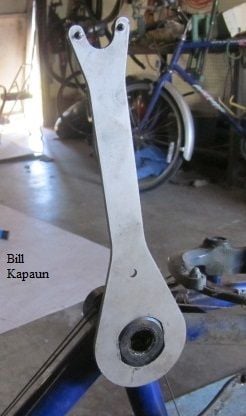
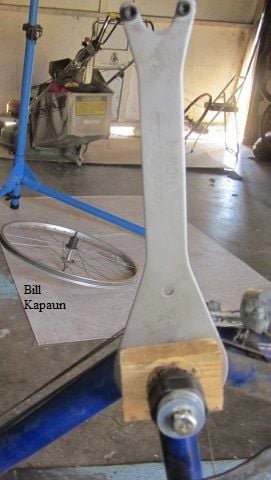
This is how I retain/remoce the fixed cup.
A large flat washer will work in place of the wooded one. I didn't have have a washer handy, but I had scrap wood & spade bits.
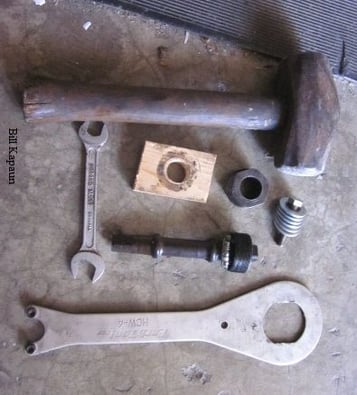
A large flat washer will work in place of the wooded one. I didn't have have a washer handy, but I had scrap wood & spade bits.
06-10-20, 05:31 PM
#11
Senior Member
Join Date: Jun 2002
Location: Montreal, Quebec
Posts: 5,921
Mentioned: 16 Post(s)
Tagged: 0 Thread(s)
Quoted: 1815 Post(s)
Liked 1,693 Times
in
974 Posts
thank you very much to all for your responses. i am on my ship now so can not check type of bb but i'm gonna assume it is old style. so where i stand now is....
bb
1. 6mm hex key
2. cheater bar
3. 14 mm thin wall socket
4. crank puller
5. adjustable cup tool
6. lock ring tool
hubs
1. 13mm cone wrench
2. 15mm cone wrench
3. 17mm wrench
what grease do you guys like ?
again thks to all for your help
mark
bb
1. 6mm hex key
2. cheater bar
3. 14 mm thin wall socket
4. crank puller
5. adjustable cup tool
6. lock ring tool
hubs
1. 13mm cone wrench
2. 15mm cone wrench
3. 17mm wrench
what grease do you guys like ?
again thks to all for your help
mark
06-10-20, 05:34 PM
#12
Senior Member
Join Date: Jun 2014
Location: Ontario, Canada
Posts: 4,624
Bikes: iele Latina, Miele Suprema, Miele Uno LS, Miele Miele Beta, MMTB, Bianchi Model Unknown, Fiori Venezia, Fiori Napoli, VeloSport Adamas AX
Mentioned: 16 Post(s)
Tagged: 0 Thread(s)
Quoted: 1324 Post(s)
Liked 927 Times
in
640 Posts
thank you very much to all for your responses. i am on my ship now so can not check type of bb but i'm gonna assume it is old style. so where i stand now is....
bb
1. 6mm hex key
2. cheater bar
3. 14 mm thin wall socket
4. crank puller
5. adjustable cup tool
6. lock ring tool
hubs
1. 13mm cone wrench
2. 15mm cone wrench
3. 17mm wrench
what grease do you guys like ?
again thks to all for your help
mark
bb
1. 6mm hex key
2. cheater bar
3. 14 mm thin wall socket
4. crank puller
5. adjustable cup tool
6. lock ring tool
hubs
1. 13mm cone wrench
2. 15mm cone wrench
3. 17mm wrench
what grease do you guys like ?
again thks to all for your help
mark
As far a as grease goes, I now use a Marine Grease. I get mine at Canadian Tire (Canada) and it's quite hard to wash off my hands if I get it on them; I need to use diashsoap and a scrubbing pad with the rough texture back and sponge. I use the rough texture part. Thus I know this grease is indeed waterproof.
Cheers
06-10-20, 05:46 PM
#13
Senior Member
Join Date: Jun 2002
Location: Montreal, Quebec
Posts: 5,921
Mentioned: 16 Post(s)
Tagged: 0 Thread(s)
Quoted: 1815 Post(s)
Liked 1,693 Times
in
974 Posts
Or you may. If that crank has been in place for a very long time you could have problems. I would remove the outer ring, shoot some lubricant into the interface, grease the inside of the removal ring, tighten it back into place, and then, and only then attempt to remove the crank
06-10-20, 05:58 PM
#14
Senior Member
Join Date: Jun 2014
Location: Ontario, Canada
Posts: 4,624
Bikes: iele Latina, Miele Suprema, Miele Uno LS, Miele Miele Beta, MMTB, Bianchi Model Unknown, Fiori Venezia, Fiori Napoli, VeloSport Adamas AX
Mentioned: 16 Post(s)
Tagged: 0 Thread(s)
Quoted: 1324 Post(s)
Liked 927 Times
in
640 Posts
Or you may. If that crank has been in place for a very long time you could have problems. I would remove the outer ring, shoot some lubricant into the interface, grease the inside of the removal ring, tighten it back into place, and then, and only then attempt to remove the crank
Cheers
06-10-20, 06:16 PM
#15
Junior Member
Thread Starter
bill kapaun, thks for the photos. i am not understanding the purpose of the wooden washer. could you enlighten me ?
06-10-20, 06:28 PM
#16
Senior Member
Join Date: Jun 2014
Location: Ontario, Canada
Posts: 4,624
Bikes: iele Latina, Miele Suprema, Miele Uno LS, Miele Miele Beta, MMTB, Bianchi Model Unknown, Fiori Venezia, Fiori Napoli, VeloSport Adamas AX
Mentioned: 16 Post(s)
Tagged: 0 Thread(s)
Quoted: 1324 Post(s)
Liked 927 Times
in
640 Posts
I prefer Sheldon Brown's Do It Yourself fixed cup removal tool.
https://www.sheldonbrown.com/tooltips/bbcups.html
Cheers
06-10-20, 06:46 PM
#17
Junior Member
Thread Starter
miele man thanks for the info and the link. that is an excellent article
06-10-20, 10:21 PM
#18


Insane Bicycle Mechanic

Join Date: Mar 2008
Location: other Vancouver
Posts: 9,826
Mentioned: 34 Post(s)
Tagged: 0 Thread(s)
Quoted: 797 Post(s)
Liked 694 Times
in
371 Posts
If it's a Shimano One-Key Release system, you probably won't need a dedicated crank puller.
As far a as grease goes, I now use a Marine Grease. I get mine at Canadian Tire (Canada) and it's quite hard to wash off my hands if I get it on them; I need to use diashsoap and a scrubbing pad with the rough texture back and sponge. I use the rough texture part. Thus I know this grease is indeed waterproof.
Cheers
I would also invest in a set of conventional crank bolts and a torque wrench for reassembly. The idea is to install the cranks with standard bolts and torque them to 300 inch-pounds before removing the bolts and reinstalling the One-Key Release. Tighten the One-Key Release to 300 inch-pounds carefully- if it strips you're screwed. (I worked on plenty of bikes with One-Key Release back in the '80's. I saw many crankarms that came loose after the owners didn't tighten them enough.)
Mark D: $50 for that bike is a pretty good deal. Shimano 600 parts from the mid-'80's were at the peak of the quality vs. price curve. Clean it up, replace the wear 'n' tear parts (rubber and cables), and ride the snot out of it.
__________________
Jeff Wills
Comcast nuked my web page. It will return soon..
Jeff Wills
Comcast nuked my web page. It will return soon..
06-10-20, 10:26 PM
#19
Really Old Senior Member
06-10-20, 10:46 PM
#20
Senior Member
Join Date: Jun 2014
Location: Ontario, Canada
Posts: 4,624
Bikes: iele Latina, Miele Suprema, Miele Uno LS, Miele Miele Beta, MMTB, Bianchi Model Unknown, Fiori Venezia, Fiori Napoli, VeloSport Adamas AX
Mentioned: 16 Post(s)
Tagged: 0 Thread(s)
Quoted: 1324 Post(s)
Liked 927 Times
in
640 Posts
I have removed some of those one-key releases by using a long handle hex wrench. Some of the bikes were assembled in the 1980s. I've always tried loosening the hex bolt with a 6mm hex key first, then with a hollow tube slide over it. Very rarely have I had to remove the bolt retaining cup and the crank fixing bolt and then use a crank extractor. Seeing as the OP doesn't have a crank extractor, why no encourage him to try using the 6mm hex key and a hollow tube? If that fails then he can go out and buy a crank extractor if he can find a shop that's open.
Cheers
Cheers
06-16-20, 10:01 AM
#21
Junior Member
Thread Starter
gentlemen, ordering my tools from parks now ouch. decided to get the crank puller because when i get off my ship time will be short, can't afford to wait for tools in the mail.
this is the crank puller i think i need. would you guys let me know if this is correct before i pull the trigger. added the other tools as well
thanks, mark

this is the crank puller i think i need. would you guys let me know if this is correct before i pull the trigger. added the other tools as well
thanks, mark
CCP-22 FEATURES
- Fits all cranks using 22mm x 1 threads and square, tapered bottom bracket spindles
- Fits Power Spline™ cranks from SRAM� using the 8mm thread bolt
- Fits BNI cranks on Bosch� e-bikes
- Strong rotating tip system ensures smooth operation and long life
- CRANK PULLER
Item #: CCP-22 - $15.49
- Update
- $15.49 Remove
- BOTTOM BRACKET LOCKRING WRENCH
Item #: HCW-5 - $15.95
- Update
- $15.95 Remove
- 15MM SHOP CONE WRENCH
Item #: SCW-15 - $8.49
- Update
- $8.49 Remove
- 13MM SHOP CONE WRENCH
Item #: SCW-13 - $8.49
- Update
- $8.49 Remove
- CRANK AND BOTTOM BRACKET WRENCH
Item #: HCW-4 - $19.95
- Update
- $39.90 Remove
- EMERGENCY TIRE BOOTS
Item #: TB-2 - $3.95
- Update
- $3.95 Remove
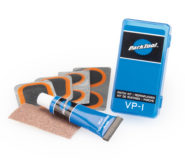
- VULCANIZING PATCH KIT
Item #: VP-1C - $2.95
- Update
- $2.95 Remove
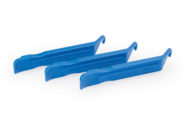
- TIRE LEVER SET
Item #: TL-1.2C - $3.95
- Update
- $3.95 Remove
06-16-20, 10:22 AM
#22
I'm good to go!
Join Date: Jul 2017
Location: Mississippi
Posts: 14,952
Bikes: Tarmac Disc Comp Di2 - 2020
Mentioned: 51 Post(s)
Tagged: 0 Thread(s)
Quoted: 6177 Post(s)
Liked 4,795 Times
in
3,307 Posts
What is your intention on fixing it up? To make it pretty much original or maybe upgrade it with new components?
If you are going to put on newer cranks and other things, then you might be buying tools to get the old stuff off that will only be needed that one time. So consider going to some bike shops and seeing what they'd charge to remove the old stuff. You might even find it worth letting them install some of the stuff to save you buying a tool you might only use once or twice.
If you are going to put on newer cranks and other things, then you might be buying tools to get the old stuff off that will only be needed that one time. So consider going to some bike shops and seeing what they'd charge to remove the old stuff. You might even find it worth letting them install some of the stuff to save you buying a tool you might only use once or twice.
06-16-20, 10:30 AM
#23
Junior Member
Thread Starter
good point Iride01, but from what i've been hearing bike shops charge an arm and a leg nowadays and they are way backed up where i am staying so its fix it myself or fix it myself. i do not plan to upgrade the components anytime soon.
06-16-20, 10:50 AM
#24
I'm good to go!
Join Date: Jul 2017
Location: Mississippi
Posts: 14,952
Bikes: Tarmac Disc Comp Di2 - 2020
Mentioned: 51 Post(s)
Tagged: 0 Thread(s)
Quoted: 6177 Post(s)
Liked 4,795 Times
in
3,307 Posts
Okay, but don't overlook just going in and asking. You take a clean frame with nothing on it but the old crank and they might just remove it for nothing. YMMV.
I used to think shops charged an arm and a leg too. However to my surprise, when I did get them to do stuff for me, I always felt they didn't charge enough. And many times, just going into shops and chatting with the mechanics or shop owners when it wasn't busy would get me free stuff. Something they may have just taken off and the bicycle owner didn't want back.
But that was prior to the current situation.
07-08-20, 05:49 AM
#25
Junior Member
Thread Starter
ok finally got off my ship and back to my bike all my park tools were waiting. still needed a wrench for the pedals and a thin walled socket for the crank bolts. took my bike to home depot. they had a guard out front so i went in through the garden dept. went to the tool section. figured out what fit then decided what the hell lets break the bolts and pedals free. bolts came free but the pedals were frozen. went to the plumbing section and grabbed a 3 ft black pipe and returned to my bike. started getting a nervous about my crappy behavior but then i thought, when was the last time a sales person was walking around looking to help someone in home depot ? never right ? so i applied the pipe and 15mm wrench to the pedals and they came free.
bike is now stripped to the frame with the exception of the seat post and headset. post is frozen, but as proof that god loves me the bike came with post at perfect height for me. gonna leave it alone for now
headset requires a special wrench that i aint gonna buy right now.
bottom bracket was fine. grease was still good. so actually did not need servicing but ya gotta check .
front hub was fine but of course i cleaned and serviced while i was in there. rear hub gets serviced today
pedals grease had turned to glue. serviced em and now they are nice and smooth
will start reassembly today
thanks to all who helped me in this thread. all wrench sizes etc that you guys passed on were absolutely spot on