


Gauging acceptable wear on steel chainrings?
 04-19-21, 05:58 PM
#1

Senior Member
Thread Starter
Join Date: Sep 2017
Location: Eastern Shore, MD
Posts: 2,107
Bikes: Road ready: 1993 Koga Miyata City Liner Touring Hybrid, 1989 Centurion Sport DLX, "I Blame GP" Bridgestone CB-1. Projects: Yea, I got a problem....
Mentioned: 24 Post(s)
Tagged: 0 Thread(s)
Quoted: 753 Post(s)
Liked 736 Times
in
422 Posts
Gauging acceptable wear on steel chainrings?
I bought a set of steel chainrings off ebay. Their 52-36T 116 bcd and I was excited to find a cottered crank "compact double set". On inspection the inner 36t chainring has more wear than the outer and a new chain "lifts" a bit more than the outer. Any ideas on how to quantify wear on steel rings? My concern would primarily be wearing out the chains and freewheels faster, but practically speaking the 36t chainring is the most unobtanium consumable in the drive train. I can get some pictures tomorrow. Thanks
 04-19-21, 06:03 PM
#2
Senior Member

Join Date: Apr 2012
Location: Middle Earth (aka IA)
Posts: 20,433
Bikes: A bunch of old bikes and a few new ones
Mentioned: 178 Post(s)
Tagged: 0 Thread(s)
Quoted: 5888 Post(s)
Liked 3,471 Times
in
2,079 Posts
Is it possible to wear out a steel chainring? Obviously the answer is yes but those things are pretty tough.
04-19-21, 06:11 PM
#3
Senior Member
Thread Starter
Join Date: Sep 2017
Location: Eastern Shore, MD
Posts: 2,107
Bikes: Road ready: 1993 Koga Miyata City Liner Touring Hybrid, 1989 Centurion Sport DLX, "I Blame GP" Bridgestone CB-1. Projects: Yea, I got a problem....
Mentioned: 24 Post(s)
Tagged: 0 Thread(s)
Quoted: 753 Post(s)
Liked 736 Times
in
422 Posts
I've seen some pretty worn rings, but I don't think I could wear this one out in my life time. I just don't want to have to feed this ting to many freewheels. That's not even a big deal as long as they keep making cheap 5 speed freewheels.
Last edited by bark_eater; 04-19-21 at 06:31 PM.
04-19-21, 06:27 PM
#4
Phyllo-buster

Join Date: Jan 2010
Location: Nova Scotia
Posts: 8,844
Bikes: roadsters, club bikes, fixed and classic
Mentioned: 133 Post(s)
Tagged: 0 Thread(s)
Quoted: 2297 Post(s)
Liked 2,048 Times
in
1,253 Posts
I had a pre war Hercules with a saw toothed chainring that had to go. It could cut your finger. This is the bike with a poor replacement as the original had the name Hercules in the webbing.

Likes For clubman:
04-19-21, 06:33 PM
#5
Full Member
I always just figured a chainring was good so long as it didn't slip and no teeth were missing.
04-20-21, 07:20 PM
#6
Senior Member
Thread Starter
Join Date: Sep 2017
Location: Eastern Shore, MD
Posts: 2,107
Bikes: Road ready: 1993 Koga Miyata City Liner Touring Hybrid, 1989 Centurion Sport DLX, "I Blame GP" Bridgestone CB-1. Projects: Yea, I got a problem....
Mentioned: 24 Post(s)
Tagged: 0 Thread(s)
Quoted: 753 Post(s)
Liked 736 Times
in
422 Posts
I tried to get pictures but lost them... using drill bits as gauges I was able to get a 1/16th bit under the rivet on the 52t ring and a 5/64th bit under the rivet on the 36t ring. I'm not sure what that all really means, except try and ride the 52t ring until I need to engage the grannie gear....
04-21-21, 05:22 AM
#7
Senior Member
Thread Starter
Join Date: Sep 2017
Location: Eastern Shore, MD
Posts: 2,107
Bikes: Road ready: 1993 Koga Miyata City Liner Touring Hybrid, 1989 Centurion Sport DLX, "I Blame GP" Bridgestone CB-1. Projects: Yea, I got a problem....
Mentioned: 24 Post(s)
Tagged: 0 Thread(s)
Quoted: 753 Post(s)
Liked 736 Times
in
422 Posts
04-21-21, 06:29 AM
#8
Senior Member
Thread Starter
Join Date: Sep 2017
Location: Eastern Shore, MD
Posts: 2,107
Bikes: Road ready: 1993 Koga Miyata City Liner Touring Hybrid, 1989 Centurion Sport DLX, "I Blame GP" Bridgestone CB-1. Projects: Yea, I got a problem....
Mentioned: 24 Post(s)
Tagged: 0 Thread(s)
Quoted: 753 Post(s)
Liked 736 Times
in
422 Posts
Here are some pictures. The 52t ring is loose enough for a 1/16th drill bit to squeeze in. The 36t will allow a 5/64 drill under the rivet. Playing with the chain it looks like the amount of slop is halved when the chain is tensioned for one side as it is when the cranks turn. I don't know what that all means, except save the 36t as a granny for the hills...


04-21-21, 08:26 AM
#9
Senior Member
Join Date: Oct 2016
Location: Cambridge UK
Posts: 852
Bikes: 1903 24 spd Sunbeam, 1927 Humber, 3 1930 Raleighs, 2 1940s Sunbeams, 2 1940s Raleighs, Rudge, 1950s Robin Hood, 1958 Claud Butler, 2 1973 Colnago Supers, Eddie Merckx, 2 1980 Holdsworth, EG Bates funny TT bike, another 6 or so 1990s bikes
Mentioned: 15 Post(s)
Tagged: 0 Thread(s)
Quoted: 331 Post(s)
Liked 332 Times
in
185 Posts
Only the 3 o'clock position on the chain ring reveals meaningful data. Did Elvis write a song along those lines?
Go to the 3 o'clock position on the chain ring. As the furthermost point from the 9 o'clock position on the rear sprocket you can gauge the amount of wear on your entire drive. Pull the chain away from the teeth at the 3 o'clock position on the chain ring . If you can see half of a tooth, change the chain (cheapest option).Repeat procedure with new said chain. If the half tooth still appears your chain ring is toast. Replace and happy days.
If it still jumps - change the rear sprocket as well.
You now have a completely new drive.
Oil every day and it will stay that way, neglect the oil and you will be back sooner or later.
04-21-21, 08:30 AM
#10


Senior Member

Join Date: Aug 2003
Location: Tampa, Florida
Posts: 13,954
Mentioned: 40 Post(s)
Tagged: 0 Thread(s)
Quoted: 413 Post(s)
Likes: 0
Liked 109 Times
in
78 Posts
If mounted on a bike pull the chain tight at 3:00. If you can see light at the tip of a tooth the rings are toast. Or 12:00 as in your pics..
I've never compared new large n small rings side by side but I'd guess the chain will pull further away on the small ring as there're fewer teeth engaged. That small ring has a bizzillion miles to go as both tooth 'bevel's' and machine marks are clearly visible. Pedal away....
Teeth on that particular ring are beveled in two directions, from the inside in and from the front/back towards the tip.
04-21-21, 10:09 AM
#11
Passista
Join Date: Jul 2005
Posts: 7,596
Bikes: 1998 Pinarello Asolo, 1992 KHS Monta�a pro, 1980 Raleigh DL-1, IGH Hybrid, IGH Utility
Mentioned: 5 Post(s)
Tagged: 0 Thread(s)
Quoted: 866 Post(s)
Liked 720 Times
in
395 Posts
Those rings look OK to me. Probably still good for many years of use.
04-21-21, 10:32 AM
#12
Senior Member
Join Date: Mar 2019
Posts: 1,606
Mentioned: 8 Post(s)
Tagged: 0 Thread(s)
Quoted: 581 Post(s)
Liked 921 Times
in
518 Posts
Rings can wear to a point where the shape of the teeth changes visibly. Those rings do not look like that. You expect to see a difference between the front and back edge of each tooth, and a bit of an extended flat section between. Neither are visible there.
My first question: is that a new chain? Because lifting off the chainrings is one way to determine if there is wear in the chain, and the same chainring can be used over the life of many chains, if the chains are changed regularly.
My first question: is that a new chain? Because lifting off the chainrings is one way to determine if there is wear in the chain, and the same chainring can be used over the life of many chains, if the chains are changed regularly.
04-21-21, 11:46 AM
#13
Senior Member
Thread Starter
Join Date: Sep 2017
Location: Eastern Shore, MD
Posts: 2,107
Bikes: Road ready: 1993 Koga Miyata City Liner Touring Hybrid, 1989 Centurion Sport DLX, "I Blame GP" Bridgestone CB-1. Projects: Yea, I got a problem....
Mentioned: 24 Post(s)
Tagged: 0 Thread(s)
Quoted: 753 Post(s)
Liked 736 Times
in
422 Posts
It's a new chain. The industrial sprocket web link put 10% of tooth width worn away as the replacement point. MKII eyeball and a Harbor Freight caliper puts the small ring at 10% compared to a NOS Nervar ring. The Nervar ring has chromed over burs on the teeth so that's probably a pessimistic comparison. I'm assuming that there's an tolerance spec for 1/2" chain.
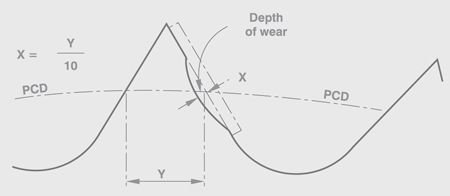
Here's an illustration from the link. If a roller is 7.75mm in diameter adding 10% gets you 8.525mm. 8.5 mm drill bits are available, I wonder if one could be used as a No-Go tooth gauges?
I get the idea of the 3 o'clock test, and having the chain tensioned back to the sprockets, will reduce the amount of slop, so there would be less lift than with how I have the unmounted chainring and drill bit. I tried tensioning the chain in the proper direction and it looked like the gap was significantly reduced, but I only have 2 hands...
04-21-21, 12:49 PM
#14
Senior Member
Join Date: Aug 2003
Location: Tampa, Florida
Posts: 13,954
Mentioned: 40 Post(s)
Tagged: 0 Thread(s)
Quoted: 413 Post(s)
Likes: 0
Liked 109 Times
in
78 Posts
I get the idea of the 3 o'clock test, and having the chain tensioned back to the sprockets, will reduce the amount of slop, so there would be less lift than with how I have the unmounted chainring and drill bit. I tried tensioning the chain in the proper direction and it looked like the gap was significantly reduced, but I only have 2 hands...
04-21-21, 07:54 PM
#15
working on my sandal tan

Join Date: Aug 2011
Location: CID
Posts: 22,627
Bikes: 1991 Bianchi Eros, 1964 Armstrong, 1988 Diamondback Ascent, 1988 Bianchi Premio, 1987 Bianchi Sport SX, 1980s Raleigh mixte (hers), All-City Space Horse (hers)
Mentioned: 98 Post(s)
Tagged: 0 Thread(s)
Quoted: 3870 Post(s)
Liked 2,563 Times
in
1,577 Posts
04-21-21, 08:01 PM
#16
Senior Member
Thread Starter
Join Date: Sep 2017
Location: Eastern Shore, MD
Posts: 2,107
Bikes: Road ready: 1993 Koga Miyata City Liner Touring Hybrid, 1989 Centurion Sport DLX, "I Blame GP" Bridgestone CB-1. Projects: Yea, I got a problem....
Mentioned: 24 Post(s)
Tagged: 0 Thread(s)
Quoted: 753 Post(s)
Liked 736 Times
in
422 Posts
There was no mention of pixy dust. I looked...
https://www.renold.com/company/lates...worn-sprockets
https://www.renold.com/company/lates...worn-sprockets
04-21-21, 08:14 PM
#17
www.theheadbadge.com

Join Date: Sep 2005
Location: Southern Florida
Posts: 28,510
Bikes: https://www.theheadbadge.com
Mentioned: 124 Post(s)
Tagged: 0 Thread(s)
Quoted: 2420 Post(s)
Liked 4,381 Times
in
2,090 Posts

 04-21-21, 08:21 PM
#18
Senior Member

Join Date: May 2010
Location: Bastrop Texas
Posts: 4,467
Bikes: Univega, Peu P6, Peu PR-10, Ted Williams, Peu UO-8, Peu UO-18 Mixte, Peu Dolomites
Mentioned: 13 Post(s)
Tagged: 0 Thread(s)
Quoted: 957 Post(s)
Liked 1,619 Times
in
1,039 Posts
When they are worn enough that I can see changes, I replace them. They seem to last longer if riding on clean roads. Dirty roads = Dirty chains = Worn out cranks... Ha
__________________
 No matter where you're at... There you are... Δf:=f(1/2)-f(-1/2)
No matter where you're at... There you are... Δf:=f(1/2)-f(-1/2)
04-21-21, 08:55 PM
#19
Senior Member
Thread Starter
Join Date: Sep 2017
Location: Eastern Shore, MD
Posts: 2,107
Bikes: Road ready: 1993 Koga Miyata City Liner Touring Hybrid, 1989 Centurion Sport DLX, "I Blame GP" Bridgestone CB-1. Projects: Yea, I got a problem....
Mentioned: 24 Post(s)
Tagged: 0 Thread(s)
Quoted: 753 Post(s)
Liked 736 Times
in
422 Posts
04-22-21, 07:08 AM
#20
Full Member
Join Date: Feb 2013
Location: Worcester, Massachusetts
Posts: 308
Bikes: Fuji Sportif 1.7C, Shogun Metro AT, Jamis Durango SX, Miyata Alumicross, Fuji Special Road Racer, Mongoose ATB, Fuji SST 1.0 Team, Gitane (?), Specialized Rockhopper SS, Univega Gran Turismo, Univega Supra Sport Mixte, Nishiki Tri-A, Diamondback Coil
Mentioned: 1 Post(s)
Tagged: 0 Thread(s)
Quoted: 82 Post(s)
Liked 141 Times
in
78 Posts
I thought I first saw it at Sheldon's, but I'm having trouble finding it. But one tip I recently discovered is to use a loose roller from a chain, pick it up with a set of needle-nose pliers, and fit it into the chainring. If it seems nicely nestled in there, then the chainring is good. If the valley is wide and the chainring teeth don't really come up the sides of the roller, then it's worn out. Hard to describe, but it's really obvious if you do it with a chainring you know is good, and then test it out on one you think is bad.
04-23-21, 02:35 PM
#21
Senior Member
Thread Starter
Join Date: Sep 2017
Location: Eastern Shore, MD
Posts: 2,107
Bikes: Road ready: 1993 Koga Miyata City Liner Touring Hybrid, 1989 Centurion Sport DLX, "I Blame GP" Bridgestone CB-1. Projects: Yea, I got a problem....
Mentioned: 24 Post(s)
Tagged: 0 Thread(s)
Quoted: 753 Post(s)
Liked 736 Times
in
422 Posts
I gave that a try, and a roller in a new chainring has zero play. Referring back to the diagram, it looks like if there is any play with the roller at the bottom of the trough, the wear point may have gone beyond 10%, but I have no idea how accurate that illustration realy is. I played with a drill index a bit more, and where there is visible wear further up the tooth an 11/64 bit would lock in to the groove, above the bottom. The next thing to play with would be the 2 5/32" drill bits approximately 1/2 a roller diameter to space a caliper off the bottom of the valley. That would be ball park, but even with spacers exactly 1/2 the rollers diameter the measurement will be off as it will be a straight line tangent bellow the PCD radius. The greater the diameter of the chainring the less this is a factor....
Last edited by bark_eater; 04-23-21 at 04:35 PM.
04-23-21, 08:45 PM
#22
Passista
Join Date: Jul 2005
Posts: 7,596
Bikes: 1998 Pinarello Asolo, 1992 KHS Monta�a pro, 1980 Raleigh DL-1, IGH Hybrid, IGH Utility
Mentioned: 5 Post(s)
Tagged: 0 Thread(s)
Quoted: 866 Post(s)
Liked 720 Times
in
395 Posts
There's a Rohloff sprocket wear gauge, I guess you can use it on a chainring too.

I made one but it wasn't of much use - when it said "worn out sprocket, replace" you could as well see that by eye...
I made one but it wasn't of much use - when it said "worn out sprocket, replace" you could as well see that by eye...
Last edited by Reynolds; 04-23-21 at 08:49 PM.
04-24-21, 05:16 AM
#23
Senior Member
Thread Starter
Join Date: Sep 2017
Location: Eastern Shore, MD
Posts: 2,107
Bikes: Road ready: 1993 Koga Miyata City Liner Touring Hybrid, 1989 Centurion Sport DLX, "I Blame GP" Bridgestone CB-1. Projects: Yea, I got a problem....
Mentioned: 24 Post(s)
Tagged: 0 Thread(s)
Quoted: 753 Post(s)
Liked 736 Times
in
422 Posts
I've been meaning to get one of those. The instructions say that they only work to 21T. Roller chain and sprocket technology must be getting close to 200 years in use, so I'm sure this has been covered before. I just need to find the right critical application that is relevant to 1/2" chain drives.
Likes For Sluggo:
04-24-21, 12:13 PM
#25
Senior Member
Join Date: Sep 2014
Location: Baton Rouge La
Posts: 1,214
Mentioned: 22 Post(s)
Tagged: 0 Thread(s)
Quoted: 394 Post(s)
Liked 346 Times
in
230 Posts
Check out the pictures of worn out vs new chainrings here: https://www.bikeforums.net/bicycle-m...isualized.html
Yours look closer to the new end of the spectrum to me. I don't think you need to actually measure it to come to that conclusion.
Yours look closer to the new end of the spectrum to me. I don't think you need to actually measure it to come to that conclusion.
