


Headbadge Mounting Method Using Brass Rivets
 11-06-19, 06:19 PM
#1

Friendship is Magic
Thread Starter

Join Date: Nov 2010
Location: Sacramento, CA
Posts: 22,984
Bikes: old ones
Mentioned: 304 Post(s)
Tagged: 0 Thread(s)
Quoted: 26400 Post(s)
Liked 10,373 Times
in
7,202 Posts
Headbadge Mounting Method Using Brass Rivets
.
...the remounting of headbadges in an aesthetically pleasing way is subject that comes up on a regular basis here. Until now, about the best I've been able to do is by gluing some drive screw heads in the badge holes, and mounting using 3M trim tape. Which works fine, nothing wrong with that.
But I have been doing a kind of extensive renovation of an early Raleigh Professional, and I'd been wanting to try something a little more like the original.
Step 1
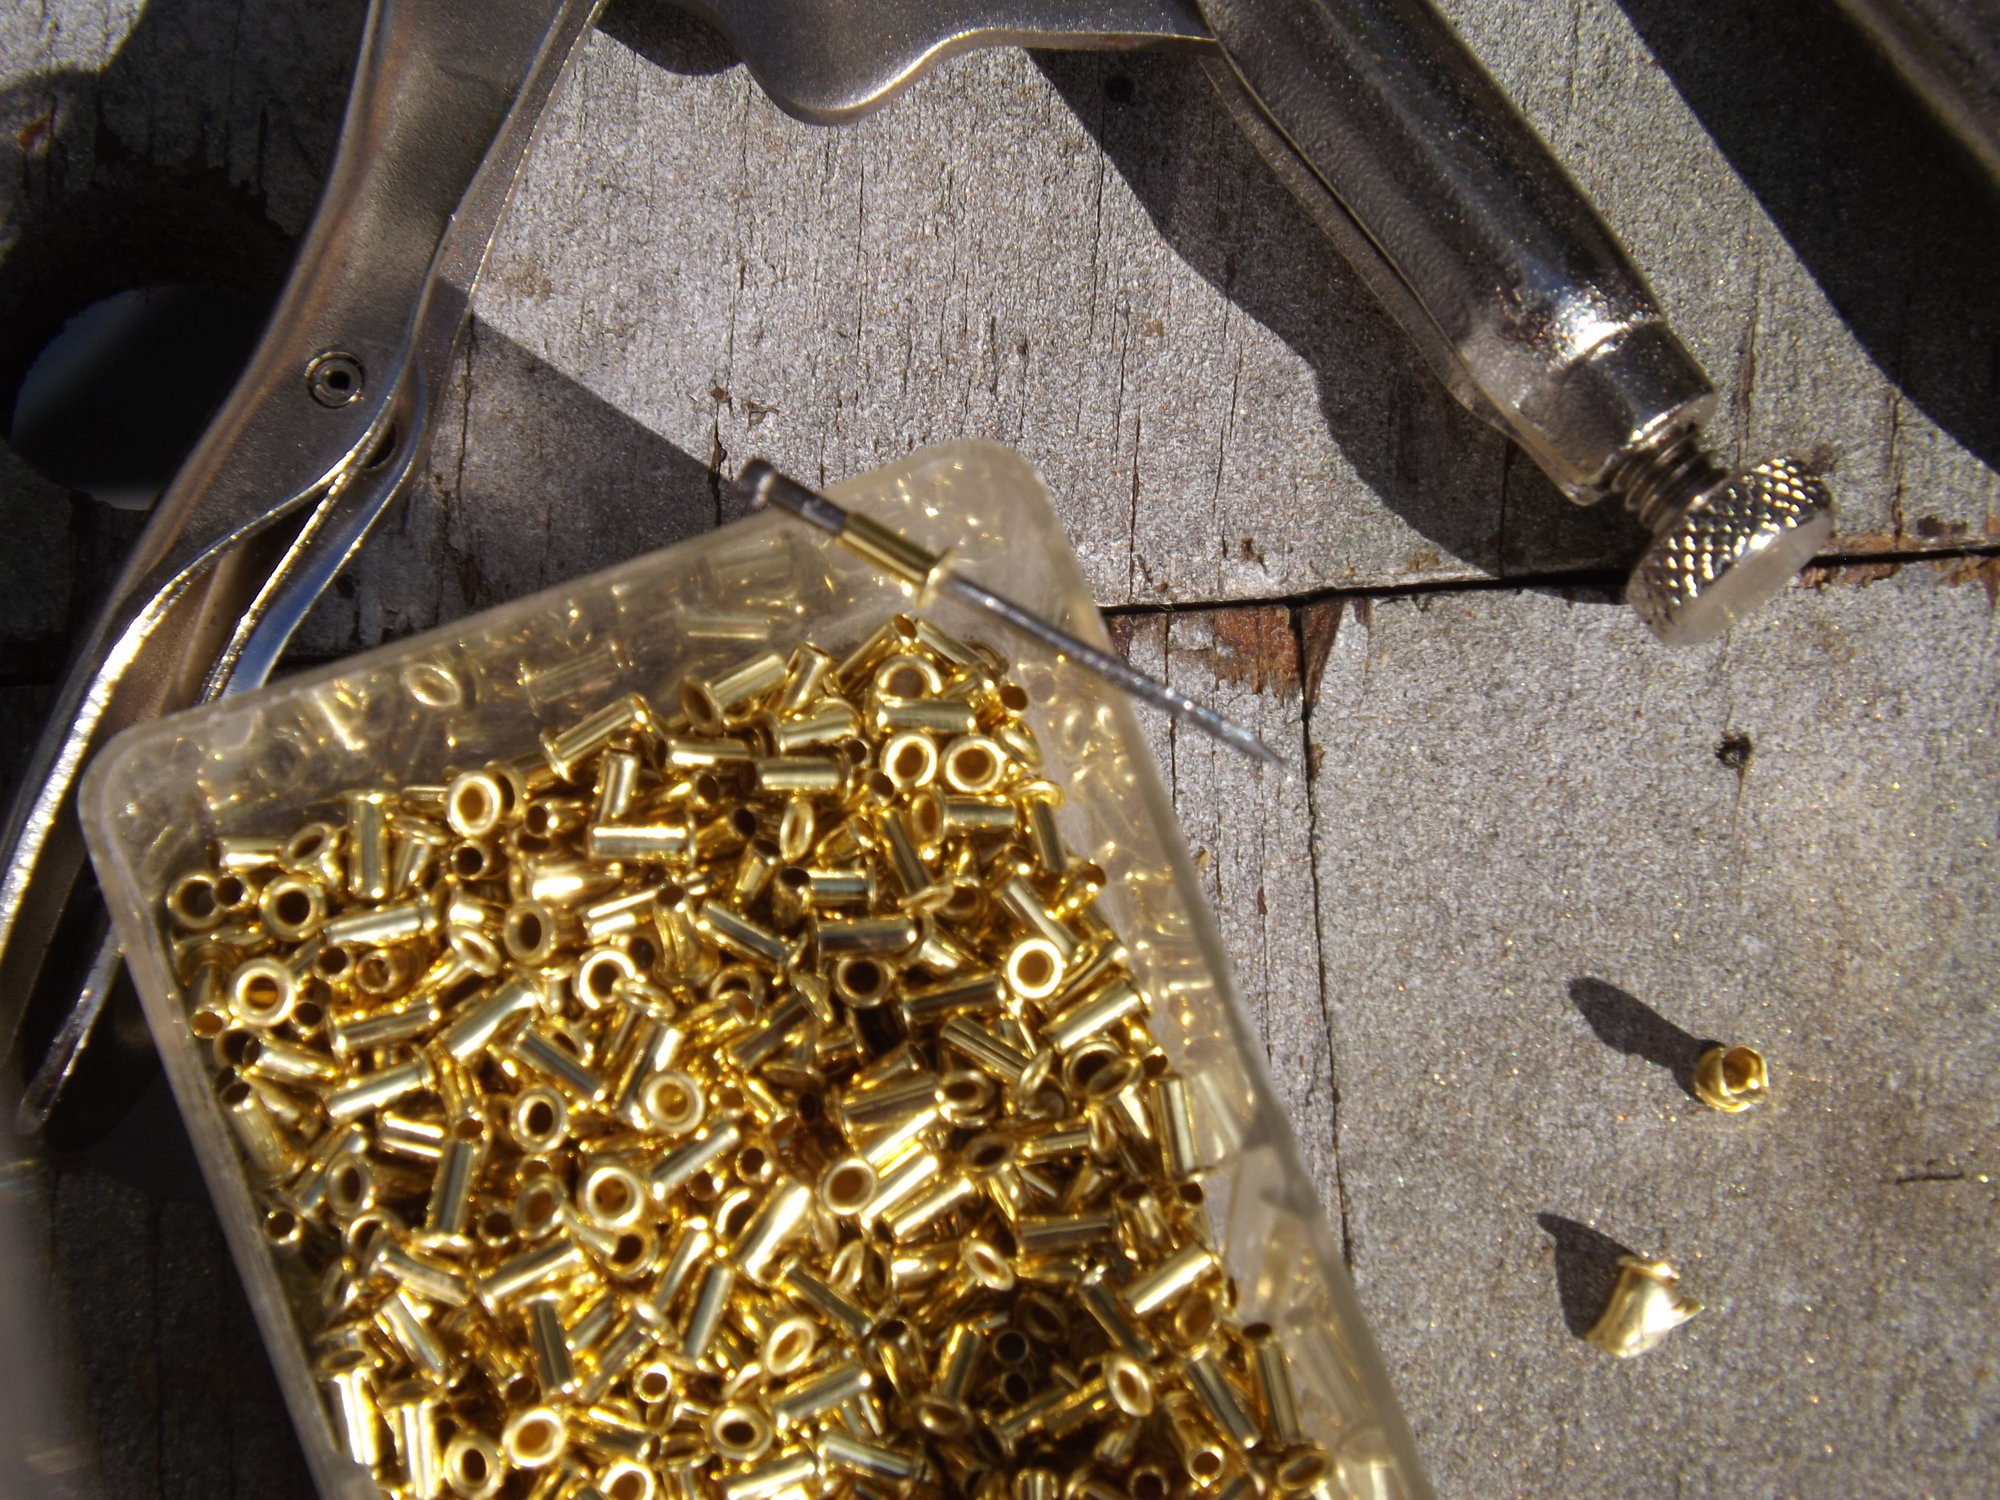
Find someplace that sells the little brass rivets. In this case it was online, at fasnap.com.
Thank you for your Online Order. Your reference number is 4596. If you have any questions, or need additional information, please contact Fasnap Corp. by calling 800-624-2058 or emailing cmiller@fasnap.com;rachelleh@fasnap.com
Order Details:
Items Requested
------------------------------------------
Item #: 03-BGS-37-BR
Item Name: GS 3-7/Brass
Product Options:
------------------------------------------
Price: $21.70
Items Per Package: 1000
Package Type: Bag
Quantity: 1
Item Total: $21.70
As you can already see, this is not for the faint of heart, but it turns out that 1000 of them will fit in a very small space. 
Step 2
Next, you need to figure out how to use them in a blind hole situation. Briefly, I figured out a way to grind down a #3 finishing nail so that it fits through my rivets, insert it from the rear in the hole in the head tube, then use a regular pop riveter to pull the rivets snug. This is best illustrated with photos.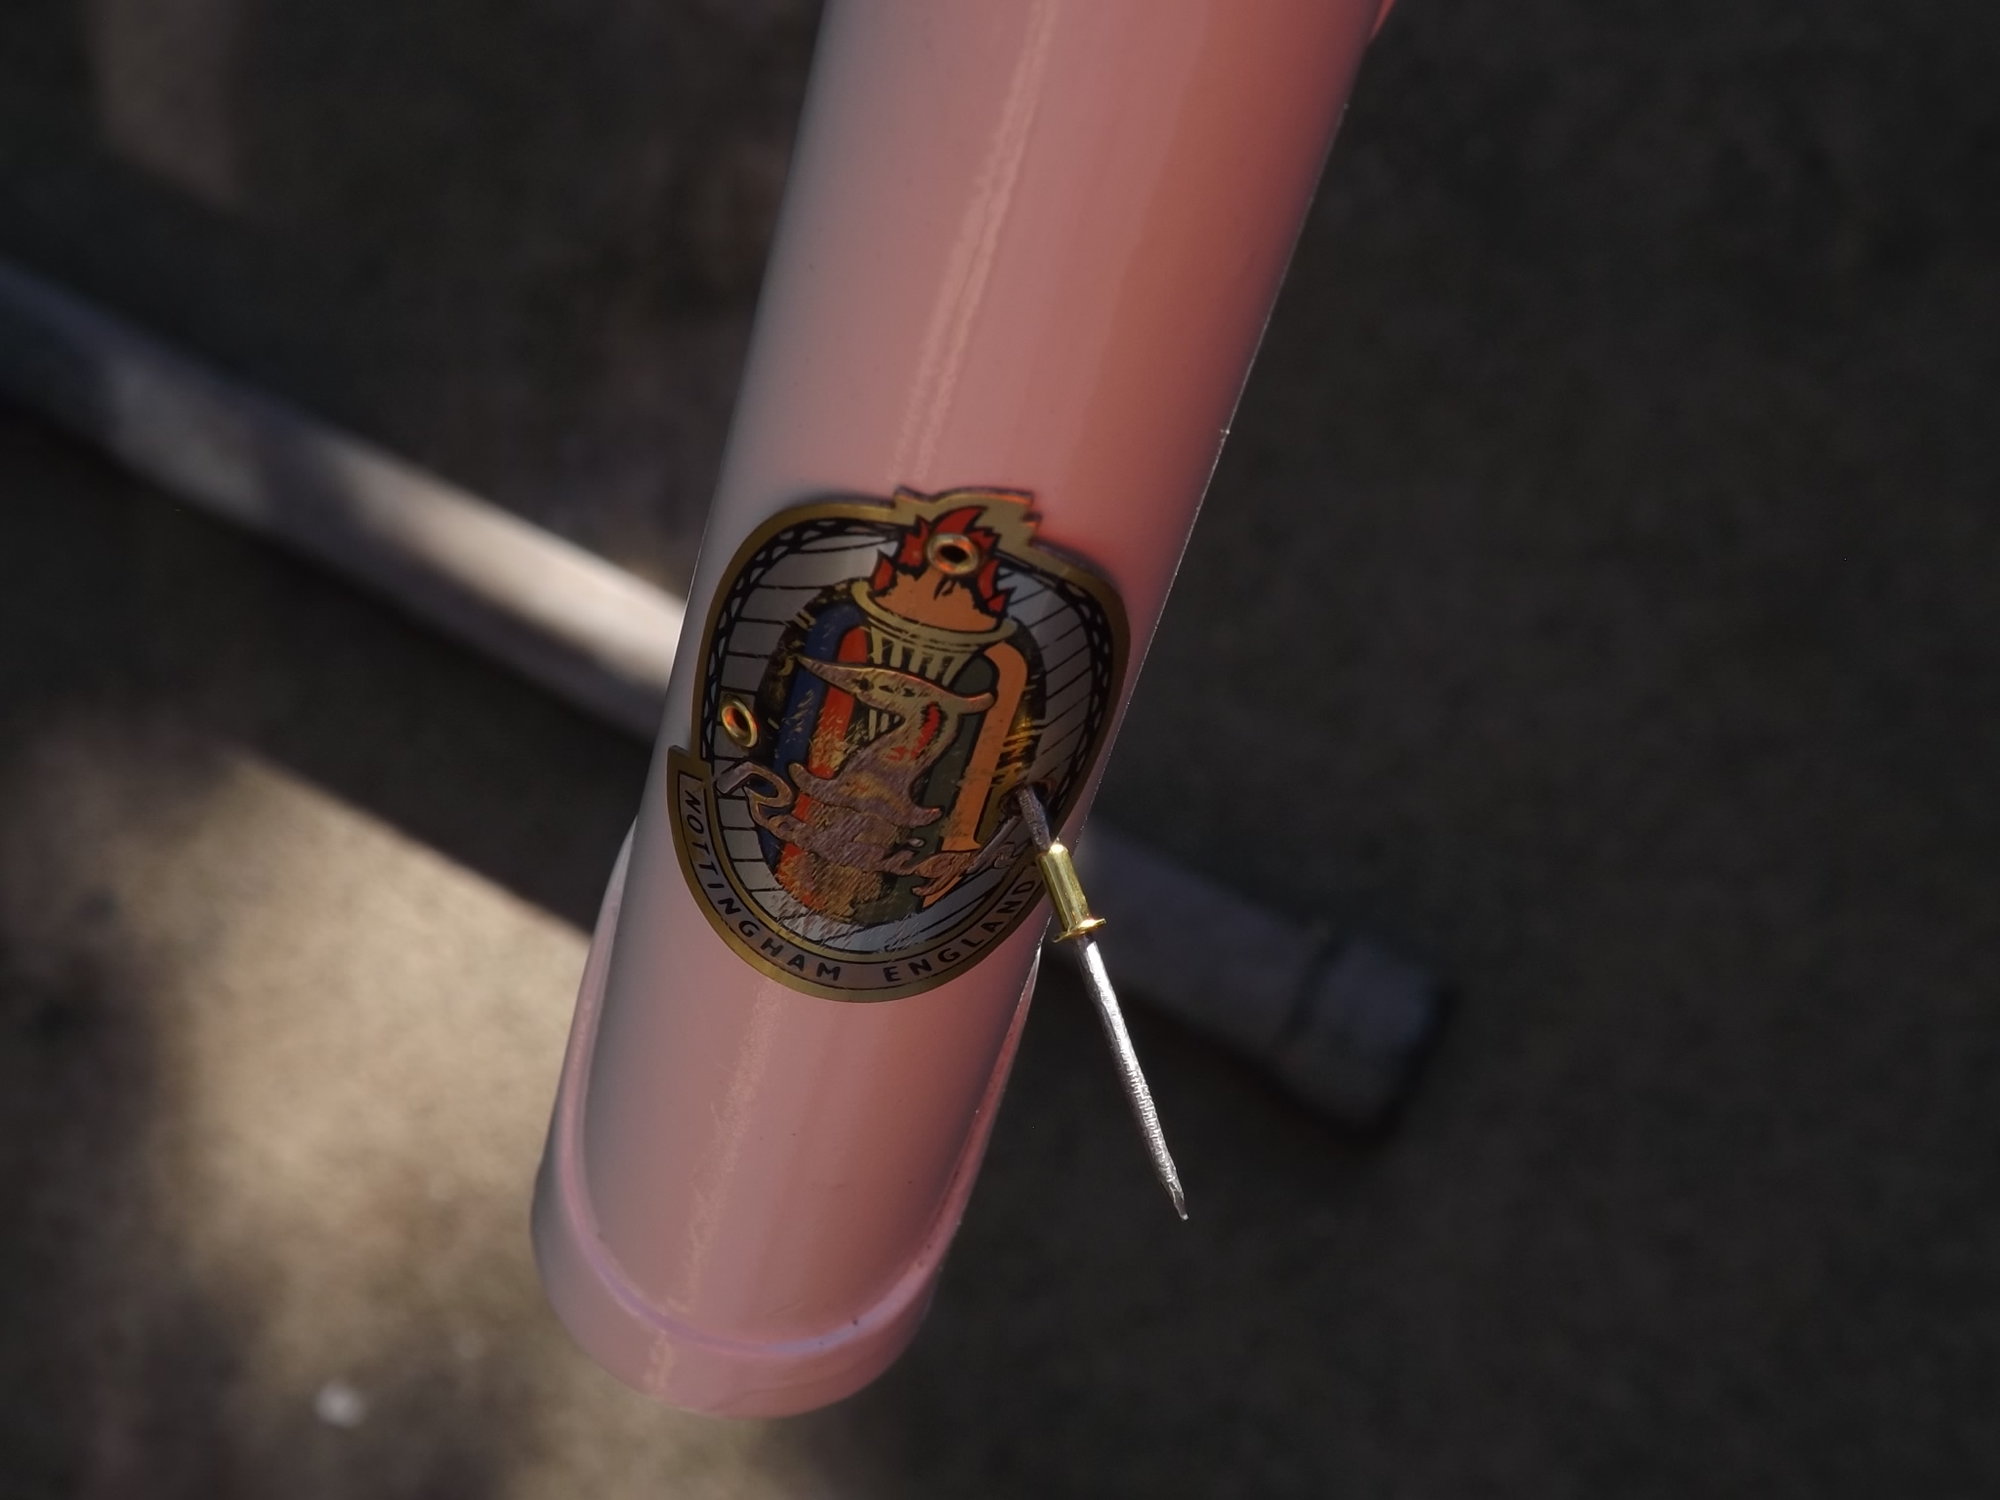


...the remounting of headbadges in an aesthetically pleasing way is subject that comes up on a regular basis here. Until now, about the best I've been able to do is by gluing some drive screw heads in the badge holes, and mounting using 3M trim tape. Which works fine, nothing wrong with that.
But I have been doing a kind of extensive renovation of an early Raleigh Professional, and I'd been wanting to try something a little more like the original.
Step 1
Find someplace that sells the little brass rivets. In this case it was online, at fasnap.com.
Thank you for your Online Order. Your reference number is 4596. If you have any questions, or need additional information, please contact Fasnap Corp. by calling 800-624-2058 or emailing cmiller@fasnap.com;rachelleh@fasnap.com
Order Details:
Items Requested
------------------------------------------
Item #: 03-BGS-37-BR
Item Name: GS 3-7/Brass
Product Options:
------------------------------------------
Price: $21.70
Items Per Package: 1000
Package Type: Bag
Quantity: 1
Item Total: $21.70
Step 2
Next, you need to figure out how to use them in a blind hole situation. Briefly, I figured out a way to grind down a #3 finishing nail so that it fits through my rivets, insert it from the rear in the hole in the head tube, then use a regular pop riveter to pull the rivets snug. This is best illustrated with photos.

Likes For 3alarmer:
11-06-19, 06:27 PM
#2
Senior Member

Join Date: Jun 2006
Location: NW Burbs, Chicago
Posts: 12,053
Mentioned: 201 Post(s)
Tagged: 0 Thread(s)
Quoted: 3015 Post(s)
Liked 3,792 Times
in
1,406 Posts
Nice.
Did it originally have blind or solid rivets?
Did it originally have blind or solid rivets?
11-06-19, 06:28 PM
#3
Friendship is Magic
Thread Starter
Join Date: Nov 2010
Location: Sacramento, CA
Posts: 22,984
Bikes: old ones
Mentioned: 304 Post(s)
Tagged: 0 Thread(s)
Quoted: 26400 Post(s)
Liked 10,373 Times
in
7,202 Posts
.
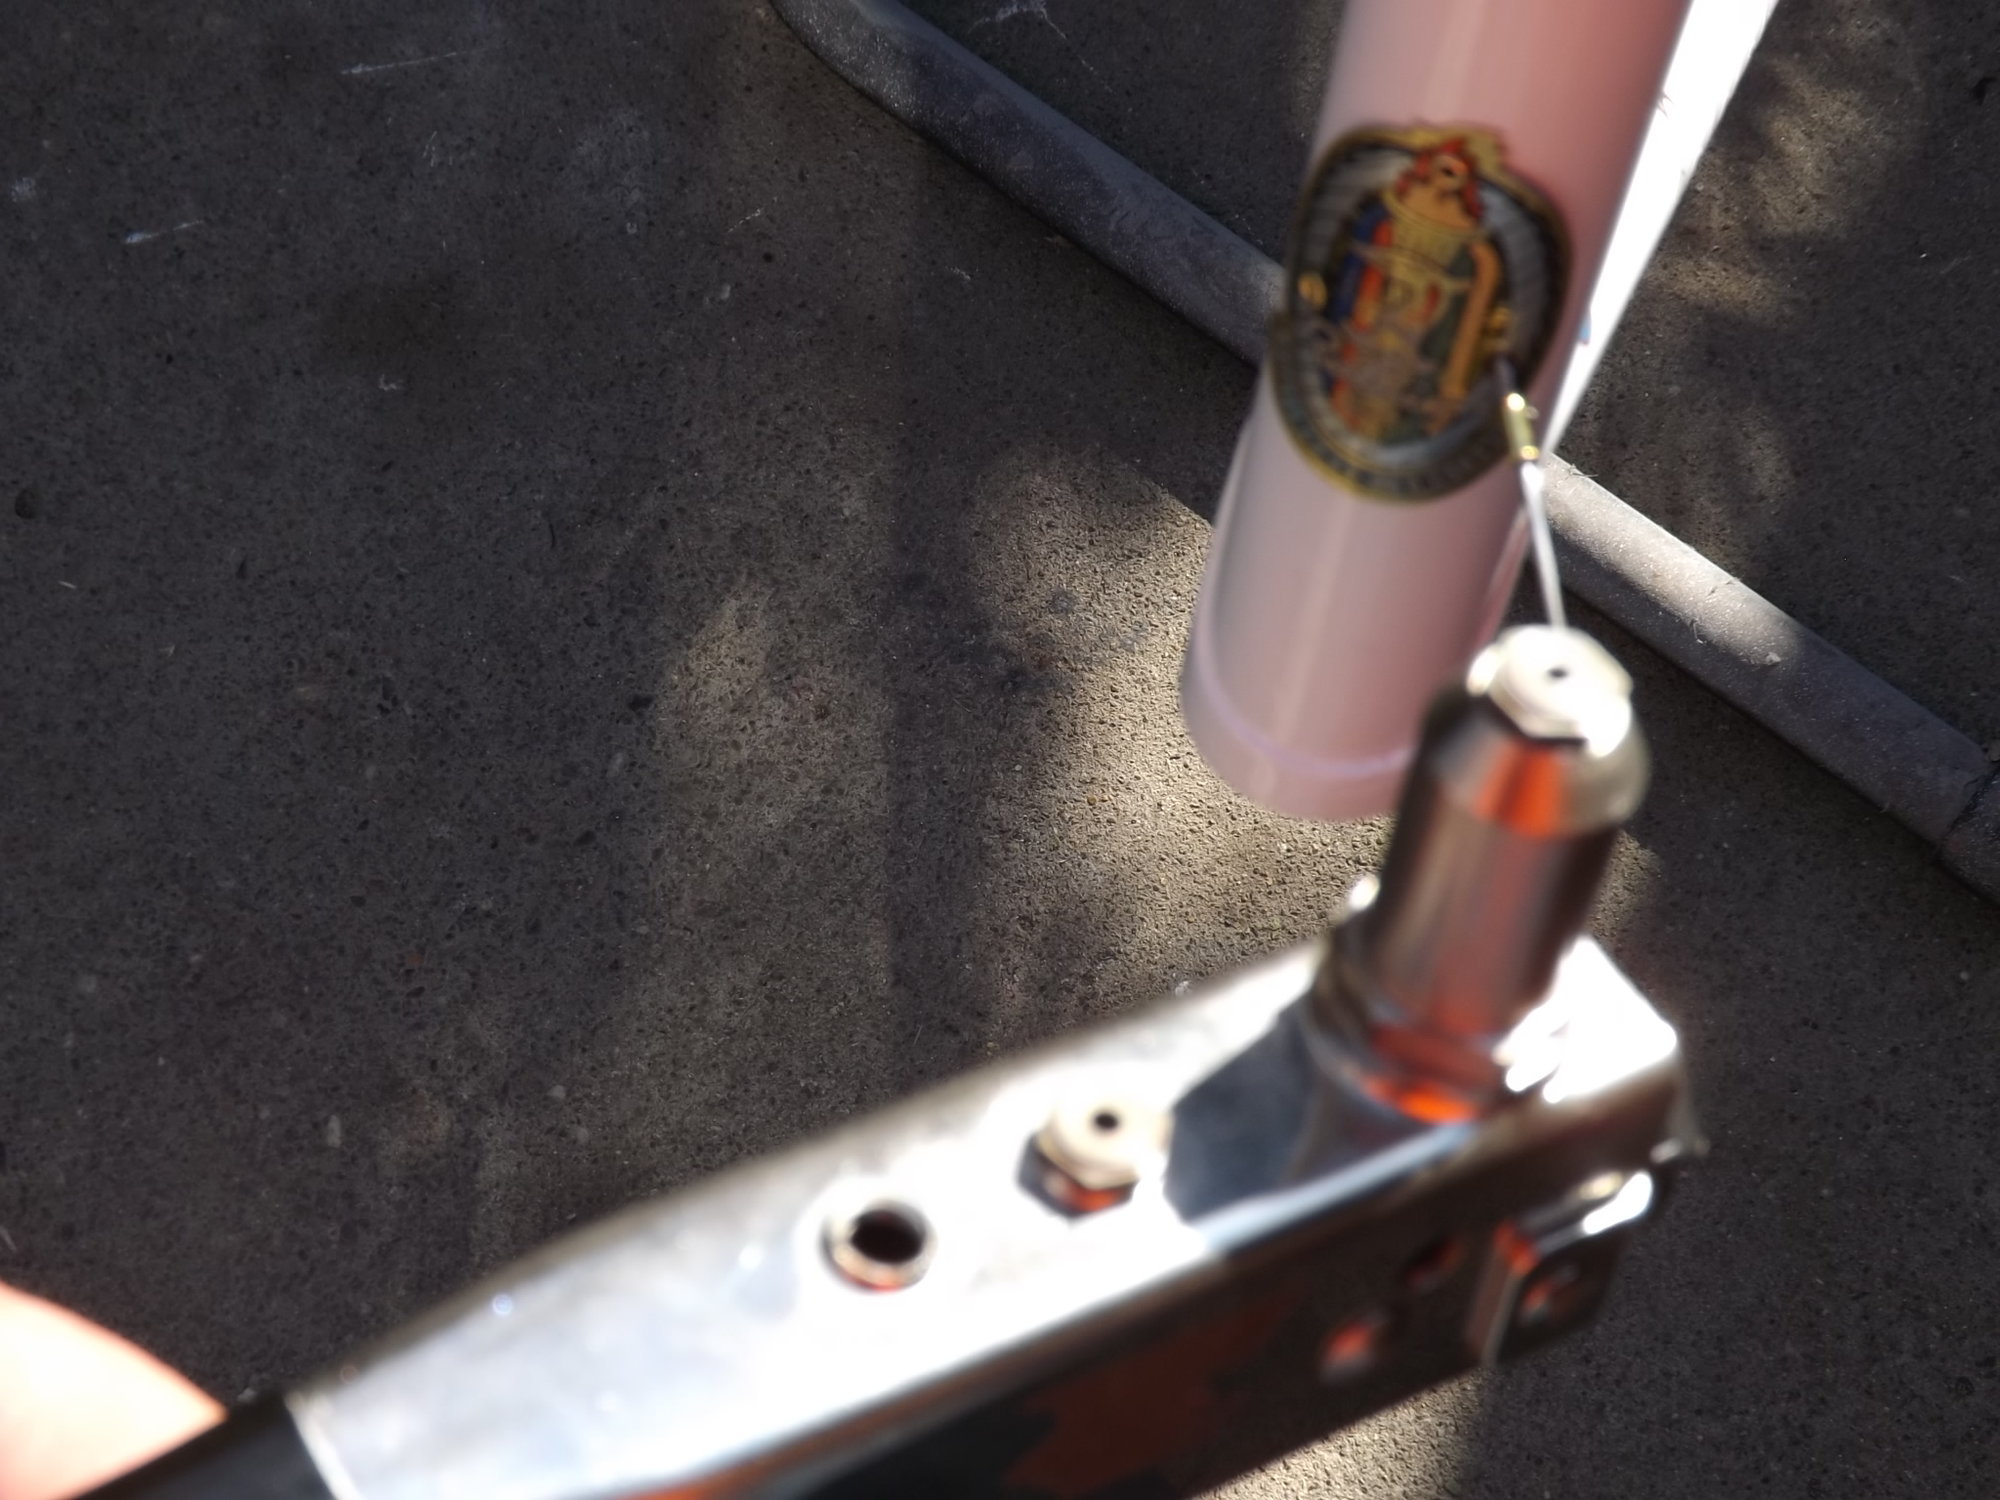
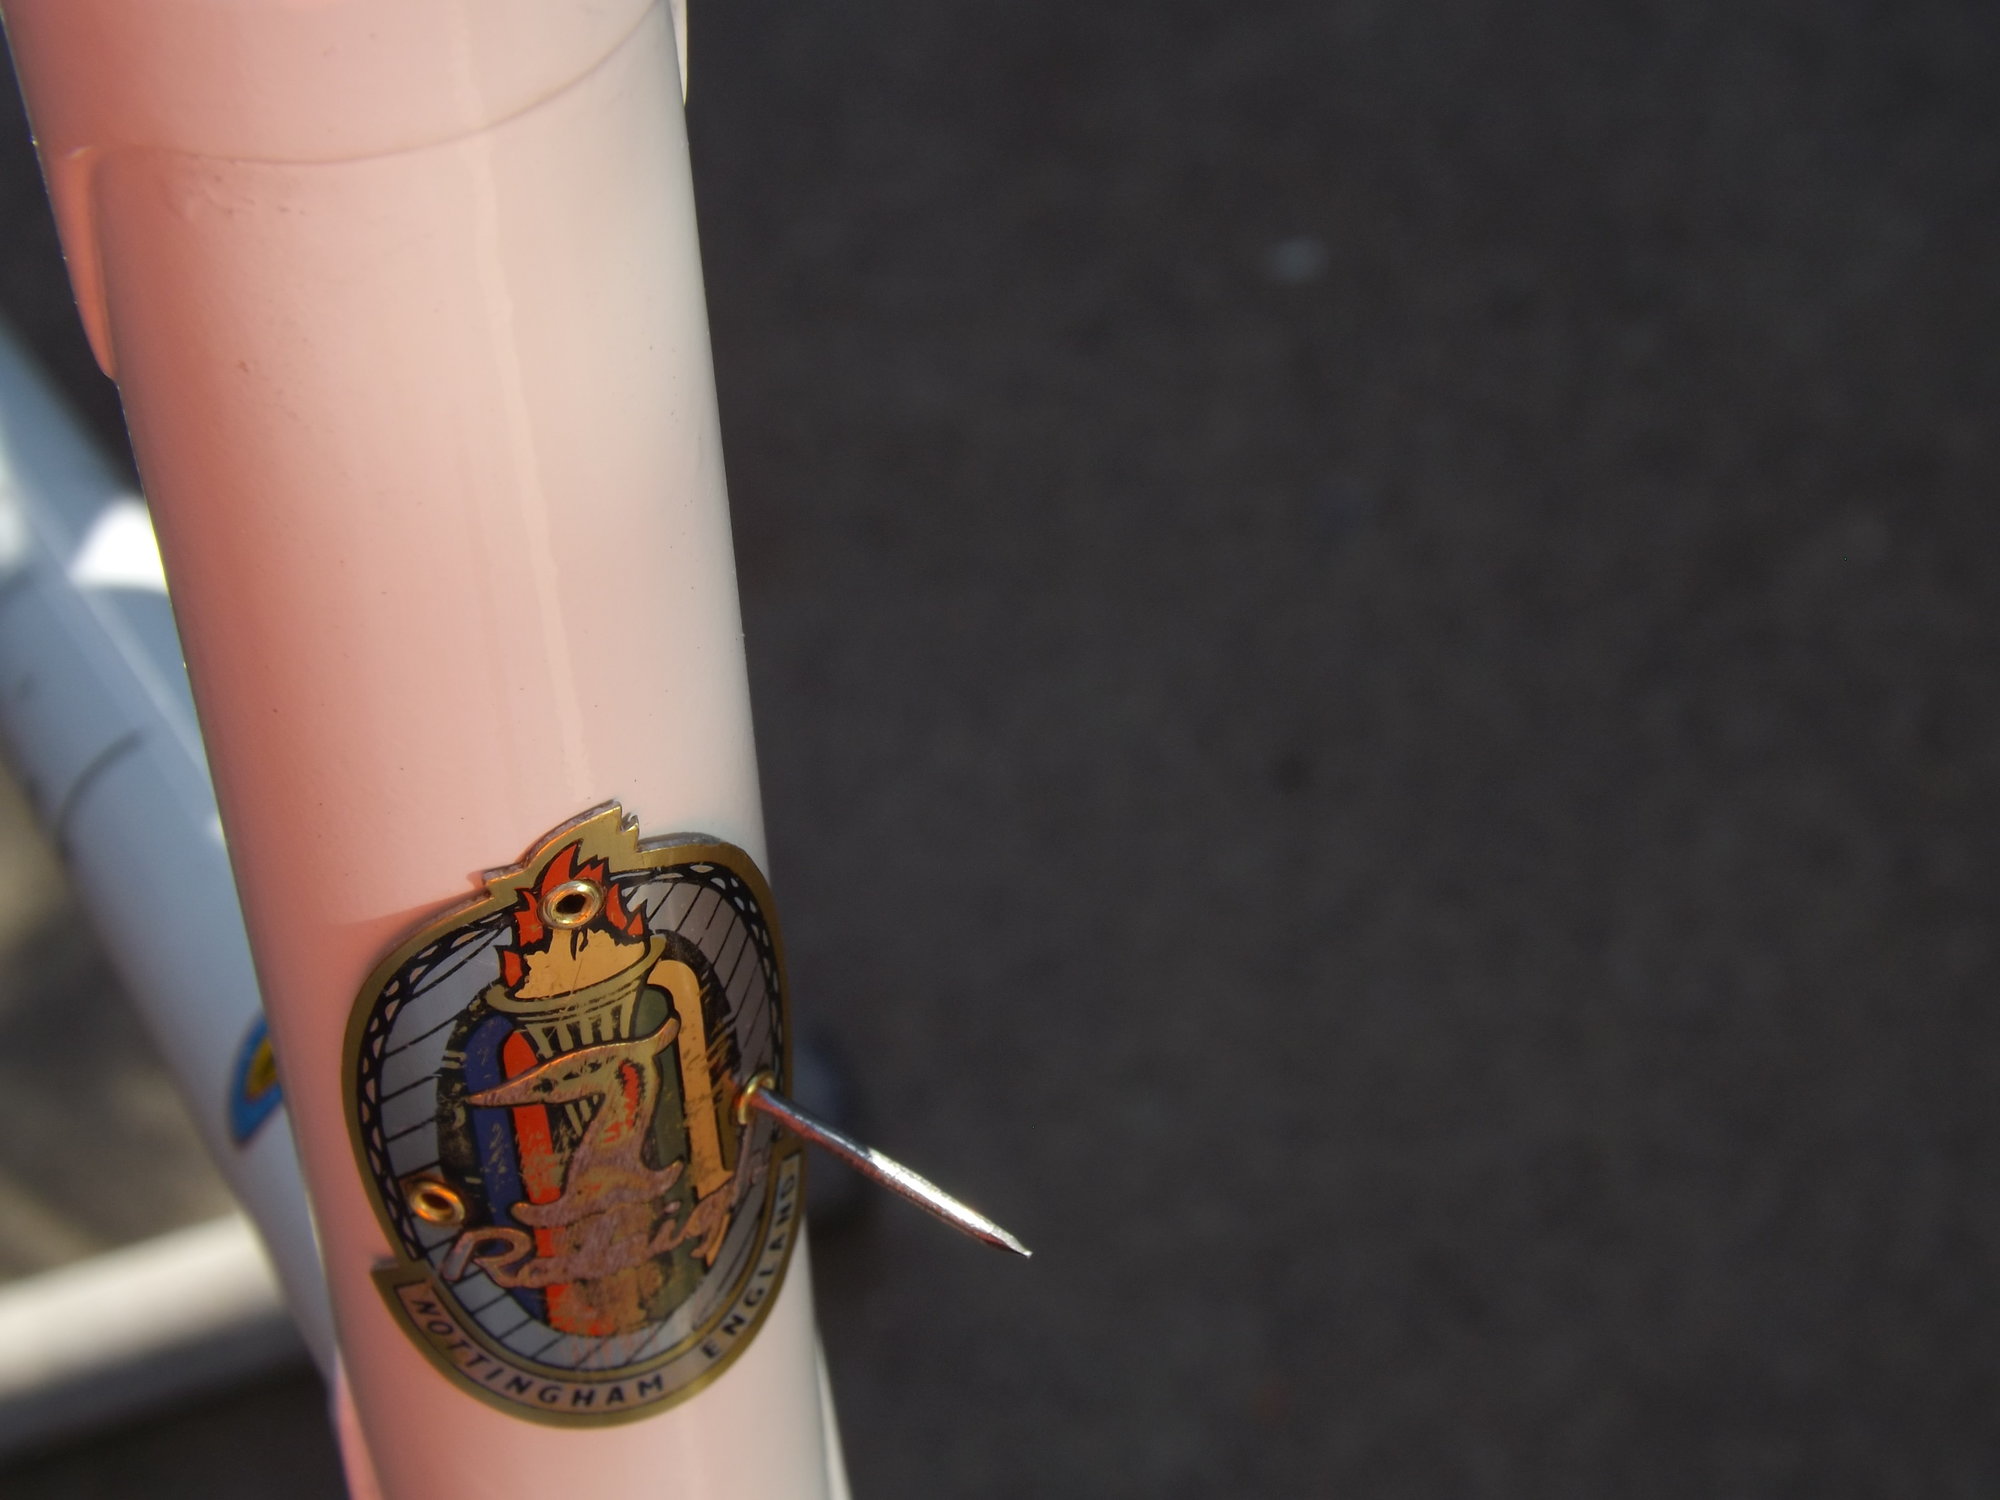
...as you can see from the photo of the inside of the head tube, the rivets still stick out little too far when you've got them snugged down. Unlike a regular pop rivet, you don't pull the finishing nail all the way through and out. this will destroy the river and damage the mounting hole. Just pull the head of the nail far enough to where you can feel the badge snug up against the surface of the head tube. Then tap it out with a small hammer.
The interior ends of the rivets are of soft , thin sheet brass. So they are easily flattened against the surface by inserting the fork steerer tube in the head tube, and pulling/pressing on it evenly until the rivet ends are clear of the fork steerer radius.
That's about it, except if you do manage to get some of these rivets, buy enough of them so you can sacrifice a few in getting your method workable. A group buy is recommended. I honestly looked for smaller quantities of them online but couldn't come up with a supplier.
11-06-19, 06:29 PM
#4
Friendship is Magic
Thread Starter
Join Date: Nov 2010
Location: Sacramento, CA
Posts: 22,984
Bikes: old ones
Mentioned: 304 Post(s)
Tagged: 0 Thread(s)
Quoted: 26400 Post(s)
Liked 10,373 Times
in
7,202 Posts
...these blind rivets are as close to the originals as I could find. I think Raleigh must have been the main consumer in those years. They probably had some purpose built riveter for applying them at production rates. This took me about an hour with all the head scratching. More if you count the internetting.
Likes For 3alarmer:
11-06-19, 06:32 PM
#5
Senior Member
Join Date: Jun 2006
Location: NW Burbs, Chicago
Posts: 12,053
Mentioned: 201 Post(s)
Tagged: 0 Thread(s)
Quoted: 3015 Post(s)
Liked 3,792 Times
in
1,406 Posts
Interesting. Not what I would have expected.
11-06-19, 06:38 PM
#6
Hump, what hump?

Join Date: Dec 2003
Location: SC midlands
Posts: 1,934
Bikes: See signature
Mentioned: 12 Post(s)
Tagged: 0 Thread(s)
Quoted: 337 Post(s)
Liked 227 Times
in
145 Posts
Thanks for posting. I need to mount a badge on my Raleigh Pro. Want to sell some of those rivets? 
__________________
2010 AB T1X ** 2010 Cannondale SIX-5 ** 1993 Cannondale RS900 ** 1988 Bottecchia Team Record ** 1989 Bianchi Brava ** 1988 Nishiki Olympic ** 1987 Centurion Ironman Expert(2) ** 1985 DeRosa Professional SLX ** 1982 Colnago Super ** 1982 Basso Gap ** 198? Ciocc Competition SL ** 19?? Roberts Audax ** 198? Brian Rourke ** 1982 Mercian Olympic ** 1970 Raleigh Professional MK I ** 1952 Raleigh Sports
2010 AB T1X ** 2010 Cannondale SIX-5 ** 1993 Cannondale RS900 ** 1988 Bottecchia Team Record ** 1989 Bianchi Brava ** 1988 Nishiki Olympic ** 1987 Centurion Ironman Expert(2) ** 1985 DeRosa Professional SLX ** 1982 Colnago Super ** 1982 Basso Gap ** 198? Ciocc Competition SL ** 19?? Roberts Audax ** 198? Brian Rourke ** 1982 Mercian Olympic ** 1970 Raleigh Professional MK I ** 1952 Raleigh Sports
11-06-19, 07:03 PM
#7
Senior Member

Nicely done. Any concern about moisture entry through the hollow rivet? I suppose it would be easy enough to fill them with silicone, epoxy or a bit of beeswax. Too ocd?
11-06-19, 07:30 PM
#8
Friendship is Magic
Thread Starter
Join Date: Nov 2010
Location: Sacramento, CA
Posts: 22,984
Bikes: old ones
Mentioned: 304 Post(s)
Tagged: 0 Thread(s)
Quoted: 26400 Post(s)
Liked 10,373 Times
in
7,202 Posts
01-14-21, 11:46 AM
#9
Senior Member
Join Date: Apr 2011
Location: Maryland, USA
Posts: 2,429
Bikes: Drysdale/Gitane/Zeus/Masi/Falcon/Palo Alto/Raleigh/Legnano
Mentioned: 34 Post(s)
Tagged: 0 Thread(s)
Quoted: 981 Post(s)
Liked 631 Times
in
402 Posts
...these blind rivets are as close to the originals as I could find. I think Raleigh must have been the main consumer in those years. They probably had some purpose built riveter for applying them at production rates. This took me about an hour with all the head scratching. More if you count the internetting.

I followed your link, it looks like diameter is .089" Didn't even occur to me this could be an issue but I ran to the one project I have w/a badge (Falcon) down in the workshop; inside of head tube is 30.5mm, outside of steerer is 25.4mm (duh! why did I even measure?), so there's only 2.55mm clearance. I had drilled out the rivets which clearly were pop rivets, using the smallest diameter drill that would free the badge -- that worked out to be 3/32". Hmm, I find 3/32" pop rivets online, but of all the measurements in the specs, of which there are many, no mention of "back side thickness once installed". Hmm, I wonder what product the factories used.
__________________
Larry:1958 Drysdale, 1961 Gitane Gran Sport, 1974 Zeus track, 1988 Masi Gran Corsa, 1974 Falcon, 1980 Palo Alto, 1973 Raleigh Gran Sport, 1974 Legnano. Susan: 1976 Windsor Profesional.
Larry:1958 Drysdale, 1961 Gitane Gran Sport, 1974 Zeus track, 1988 Masi Gran Corsa, 1974 Falcon, 1980 Palo Alto, 1973 Raleigh Gran Sport, 1974 Legnano. Susan: 1976 Windsor Profesional.
01-14-21, 12:03 PM
#10
Bike Butcher of Portland

Join Date: Jul 2014
Location: Portland, OR
Posts: 11,633
Bikes: It's complicated.
Mentioned: 1299 Post(s)
Tagged: 0 Thread(s)
Quoted: 4678 Post(s)
Liked 5,793 Times
in
2,280 Posts
Shoot, I'd take 100 200 off your hands and Paypal you some funds!
I'd also be willing to share with my PNW brethren.
edit: For $20, I'll just get 1000. Thanks for figuring this out and posting!
I'd also be willing to share with my PNW brethren.
edit: For $20, I'll just get 1000. Thanks for figuring this out and posting!
__________________
If someone tells you that you have enough bicycles and you don't need any more, stop talking to them. You don't need that kind of negativity in your life.
If someone tells you that you have enough bicycles and you don't need any more, stop talking to them. You don't need that kind of negativity in your life.
Last edited by gugie; 01-14-21 at 12:18 PM.
01-14-21, 02:09 PM
#11
Senior Member
Join Date: Oct 2016
Location: Cambridge UK
Posts: 852
Bikes: 1903 24 spd Sunbeam, 1927 Humber, 3 1930 Raleighs, 2 1940s Sunbeams, 2 1940s Raleighs, Rudge, 1950s Robin Hood, 1958 Claud Butler, 2 1973 Colnago Supers, Eddie Merckx, 2 1980 Holdsworth, EG Bates funny TT bike, another 6 or so 1990s bikes
Mentioned: 15 Post(s)
Tagged: 0 Thread(s)
Quoted: 331 Post(s)
Liked 332 Times
in
185 Posts
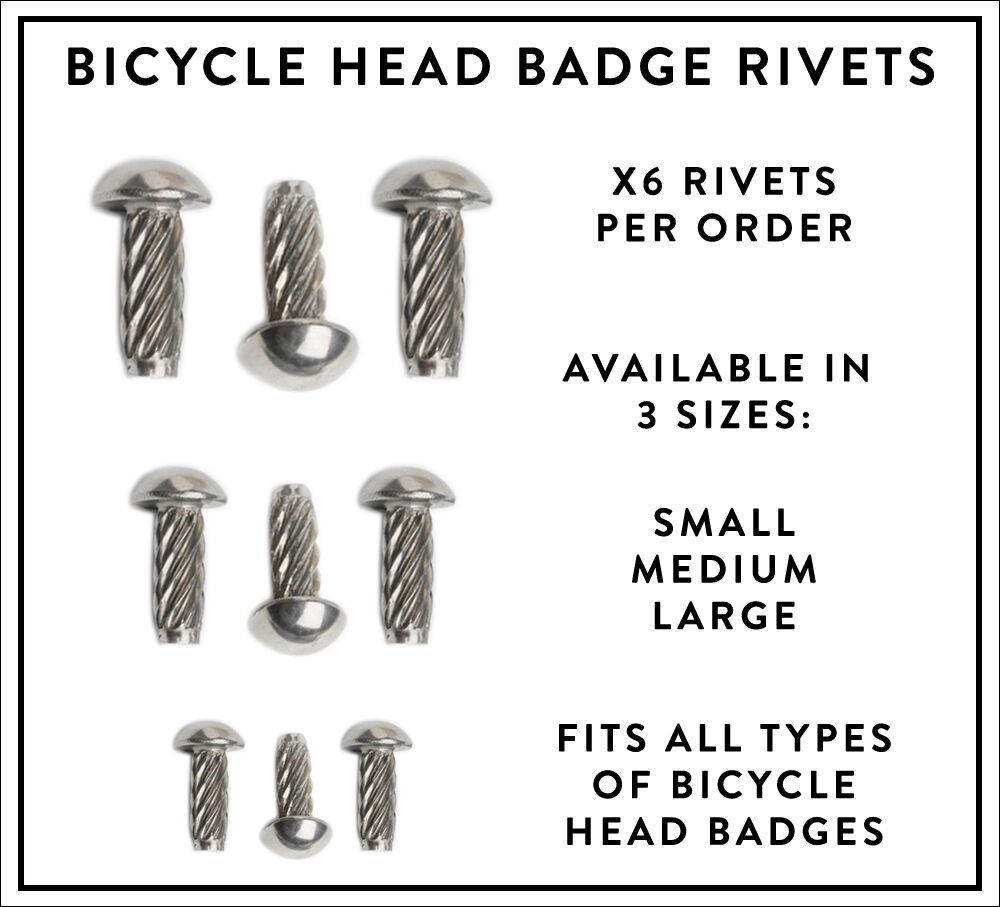
These are a modern copy of the traditional head badge rivets
01-14-21, 02:47 PM
#12
Senior Member
This is very ingenious.
I tried drive screws and a) I found them so tiny as to be impossible to apply, even using forceps to hold; b) I drilled per spec and still the head tube began to deform before the pin went in.
The only thing I wonder about with the OP�s method is whether the rivets are slightly longer than necessary. I guess if they don�t hit the steerer then all is good.
01-14-21, 03:24 PM
#13
Bike Butcher of Portland
Join Date: Jul 2014
Location: Portland, OR
Posts: 11,633
Bikes: It's complicated.
Mentioned: 1299 Post(s)
Tagged: 0 Thread(s)
Quoted: 4678 Post(s)
Liked 5,793 Times
in
2,280 Posts
I have a selection of all three of those sizes, and I got them from Great Britain! A few issues with them:
1. The headbadge holes in vintage Raleighs are too big for the smallest rivet shown above.
2. The rivet head is pretty large for a Raleigh "Heron" headbadge, doesn't look that great. They look significantly larger than the original rivetes
3. The medium rivets scrape against the steerer. I've installed them, then used a small chisel to knock off the excess from the inside.
__________________
If someone tells you that you have enough bicycles and you don't need any more, stop talking to them. You don't need that kind of negativity in your life.
If someone tells you that you have enough bicycles and you don't need any more, stop talking to them. You don't need that kind of negativity in your life.
01-14-21, 04:55 PM
#14
Friendship is Magic
Thread Starter
Join Date: Nov 2010
Location: Sacramento, CA
Posts: 22,984
Bikes: old ones
Mentioned: 304 Post(s)
Tagged: 0 Thread(s)
Quoted: 26400 Post(s)
Liked 10,373 Times
in
7,202 Posts
This is very ingenious.
I tried drive screws and a) I found them so tiny as to be impossible to apply, even using forceps to hold; b) I drilled per spec and still the head tube began to deform before the pin went in.
The only thing I wonder about with the OP�s method is whether the rivets are slightly longer than necessary. I guess if they don�t hit the steerer then all is good.
I tried drive screws and a) I found them so tiny as to be impossible to apply, even using forceps to hold; b) I drilled per spec and still the head tube began to deform before the pin went in.
The only thing I wonder about with the OP�s method is whether the rivets are slightly longer than necessary. I guess if they don�t hit the steerer then all is good.
01-14-21, 05:38 PM
#15
Senior Member

Join Date: Sep 2009
Location: Corvallis, OR
Posts: 1,234
Mentioned: 39 Post(s)
Tagged: 0 Thread(s)
Quoted: 174 Post(s)
Liked 243 Times
in
114 Posts
...you try to measure and order the right length, but even if they are a little long, they are very soft sheet brass. You use either the fork steerer or just a plain piece of steel plumbing pipe to flatten them on the inside using hand pressure, so they clear the rotating steerer. The inside doesn't need to be cosmetically perfect. Nobody but you will see it.
Basically, if there is an opportunity for pop rivets, such as the OP provided, I'd go that route every time.
__________________
The Simplicity of Vintage Cycles
The Simplicity of Vintage Cycles
01-14-21, 06:48 PM
#16
Friendship is Magic
Thread Starter
Join Date: Nov 2010
Location: Sacramento, CA
Posts: 22,984
Bikes: old ones
Mentioned: 304 Post(s)
Tagged: 0 Thread(s)
Quoted: 26400 Post(s)
Liked 10,373 Times
in
7,202 Posts
I agree with all above. However, I have had difficulty flattening the rivets on the inside before. Trying to mash the rivet to hold securely, hold on to the badge and keep it from popping off, plus trying not to mar the public facing side of the rivet, all being done at a strange, downward angle can be tricky. I've had rivets not hold well even though they held after the "process". But, by then, your bars are already assembled and wired up. It's the last job you want to have to do again.
Basically, if there is an opportunity for pop rivets, such as the OP provided, I'd go that route every time.
Basically, if there is an opportunity for pop rivets, such as the OP provided, I'd go that route every time.
If you are talking about the hollow brass sheet rivets illustrated in the above photos, and they are somehow backing out as you try to flatten them, you have done something wrong in the installation.
The difference here is that by removing the finishing nail after pulling the interior end of the rivet snug, you don't end up with that extra little troublesome solid metal head in there. Otherwise, this is almost identical to a pop rivet process.
BTW, I am the OP in this thread.
Likes For 3alarmer:
01-15-21, 04:44 AM
#17
Senior Member
Join Date: Nov 2013
Location: Near Pottstown, PA: 30 miles NW of Philadelphia
Posts: 2,186
Bikes: 2 Trek Mtn, Cannondale R600 road, 6 vintage road bikes
Mentioned: 83 Post(s)
Tagged: 0 Thread(s)
Quoted: 472 Post(s)
Liked 1,028 Times
in
404 Posts
Way back when, I reinstalled my Raleigh heron badge during the rehab. Being a frugal but inventive guy, and not liking the look of any of the rivets or drive screws or fasteners I'd seen on these head badges I decided to make something. I took a length of solid copper wire (IIRC 12awg but that was years ago) and slightly peened over the end. Then cut off a very short piece, and did that two more times. Whatever awg wire I picked slid through the HT holes and a bit snug through the headbadge holes. The peened end was larger than the HT holes. I carefully inserted the copper "rivets" into the HT from the inside. I used a solid iron rod inside the HT as a backer and peened the outside of the "rivets". Small ball peen hammer, tap, tap, tap. Go slow. I did not peen them much but enough. Did the next one then the third. They are very small and have oxidized nicely. I think they look good. Subtle.
They have held the badge in place just fine for the past 7 years and not one living soul has leaned over then swept away, stumbling back in shock at the lack of proper factory fasteners. Just lucky I guess.
They have held the badge in place just fine for the past 7 years and not one living soul has leaned over then swept away, stumbling back in shock at the lack of proper factory fasteners. Just lucky I guess.
 01-15-21, 08:20 AM
#18
www.theheadbadge.com

Join Date: Sep 2005
Location: Southern Florida
Posts: 28,512
Bikes: https://www.theheadbadge.com
Mentioned: 124 Post(s)
Tagged: 0 Thread(s)
Quoted: 2421 Post(s)
Liked 4,388 Times
in
2,092 Posts
Fantastic work, @3alarmer. Question though - do you think a shorter version of the exact same rivet would smush better? It seems as if that might be the only reason the current rivet deforms itself past a usable state if pulled too far with the pop riveter. Too much material to fold up.
-Kurt
P.S. to the group: Raleigh used different headbadge attaching methods BITD. These blind-without-a-mandrel pop rivets were one method, usually used on the Carltons, and definitely on these anniversary badges. Sometimes zinc versions of the same, I believe. Flat rivets peened from the back were common on the basic Nottingham production.
__________________


Last edited by cudak888; 01-15-21 at 08:30 AM.
01-15-21, 08:50 AM
#19
Senior Member

When I rehabbed my Holdsworth I used short aluminum pop rivets. Once attached I drove the 'pin' back through so I could remove it. I then took a screw driver and inserted it through the head tube to bend the rivet over so there was room for the fork steerer. It worked really well.
01-19-21, 12:20 PM
#21
Bike Butcher of Portland
Join Date: Jul 2014
Location: Portland, OR
Posts: 11,633
Bikes: It's complicated.
Mentioned: 1299 Post(s)
Tagged: 0 Thread(s)
Quoted: 4678 Post(s)
Liked 5,793 Times
in
2,280 Posts
@3alarmer, Ordered and received those brass rivets myself, very nice!
I didn't have any #3 finishing nails, but was anxious to try these rivets out. I did have some 3/16" rivets. I removed the pin from them and found they would work, so I attached a Raleigh headbadge to to a frame project I'm working on, and they worked perfectly! A sharpened screwdriver was used to whack off most of the protrusion inside the headtube to avoid scraping against the steerer.

The top rivet (Heron's eyeball on a Raleigh badge) is removed, the bottom two are not yet whacked off in this picture.
I've used aluminum rivets once or twice in the past, but they have a much larger diameter on the flange and look a bit odd. These look exactly like the originals, and brass looks a lot nicer than dull aluminum.
Thanks for the tip!
I didn't have any #3 finishing nails, but was anxious to try these rivets out. I did have some 3/16" rivets. I removed the pin from them and found they would work, so I attached a Raleigh headbadge to to a frame project I'm working on, and they worked perfectly! A sharpened screwdriver was used to whack off most of the protrusion inside the headtube to avoid scraping against the steerer.
The top rivet (Heron's eyeball on a Raleigh badge) is removed, the bottom two are not yet whacked off in this picture.
I've used aluminum rivets once or twice in the past, but they have a much larger diameter on the flange and look a bit odd. These look exactly like the originals, and brass looks a lot nicer than dull aluminum.
Thanks for the tip!
__________________
If someone tells you that you have enough bicycles and you don't need any more, stop talking to them. You don't need that kind of negativity in your life.
If someone tells you that you have enough bicycles and you don't need any more, stop talking to them. You don't need that kind of negativity in your life.
Likes For gugie:
01-19-21, 12:43 PM
#22
Junior Member
Join Date: Dec 2020
Location: Estonia
Posts: 142
Bikes: HVZ Meteor 1979, HVZ Champion 1962, HVZ SS Moskva80 1981, D�rkopp 1936
Mentioned: 3 Post(s)
Tagged: 0 Thread(s)
Quoted: 41 Post(s)
Liked 350 Times
in
70 Posts
Way back when, I reinstalled my Raleigh heron badge during the rehab. Being a frugal but inventive guy, and not liking the look of any of the rivets or drive screws or fasteners I'd seen on these head badges I decided to make something. I took a length of solid copper wire (IIRC 12awg but that was years ago) and slightly peened over the end. Then cut off a very short piece, and did that two more times. Whatever awg wire I picked slid through the HT holes and a bit snug through the headbadge holes. The peened end was larger than the HT holes. I carefully inserted the copper "rivets" into the HT from the inside. I used a solid iron rod inside the HT as a backer and peened the outside of the "rivets". Small ball peen hammer, tap, tap, tap. Go slow. I did not peen them much but enough. Did the next one then the third. They are very small and have oxidized nicely. I think they look good. Subtle.
They have held the badge in place just fine for the past 7 years and not one living soul has leaned over then swept away, stumbling back in shock at the lack of proper factory fasteners. Just lucky I guess.
They have held the badge in place just fine for the past 7 years and not one living soul has leaned over then swept away, stumbling back in shock at the lack of proper factory fasteners. Just lucky I guess.
01-19-21, 01:23 PM
#23
Friendship is Magic
Thread Starter
Join Date: Nov 2010
Location: Sacramento, CA
Posts: 22,984
Bikes: old ones
Mentioned: 304 Post(s)
Tagged: 0 Thread(s)
Quoted: 26400 Post(s)
Liked 10,373 Times
in
7,202 Posts
Fantastic work, @3alarmer. Question though - do you think a shorter version of the exact same rivet would smush better? It seems as if that might be the only reason the current rivet deforms itself past a usable state if pulled too far with the pop riveter. Too much material to fold up.
-Kurt
-Kurt
...probably so....but I was kind of guestimating on the length that would work, and a guy sittin' on 1,000 of them is unlikely to order more in a different size.
01-19-21, 01:25 PM
#24
Friendship is Magic
Thread Starter
Join Date: Nov 2010
Location: Sacramento, CA
Posts: 22,984
Bikes: old ones
Mentioned: 304 Post(s)
Tagged: 0 Thread(s)
Quoted: 26400 Post(s)
Liked 10,373 Times
in
7,202 Posts
01-19-21, 01:27 PM
#25
52psi

Join Date: Aug 2013
Location: Tucson, AZ
Posts: 4,015
Bikes: Schwinn Volare ('78); Raleigh Competition GS ('79)
Mentioned: 29 Post(s)
Tagged: 0 Thread(s)
Quoted: 790 Post(s)
Liked 802 Times
in
391 Posts
Now you just need 332 more Raleighs.
__________________
A race bike in any era is a highly personal choice that at its "best" balances the requirements of fit, weight, handling, durability and cost tempered by the willingness to toss it and oneself down the pavement at considerable speed. ~Bandera
A race bike in any era is a highly personal choice that at its "best" balances the requirements of fit, weight, handling, durability and cost tempered by the willingness to toss it and oneself down the pavement at considerable speed. ~Bandera