


Stuck BB-driveside cup in Ti frame
 07-29-21, 11:58 AM
#76
Full Member
Frame is still at the shop. They guy said he had a couple things he wanted to try when I stopped by to ask if the BB was still usable last Friday. I guess I'm waiting for him to call it (or for Litespeed to tell me that it'll cost X to replace the shell or that they won't do it), but I should probably just call it for him.
 07-29-21, 12:04 PM
#77
Senior Member

Join Date: Nov 2014
Location: Eugene, Oregon, USA
Posts: 27,547
Mentioned: 217 Post(s)
Tagged: 0 Thread(s)
Quoted: 18351 Post(s)
Liked 4,502 Times
in
3,346 Posts
Since we have the discussion here... and the shop is there...
#1, they are attempting to turn the BB shell counter clockwise, right?
Any other suggestions they're trying? At least mild heat?
#1, they are attempting to turn the BB shell counter clockwise, right?
Any other suggestions they're trying? At least mild heat?
07-29-21, 12:08 PM
#78

Senior Member
Thread Starter

Join Date: Jun 2008
Location: Louisville, KY
Posts: 13,443
Mentioned: 33 Post(s)
Tagged: 0 Thread(s)
Quoted: 4224 Post(s)
Liked 2,944 Times
in
1,803 Posts
When I talked to him last week, he said that, if he couldn't get it out, I wouldn't owe him anything. I don't get the impression he has spent a ton of time on it much as a result. Sounds like a couple half hour sessions total when he feels motivated to deal with some frustrations. He only cleared with me up to that their fees would be $40-100 for removal and this would be at the upper end of that. If he gets it out, I don't have a problem with it costing a fair bit more than that.
08-02-21, 02:05 PM
#79
Senior Member
Thread Starter
Join Date: Jun 2008
Location: Louisville, KY
Posts: 13,443
Mentioned: 33 Post(s)
Tagged: 0 Thread(s)
Quoted: 4224 Post(s)
Liked 2,944 Times
in
1,803 Posts
Litespeed got back to me and said that cutting out and replacing the BB shell is something that they usually would do (didn't say how much they charged), but, due to their busy times as a result of the pandemic, they are only doing repairs on their own frames now, not those of other brands (they did build this, so it sort of is their frame, but I get their point, plus, it's not like I'm the original owner). They said to try back in a couple of months when they thought they'd be less busy.
I've also contacted Ti Cycles, because they're the only other shop that a quick googling said would do Ti bike frame repair. They're on the other side of the country, so shipping would be a pain if they have a reasonable price. Not sure what I'd consider to be a reasonable price, but it seems pretty clear that the local shop I took it to isn't going to be able to get it out.
I'm thinking about going and getting it and trying 3a's acetone/ATF with some heat while I wait to see if Litespeed's schedule opens up.
This was supposed to be a quick and easy parts bin build while I waited for the insurance company of the driver that hit me made me right (though finding a Ti Merckx meant I spent a bit more than I'd planned for a short term parts bin build and I was probably going to just get better parts to hang on it when I got the insurance money). 2.5 months later, still waiting on compensation from the insurance company, and I don't think I want to buy another stopgap frame until I can get the original stopgap frame fixed.
I have a touring frame that I've had waiting forever to build up, but it needs some paintwork and wheels built and probably wouldn't work with my trainer setup for me to ride on Zwift as currently planned. Still, I probably should have just started working on that at the beginning of the summer rather than going on this Merckx odyssey.
08-02-21, 02:50 PM
#80
Full Member
If the BB shell was originally installed by the factory, it seems hard to believe that the factory would not have applied anti-seize on it to prevent galvanic corrosion. It's a very predictable problem whenever two dissimilar metals are touching. Make me wonder if the previous owner removed the BB and used regular grease.
Here's stuff that I've used on cars and bikes, including on my Ti bike BB. (I'm not entirely sure that I used the right flavor on my own bike.) The Nickel variant does mention Ti in the description.
https://www.permatex.com/product-cat...ts-anti-seize/
Here's stuff that I've used on cars and bikes, including on my Ti bike BB. (I'm not entirely sure that I used the right flavor on my own bike.) The Nickel variant does mention Ti in the description.
https://www.permatex.com/product-cat...ts-anti-seize/
08-02-21, 04:29 PM
#81
Senior Member
Thread Starter
Join Date: Jun 2008
Location: Louisville, KY
Posts: 13,443
Mentioned: 33 Post(s)
Tagged: 0 Thread(s)
Quoted: 4224 Post(s)
Liked 2,944 Times
in
1,803 Posts
Given that this bike was sold outfitted with campagnolo record everything (that's the only version I see, but I suppose they could have also sold it with dura ace or ultegra, 105 is less likely), and I got it with an octalink bb and a shimano 600 headset, I imagine that sometime in the 25 or so years since it was welded, someone put a new BB on it and just failed to lubricate the threads. Probably at least 15 years ago. The fact that the NDS cup threads were super clean sort of confirms that.
08-02-21, 08:26 PM
#82
bike whisperer

Join Date: Dec 2009
Location: Melbourne, Oz
Posts: 9,537
Bikes: https://weightweenies.starbike.com/forum/viewtopic.php?f=10&t=152015&p=1404231
Mentioned: 15 Post(s)
Tagged: 0 Thread(s)
Quoted: 1523 Post(s)
Liked 716 Times
in
508 Posts
I'd get the frame back from the shop, do the ATF/acetone soak and hit it with an air powered impact wrench (with the BB tool bolted on), no idea why folks are leery of that. If that doesn't crack it loose, it might at least go partway there, and putting the BB tool in a bench vise and reefing on the frame would stand a pretty good chance after all that IMO.
__________________
Sheldon Brown's bike info ~~~ Park Tools repair help
Half-step triple, using double gear ~~~ 6400 STI rebuild walkthrough ~~~ Want 8/9/10s @126mm OLD? OCR. ~~~ Shimano cassette body overhaul ~~~ Ergopower Escape wear repair ~~~ PSA: drivetrain wear
List of US/Canada bike co-ops ~~~ Global list
Sheldon Brown's bike info ~~~ Park Tools repair help
Half-step triple, using double gear ~~~ 6400 STI rebuild walkthrough ~~~ Want 8/9/10s @126mm OLD? OCR. ~~~ Shimano cassette body overhaul ~~~ Ergopower Escape wear repair ~~~ PSA: drivetrain wear
List of US/Canada bike co-ops ~~~ Global list
06-11-22, 04:18 PM
#83
Senior Member
Thread Starter
Join Date: Jun 2008
Location: Louisville, KY
Posts: 13,443
Mentioned: 33 Post(s)
Tagged: 0 Thread(s)
Quoted: 4224 Post(s)
Liked 2,944 Times
in
1,803 Posts
Update almost a year after I got the frameset.
Several of you ( 3alarmer is one I remember, but I think there were others) had suggested soaking in a 50/50 mix of Automatic Transmission Fluid and acetone. Due to space, and fumes issues, I didn't get around to that until last weekend. I had been dribbling some in using a pipette every night and just letting it sit.
Several of you, also suggested hitting it with high heat, letting it cool, then hitting it with high heat again in cycles because the steel (I think) shell of the cartridge BB would expand at a different rate than the Ti shell. I got hold of a propane torch (and my family is off visiting the in-laws to help them with a garage sale this weekend - no wife to see my stupidity and no kids to endanger are key factors here). I hit it pretty significantly with the propane torch. The acetone in the ATF/acetone mixture caught fire, so that was fun.
After I put away the torch, I dribbled some more AFT/acetone mix in and let it sit for about an hour. Once it had cooled, I used the Pedro's tool that threads into the BB and locks the BB tool in place, to hold the Park BB-whatever tool onto the BB. I then used my chainwhip (because it's got a 1" socket for the BB tool and a nice long handle) and beat on it with a mallet. No joy.
Then, I got an email from merziac who said, "You need more leverage". I was trying to figure out what I could use to make into a cheater bar when I remembered that I'd bought the Park FFS-2 tube bending tool (when I'd thought about straightening the frame that got bent in the collision that started this whole odyssey - I decided I didn't trust myself enough to use it and not make things worse on that frame). I couldn't get that to grab onto the chainwhip, but I locked an 18" pipe wrench to the Park BB tool and then used the Park FFS-2 on the 18" pipe wrench.
Long story short:
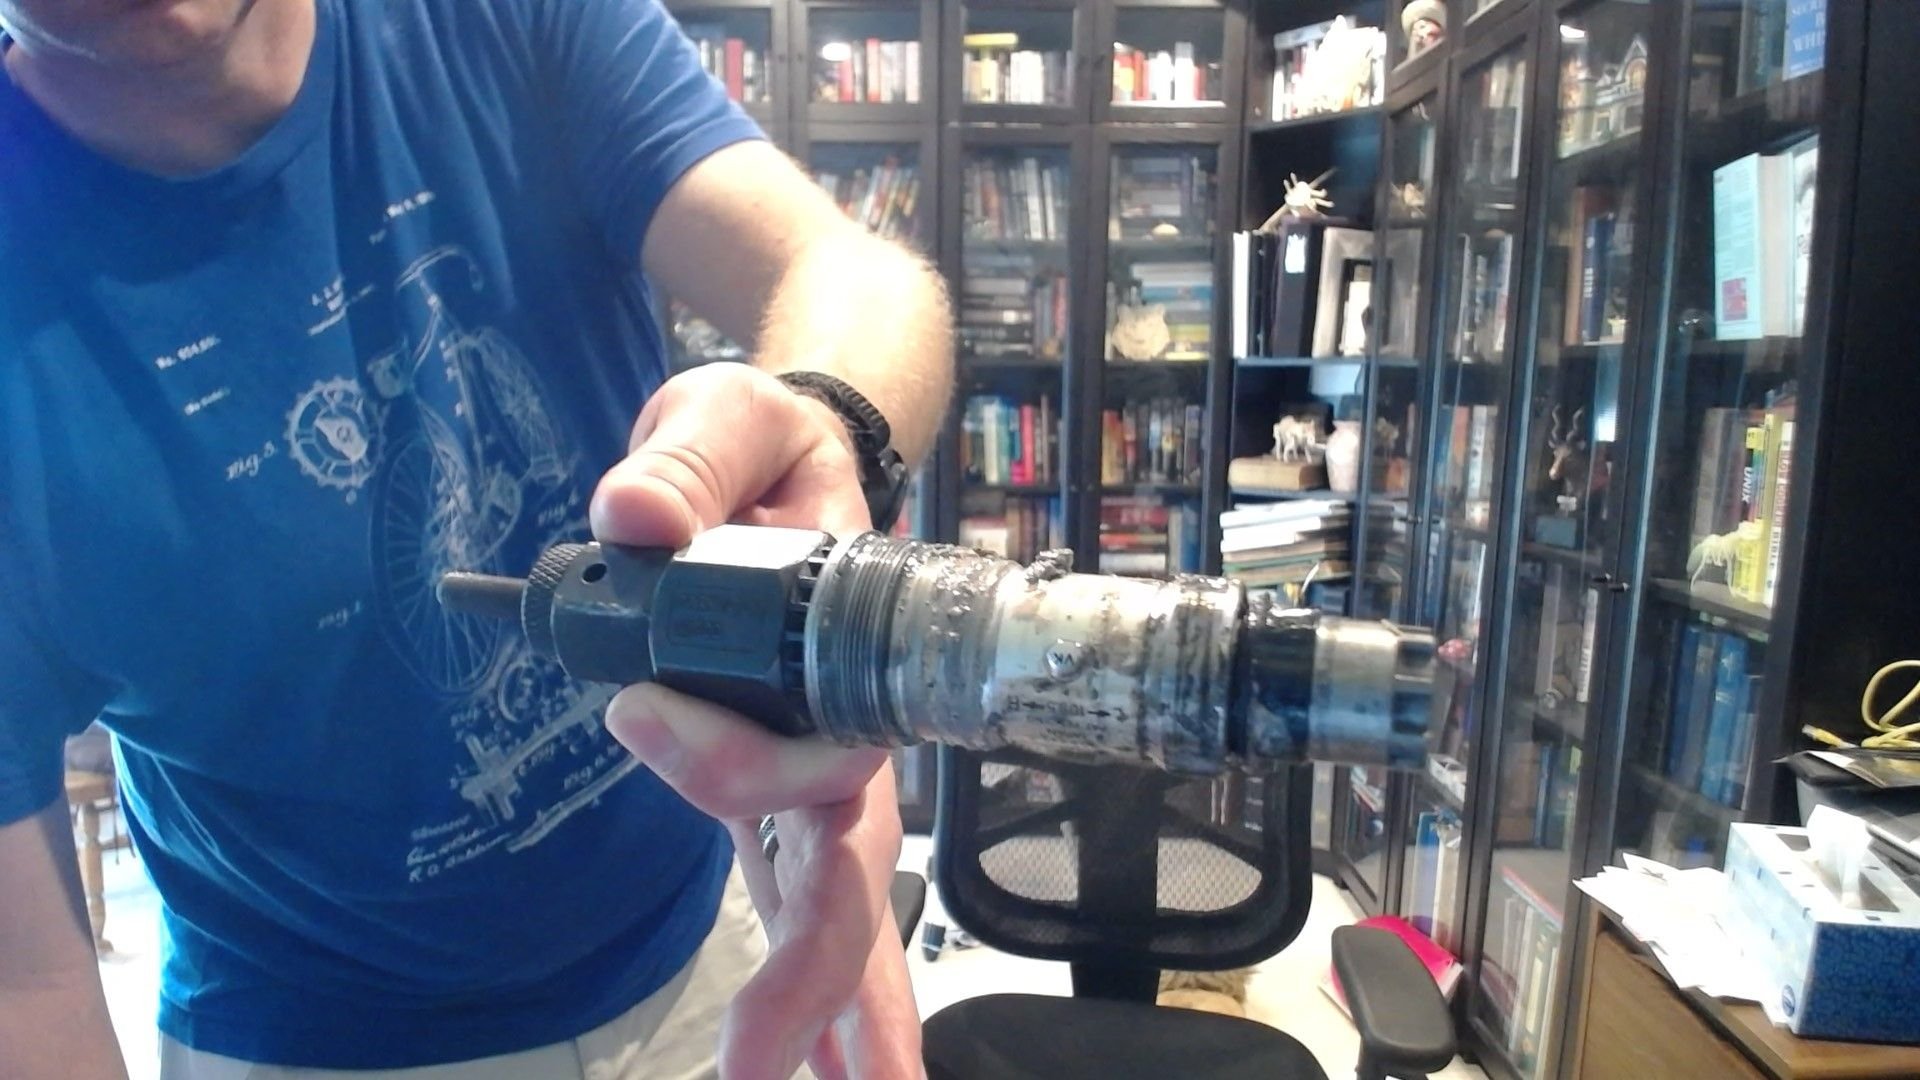
I don't know if it was the leverage alone or the leverage in combination with the heat, ATF/acetone mixture, and the whackings from the hammer, but I don't care. I just want to thank you all for your help as this BB is finally out. Now, I just need to very thoroughly clean the shell, lube up the threads with the compound suggested above (I bought some a long time ago and have used it to install a couple different BBs in other bikes), and get to building the frame up.
Thank you everyone for all your suggestions. Quite a ways to go, but it looks like it's something I'm going to be able to do now. Super excited.
Several of you ( 3alarmer is one I remember, but I think there were others) had suggested soaking in a 50/50 mix of Automatic Transmission Fluid and acetone. Due to space, and fumes issues, I didn't get around to that until last weekend. I had been dribbling some in using a pipette every night and just letting it sit.
Several of you, also suggested hitting it with high heat, letting it cool, then hitting it with high heat again in cycles because the steel (I think) shell of the cartridge BB would expand at a different rate than the Ti shell. I got hold of a propane torch (and my family is off visiting the in-laws to help them with a garage sale this weekend - no wife to see my stupidity and no kids to endanger are key factors here). I hit it pretty significantly with the propane torch. The acetone in the ATF/acetone mixture caught fire, so that was fun.
After I put away the torch, I dribbled some more AFT/acetone mix in and let it sit for about an hour. Once it had cooled, I used the Pedro's tool that threads into the BB and locks the BB tool in place, to hold the Park BB-whatever tool onto the BB. I then used my chainwhip (because it's got a 1" socket for the BB tool and a nice long handle) and beat on it with a mallet. No joy.
Then, I got an email from merziac who said, "You need more leverage". I was trying to figure out what I could use to make into a cheater bar when I remembered that I'd bought the Park FFS-2 tube bending tool (when I'd thought about straightening the frame that got bent in the collision that started this whole odyssey - I decided I didn't trust myself enough to use it and not make things worse on that frame). I couldn't get that to grab onto the chainwhip, but I locked an 18" pipe wrench to the Park BB tool and then used the Park FFS-2 on the 18" pipe wrench.
Long story short:
I don't know if it was the leverage alone or the leverage in combination with the heat, ATF/acetone mixture, and the whackings from the hammer, but I don't care. I just want to thank you all for your help as this BB is finally out. Now, I just need to very thoroughly clean the shell, lube up the threads with the compound suggested above (I bought some a long time ago and have used it to install a couple different BBs in other bikes), and get to building the frame up.
Thank you everyone for all your suggestions. Quite a ways to go, but it looks like it's something I'm going to be able to do now. Super excited.
06-11-22, 05:24 PM
#84
Senior Member
Join Date: May 2019
Location: Bloomington, IN
Posts: 2,940
Bikes: Paramount, Faggin, Ochsner, Ciocc, Basso
Mentioned: 115 Post(s)
Tagged: 0 Thread(s)
Quoted: 1301 Post(s)
Liked 1,902 Times
in
1,137 Posts
When I am doing a cleaning of the BB shell, I am a bit lazy and use a wire brush attachment for a drill driver and run it in a circular manner inside the threaded section. The process cleans out any galvanic reside or rust and allows for quick wipe down with a solvent before new parts installation. I use a lot of 3M brake cleaner here for a quick cleaning of solvent based products and it evaporates quickly leaving a clean surface to work with. HTH, MH
 06-11-22, 05:32 PM
#85
Senior Member
Thread Starter
Join Date: Jun 2008
Location: Louisville, KY
Posts: 13,443
Mentioned: 33 Post(s)
Tagged: 0 Thread(s)
Quoted: 4224 Post(s)
Liked 2,944 Times
in
1,803 Posts
When I am doing a cleaning of the BB shell, I am a bit lazy and use a wire brush attachment for a drill driver and run it in a circular manner inside the threaded section. The process cleans out any galvanic reside or rust and allows for quick wipe down with a solvent before new parts installation. I use a lot of 3M brake cleaner here for a quick cleaning of solvent based products and it evaporates quickly leaving a clean surface to work with. HTH, MH
06-12-22, 04:25 AM
#87
Senior Member
Thread Starter
Join Date: Jun 2008
Location: Louisville, KY
Posts: 13,443
Mentioned: 33 Post(s)
Tagged: 0 Thread(s)
Quoted: 4224 Post(s)
Liked 2,944 Times
in
1,803 Posts
Yeah, I hate when a thread starts asking for advice and we never find out if it actually worked or not. At least this way, if someone else ever has a similar issue, an answer of sorts is here.
06-12-22, 08:13 AM
#88
Senior Member
Join Date: Aug 2005
Location: Pittsburgh, PA
Posts: 33,656
Bikes: '96 Litespeed Catalyst, '05 Litespeed Firenze, '06 Litespeed Tuscany, '20 Surly Midnight Special, All are 3x10. It is hilly around here!
Mentioned: 39 Post(s)
Tagged: 0 Thread(s)
Quoted: 2026 Post(s)
Likes: 0
Liked 1,095 Times
in
741 Posts
Another thanks for the follow-up. It's good to know it finally worked. I have three Litespeeds that have, over the years (one is a 1996 and two are 2006 vintage), been fitted with square taper, Octalink and currently HTII external bearing bottom brackets. I have always used teflon plumber's tape to wrap the bottom bracket threads and torqued them to spec. I never had any come loose or cause any problems when removed for maintenance or replacement.
06-12-22, 08:54 AM
#89
Senior Member
I'd like to add my congrats for the long-delayed success. Enjoy your "new"  titanium frame, himespau.
I'd also like to add my thanks to those of jccaclimber and HillRider for posting the results. I missed the original discussion, and the "blow by blow" regarding your struggle was quite interesting reading.
I now own a 1990s Ti frame awaiting build. No stuck BB in mine, thankfully; the original BB that came with the frame was also Octalink v1 and had gotten water in it and corroded internally, but wasn't stuck and was removable. However, knowledge of what can/has gone wrong in other cases - and what did or didn't work to fix the problem - is always a good thing. (I think I still have that old BB anyone needs it for parts only. It's an old DuraAce BB-7700; spindle and drive-side bearings appear shot, but the rest appears usable for repair parts.)
Did you by any chance take photos of the BB threads after removing the stuck BB, but before or prior to completing the cleaning/prep process? I'd love to see those if they exist. Ti reputedly behaves very differently re: corrosion than either steel or Al; this article discusses Ti corrosion at minor length. While I've read this and other things about Ti and corrosion, I've not see any examples yet firsthand. I'd love to know what to look for.
Again: congrats on the long-delayed success.
titanium frame, himespau.I'd also like to add my thanks to those of jccaclimber and HillRider for posting the results. I missed the original discussion, and the "blow by blow" regarding your struggle was quite interesting reading.
I now own a 1990s Ti frame awaiting build. No stuck BB in mine, thankfully; the original BB that came with the frame was also Octalink v1 and had gotten water in it and corroded internally, but wasn't stuck and was removable. However, knowledge of what can/has gone wrong in other cases - and what did or didn't work to fix the problem - is always a good thing. (I think I still have that old BB anyone needs it for parts only. It's an old DuraAce BB-7700; spindle and drive-side bearings appear shot, but the rest appears usable for repair parts.)
Did you by any chance take photos of the BB threads after removing the stuck BB, but before or prior to completing the cleaning/prep process? I'd love to see those if they exist. Ti reputedly behaves very differently re: corrosion than either steel or Al; this article discusses Ti corrosion at minor length. While I've read this and other things about Ti and corrosion, I've not see any examples yet firsthand. I'd love to know what to look for.
Again: congrats on the long-delayed success.
06-12-22, 09:11 AM
#90
Senior Member
Thread Starter
Join Date: Jun 2008
Location: Louisville, KY
Posts: 13,443
Mentioned: 33 Post(s)
Tagged: 0 Thread(s)
Quoted: 4224 Post(s)
Liked 2,944 Times
in
1,803 Posts
Ooh, plumber's tape is an interesting idea.
The under the BB cable guide seems to have disappeared. At least, it used to be there and isn't now. I don't think I would have taken it off and can't find it where I put the things I did take off the frame (DT cable stops, headset, seatpost binder bolt), but it was a year ago. I wonder if the bike shop took it off to work on it, and it didn't come back. Replacement is ordered.
I used the BB I had planned for it on the Colnago Super Piu frameset I bought when I couldn't get this frame to work in a timely fashion, so I have to get another one of those.
Similarly the stem I'd planned to use for this is on the Colnago (and I've gotten to really like Nitto Ui-12 stems that I can only get from Japan, so that will be a while).
The Record headset I'd planned on using is also on the Colnago, and 1" threaded Record headsets seem to be in short supply again. Should have bought a spare when they were cheap, but I wasn't confident I'd be able to ever get the BB out. I might be able to salvage the headset from the wrecked frame, put the Shimano 600 headset that was on the frameset when I bought it (shimano headset on an all Campagnolo bike? Blasphemy, on the other hand the seatpost is Thomson and the stem and bars are Nitto, so it's not like I'm strictly sticking to an Italian build), or I do have an old Veloce headset from the 90's that would match the industrial look of the frame, but I think the stack might be a couple mm to tall to work.
I have some really nice DT Swiss hubs that I'd like to build up into some fancy, lightweight wheels, but high end rims/spokes aren't in the budget at the moment. I have some wheels I built up with 9 speed record hubs (silver 36h with pretty heavy rims, so not a long-term match with a lightweight Ti frame/carbon fork bike) that I need to check the cones and repack the bearings if fine for the rear hub that might do if I can get the other parts.
All in all, it's going to be a bit before I can get it built into a bike, but I'm excited to be on the way.
06-12-22, 09:16 AM
#91
Senior Member
Thread Starter
Join Date: Jun 2008
Location: Louisville, KY
Posts: 13,443
Mentioned: 33 Post(s)
Tagged: 0 Thread(s)
Quoted: 4224 Post(s)
Liked 2,944 Times
in
1,803 Posts
Did you by any chance take photos of the BB threads after removing the stuck BB, but before or prior to completing the cleaning/prep process? I'd love to see those if they exist. Ti reputedly behaves very differently re: corrosion than either steel or Al; this article discusses Ti corrosion at minor length. While I've read this and other things about Ti and corrosion, I've not see any examples yet firsthand. I'd love to know what to look for.
Again: congrats on the long-delayed success.
06-12-22, 09:33 AM
#92
Senior Member
The only pictures I have so far are the BB as above and the threads look fairly clean as do those in the shell. At least they look smooth and don't have visible distortions or bits from the other partner corroded onto them. Right now, I've got a lot of paper towels in the frame trying to absorb all the solvents out of it (every time I think it's dry, I set it down and then I see drops under the threaded hole in the BB shell the next time I pick it up), but I'll look to see if there's anything visible in there when I finally get the thing dry enough to clean out with a brush on my dremel, which will be followed by wiping out with acetone.
Again, congrats.
06-12-22, 03:33 PM
#93
Senior Member
https://www.somafabshop.com/shop/pro...12-31-8mm-2620
They seem to have the 72-degree and 90-degree versions of the UI-12 available (31.8mm handlebar clamp) in 10mm steps from 60 to 120mm except for the 72-degree, 120mm version. I say "seem" because the specs they list are very limited.
They're pricey, but it might beat paying to have one shipped from Japan if they have what you need.
06-12-22, 05:54 PM
#94
Senior Member
Thread Starter
Join Date: Jun 2008
Location: Louisville, KY
Posts: 13,443
Mentioned: 33 Post(s)
Tagged: 0 Thread(s)
Quoted: 4224 Post(s)
Liked 2,944 Times
in
1,803 Posts
Just noticed this. I presume you've seen the following link?
https://www.somafabshop.com/shop/pro...12-31-8mm-2620
They seem to have the 72-degree and 90-degree versions of the UI-12 available (31.8mm handlebar clamp) in 10mm steps from 60 to 120mm except for the 72-degree, 120mm version. I say "seem" because the specs they list are very limited.
They're pricey, but it might beat paying to have one shipped from Japan if they have what you need.
07-23-22, 01:04 PM
#95
Senior Member
Thread Starter
Join Date: Jun 2008
Location: Louisville, KY
Posts: 13,443
Mentioned: 33 Post(s)
Tagged: 0 Thread(s)
Quoted: 4224 Post(s)
Liked 2,944 Times
in
1,803 Posts
Well, it's slowly, slowly starting to look like a bicycle.
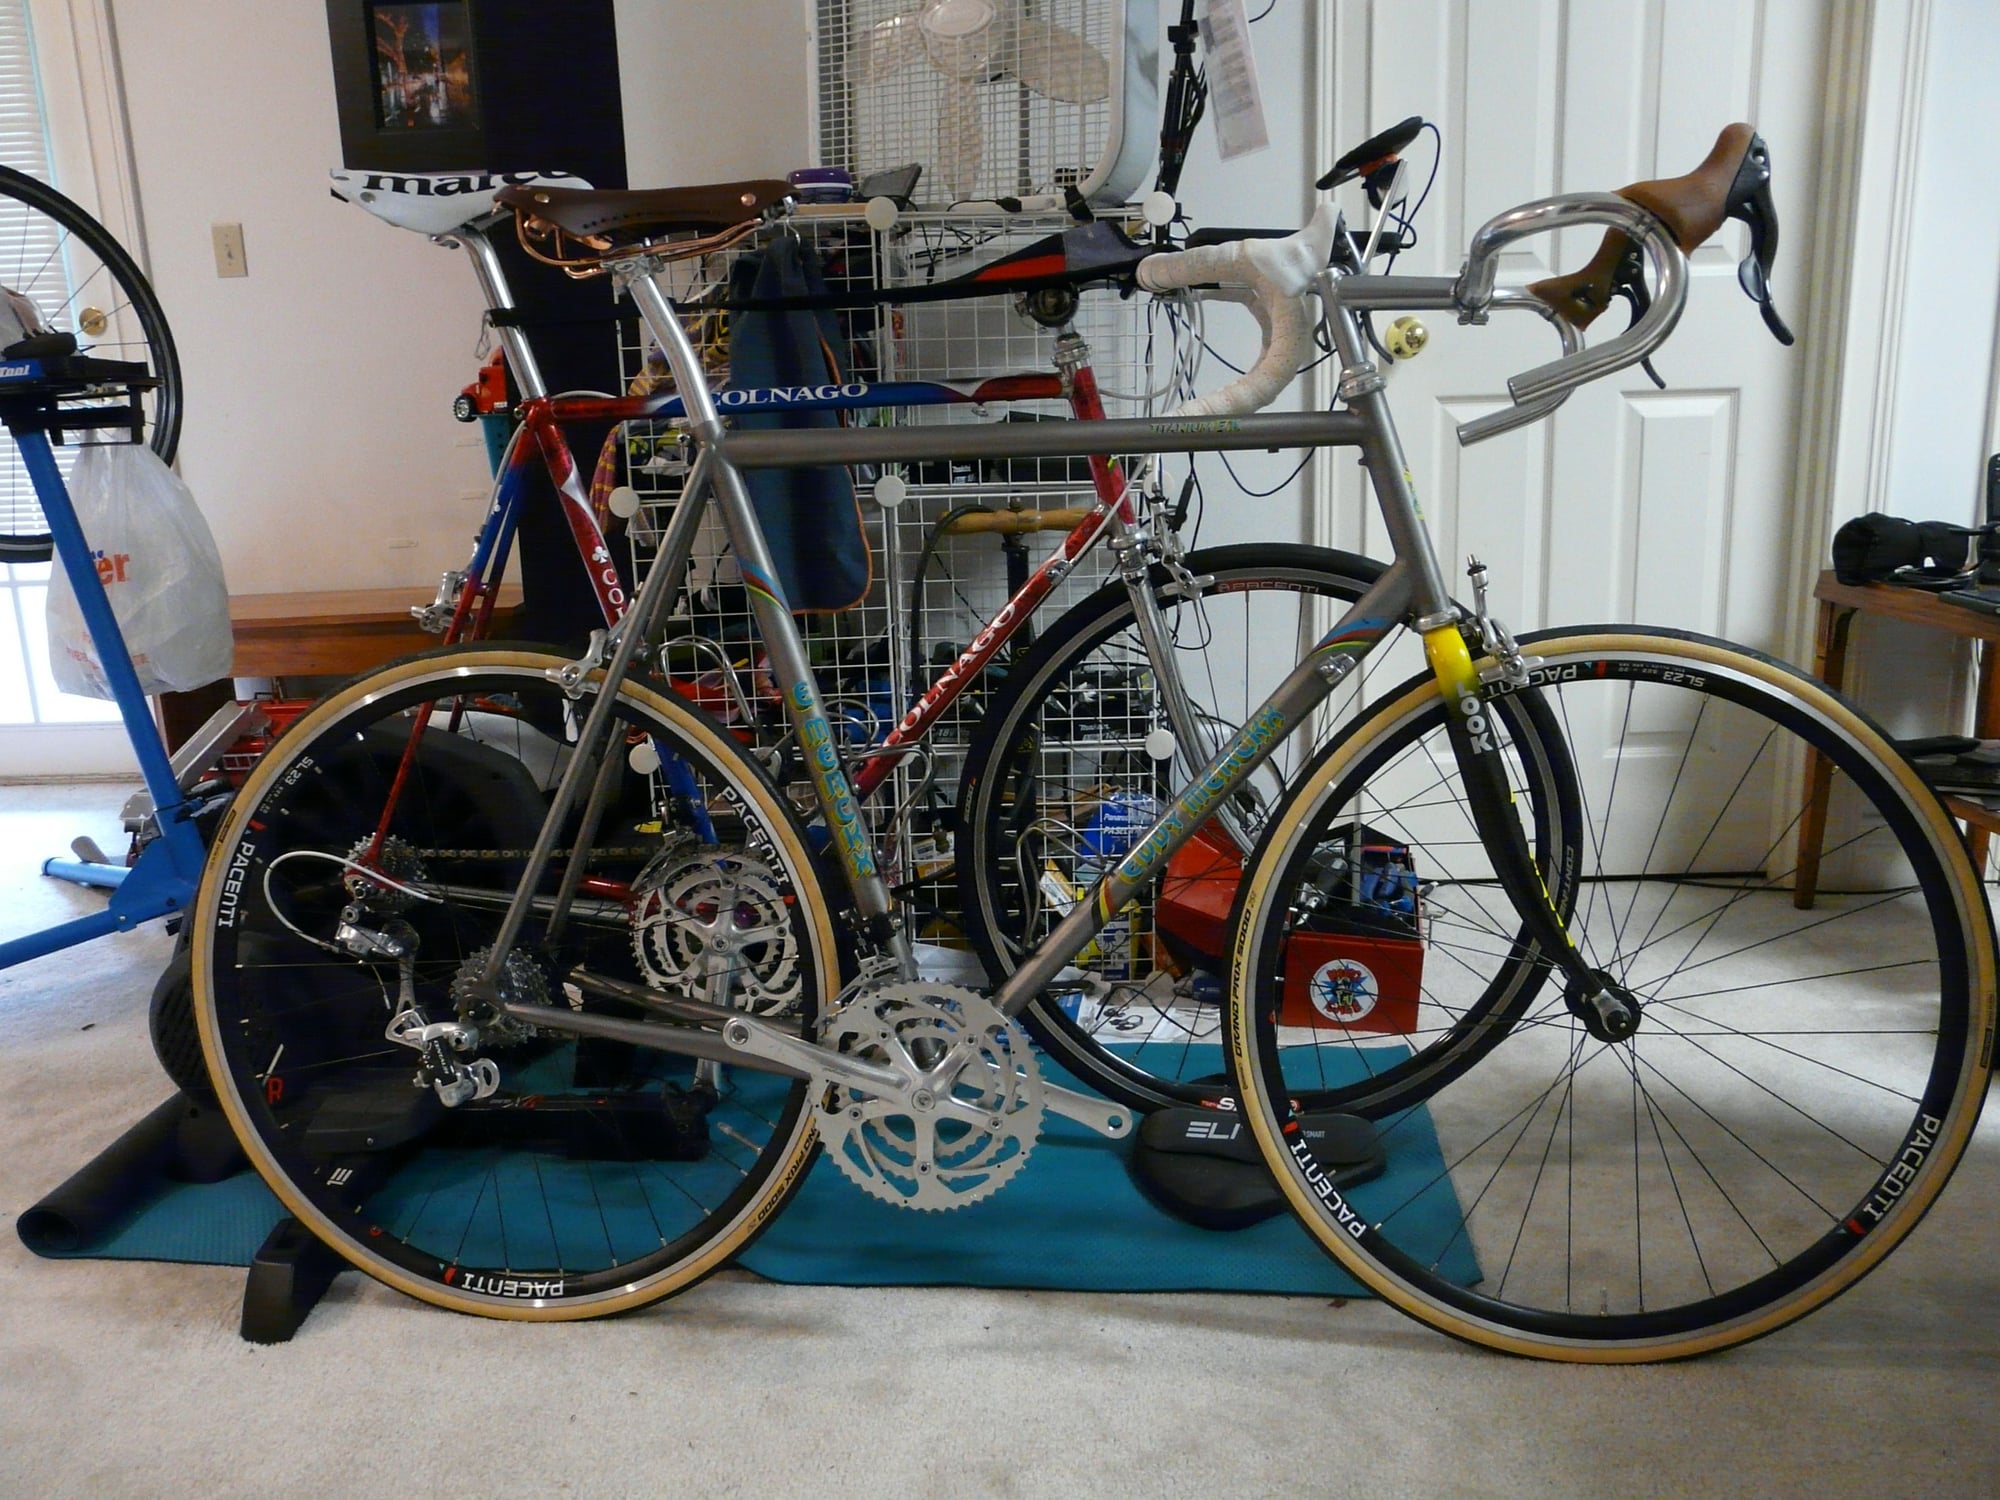
Had hoped to have it done by now, but other things have taken priorities.
Had hoped to have it done by now, but other things have taken priorities.
10-02-22, 02:57 PM
#96
Senior Member
Thread Starter
Join Date: Jun 2008
Location: Louisville, KY
Posts: 13,443
Mentioned: 33 Post(s)
Tagged: 0 Thread(s)
Quoted: 4224 Post(s)
Liked 2,944 Times
in
1,803 Posts

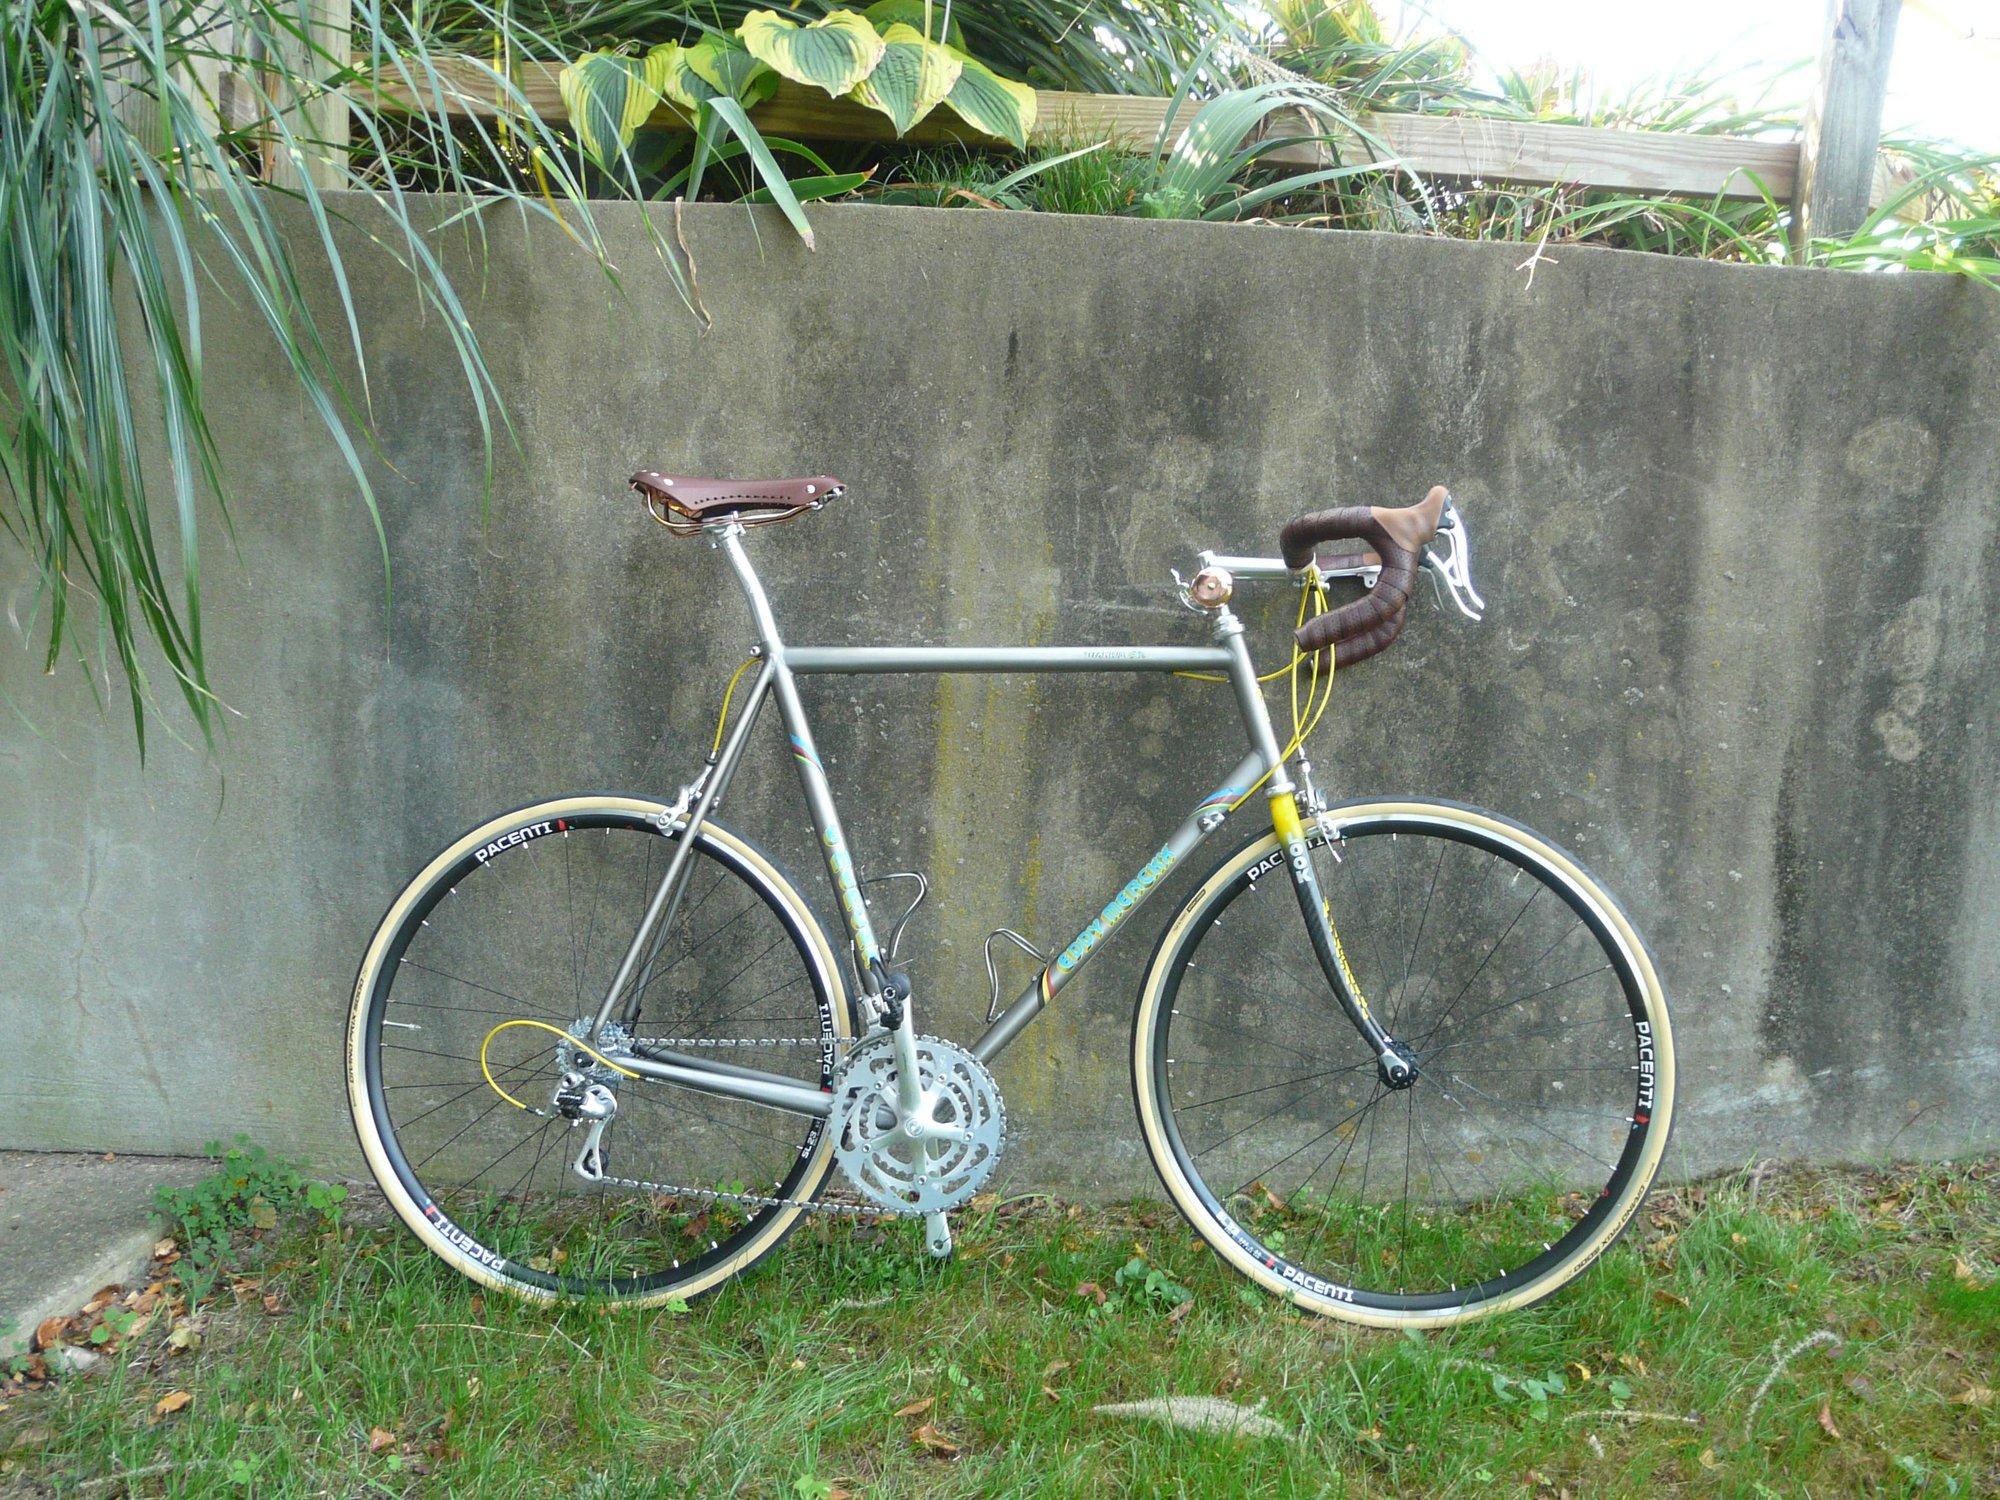

Still need to get the FD dialed in, but it's rideable. Excited to get riding it.
Likes For himespau:
