


531 Build Inspired by Raleigh Pros
 06-24-22, 07:19 PM
#1

Senior Member
Thread Starter
Join Date: Feb 2012
Location: Rochester, NY
Posts: 18,070
Bikes: Stewart S&S coupled sport tourer, Stewart Sunday light, Stewart Commuting, Stewart Touring, Co Motion Tandem, Stewart 3-Spd, Stewart Track, Fuji Finest, Mongoose Tomac ATB, GT Bravado ATB, JCP Folder, Stewart 650B ATB
Mentioned: 0 Post(s)
Tagged: 0 Thread(s)
Quoted: 4198 Post(s)
Liked 3,849 Times
in
2,300 Posts
531 Build Inspired by Raleigh Pros
This is the second frame I'm building with no specific rider in mind. I have the tube set (from years ago) and the and a fondness for the early/mid 1970s Raleigh Pros. Fastback stays, full sloping crown, domed stay ends and crude finishing.
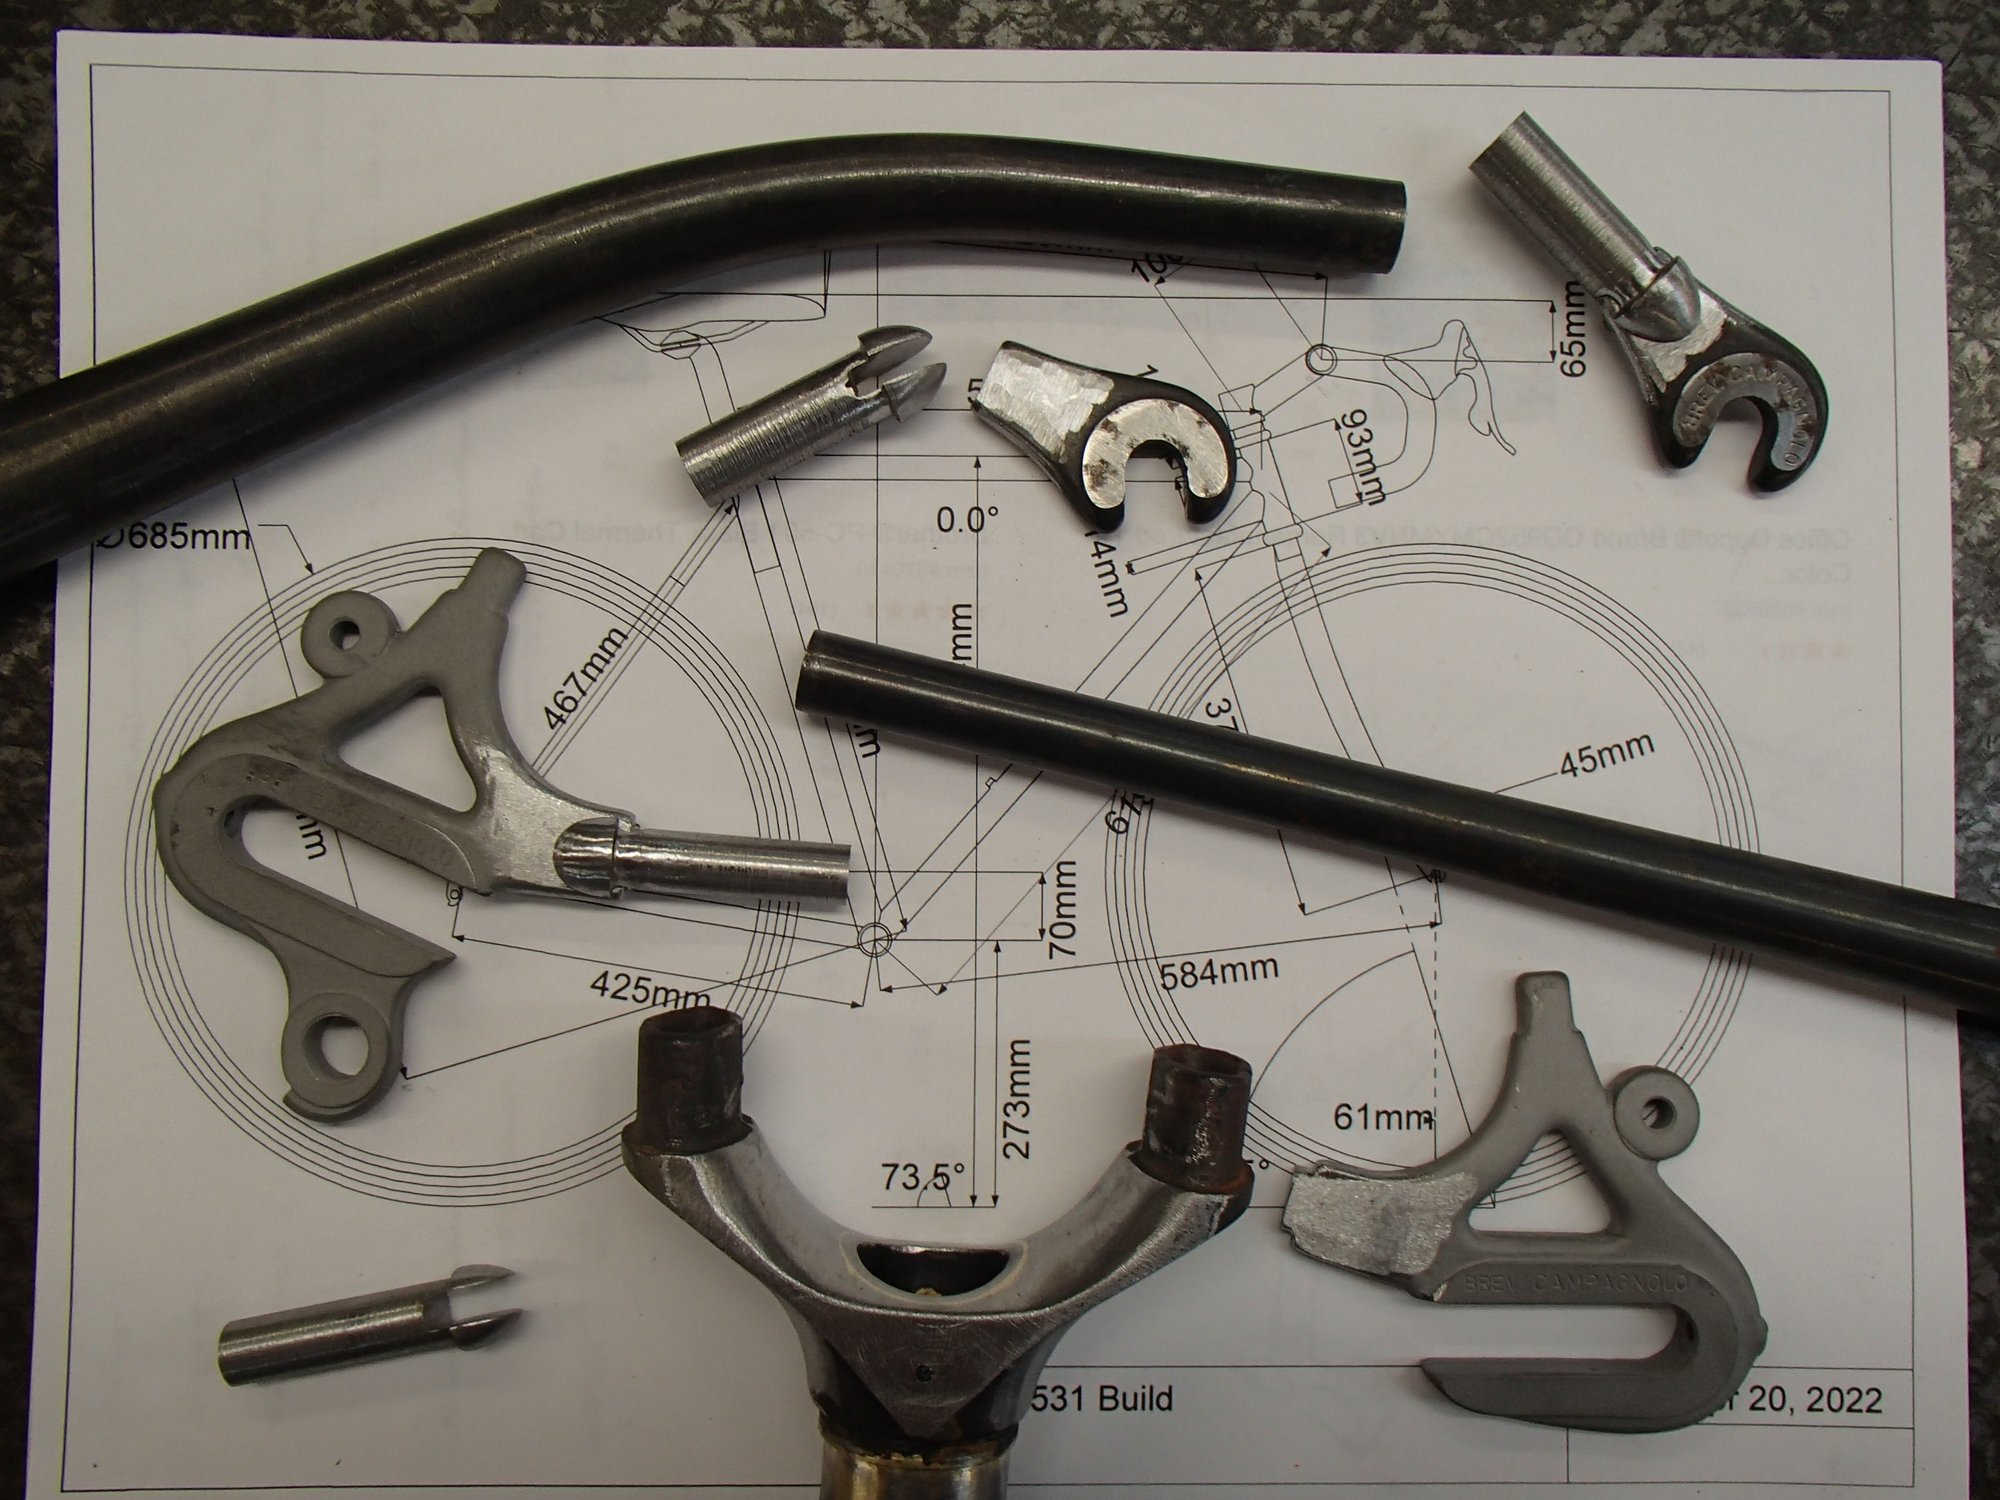
Per my usual seasonal workload after finishing the French themed I had little time to do more then think about this next frame. With too much time to think one can get into trouble about choices and I found myself being attracted to the rare "bird's mouth" lugged version. So I started to make the lugs and stalled after the blanks were done. They sit with bluing painted on them waiting for the right day to scribe the shorelines and start that step.
But for now I will show the stay/blade ends and fork's progress. I did some light milling on the fork crown's faces to provide a flat surface for the brake to butt against. A bit of pre finishing on the slopes to remove most of the manufacture marks. I pinned the crown to the steerer right at one of the brake holes, if all goes well the pin will be drilled away with forming the brake hole.
I wanted to have domed stay/blade ends. I think we here had a thread about this a while ago... making domed ends. I never liked the two methods I have used a long time ago to do this. Glob on brass to the square cut stay end when attaching the drop out and file away to shape or cut/dart and bend over the stay ends then fill and file before fitting the drops. I decided to go the vastly more time consuming method and machine out some domed plugs. The 4 shown took a few hours to make so far. The length of the male plug that will sit inside the stay end will be cut down a lot, the length makes for nice handles for the grinder and belt sander work.
Next is to figure out fixturing the bits so the plugs and drop out slots all are at the right angles during brazing. Andy
__________________
AndrewRStewart
AndrewRStewart

Likes For Andrew R Stewart:


 06-27-22, 11:08 PM
#5
blahblahblah chrome moly

Join Date: Apr 2009
Location: Seattle
Posts: 1,986
Mentioned: 92 Post(s)
Tagged: 0 Thread(s)
Quoted: 1172 Post(s)
Liked 2,567 Times
in
1,072 Posts
You can also "forge" your own domes, but it's a fair bit of work, and most people would say it's not worth it, at least from a commercial standpoint. Even back when custom steel frames were what every bikie wanted, very few customers were aware of such small details, so the extra work you put into making custom domes was mostly for the framebuilder's own appreciation. So with rare exceptions, when you see domes, they came that way from the tube factory.
The ones I made had a longer taper, more like a parabola instead of a semi-circle like a Reynolds dome. I thought they were elegant but customers responded with a yawn, so I stopped doing it. Jim Merz has told just about the same story.
Mark B
Likes For bulgie:
06-28-22, 02:22 AM
#6


Randomhead
Join Date: Aug 2008
Location: Happy Valley, Pennsylvania
Posts: 24,394
Mentioned: 0 Post(s)
Tagged: 0 Thread(s)
Quoted: 4 Post(s)
Liked 3,693 Times
in
2,515 Posts
When I was a snotty teenager back in the '70s, those domed ends looked old-fashioned to me and I always cut them off when I bought a set of Reynolds tubes.
Likes For unterhausen:
06-28-22, 04:31 AM
#7
Senior Member
Join Date: Dec 2019
Posts: 955
Mentioned: 3 Post(s)
Tagged: 0 Thread(s)
Quoted: 321 Post(s)
Liked 263 Times
in
212 Posts
If you'd kept those domed stays you could be selling them off now probably at a profit. I wonder if Reynolds still have the machine they used to make them.
Likes For guy153:
06-28-22, 11:40 AM
#8
Randomhead
Join Date: Aug 2008
Location: Happy Valley, Pennsylvania
Posts: 24,394
Mentioned: 0 Post(s)
Tagged: 0 Thread(s)
Quoted: 4 Post(s)
Liked 3,693 Times
in
2,515 Posts
I dunno, I tried to sell some domed 531 fork blades on ebay and got zero takers. I was a bit surprised. I wish I could have taken a picture of the stamping
Likes For unterhausen:
06-28-22, 05:45 PM
#9
blahblahblah chrome moly
Join Date: Apr 2009
Location: Seattle
Posts: 1,986
Mentioned: 92 Post(s)
Tagged: 0 Thread(s)
Quoted: 1172 Post(s)
Liked 2,567 Times
in
1,072 Posts
I also didn't like that you couldn't clean the inside of the tube to shiny metal, so even when I wanted domes, I cut the factory domes off, cleaned the tube inside, then made my own domes. Partly because I liked the shape of mine better, also to flatten the inner half of the right-side stays for chain/freewheel clearance before brazing, which is harder with domes there. I know you don't really need shiny steel inside your stay ends, I was just being OCD, but my joints always came out really clean. This is part of why I never made much money in the bike biz, too slow!
One unsung advantage of domed ends is the ability to use "runny" silver when using stainless DO's. I first made my own domes in 1977 to be able to silver braze the SS dropouts I got from Art Stump. A '70s Stump dropout:

Mr. Stump showed me his method of doming the stays, which he did cold. I have heard others say they hot-forged theirs. I think Jim Merz said he had to normalize the ends of 753 stays to make them ductile enough for doming without cracking. I never tried my way on heat-treated stays. 531 is soft enough to do that much forming cold without any worries of cracking from work-hardening.
Mark B
06-28-22, 06:58 PM
#10
Randomhead
Join Date: Aug 2008
Location: Happy Valley, Pennsylvania
Posts: 24,394
Mentioned: 0 Post(s)
Tagged: 0 Thread(s)
Quoted: 4 Post(s)
Liked 3,693 Times
in
2,515 Posts
Cleaning domed ends without a sandblaster is a pain. Andy's method of having plugs is much easier to clean.
When I was at Trek, it used to kill me when the guys with dynabrades undercut my carefully brazed dropouts. It does make a nice scallop in the right hands though, like Mike Appel.
When I was at Trek, it used to kill me when the guys with dynabrades undercut my carefully brazed dropouts. It does make a nice scallop in the right hands though, like Mike Appel.
Likes For unterhausen:
06-28-22, 08:25 PM
#11
Senior Member
Thread Starter
Join Date: Feb 2012
Location: Rochester, NY
Posts: 18,070
Bikes: Stewart S&S coupled sport tourer, Stewart Sunday light, Stewart Commuting, Stewart Touring, Co Motion Tandem, Stewart 3-Spd, Stewart Track, Fuji Finest, Mongoose Tomac ATB, GT Bravado ATB, JCP Folder, Stewart 650B ATB
Mentioned: 0 Post(s)
Tagged: 0 Thread(s)
Quoted: 4198 Post(s)
Liked 3,849 Times
in
2,300 Posts
This time last night I thought I would do a longish ride today. But early this morning I got a call from a friend who was in the hospital this weekend and asked for a ride home as she was being discharged. So i shifted gears and spent the day in the basement. I got a lot of work done with the dropouts and stays/blades. Not enough to show yet (I've been told it looks better if I show completed/after clean up work than in process and still all dirty after brazing stuff...).
All this talk about how to make domed ends, what we did/do. In my working up to this project I did some refreshing on previous methods. I have done only one frame with hammered (oops, I mean forged) over ends. That experience was disappointing with cracks forming as I deformed the stay/blade ends. In hindsight not surprising with my very wet behind the ears abilities back then. This drove me to try, the next time or two, cutting darts (a tailoring term) and forming a dome with needle nose pliers. A much better method for my poor skills back then. For this project i did a very rough practice attempt at this method and here's the proof.
The tubes are some pair of really old track blades that one had been cut way short so had been tossed into the scrap drawer. The unbrazed one shows a couple of the cuts, as I said roughly done. The brazed one had me trying to only add filler to the tube walls, I could have added a tad more. Like so much of this craft more practice would improve the breed. A good practice as it convinced me to try making a domed plug style addition instead.
I had mentioned the lug blanks were lay out blued, waiting for the shorelines to be drawn. I should have said "redded" as that's the layout fluid color I have. You might be able to see the scraped lines of the tube centerlines. The TT socket OD has machining lines that will erode away with further finishing. I'm still waiting for the inspiration moment to do the shorelines... This frame will be a small one (although in classic English fashion have a long top tube) and thus the head lugs will flow into each other. Andy
I finally picked up Sandra about 6pm, only 9 hours after her discharge process has begun. I could have done a nice ride on what ended up being a near perfect day to ride.
__________________
AndrewRStewart
AndrewRStewart
Likes For Andrew R Stewart:
06-29-22, 04:32 AM
#12
Randomhead
Join Date: Aug 2008
Location: Happy Valley, Pennsylvania
Posts: 24,394
Mentioned: 0 Post(s)
Tagged: 0 Thread(s)
Quoted: 4 Post(s)
Liked 3,693 Times
in
2,515 Posts
That domed stay looks great, why did you decide not to do that?
06-29-22, 08:04 AM
#13
Senior Member
Thread Starter
Join Date: Feb 2012
Location: Rochester, NY
Posts: 18,070
Bikes: Stewart S&S coupled sport tourer, Stewart Sunday light, Stewart Commuting, Stewart Touring, Co Motion Tandem, Stewart 3-Spd, Stewart Track, Fuji Finest, Mongoose Tomac ATB, GT Bravado ATB, JCP Folder, Stewart 650B ATB
Mentioned: 0 Post(s)
Tagged: 0 Thread(s)
Quoted: 4198 Post(s)
Liked 3,849 Times
in
2,300 Posts
For the same reasons why I don't build frames for a living. I like taking my time and trying different stuff. Having said that I doubt I would do what I just did again.
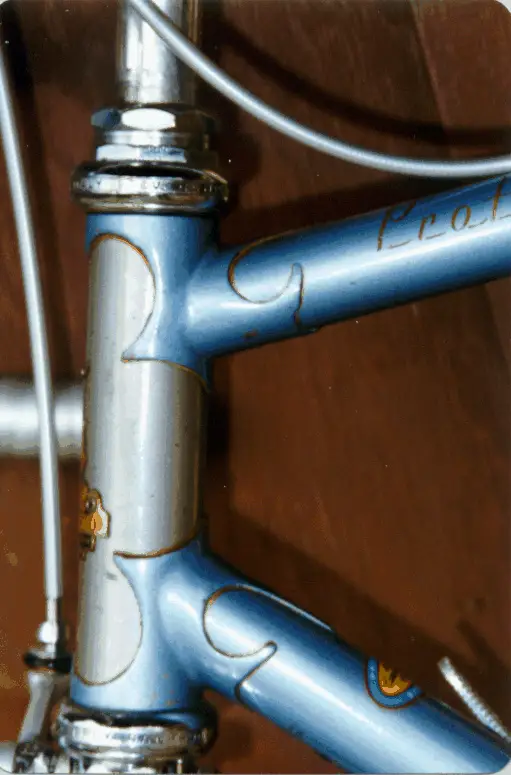
Like some here I, too, view domed ends as being somewhat cheap or an indicator of low craft. After I made a few frames with the supplied domed ends I began trying to emulate what I call "French scalloped" styled ends. Somewhat like the Italian chisel style but with a 3D filler surface, the filler is drawn into the stay/blade end a bit. I made quite a few frames with this style and I still like it a lot. These days I generally square cut the ends, fill so the braze slightly bulges out and file it smooth and knock down the sharp edge of the tube. Andy
Like some here I, too, view domed ends as being somewhat cheap or an indicator of low craft. After I made a few frames with the supplied domed ends I began trying to emulate what I call "French scalloped" styled ends. Somewhat like the Italian chisel style but with a 3D filler surface, the filler is drawn into the stay/blade end a bit. I made quite a few frames with this style and I still like it a lot. These days I generally square cut the ends, fill so the braze slightly bulges out and file it smooth and knock down the sharp edge of the tube. Andy
__________________
AndrewRStewart
AndrewRStewart
Likes For Andrew R Stewart:
08-02-22, 08:08 PM
#14
Senior Member
Thread Starter
Join Date: Feb 2012
Location: Rochester, NY
Posts: 18,070
Bikes: Stewart S&S coupled sport tourer, Stewart Sunday light, Stewart Commuting, Stewart Touring, Co Motion Tandem, Stewart 3-Spd, Stewart Track, Fuji Finest, Mongoose Tomac ATB, GT Bravado ATB, JCP Folder, Stewart 650B ATB
Mentioned: 0 Post(s)
Tagged: 0 Thread(s)
Quoted: 4198 Post(s)
Liked 3,849 Times
in
2,300 Posts
Update- Here are a few shots of the current status on my build.
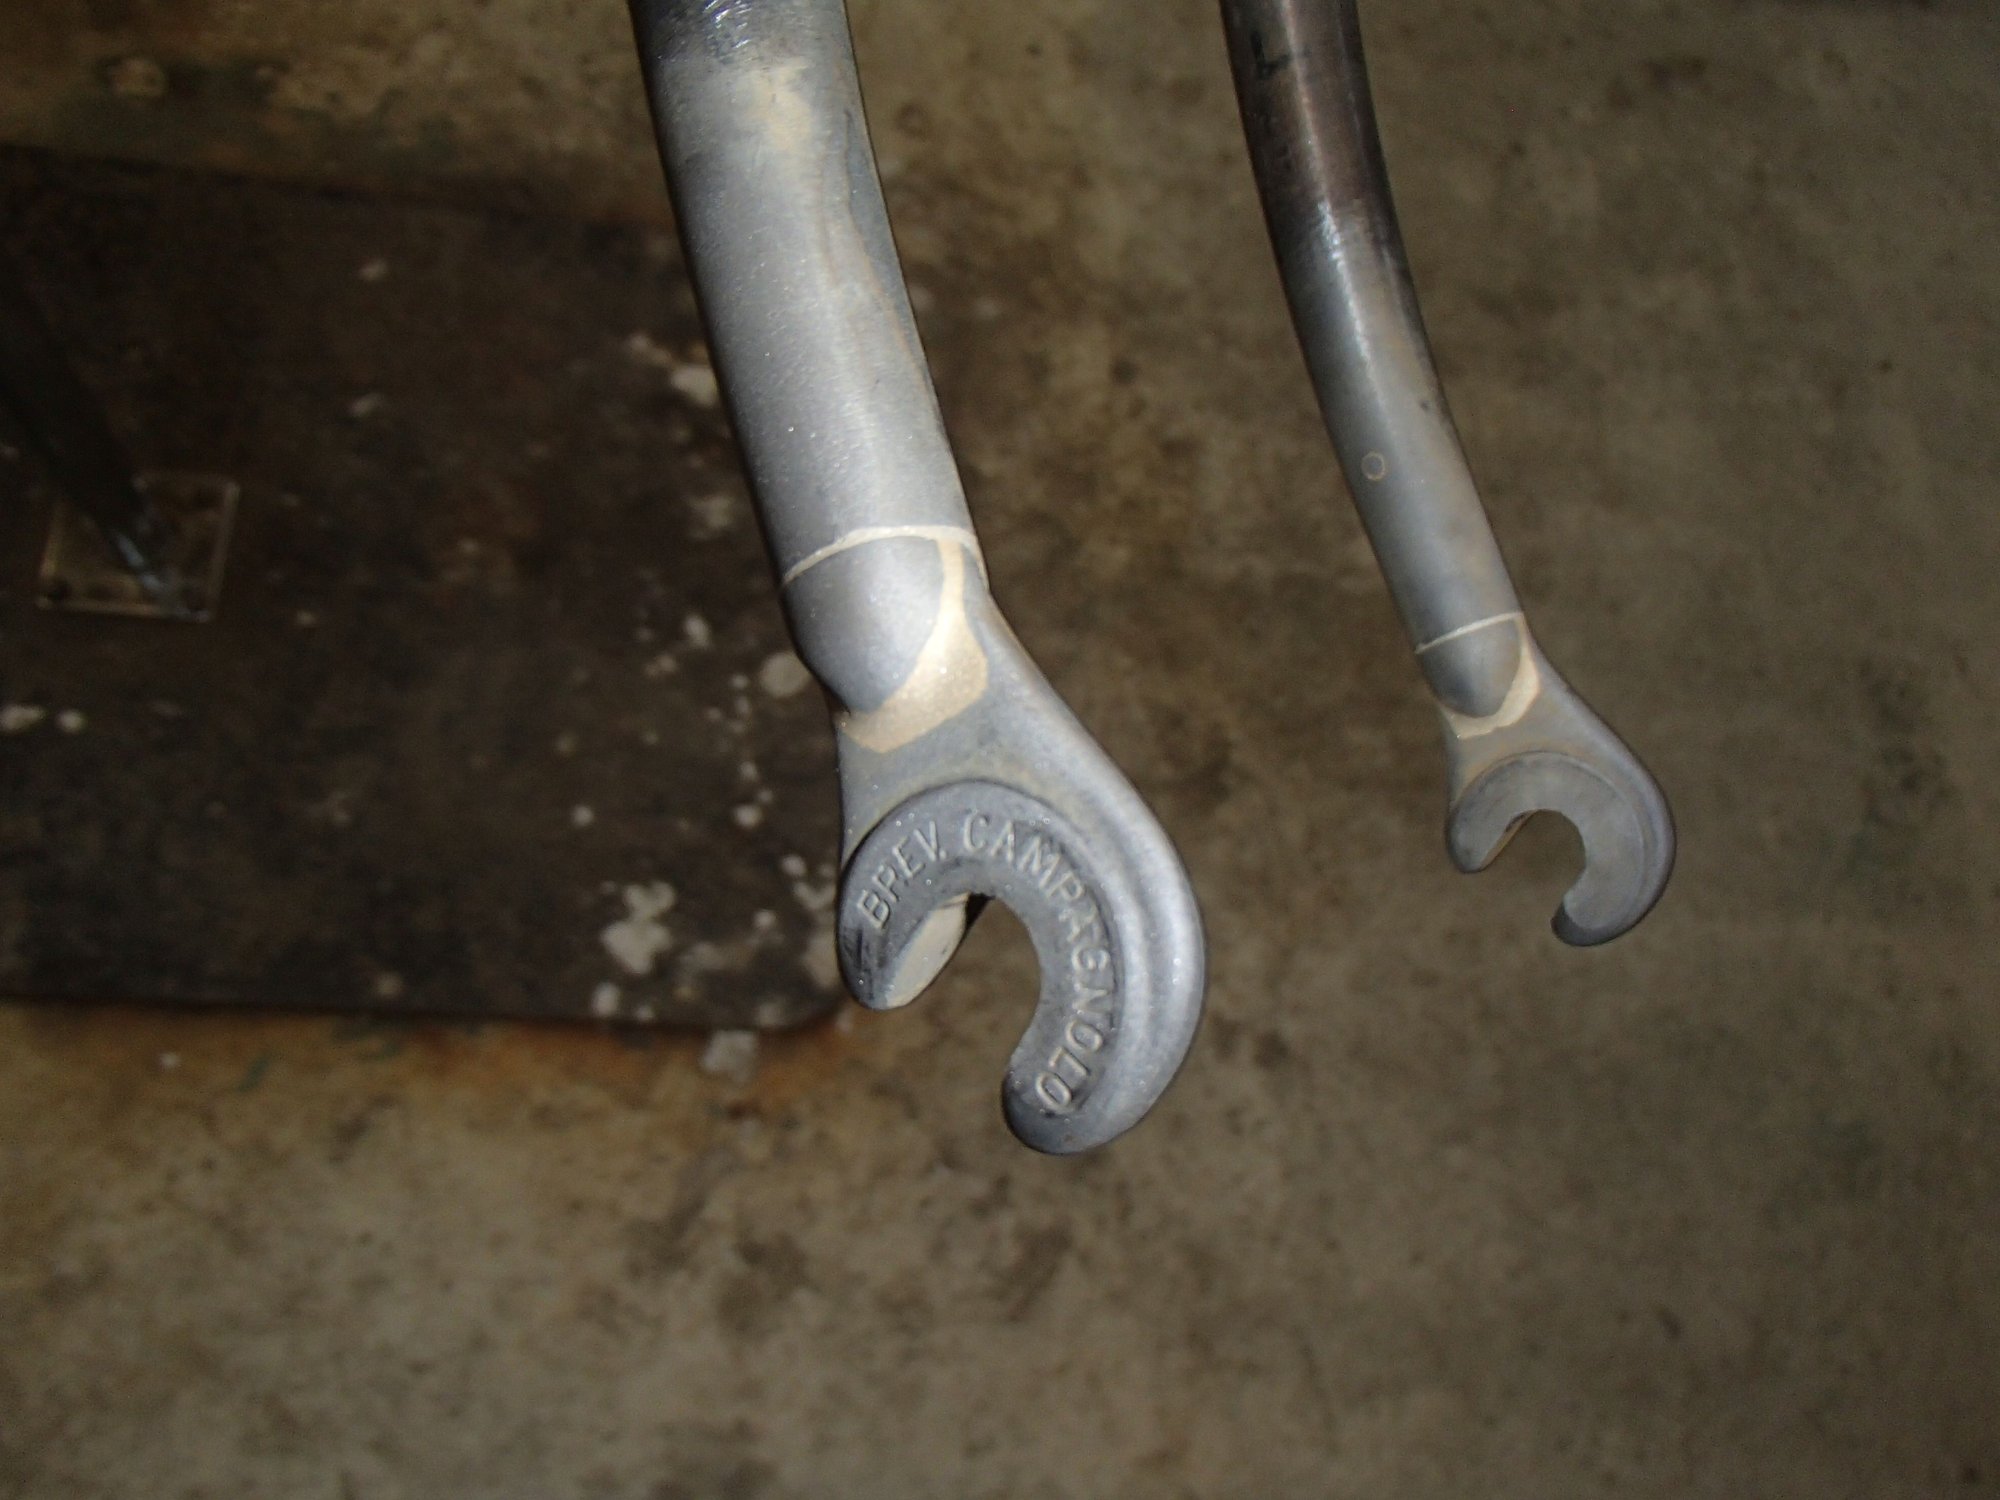
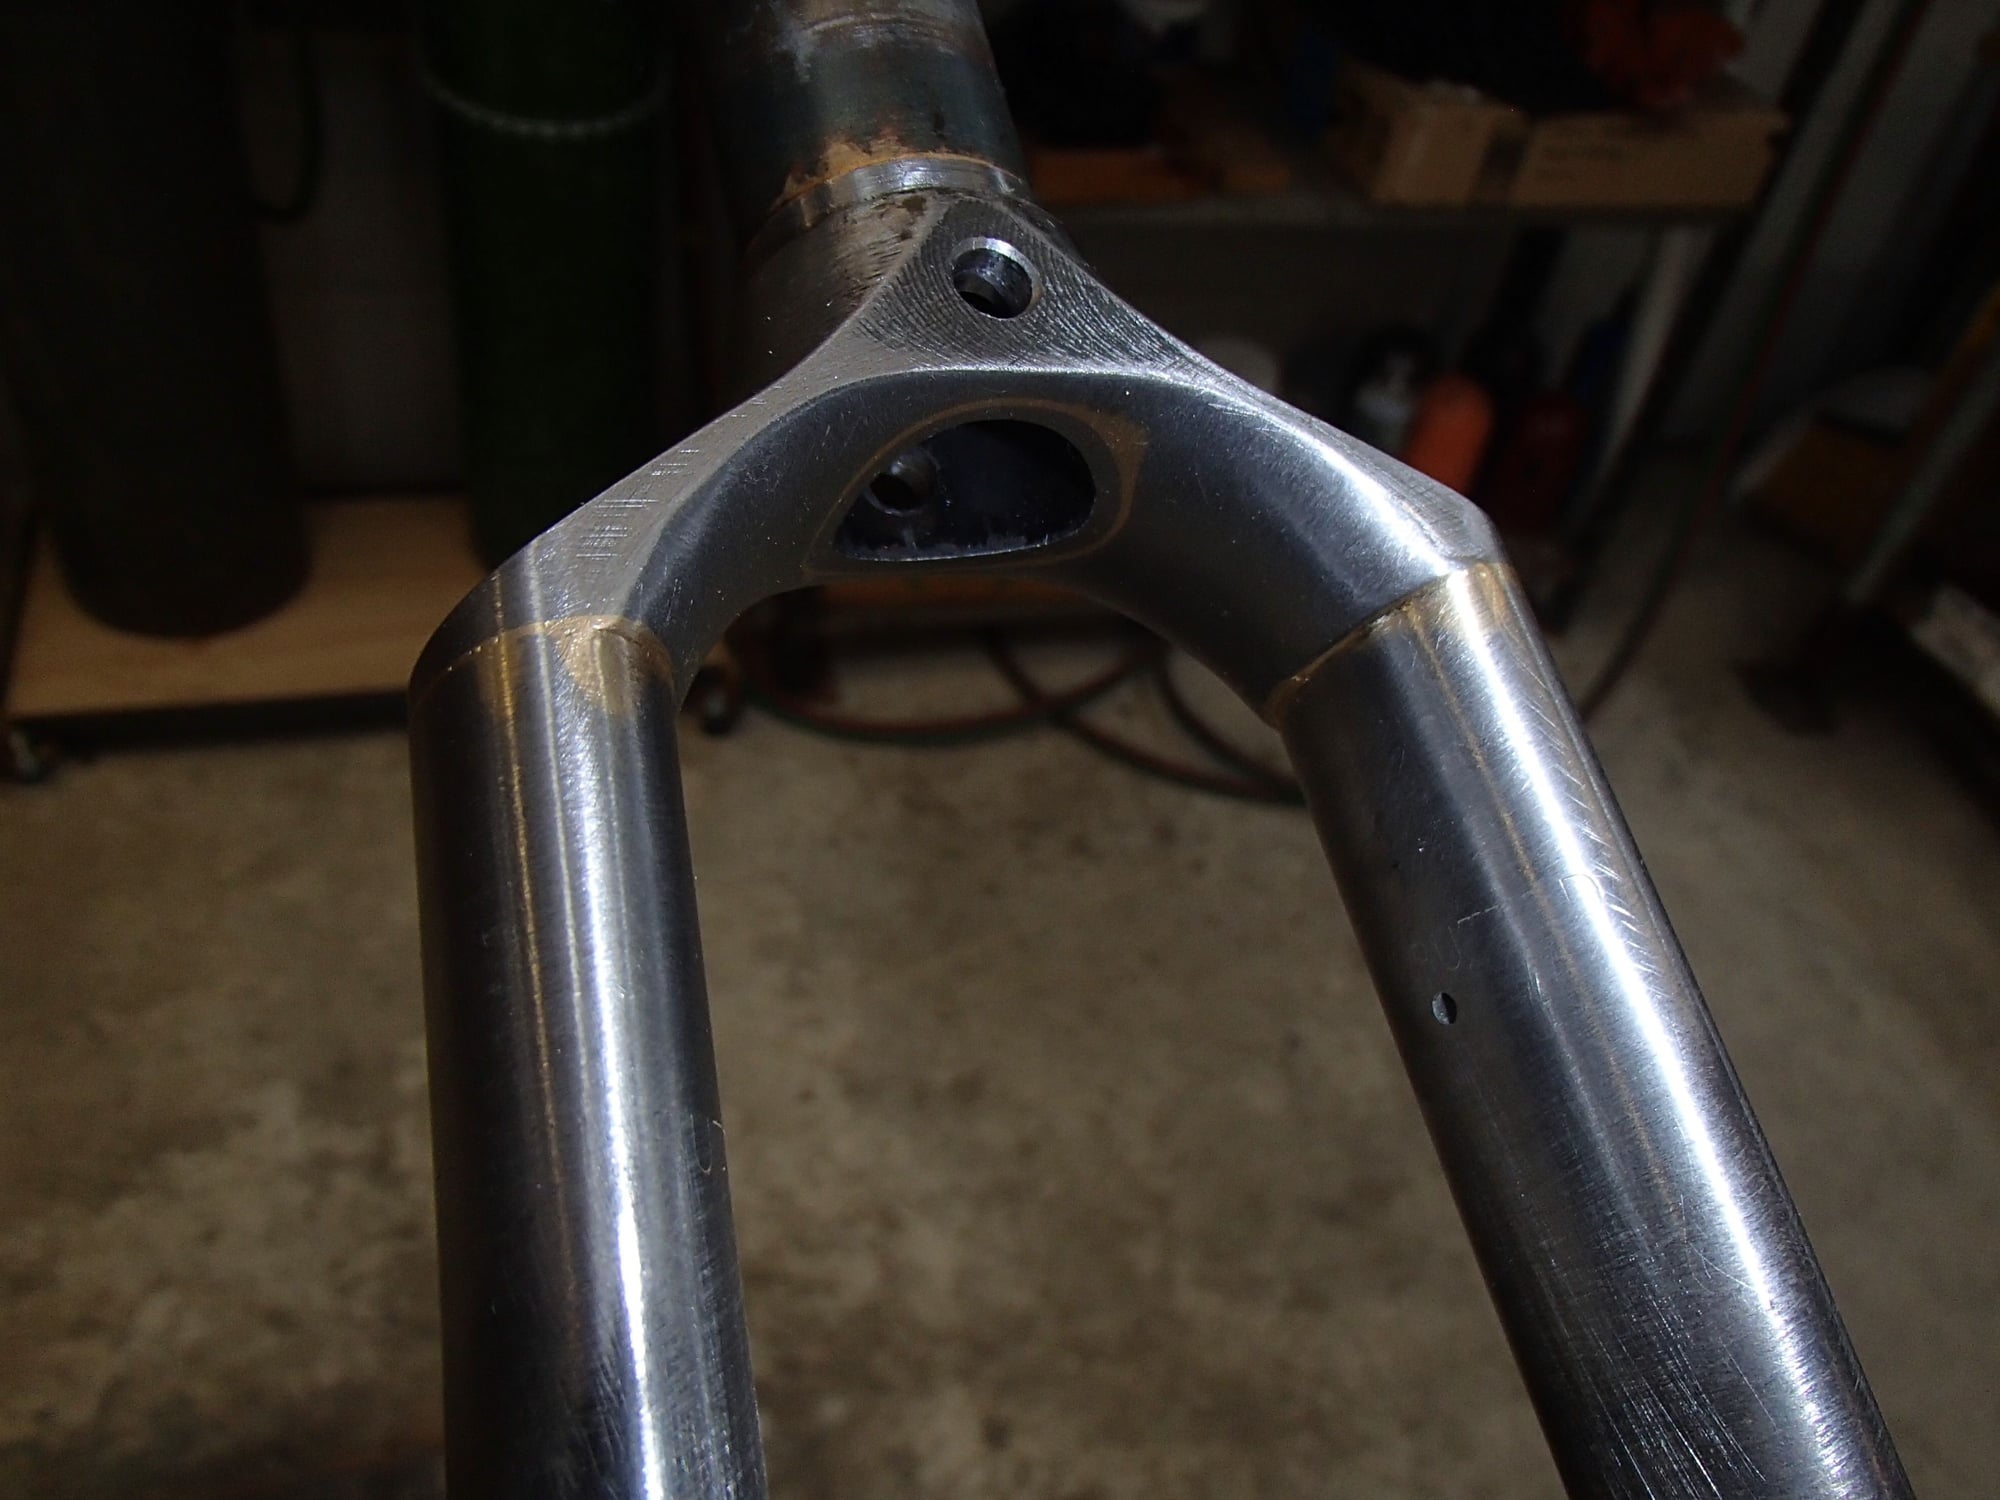
The forks went badly, twice. I hate making stupid mistakes let alone a second time. The first set of blades are scrap now and the replacement ones had a shallower rake curve. I added rake, a slightly tighter curve, so now the blades have a sort of changing curve radius (I might call it a French curve but the Brits might take offence ). The "recycled" drop outs brazed in well and only a small amount of clean up was needed. Blade length was cut and "walked up to" (mistake 1 AND 2) than brazed to the crown. That clean up went better than I was expecting. I decided to leave the little shoulder at the crown/blade joint along the blades' insides. I think this looks cool. The fork is really straight, near zero "adjustment" needed. A final sanding and closing up the spare vent holes are all that's left to do.
The rear drops are joined to the chain stays. No drama or issues.
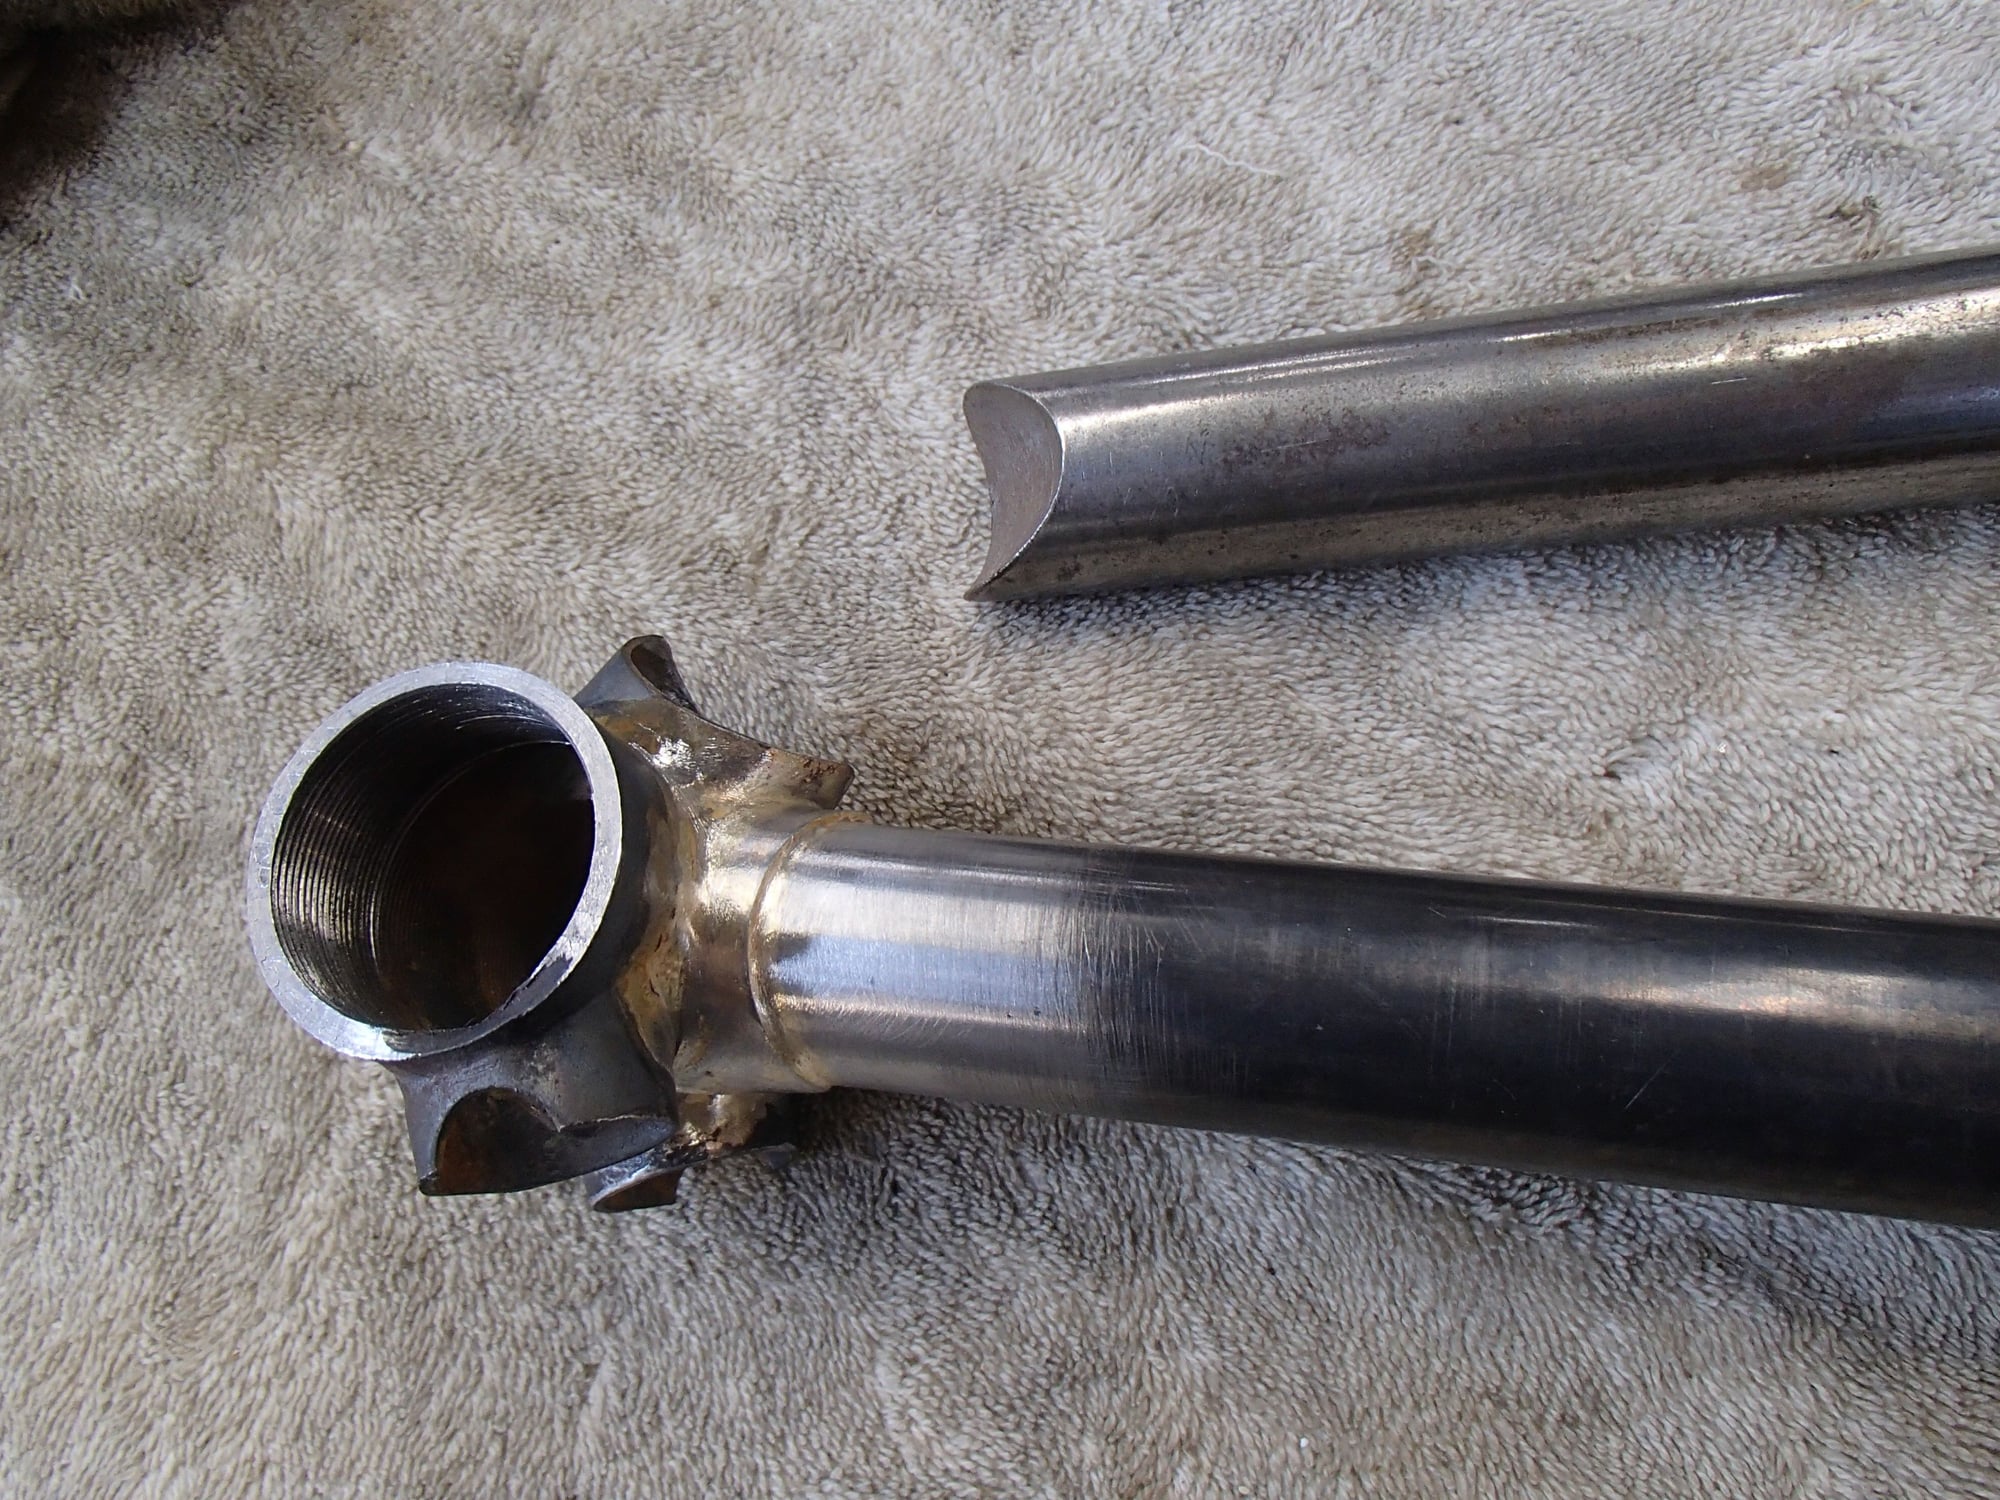

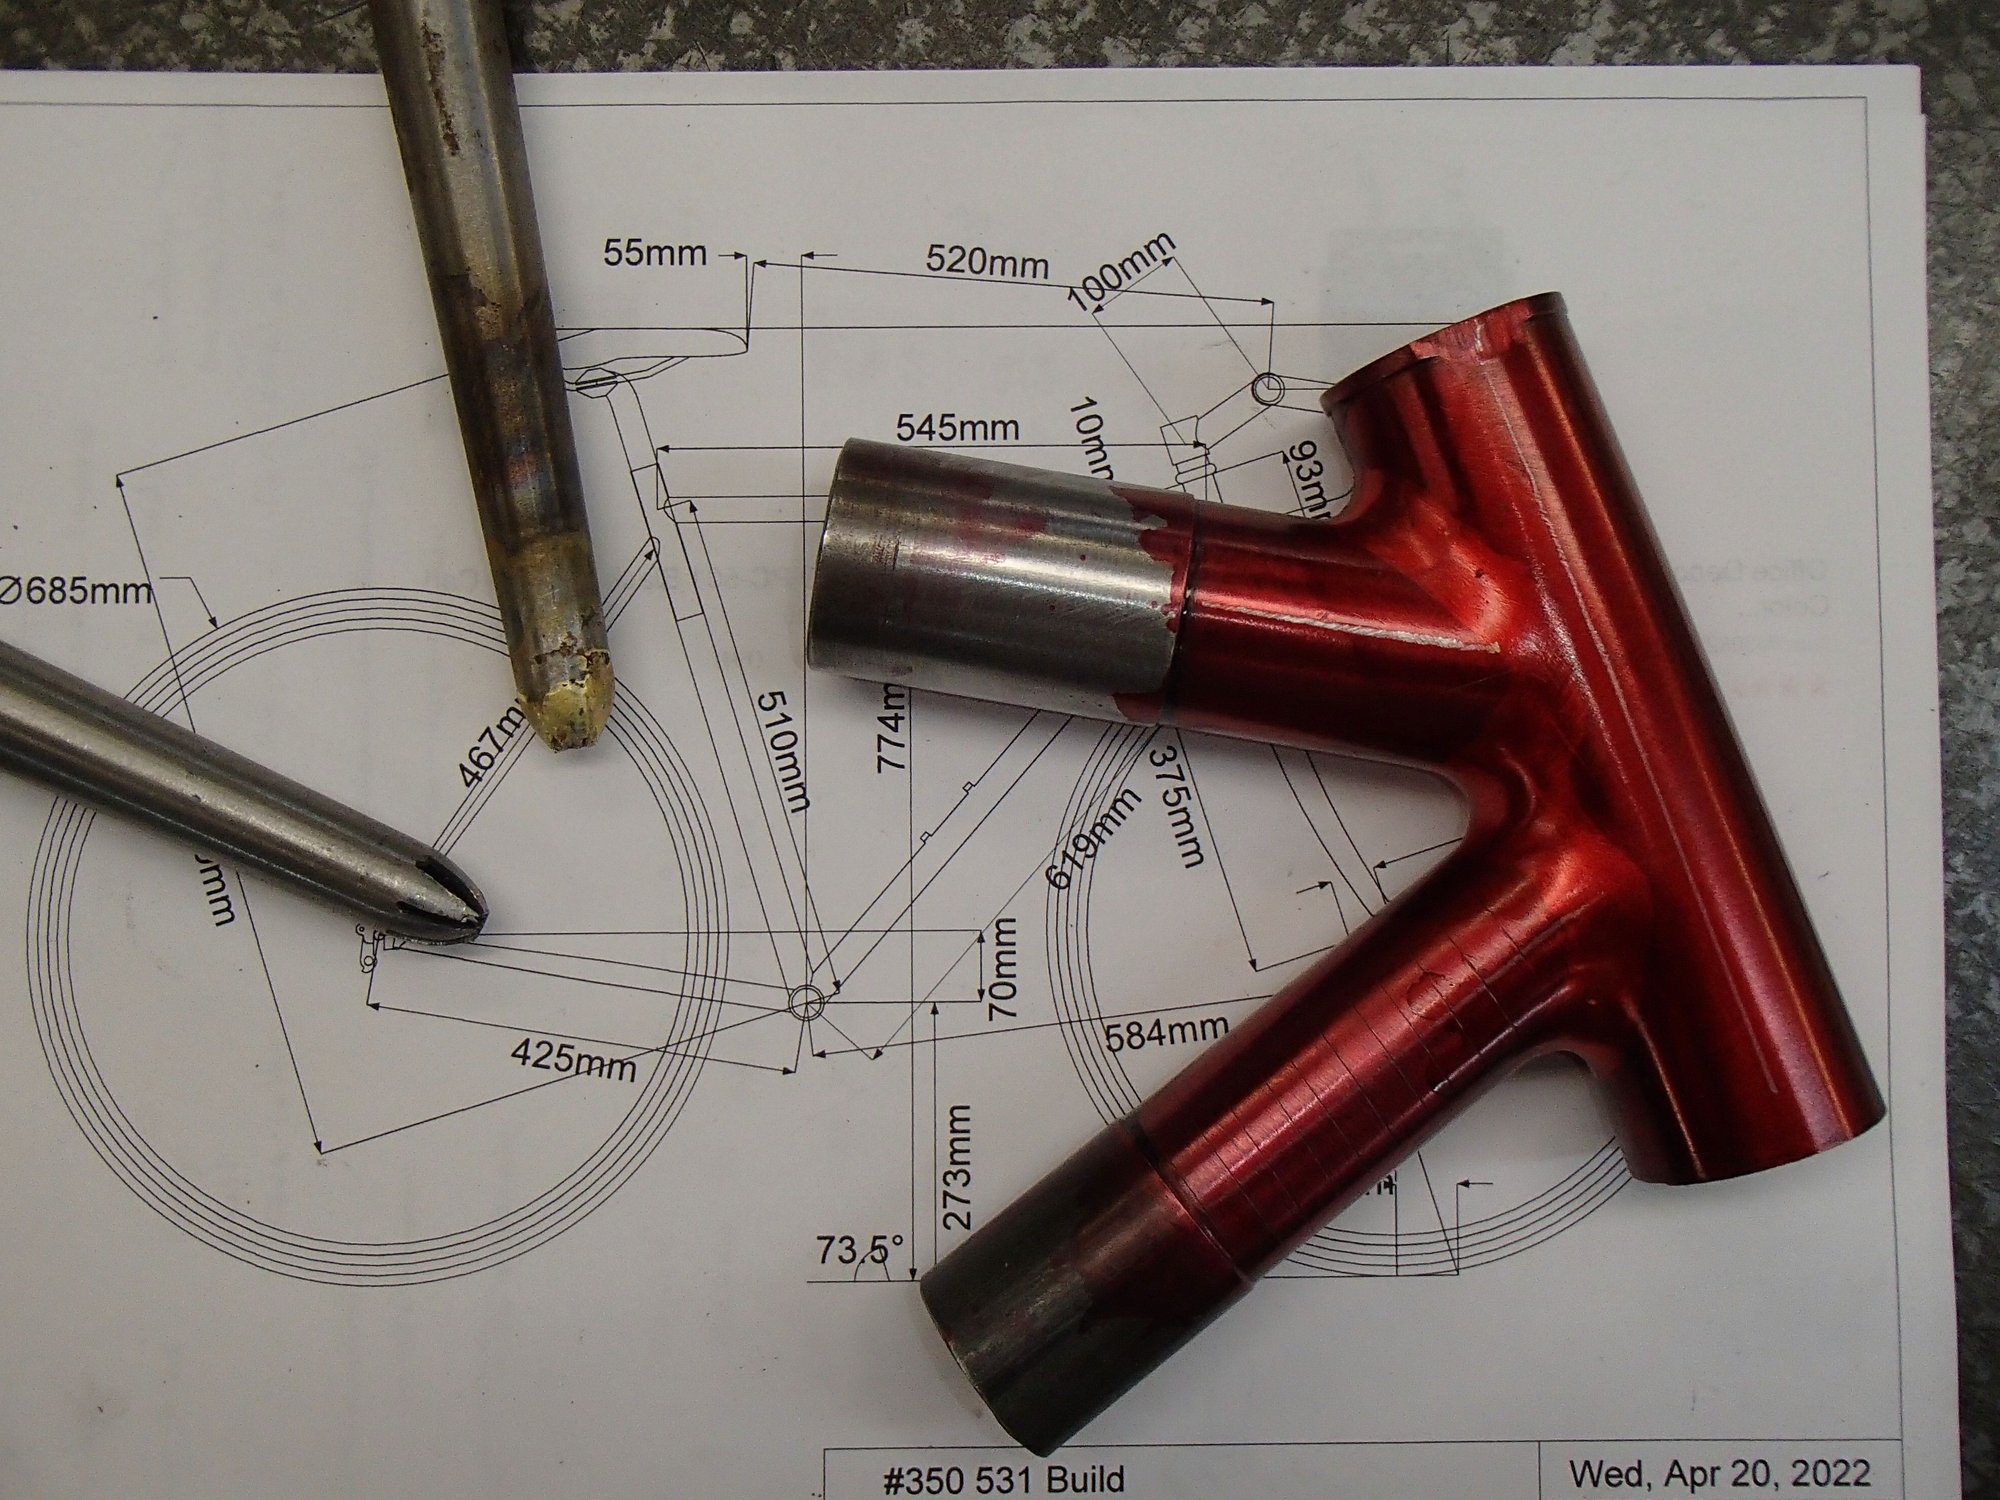
The ST is brassed into the shell. Again, the clean up went well. I like to brass/bronze the ST to the shell first as the remaining brazing (FT and stays) will have less chance to disturb the ST joint. I've opened up the DT socket on the shell and set it's angle to the ST.
Next up is what I have been avoiding, cutting the lugs from the blanks. I've played with Sharpies and various designs and am narrowing down what I want. This will take some time to complete. Andy
The forks went badly, twice. I hate making stupid mistakes let alone a second time. The first set of blades are scrap now and the replacement ones had a shallower rake curve. I added rake, a slightly tighter curve, so now the blades have a sort of changing curve radius (I might call it a French curve but the Brits might take offence
). The "recycled" drop outs brazed in well and only a small amount of clean up was needed. Blade length was cut and "walked up to" (mistake 1 AND 2) than brazed to the crown. That clean up went better than I was expecting. I decided to leave the little shoulder at the crown/blade joint along the blades' insides. I think this looks cool. The fork is really straight, near zero "adjustment" needed. A final sanding and closing up the spare vent holes are all that's left to do.The rear drops are joined to the chain stays. No drama or issues.
The ST is brassed into the shell. Again, the clean up went well. I like to brass/bronze the ST to the shell first as the remaining brazing (FT and stays) will have less chance to disturb the ST joint. I've opened up the DT socket on the shell and set it's angle to the ST.
Next up is what I have been avoiding, cutting the lugs from the blanks. I've played with Sharpies and various designs and am narrowing down what I want. This will take some time to complete. Andy
__________________
AndrewRStewart
AndrewRStewart
Likes For Andrew R Stewart:
08-03-22, 12:17 PM
#15
Randomhead
Join Date: Aug 2008
Location: Happy Valley, Pennsylvania
Posts: 24,394
Mentioned: 0 Post(s)
Tagged: 0 Thread(s)
Quoted: 4 Post(s)
Liked 3,693 Times
in
2,515 Posts
All the raleigh pros I have ever seen had fairly bland/stock prugnat lugs. I assume you are planning on something different?
08-03-22, 03:32 PM
#16
blahblahblah chrome moly
Join Date: Apr 2009
Location: Seattle
Posts: 1,986
Mentioned: 92 Post(s)
Tagged: 0 Thread(s)
Quoted: 1172 Post(s)
Liked 2,567 Times
in
1,072 Posts
Fun show, can't wait for the next episode!
You might want to consider a lighter downtube though, that one looks a bit, um, husky?
That sucks about cutting blades too short. Normally if I did that, I'd repurpose them to use with full-sloping crowns, that need shorter blades. D'oh! Maybe for a funnybike?
Cheers and thanks
-mb
You might want to consider a lighter downtube though, that one looks a bit, um, husky?
That sucks about cutting blades too short. Normally if I did that, I'd repurpose them to use with full-sloping crowns, that need shorter blades. D'oh! Maybe for a funnybike?
Cheers and thanks
-mb
08-03-22, 07:52 PM
#17
Senior Member
Thread Starter
Join Date: Feb 2012
Location: Rochester, NY
Posts: 18,070
Bikes: Stewart S&S coupled sport tourer, Stewart Sunday light, Stewart Commuting, Stewart Touring, Co Motion Tandem, Stewart 3-Spd, Stewart Track, Fuji Finest, Mongoose Tomac ATB, GT Bravado ATB, JCP Folder, Stewart 650B ATB
Mentioned: 0 Post(s)
Tagged: 0 Thread(s)
Quoted: 4198 Post(s)
Liked 3,849 Times
in
2,300 Posts
Mark- Glad to know that I'm not the first person to make mistakes. When I took Eisentraut's 1979 Rutland VT class he commented that one mark of a pro was how they hid theirs
I thought about saving the blades but after pulling the drop outs and having little use for curved and tapered small diameter tubes in the past, i tossed them.
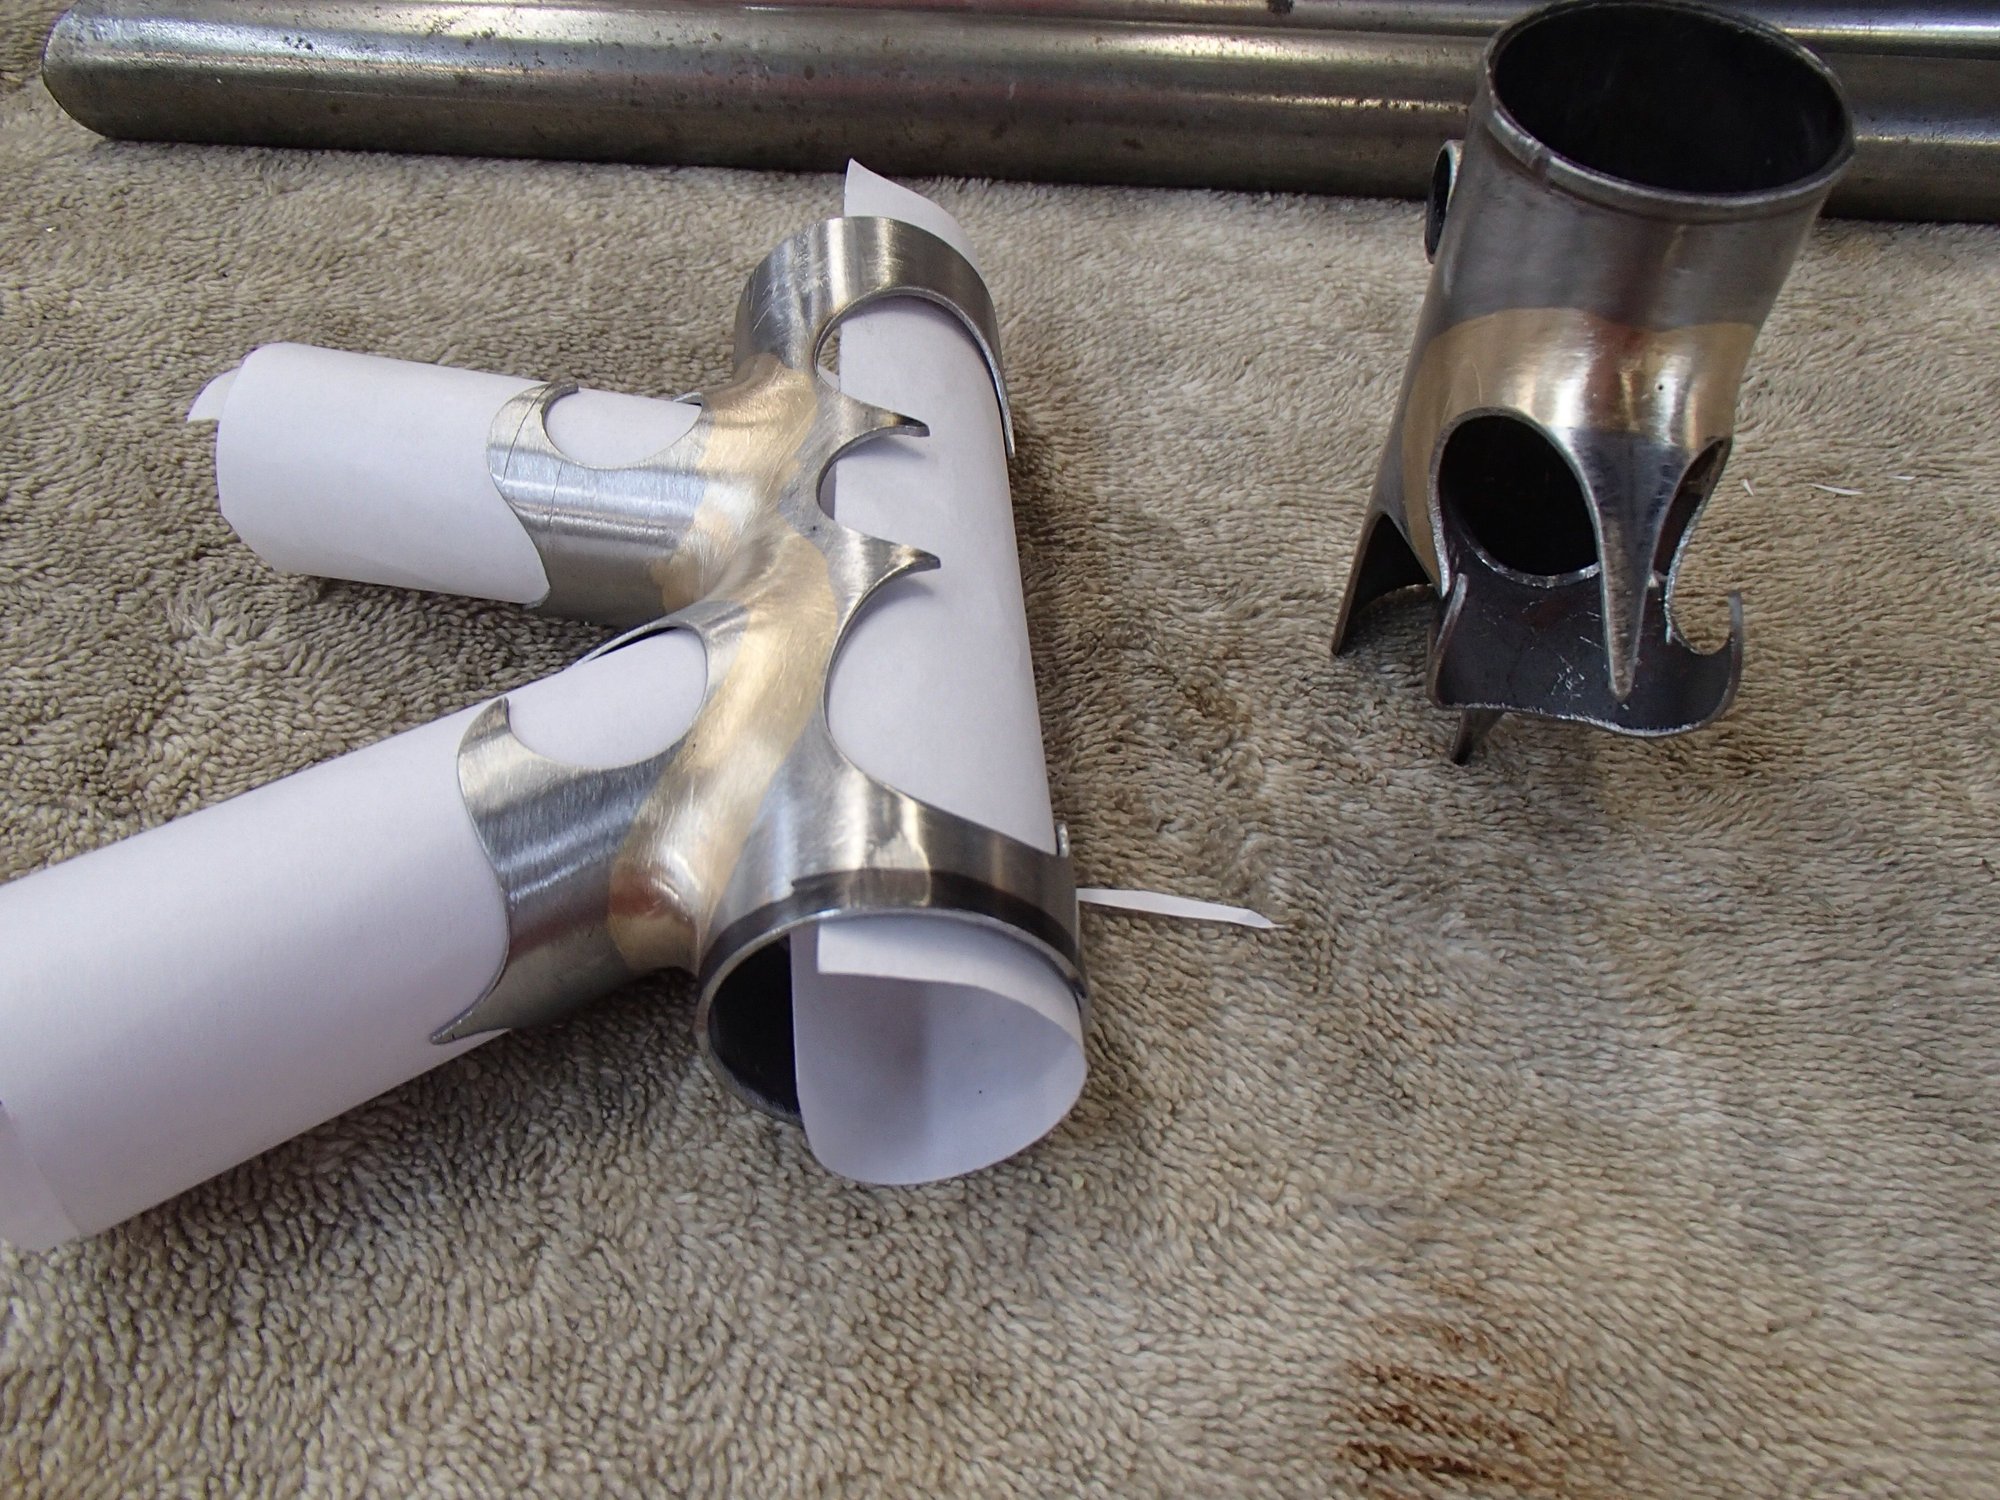
Eric- Bird's mouth lugs. The frame I am building has the head lugs touching. I am not a natural at artistic lines so this is taking a lot of thinking and trial and error with Sharpie at this point. I have some of the shoreline basic points and curves figured out on a few tubes but not the complete design yet. The bluing (actually red...) has been removed, reapplied and removed again as I doodle on the blanks. Andy (who has stuffed a big bird into his mouth this time).
I thought about saving the blades but after pulling the drop outs and having little use for curved and tapered small diameter tubes in the past, i tossed them.
Eric- Bird's mouth lugs. The frame I am building has the head lugs touching. I am not a natural at artistic lines so this is taking a lot of thinking and trial and error with Sharpie at this point. I have some of the shoreline basic points and curves figured out on a few tubes but not the complete design yet. The bluing (actually red...) has been removed, reapplied and removed again as I doodle on the blanks. Andy (who has stuffed a big bird into his mouth this time).
__________________
AndrewRStewart
AndrewRStewart
Likes For Andrew R Stewart:
08-05-22, 07:36 PM
#18

Senior Member
Join Date: Jun 2006
Posts: 20,305
Mentioned: 130 Post(s)
Tagged: 0 Thread(s)
Quoted: 3464 Post(s)
Liked 2,828 Times
in
1,995 Posts
Mark- Glad to know that I'm not the first person to make mistakes. When I took Eisentraut's 1979 Rutland VT class he commented that one mark of a pro was how they hid theirs
I thought about saving the blades but after pulling the drop outs and having little use for curved and tapered small diameter tubes in the past, i tossed them.
Eric- Bird's mouth lugs. The frame I am building has the head lugs touching. I am not a natural at artistic lines so this is taking a lot of thinking and trial and error with Sharpie at this point. I have some of the shoreline basic points and curves figured out on a few tubes but not the complete design yet. The bluing (actually red...) has been removed, reapplied and removed again as I doodle on the blanks. Andy (who has stuffed a big bird into his mouth this time).
08-10-22, 09:05 PM
#19
Senior Member
Thread Starter
Join Date: Feb 2012
Location: Rochester, NY
Posts: 18,070
Bikes: Stewart S&S coupled sport tourer, Stewart Sunday light, Stewart Commuting, Stewart Touring, Co Motion Tandem, Stewart 3-Spd, Stewart Track, Fuji Finest, Mongoose Tomac ATB, GT Bravado ATB, JCP Folder, Stewart 650B ATB
Mentioned: 0 Post(s)
Tagged: 0 Thread(s)
Quoted: 4198 Post(s)
Liked 3,849 Times
in
2,300 Posts
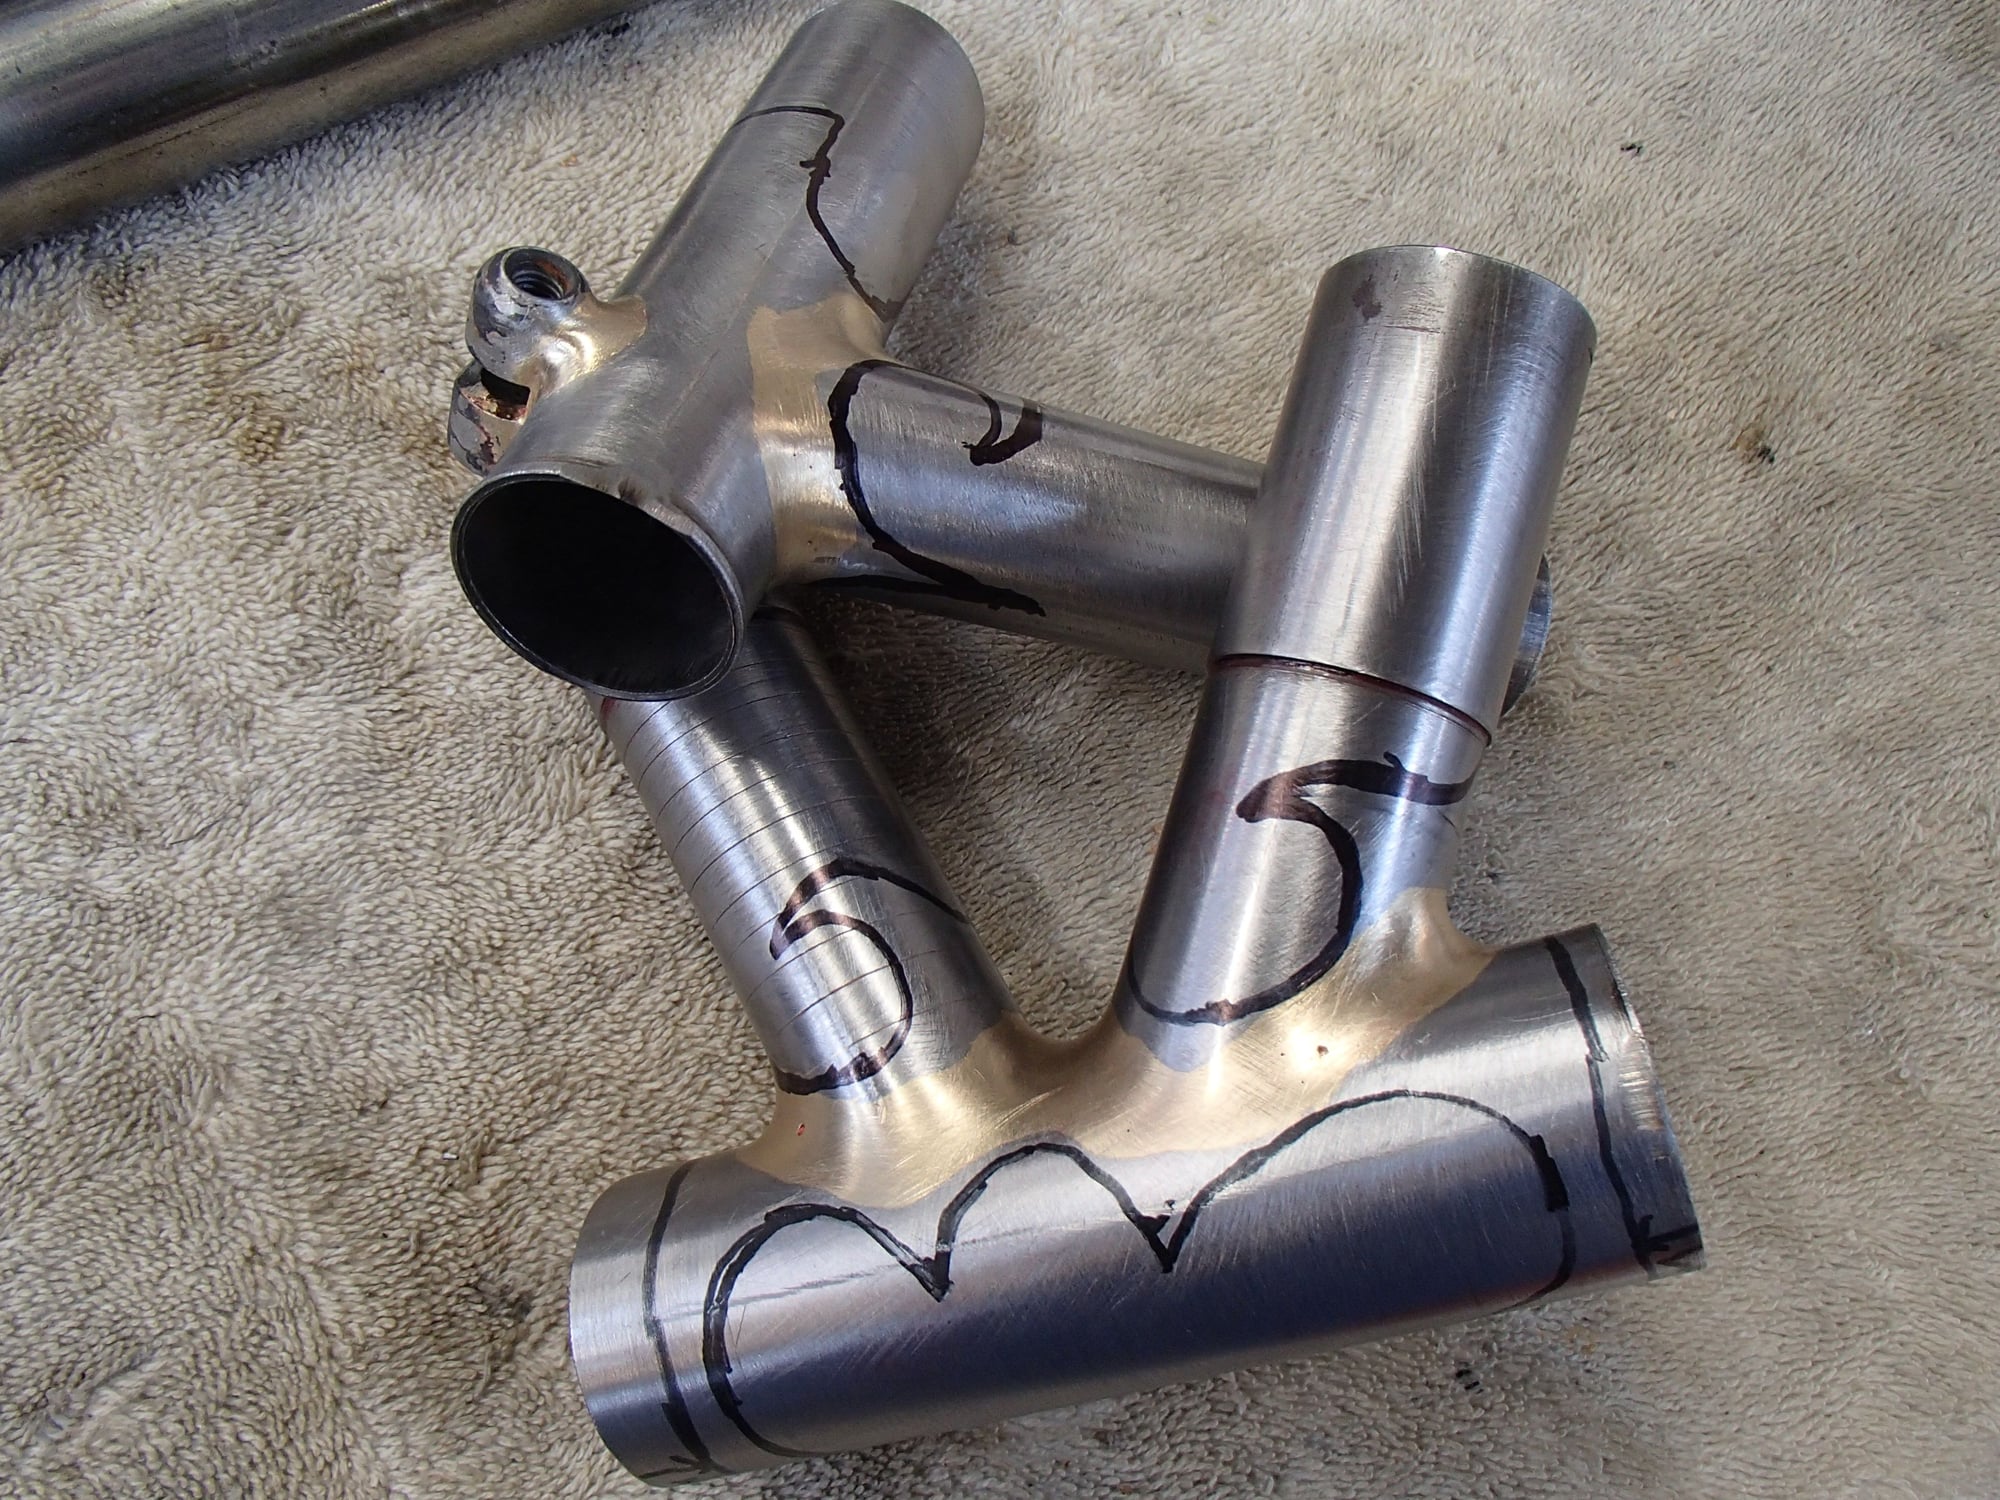
More progress. I drew the basic shore lines for the lugs and began carving. This is a step that I have been procrastinating on for a while. So far i think the seat lug looks OK, maybe 90% done at this point. The skirt on the backside of the seat tube will be done when all is fitted up and I have the seat stays roughly mitered. Now I just have to mimic the curves and points on the head's set. Andy

__________________
AndrewRStewart
AndrewRStewart
08-11-22, 09:13 AM
#20
Junior Member
Join Date: Sep 2020
Posts: 75
Mentioned: 0 Post(s)
Tagged: 0 Thread(s)
Quoted: 18 Post(s)
Likes: 0
Liked 39 Times
in
24 Posts
Beautiful work! As a 'height challenged' rider/builder, I especially appreciate your one-piece headlug. Very cool getting all of that flowing together!
Likes For sdodd:
08-11-22, 10:05 AM
#21
Senior Member
Thread Starter
Join Date: Feb 2012
Location: Rochester, NY
Posts: 18,070
Bikes: Stewart S&S coupled sport tourer, Stewart Sunday light, Stewart Commuting, Stewart Touring, Co Motion Tandem, Stewart 3-Spd, Stewart Track, Fuji Finest, Mongoose Tomac ATB, GT Bravado ATB, JCP Folder, Stewart 650B ATB
Mentioned: 0 Post(s)
Tagged: 0 Thread(s)
Quoted: 4198 Post(s)
Liked 3,849 Times
in
2,300 Posts
Thanks, I have made quite a few smaller frames for myself (5' 6") and a few women in my life (5' 0" to 5' 4") and always have disliked how the production bikes rarely seem to get small sizes done well. Even simple things like where along the top tube the cable stops are placed are often poorly done.
I hope to start up the head lugs carving tomorrow (rest day, off the bike). Andy
__________________
AndrewRStewart
AndrewRStewart
08-12-22, 06:18 PM
#22
Senior Member
Thread Starter
Join Date: Feb 2012
Location: Rochester, NY
Posts: 18,070
Bikes: Stewart S&S coupled sport tourer, Stewart Sunday light, Stewart Commuting, Stewart Touring, Co Motion Tandem, Stewart 3-Spd, Stewart Track, Fuji Finest, Mongoose Tomac ATB, GT Bravado ATB, JCP Folder, Stewart 650B ATB
Mentioned: 0 Post(s)
Tagged: 0 Thread(s)
Quoted: 4198 Post(s)
Liked 3,849 Times
in
2,300 Posts
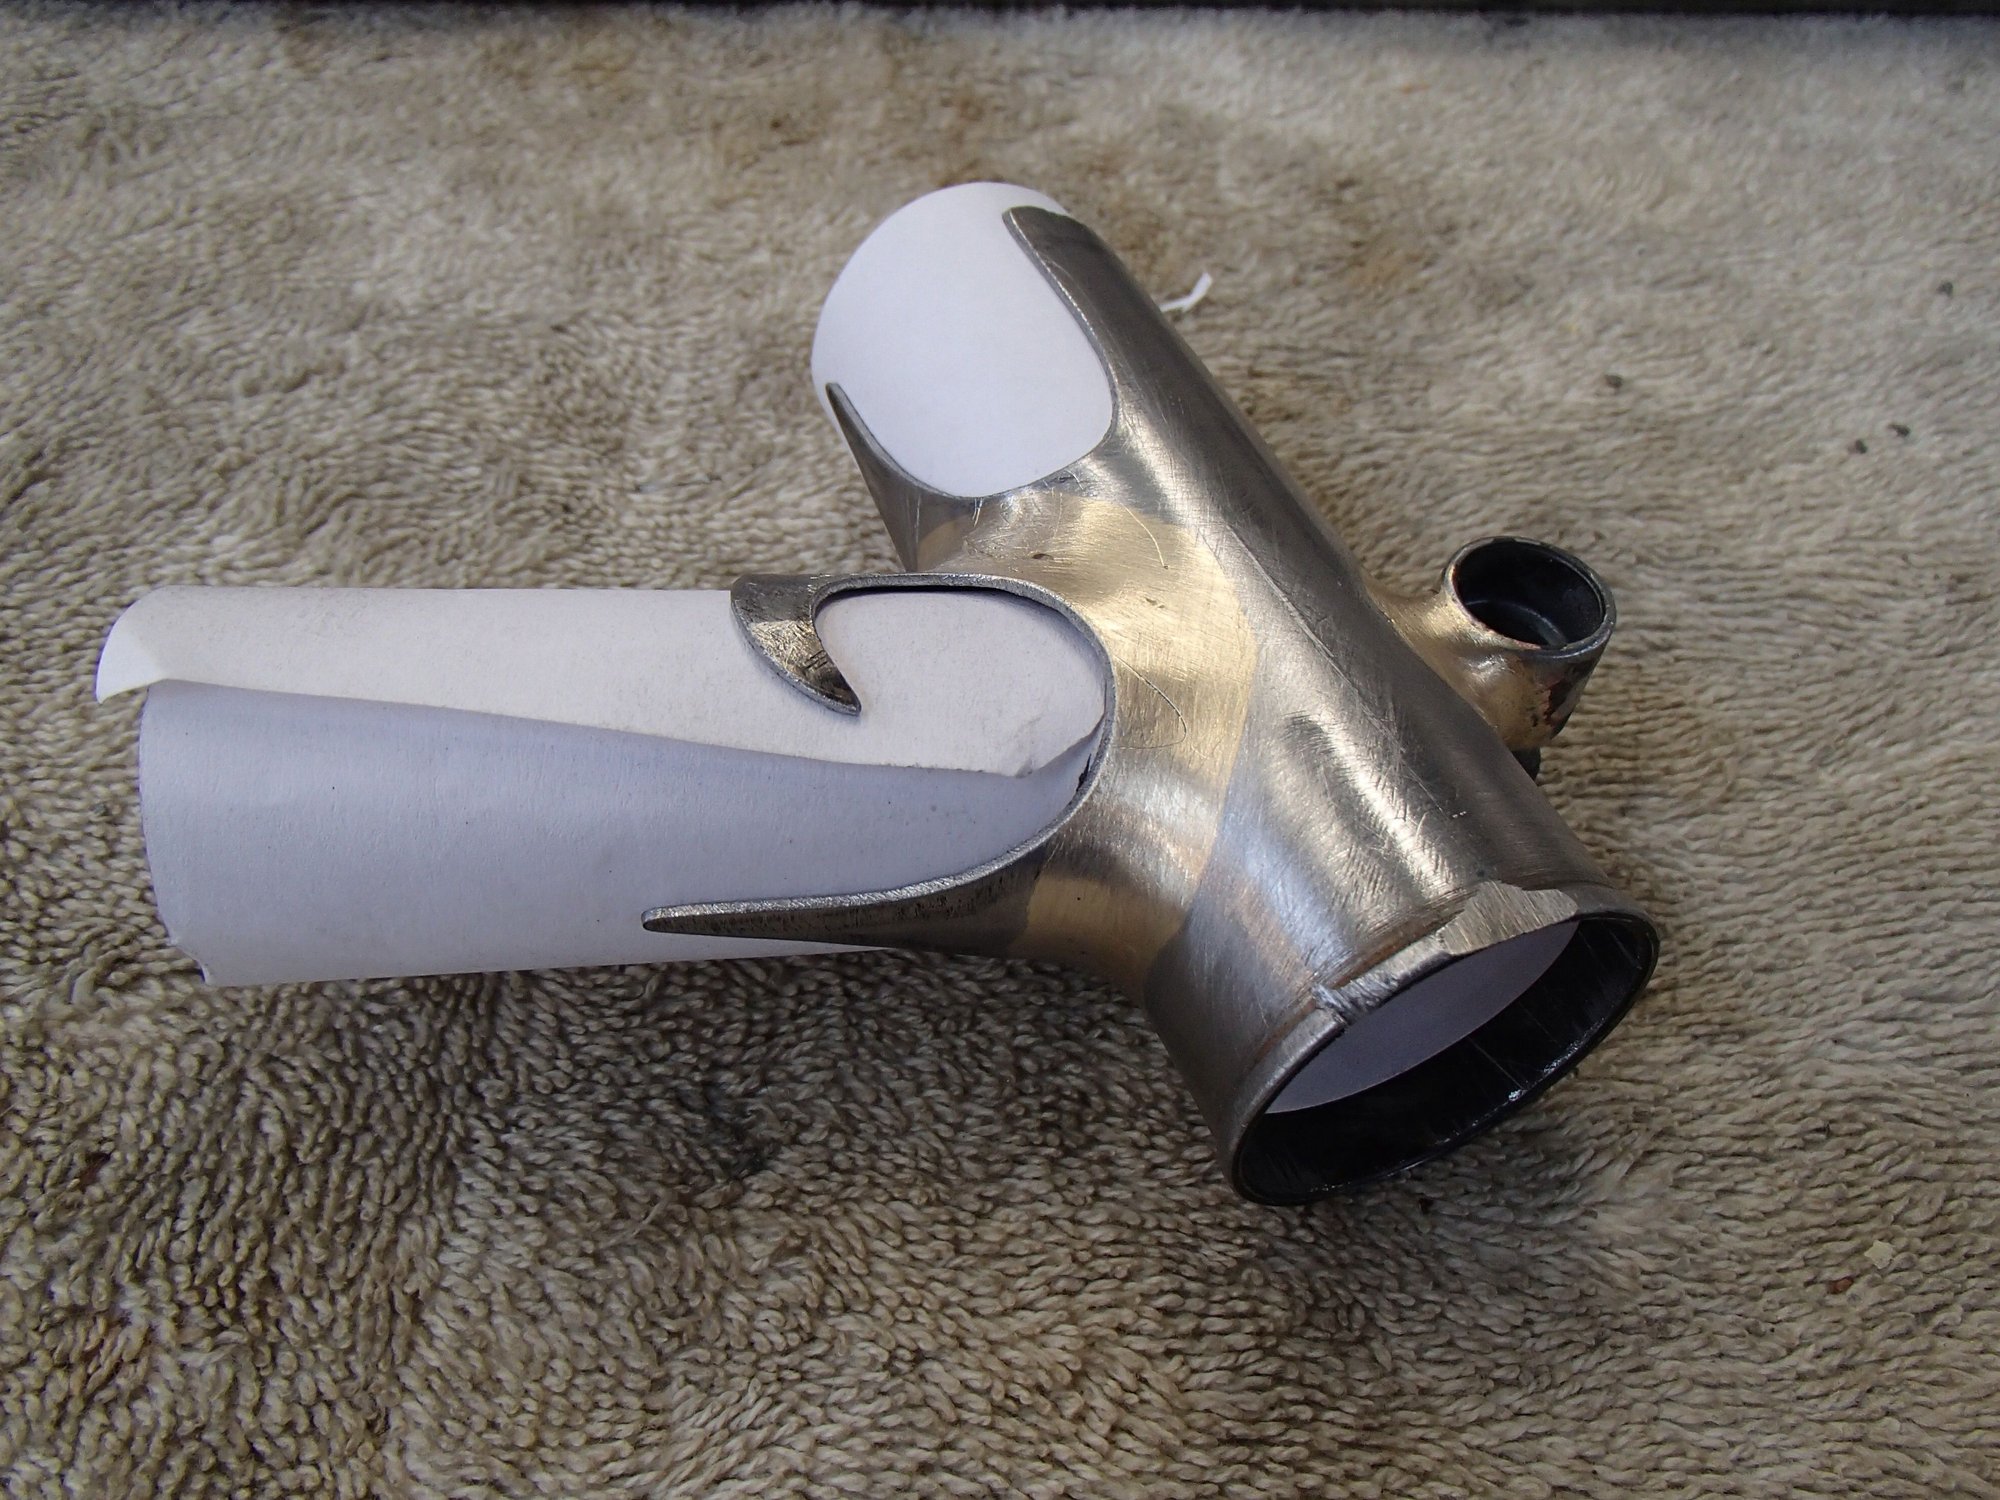
Head lugs done about 95%, enough to start the tube mitering and fit up. About 3.5 hours of cutting, grinding and filing. I'm still happy with the results. (Very important when you are not being paid). The lug shapes are not exactly what I initially was planning but once the cutting starts sometimes you just have to follow the flow. The last couple of days are the result of 4+ months of prep and thought. Glad this step is done and I can go back to "easy" steps for a while Andy

Andy
__________________
AndrewRStewart
AndrewRStewart
Likes For Andrew R Stewart:
Likes For HelpSingularity:
08-13-22, 10:43 AM
#24
Senior Member
Join Date: Aug 2012
Location: Seattle
Posts: 507
Mentioned: 0 Post(s)
Tagged: 0 Thread(s)
Quoted: 103 Post(s)
Liked 144 Times
in
88 Posts
Looking great Andrew. It looks like you're putting some blood and sweat into these!
__________________
https://www.flickr.com/photos/54319503@N05/
https://www.draper-cycles.com
https://www.flickr.com/photos/54319503@N05/
https://www.draper-cycles.com
Likes For duanedr:
08-17-22, 02:57 PM
#25
Bikeable
Join Date: Jan 2011
Posts: 326
Mentioned: 1 Post(s)
Tagged: 0 Thread(s)
Quoted: 173 Post(s)
Likes: 0
Liked 104 Times
in
73 Posts
I have made custom lugs before. I do the lay out covering the tube with masking tape and prefer a ball point pen (more precise). An easier way to do it is using a hole saw bit/ blade for the holes and disk cut/ grind/ file the points.