


What can or should I change?
 08-30-22, 02:45 PM
#1
Newbie
Thread Starter
What can or should I change?
While I've been on bikes for over 40 years, I've never really dug into components or upgrades beyond basic brakes/tuning/tires.
Now that's changing and I need help understanding how I can identify parts that fit a Shogun Custom Sport, circa 1992 (or so).
Over this last winter I dug out my old Shogun (bought in the early 90s when I had access daily to rural PA roads and not used much since I moved to DC in the mid 90s) to use on top of a smart trainer with zwift. To get it to fit, I figured out how to swap out the bolted rear hub with a quick release one to fit my trainer. Even bought and packed new bearings. Yay me.
Building on this success, I suspect I should probably look at, lube, or replace the bottom bracket (never been done) and I'd like to get new, wider handlebars (maybe even a longer post and longer brake mounts that wire underneath the bar tape). Where should I look to figure out sizes, compatibility with the frame/front fork?
For now I'm fine with friction shifters on the stem.
Anything else I should be looking at?
(Apologies if these are NOOB questions covered in a FAQ I couldn't find.)
 08-30-22, 03:00 PM
#2
se�or miembro

Join Date: Dec 2018
Location: Pac NW
Posts: 6,621
Bikes: '70s - '80s Campagnolo
Mentioned: 92 Post(s)
Tagged: 0 Thread(s)
Quoted: 3880 Post(s)
Liked 6,468 Times
in
3,200 Posts
Of the best upgrades to move your bike up to more mid-level territory, you've already completed the most difficult task, changing the rear axle to a hollow one. You realize the bb needs servicing and you should probably do the rest of it (overhaul the headset, new consumables, etc.).
Besides the axle, one of the things I used to change on these lower-level bikes is to find some $10 Suntour down tube shifters at the co-op. It's such a cleaner, more efficient look for a road bike. I do prefer non-aero brake levers, but I keep the cables low and the bikes older than '92.
Besides the axle, one of the things I used to change on these lower-level bikes is to find some $10 Suntour down tube shifters at the co-op. It's such a cleaner, more efficient look for a road bike. I do prefer non-aero brake levers, but I keep the cables low and the bikes older than '92.
Likes For SurferRosa:
08-30-22, 03:42 PM
#3
Newbie
Thread Starter
Of the best upgrades to move your bike up to more mid-level territory, you've already completed the most difficult task, changing the rear axle to a hollow one. You realize the bb needs servicing and you should probably do the rest of it (overhaul the headset, new consumables, etc.).
 I'm optimistic I can do all the things you're suggesting, and can even find the youtube videos to show me how. But how do I know which parts to get that fit? Are there guides out there, are things pretty standard back then, or is this all tribal wisdom that I need to tap into?
Besides the axle, one of the things I used to change on these lower-level bikes is to find some $10 Suntour down tube shifters at the co-op. It's such a cleaner, more efficient look for a road bike. I do prefer non-aero brake levers, but I keep the cables low and the bikes older than '92.
Also, Pixies!
Likes For 5pac3gh0st:
08-30-22, 04:05 PM
#4
se�or miembro
Join Date: Dec 2018
Location: Pac NW
Posts: 6,621
Bikes: '70s - '80s Campagnolo
Mentioned: 92 Post(s)
Tagged: 0 Thread(s)
Quoted: 3880 Post(s)
Liked 6,468 Times
in
3,200 Posts
Not sure what you mean. Easiest to focus on one component at a time, understand it, sort it, and move on to the next.
My hands can go numb too. Drop bars and appropriately positioned brake levers allow a few different hand positions, one being "on the hoods." I also have to remind myself to use my core or simply take a break.
My right hand goes numb on long rides.
Likes For SurferRosa:
08-30-22, 04:47 PM
#5
Senior Member
Join Date: Oct 2015
Location: PDX
Posts: 13,034
Bikes: Merz x 5 + Specialized Merz Allez x 2, Strawberry/Newlands/DiNucci/Ti x3, Gordon, Fuso/Moulton x2, Bornstein, Paisley,1958-74 Paramounts x3, 3rensho, 74 Moto TC, 73-78 Raleigh Pro's x5, Marinoni x2, 1960 Cinelli SC, 1980 Bianchi SC, PX-10 X 2
Mentioned: 267 Post(s)
Tagged: 0 Thread(s)
Quoted: 4510 Post(s)
Liked 6,377 Times
in
3,667 Posts
While I've been on bikes for over 40 years, I've never really dug into components or upgrades beyond basic brakes/tuning/tires.
Now that's changing and I need help understanding how I can identify parts that fit a Shogun Custom Sport, circa 1992 (or so).
Over this last winter I dug out my old Shogun (bought in the early 90s when I had access daily to rural PA roads and not used much since I moved to DC in the mid 90s) to use on top of a smart trainer with zwift. To get it to fit, I figured out how to swap out the bolted rear hub with a quick release one to fit my trainer. Even bought and packed new bearings. Yay me.
Building on this success, I suspect I should probably look at, lube, or replace the bottom bracket (never been done) and I'd like to get new, wider handlebars (maybe even a longer post and longer brake mounts that wire underneath the bar tape). Where should I look to figure out sizes, compatibility with the frame/front fork?
For now I'm fine with friction shifters on the stem.
Anything else I should be looking at?
(Apologies if these are NOOB questions covered in a FAQ I couldn't find.)
Now that's changing and I need help understanding how I can identify parts that fit a Shogun Custom Sport, circa 1992 (or so).
Over this last winter I dug out my old Shogun (bought in the early 90s when I had access daily to rural PA roads and not used much since I moved to DC in the mid 90s) to use on top of a smart trainer with zwift. To get it to fit, I figured out how to swap out the bolted rear hub with a quick release one to fit my trainer. Even bought and packed new bearings. Yay me.
Building on this success, I suspect I should probably look at, lube, or replace the bottom bracket (never been done) and I'd like to get new, wider handlebars (maybe even a longer post and longer brake mounts that wire underneath the bar tape). Where should I look to figure out sizes, compatibility with the frame/front fork?
For now I'm fine with friction shifters on the stem.
Anything else I should be looking at?
(Apologies if these are NOOB questions covered in a FAQ I couldn't find.)

We always need pics (or it didn't happen
 ) and they will really help us help you.
You need 5 posts X 2 days for 10 to post them here, you can also add them to an album on your homepage and they may get moved here.
08-30-22, 05:32 PM
#6
Senior Member
Join Date: Dec 2020
Location: Wake Forest, NC
Posts: 5,779
Bikes: 1989 Cinelli Supercorsa
Mentioned: 11 Post(s)
Tagged: 0 Thread(s)
Quoted: 3502 Post(s)
Liked 2,921 Times
in
1,774 Posts
If you�ve swapped the solid axle for a QR one, successfully, then you may well be on your way. Figure out what you want to upgrade, and why. I spent most of the pandemic upgrading bits and pieces of my bike, from bearings to derailleurs to handlebar tape. Some upgrades were for lighter parts, some for better performance and some for better looks.
Likes For smd4:
08-31-22, 03:20 PM
#7
Newbie
Thread Starter
So, for example, let's take my bottom bracket on this bike. It's pre-internet, so how do I know which one I should buy if I need to replace parts? Is there a database for that? Also, I've read that if there's any unusual movement in the pedals it will indicate a problem (mine don't exhibit this) are there other indicators or is it just best practice to take it apart and degrease/grease everything up ever few years?
And for the handlebars... I'm pretty sure I want to get wider ones. Also, pretty sure I have a "threaded" type of headset. Will most newer drop bars seat properly in this older stem? Should I upgrade this part too at this point?
I have a pic, but apparently can't attach?
And for the handlebars... I'm pretty sure I want to get wider ones. Also, pretty sure I have a "threaded" type of headset. Will most newer drop bars seat properly in this older stem? Should I upgrade this part too at this point?
I have a pic, but apparently can't attach?
08-31-22, 06:05 PM
#8

Senior Member
Join Date: Oct 2005
Location: Upper Left, USA
Posts: 1,915
Mentioned: 50 Post(s)
Tagged: 0 Thread(s)
Quoted: 634 Post(s)
Liked 444 Times
in
298 Posts
So, for example, let's take my bottom bracket on this bike. It's pre-internet, so how do I know which one I should buy if I need to replace parts? Is there a database for that? Also, I've read that if there's any unusual movement in the pedals it will indicate a problem (mine don't exhibit this) are there other indicators or is it just best practice to take it apart and degrease/grease everything up ever few years?
And for the handlebars... I'm pretty sure I want to get wider ones. Also, pretty sure I have a "threaded" type of headset. Will most newer drop bars seat properly in this older stem? Should I upgrade this part too at this point?
I have a pic, but apparently can't attach?
And for the handlebars... I'm pretty sure I want to get wider ones. Also, pretty sure I have a "threaded" type of headset. Will most newer drop bars seat properly in this older stem? Should I upgrade this part too at this point?
I have a pic, but apparently can't attach?
Likes For tricky:
08-31-22, 06:31 PM
#9
Senior Member
Join Date: Dec 2020
Location: Wake Forest, NC
Posts: 5,779
Bikes: 1989 Cinelli Supercorsa
Mentioned: 11 Post(s)
Tagged: 0 Thread(s)
Quoted: 3502 Post(s)
Liked 2,921 Times
in
1,774 Posts
So, for example, let's take my bottom bracket on this bike. It's pre-internet, so how do I know which one I should buy if I need to replace parts? Is there a database for that? Also, I've read that if there's any unusual movement in the pedals it will indicate a problem (mine don't exhibit this) are there other indicators or is it just best practice to take it apart and degrease/grease everything up ever few years?
And for the handlebars... I'm pretty sure I want to get wider ones. Also, pretty sure I have a "threaded" type of headset. Will most newer drop bars seat properly in this older stem? Should I upgrade this part too at this point?
I have a pic, but apparently can't attach?
And for the handlebars... I'm pretty sure I want to get wider ones. Also, pretty sure I have a "threaded" type of headset. Will most newer drop bars seat properly in this older stem? Should I upgrade this part too at this point?
I have a pic, but apparently can't attach?
Same with pedals, headsets, stems and bars. Bars come in different diameters. You can get a head start before you can post pictures by getting a good caliper and measuring the bar diameter at the clamp for yourself. When you know that diameter (down to the 1/10 mm) you can measure the bar width at the ends (cm, center to center). Then you can start looking for replacements. Check out Cinelli, 3TTT, Nitto and others.
If you want to wrap the brake cable under the bar tape you may need different brake levers. If you go this route, you will need new cables and bar tape. You can start looking for bar tape you like now. It comes in a million different colors and textures and prices, from real leather to cloth to plastic.
Like I said, one of the most important questions is why do you want to replace something? Is it for cosmetic or performance reasons? After we know that, better suggestions can be offered.
08-31-22, 07:16 PM
#10
Senior Member

Join Date: Jun 2018
Location: The Urban Shores Of Michigami
Posts: 1,749
Bikes: ........................................ .....Holdsworth "Special"..... .......Falcon "Special".......... .........Miyata 912........... ........................................
Mentioned: 11 Post(s)
Tagged: 0 Thread(s)
Quoted: 702 Post(s)
Liked 672 Times
in
420 Posts
........ I need help understanding how I can identify parts that fit a Shogun Custom Sport, circa 1992 (or so).
.......I suspect I should probably look at, lube, or replace the bottom bracket (never been done) and I'd like to get new, wider handlebars (maybe even a longer post and longer brake mounts that wire underneath the bar tape). Where should I look to figure out sizes, compatibility with the frame/front fork?
"Replace the bottom bracket"........probably not necessary, just remove it, clean the old grease off and repack it with an appropriate grease
"Wider handlebars"....... should be no problem
"Longer brake mounts that wire underneath the bar tape".......I'm guessing you'll need "Aero" type brake levers to accomplish this
The most effective "upgrade" you can do to any old road bike is to completely overhaul it. Bottom Bracket, Headset, Hubs, Derailleurs, Brakes, Freewheel, Chain and anything else that can be removed, cleaned and relubed...... should be.
Likes For branko_76:
08-31-22, 07:46 PM
#11

Thrifty Bill

Join Date: Jan 2008
Location: Mountains of Western NC
Posts: 23,524
Bikes: 86 Katakura Silk, 87 Prologue X2, 88 Cimarron LE, 1975 Sekai 4000 Professional, 73 Paramount, plus more
Mentioned: 96 Post(s)
Tagged: 0 Thread(s)
Quoted: 1236 Post(s)
Liked 964 Times
in
628 Posts
Measure twice, order once. Make friends at the local bike shop, and work with them. For the added mark up on parts, you get advice. Buying stuff on the web is best suited for someone who knows EXACTLY what they want. Shops are useful!
I remember a guy who worked at the local hospital who would come in to the shop and complain about prices! Meanwhile, the same hospital charges $25 for an aspirin...... The bike shop business is a tough grind. Its OK to give them some business. Now some shops don't like older bikes. One shop in my area told me any bike over 5 years old was obsolete! So I took my business elsewhere.
If you like doing the work yourself, find a local co-op and see if they loan tools. Some charge for bench time, every co op is different. Bike tools tend to pay for themselves by the second, third or fourth use. The first time, not so much.
Where you look for parts sizing is your bike in front of you. Get a decent digital caliper and measure stuff. A good enough digital caliper can be purchased at Harbor Freight for about $20.
Likes For wrk101:
08-31-22, 08:21 PM
#12
Senior Member

Join Date: Mar 2015
Location: Texas panhandle
Posts: 512
Bikes: 1987 Schwinn Circuit, 1986 Schwinn Passage, 1987 Shogun Katana, 2018 Giant Anyroad Advanced, 2013 Karate Monkey
Mentioned: 15 Post(s)
Tagged: 0 Thread(s)
Quoted: 125 Post(s)
Liked 269 Times
in
93 Posts
Definitely find a co-op to learn from. I find overhauling bikes very satisfying and have invested in a few specialty tools that a co-op should have for you to use. Keep a note of any tools you might want to pick up for your personal tool box, definitely start with a caliper I've had a cheap Harbor Freight digital one that works great and is just as accurate as the more expensive ones we used at work.
An extremely useful skill to learn is wheel truing. I am stumbling along learning how and would love if there was someone close I could learn from.
An extremely useful skill to learn is wheel truing. I am stumbling along learning how and would love if there was someone close I could learn from.
Likes For Rotten:
08-31-22, 08:21 PM
#13
Newbie
Thread Starter
Such a bunch of super helpful replies. May major takeaways so far are:
Finally, knowing my intended use would be helpful: this bike was hanging from my ceiling in the basement for roughly 20 years when I pulled it out on a whim to rehab for a ride with friends on a local rail trail. Replaced the tires, tape, brakes, lubed everything and had an ok ride. A couple years later covid happened and I needed a way to stay in shape indoors (my locals were yelling a bikers on the path who were unmasked). I got a trainer and this became the bike that went on it. Now, that I've been exploring more on my commuter bike (another mid 90's classic�a bianchi ocelot) I've come to the conclusion that it would be fun to rehab this bike to ride the local trail systems. Not quite a gravel upgrade but certainly approaching it. It's a cro-moly frame. Japanese manufactured (I think).
Thank you all for the kind introduction to the boards here and I'll be back with pics and a set of calipers.
- Ask questions but be clear and detailed and when your account supports uploading photos, do so and I'll get a specific response.
- Be more outgoing with local shops. There's one near me that did me a sold recently on a mountain bike�I could ask them about something about older bikes.
- Co-ops sound cool. I should check and see if there's one nearby.
- I should get myself a set of calipers and that's how I can make sure things fit (duh).
- sheldon brown has a pretty good website with lots of information
Finally, knowing my intended use would be helpful: this bike was hanging from my ceiling in the basement for roughly 20 years when I pulled it out on a whim to rehab for a ride with friends on a local rail trail. Replaced the tires, tape, brakes, lubed everything and had an ok ride. A couple years later covid happened and I needed a way to stay in shape indoors (my locals were yelling a bikers on the path who were unmasked). I got a trainer and this became the bike that went on it. Now, that I've been exploring more on my commuter bike (another mid 90's classic�a bianchi ocelot) I've come to the conclusion that it would be fun to rehab this bike to ride the local trail systems. Not quite a gravel upgrade but certainly approaching it. It's a cro-moly frame. Japanese manufactured (I think).
Thank you all for the kind introduction to the boards here and I'll be back with pics and a set of calipers.
09-09-22, 04:23 PM
#14
Newbie
Thread Starter
OK... calipers acquired. I'd be looking for a 25.4mm drop bar based in my current setup. Looking at what's widely avalable, it looks like I'd only gain about 2 inches in width (max) by upgrading my bars. So for the time being I just got new brake levers and tape and called it a day.
Here's what I'm looking at for the bike. What else would you touch after basic maintenance? What should I avoid?
I intend to occasionally use this on paved and gravel trails around the DC area. Not much road riding. I will also continue to use it as the primary crank for my smart trainer in the winter. I have another bike for commuting and a mountain bike for serious trails.

Shogun Custom Sport

Headset Front

Headset and shifters

bottom bracket

rear hub

Crank set and front shifter

rear cassette and shifter

top view of rear hub
Here's what I'm looking at for the bike. What else would you touch after basic maintenance? What should I avoid?
I intend to occasionally use this on paved and gravel trails around the DC area. Not much road riding. I will also continue to use it as the primary crank for my smart trainer in the winter. I have another bike for commuting and a mountain bike for serious trails.
Shogun Custom Sport
Headset Front
Headset and shifters
bottom bracket
rear hub
Crank set and front shifter
rear cassette and shifter
top view of rear hub
Likes For 5pac3gh0st:
09-09-22, 05:28 PM
#15
Senior Member
Join Date: Dec 2020
Location: Wake Forest, NC
Posts: 5,779
Bikes: 1989 Cinelli Supercorsa
Mentioned: 11 Post(s)
Tagged: 0 Thread(s)
Quoted: 3502 Post(s)
Liked 2,921 Times
in
1,774 Posts
Looks like the front brake was adjusted with the quick release in the �open� position. Can�t see the rear brake.
Likes For smd4:
09-09-22, 05:44 PM
#16
Senior Member
Join Date: Jun 2018
Location: The Urban Shores Of Michigami
Posts: 1,749
Bikes: ........................................ .....Holdsworth "Special"..... .......Falcon "Special".......... .........Miyata 912........... ........................................
Mentioned: 11 Post(s)
Tagged: 0 Thread(s)
Quoted: 702 Post(s)
Liked 672 Times
in
420 Posts
The rear derailleur hanger is missing the attaching bolt, that will be a problem when removing the rear wheel.
When posting photos of the bike, it's a good idea to include an overall photo of the drive side.
When posting photos of the bike, it's a good idea to include an overall photo of the drive side.
09-09-22, 06:17 PM
#17
The Wheezing Geezer

Join Date: Oct 2021
Location: Espa�ola, NM
Posts: 1,052
Bikes: 1976 Fredo Speciale, Jamis Citizen 1, Ellis-Briggs FAVORI, Rivendell Clem Smith Jr.
Mentioned: 1 Post(s)
Tagged: 0 Thread(s)
Quoted: 414 Post(s)
Liked 910 Times
in
445 Posts
Congratulations for making use of a perfectly good machine. The only thing that makes bikes like yours obsolete is neglect.
Ride on!
Ride on!
Likes For Fredo76:
09-11-22, 03:14 PM
#18
Newbie
Thread Starter
It's entirely possible I've done the front brake adjustment wrong, but when I flip the switch on the brakes to "open" them and let the wheel come off, it's in the other position... what's in these photos is "closed". Are you saying that you see something that indicates I should adjust them in some way? Thanks!
09-11-22, 03:23 PM
#19
Newbie
Thread Starter
Great tip, thanks!
09-11-22, 04:07 PM
#20
Full Member
See this page about hub widths. I wonder if your rear QR skewer is designed for 130 mm (or even 135 mm); and if it is, whether it's simply too long for your purpose.
Where I happen to live, QR skewers for 126 mm (let alone 120 mm) wouldn't be stocked by any normal bike store. (I think I'd have to rummage around in a bike flea-market.)
Where I happen to live, QR skewers for 126 mm (let alone 120 mm) wouldn't be stocked by any normal bike store. (I think I'd have to rummage around in a bike flea-market.)
Last edited by microcord; 09-11-22 at 04:19 PM.
09-11-22, 04:10 PM
#21
Senior Member
Join Date: Dec 2020
Location: Wake Forest, NC
Posts: 5,779
Bikes: 1989 Cinelli Supercorsa
Mentioned: 11 Post(s)
Tagged: 0 Thread(s)
Quoted: 3502 Post(s)
Liked 2,921 Times
in
1,774 Posts
See this page about hub widths. I wonder if your rear QR skewer is designed for 130 mm (or even 135 mm); and if it is, whether it's simply too long for your purpose.
Likes For smd4:
09-11-22, 04:12 PM
#22
Senior Member
Join Date: Dec 2020
Location: Wake Forest, NC
Posts: 5,779
Bikes: 1989 Cinelli Supercorsa
Mentioned: 11 Post(s)
Tagged: 0 Thread(s)
Quoted: 3502 Post(s)
Liked 2,921 Times
in
1,774 Posts
It's entirely possible I've done the front brake adjustment wrong, but when I flip the switch on the brakes to "open" them and let the wheel come off, it's in the other position... what's in these photos is "closed". Are you saying that you see something that indicates I should adjust them in some way? Thanks!
Likes For smd4:
09-11-22, 04:22 PM
#23
Full Member
09-11-22, 04:29 PM
#24
Senior Member
Join Date: Dec 2020
Location: Wake Forest, NC
Posts: 5,779
Bikes: 1989 Cinelli Supercorsa
Mentioned: 11 Post(s)
Tagged: 0 Thread(s)
Quoted: 3502 Post(s)
Liked 2,921 Times
in
1,774 Posts
09-11-22, 06:01 PM
#25
Senior Member
Join Date: Jan 2004
Location: Madison, WI USA
Posts: 6,154
Mentioned: 50 Post(s)
Tagged: 0 Thread(s)
Quoted: 2363 Post(s)
Liked 1,749 Times
in
1,191 Posts
The original hub was solid with nuts holding it on. Maybe I lost something when I upgraded it to quick release. I freely admit that keeping the quick release parts together is a balancing act I don't enjoy. The derailleur hanger being held in position by the QR skewer requires very careful alignment and may even be contributing to the lack of clamping force on that side of the hub. When I ride hard, the rear wheel displaces over time, eventually rubbing the frame. The force from the chain is strong enough to pull that side of the hub forward in tiny increments over the course of a ride. I wish I had a solution for this—I've cranked down the QR skewer as tight as I can get it. Maybe drilling a hole in my frame to attach the derailleur hanger with a bolt would help? Or maybe I need a new hanger?
Having the claw at that angle may also affect the shifting, as it changes the angluar position of the stop that the B-screw (or fixed swing stop) on the derailleur hits.
Getting that right *MIGHT* (but I wouldn't bet on it) resolve the issue of the QR not really reefing down properly to hold the wheel tight. But if it doesn't, the other likely culprit is that the axle itself (NOT the skewer) is too long, possibly for a 130 or 135mm application. When the wheel is off, look at how much axle is exposed beyond the locknuts. It should be LESS than the thickness of the dropouts. Well, on the drive side, you can actually count the thickness of the dropout plus the claw. This is especially likely with the thin stamped dropouts your bike has. If it turns out you have too much exposed on the non-drive side, but you have some leeway on the drive side (because of the extra thickness the claw constitutes), you could possibly "shift" the axle relative to the locknuts, so there's less exposed on the non-drive side, and more exposed on the drive side. But if you still have any axle protruding beyond the outsides of the dropouts/claw, you'll have to cut or file the axle.
Edit -- where are my manners? Just remembered I recently (which explains the crud factor, in advance of any peanut gallery comments...) bought an '80s Ross similarly equipped. Pics will speak many more words:

This is how the claw should be mounted on the dropout
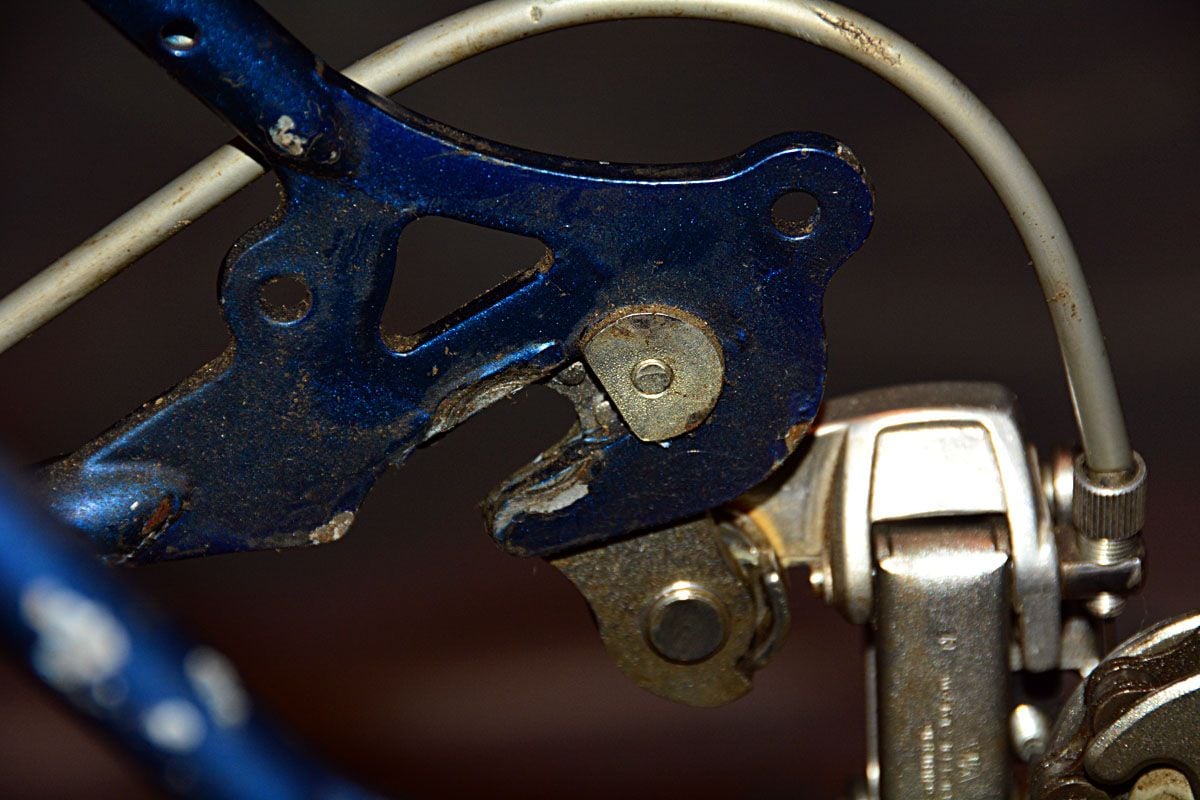
This is the nut I referred to, that the claw screw fastens to

Less axle exposure on the non-drive side

More axle exposure on the drive side; the combined thickness of the dropout and claw allow for this
Last edited by madpogue; 09-11-22 at 06:45 PM.