


Has anyone here done any box-lining?
 09-20-22, 09:11 PM
#1

vintage motor
Thread Starter

Join Date: Sep 2008
Location: Tepic, Nayarit, Mexico
Posts: 1,593
Bikes: 48 Automoto, 49 Stallard, 50 Rotrax, 62 Jack Taylor, 67 Atala, 68 Lejeune, 72-74-75 Motobecanes, 73 RIH, 71 Zieleman, 74 Raleigh, 78 Windsor, 83 Messina (Villata), 84 Brazzo (Losa), 85 Davidson, 90 Diamondback, 92 Kestrel
Mentioned: 6 Post(s)
Tagged: 0 Thread(s)
Quoted: 163 Post(s)
Likes: 0
Liked 101 Times
in
78 Posts
Has anyone here done any box-lining?
I am about to embark on refinishing a frame that had quite a bit of box-lining. I would like to reproduce it but don't really know how. I have done a lot of lug outlining, but painting a thin, straight line is a different matter. I remember watching a Raleigh documentary, where the painter had a set of jigs and could box-line an entire frame in a few minutes. Any ideas or experiences?
 09-20-22, 09:20 PM
#2
Senior Member
Join Date: Oct 2020
Location: Phoenix, AZ
Posts: 905
Bikes: 1964(?) Frejus Tour de France, 1967(?) Dawes Double Blue, 1979 Trek 710, 1982 Claud Butler Dalesman, 1983 Schwinn Paramount Elite, 2014 Brompton, maybe a couple more
Mentioned: 8 Post(s)
Tagged: 0 Thread(s)
Quoted: 310 Post(s)
Liked 677 Times
in
329 Posts
Andy Antipas posted this thread in C&V sales recently: https://www.bikeforums.net/classic-v...andonneur.html
Maybe he will get the bat signal.
Maybe he will get the bat signal.
09-20-22, 09:57 PM
#3
Senior Member
Join Date: Oct 2015
Location: PDX
Posts: 13,033
Bikes: Merz x 5 + Specialized Merz Allez x 2, Strawberry/Newlands/DiNucci/Ti x3, Gordon, Fuso/Moulton x2, Bornstein, Paisley,1958-74 Paramounts x3, 3rensho, 74 Moto TC, 73-78 Raleigh Pro's x5, Marinoni x2, 1960 Cinelli SC, 1980 Bianchi SC, PX-10 X 2
Mentioned: 267 Post(s)
Tagged: 0 Thread(s)
Quoted: 4510 Post(s)
Liked 6,374 Times
in
3,666 Posts
I am about to embark on refinishing a frame that had quite a bit of box-lining. I would like to reproduce it but don't really know how. I have done a lot of lug outlining, but painting a thin, straight line is a different matter. I remember watching a Raleigh documentary, where the painter had a set of jigs and could box-line an entire frame in a few minutes. Any ideas or experiences?

Eastwood sells kits with guides.
https://www.eastwood.com/paints/pins...SAAEgIaqPD_BwE
09-20-22, 10:13 PM
#4
Friendship is Magic

Join Date: Nov 2010
Location: Sacramento, CA
Posts: 22,984
Bikes: old ones
Mentioned: 304 Post(s)
Tagged: 0 Thread(s)
Quoted: 26389 Post(s)
Liked 10,365 Times
in
7,197 Posts
1. doing box lining by hand is a lot harder than you might suppose.
2. on the couple of occasions I've done something on a frame repaint that required long straight lines, I just bought vinyl decals and put them on at the same time as the other decals. Then I just cleared over everything with urethane 2 stage paint.
Do a couple of searches on Amazon for "pinstriping decals" if you are interested in this approach. ...here's one result
__________________
 09-20-22, 10:17 PM
#5
Senior Member

Join Date: Aug 2016
Location: Visalia, CA
Posts: 2,249
Mentioned: 45 Post(s)
Tagged: 0 Thread(s)
Quoted: 981 Post(s)
Liked 1,844 Times
in
609 Posts
A lot of guys who did it professionally were using striping tools with roller heads like those made by Beugler. A documentary on the Taylor bothers at Jack Taylor in the '80s covered this a bit and that was their preferred method. I've used one before and it's pretty simple and competent compared to a brush...
-Gregory
-Gregory
09-21-22, 12:06 AM
#6
Senior Member

Join Date: Sep 2009
Location: Corvallis, OR
Posts: 1,234
Mentioned: 39 Post(s)
Tagged: 0 Thread(s)
Quoted: 174 Post(s)
Liked 243 Times
in
114 Posts
I've mostly heard this was the one to get.
The 4 minute video at the bottom of the page is gold for technique and application.
The 4 minute video at the bottom of the page is gold for technique and application.
__________________
The Simplicity of Vintage Cycles
The Simplicity of Vintage Cycles
Last edited by The Thin Man; 09-21-22 at 12:10 AM.
09-21-22, 05:02 AM
#7
...
Join Date: Oct 2021
Location: Whitestone and Rensselaerville, New York
Posts: 1,494
Bikes: Bicycles? Yup.
Mentioned: 8 Post(s)
Tagged: 0 Thread(s)
Quoted: 477 Post(s)
Liked 1,559 Times
in
727 Posts
I used pinstriping masking tape and paint;
https://www.xcaliberart.com/product/...-stencil-tape/
https://www.xcaliberart.com/product/...-stencil-tape/
09-21-22, 05:31 AM
#8
Senior Member
Join Date: Dec 2016
Posts: 586
Mentioned: 12 Post(s)
Tagged: 0 Thread(s)
Quoted: 191 Post(s)
Liked 564 Times
in
196 Posts
There is a video on YouTube of Jack Taylor box lining a frame (among other things in the video of the routine events in the shop). Well worth looking up and watching. As I recall the tools were old paint wheels, but it was clear that there was a LOT of skill and practice involved.
09-21-22, 06:34 AM
#9
Full Member
Join Date: Sep 2011
Location: Durango, CO
Posts: 493
Bikes: too many old steel bikes
Mentioned: 73 Post(s)
Tagged: 0 Thread(s)
Quoted: 136 Post(s)
Liked 938 Times
in
176 Posts
box lining
I gotta go to work, but will respond tonight. I don't do it the traditional way.
Paging @Andy Antipas
Eastwood sells kits with guides.
https://www.eastwood.com/paints/pins...SAAEgIaqPD_BwE
Eastwood sells kits with guides.
https://www.eastwood.com/paints/pins...SAAEgIaqPD_BwE
Likes For Andy Antipas:
09-21-22, 09:48 AM
#10
Senior Member
I've done a lot of detailed work in my days.
I would NOT attempt to box line or pin stripe with a hand held brush.
I would NOT attempt to box line or pin stripe with a hand held brush.
09-21-22, 10:38 AM
#11
vintage motor
Thread Starter
Join Date: Sep 2008
Location: Tepic, Nayarit, Mexico
Posts: 1,593
Bikes: 48 Automoto, 49 Stallard, 50 Rotrax, 62 Jack Taylor, 67 Atala, 68 Lejeune, 72-74-75 Motobecanes, 73 RIH, 71 Zieleman, 74 Raleigh, 78 Windsor, 83 Messina (Villata), 84 Brazzo (Losa), 85 Davidson, 90 Diamondback, 92 Kestrel
Mentioned: 6 Post(s)
Tagged: 0 Thread(s)
Quoted: 163 Post(s)
Likes: 0
Liked 101 Times
in
78 Posts
Thanks for the replies. The Beugler kit is too expensive for me, although if I was doing this on a regular basis it would be perfect. Masking would work just fine, although it would be very time-consuming. I have done a bit of that, painting narrow seat tube bands and the borders of seat stay caps. On this frame I am already looking at a big job masking and/or outling the fancy head lugs. The pinstriping tape sounds like the simplest solution, it's not paint but under a couple coats of clear would probably look just fine.
Andy, that is a beautiful restoration on your Peugeot. I can�t believe you're selling it--if I put that much work into a bike and got such a nice result, it would definitely be a keeper.
My frame is a 1948 Automoto. It has some of its original parts, and I plan to do something along the lines of Andy's restoration: 650B wheels and fenders, some period components along with some newer parts as long as they blend in well. Here it is, you can see the remains of the original pinstriping in several places:
https://www.flickr.com/photos/476463...57629536444570
09-21-22, 02:12 PM
#12
Senior Member

Join Date: Mar 2014
Location: City of Angels
Posts: 4,870
Bikes: A few too many
Mentioned: 42 Post(s)
Tagged: 1 Thread(s)
Quoted: 1364 Post(s)
Liked 2,178 Times
in
1,182 Posts
I have used these 2 along with a stripping brush with good results. For me the large nib Kohinoor ink nibs are nice. They have an offset nib to barrel, so when making a paint lines you can use a thin piece of chip board as a guide for the stipe. The offset wont let the paint run under the edge etc. You will need to find the larger nibs and thin the paint a lot in order to gat it to flow. The Kemper might also be useful. see the pics for both.
If you have a steady hand (which I use to have) a pin-striper brush with guide would be the way to go because you can vary the lines width with up or down pressure on the brush.....either way practice practice practice.
BTW, I have sed "1 Shot " paint that is really thinned for application.
Here is a vid

Note the offset on the nib

Kemper is similar but a higher offset than the K

1 shot with stripe brushes
Best, Ben
BTW, If you want to cheat...theres alway pin striping tape...stick adhesive and go.
If you have a steady hand (which I use to have) a pin-striper brush with guide would be the way to go because you can vary the lines width with up or down pressure on the brush.....either way practice practice practice.
BTW, I have sed "1 Shot " paint that is really thinned for application.
Here is a vid
Note the offset on the nib
Kemper is similar but a higher offset than the K
1 shot with stripe brushes
Best, Ben
BTW, If you want to cheat...theres alway pin striping tape...stick adhesive and go.
__________________
"EVERY PERSON IS GUILTY OF ALL THE GOOD THEY DID NOT DO"
Voltaire
Voice recognition may sometimes create odd spelling and grammatical errors
"EVERY PERSON IS GUILTY OF ALL THE GOOD THEY DID NOT DO"
Voltaire
Voice recognition may sometimes create odd spelling and grammatical errors
09-21-22, 03:00 PM
#13
Senior Member

Join Date: Jun 2006
Location: NW Burbs, Chicago
Posts: 12,047
Mentioned: 201 Post(s)
Tagged: 0 Thread(s)
Quoted: 3011 Post(s)
Liked 3,788 Times
in
1,405 Posts
Pay a guy/gal.
Why would anyone think this is easy or cheap?
Why would anyone think this is easy or cheap?
09-21-22, 03:17 PM
#14
Senior Member
Join Date: Aug 2016
Location: Visalia, CA
Posts: 2,249
Mentioned: 45 Post(s)
Tagged: 0 Thread(s)
Quoted: 981 Post(s)
Liked 1,844 Times
in
609 Posts
Although I posted above I failed to mention that I have tried my hand at it, and was going for a more pronounced, heavy line like I'd seen on some early-20th century bicycles. If I were to do it again on one of my current mid-century British frames I'd try it with a lot more finesse. I masked off the lines and filled them in with a brush to achieve this result. Bar purchasing a Beugler kit (I actually used to own one and never got around to using it before moving it along) I'd try the same method again with thinner lines as well. Such a thing would be impossible to freehand without extensive pinstriping experience or a lifetime without coffee.
-Gregory


-Gregory
Likes For Kilroy1988:
09-21-22, 06:52 PM
#15
Full Member
Join Date: Sep 2011
Location: Durango, CO
Posts: 493
Bikes: too many old steel bikes
Mentioned: 73 Post(s)
Tagged: 0 Thread(s)
Quoted: 136 Post(s)
Liked 938 Times
in
176 Posts
box lining method
I have carried out box lining on freshly powder coated frames. I use 1000 grit wet/dry paper and very gently remove some of the shine so the paint will be able to adhere to the finish. Then I use 3M Precision masking tape in one inch and half inch widths. I mask out the areas I want to paint by eye and I try to utilize the width of the tape to minimize me having to cut the tape with razor blades or scissors. I do not use a ruler to check line width and do it all by eye. Once I have the "box" masked out I use my airbrush to apply the paint. It usually takes 2 or three light coats to get decent coverage. I usually give the final coat of paint a half hour or so to dry a bit and then I carefully remove the tape. However, on the PL-50, which was my first attempt at box lining, I used a small paint brush, which I think gives a more authentic period finish, but I went to the airbrush on the other two frames.
I have painted box lining on three different frames now and depending on how much lining I want it usually takes me a week to finish box lining a frame working on it a couple of hours a night, This process takes a lot longer than it took the Ken Taylor to hand paint their box lining, which he could do in a matter of minutes. I have tried using a buegler pin striping tool, but I didn't have the patience to give myself the time needed to become proficient at using the tool. I remember Bob Freeman telling me that he showed Ken one of the frames his old bike shop (Elliott Bay Cycles) restored. Ken said Bob's box lining restoration was way better than what he did by hand! Here are the three bikes.

1957 Peugeot PL-50

1969 Urago
1972 Moto-Gugie Grand Record conversion
I have painted box lining on three different frames now and depending on how much lining I want it usually takes me a week to finish box lining a frame working on it a couple of hours a night, This process takes a lot longer than it took the Ken Taylor to hand paint their box lining, which he could do in a matter of minutes. I have tried using a buegler pin striping tool, but I didn't have the patience to give myself the time needed to become proficient at using the tool. I remember Bob Freeman telling me that he showed Ken one of the frames his old bike shop (Elliott Bay Cycles) restored. Ken said Bob's box lining restoration was way better than what he did by hand! Here are the three bikes.
1957 Peugeot PL-50
1969 Urago
1972 Moto-Gugie Grand Record conversion
Likes For Andy Antipas:
09-23-22, 06:12 AM
#16
Senior Member
Join Date: Feb 2020
Posts: 2,813
Mentioned: 49 Post(s)
Tagged: 0 Thread(s)
Quoted: 1105 Post(s)
Likes: 0
Liked 1,326 Times
in
782 Posts
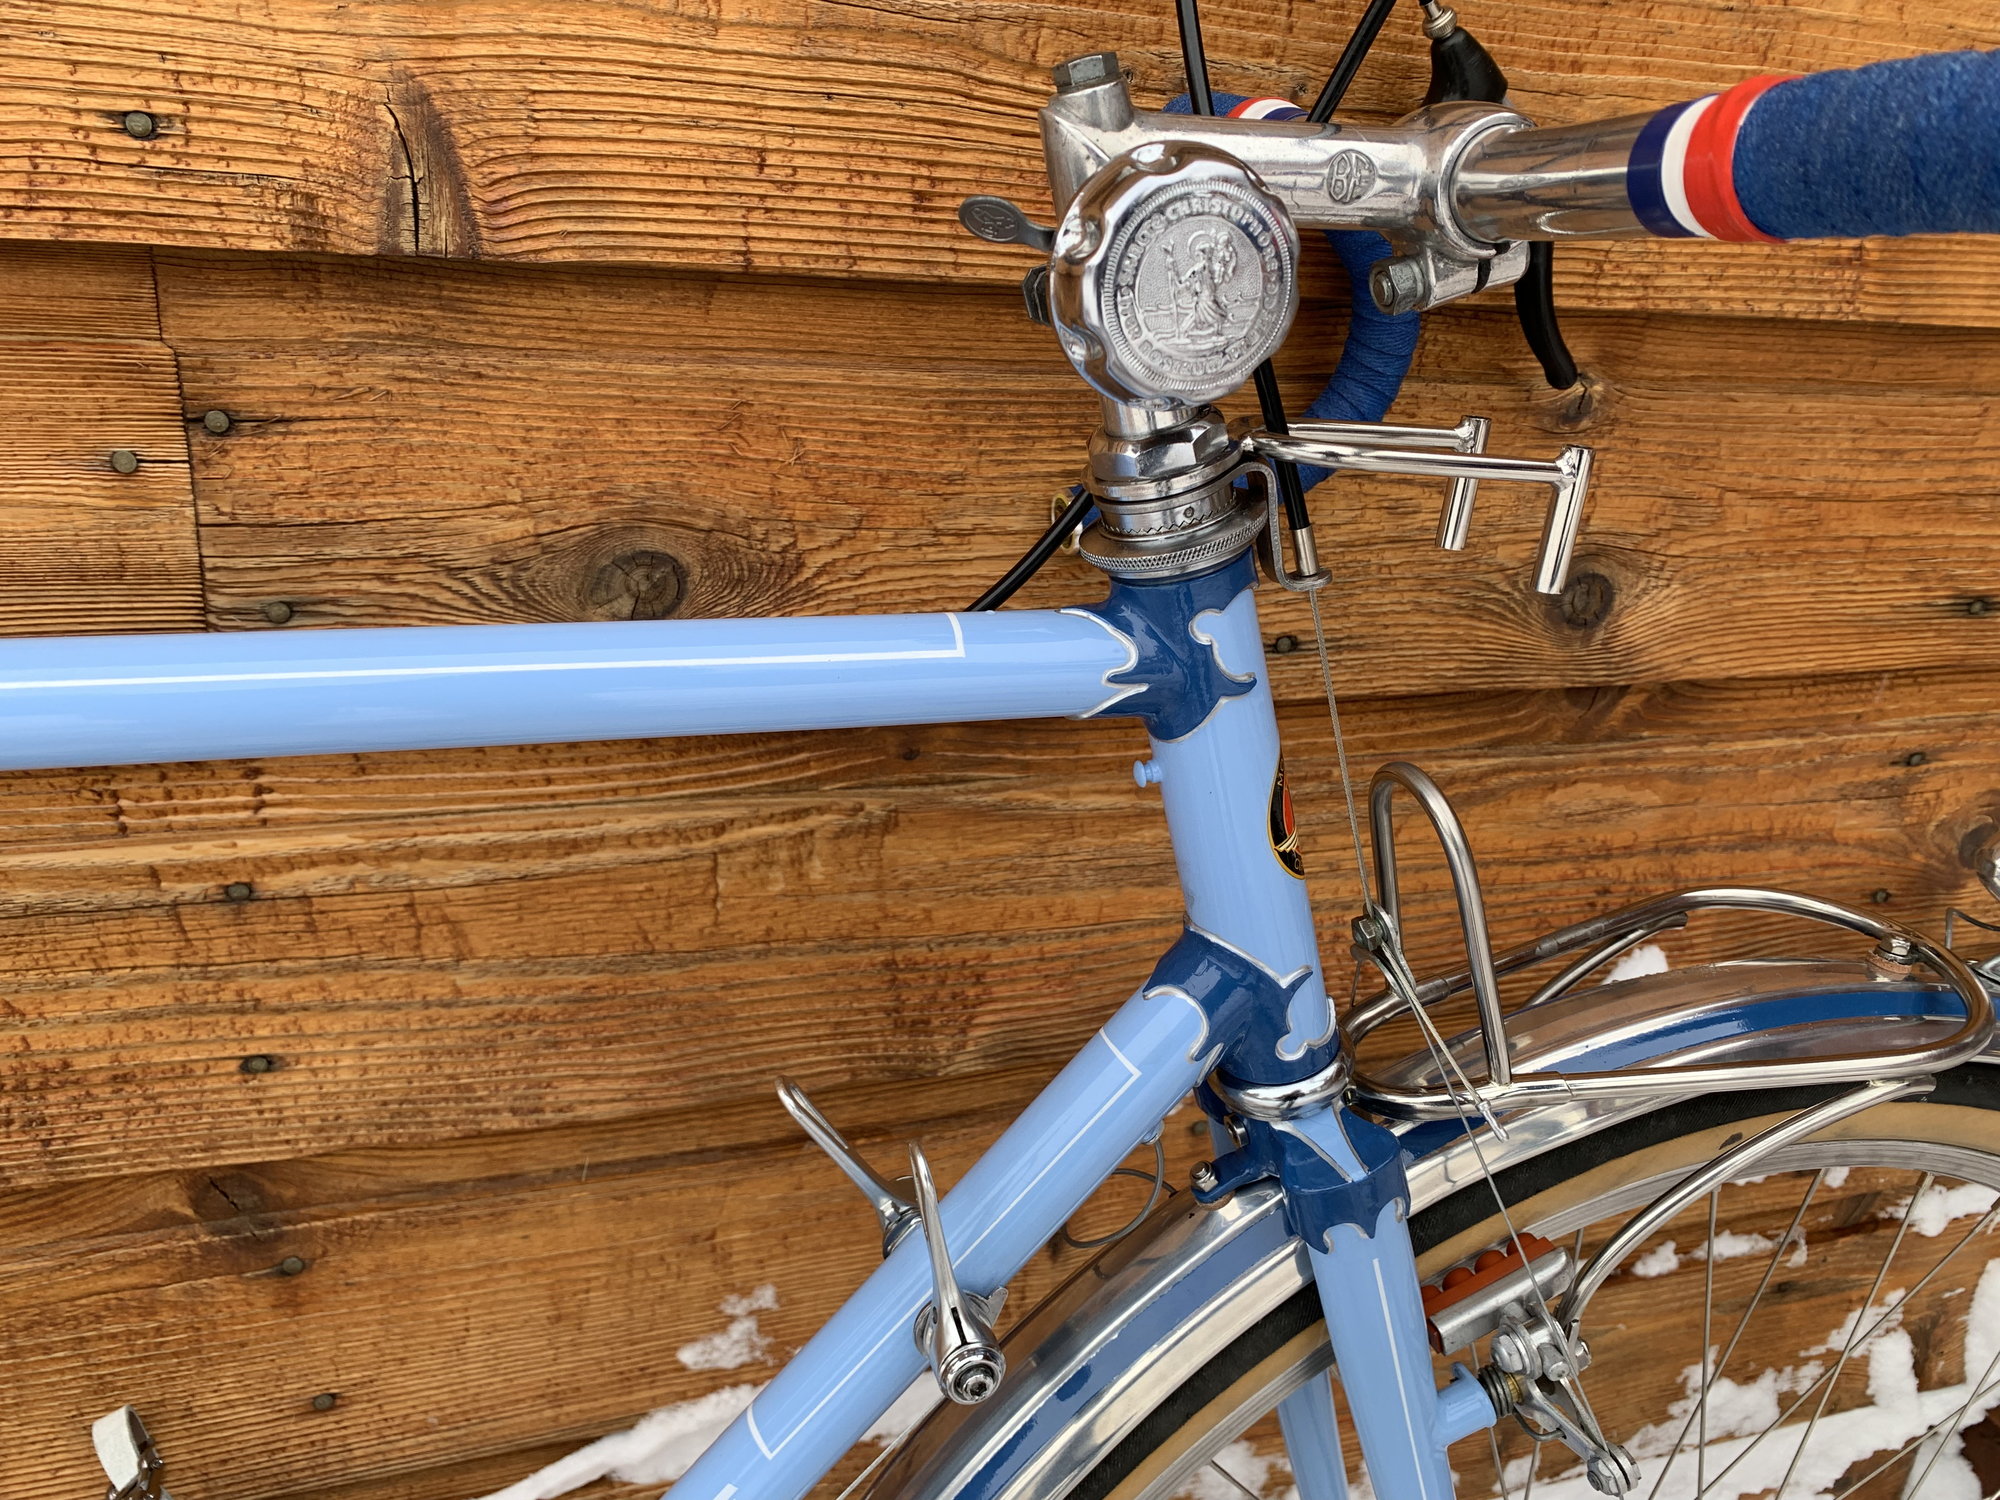
I tried using masking tape and a brush, but the paint crept up the tape edges, so the line was concave in cross section, where a brush/wheel leave a convex section. Didn't like that, so have only tried this once, for (in the pic below) the stay ends near the dropout and the thin blue lines on the downtube panel:
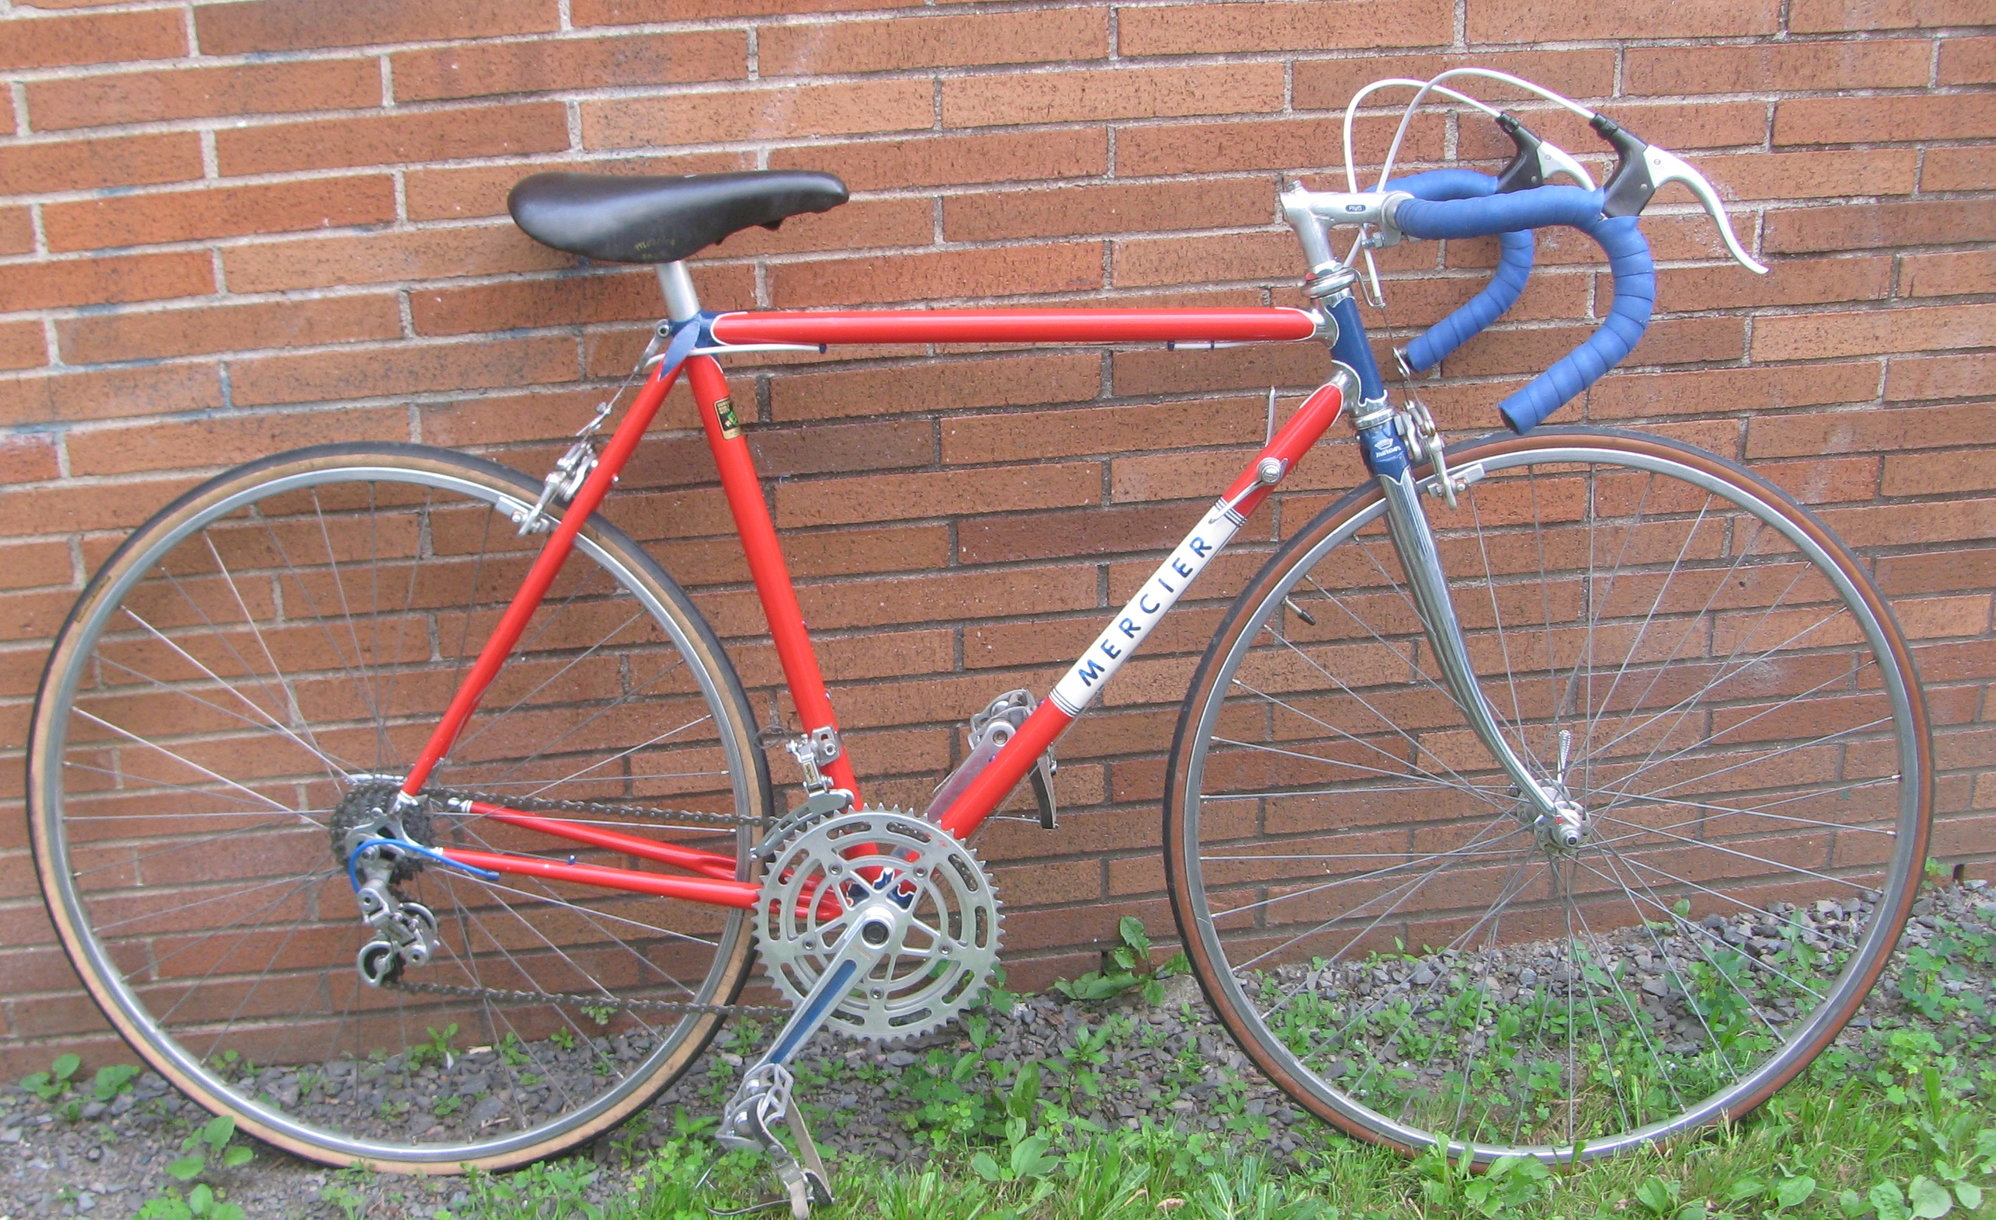
Since then it's either been decals or auto-pinstripe tape. Below isn't box-lining but it does show how thin the tape can be - it's the gold bands at the paint/chrome junction:

Since then it's either been decals or auto-pinstripe tape. Below isn't box-lining but it does show how thin the tape can be - it's the gold bands at the paint/chrome junction:
Likes For oneclick:
09-23-22, 07:41 AM
#17
Senior Member

Join Date: Aug 2015
Posts: 3,283
Mentioned: 39 Post(s)
Tagged: 0 Thread(s)
Quoted: 1135 Post(s)
Liked 1,727 Times
in
951 Posts
Some day I will do box lines on a Jack Taylor, but I will go the Chevy SS method. GM did not paint stripes on their cars, they painted stripe colors then masked off the striped area and painted body color. Next they pulled the masking to show the stripes and painted clear coat, wetsanded the clear to level the painted colors, and then another coat of clear.
Likes For Mr. 66:
09-24-22, 09:02 AM
#19
Bianchi Goddess

Join Date: Apr 2009
Location: Shady Pines Retirement Fort Wayne, In
Posts: 27,846
Bikes: Too many to list here check my signature.
Mentioned: 192 Post(s)
Tagged: 2 Thread(s)
Quoted: 2926 Post(s)
Liked 2,921 Times
in
1,489 Posts
Unless you want legitimate brushed on pinstripe I think as mentioned earlier vinyl is the way to go. If was going to try this I might use automotive pinstripe and some contrasting threads tape to the frame as a guide.
__________________
�One morning you wake up, the girl is gone, the bikes are gone, all that's left behind is a pair of old tires and a tube of tubular glue, all squeezed out"
Sugar "Kane" Kowalczyk
�One morning you wake up, the girl is gone, the bikes are gone, all that's left behind is a pair of old tires and a tube of tubular glue, all squeezed out"
Sugar "Kane" Kowalczyk
09-24-22, 10:51 AM
#20
framebuilder
I learned the principles of how to do frame line painting when I was learning how to build frames at Ellis Briggs Cycles in Shipley West Yorkshire in 1975. Here is a picture of frames made and painted with double box lining at EB (only the 2 on the left end) after the war.

The 2 frames on the left are original paint from when the frames were made in the early 50's.
Their frame building room was next to the painting room. I didn't try my hand at spraying while I was there but it was a huge advantage to me to get to watch what they did so i knew what to do later. Rod one of their painters used a sword brush. He would hold the brush with his thumb and forefinger and would guide the brush along the tube with his middle finger. This kept him from wavering. He would start sooner and go longer than the final result. After he did the cross stripes, he would wipe off the excess beyond the corners. Here is a picture of a Johnny Berry he painted while I was there.

Rod painted this 1953 Johnny Berry frame at Ellis Briggs in 1975
When I started to make and paint frames in Niles, Michigan after I got back from England in 1976, double box lining was considered to be old fashioned and nobody ever requested it until it became popular again about a dozen years ago.
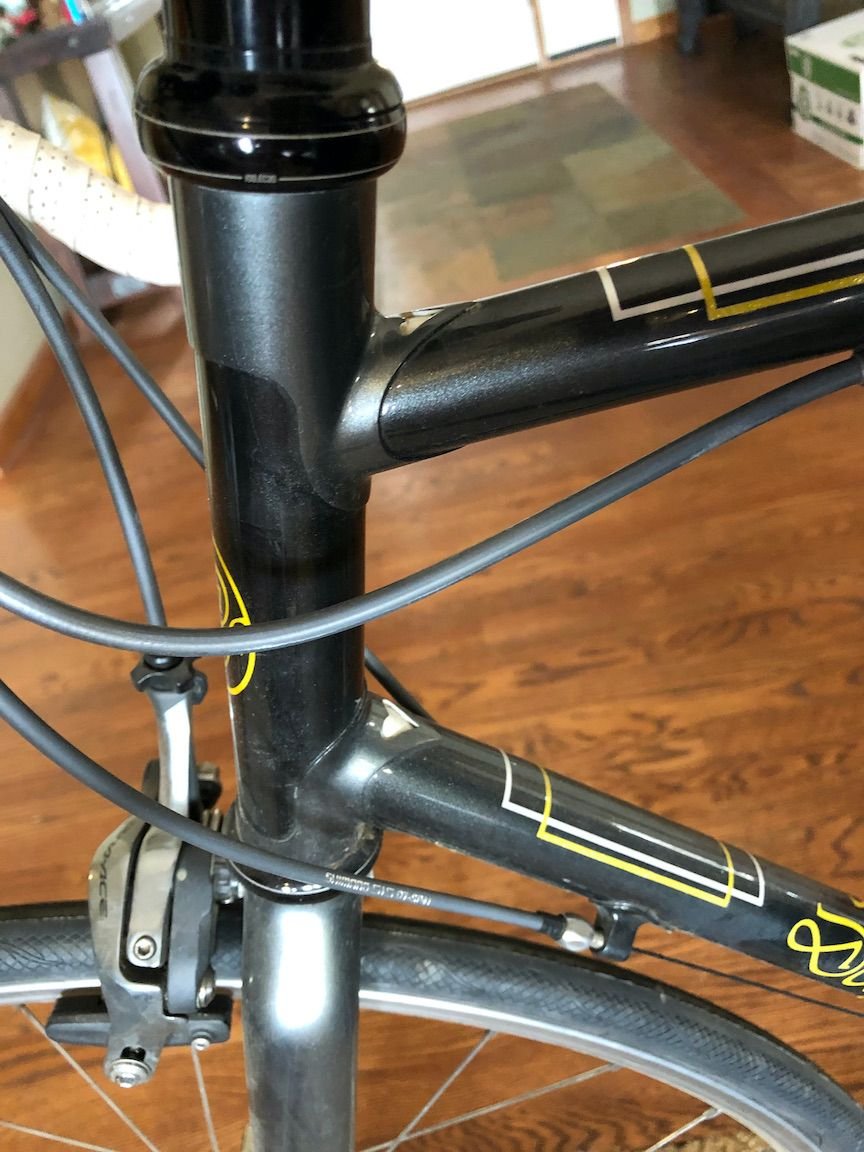
When I made my daughter a custom frame a few years ago I wanted it to have double box lining. I used the same method as described by Mr.66 in post #17. I chose to have one box a white pearl and the other box a yellow pearl. The frame itself was painted in 2 shades of gray pearl. This was to coordinate with the Dura Ace gray. Here are some pictures of her bicycle:


One of my colleagues uses a local sign painter to do his double box lining.
The 2 frames on the left are original paint from when the frames were made in the early 50's.
Their frame building room was next to the painting room. I didn't try my hand at spraying while I was there but it was a huge advantage to me to get to watch what they did so i knew what to do later. Rod one of their painters used a sword brush. He would hold the brush with his thumb and forefinger and would guide the brush along the tube with his middle finger. This kept him from wavering. He would start sooner and go longer than the final result. After he did the cross stripes, he would wipe off the excess beyond the corners. Here is a picture of a Johnny Berry he painted while I was there.
Rod painted this 1953 Johnny Berry frame at Ellis Briggs in 1975
When I started to make and paint frames in Niles, Michigan after I got back from England in 1976, double box lining was considered to be old fashioned and nobody ever requested it until it became popular again about a dozen years ago.
When I made my daughter a custom frame a few years ago I wanted it to have double box lining. I used the same method as described by Mr.66 in post #17. I chose to have one box a white pearl and the other box a yellow pearl. The frame itself was painted in 2 shades of gray pearl. This was to coordinate with the Dura Ace gray. Here are some pictures of her bicycle:
One of my colleagues uses a local sign painter to do his double box lining.
Likes For Doug Fattic:
09-24-22, 04:26 PM
#21

Disraeli Gears

Just my opinion: if you want to do something like this, then get it done right, by someone for whom it is second nature, or else learn yourself how to do it before messing up a nice bike. The Johnny Berry frame shown by Doug Fattic above, and (though harder to see clearly) the two Ellis Briggs frames have a characteristic that, to me, typifies this type of work and gives it a particular charm: the ends of the lines cross a bit, and each line appears to be slightly thicker at/near its termination. See also any Jack Taylor frame, even though they appear to have used a different (roller wheel) application method. I think that the reason for this is the hand speed is slowing. Doug Fattic might confirm or rebut -- I've never seen such work in execution except for the Taylor brothers video referenced above.
Go to about 11:30 for the box-lining portion (the commentary by Jack, the Taylor brother doing it, is very interesting in this context), but the whole thing is a lot of fun.
When we used to do architectural drawings manually, whether using ink and technical pens on board or film, or using plastic or graphite lead on film or vellum respectively, there was a technique for doing this called "snap and punch" wherein one would emphasize the ends of lines by applying greater pressure with lead or a slower pace at ends with ink. It did pretty much the same thing, and I continue to draw lines (manually) this way instinctively.
From a DIY perspective, I've done decent-looking lug lining (completely different) using Decocolor paint pens (fine or extra fine), and have contemplated doing the longitudinal ones with an edge-relieved straightedge in some sort of jig fastened to each tube; but I haven't figured out a good way to do the cross-lines in a way I wouldn't muck up.
As might be obvious, I feel that the approaches done with some sort of masking or with tape result in something lacking: lines not just the right width, the masking "peel-up" along the lines being obvious.
And, why isn't Rudi Mayr (rhm) at this party. I think he's pretty much the DIY graphics look-to, and have really, really enjoyed his various posts on this topic.
Last edited by Charles Wahl; 09-25-22 at 09:32 AM.
09-25-22, 08:02 AM
#22
framebuilder
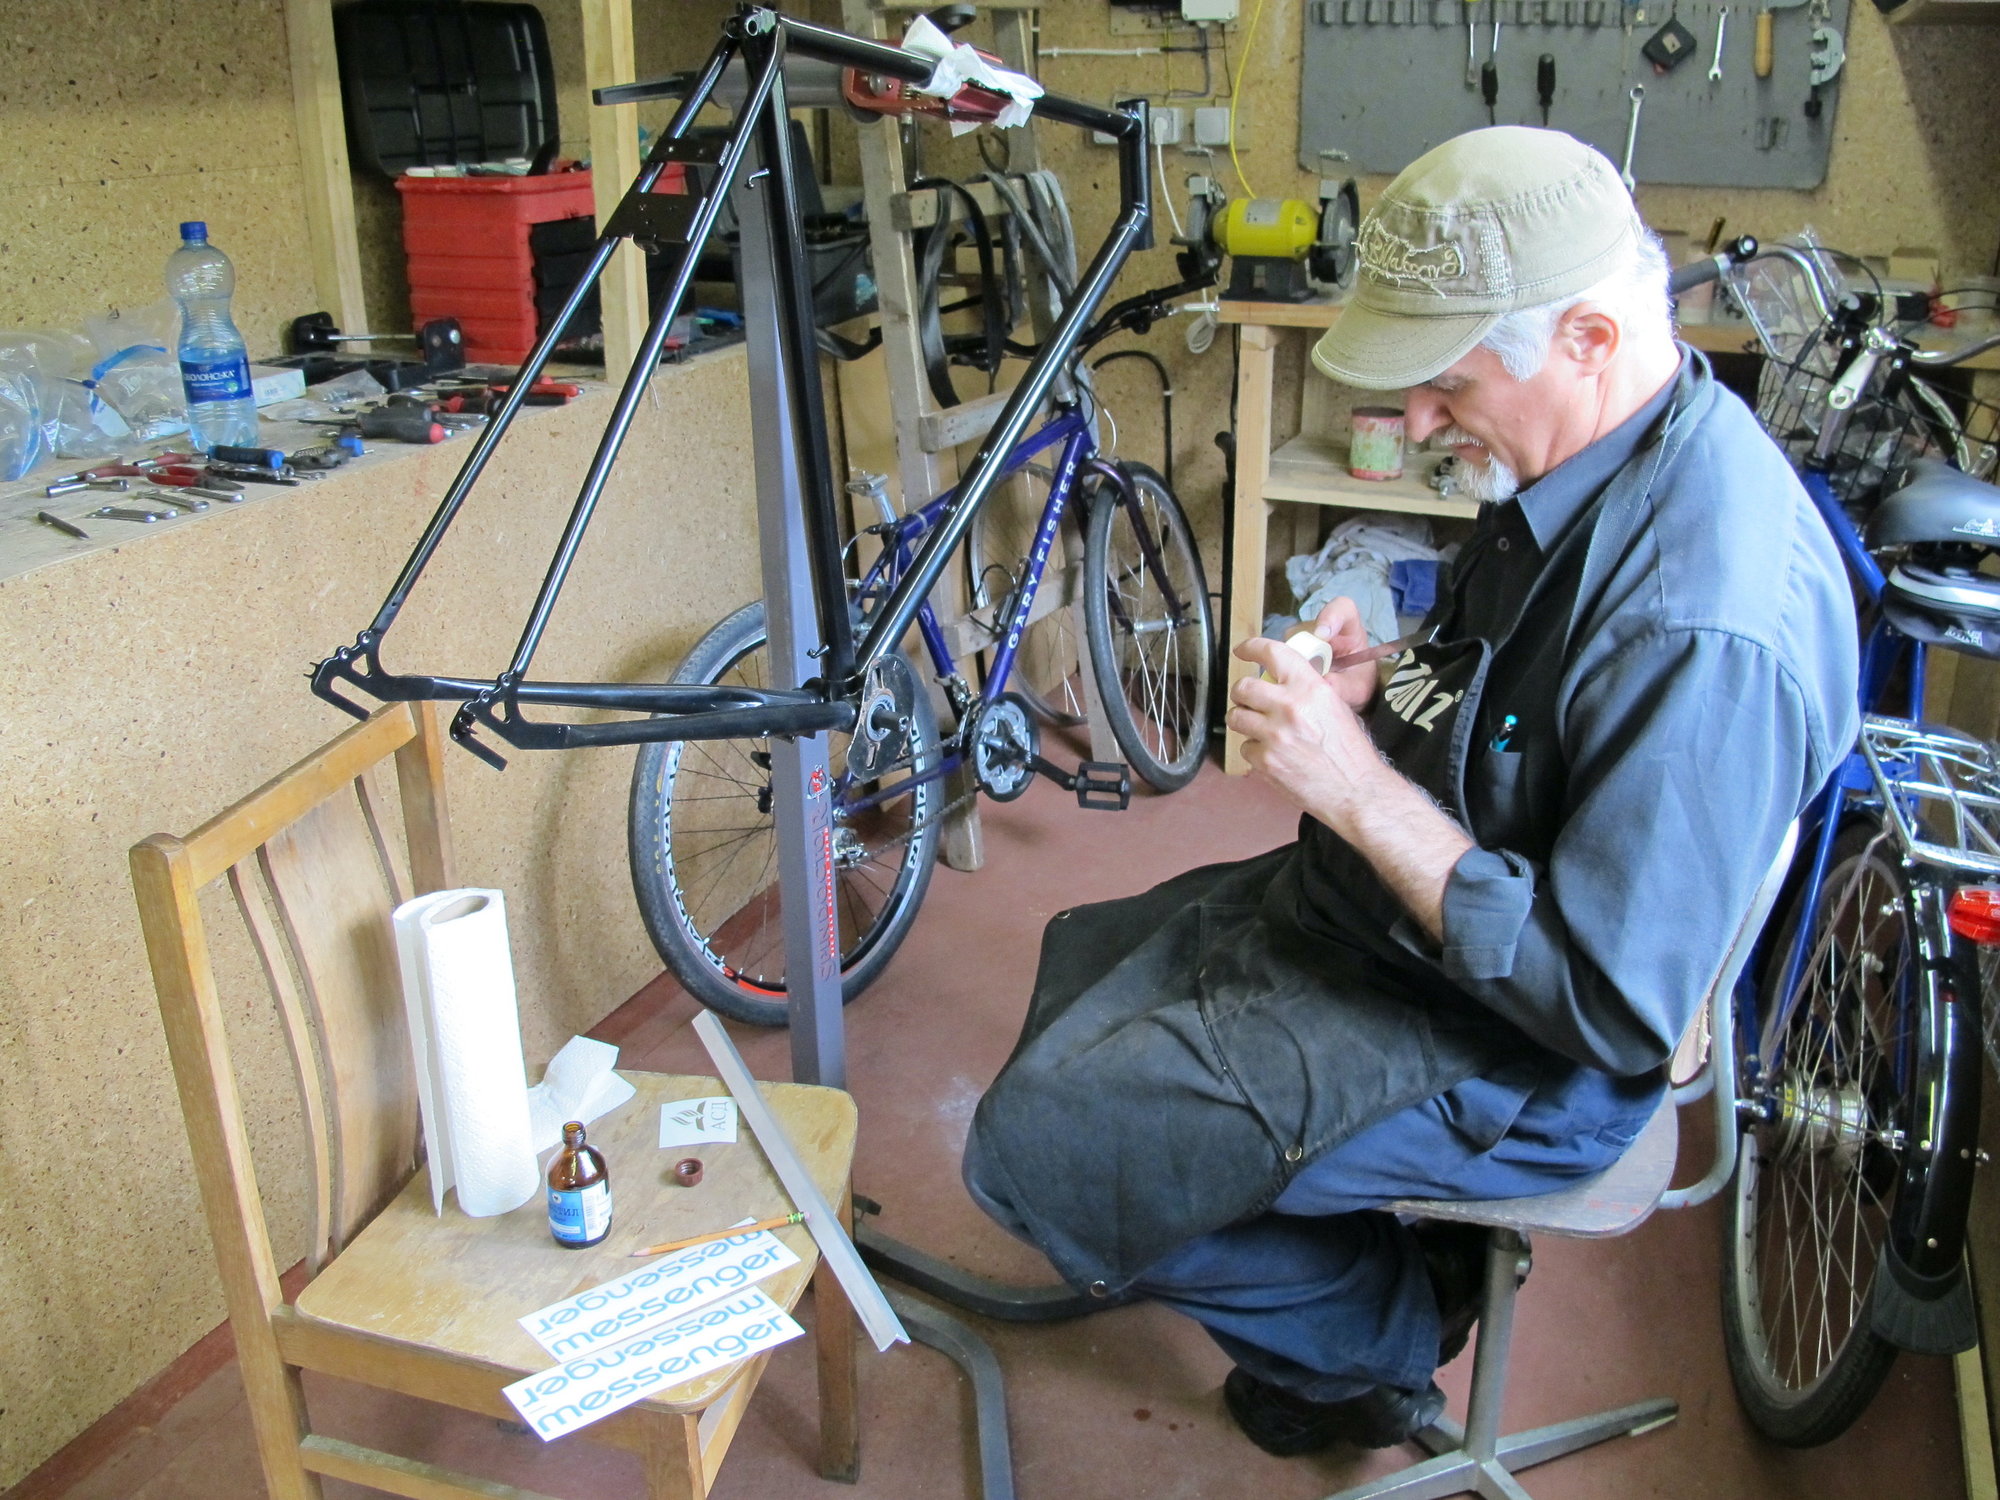
One of the tools that can be really useful in laying out masking tape so it will be straight on a tube is aluminum angle that can be bought at almost any hardware store. Get the size that is 3/4'" X 3/4" X 1/8". It comes in various lengths. It can be cut to a length that fits in-between braze-on bosses. I also use it to make sure decals are straight on a tube. Here are pictures of Yuriy using a piece of aluminum angle to mark masking tape so he can place our decal exactly where it should be. Many decals can not be moved once some part touches the frame. These pictures were taken a few years ago in our shop in Bucha Ukraine where we make bicycles for our charity project. The Russians did break into this shop earlier this year. They took general use tools but not bicycle specific equipment. For example the grinder you see in the first picture and all the wrenches on the back wall are now missing. Yuriy had to hid in his root cellar for several weeks while his place was shelled. He eventually escaped across the Irpin Rivier and has lived in the west Ukraine since March. He is coming back in October to more fully assess our losses. In this case Yuriy is marking lines on 2 pieces of tape wrapped around the top and bottom of the down tube. Using the aluminum angle insures the marks are lined up with each other.
For box lining, the angle piece can be used to help lay a section of regular masking tape along the length of a tube. Then thin 3M "Fineline" tape (the real masking tape) can be laid along the wider regular masking tape. This process can insure the Fineline tape can be perfectly straight.
Yuriy preparing to apply decals with the assistance of an aluminum angle tool waiting to be used on the chair
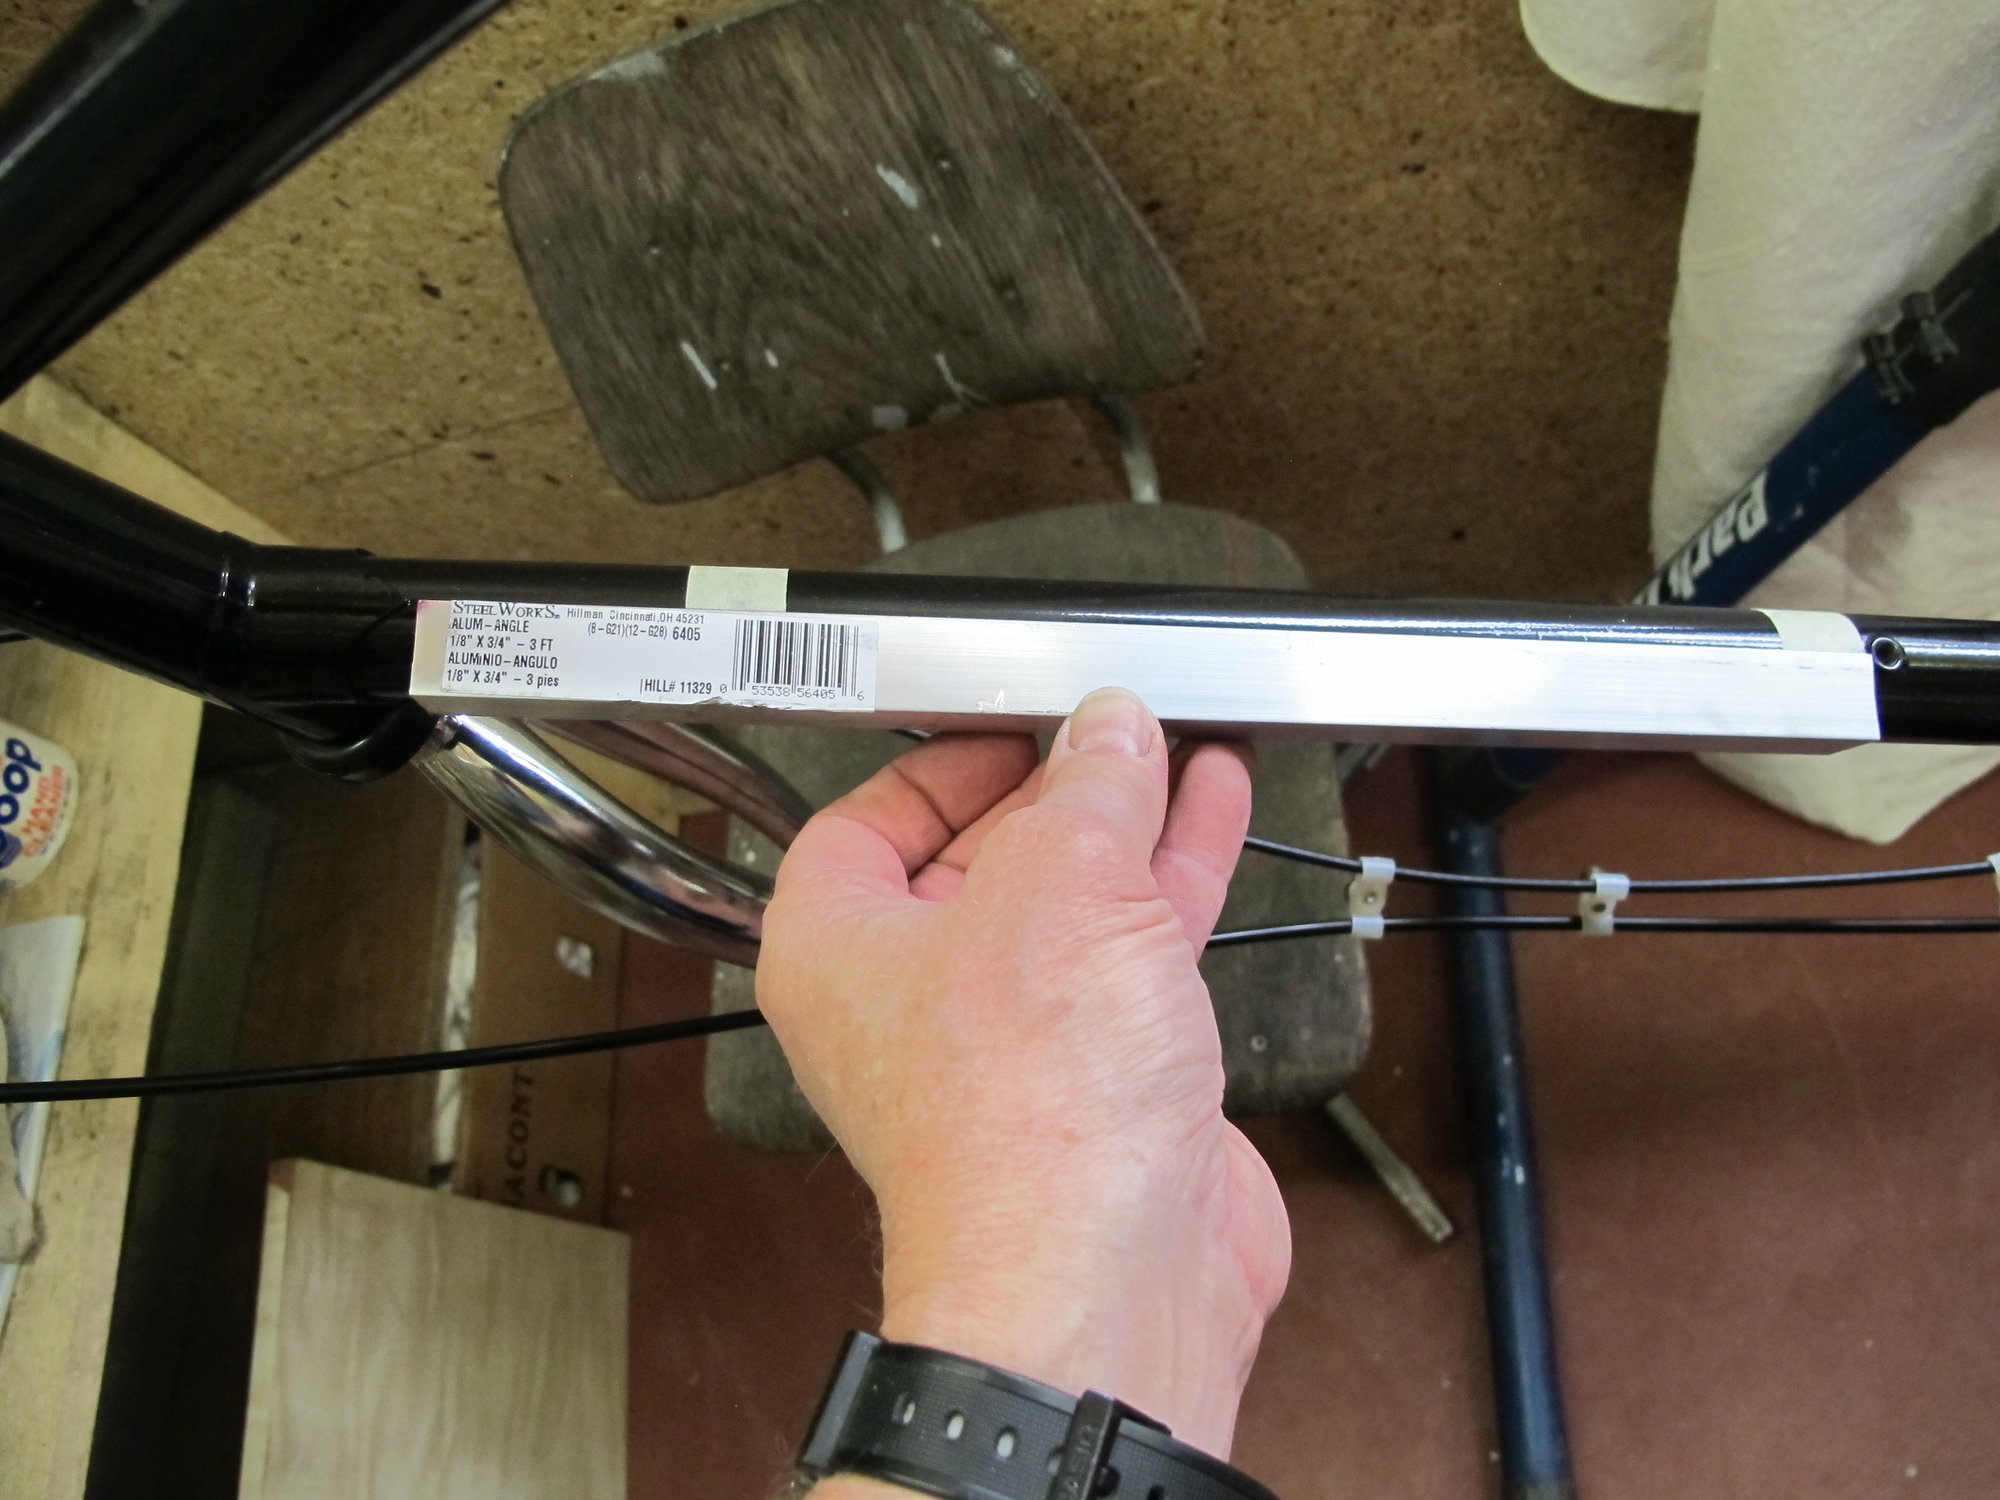
The angle piece in use. The store markings on the left can remind you what to get

Using the lug point and water bottle bosses as placement guides
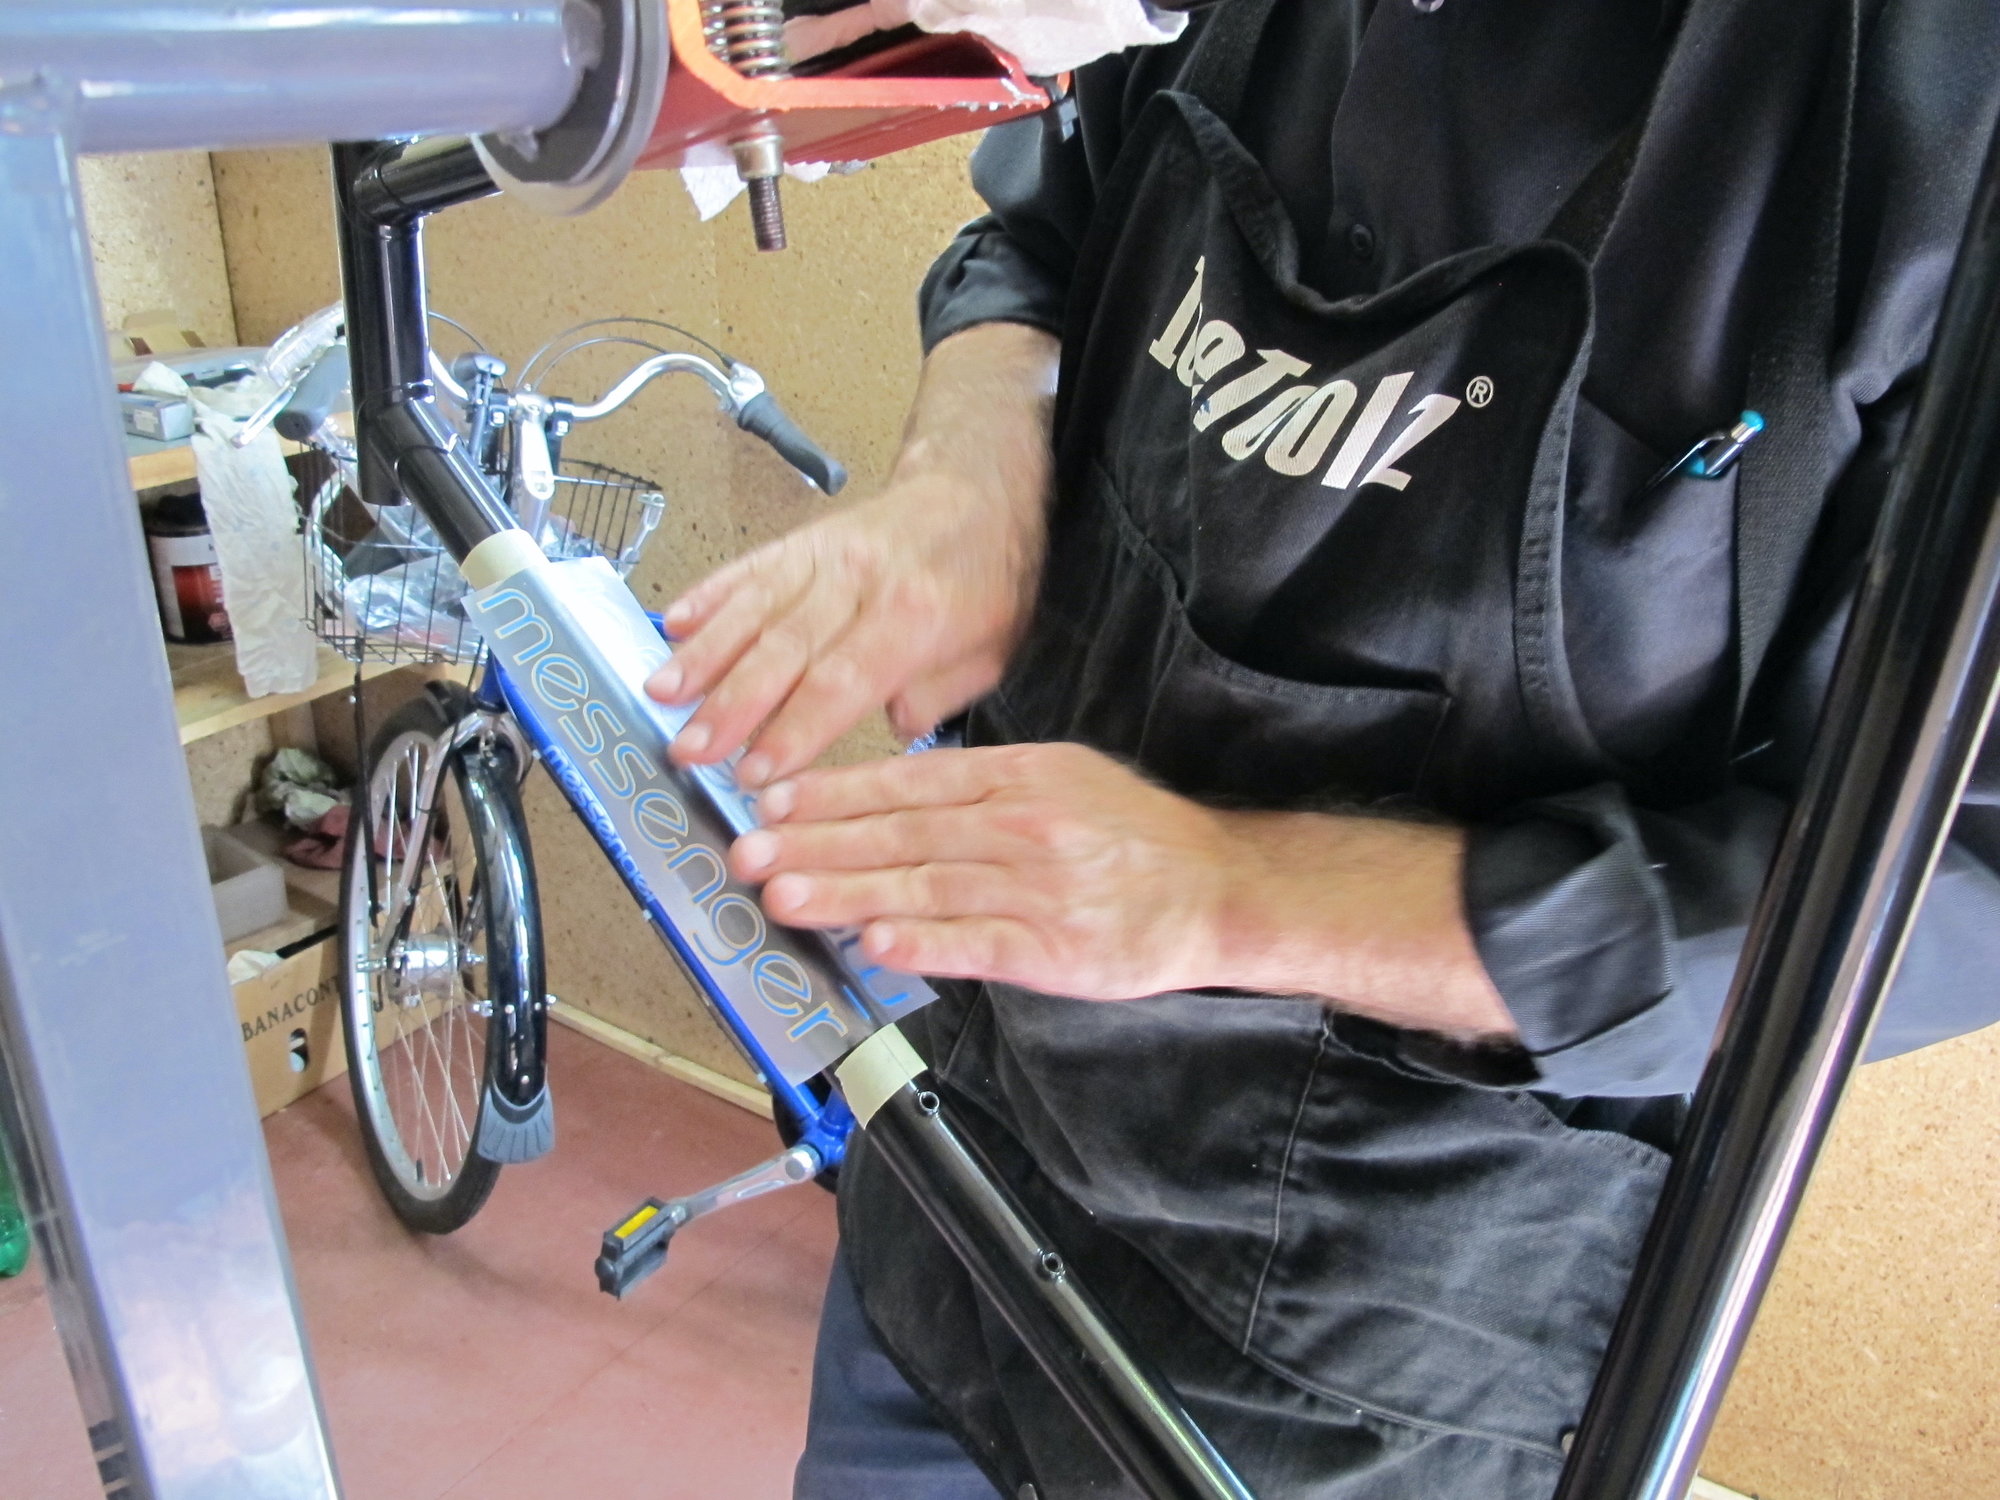
the decal backing paper has centering guides that are matched to the masking tape marks

The decal is correctly placed after using an aluminum angle piece to help position the markings
For box lining, the angle piece can be used to help lay a section of regular masking tape along the length of a tube. Then thin 3M "Fineline" tape (the real masking tape) can be laid along the wider regular masking tape. This process can insure the Fineline tape can be perfectly straight.
Yuriy preparing to apply decals with the assistance of an aluminum angle tool waiting to be used on the chair
The angle piece in use. The store markings on the left can remind you what to get
Using the lug point and water bottle bosses as placement guides
the decal backing paper has centering guides that are matched to the masking tape marks
The decal is correctly placed after using an aluminum angle piece to help position the markings
Likes For Doug Fattic:
09-25-22, 07:46 PM
#23
framebuilder
In the last post I explained how a length of aluminum angle (that can be bought at a hardware store) can be used to create a straight line along a tube. The other simple tool anyone can make can be used to help make a circle around a tube that isn't crooked. It an be used to place masking tape or check the straightness of a decal. I also use it to make sure braze-ons are right across from each other. I take a short section of a tube and somehow dress the end so it is squared up. I can do this on my lathe or belt sander. Once at least one end is square, I split the tube lengthwise so it can be placed on a slightly smaller diameter tube. If one is doing a double box lining, the end of this split tube can be used as a guide so the cross end of the box lining won't be crooked. Here is the only picture I could find in my laptop of one in use. In this case I'm using it to place a 2nd cable guide straight across from the 1st one already brazed on. I'm holding it on the DT with my thumb and finger. I'm replacing a damaged boss on an old Super Sport.

the tool in my hand resting on the tube can be used to make circle markings square around a tube
the tool in my hand resting on the tube can be used to make circle markings square around a tube
Likes For Doug Fattic:
