


help service these pedals, please?
 10-16-21, 07:19 PM
#1
Senior Member
Thread Starter

help service these pedals, please?
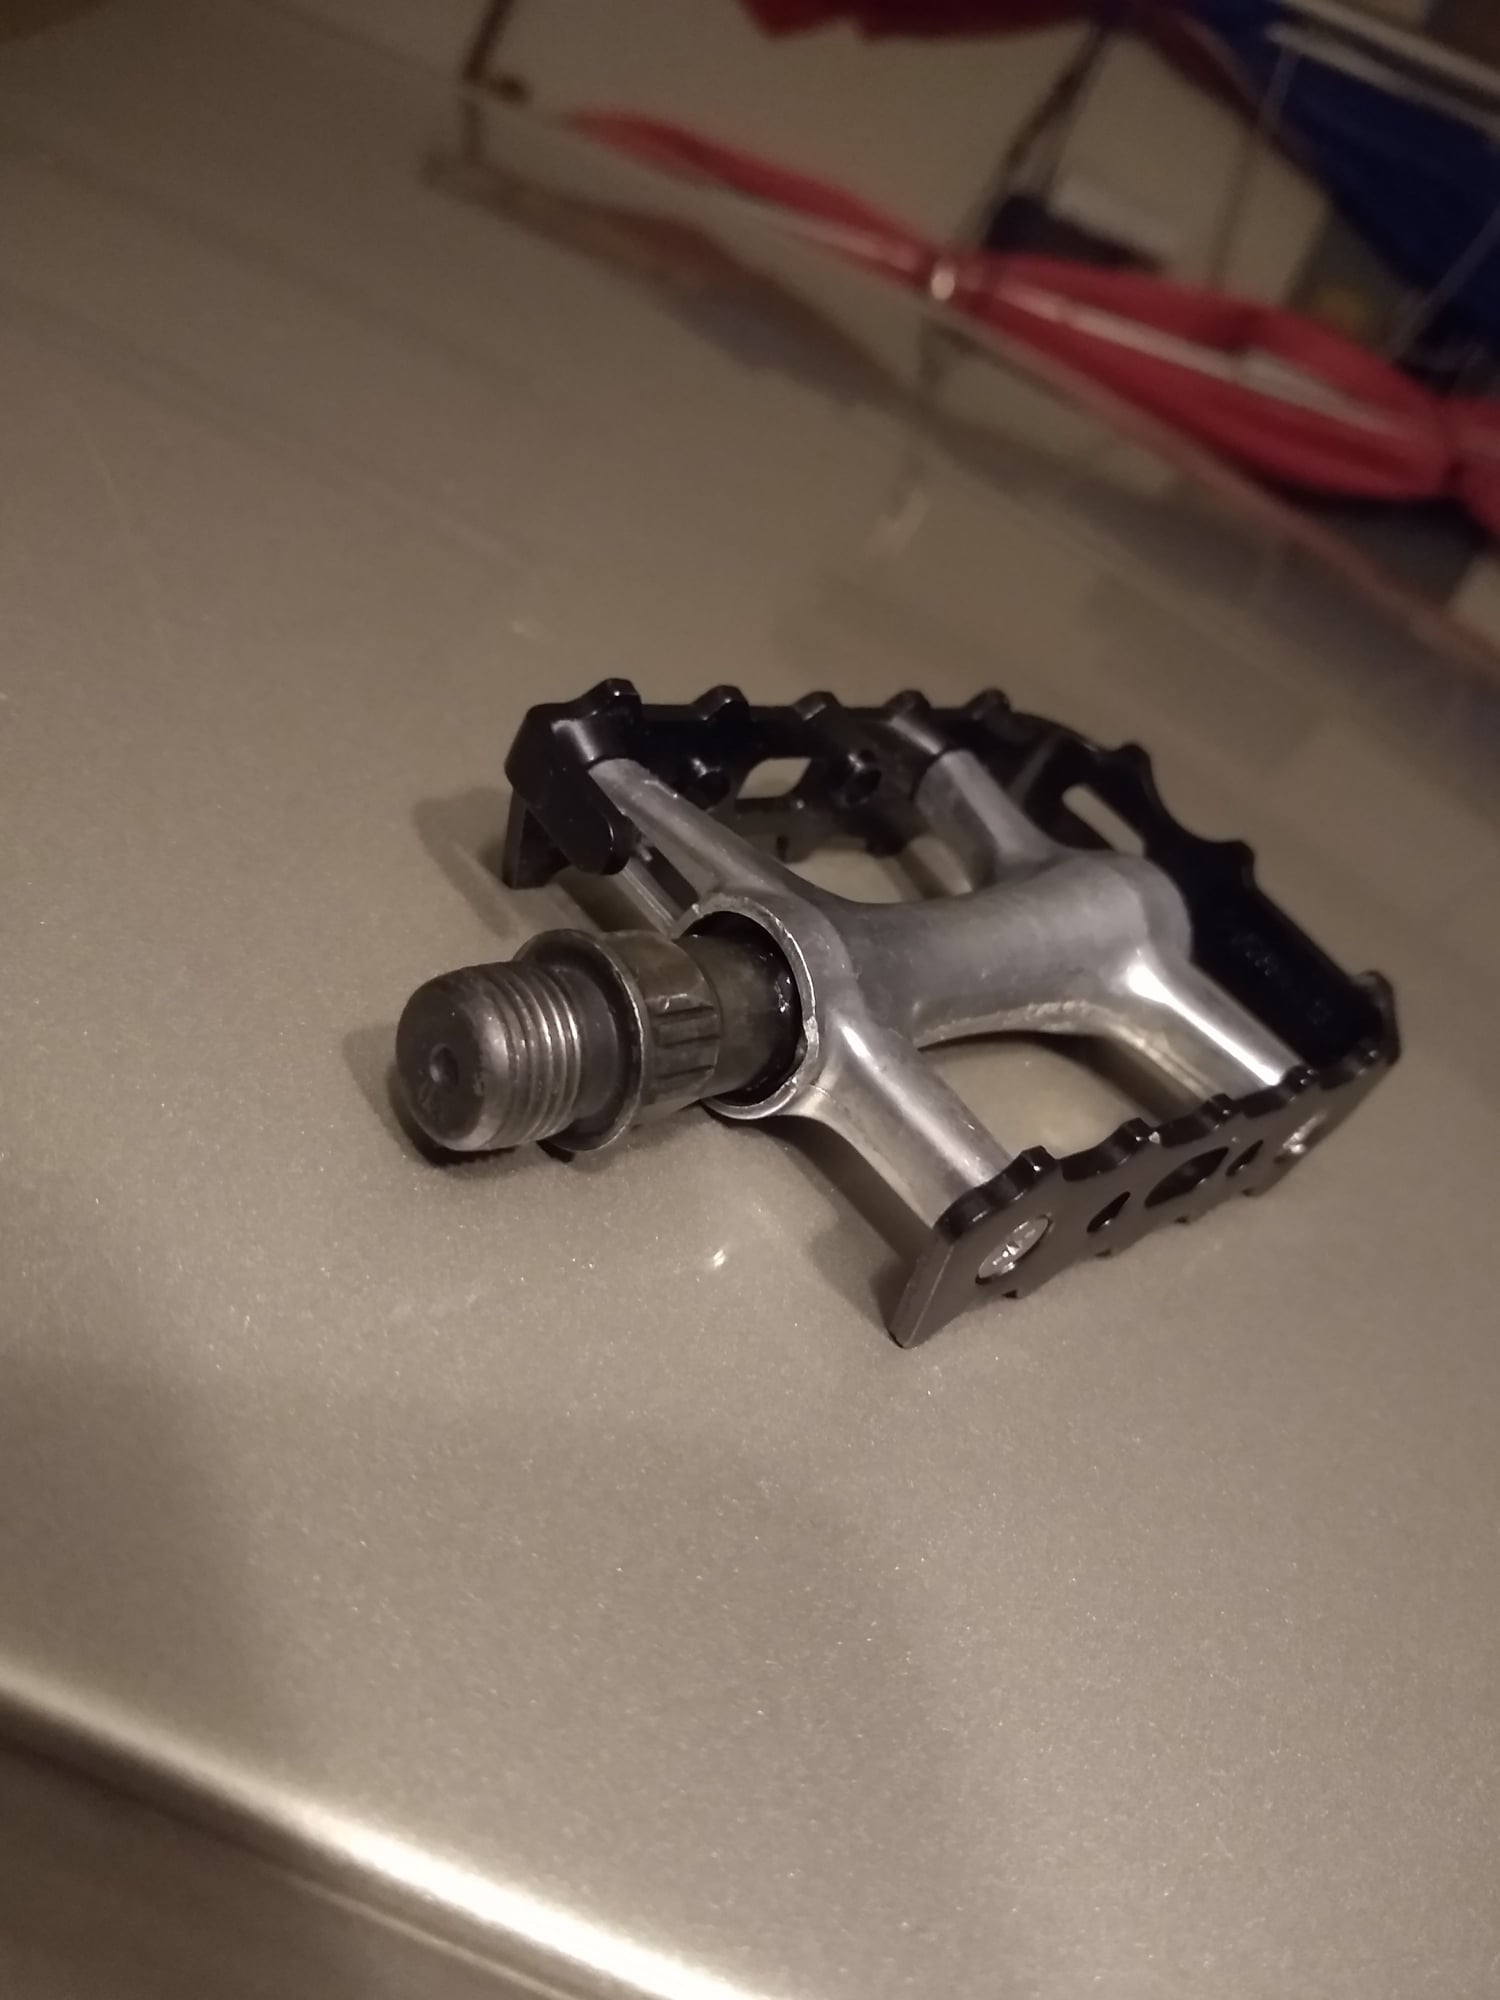
I've never messed with pedals before so I don't know where to start. I found some videos but only for clip-in pedals and mountain bike pedals that don't have this plastic cover on them. How does that come off? Then what happens? I'm asking because on feels sluggish (smooth but doesn't turn freely) and the other has play in it. If I hold the part that screws into the crank, the main part (not the outer cage that screws to the main part) wiggles.
Thanks for any help. I know it's a basic question probably, but I'm having trouble getting youtube to come up with anything helpful.

Thanks for any help. I know it's a basic question probably, but I'm having trouble getting youtube to come up with anything helpful.
 10-16-21, 07:25 PM
#2
Senior Member
Join Date: Jun 2015
Location: Down Under
Posts: 1,936
Bikes: A steel framed 26" off road tourer from a manufacturer who thinks they are cool. Giant Anthem. Trek 720 Multiroad pub bike. 10 kids bikes all under 20". Assorted waifs and unfinished projects.
Mentioned: 11 Post(s)
Tagged: 0 Thread(s)
Quoted: 1188 Post(s)
Liked 1,154 Times
in
640 Posts
Unscrew the cage, use a pointy something to work off the plastic cap. That'll expose the locknut and the cone. If you are lucky the cone will have spanner flats on it and you can jamb a screwdriver down the side of it when you are tightening up the locknut.
Likes For Trevtassie:
10-16-21, 07:34 PM
#3

Full Member
Join Date: Jun 2021
Location: Des Moines, Iowa
Posts: 261
Bikes: A Blue One and 2 Green One's, then there's the Yellow one. And oh, yeah, a Black One. Did I mention the Red One?
Mentioned: 4 Post(s)
Tagged: 0 Thread(s)
Quoted: 75 Post(s)
Liked 195 Times
in
82 Posts
Unscrew the footrest from the body and take it off.
The plastic cap will have little recess on the edge somewhere, Im pretty sure that plastic cap just snaps into place. You should be able to put a dinky screw driver or what ever in that little recess and pry it out.
But...
Maybe it unscrews. It will be easier to look at with the foot rest off.
Under the cap you will find a top lock nut holding down the cone nut.
You will hold the axle still with another wrench on the threaded axle end or in a vice but it is better to disassemble over a catch pan of some sort because the bearings are most likely loose inside and some will fall out when disassembling and pulling out the axle.
Clean everything, inspect for damage, re-assemble with your chosen grease.
you pack grease in the cup on each end and sink the bearings into the grease which will hold them still for re-assembly.
Grease the cones and re=assemble.
Note:
When tightening the lock nut, sometimes it will squeeze the cone nut down a little tighter and mess up the adjustment you thought was good. You need to apply a little reverse pre-load to the cone nut (not so tight next time by 1/4 thread) so when the lock nut tightens, it brings the setting into place rather than pushing it away.
10-16-21, 07:40 PM
#4
Senior Member
Thread Starter

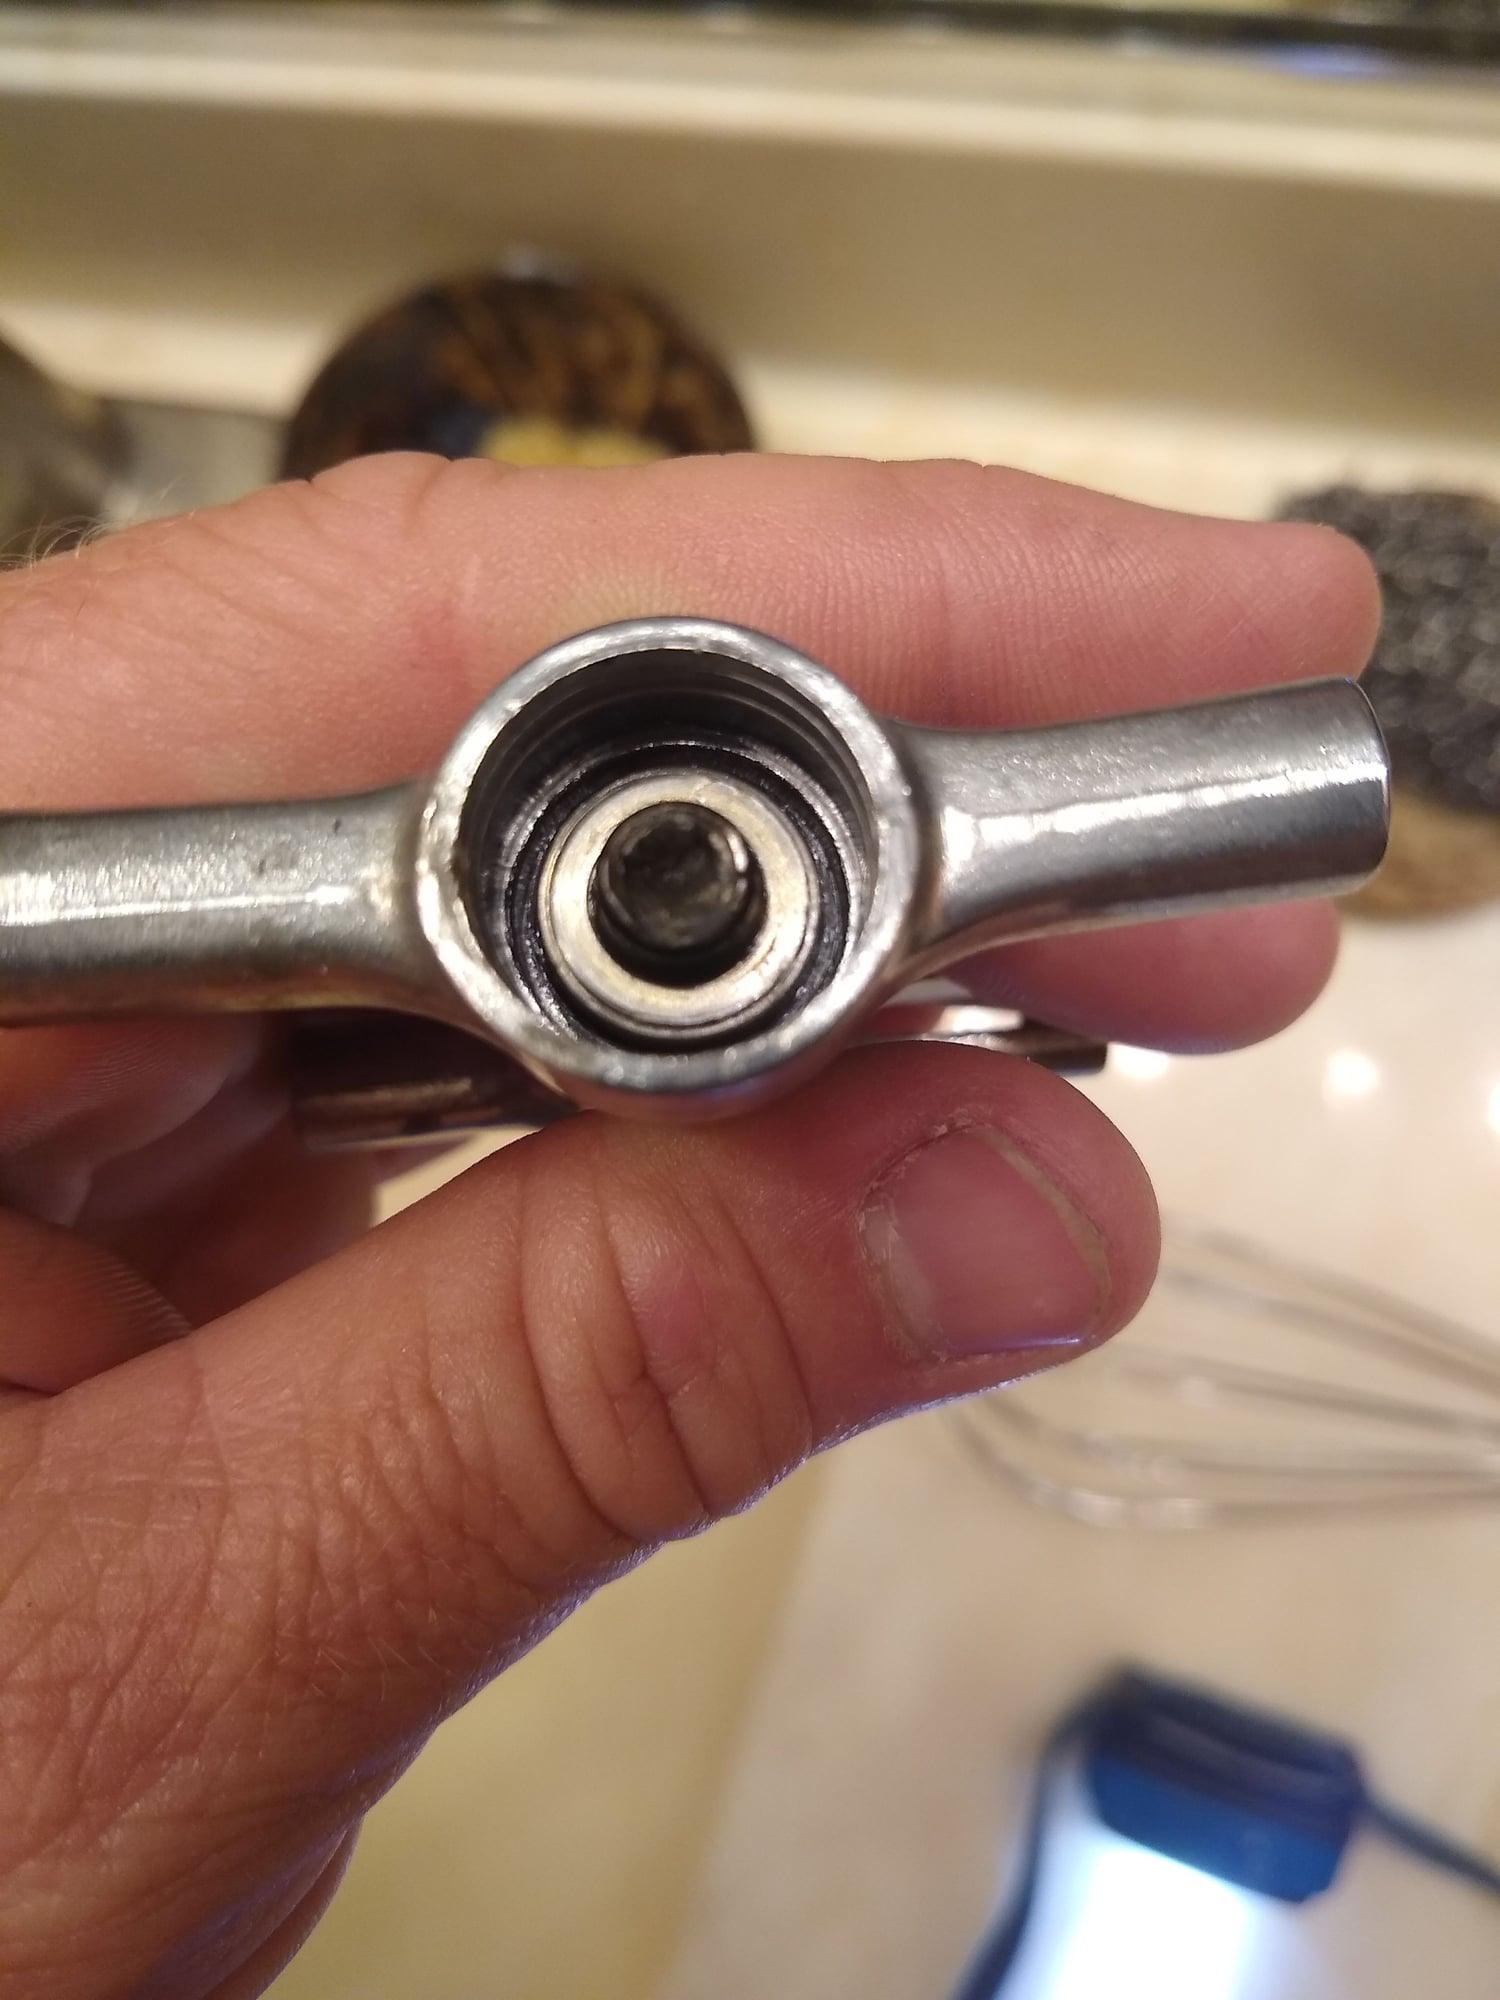
Here's a picture after cleaning the grease out:
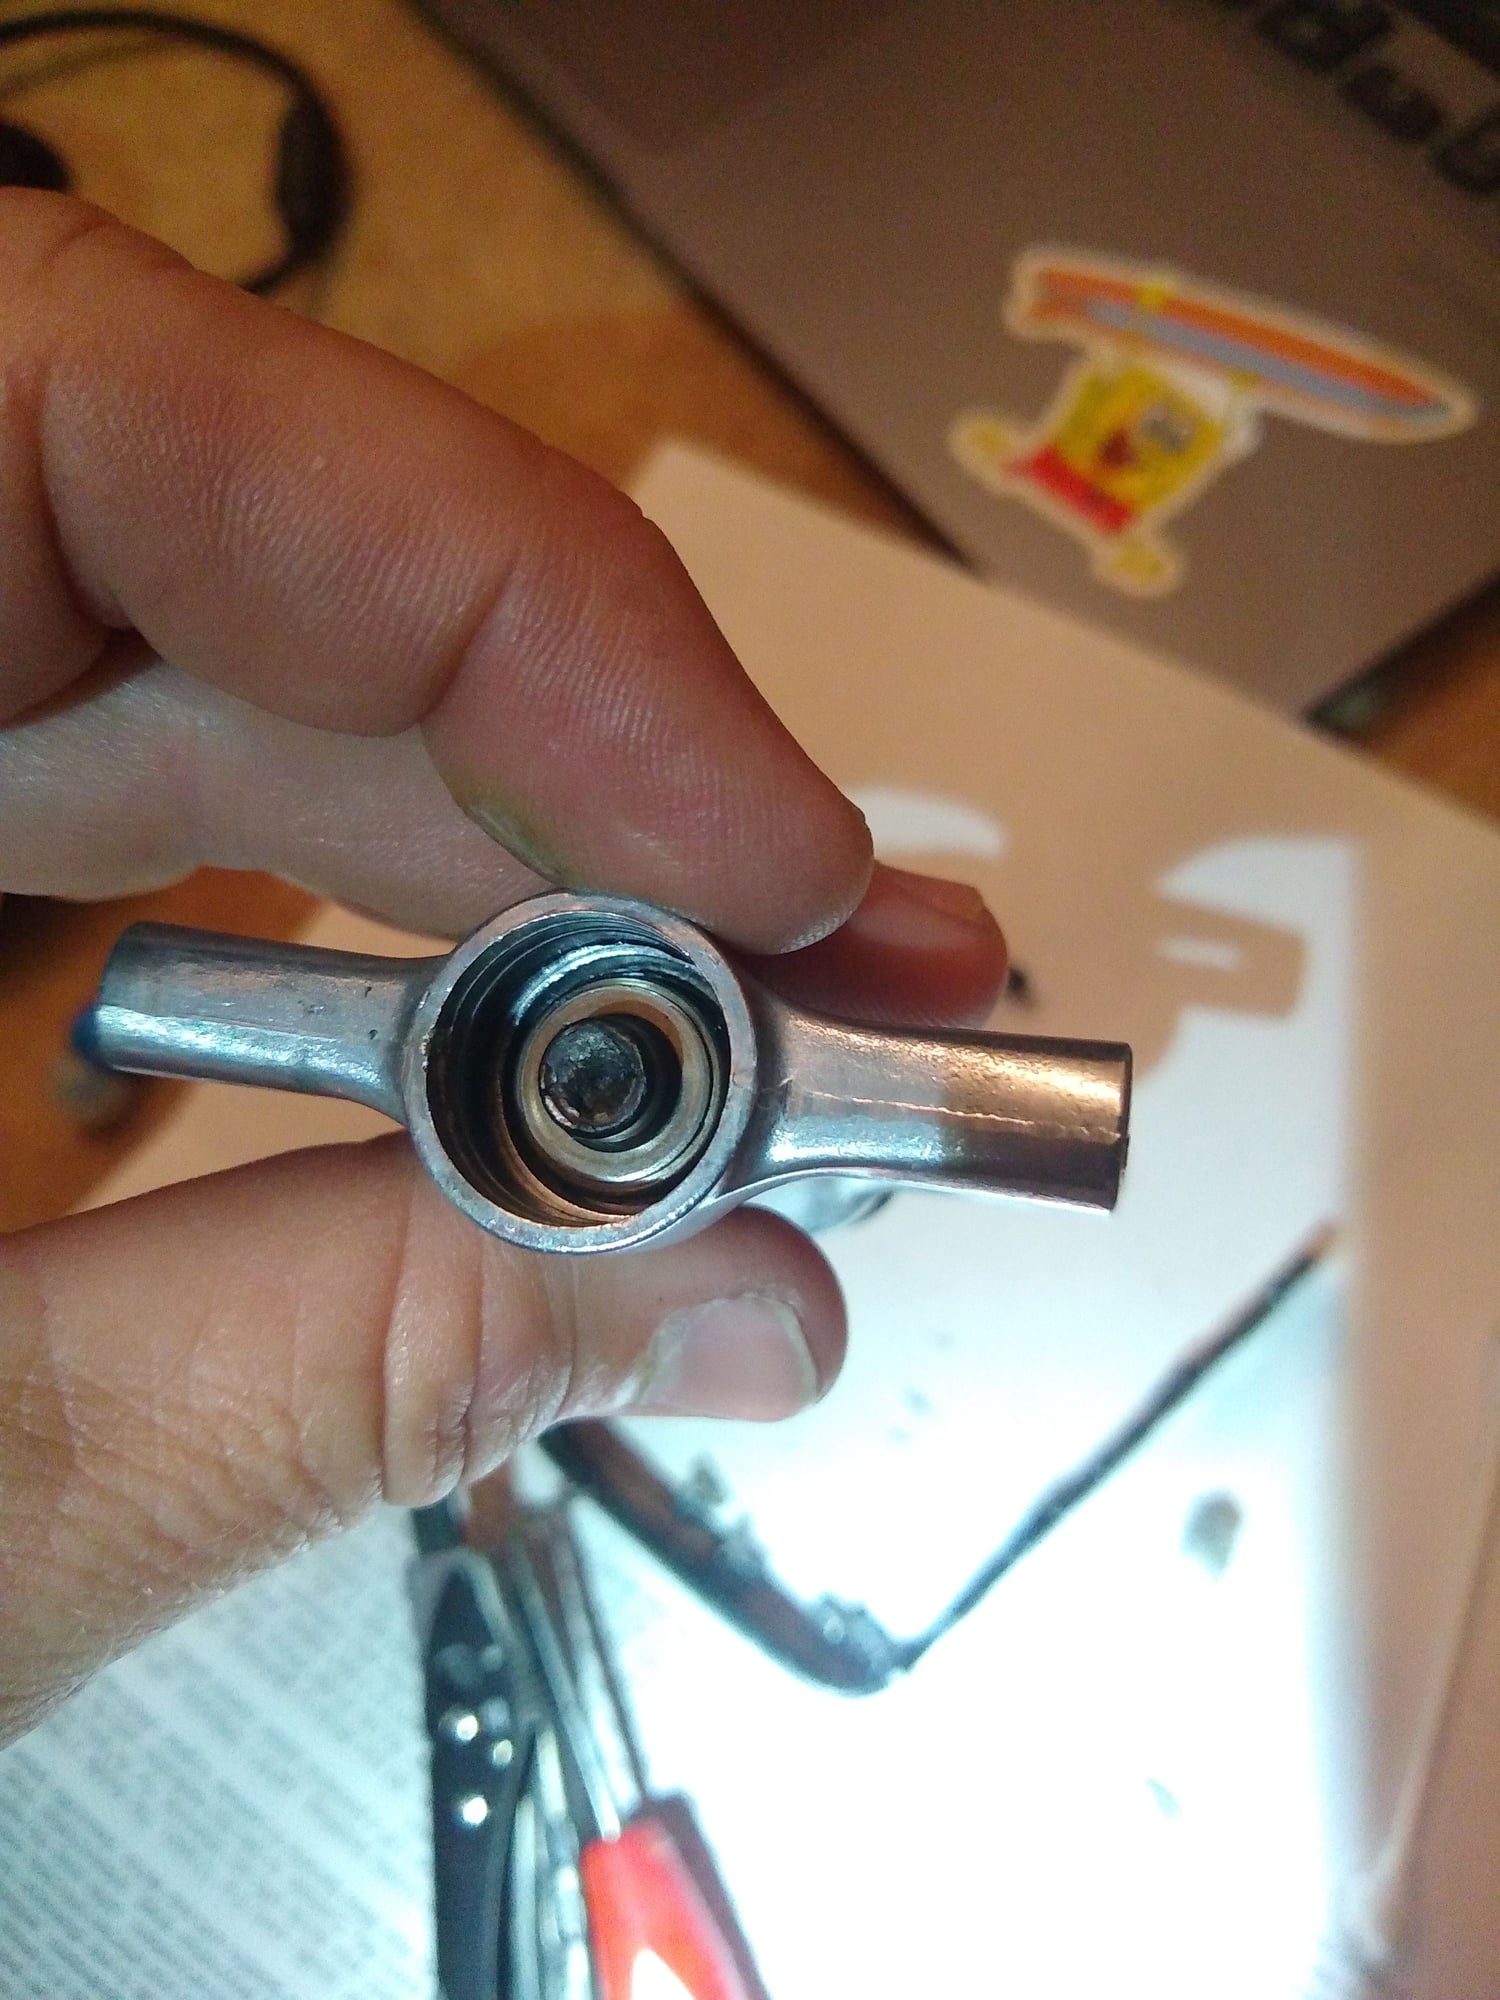
There doesn't seem to be anything that any too could grab onto. Are some pedals just not serviceable?
Last edited by cyrano138; 10-16-21 at 07:51 PM.
10-16-21, 07:44 PM
#5
Just Pedaling

Join Date: Oct 2021
Location: US West Coast
Posts: 1,013
Bikes: YEP!
Mentioned: 0 Post(s)
Tagged: 0 Thread(s)
Quoted: 333 Post(s)
Liked 522 Times
in
348 Posts
Get in there with an itty bitty screw driver and work the grease out. I'm betting you'll discover that it's not round after all. It's going to be a tight fit for a socket, hope it's maybe an Allen. My luck would be socket and need a super thin wall.
10-16-21, 07:45 PM
#6
Senior Member
Join Date: Jun 2015
Location: Down Under
Posts: 1,936
Bikes: A steel framed 26" off road tourer from a manufacturer who thinks they are cool. Giant Anthem. Trek 720 Multiroad pub bike. 10 kids bikes all under 20". Assorted waifs and unfinished projects.
Mentioned: 11 Post(s)
Tagged: 0 Thread(s)
Quoted: 1188 Post(s)
Liked 1,154 Times
in
640 Posts
There should be a 10mm locknut under that grease.
The cone being round means you'll need hammer a screwdriver down the side to wedge it in place while you do up the locknut. Brutal but effective.
The cone being round means you'll need hammer a screwdriver down the side to wedge it in place while you do up the locknut. Brutal but effective.
10-16-21, 08:04 PM
#7
Senior Member
Join Date: Dec 2010
Location: St Cloud Fl.
Posts: 1,945
Bikes: Only my riders left...
Mentioned: 6 Post(s)
Tagged: 0 Thread(s)
Quoted: 350 Post(s)
Liked 782 Times
in
389 Posts
Maybe, “hammer” is a bit harsh…I’ve never had to “hammer”, maybe insert with the appropriate amount of authority…sometimes all you need to do is to start with a regular size flat tip screwdriver rather than a small one..
10-16-21, 08:06 PM
#8
Senior Member
Thread Starter
Just can't see anything like a lock nut. Sorry, I'm sure it's frustrating to keep explaining. Where am I jamming the screwdriver?
10-16-21, 08:21 PM
#9
Senior Member
Join Date: Dec 2010
Location: St Cloud Fl.
Posts: 1,945
Bikes: Only my riders left...
Mentioned: 6 Post(s)
Tagged: 0 Thread(s)
Quoted: 350 Post(s)
Liked 782 Times
in
389 Posts
Hmmmm…looks like a bearing! I wish I had it in my hand…usually there’s a washer…does the round flat piece pick up with a little screwdriver, needle nose pliers? I’ve never seen a bearing at one end and ball bearings at the other…there are ball bearings at the other end, right?
10-16-21, 08:29 PM
#10
Senior Member
Thread Starter
Hmmmm�looks like a bearing! I wish I had it in my hand�usually there�s a washer�does the round flat piece pick up with a little screwdriver, needle nose pliers? I�ve never seen a bearing at one end and ball bearings at the other�there are ball bearings at the other end, right?
 10-16-21, 08:49 PM
#11
Senior Member
Join Date: Dec 2010
Location: St Cloud Fl.
Posts: 1,945
Bikes: Only my riders left...
Mentioned: 6 Post(s)
Tagged: 0 Thread(s)
Quoted: 350 Post(s)
Liked 782 Times
in
389 Posts
Well. Usually by now, I’m rummaging around in my pedal pile looking for replacements…hold on! Just looked these up…maybe a Polymer Bearing…yup…a plastic bearing…you may have to do some destructive exploration on those puppies! Keep us informed!
10-16-21, 09:12 PM
#12
Senior Member
Thread Starter
I like your style, haha. Yeah I'm going to break out the grinder tomorrow and see what's in these.
10-16-21, 09:42 PM
#13
Senior Member
Join Date: Jun 2015
Location: Down Under
Posts: 1,936
Bikes: A steel framed 26" off road tourer from a manufacturer who thinks they are cool. Giant Anthem. Trek 720 Multiroad pub bike. 10 kids bikes all under 20". Assorted waifs and unfinished projects.
Mentioned: 11 Post(s)
Tagged: 0 Thread(s)
Quoted: 1188 Post(s)
Liked 1,154 Times
in
640 Posts
Now it's clean, yep, in terms of rebuild you are SOL, they are bushing pedals, plastic sleeve and the end of the shaft riveted to hold it together.
What you can do is re grease them. That'll fix the stiff one, but it won't tighten the loose one, that's worn, but it might get you some more life.
Grab some car brake cleaner in a spray can and fill the outer end of the pedal, holding it vertical, spin the pedal from the thread end and let the brake cleaner flush any crap out of the bushing. Do it a few times. Get a can of lithium spray grease and spray a bit in the outer end and again spin it so the grease goes down the axle. Alternatively you can mix some brake cleaner and normal grease to a runny liquid and spin that in. Put the pedal somewhere warm and allow the brake cleaner to evaporate. Then pack the outer end with grease, as well as the cap and slowly push it back in, that'll force more grease down the axle. If you can push and spin the axle, even better.
Ultimately they are close to the cheapest pedals you can get and are doomed to die sooner or later.
10-16-21, 10:06 PM
#14
Senior Member
Join Date: Dec 2010
Location: St Cloud Fl.
Posts: 1,945
Bikes: Only my riders left...
Mentioned: 6 Post(s)
Tagged: 0 Thread(s)
Quoted: 350 Post(s)
Liked 782 Times
in
389 Posts
I’ve been known to fill the ends of non- rebuildable pedals with grease, push as much down into the pedals as I can with my fingers, then grab a rag and my air hose…point the nozzle of my air hose at the most obvious void that grease could possibly get into…wrap the rag around the nozzle and blow as much grease into that void as possible! Pushing the grease with my fingers work well for the open end of the pedal, but, you really need to get the grease to the other end! So push as much grease as you can into the open end…
10-16-21, 10:23 PM
#15
Senior Member
Thread Starter
These were freebies so no great loss. I'd rather replace these with something serviceable. I think mks makes decent ones. I'll post some pics when I cut these open in case anyone's curious.
Likes For cyrano138:
10-16-21, 10:32 PM
#16
Senior Member
Join Date: Apr 2010
Location: Elevation 666m Edmonton Canada
Posts: 2,482
Bikes: 2013 Custom SA5w / Rohloff Tourster
Mentioned: 7 Post(s)
Tagged: 0 Thread(s)
Quoted: 1237 Post(s)
Liked 321 Times
in
248 Posts
It could be there's a sealed bearing on the open side and just a sleeve bushing on the crank side. I can't see flats on what should be the 10 mm nut. So if it's like I said, then there's no adjustment involved. Just snug up the nut.
My Vsixty pedals were like this and lasted pretty well.
IF otherwise with loose bearing adjustment, make sure there is play and they can spin 6 or 8 revs.
My Vsixty pedals were like this and lasted pretty well.
IF otherwise with loose bearing adjustment, make sure there is play and they can spin 6 or 8 revs.
10-17-21, 08:04 AM
#17
Senior Member
Join Date: Jan 2009
Location: San Diego, CA
Posts: 3,670
Mentioned: 10 Post(s)
Tagged: 0 Thread(s)
Quoted: 836 Post(s)
Liked 1,061 Times
in
745 Posts
Have you checked if the outside end has an allen or torx head on it? It kinda, sorta looks like there may be something like that under the grease.
