


GRX Hollowtech Crank Arm
 05-25-22, 02:49 PM
#1
For The Fun of It
Thread Starter

Join Date: May 2007
Location: Louisissippi Coast
Posts: 5,851
Bikes: Lynskey GR300, Lynskey Backroad, Litespeed T6, Lynskey MT29, Burley Duet
Mentioned: 12 Post(s)
Tagged: 0 Thread(s)
Quoted: 2135 Post(s)
Liked 1,644 Times
in
826 Posts
GRX Hollowtech Crank Arm
Let me see if I can 'splain this issue.
I have set up Hollowtech crank arms without issue in the past. When I built a new gravel bike a few months ago, I set it up as I previously had (by the book on torque) and everything seemed to work out well. After several months the crank arm came loose during a ride. I got it home and re-did everything. It seemed to go back together well, although the little plastic fixing bolt seemed a bit mushy A month later, it came loose again.
This time I ordered an aftermarket aluminum fixing bolt. I replaced the retainer dohicky as well. When I snugged it up to max torque, it didn't cinch tight enough to compress against the retainer. I backed everything off. This time I ran the fixing bolt in beyond torque spec. It didn't compress the crank arm against the BB hard enough to cause drag. I tightened everything back up again. Still the crank arm didn't cinch snugly against the retainer.
Everything feels very snug. There's no slop at all. Any ideas? I really don't want to be 30 miles from the house and have this thing come loose.
 05-25-22, 04:27 PM
#2

I'm good to go!
Join Date: Jul 2017
Location: Mississippi
Posts: 14,984
Bikes: Tarmac Disc Comp Di2 - 2020
Mentioned: 51 Post(s)
Tagged: 0 Thread(s)
Quoted: 6191 Post(s)
Liked 4,807 Times
in
3,316 Posts
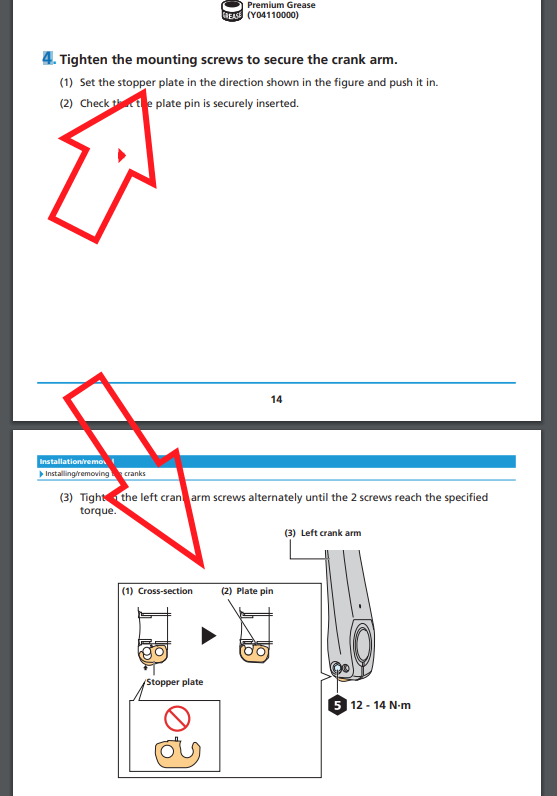
What are you calling the retainer? Is that the stopper plate in the split of the crank arm? If so, it's supposed to be pulled out slightly before you tighten the plastic cap to get the crank arm fully on the spindle. Then before tightening the pinch bolts, you push the stopper plate in to ensure that you've gotten the arm on far enough.
https://si.shimano.com/api/publish/s...001-02-ENG.pdf
Check out pages 13 - 15. This is for the FC-RX810 and FC-RX600, but much is pretty standard for the 2 piece Shimano Cranks.
https://si.shimano.com/api/publish/s...001-02-ENG.pdf
Check out pages 13 - 15. This is for the FC-RX810 and FC-RX600, but much is pretty standard for the 2 piece Shimano Cranks.
05-25-22, 05:44 PM
#3
For The Fun of It
Thread Starter
Join Date: May 2007
Location: Louisissippi Coast
Posts: 5,851
Bikes: Lynskey GR300, Lynskey Backroad, Litespeed T6, Lynskey MT29, Burley Duet
Mentioned: 12 Post(s)
Tagged: 0 Thread(s)
Quoted: 2135 Post(s)
Liked 1,644 Times
in
826 Posts
That's the way I installed it. This crank has been frustrating from tho onset. With the Shimano bottom bracket, it took substantial force to get the spindle through both cups.
05-25-22, 05:51 PM
#4
ignominious poltroon

Join Date: Jan 2022
Posts: 4,034
Mentioned: 3 Post(s)
Tagged: 0 Thread(s)
Quoted: 2238 Post(s)
Liked 3,429 Times
in
1,793 Posts
I haven't had one come loose, but I did notice it took a lot more effort to get it through the BB cups than the Ultegra crank I had before. This is my second GRX crankset, and both were like that. So I think their manufacturing tolerances changed.
I bought one of those bling aluminum crank caps and screw it in a bit tighter than recommended, before tightening down the pinch bolts on the left crank-arm. Maybe that helped keep it in place.
I bought one of those bling aluminum crank caps and screw it in a bit tighter than recommended, before tightening down the pinch bolts on the left crank-arm. Maybe that helped keep it in place.
05-25-22, 06:58 PM
#5
For The Fun of It
Thread Starter
Join Date: May 2007
Location: Louisissippi Coast
Posts: 5,851
Bikes: Lynskey GR300, Lynskey Backroad, Litespeed T6, Lynskey MT29, Burley Duet
Mentioned: 12 Post(s)
Tagged: 0 Thread(s)
Quoted: 2135 Post(s)
Liked 1,644 Times
in
826 Posts
I haven't had one come loose, but I did notice it took a lot more effort to get it through the BB cups than the Ultegra crank I had before. This is my second GRX crankset, and both were like that. So I think their manufacturing tolerances changed.
I bought one of those bling aluminum crank caps and screw it in a bit tighter than recommended, before tightening down the pinch bolts on the left crank-arm. Maybe that helped keep it in place.
I bought one of those bling aluminum crank caps and screw it in a bit tighter than recommended, before tightening down the pinch bolts on the left crank-arm. Maybe that helped keep it in place.
05-25-22, 09:12 PM
#6
Senior Member
Join Date: Aug 2005
Location: Pittsburgh, PA
Posts: 33,656
Bikes: '96 Litespeed Catalyst, '05 Litespeed Firenze, '06 Litespeed Tuscany, '20 Surly Midnight Special, All are 3x10. It is hilly around here!
Mentioned: 39 Post(s)
Tagged: 0 Thread(s)
Quoted: 2026 Post(s)
Likes: 0
Liked 1,096 Times
in
742 Posts
Did you torque the pinch bolts evenly and to their torque spec? The tightening torque is about 110 inch pounds which is quite tight and the instructions say to tighten them alternately and in increments. I have four Hollowtech II cranks and bottom brackets and none of them have ever come loose. Tightened properly the "plastic doohicky that sits in the gap" shouldn't move at all.
05-25-22, 09:28 PM
#7
ignominious poltroon
Join Date: Jan 2022
Posts: 4,034
Mentioned: 3 Post(s)
Tagged: 0 Thread(s)
Quoted: 2238 Post(s)
Liked 3,429 Times
in
1,793 Posts
The plastic part is the cap that threads into the left crank arm to press the crank arm down on the spindle. Shimano sells another piece of plastic that allows you to hand-tighten it, the idea being they don't want you to over-do it. But if you haven't tightened it down properly and seated the metal retaining clip properly before tightening the two opposing pinch bolts, this would likely be the source of your problems.
Here are some photos ...

The bag that the Shimano plastic crank tightener came in.
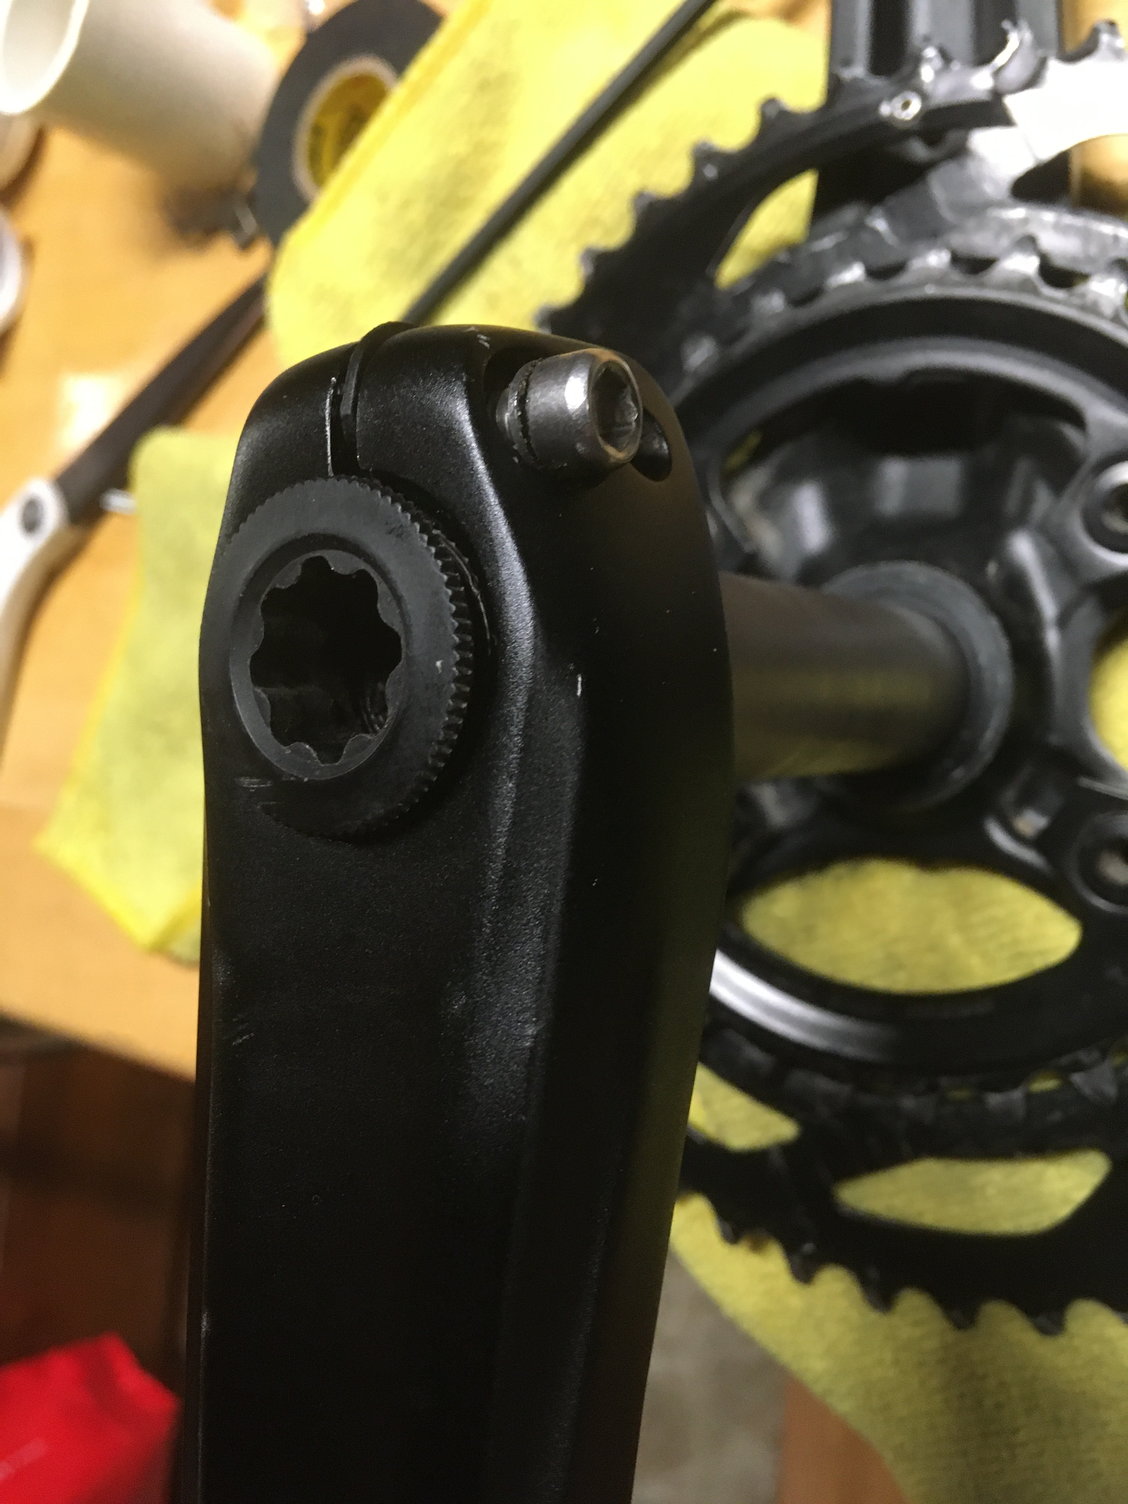
How the gap with the metal doohickie should look.
The crank arm loosely fitted, showing the compression/extraction plastic cap, into which the Shimano plastic crank tightener tool is inserted.

The metal doohickie that prevents the left crank arm from sliding off if the bolts come loose.

The partially exposed metal doohickie.

The Shimano crank tightener/extractor tool mated with the crank cap.
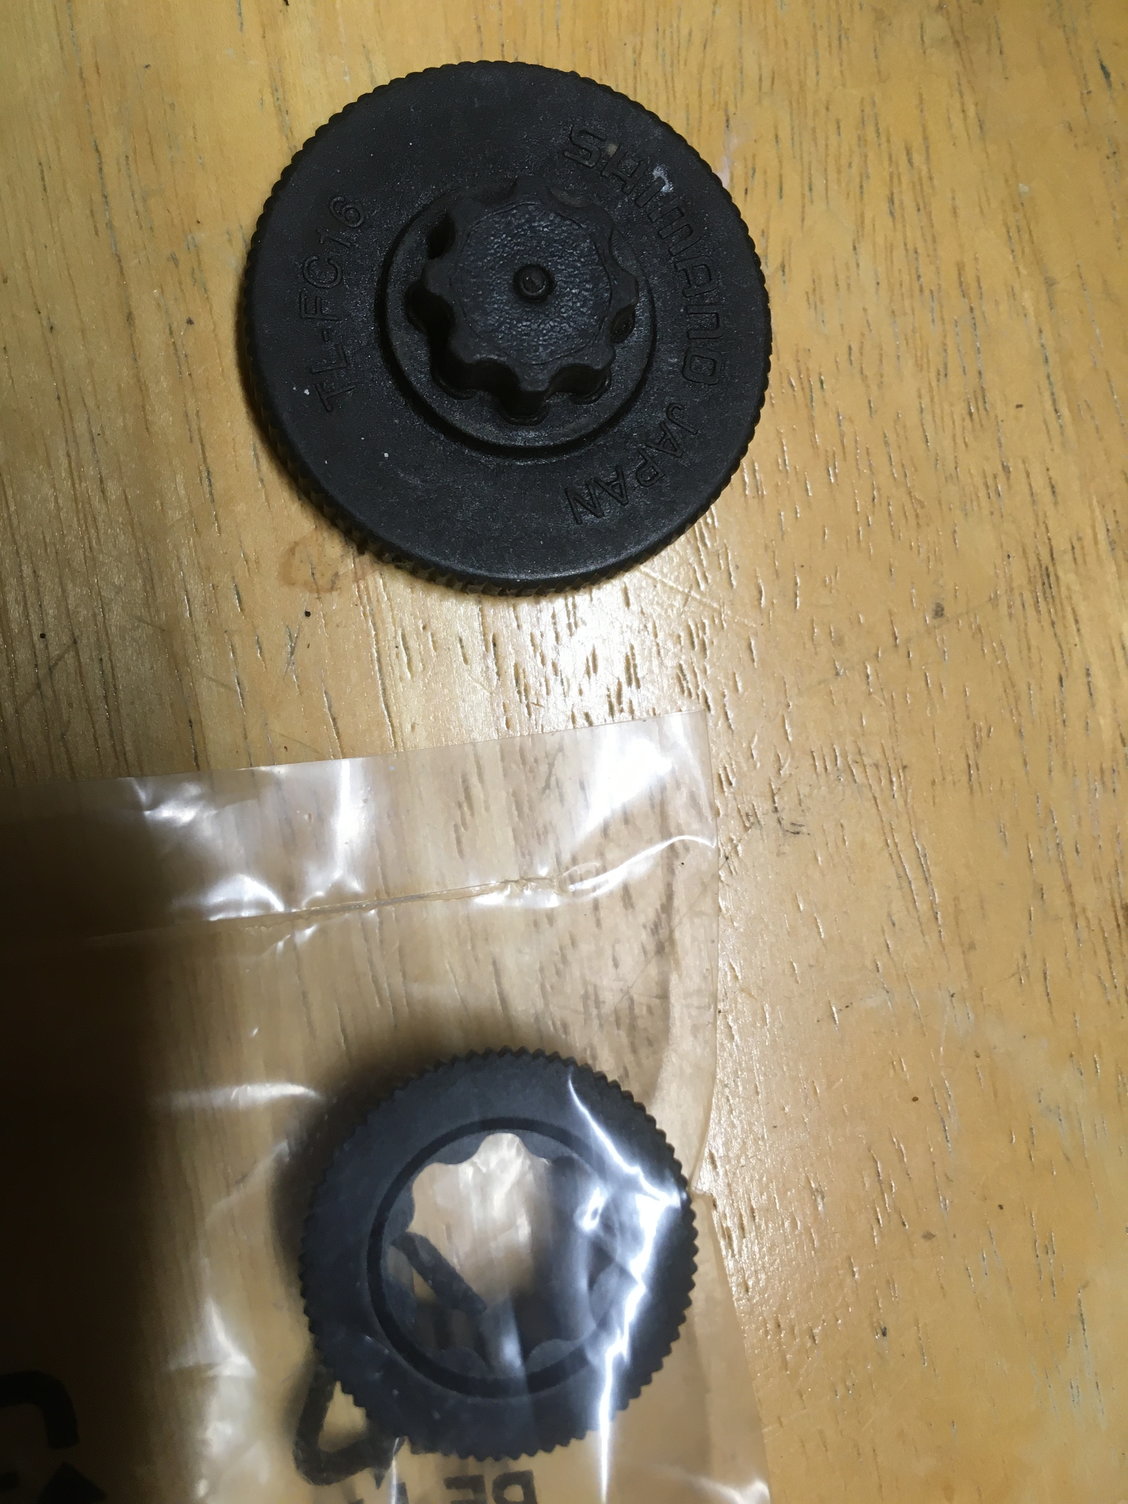
The tool and an extra crank cap.
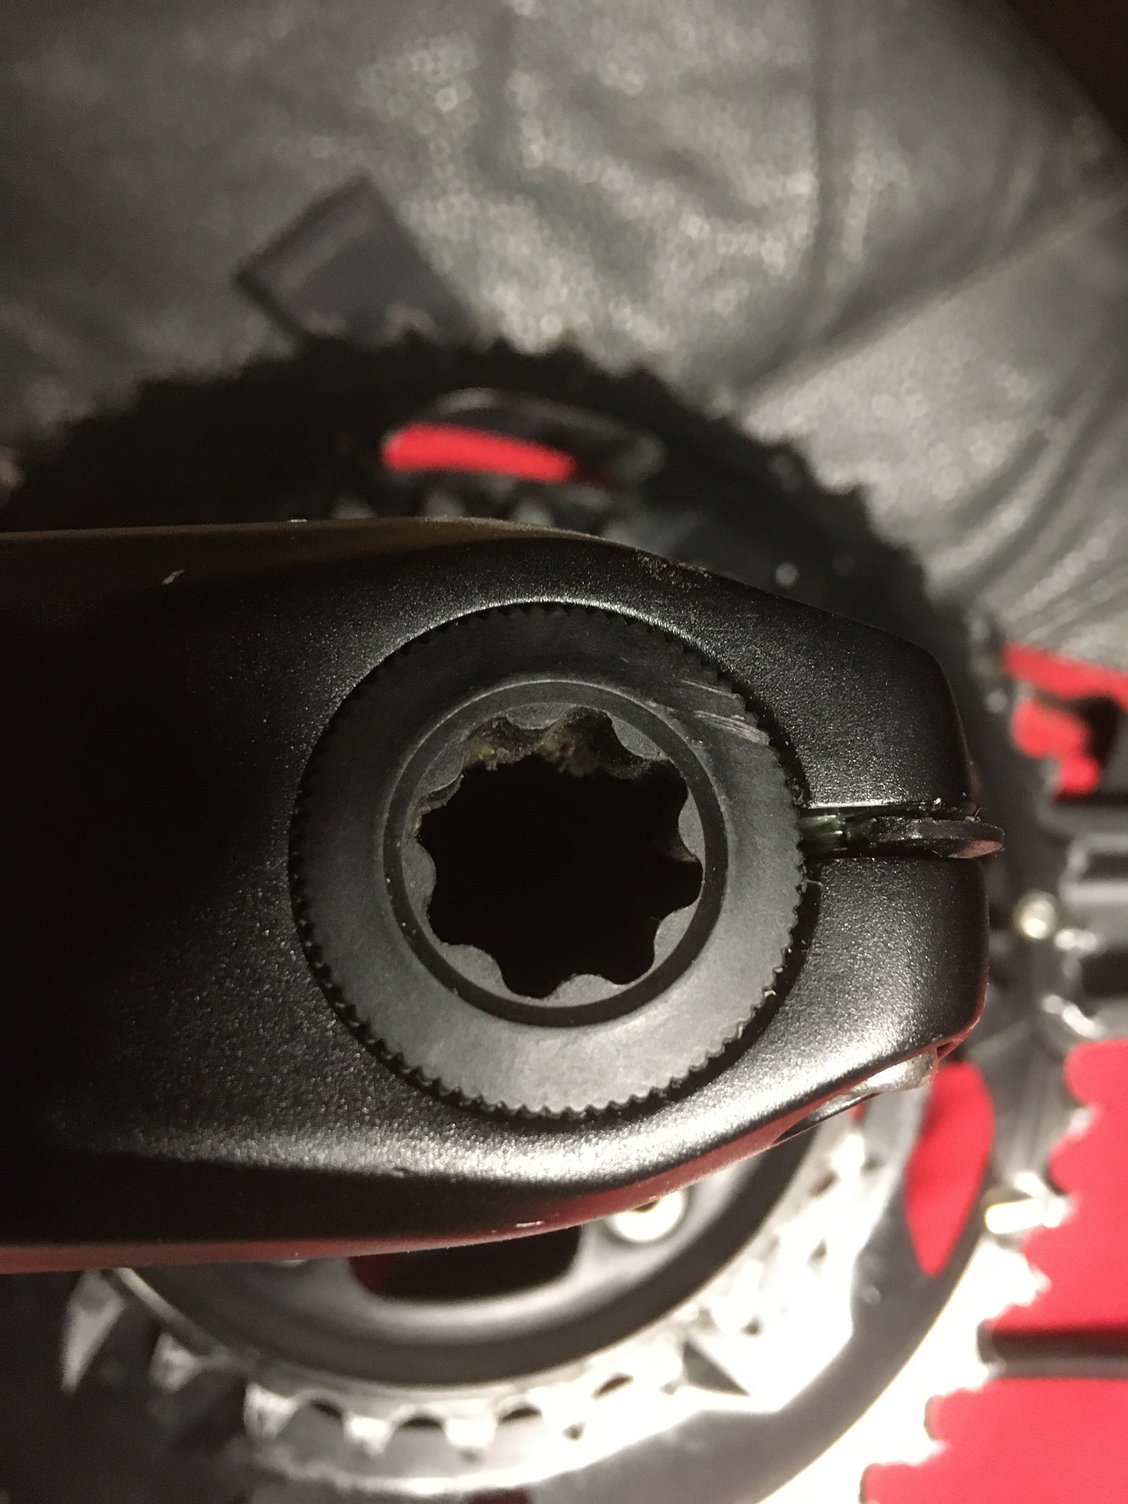
Close-up of the crank cap, with the slot and doohickie also visible.

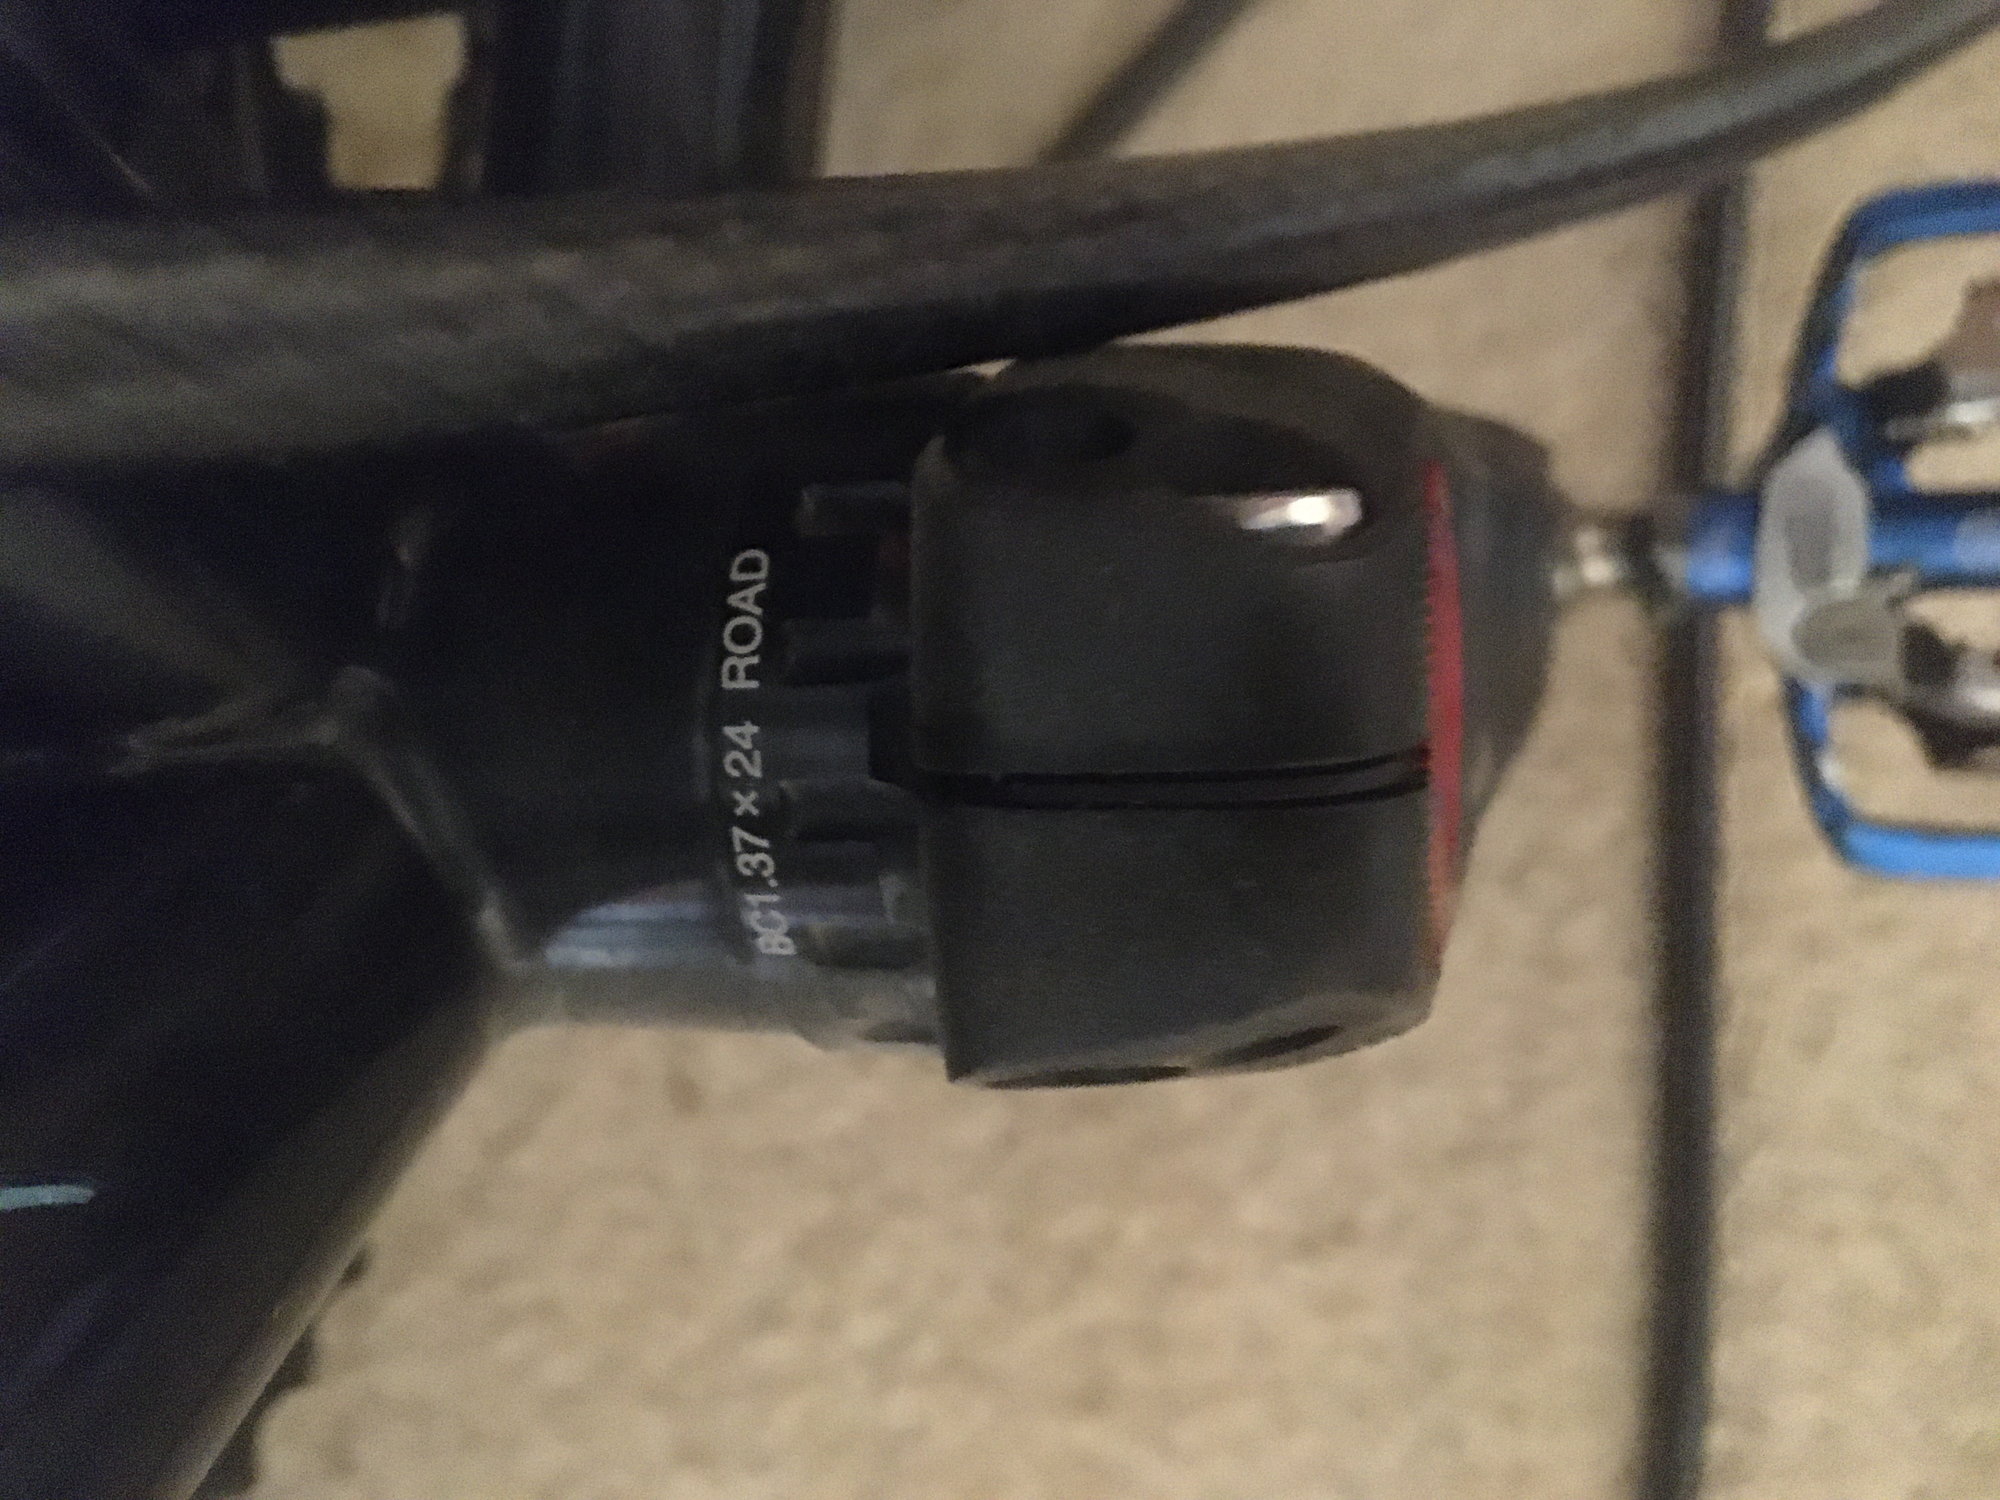
The torque spec on the side of the GRX crankarm
Last edited by Polaris OBark; 05-25-22 at 09:52 PM. Reason: add some photos
Likes For Polaris OBark:
05-26-22, 04:59 AM
#8
For The Fun of It
Thread Starter
Join Date: May 2007
Location: Louisissippi Coast
Posts: 5,851
Bikes: Lynskey GR300, Lynskey Backroad, Litespeed T6, Lynskey MT29, Burley Duet
Mentioned: 12 Post(s)
Tagged: 0 Thread(s)
Quoted: 2135 Post(s)
Liked 1,644 Times
in
826 Posts
Wow Polaris, I appreciate the effort. I thought the "spacer" was plastic not metal. It looks like from your second photo that when you tighten the crank arm bolts that it doesn't compress down on the spacer. Mine did when I had the factory plastic crank arm fixing bolt on. When I replaced it with the red fancy alloy fixing bolt like you have done, and tightened the two crank arm bolts, it didn't cinch down on the spacer piece.
Just looked at my other two Hollowtech bikes. They are completely factory and they don't compress on the spacer piece either.
I may be good now.
Just looked at my other two Hollowtech bikes. They are completely factory and they don't compress on the spacer piece either.
I may be good now.
05-26-22, 08:33 AM
#9
ignominious poltroon
Join Date: Jan 2022
Posts: 4,034
Mentioned: 3 Post(s)
Tagged: 0 Thread(s)
Quoted: 2238 Post(s)
Liked 3,429 Times
in
1,793 Posts
cxwrench in another thread calls it a "safety plate" FWIW.
Last edited by Polaris OBark; 05-26-22 at 08:38 AM.
Likes For Polaris OBark:
05-26-22, 08:38 AM
#10
I'm good to go!
Join Date: Jul 2017
Location: Mississippi
Posts: 14,984
Bikes: Tarmac Disc Comp Di2 - 2020
Mentioned: 51 Post(s)
Tagged: 0 Thread(s)
Quoted: 6191 Post(s)
Liked 4,807 Times
in
3,316 Posts
Stopper plate!
Likes For Iride01:
05-26-22, 08:43 AM
#11
ignominious poltroon
Join Date: Jan 2022
Posts: 4,034
Mentioned: 3 Post(s)
Tagged: 0 Thread(s)
Quoted: 2238 Post(s)
Liked 3,429 Times
in
1,793 Posts
Doohickey
Likes For Polaris OBark:
Likes For Camilo:
05-26-22, 07:55 PM
#13
ignominious poltroon
Join Date: Jan 2022
Posts: 4,034
Mentioned: 3 Post(s)
Tagged: 0 Thread(s)
Quoted: 2238 Post(s)
Liked 3,429 Times
in
1,793 Posts
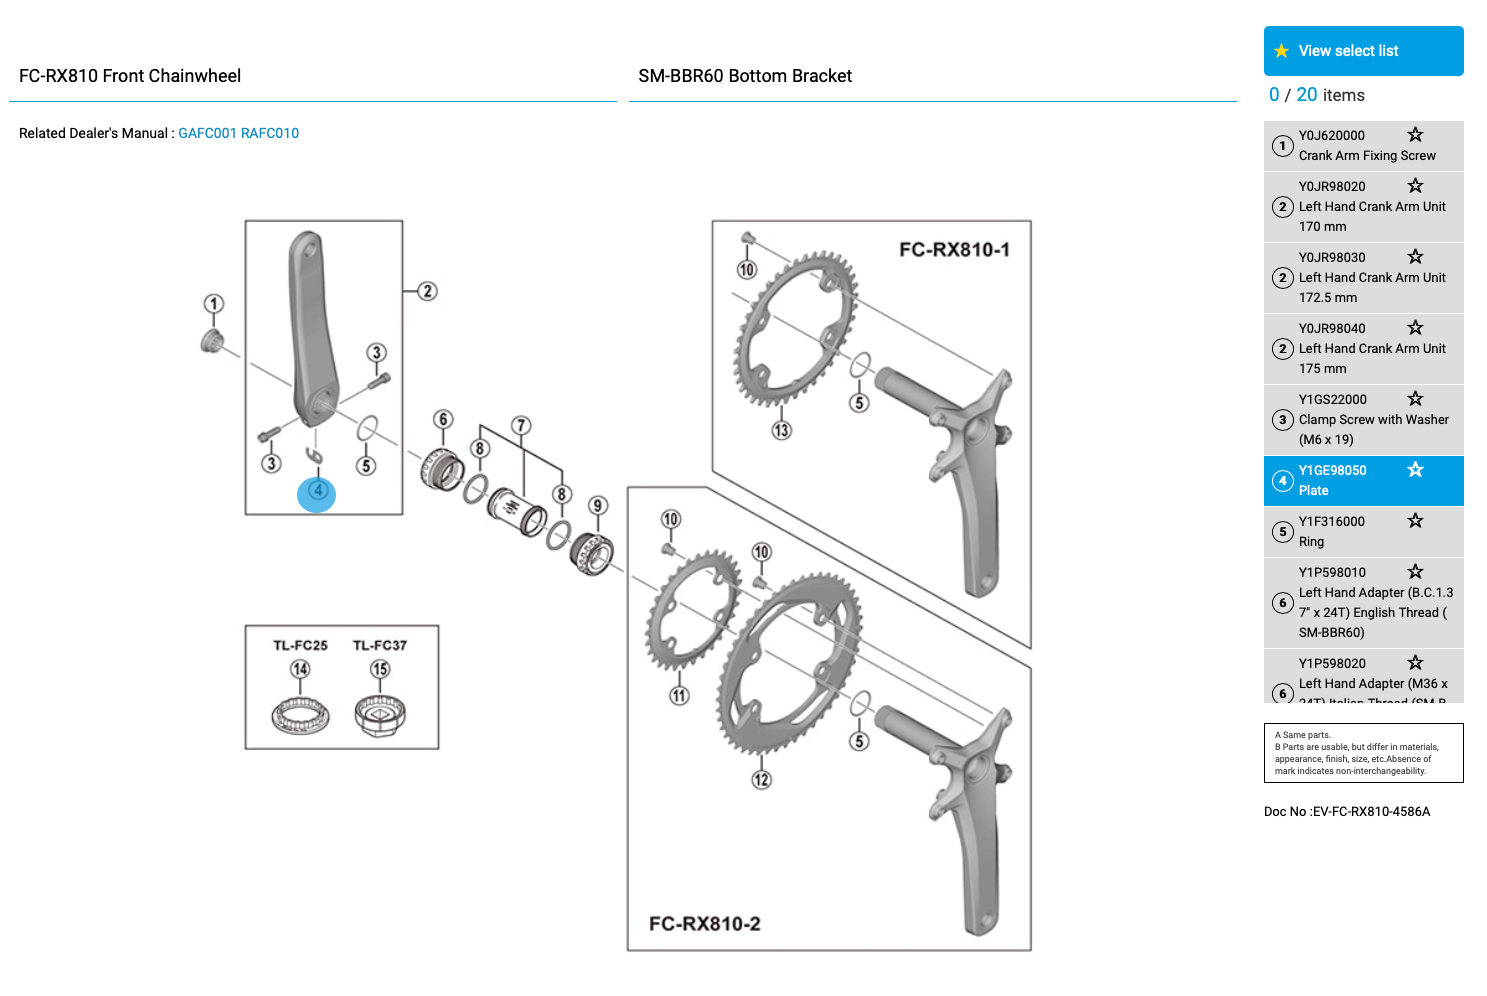
OK, I looked it up on Shimano's website: https://si.shimano.com/#/en/iEV/FC-RX810
Officially, it is simply called "Plate".
Officially, it is simply called "Plate".
05-27-22, 08:53 AM
#14
I'm good to go!
Join Date: Jul 2017
Location: Mississippi
Posts: 14,984
Bikes: Tarmac Disc Comp Di2 - 2020
Mentioned: 51 Post(s)
Tagged: 0 Thread(s)
Quoted: 6191 Post(s)
Liked 4,807 Times
in
3,316 Posts
OK, I looked it up on Shimano's website: https://si.shimano.com/#/en/iEV/FC-RX810
Officially, it is simply called "Plate".
Officially, it is simply called "Plate".
https://si.shimano.com/api/publish/s...001-02-ENG.pdf
So are we at an impasse? Seems like in the call out list you point to, they are specific about the screws specifying the size and pitch of threads. For some reason Shimano decided to be less specific about the stopper plate in that list but more specific in the actual instructions, yet in those same instructions they are less specific about the screws. They simply call them screws.
I always thought it funny that in this diagram, they show the crankarm from the rear view. I'm always use to diagrams showing from the front view. And I've heard of people that have stopper plates backwards in their crank arms. Did they take them out and put them back in not realizing that the view is from the rear?
Or is the bike upside down for Shimano's diagrams and it is the front view.... but upside down.
Last edited by Iride01; 05-27-22 at 09:02 AM.
Likes For Iride01:
05-27-22, 09:15 AM
#15
I'm good to go!
Join Date: Jul 2017
Location: Mississippi
Posts: 14,984
Bikes: Tarmac Disc Comp Di2 - 2020
Mentioned: 51 Post(s)
Tagged: 0 Thread(s)
Quoted: 6191 Post(s)
Liked 4,807 Times
in
3,316 Posts
Paul Barnard did you get it sorted out?
Curious about your statement the other arms don't compress the stopper plate. Does this arm compress the stopper plate?
Curious about your statement the other arms don't compress the
05-27-22, 09:31 AM
#16
ignominious poltroon
Join Date: Jan 2022
Posts: 4,034
Mentioned: 3 Post(s)
Tagged: 0 Thread(s)
Quoted: 2238 Post(s)
Liked 3,429 Times
in
1,793 Posts
Makes sense. "Plate" by itself doesn't tell you much. Safety/stopper/retainer clip would make it clearer.
The instructions you posted are definitely better/more detailed and explicit than the ones that I found (DM for GRX crankset).
The instructions you posted are definitely better/more detailed and explicit than the ones that I found (DM for GRX crankset).
05-29-22, 11:40 AM
#17
ignominious poltroon
Join Date: Jan 2022
Posts: 4,034
Mentioned: 3 Post(s)
Tagged: 0 Thread(s)
Quoted: 2238 Post(s)
Liked 3,429 Times
in
1,793 Posts
Paul Barnard did you get it sorted out?
Curious about your statement the other arms don't compress the stopper plate. Does this arm compress the stopper plate?
Curious about your statement the other arms don't compress the
05-29-22, 12:29 PM
#18
I'm good to go!
Join Date: Jul 2017
Location: Mississippi
Posts: 14,984
Bikes: Tarmac Disc Comp Di2 - 2020
Mentioned: 51 Post(s)
Tagged: 0 Thread(s)
Quoted: 6191 Post(s)
Liked 4,807 Times
in
3,316 Posts
If it compressed the stopper plate, it would either need to crush the 24 mm hollow spindle, or not be put on right (with both screws balanced), which would lead to the crankarm coming off, which it did. (Even then, I would be surprised if it could pinch down on that plate.)
Likes For Iride01:
