


Come Again #150
 10-18-21, 08:54 PM
#1

Senior Member
Thread Starter
Join Date: Feb 2012
Location: Rochester, NY
Posts: 18,063
Bikes: Stewart S&S coupled sport tourer, Stewart Sunday light, Stewart Commuting, Stewart Touring, Co Motion Tandem, Stewart 3-Spd, Stewart Track, Fuji Finest, Mongoose Tomac ATB, GT Bravado ATB, JCP Folder, Stewart 650B ATB
Mentioned: 0 Post(s)
Tagged: 0 Thread(s)
Quoted: 4197 Post(s)
Liked 3,849 Times
in
2,300 Posts
Come Again #150
It's time to continue my MtB frame project, or restart it after last spring's attempt ending in a nasty crash. Here's the link to that story A Long Time Coming - Bike Forums Before I could start a new MtB bike I had to build a road/rainy day bike for the wife. Which is done and as soon as she picks a color off it goes to get sprayed.
The subject of this thread is a 650B (I so dislike the 27.5" label) dual rigid MtB with 2.5ish tires. The fork if from the crashed first one, it wasn't bent at all so will see life again. I won't do a complete build photo set but will post interesting points along the way. Today we have two aspects to mention.
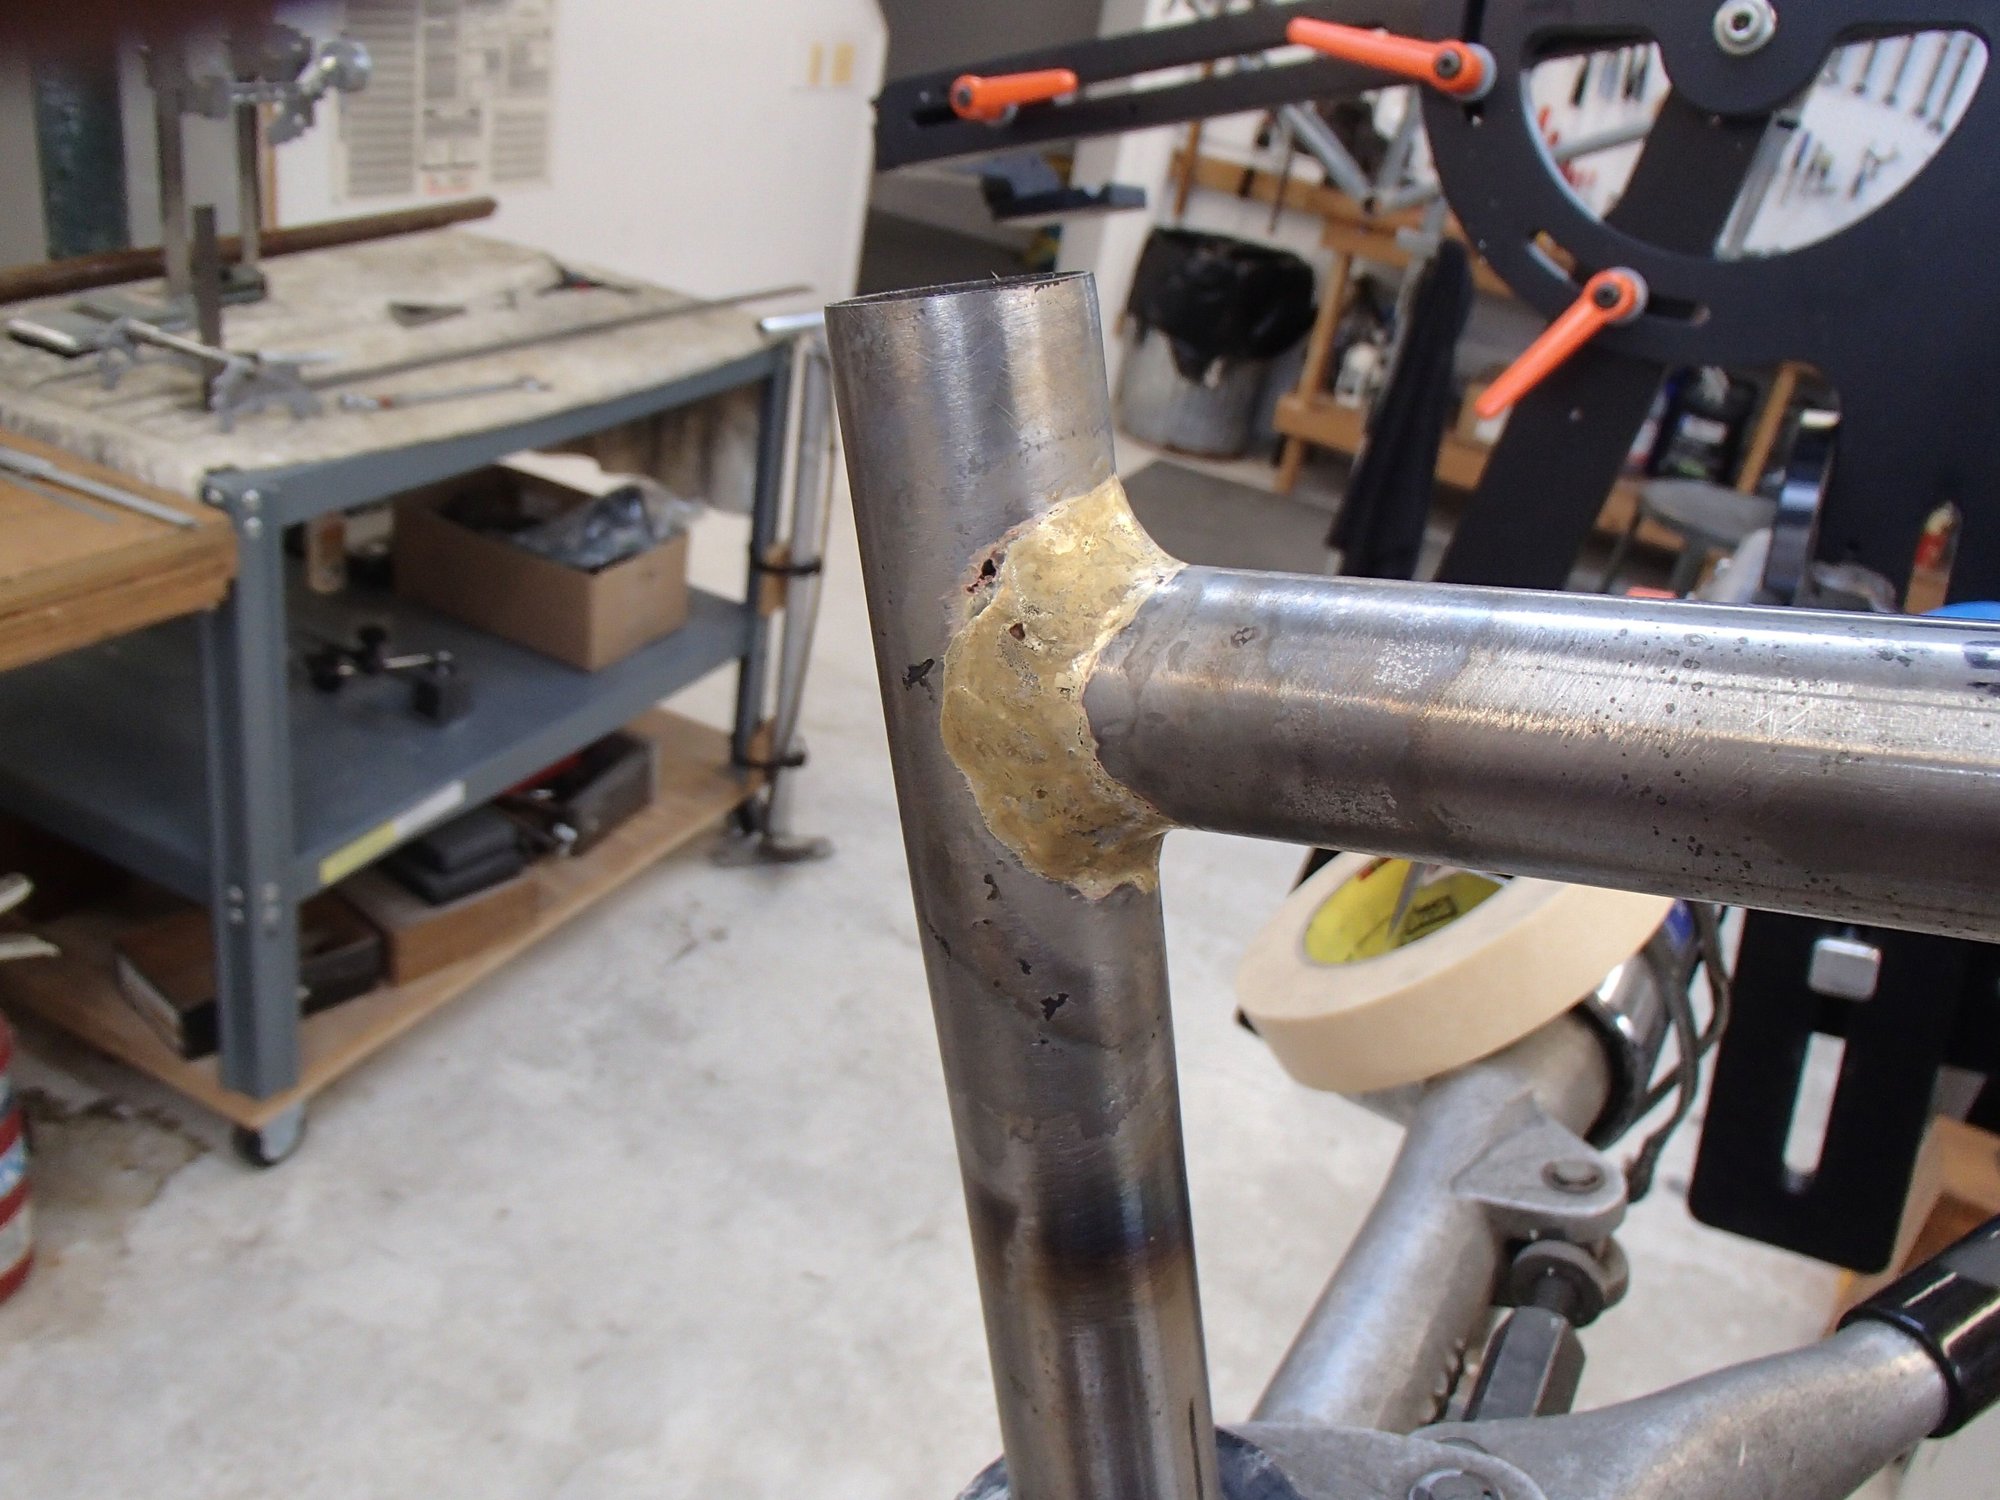
Typical fillet photo, after flux is soaked off but with no filing or sanding. One of the things about doing fillets is the filing/sanding finishing part. Some have suggested otherwise but I don't like filing anymore then the next guy so seeing how ok (I won't say nice) looking the fillets I did today are I've decided to do no more then sand blasting clean up and leave the fillets as is. Being just a MtB I'm good with this This will save me quite a few hours and almost seems wrong, but not quite.

My first MtB frame had a significant Scallop and capping of that to get tire clearance. It was a lot of work and I didn't like the results much. So this time I tried a double bent stay, a Reynolds 631 pair. Mocking up the rear end showed less tire clearance then I liked so I took the plunge and crimped the tight spot. It took some deep breathing and walk away and come back before I cranked the crimper down. The oval stay barely fit my crimper cradle but I think the results are pretty nice. This gained me about 2-3mm of added gap per side, I think enough for my tire choice. I still have to check out the chain ring clearances but that should be less stressful to deal with. Andy
The subject of this thread is a 650B (I so dislike the 27.5" label) dual rigid MtB with 2.5ish tires. The fork if from the crashed first one, it wasn't bent at all so will see life again. I won't do a complete build photo set but will post interesting points along the way. Today we have two aspects to mention.
Typical fillet photo, after flux is soaked off but with no filing or sanding. One of the things about doing fillets is the filing/sanding finishing part. Some have suggested otherwise but I don't like filing anymore then the next guy so seeing how ok (I won't say nice) looking the fillets I did today are I've decided to do no more then sand blasting clean up and leave the fillets as is. Being just a MtB I'm good with this
This will save me quite a few hours and almost seems wrong, but not quite. My first MtB frame had a significant Scallop and capping of that to get tire clearance. It was a lot of work and I didn't like the results much. So this time I tried a double bent stay, a Reynolds 631 pair. Mocking up the rear end showed less tire clearance then I liked so I took the plunge and crimped the tight spot. It took some deep breathing and walk away and come back before I cranked the crimper down. The oval stay barely fit my crimper cradle but I think the results are pretty nice. This gained me about 2-3mm of added gap per side, I think enough for my tire choice. I still have to check out the chain ring clearances but that should be less stressful to deal with. Andy
__________________
AndrewRStewart
AndrewRStewart

Likes For Andrew R Stewart:
10-31-21, 07:32 PM
#2
Senior Member
Thread Starter
Join Date: Feb 2012
Location: Rochester, NY
Posts: 18,063
Bikes: Stewart S&S coupled sport tourer, Stewart Sunday light, Stewart Commuting, Stewart Touring, Co Motion Tandem, Stewart 3-Spd, Stewart Track, Fuji Finest, Mongoose Tomac ATB, GT Bravado ATB, JCP Folder, Stewart 650B ATB
Mentioned: 0 Post(s)
Tagged: 0 Thread(s)
Quoted: 4197 Post(s)
Liked 3,849 Times
in
2,300 Posts
Well, I guess that there wasn't too much that I found interesting to show in making this frame... Or at least what was photo worthy. There are some details that I will expound on after paint and build up (which will be a couple of months now that the cold weather is with us). For today here's the other construction detail that some might want to keep as a future option on their builds.
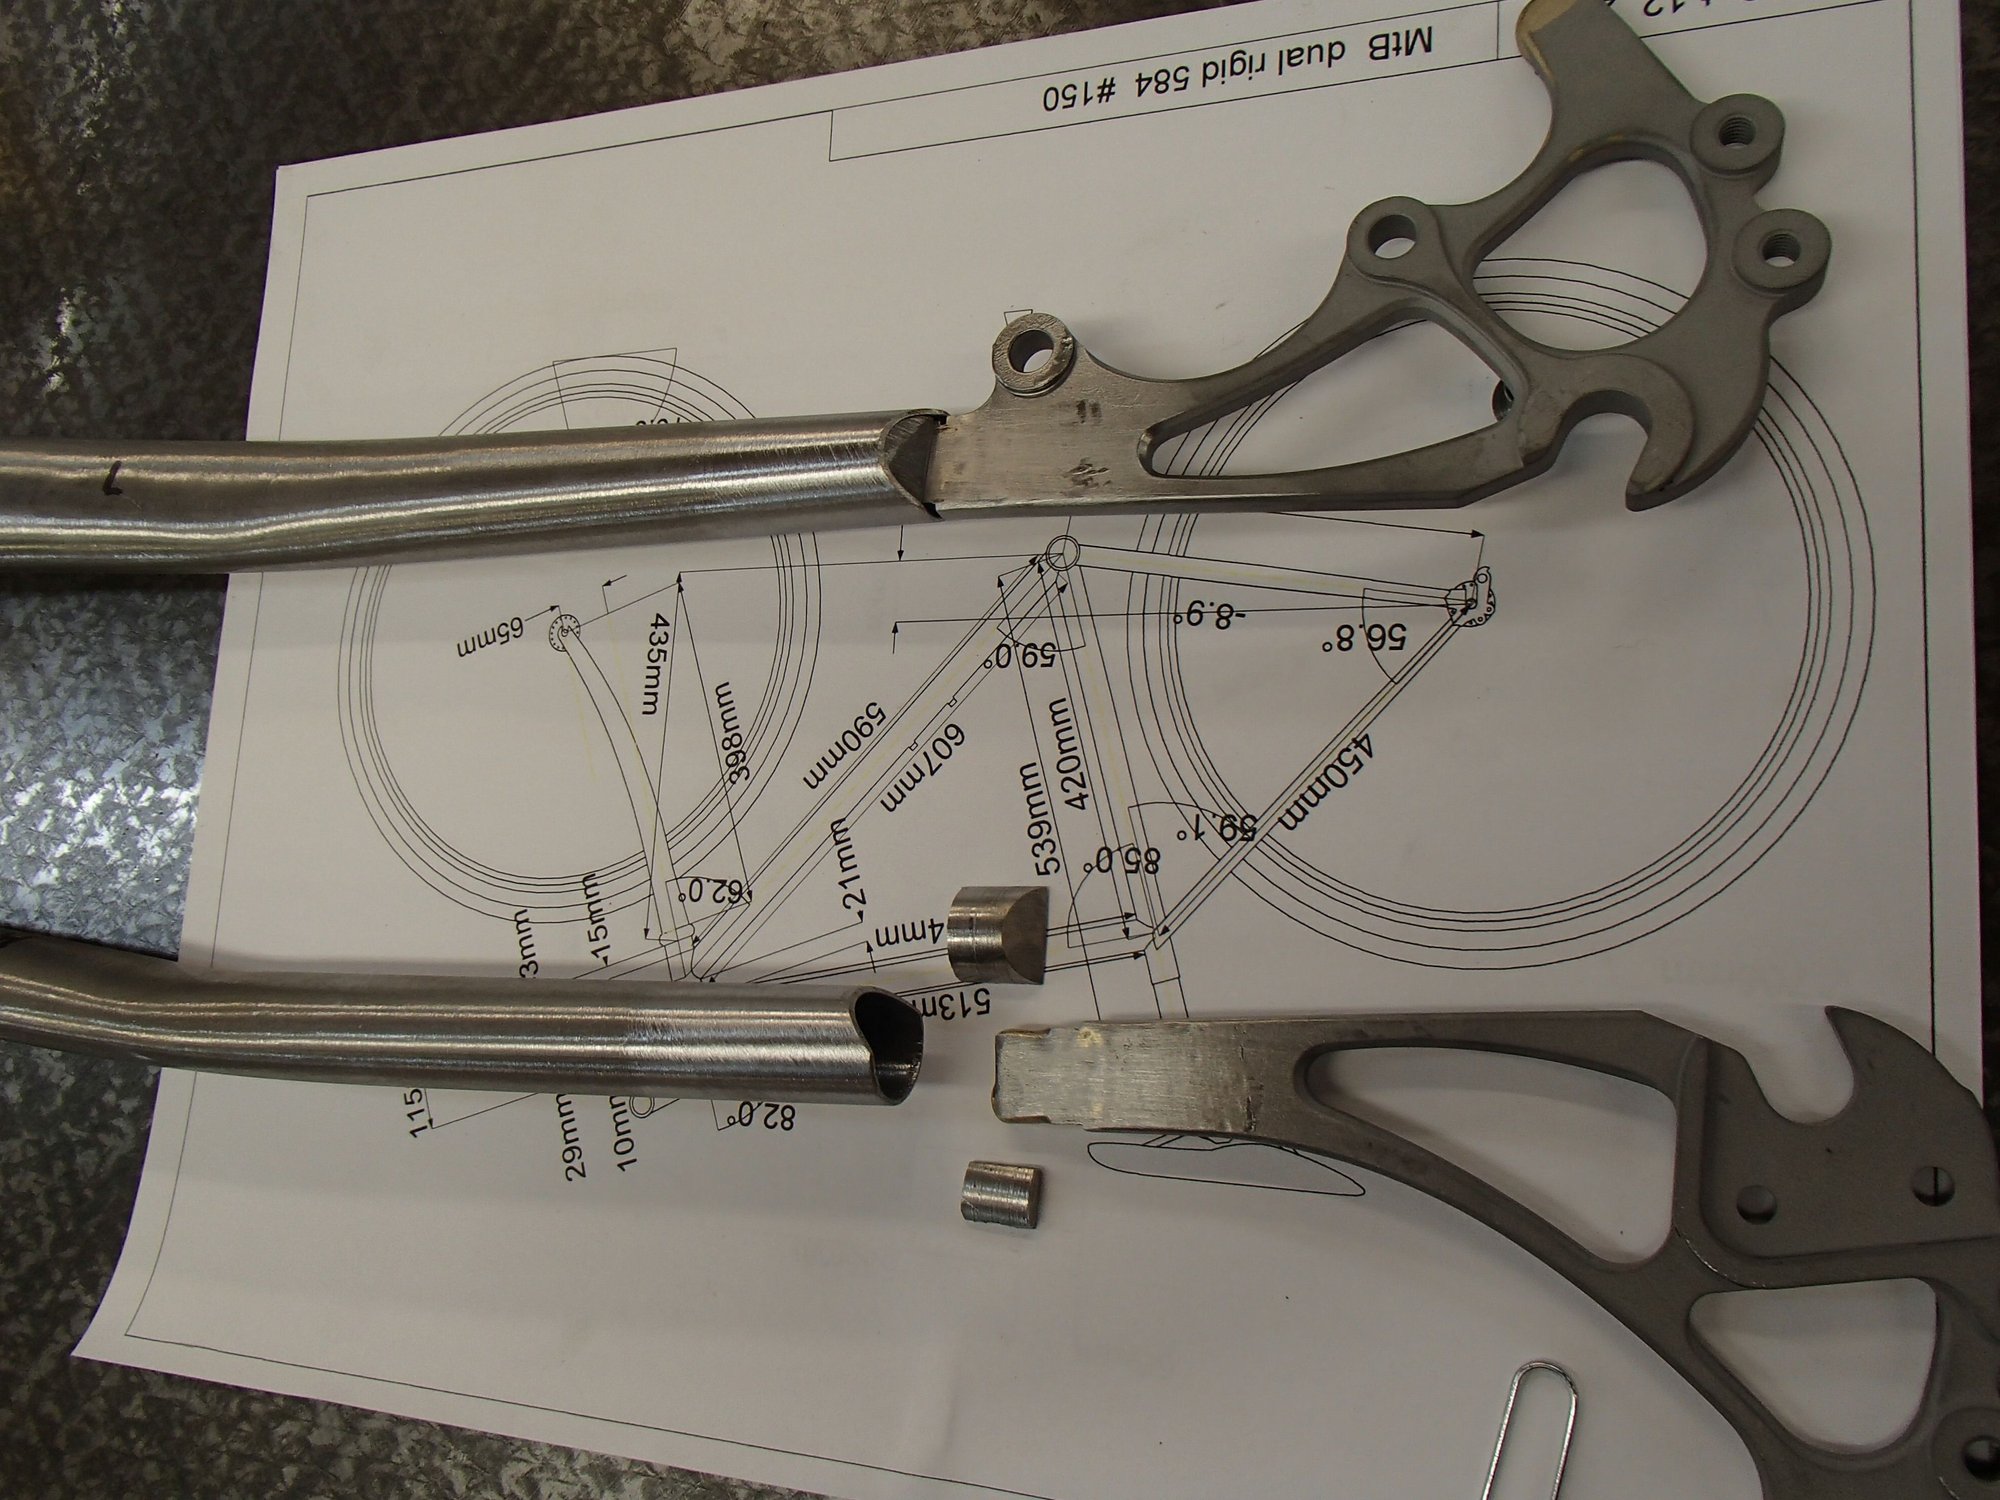
Like the fork blade ends, the chain stays are rather large and with the plate/tab dropouts this means there's a huge whale mouth of open stay end to fill. So I took a page from the 1970's 753 builders and used a plug to fill the open gap (of course back then it was to be able to use silver filler). I cut, filed and ground a couple of plugs for the outer side. The inner side's opening is less but I still added plugs to that side. On the brazing these plugs sucked into the stay end a bit. So I still had to fill a big mouth anyways. But with the less then usual overlap between the dropout tab and the stay more material filling the ends isn't bad.
I am looking to powder coat this frame/fork. The first MtB was blued then clear coated and if we were having summer weather I might have done that again. How I will protect decals is yet to be figured out. I might go unbranded Andy

Like the fork blade ends, the chain stays are rather large and with the plate/tab dropouts this means there's a huge whale mouth of open stay end to fill. So I took a page from the 1970's 753 builders and used a plug to fill the open gap (of course back then it was to be able to use silver filler). I cut, filed and ground a couple of plugs for the outer side. The inner side's opening is less but I still added plugs to that side. On the brazing these plugs sucked into the stay end a bit. So I still had to fill a big mouth anyways. But with the less then usual overlap between the dropout tab and the stay more material filling the ends isn't bad.
I am looking to powder coat this frame/fork. The first MtB was blued then clear coated and if we were having summer weather I might have done that again. How I will protect decals is yet to be figured out. I might go unbranded
Andy
__________________
AndrewRStewart
AndrewRStewart
Likes For Andrew R Stewart:
11-01-21, 04:54 AM
#3
Senior Member
Join Date: Jan 2013
Location: South Jersey
Posts: 2,262
Mentioned: 18 Post(s)
Tagged: 0 Thread(s)
Quoted: 713 Post(s)
Liked 796 Times
in
473 Posts
Oracal 651 is quite durable for decals. I use it for the decals on my frames and never had one come off. No need for any clear coat and it makes it easy to replace them if one gets damaged.
11-01-21, 07:55 PM
#4
Senior Member
Thread Starter
Join Date: Feb 2012
Location: Rochester, NY
Posts: 18,063
Bikes: Stewart S&S coupled sport tourer, Stewart Sunday light, Stewart Commuting, Stewart Touring, Co Motion Tandem, Stewart 3-Spd, Stewart Track, Fuji Finest, Mongoose Tomac ATB, GT Bravado ATB, JCP Folder, Stewart 650B ATB
Mentioned: 0 Post(s)
Tagged: 0 Thread(s)
Quoted: 4197 Post(s)
Liked 3,849 Times
in
2,300 Posts
Thanks for the suggestion but I have SSS Ink dry transfers already made up so that is what I will be using, if at all. Andy
__________________
AndrewRStewart
AndrewRStewart
11-01-21, 08:35 PM
#5
Senior Member
Thread Starter
Join Date: Feb 2012
Location: Rochester, NY
Posts: 18,063
Bikes: Stewart S&S coupled sport tourer, Stewart Sunday light, Stewart Commuting, Stewart Touring, Co Motion Tandem, Stewart 3-Spd, Stewart Track, Fuji Finest, Mongoose Tomac ATB, GT Bravado ATB, JCP Folder, Stewart 650B ATB
Mentioned: 0 Post(s)
Tagged: 0 Thread(s)
Quoted: 4197 Post(s)
Liked 3,849 Times
in
2,300 Posts
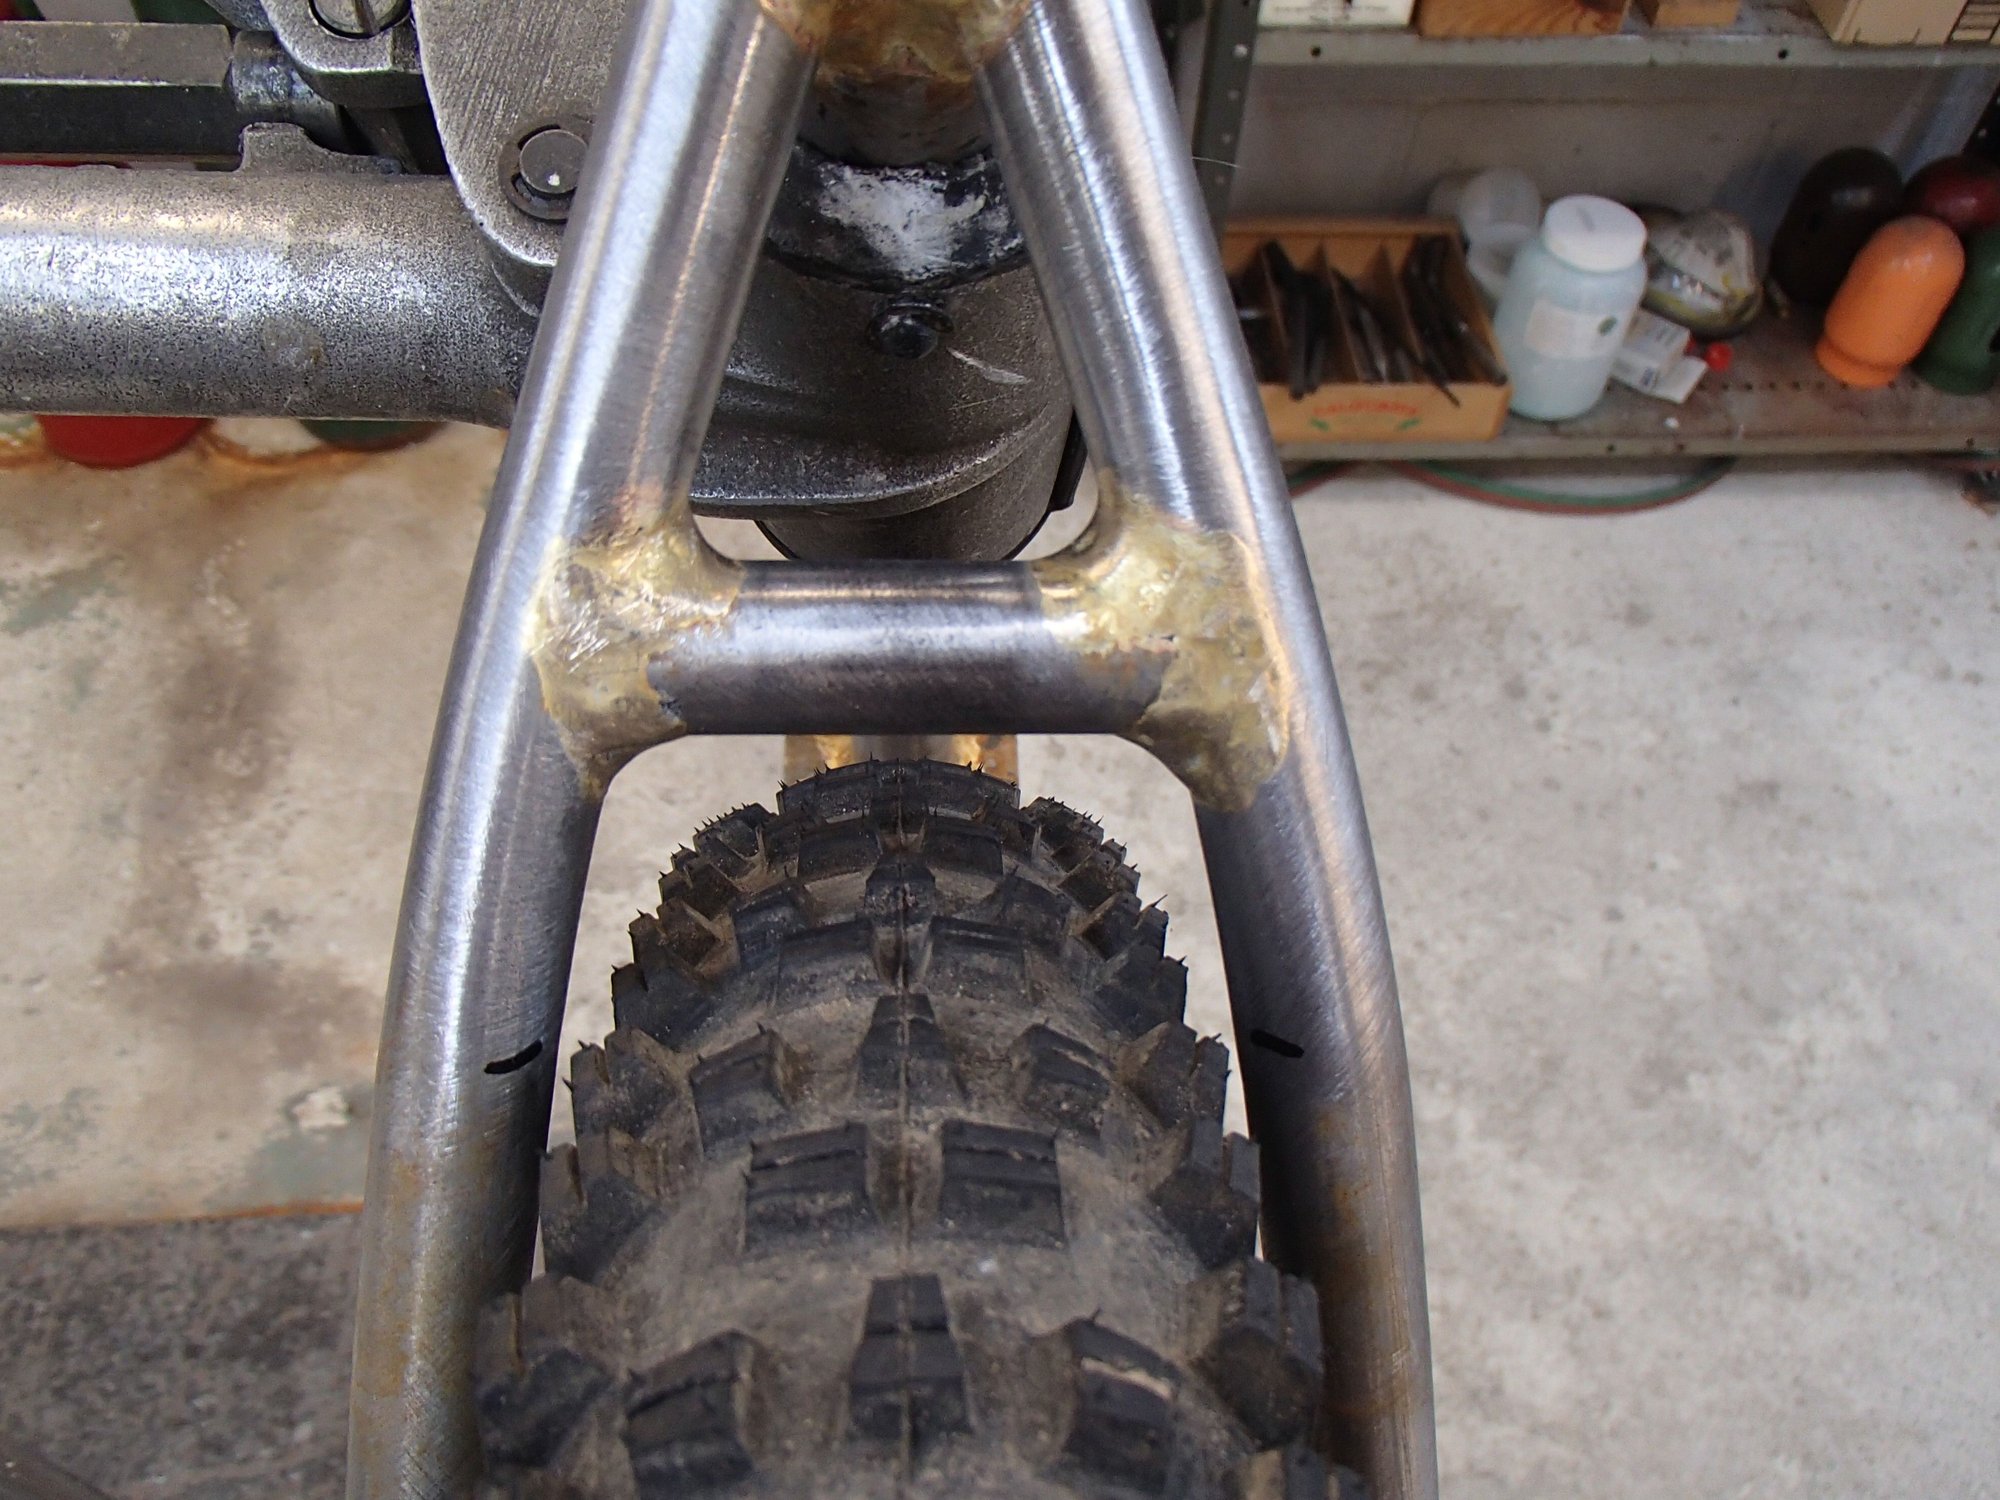
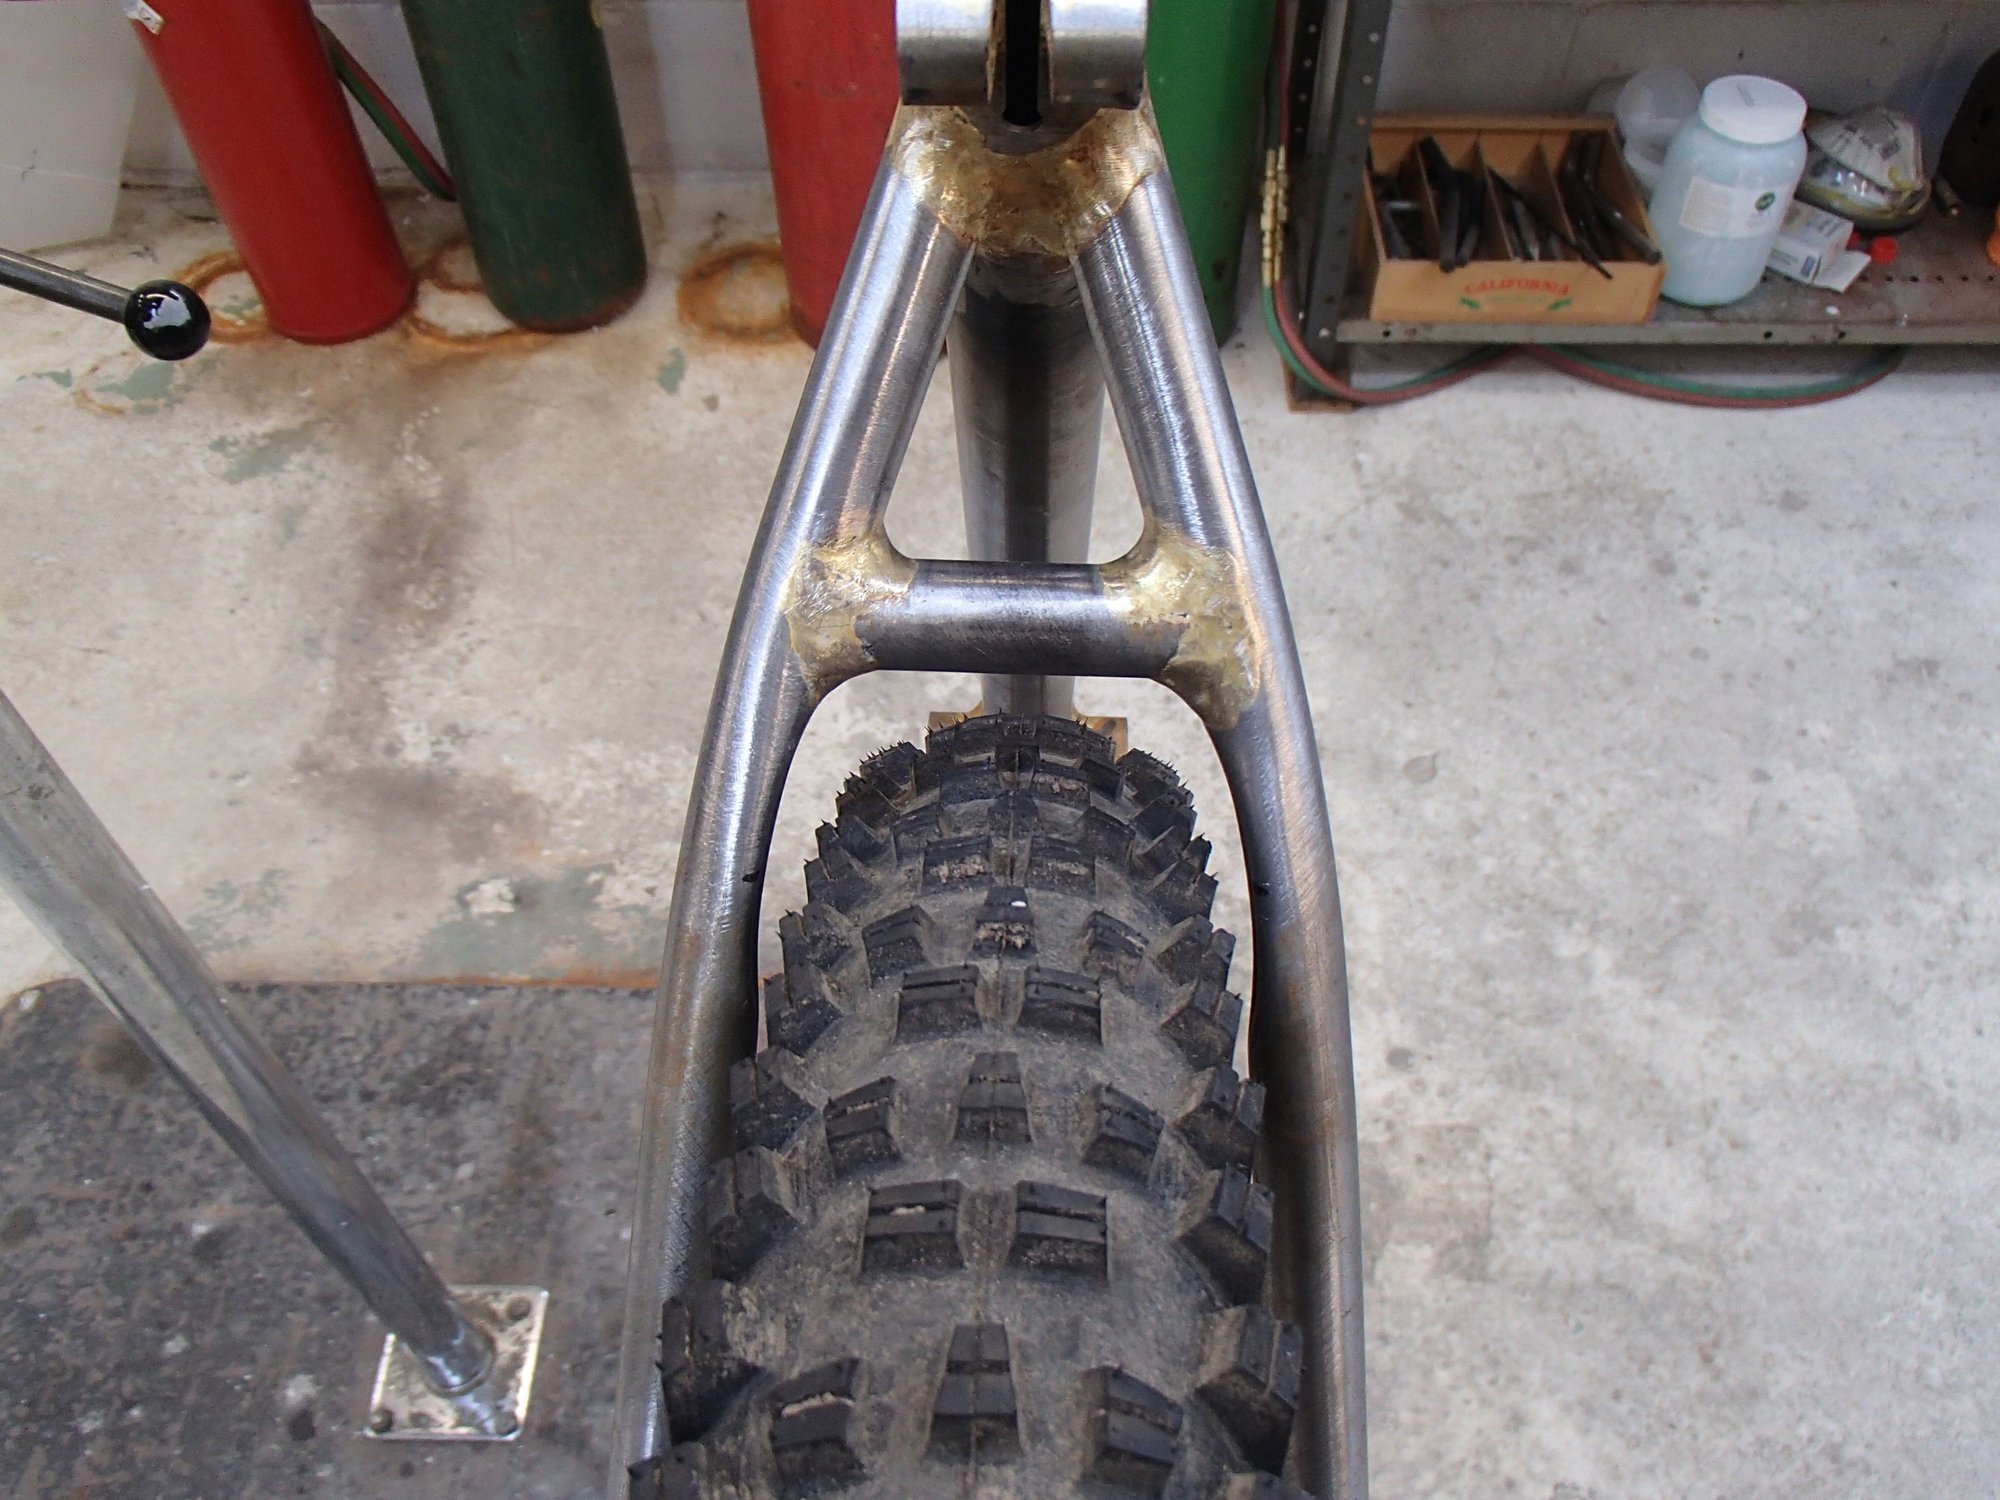
My claim this frame was done turned out to be premature. This morning I discovered that the seat stay/tire gaps were about half what I had measured during the set up. On a road bike the aprox. 2.5mm gaps might be ok but on a mudder not at all. What was I to do? I could crimp the stays a bit, Cut the SS bridge and spread the stays at the tire's radius, then "bridge" the bridge with an insert spanning that gap. Replace the stays with a pair with more tire bent clearance. Or just ride the dam bike. I did the right thing and went for a ride to mull over what to do. Here's the shot of the minimal clearances.
Returning to home I had a plan, actually two plans to be begun at the same time. I figured that at worst case I could replace the stays so began trying to bend a second set more then the first. At the same time I was considering bending the current ones wider. If this failed then the replacement was on deck.
My attempt to bend a stay (16mm diameter and about .8mm wall)resulted in both a disfigured stay (the bend resulted in an indent on it's inside, like a crimp), bender block dents and a pulley flange cracking off failure (cast steel pulley). Not a fun moment as I looked at the broken pulley and ruined stay (which will be recycled as other frame parts).
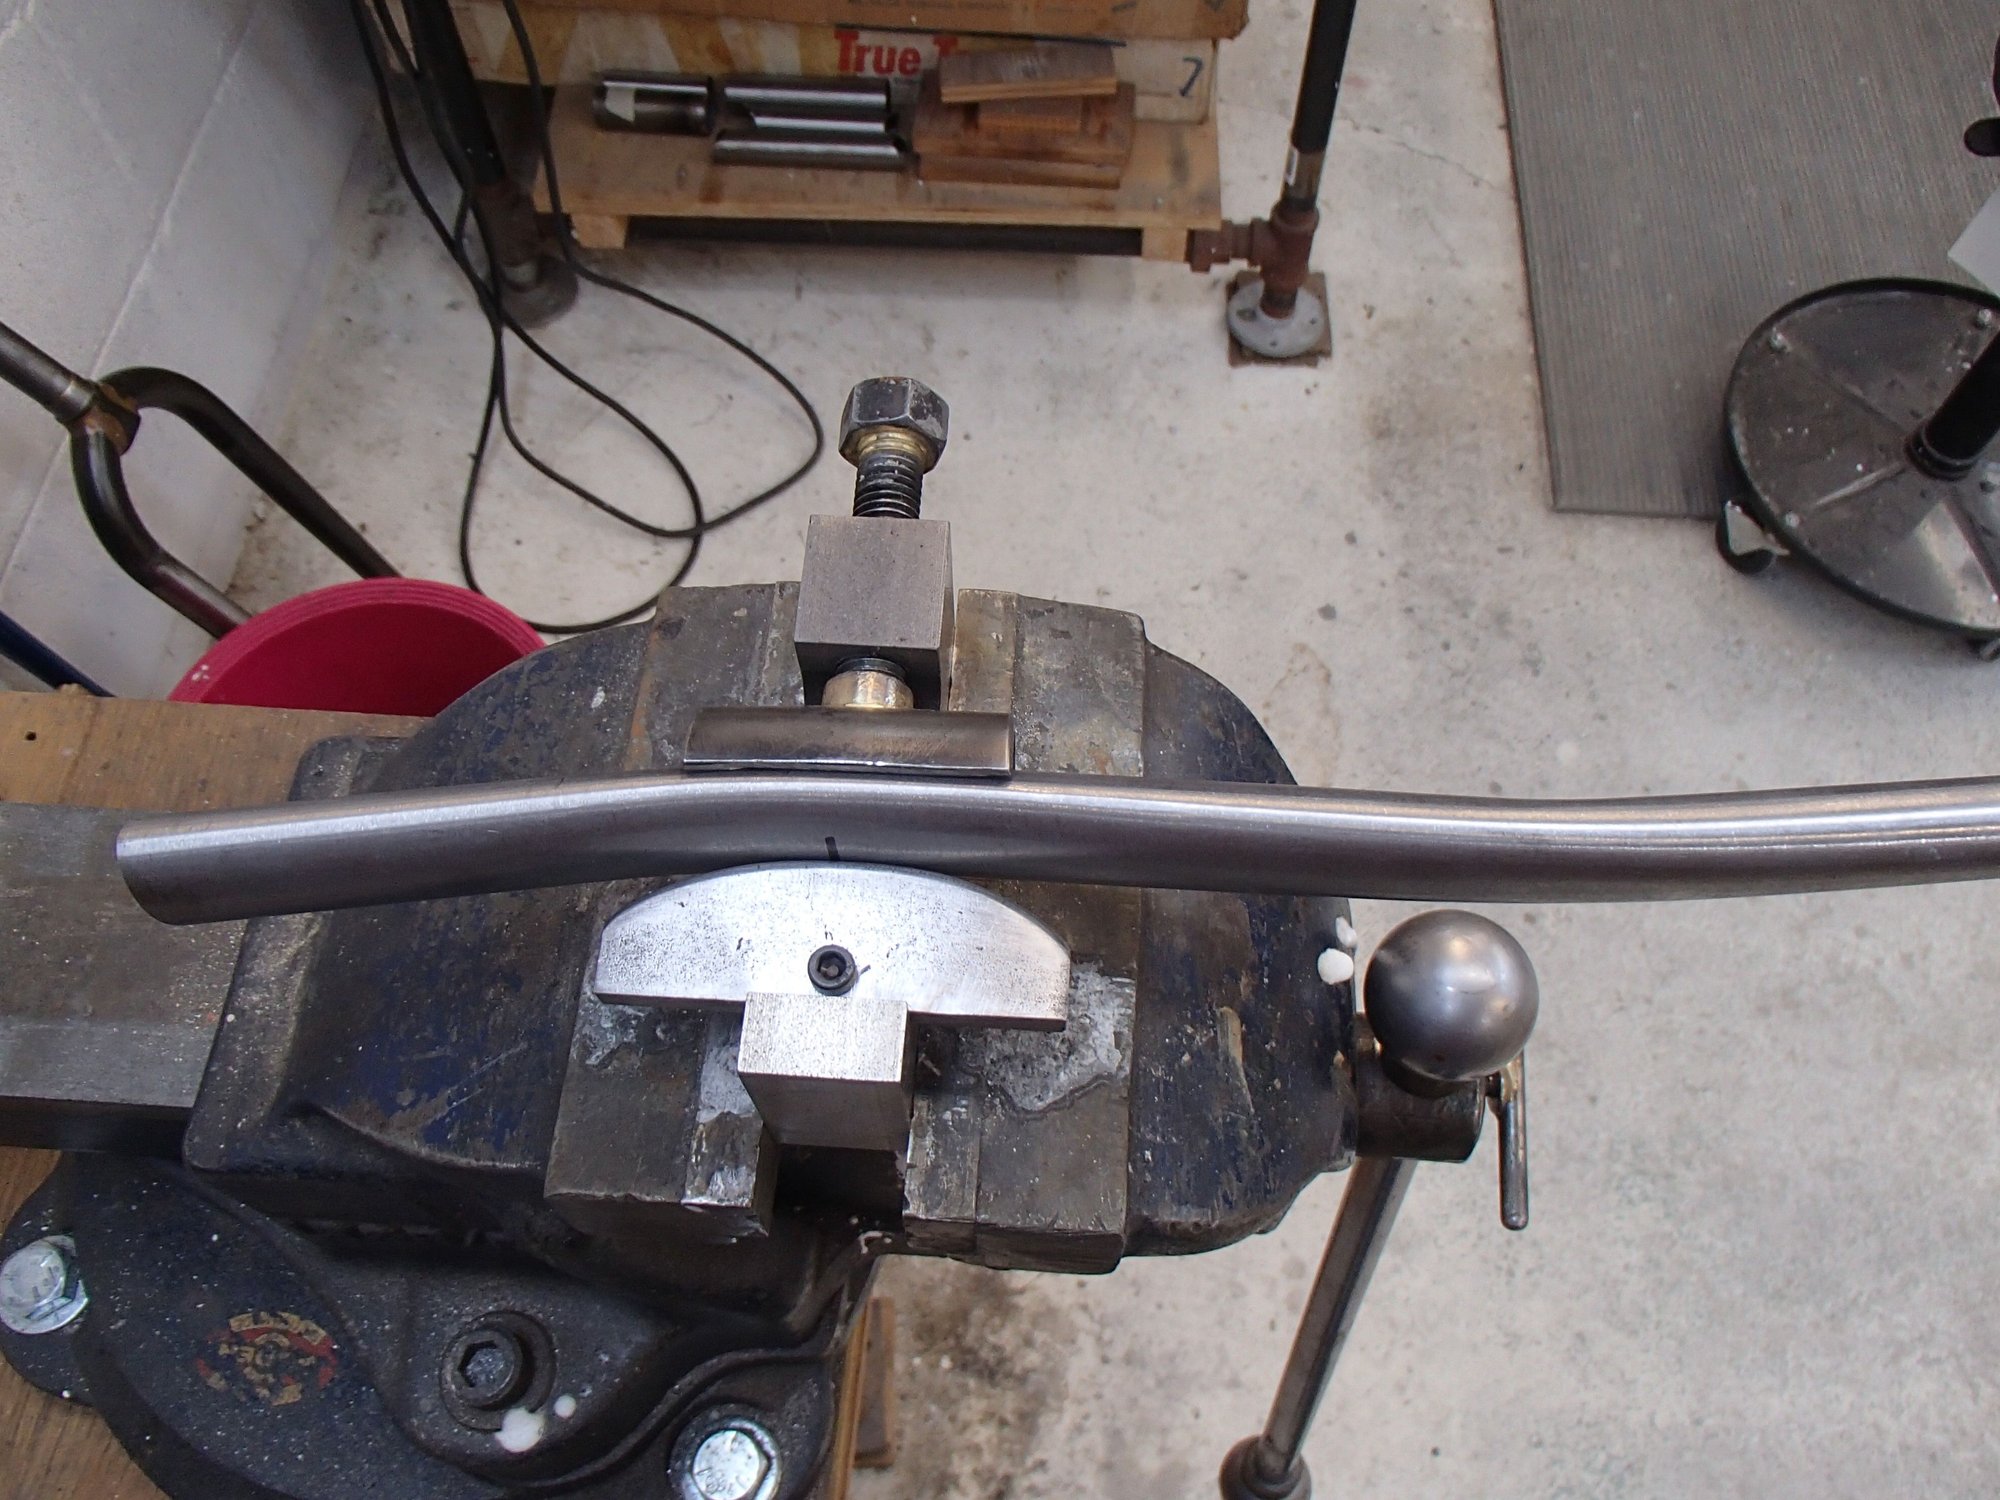
Back to plan A and I pondered the widening of the current stays and decided that I would try crimping the inner sides. Again I could get more stays and replace them if I had to. I used my "erector set" crimper with some tube reducing shims. here's a shot of that set up.

This resulted in about double the gaps i had before and one thing I have learned is to stop while you're not far behind Here's the shot showing the gained clearances. Much better.
My plans for finishing have also evolved. I better realize that I might be revisiting this frame, torch wise. As such I don't want to apply a stinky to remove paint coating yet. I think I will just sand blast and shoe shine sand then apply a Phosphate solution to slightly darken the tube, apply my dry transfer decals and call it Ok for now. But my plans might change... Andy
Returning to home I had a plan, actually two plans to be begun at the same time. I figured that at worst case I could replace the stays so began trying to bend a second set more then the first. At the same time I was considering bending the current ones wider. If this failed then the replacement was on deck.
My attempt to bend a stay (16mm diameter and about .8mm wall)resulted in both a disfigured stay (the bend resulted in an indent on it's inside, like a crimp), bender block dents and a pulley flange cracking off failure (cast steel pulley). Not a fun moment as I looked at the broken pulley and ruined stay (which will be recycled as other frame parts).
Back to plan A and I pondered the widening of the current stays and decided that I would try crimping the inner sides. Again I could get more stays and replace them if I had to. I used my "erector set" crimper with some tube reducing shims. here's a shot of that set up.
This resulted in about double the gaps i had before and one thing I have learned is to stop while you're not far behind
Here's the shot showing the gained clearances. Much better.My plans for finishing have also evolved. I better realize that I might be revisiting this frame, torch wise. As such I don't want to apply a stinky to remove paint coating yet. I think I will just sand blast and shoe shine sand then apply a Phosphate solution to slightly darken the tube, apply my dry transfer decals and call it Ok for now. But my plans might change... Andy
__________________
AndrewRStewart
AndrewRStewart
Likes For Andrew R Stewart:
11-02-21, 10:09 AM
#6
Senior Member
Join Date: Dec 2019
Posts: 954
Mentioned: 3 Post(s)
Tagged: 0 Thread(s)
Quoted: 321 Post(s)
Liked 263 Times
in
212 Posts
It looks like that turned out well in the end. I think you said before you were thinking of doing a sort of wishbone rear end but like a segmented fork?
11-02-21, 07:10 PM
#7
Senior Member
Thread Starter
Join Date: Feb 2012
Location: Rochester, NY
Posts: 18,063
Bikes: Stewart S&S coupled sport tourer, Stewart Sunday light, Stewart Commuting, Stewart Touring, Co Motion Tandem, Stewart 3-Spd, Stewart Track, Fuji Finest, Mongoose Tomac ATB, GT Bravado ATB, JCP Folder, Stewart 650B ATB
Mentioned: 0 Post(s)
Tagged: 0 Thread(s)
Quoted: 4197 Post(s)
Liked 3,849 Times
in
2,300 Posts
Yes, the first effort had that possibility in the mix. Then reality and ability re entered...
This frame was made far quicker then most any other one I have done. A major aspect was the not making the fillets look all nice and flowing. Another was having the confidence to be able to go with the flow of how my less then precise plans happened and accepting OK results. Last is that I just can do this one over if I had to Andy (hearing that freedom is nothing left to loose).
This frame was made far quicker then most any other one I have done. A major aspect was the not making the fillets look all nice and flowing. Another was having the confidence to be able to go with the flow of how my less then precise plans happened and accepting OK results. Last is that I just can do this one over if I had to
Andy (hearing that freedom is nothing left to loose).
__________________
AndrewRStewart
AndrewRStewart
Likes For Andrew R Stewart:
